
SD90010CREN - Deep fryer SWAN - Free user manual and instructions
Find the device manual for free SD90010CREN SWAN in PDF.


| Product Type | Deep fryer |
| Brand | Swan |
| Model | SD90010CREN |
| Capacity | 1.5 L (oil) |
| Power Consumption | 1500 W |
| Voltage | 220-240 V, 50/60 Hz |
| Temperature Control | Adjustable thermostat |
| Indicator Lights | Power and ready lights |
| Frying Basket | Removable with cool-touch handle |
| Interior Coating | Non-stick |
| Exterior Material | Stainless steel / plastic |
| Safety Features | Auto shut-off, cool-touch handles, anti-slip feet |
| Dimensions (W x D x H) | Approx. 25 x 20 x 30 cm |
| Weight | Approx. 2.5 kg |
| Cord Length | Approx. 0.9 m |
| Cleaning | Removable bowl and basket, dishwasher safe parts |
| Spare Parts Availability | Basket, bowl, filter available |
| Repairability Index | 8/10 |
Frequently Asked Questions - SD90010CREN SWAN
User questions about SD90010CREN SWAN
0 question about this device. Answer the ones you know or ask your own.
Ask a new question about this device
Download the instructions for your Deep fryer in PDF format for free! Find your manual SD90010CREN - SWAN and take your electronic device back in hand. On this page are published all the documents necessary for the use of your device. SD90010CREN by SWAN.
USER MANUAL SD90010CREN SWAN
Air Fryer
Model: SD90010N
Help line: 01733 404703
When using any electrical appliance, basic safety precautions should always be followed including the following:
- Always ensure that the voltage on the rating label corresponds to the mains voltage in your home
- Incorrect operation and improper use can damage the appliance and cause injury to the user.
- This appliance can be used by children aged from 8 years and above if they have been given supervision or instruction concerning use of the appliance in a safe way and if they understand the hazards involved. Cleaning and user maintenance shall not be made by children unless they are older than 8 and supervised. Keep the appliance and its cord out of reach of children aged less than 8 years. Check the power cord and plug regularly for any damage. If the cord or the plug is damaged, it must be replaced by the manufacturer or qualified person in order to avoid an electrical hazard.
- Do not use the appliance if it has been dropped or damaged in any way. In case of damage, take the unit in for examination and/or repair by an authorised service agent.
- Never immerse the unit in water or any other liquid for cleaning purposes.
- Remove the plug from the socket by gripping the plug. Do not pull on the cord to disconnect the appliance from the mains. Always unplug the unit when not in use, before cleaning or when adding or removing parts.
- The use of accessory attachments that are not recommended or supplied by the manufacturer may result in injuries, fire or electric shock.
- Do not let the cord hang over the edge of a table or counter. Ensure that the cord is not in a position where it can be pulled on inadvertently.
- Do not allow the cord to touch hot surfaces and do not place on or near a hot gas or electric burner or in a heated oven.
- Do not use the appliance on a gas or electric cooking top or over or near an open flame.
- Use of an extension cord with this appliance is not recommended. However, if it is necessary to use an extension lead, ensure that the lead is suited to the power consumption of the appliance to avoid overheating of extension cord, appliance or plug point. Do not place the extension cord in a position where it can be pulled on by children or animals or tripped over.
- This appliance is not suitable for outdoor use. Do not use the appliance for anything other than its intended use.
- Do not carry the appliance by the power cord.
- Do not leave the appliance unattended during use. Always unplug the unit when not in use or before cleaning.
- Always operate the appliance on a smooth, even, stable surface. Do not place the unit on a hot surface.
- Ensure that the unit is switched off after use.
- The manufacturer does not accept responsibility for any damage or injury caused by improper or incorrect use, or for repairs carried out by unauthorised personnel.

IMPORTANT INFORMATION - RETAIN FOR FUTURE USE
- In case of technical problems, switch off the product and do not attempt to repair it yourself. Return the appliance to an authorised service facility for examination, adjustment or repair. Always insist on the use of original spare parts. Failure to comply with the above mentioned precautions and instructions, could affect the safe operation of this product.
- Your appliance must never be switched on through an external timer or any kind of separate remote control system
CAUTION: SURFACES BECOME HOT DURING USE. ALWAYS USE TONGS WHENEVER POSSIBLE
CAUTION: PLEASE ENSURE YOUR WORK TOP IS ABLE TO WITHSTAND A TEMPERATURE OF AT LEAST 60 DEGREES CENTIGRADE FOR EXTENDED PERIODS. IF IN DOUBT, MOUNT THE PRODUCT ON A SUITABLE WOODEN PLINTH.

TECHNICAL DATA
Description: Air Fryer
Model: SD90010N
Input Voltage: 220-240V
Frequency: 50/60Hz
Power consumption: 1350 Watts

Before first use, carefully remove all packaging and familiarise yourself with the various parts of your product







PARTS - REFER TO PANEL 1 ABOVE
1 Basket
2 Pan - caution, it gets hot!
3Basket handle
4 Basket release button
5Heating-up light
6 Power-on light
7 Timer (0-30min.)/power-on knob
8 Temperature control knob (80-200C)
9 Air inlet
10 Air outlet openings
11 Mains cord
This product uses air flow in conjunction with a high power element to cook food quickly and efficiently. Some of the many benefits are:
- Reduced cooking times
• Little or no pre-heating needed
• Even cooking with little or no fat required - Compact, space-saving design
Please ensure all food is piping hot throughout before consuming.
- Before using for the first time, remove the basket and wash in warm. soapy water. Rinse and dry thoroughly before putting back into the Air Fryer.
- Ensure the Air Fryer is on a stable, even surface.
• DO NOT put any oil into the basket or pan - Do not use the Air Fryer without the pan and basket fitted
HOT AIR FRYING
- Connect the mains plug into an earthed wall socket.
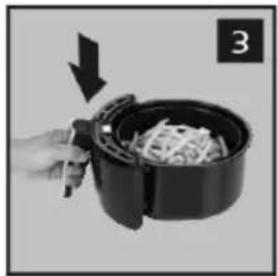
- Carefully pull the pan out of the Air Fryer (fig.4)
- Place the ingredients in the basket. Note: Do not exceed the MAX indication (see section 'settings'), as it may effect the quality of the food.
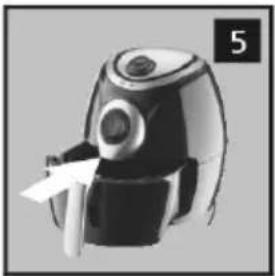
- Slide the pan back into the Air Fryer (fig.5). Never use the pan without the basket in it. Caution: Do not touch the pan during or shortly after use, as it gets very hot. Only hold the pan by the handle.
- Turn the temperature control knob to the desired temperature. See section 'Settings' to determine the right temperature [fig.6].
- Refer to "Settings" section to determine cooking time. To switch on the appliance, turn the timer knob to the required preparation time (fig.7).
- TIP: Preheat time is usually not required but if used in a cold room, pre-heating for 2 or 3 minutes will give better results
- TIP: When setting the timer it is best to turn the knob a little bit PAST your desired time then turn it back to the exact point you need. All products with this type of timer give more accurate cooking times when set like like this!
• The power-on light and the heating-up light go on.
• The timer starts counting down the set cooking time.
- During the hot air frying process, the heating-up light comes on and goes out from time to time. This indicates that the heating element is switching on and off to maintain the set temperature.
- Excess oil and fat from the food is collected on the bottom of the pan. It's better there than on your waistline!
- Some foods may require shaking halfway during the preparation time (see section ‘Settings’ in this chapter). To do this, pull the pan out of the appliance by the handle and shake it. Then slide the pan back into the Air Fryer [fig.8].
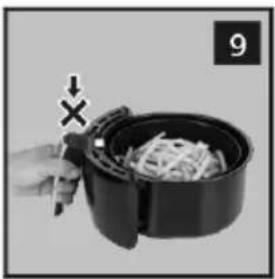
- Caution: Do not press the button of the handle during shaking. (fig.9)
When you hear the timer bell, the set cooking time has elapsed. Pull the pan out of the appliance and place it on a heat-resistant surface.
Note: You can also switch off the appliance manually. To do this, turn the temperature control knob to 0.
Check if the food is ready.
If the ingredients are not ready yet, simply slide the pan back into the appliance and set the timer to a few extra minutes. Always ensure food is piping hot throughout before consuming
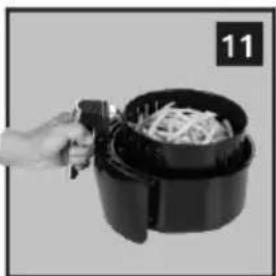
To remove small ingredients (e.g. fries), press the basket release button and lift the basket out of the pan. (fig.11) You will notice that excess fat from the food has collected in the bottom of the pan.
The pan and the ingredients are hot after hot air frying. Depending on the type of the ingredients in the in fryer, steam may escape from the pan. Take care with hot temperatures
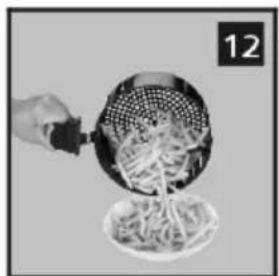
Empty the basket into a bowl or onto a plate. (fig.12)
Tip: To remove large or fragile ingredients, lift the ingredients out of the basket using a pair of tongs.
When a batch of food is ready, the Air Fryer can be used again immediately
This table below will help you to select the basic settings for the ingredients.
Note: Keep in mind that these settings are indications. As ingredients differ in origin, size, shape and brand, we cannot guarantee the best setting for your ingredients.
Because the Rapid Air technology reheats the air inside the appliance instantly, pulling the pan briefly out of the appliance during hot air frying (to check progress) barely disturbs the cooking process.
Tips
- Smaller ingredients usually require a slightly shorter preparation time than larger ingredients.
- A larger volume of ingredients only requires a slightly longer preparation time, a smaller volume of ingredients only requires a slightly shorter preparation time.
- Shaking smaller ingredients halfway during the preparation time optimises the end result and can help prevent unevenly fried ingredients - just as it does in a regular fryer
- Spray some oil on to fresh potatoes for a crispy result. Fry your ingredients in the air fryer within a few minutes after adding the oil.
- You can also use the AIR FRYER to reheat ingredients. To reheat ingredients, set the temperature to 150C for up to 10 minutes.
| Temp (C) Food Amount Time (mins) | |||
| 200 Frozen chips th | in 100-400g 9 | ||
| 200 Frozen chips th | ick 100-400g 11-18 | ||
| 180 Fresh chips/ | wedges | 100-400 15-22 (spray with oil first) | |
| 180 Pork chop up to | 500g 10-15 | ||
| 180 Burger uo to | 500g 7-14 | ||
| 180 Chicken breast | up to 500g 10-15 | ||
| 200 Chicken nuggets | Up tp 400g | 6-10 | |
| 180 Sausage frozen | Up to 400g | 20 | |
| 180 Sausage fresh | Up to 400g | 15 | |
| 180 Pasties/pastry | top | Up to 500g | 8-12 mins |
CLEANING & MAINTENANCE
- Remove the mains plug from the wall socket and allow the appliance to cool downNote: Remove the pan to let the AIR FRYER cool down more quickly.
- Wipe the outside of the appliance with a moist cloth & dry with kitchen towel.
- Clean the pan and basket AFTER EVERY USE with hot water, some washing-up liquid and a non-abrasive sponge.
Note: The pan and basket are dishwasher-proof.
Tips: If dirt is stuck to the basket or the bottom of the pan, fill the pan with hot water with some washing-up liquid. Put the basket in the pan and let the pan and the basket soak for about 10 minutes. Clean the inside of the appliance with hot water and non-abrasive sponge.
Do not use abrasive cleaners (eg metal scouring pads), or strong chemical cleaners
NEVER immerse the main unit is water or run it under the tap.
We Swan Products Ltd declare that this product conforms to the following product legislation in accordance with the following directive(s):
2004/108/EC The EMC Directive (the Electromagnetic Compatibility Directive).
2006/95EC. The LVD Directive (Low Voltage Directive).
2011-65-EU. The RoHS directive (Restriction of Hazardous Substances Directive)
EC 1935/2004 Food Contact

WARRANTY
This product is guaranteed for 2 years from the date of original purchase. If any defect arises due to faulty materials of workmanship the faulty products must be returned to the place of purchase. Refunds or replacement is at the discretion of the store.
The following conditions apply:
- The product must be returned to the retailer with proof of purchase.
- The product must be installed and used in accordance with the instructions contained in this instruction guide.
• It must be used only for domestic purposes.
• It does not cover wear and tear, damage, misuse or consumable parts.
• Swan Products Ltd has limited liability for incidental or consequential loss or damage.
• This guarantee is valid in the UK and Eire Only.

BS PLUG
The wires in the mains lead are coloured in accordance with the following code:
BLUE NEUTRAL
BROWN LIVE
GREEN/YELLOW EARTH
As the colours of the wire in the mains lead of this appliance may not correspond with the colour markings identifying the terminals on your plug, proceed as follows:
The wire which is coloured BLUE must be connected to the terminal which is marked with the letter N or coloured black. The wire which is coloured BROWN must be connected to the terminal which is marked with the letter L or coloured red. The wire which is coloured GREEN/YELLOW must be connected to the terminal which is marked with the letter E or (earth symbol) and is coloured GREEN or GREEN/YELLOW.
WARNING: THIS APPLIANCE MUST BE EARTHED

DISPOSAL OF UNIT
Appliances bearing the symbol shown here may not be disposed of in domestic rubbish. You are required to dispose of old electrical and electronic appliances like this separately. Please visit www.recycle-more.co.uk or www.recyclenow.co.uk for access to information about the recycling of electrical items. Please visit www.weeeireland.ie for access to information about the recycling of electrical items purchased in Ireland. The WEEE directive, introduced in
August 2006, states that all electrical items must be recycled, rather than taken to landfill. Please arrange to take this appliance to your local Civic Amenity site for recycling, once it has reached the end of its life.


Did you know...
In 1933 Swan were the first to develop an electric heating element that could be immersed in water. This led to the Swan kettle range that could boil up to six pints of water in just over nine minutes - pretty hot for the time! These days it takes about two minutes for a Swan kettle to boil.

www.swan-brand.co.uk
Scan this QR code to hear about our story

We love what we do

we're proud of our quality

Find us on Facebook
* on selected products


- AIR FRYER
- WHEN USING ANY ELECTRICAL APPLIANCE, BASIC SAFETY PRECAUTIONS SHOULD ALWAYS BE FOLLOWED INCLUDING THE FOLLOWING
- IMPORTANT INFORMATION - RETAIN FOR FUTURE USE
- CAUTION: SURFACES BECOME HOT DURING USE. ALWAYS USE TONGS WHENEVER POSSIBLE
- CAUTION: PLEASE ENSURE YOUR WORK TOP IS ABLE TO WITHSTAND A TEMPERATURE OF AT LEAST 60 DEGREES CENTIGRADE FOR EXTENDED PERIODS. IF IN DOUBT, MOUNT THE PRODUCT ON A SUITABLE WOODEN PLINTH
- TECHNICAL DATA
- PARTS - REFER TO PANEL 1 ABOVE
- PLEASE ENSURE ALL FOOD IS PIPING HOT THROUGHOUT BEFORE CONSUMING
- HOT AIR FRYING
- CHECK IF THE FOOD IS READY
- TIPS
- CLEANING & MAINTENANCE
- WARRANTY
- THE FOLLOWING CONDITIONS APPLY
- BS PLUG
- DISPOSAL OF UNIT
- DID YOU KNOW
Brand : SWAN
Model : SD90010CREN
Category : Deep fryer