BK450 - Dishwasher Tricity Bendix - Free user manual and instructions
Find the device manual for free BK450 Tricity Bendix in PDF.


| Product Type | Built-in Dishwasher |
| Brand | Tricity Bendix |
| Model | BK450 |
| Dimensions (H x W x D) | 85 cm x 60 cm x 60 cm |
| Weight | 45 kg |
| Power Supply | 220-240 V, 50 Hz, 10 A |
| Place Settings | 12 |
| Energy Efficiency Class | A+ |
| Noise Level | 49 dB |
| Wash Programs | Intensive, Eco, Normal, Quick, Soak |
| Functions | Delay Start (1-24h), Half Load, Extra Dry |
| Water Consumption (per cycle) | 12 L (Eco) |
| Energy Consumption (per cycle) | 1.05 kWh (Eco) |
| Drying System | Condensation drying |
| Safety Features | Child lock, Flood protection, Anti-tilt brackets |
| Filter System | Stainless steel microfilter, Coarse filter |
| Rinse Aid Dispenser | Yes, with level adjustment |
| Salt Container | Yes, for water softener |
| Cutlery Basket | Removable, 3-piece |
| Rack Material | PVC-coated wire |
| Control Panel | Electronic push buttons with LED indicators |
| Maintenance | Clean filters weekly, run cleaning cycle monthly |
| Spare Parts Availability | Racks, spray arms, drain pump, seals, control board |
| Warranty | 2 years parts and labour |
Frequently Asked Questions - BK450 Tricity Bendix
User questions about BK450 Tricity Bendix
0 question about this device. Answer the ones you know or ask your own.
Ask a new question about this device
Download the instructions for your Dishwasher in PDF format for free! Find your manual BK450 - Tricity Bendix and take your electronic device back in hand. On this page are published all the documents necessary for the use of your device. BK450 by Tricity Bendix.
USER MANUAL BK450 Tricity Bendix
natural_image
Illustration of various kitchen appliances including refrigerator, oven, microwave, and washing machine (no text or symbols)OPERATING AND INSTALLATION INSTRUCTIONS
BK450
CONTENTS
Warnings . . . . . . . . . . . . . . . . . . . . . . . . . . . . . . . . . . . . . . . . . . . . . . . . . . . . . . . . . . . . . . . . . . . . . . . . page 3
Installation . . . . . . . . . . . . . . . . . . . . . . . . . . . . . . . . . . . . . . . . . . . . . . . . . . . . . . . . . . . . . . . . . . . . . . . . page 4
Positioning, levelling . . . . . . . . . . . . . . . . . . . . . . . . . . . . . . . . . . . . . . . . . . . . . . . . . . . . . . . . . . . . . . . . . . . . . page 4
Water supply connections, water outlet connection . . . . . . . . . . . . . . . . . . . . . . . . . . . . . . . . . . . . . . . . . . . . . . . . page 4
The electrical connections . . . . . . . . . . . . . . . . . . . . . . . . . . . . . . . . . . . . . . . . . . . . . . . . . . . . . . . . . . . . . . . . . page 5
Use . . . . . . . . . . . . . . . . . . . . . . . . . . . . . . . . . . . . . . . . . . . . . . . . . . . . . . . . . . . . . . . . . . . . . . . . . page 6
The water softener, filling with salt . . . . . . . . . . . . . . . . . . . . . . . . . . . . . . . . . . . . . . . . . . . . . . . . . . . . . . . . . . . . . page 7
Use of rinse aid, use of detergent. . . . . . . . . . . . . . . . . . . . . . . . . . . . . . . . . . . . . . . . . . . . . . . . . . . . . . page 8
Loading the machine, use of the lower basket, use of the upper basket. . . . . . . . . . . . . . . page 9
Adjusting the height of the upper basket . . . . . . . . . . . . . . . . . . . . . . . . . . . . . . . . . . . . . . . . . . . . . . . . . . . . . page 10
Helpful hints. . . . . . . . . . . . . . . . . . . . . . . . . . . . . . . . . . . . . . . . . . . . . . . . . . . . . . . . . . . . . . . . . . . . . . . . . . . . . . page 10
Washing programmes . . . . . . . . . . . . . . . . . . . . . . . . . . . . . . . . . . . . . . . . . . . . . . . . . . . . . . . . . . . . . . . . page 11
Operating sequence . . . . . . . . . . . . . . . . . . . . . . . . . . . . . . . . . . . . . . . . . . . . . . . . . . . . . . . . . . . . . . . . . . . page 12
Maintenance and cleaning . . . . . . . . . . . . . . . . . . . . . . . . . . . . . . . . . . . . . . . . . . . . . . . . . . . . . . . . . . . . . . . . . page 13
Cleaning the central filters, cleaning the large filter, internal and external cleaning . . . . . . . . page 13
Servicing . . . . . . . . . . . . . . . . . . . . . . . . . . . . . . . . . . . . . . . . . . . . . . . . . . . . . . . . . . . . . . . . . . . . . . . . . . . . . . . . . . . . . . . . . . page 14
Building-in . . . . . . . . . . . . . . . . . . . . . . . . . . . . . . . . . . . . . . . . . . . . . . . . . . . . . . . . . . . . . . . . . . . . . . . . . . . . . . . . . . . . page 15
Guarantee Conditions . . . . . . . . . . . . . . . . . . . . . . . . . . . . . . . . . . . . . . . . . . . . . . . . . . . . . . . . . . . . . . . . page 17
Service Centres . . . . . . . . . . . . . . . . . . . . . . . . . . . . . . . . . . . . . . . . . . . . . . . . . . . . . . . . . . . . . . . . . . . . . . . . . . . . . . page 18
TECHNICAL SPECIFICATIONS
| DIMENSIONS | Width | cm | 44.6 |
| Height | cm | 81.8÷87.8 | |
| Max depth | cm | 55.5 | |
| Max depth with door open | cm | 115 | |
| ELECTRICAL CONNECTION | Voltage | 220-240 V / 50 Hz | |
| POWER OF HEATING ELEMENT | 2570 W | ||
| OVERALL POWER | 2770 W | ||
| WATER SUPPLY PRESSURE | minimum | 7 psi - 49 KN/cm 2 | |
| maximum | 110 psi - 758 KN/cm 2 | ||
| CAPACITY (STANDARD IEC PLACE SETTINGS) | 8 | ||
| CONSUMPTION: | Water | 22 lt | |
| Electricity | 1.3 kW/h | ||
It is most important that this instruction book should be retained with the appliance for future reference. Should the appliance be sold or transferred to another owner, or should you move house and leave the appliance, always ensure that the book is left with the appliance in order that the new owner can get to know the functioning of the appliance and the relevant warnings.
These warnings are provided in the interest of safety. You must read them carefully before installing or using the appliance.
■ Unplug the appliance and turn off the water after use.
■ Any plumbing work required to install this appliance should be carried out by a qualified plumber or competent person.
■ Any electrical work required to install this appliance should be carried out by a qualified electrician or competent person.
- This appliance is designed to be operated by adults. Children should not be allowed to tamper with the controls or play with the product.
- This product should be serviced by an authorised Tricity Bendix Service Centre, and only genuine spare parts should be used.
- It is dangerous to alter the specification or modify the product in any way.
■ Care must be taken to ensure that the appliance does not stand on the electrical supply cable.
- Tricity Bendix dishwashers are designed to be used for washing normal household utensils. Items that are contaminated by petrol, paint, steel or iron debris, corrosive, acidic or alkaline chemicals are not to be washed in a dishwasher.
■ When finishing loading or unloading close the door, as an open door can be a hazard.
If your house is fitted with a water softening unit or if you live in a soft water area, it is not necessary to add salt to the water softening unit in the dishwasher.
- Do not put in your dishwasher: Cutlery with wooden or horn handles or glued parts, bronze cutlery, saucepans with wooden handles unless they are sold as dishwasher proof, aluminium ware, crystal ware, leaded glass, plastic articles unless sold as dishwasher proof, antique china or fine decorated china unless sold as dishwasher proof. Always check with the manufacturer of the item if in any doubt.
- A chemical reaction can occur between silver cutlery and stainless steel cutlery. As a precaution do not wash together.
■ Under no circumstances should you open the door whilst the appliance is in operation. Always turn off the appliance before opening the door.
■ Care should be taken when cleaning the bottom door seal and hinge area as any exposed metal edges may cut if care is not taken.
■ Built-in dishwashers only: The appliance must be secured to the underside of the worktop using the brackets provided. Failure to do this could result in an unstable appliance which may cause damage or injury.
- Do not install a dishwasher in a garage of outhouse where the ambient humidity is very high, as this may have an adverse effect on the controls and/or cabinet.
■ Under no circumstances should you attempt to repair the appliance yourself. Repairs carried out by inexperienced persons may cause injury or more serious malfunctioning. Refer to your local Service Force Centre. Always insist on genuine spare parts.
Remove all packaging before positioning the machine.
Positioning
If possible, position the machine next to a water tap and a drain.
The dishwasher features fill and drain hoses which can be turned either to the left or the right to suit the installation.
Levelling
Good levelling is essential for correct closure and sealing of the door.
Loosen or tighten the adjustable support feet, until the machine is perfectly level.
Water Supply Connections
This dishwasher must be plumbed into a cold water supply and it is preferable for it to be permanently plumbed in.
The water pressure must be within the limits given in the technical specifications, as it will not function correctly if pressure is outside these specifications.
Your local Water Authority will advise you on the average mains pressure in your area. Where the water is supplied via a cold water storage cistern, you can work out the pressure yourself by measuring the vertical distance (or «head») between the machine's inlet hose and the outlet from the cold water storage cistern, allowing roughly 1 psi for every 2 feet.

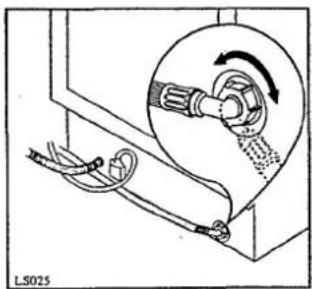
For making the connection itself, the coupling nut fitted to the machine's supply hose is designed to screw onto either a 3/4 inch gas thread spout, or to a purpose-made quick-coupling tap such as the Press-Block.
To make this easier, the hose itself may be turned to the left or the right. In either case, be sure to incorporate the strainer (A) supplied with the machine into the joint. See picture.
Caution: the retaining ring must be correctly fitted to avoid water leaks.
natural_image
Diagram of a mechanical device with hoses and a circular inset showing rotational motion (no text or symbols)Avoid bends or kinks in the hose which could prevent or slow down the flow of water.
If the machine is connected to new pipes or pipes which have not been used for a long time, you are advised to run
the water for a few minutes before connecting the inlet hose. This will prevent deposits of sand or rust clogging the inlet hose filter.
Water Outlet Connection
The end of the drain hose can be connected as follows:
to the sink outlet siphon, securing it if necessary with a clip;
to a wall outlet provided with vent-hole, minimum internal diameter 4 cm;
hooked over the edge of the sink using the special curved plastic guide provided.
The waste connection must be at a height of between 30 cm (minimum) and 100 cm (maximum) from the floor.
It makes no difference which way the drain hose faces, either to the right or left of the dishwasher.
Avoid bending or kinking the hose as this could prevent or slow down the discharge of water.
If you use a drain hose extension it must be no longer than 2 metres and its internal diameter must be no smaller than the diameter of the hose provided.
Likewise the internal diameter of the couplings used for connection to the waste outlet must be no smaller than the diameter of the drain hose.

Note: The sink plug must not be in place when the machine is draining as this could cause the water to siphon back into the machine.
The electrical connections
WARNING: THIS APPLIANCE MUST BE EARTHED.
The manufacturer declines any liability should this safety measure not be observed.
If the plug that is fitted to your appliance is not suitable for your socket outlet, it must be cut off and the appropriate plug fitted.
Remove the fuse from the cut off plug.
The cut off plug should then be disposed of to prevent the hazard of shocks in case it should be plugged into a 13amp socket in another part of your home.
Important
The wires in the mains lead are coloured in accordance with the following code:
| Green and Yellow | - Earth |
| Blue | - Neutral |
| Brown | - Live |
If you fit your own plug, the colours of the wires in the mains lead of your appliance may not correspond with the markings identifying the terminals in your plug, proceed as follows:
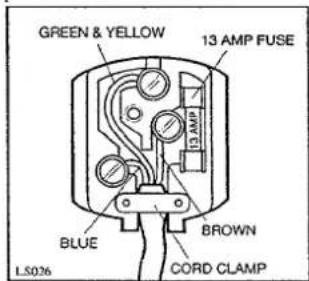
Connect the Green and Yellow (earth) wire to the terminal in the plug which is marked with the letter «E» or the earth symbol ⏻, or coloured green and yellow.
Connect the blue (neutral) wire to the terminal in the plug which is marked with the letter «N» or coloured black.
Connect the brown (live) wire to the terminal in the plug which is marked with the letter «L» or coloured red.
The plug moulded onto the lead incorporates a fuse. For replacement, use a 13amp BS1362 fuse. Only ASTA or BSI approved fuses should be used.
The plug must not be used if the fuse cover/carrier is lost. The cover/carrier is indicated by the coloured insert at the base of the plug.
A replacement cover/carrier must be obtained from your local Zanussi Service Force Centre whose address is listed in the Customer Care Booklet which accompanies your instruction manual.
Please ensure that when the appliance is installed it is easily accessible for the engineer in the event of a breakdown.
CE This appliance complies with the following E.E.C. Directives:
- 73/23 of 19.2.73 (Low Voltage Directive) and subsequent modifications;
- 89/336 of 3.5.89 (Electromagnetic Compatibility Directive) and subsequent modifications.
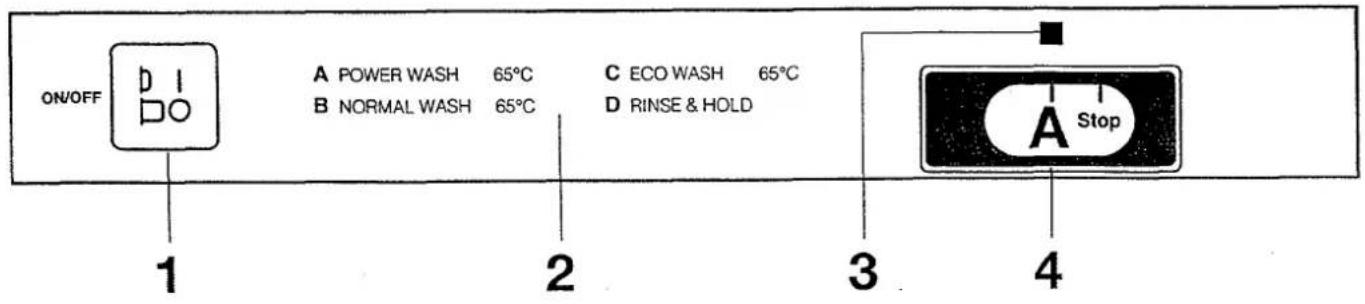
1. ON/OFF Pushbutton ☐ I ☐ O
Depress this pushbutton to start a programme.
Depress it again to stop the dishwasher.
2. Programme Guide
This is a summary of the washing programme chart to help you to select the correct programme.
3. Programme marker ■
4. Programme Selector Dial
To select a programme, turn the Programme Selector Dial clockwise, making sure that the programme letter you wish to select corresponds with the Programme marker (3) ■ on the control panel.
At the end of the washing programme the dishwasher stops automatically in one of the STOP positions.
The Water Softener
Water contains varying amounts of lime and mineral salts depending on the area where you live: these are deposited on the dishes leaving white marks.
The higher the content of these salts, the harder your water will be. The «hardness» level is measured on 2 equivalent scales: French Degrees or Clarke Degrees. Contact your local Water Authority to find the exact water hardness level for your area.
The dishwasher is equipped with a softener which uses special dishwasher salt to provide lime-free (softened) water. The softener can treat water hardness up to 90 french degrees / 63 Clarke degrees via 5 adjustment levels.
Find on the table below the level corresponding to the hardness of your water and the required adjustments:
| Water hardness | Level | Use of salt | Water softener adjustment | Adjustment on the machine | |
| Clarke degrees | °TH French degrees | ||||
| 0-10 | 0-14 | 1 | ** NO | NO | NO |
| 11-27 | 15-39 | *2 | YES | NO | NO |
| 28-35 | 40-50 | 3 | YES | YES | NO |
| 36-49 | 51-70 | 4 | YES | NO | YES |
| 50-63 | 71-90 | 5 | YES | YES | YES |
* The water softener is factory set at level 2 as this suits most users.
** If you use phosphate free detergents containing enzymes, add salt starting from 6 Clarke Degrees.
Level 1
If your water is «level 1» it is already soft and therefore there is no need to use salt.
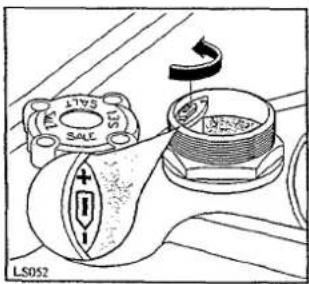
Levels 3 and 5 (water softener adjustment)
If your water is level 3 or 5, proceed as follows:
slide out the lower basket and unscrew the cap of the salt container;
turn the two-position selector anticlockwise from position — to position + with the aid of a blunt knife or a screwdriver.
Levels 4 and 5 (adjustment on the machine)

If your water is level 4 or 5, open the door and drill membrane (A) on the upper left-hand corner of the machine.
With a water hardness of level 5 both adjustments must be made.
Important
Salt MUST be used regularly from level 2 upward, otherwise white lime deposits will build up inside the dishwasher and wash results will be impaired.
Filling with Salt
Only use salt which is specifically designed for use in dishwasher. Other types of salt i.e.: table/cooking salt contain high percentages of other substances which may reduce the efficiency of the water softener.
To fill with salt, unscrew the cap of the salt container. Pour about half a litre of water inside the container, or until it is full (this is necessary only before filling with salt for the first time).

Then, using the funnel provided, pour in the salt until the container is full (approx. 1 kg). Do not worry if water overflows from the unit when filling with salt this is quite normal.
Replace the cap making sure that there is no trace
of salt on the screw thread or on the gasket.
Screw the cap on tightly.
If you have inadvertently spilled salt select a wash programme immediately after.
All that is then required is to periodically top up the container with salt. You are reminded of this by a green refill indicator on the cap of the salt container. This is a float which is clearly visible on the small window in the cap when there is salt inside the container, and almost disappears when the salt is finished (i.e. every 20-40 washes depending on the setting of the water softener).
The salt container always has some water inside which will normally overflow when refilling with salt.
Caution:
Only fill with salt just before starting one of the complete washing programmes (not the Rinse and Hold programme). This will prevent any grains of salt or salty water, which may have been spilled, remaining on the bottom of the machine for any period of time. This could cause corrosion.
Rinse Aid
This liquid ensures thorough rinsing and spot and streak free drying, making the water run quickly off the dishes for sparkling results. It is automatically added during the hot rinse. The dispenser, which is positioned inside the door, holds about 110 ml of rinse aid, which is sufficient for 16-40 dishwashing programmes, depending upon the dosage setting.
Filling with Rinse Aid
Open the container by turning the cap (A) anticlockwise.
Add rinse aid until the container is completely full (approx. 110 ml). The indicator (B) will be completely dark.
Top up with rinse aid when the indicator (B) becomes clear.
Remember to CLOSE the cap after every refill.
Caution
Clean up any rinse aid spilt during filling with an absorbent cloth to avoid excess foaming during the next wash.
Adjusting the Dose
According to the finish and drying results obtained, adjust the dose of rinse aid by means of the 6 position selector (C) (position 1 - minimum dose, position 6 - maximum dose). Gradually increase the dose if there are drops of water or lime spots on the dishes after washing. Reduce it if there are sticky whitish streaks on the dishes.
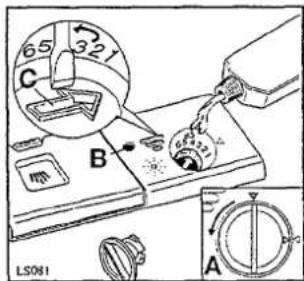
Use of Detergent
Before starting any of the dishwashing programmes, except for the rinse and hold programme, load the detergent in the dispenser.
Use only tablets, powder or liquid detergents specifically designed for domestic dishwashers.
Unsuitable detergents (such as those for washing by hand) do not contain the right ingredients for machine washing and hamper the correct functioning of the machine.
To open the dispenser lid, pull the catch (D). This will open it.
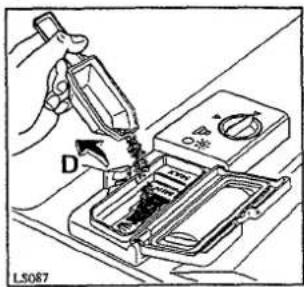
To help you to correctly dose the right amount of detergent, inside the container there are two reference marks:
-MIN=15ml
-MAX=30ml
The amount of detergent to be used varies depending on how soiled
the dishes are and the type of dishes being washed. We recommend the amounts shown in the programme chart on the next pages.
After filling the dispenser with detergent, close the lid.

The programmes with prewash require a small extra amount of detergent of approximately 5 g = a teaspoon to be poured over the lid of the dispenser, as shown on the picture.
At the end of any washing programme the lid is always open, ready for the next wash.
Since not all detergents are the same, you should also consult the instructions on the packet.
Remember that insufficient quantities of detergent will produce poor washing results whereas an excessive amount of detergent does not improve washing results and is also wasteful.
Using no more than the correct amount of detergent also contributes to reducing pollution.
Tricity Bendix recommends the use of Fairy Dish-washer Detergent and Rinse Aid.
Phosphate free detergents with enzymes
These new detergents, although welcome from an ecological point of view, react far more susceptibly to water hardness than conventional products.
Therefore, in order to avoid white lime deposits on crockery and the inner tub, you should add salt in the water softener even if the hardness of your water is as low as 6 Clarke degrees, when using these new detergents.
Loading your Machine
Before placing dishes in the machine, remove any large scraps of food from the plates (small bones, toothpicks, fish bones, scraps of meat and vegetables, fruit skins etc.) to avoid clogging the filters and consequently reducing performance.
Open the door and slide out the baskets to load the dishes.
Use of the Lower Basket
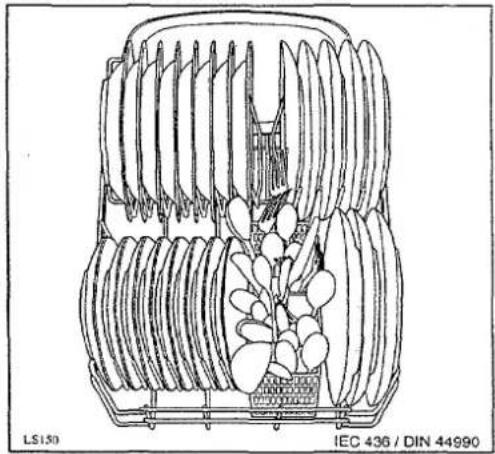
The lower basket is designed to take saucepans, lids, plates (up to 27 cm in diameter), salad bowls, cutlery etc.
Serving dishes and large lids should be arranged around the edge of the basket, ensuring that the upper spray arm can turn freely.
natural_image
Technical line drawing of a mechanical component with internal layered structure (no text or symbols)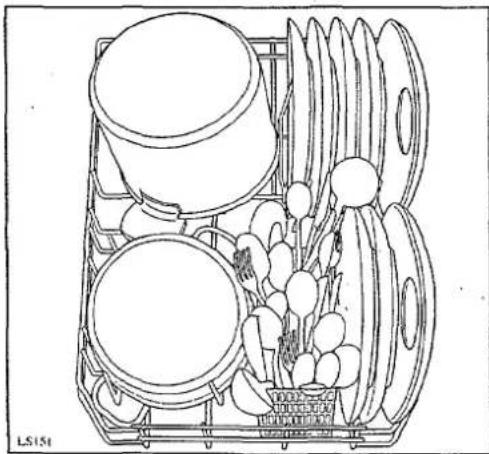
natural_image
Line drawing of a multi-tiered kitchen appliance with cutlery and a basket (no text or symbols)Cutlery should be placed in the removable cutlery basket with the handles facing downwards. If the handles protrude from the bottom of the basket, obstructing the lower spray arm, load the cutlery with the handles facing upward.
Mix spoons with the other cutlery to prevent them sticking together.
Use of the Upper Basket
The upper basket is designed for plates (dessert plates, saucers, dinner plates up to 24 cm in diameter), salad bowls, cups and glasses; these should be arranged as shown in the pictures.
Glasses with long stems can be placed upside-down in the raised cup-racks.

natural_image
Line drawing of a basket filled with various ceramic and ceramic items, no text or symbols present
natural_image
Technical line drawing of a mechanical assembly with multiple circular components and a central rack (no text or symbols)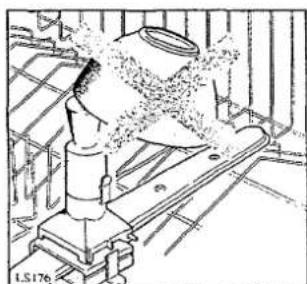
natural_image
Technical line drawing of a mechanical assembly with no visible text or symbolsCaution
When loading the dishes, ensure that you do not cover the water inlet funnel in the middle of the upper basket.
Before closing the door, ensure that the spray arms can rotate freely.
Adjusting the Height of the Upper Basket
If washing very large plates (over 27 cm and up to 31 cm in diameter) you can load them in the lower basket after moving the upper basket to the higher position as follows:
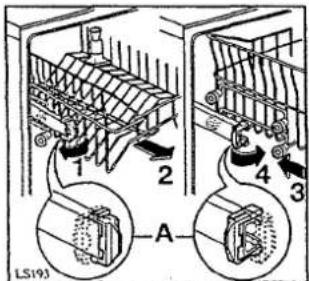
Move the front runner stops (A) of the upper basket outward and slide the basket out.
Refit the basket in the higher position and replace the stops (A) in their original position.
When the top basket is in the higher position it will only take plates up to 20 cm in diameter and you will not be able to use the raised cup racks.
HELPFUL HINTS
For Best Washing Results:
Before loading, remove all scraps of food and soak very heavily soiled pots and pans.
Always arrange saucepans, cups and glasses etc. upside-down.
Tilt items with convex or concave surfaces so that the water drains off easily.
...Long items of cutlery such as ladles, carving knives etc. should be positioned horizontally in the upper basket.
Avoid contact between the dishes as far as possible; correct arrangement of the items will give better washing results.
Light items (plastic bowls etc.) should be loaded in the upper basket and arranged so that they do not move during washing.
To Save Energy
Do not prewash dishes under running water.
Place dishes in the machine immediately after every meal and wait until the dishwasher is full before washing.
If necessary run the Rinse and Hold programme (see Programme Chart on the following pages), so that any food scraps do not become caked on the dishes while you are waiting to run the complete wash programme.
You will improve drying results by leaving the dishwasher door ajar for at least 15-30 minutes as soon as
Items not Suitable for Dishwashers
The following should not be washed in the dishwasher:
Cutlery or dishes with wooden or horn handles or glued parts.
Handmade items, wooden objects, antiques or hand-painted china.
Certain types of decoration can discolour when washed in a dishwasher.
Crystal-ware and plastic objects, if not guaranteed dishwasher-proof, should be washed by hand. You are advised to place them in the upper basket and to select a delicate programme.
Certain types of glass can also become opaque after being washed several times in a dishwasher.
Silver cutlery tends to go black if mixed with steel cutlery. Place it in the cutlery basket separate from the others.
Iron and cast iron objects can rust and stain other items.
Aluminium tends to go black; copper, pewter and brass tend to stain.
Caution: You are advised not to load very small or plastic items which can fall through the baskets.
Note: When buying new dishes, ensure that they are dishwasher-proof.
Washing programmes
| Programme | Degree of soil | Type of load | Starting position of the programmer | Required pushbutton | Recommended quantity of detergent | Programme description | |
| In the dispenser | On the dispenser lid | ||||||
| * POWER WASH 65°C | Heavy Soil | Pots - Pans | A | ON/OFF | 1 heaped dessert spoon (15 g) | Half dessert spoon (5 g) | Cold water prewash Main wash at 65°C 2 cold rinses 1 warm rinse at 65°C Hot air drying |
| NORMAL WASH 65°C | Normal Soil | Crockery | B | ON/OFF | 1 heaped dessert spoon (15 g) | / | Main wash at 65°C 2 cold rinses 1 warm rinse at 65°C Hot air drying |
| * ECO WASH | Light Soil | Crockery | C | ON/OFF | 1 heaped dessert spoon (15 g) | / | Main wash at 65°C 2 cold rinses |
| RINSE & HOLD | Any | Any | D | ON/OFF | / | / | 1 cold rinse (to avoid food scraps from sticking to the crockery) |
* This programme is equivalent to IEC436 standard.
Recommended quantity of detergent: 15g in the dispenser, 5g on the dispenser lid.
Standard place settings: 8.
This is a special programme to wash in a short time (approx. 30 minutes) a full load of lightly soiled dishes, glasses and crockery (except pots) so that you may re-use them promptly. Due to the shortness of the programme, no drying phase is included.
Operating Instructions
1 Check that the filters are clean
(see cleaning instructions)
2 Check that there is salt and rinse aid
3 Load the dishes
Remove larger scraps of food.
Pull the lower basket out and arrange the saucepans, plates and cutlery in it.
Pull the upper basket out and arrange the plates, saucers, glasses and cups etc. in it.
Slide the baskets back into the machine.
Ensure that the spray arms can rotate freely.
4 Measure out detergent
Pour the required amount of detergent into the dispenser according to the indications in the Washing Programmes chart and close the lid.
Close the dishwasher door.
5 Set the programme
The selection of a programme occurs with the door partially opened.

Turn the Programme Selector Dial clockwise until the programme letter you wish to select corresponds with the Programme marker on the control panel.
6 Start the programme
Insert the plug into the wall socket.
Open the water tap.
Depress the ON/OFF pushbutton D1 and close the door; the machine will start.
7 At the end of the washing programme
The dishwasher will automatically stop in one of the STOP positions.
Turn off the water tap.
Open the door and depress the ON/OFF button DO to switch off the dishwasher. Wait a few minutes before removing the dishes; in this way they will be cooler and drying will be improved.
Empty the lower basket first and then the upper one; this will avoid water dripping from the upper basket onto the dishes in the lower one.
Caution
In general it is not advisable to open the door while the machine is working; if the door is opened however, a safety device ensures that the machine stops.
Care must be taken if opening the door, as steam will escape.
Cleaning the Central Filters
(After each wash)
Inspect the central filters (B) and (C) and remove any scraps of food with a brush, under running water.
Filters (B) and (C) are both removed by lifting up the outer one (B) (pulling the central funnel upwards); the smaller filter (C) can then be removed by pressing the two tongues (D).
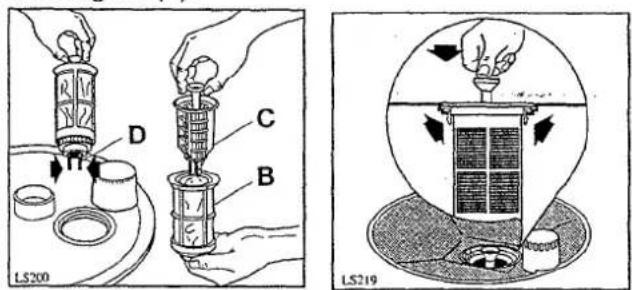
Once cleaned, refit the filters by pressing them down until they click into place.
Cleaning the Large Filter
(Once a month)
Clean the large filter (A) on both sides under running water, using a brush.
To take it out, remove the spray arm by pressing the two tongues (E), turn the ring (F) anticlockwise (towards the left) and then slide the whole part out.
Refit the filter following the above instructions in reverse order.

Caution: the dishwasher must not be used without filters.
Incorrect repositioning of the filters will produce poor washing results.
Cleaning of the filters is vital to ensure correct operation of the machine.
Internal and External Cleaning
You must ensure that the seals around the door, the detergent and rinse aid dispensers are cleaned regularly with a damp cloth.
We recommend the use of Fairy Dishwasher Cleaner every 3 months, or run a wash programme without dishes using detergent.
Check that the spray arm nozzles are not obstructed. To remove the bottom spray arm, release it from its securing catches and pull it out. To clean the nozzles of the top spray arm, slide out the top basket whereby the spray arm will become accessible. To remove it, withdraw the centre funnel by pressing the two side tabs and undscrewing the retaining ring.
Wash the spray arms under running water and refit them in place.
Clean the external surfaces of the machine and control panel with a soft damp cloth. If necessary use only neutral detergents. Never use abrasive products, scouring pads or solvents (acetone, trichloroethylene etc...).
Prolonged Periods of Non-Operation
If you are not using the machine for any period of time you are advised to:
unplug the appliance and turn off the water;
fill the rinse aid dispenser;
leave the door ajar to prevent the formation of unpleasant smells;
leave the inside of the machine clean.
Frost Precautions
Avoid placing the machine in a location where the temperature is below 0°C.
If this is unavoidable, empty the machine, close the water inlet tap, disconnect the water inlet pipe and empty it.
Moving the Machine
If you have to move the machine (you are moving house etc...):
unplug it;
turn off the water tap;
remove the water inlet and discharge hoses;
pull the machine out together with the hoses.
Caution: avoid over tilting the machine during transport.
Certain problems are due to lack of simple maintenance or oversights and can be solved easily without having to call out an engineer.
The machine will not start
■ The door has not been properly closed.
■ The plug is not properly inserted in the power socket.
■ There is no current at the socket. Check the fuse.
The machine will not fill with water
■ The water tap is shut.
■ The water supply has been cut off.
■ The inlet hose is kinked.
■ The water inlet hose filter is clogged.
The machine will not drain
■ The drain hose is kinked.
■ The sink drain is blocked.
■ The drain hose extension is not correct.
■ There is no air vent in the end of the drain hose.
The dishes are not clean (poor wash)
■ The baskets are too full.
■ The dishes have not been arranged properly.
■ The spray arms do not rotate.
■ The spray arm holes are clogged.
■ The water inlet funnel in the centre of the upper basket is covered by dishes.
■ The end of the drain hose is submerged in waste water (in the sink).
■ The filters are clogged.
■ The filters are not in position.
■ Not enough detergent has been used or it is unsuitable.
■ The detergent is old or has gone hard.
■ The salt container cap is not properly closed.
■ The washing programme selected is too gentle.
Visible lime deposits or white film on the dishes
■ There is no salt or the softener has not been adjusted to the hardness of the water.
■ The rinse aid has run out or too little is being used
The machine is noisy
■ The dishes are rattling against each other.
■ The spray arms are knocking against the dishes.
The dishes are not quite dry
■ The dishes have been left too long inside the machine.
The door is difficult to close
■ The dishwasher is not level or is not properly built-in.

If, after the above checks, the fault persists, call your local Tricity Bendix Service Centre. Please make sure you give the model and serial number of the appliance. This information can be found on the rating plate located on the right-hand side of the dishwasher door (see picture).
Original spare parts can be purchased from Tricity Bendix Service Centres.
In guarantee customers should ensure that the above checks have been made as the engineer will make a charge if the fault is not a mechanical or electrical breakdown.
Please note that proof of purchase is required for any guarantee service calls.
Tricity Bendix Customer Service
Telephone 01582 - 585858
Building-in features
This dishwasher is designed to be fitted under a kitchen counter or sink.
In either case, it is essential that the recess dimensions indicated in the picture are followed.
No further openings for venting of the dishwasher are required, but only to let the water fill and drain hoses and power supply cable pass through.
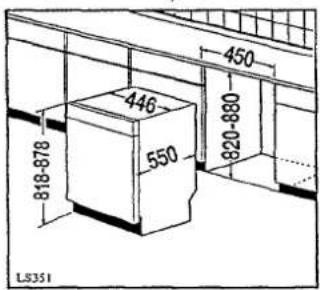
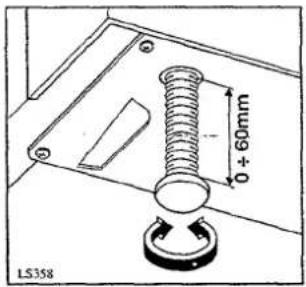
The recess height may be anywhere between 820 and 880 mm from the floor since the dishwasher incorporates levelling feet adjustable over a wide range (max 60 mm).
Adjust the height of the appliance by turning these feet.
A distance of 2 mm should be allowed between the top of the dishwasher and the counter top.
Fitting under a counter (kitchen worktop or sink)
It is absolutely essential that the dishwasher is disconnected from the electricity supply before gaining access to any internal component.
Fit the dishwasher into the appropriate housing space and connect it. Make sure that the water fill and drain hoses and the power supply cable are not bent or kinked.
Fitting the panel onto the door
The door on this model is designed for the overlay of a panel having the following dimensions:
Width: 446 mm
Height: 644 to 714 mm max
Thickness: 20 mm max
Weight: 1,5 to 6 kg max
Note:
The panel height should not be more than what indicated, otherwise complete opening of the door will no longer be possible as the panel hits against the dishwasher plinth.
Mounting of decor panel onto the door
The height of the panel depends on the height of the plinth of adjacent kitchen units (see kitchen plinth adjustment).
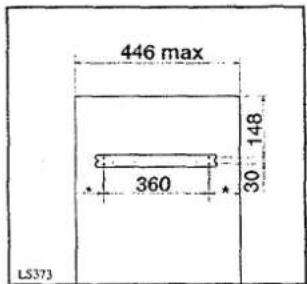
The panel must be fitted with a handle, as the dishwasher handle will be hidden by the panel.
Drill the panel with a ∅ 2x12 bit according to the dimensions indicated in the figure.
Fix the cross bar onto the panel using four 3.5x16 screws provided. Reduce the lenght of fixing screws according to thickness of panel.

If for aesthetic matching the panel is provided with a false drawer (fitted or carved on the panel itself), the two brackets provided should also be used. Fix the brackets according to the measurements shown in the figure, by using four 3.5x16 screws.
Reduce the lenght of fixing screws according to thickness of panel.
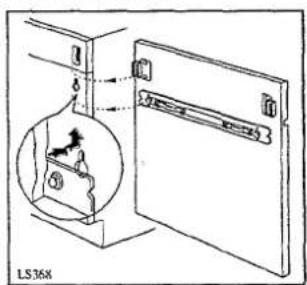
Mount the decor panel by inserting the two pivots of the cross-bar into the slotted holes of the door.
Lift the decor panel until perfect alignment with the facia panel is obtained: if the two brackets have also been used, they will automatically engage in
the special holes provided on the dishwasher door.

natural_image
Technical line drawing of a mechanical assembly with no visible text or symbolsOnce the correct position has been found, open the door and fasten the decor panel on the lower section by means of the two long 4x40 screws provided, using the holes through the inner door (see fig.).
Securing under a counter

Secure the dishwasher to the counter on the front part by means of two 4,2x13 screws provided (see fig. - point A).
Important!
The dishwasher must be secured against tilting. Therefore, make sure that the counter it is fitted under, is suitably secured to a fixed structure (adjacent kitchen cabinets, wall).
Attention!
When the dishwasher is secured to the kitchen cabinets, be sure not to drill any holes into the sides of the machine.
Adjusting the door balance
The door of the dishwasher is balanced when it is open in any position.

Fitting the decor panel may sometimes affect this balance. In this case it will be necessary to adjust the balance as follows: Half-open the door, remove the plugs and regulate the screws located on the front side of the appliance.
By screwing or unscrewing these screws by the same amount, the tension of the door balancing springs is increased or decreased respectively. Refit the plugs.
Attention!
The weight of the panel should be within the limits given in the "dimensions of the panel", otherwise balancing the door will not be possible.
Levelling
Make sure that the dishwasher door closes properly, without rubbing on sides. Otherwise level the machine by slightly screwing or unscrewing the two front feet until perfect closure of the door is reached.
Kitchen plinth adjustment

natural_image
Line drawing of a wooden cabinet with a door and two tools, no text or symbols presentTo allow correct opening of the door it is sometimes necessary to cut the kitchen plinth. Refer to the cutting table below.
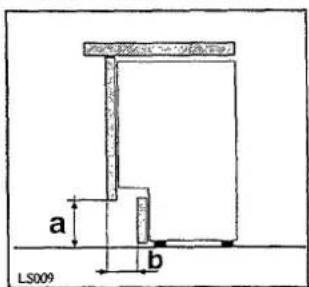
According to dimensions of (a) and (b) as shown on the figure, you will find on the following table the depth (X) of the cut to be made on the plinth.
The dimensions (a) and (b) of the table are those more frequently used in the kitchen furnitures.
| Height (a)* | ||||||||
| 170 | 160 | 150 | 140 | 130 | 120 | 110 | 100 | |
| 40 | 34 | 29 | 25 | 22 | 20 | 20 | 17 | 15 |
| 50 | 35 | 29 | 25 | 22 | 20 | 18 | 18 | 15 |
| 60 | 33 | 28 | 25 | 22 | 20 | 18 | 16 | 15 |
| 70 | 32 | 26 | 22 | 20 | 20 | 16 | 15 | 15 |
| 80 | / | 21 | 20 | 16 | 15 | 15 | 12 | 12 |
| 90 | / | / | 12 | 11 | 10 | 10 | 10 | 10 |
| 100 | / | / | / | 5 | 5 | 5 | 5 | 5 |
(*) dimensions in mm

Dimensions of the cut-out in plinth
Guarantee conditions
We, Tricity Bendix, undertake that if, within twelve months of the date of the purchase, this Tricity Bendix appliance or any part thereof is proved to be defective by reason only of faulty workmanship or materials, we will, at our option, repair or replace the same FREE OF ANY CHARGE for labour, materials or carriage on condition that:
■ The appliance has been correctly installed and used only on the electricity supply stated on the rating plate.
- The appliance has been used for normal domestic purposes only, and in accordance with the manufacturer's operating and maintenance instructions.
■ The appliance has not been serviced, maintained, repaired, taken apart or tampered with by any person not authorised by us.
All service work under this guarantee must be undertaken by a Tricity Bendix service representative or authorised agent.
Any appliance or defective part replaced shall become the property of Tricity Bendix.
This guarantee is in addition to your statutory and other legal rights.
Home visits are made between 8.30am and 5.30pm Monday to Friday. Visits may be available outside these hours in which case a charge will be made.
Exclusions
This guarantee does not cover:
■ Damage or calls resulting from transportation, improper use or neglect, the replacement of any light bulbs or removable parts of glass or plastic.
■ Costs incurred for calls to put right machines improperly installed or calls to machines outside the United Kingdom.
■ Appliances found to be in use within a commercial environment, plus those which are the subject of rental agreements.
■ Products of Tricity Bendix manufacture which are NOT marketed by Tricity Bendix.
■ EEC Countries - The standard guarantee is applicable but is subject to the owner's responsibility and cost to ensure the appliance meets the standards set by the country to which the product is taken. Proof of purchase may be required. Electrolux After-sales Service in the country concerned, with whom Tricity Bendix have an arrangement, will be pleased to advise further.
Tricity Bendix After Sales Service Service Centres Addresses
| CENTRE | POSTAL DISTRICTS | SERVICE APPTS. | ADDRESS |
| ABERDEEN | AB | 01224-696569 | Tricity Bendix After Sales ServiceNortheast Appliance Service, 8 Comhill Arcade,Aberdeen, AB2 5UT |
| ARGYLLE | PA24-61 | 01369-703161 | Tricity Bendix After Sales ServiceT.D.C. Refrigeration, Briar Hill, 7 Hill Street, Dunoon, PA23 7AL |
| BARNSTAPLE | EX18-23, 31-39 | 01271-328826 | Tricity Bendix After Sales ServiceMc Bain Refrigeration, P.O. Box 12,Barnstaple, North Devon, EX31 2YB |
| BORDERS | TD | 01573-224411 | Tricity Bendix After Sales ServiceJames Stewart & Son, 2-8 Wood Market,Kelso, Borders, TD5 7AX |
| BRISTOL | BA BS SP TA | 0117-921-1876 | Tricity Bendix After Sales ServiceUnit BE46, P.O. Box 37, Bristol, BS 99 1UD |
| CANVEY | E EC EN N NW W WCAL CB HA HP LU MK SGUB WDCM CO IG RM SSIP NR PE14-19, 30-38 | 0181-443-34640181-965-96990181-965-969901268-69414401603-667017or 01268-694144 | Tricity Bendix After Sales Service2-4 Sandhurst,Kings Road, Canvey Island, SS8 0QY |
| CARDIFF | CF NP1-4, 6, 9-44SA1-18, 21-32 | 01222-460131 | Tricity Bendix After Sales ServiceGuardian Industrial Estate, Clydesmuir Road,Tremorfa, Cardiff, CF2 2QS |
| CUMBRIA | CA | 01228-594747 | Tricity Bendix After Sales ServiceE.T.B. Services, Carlisle Enterprise Centre, James Street,Carlisle, CA2 5AP |
| DUMFRIES &GALLOWAY | DG1-14 | 01387-265166 | Tricity Bendix After Sales ServiceAllan Crossan (Service), 93 Irish Street, Dumfries, Scotland, DG1 2PQ |
| DUNDEE | DD1-14PH8-18 | 01250-876285 | Tricity Bendix After Sales ServiceI Brogan Domestics, 41 Lesley Street,Blairgowrie, Perthshire, PH10 6AT |
| GLASGOW | EH FK G KA KY1-16 MLPA1-23 PH1-7 | 0141-647-4381 | Tricity Bendix After Sales Service20 Cunningham Road, Clyde Estate, Rutherglen, Glasgow, G73 1PP |
| GUERNSEY | All Codes | 01481-46931 | Guernsey ElectricityP.O. Box 4, Vale, Guernsey, Channel Islands |
| HAVERFORDWEST | SA33-39, 41-44, 61-73 | 01437-710914 | Tricity Bendix After Sales ServiceC Butherway, 1 Church Road, Roch, Haverfordwest,Dyfed, Wales, SA62 6AG |
| -MEREFORD | HR1-9 LD1-8 SY7 SY18NP5 NP7-8 | 01432-340334 | Tricity Bendix After Sales ServiceDomestic Repair Centre, Unit 3 Bank Buildings,Cattle Market, Hereford, HR4 9HX |
| HULL | Y04, 11-18, 25HU1-19 DN14 | 01482-585678 | Tricity Bendix After Sales ServiceJohn Sizer, Unit 1 Boulevard Unit, Factory Estate, Hull, HU3 4AY |
| INVERNESS | IV1-28, 30-36, 52-56PH19-26, 42-44 KW1-14 | 01463-792952 | Tricity Bendix After Sales ServiceHighland Appliances, Unit 3B3 Smithton Industrial Estate,Smithton, Inverness, IV1 2PD |
| INVERNESS | PH30-41 IV40-51 | 01855-821315 | Tricity Bendix After Sales ServiceGeorge Ross Electrical, Forrestry Workshop,Inchree, Onich, Invernesshire, PH33 6SE |
| ISLE OF WIGHT | PO30-41 | 01983-872552 | Tricity Bendix After Sales ServiceWyatts Electrical Service, 4 Forelands Road,Bembridge, Isle of Wight, PO35 5XW |
| ISLE OF ARRAN | KA27 | 01770-302909 | Tricity Bendix After Sales ServiceArran Domestics, Unit 4 The Douglas Centre,Brodick, Isle of Arran, KA27 8AJ |
| ISLE OF LEWIS | PA83-87 | 01851-705555 | Tricity Bendix After Sales ServiceN D Macleod, Churchouse, 16 James StreetStornoway, Isle of Lewis, PA87 2QW |
| ISLE OF MAN | IM | 01624-687794 | Tricity Bendix After Sales ServiceManx Electricity, Service Workshop,North Quay, Douglas, Isle of Man |
| ISLE OF MULL | PA62-75 | 01688-302262 | Tricity Bendix After Sales ServiceB Hogg, Braeside, Raeric Road,Tobermory, Isle of Mull, PA75 6PU |
| JERSEY | ALL CODES | 01534-505050 | Jersey Electricity CompanyPO Box 45 Queens Road, St HelierJersey, Channel Islands, JE4 8NY |
| LAMPETER | SA19, 20, 40, 45-48SY23, 24, 25 | 01570-423020 | Tricity Bendix After Sales ServiceLampeter Domestic Appliance Services,Unit 16 Lampeter Industrial Estate, Lampeter, Dyfed, SA48 7DY |
| LANCASTER | LA1-23 | 01772-316175 | Tricity Bendix After Sales ServiceNL Services, Unit 333 Ranglet Road, Walton Summit,Bamber Bridge, Preston, Lancashire, PR5 8AR |
Tricity Bendix After Sales Service Service Centres Addresses
| CENTRE | POSTAL DISTRICTS | SERVICE APPTS. | ADDRESS |
| LEEDS | BD DN1-7, 10-12 HD HG HXLS S WF YO1-3, 5-8 DENG-1-22, 25 | 0113-2608511 | Tricity Bendix After Sales Service64-66 Cross Gates Road,Leeds, LS15 7NN |
| LINCOLN | DN21 Subcodes 1,2, 5 onlyLN 1, 2, 4, 5, 6LN3 Subcodes 4, 5 onlyLN8-10 NG23, 24, 31-34 PE1-13, 20-25 | 01522-514603 | Tricity Bendix After Sales ServiceBrian Hudson, Unit 8 Stonefield Park,Clifton Street, Lincoln, LN5 8AA |
| LIVERPOOL | FY PR L WN CH CW WA(except WA14-15) | 0151-254-1724 | Tricity Bendix After Sales Service1 Honeys Green Precinct, Honeys Green Lane,West Derby, Liverpool, L12 9JH |
| MANCHESTER | BB BL OL M SKWA14-15 | 0161-477-7758 | Tricity Bendix After Sales ServiceUnit 30 Oakhill Trading Estate, Devonshire Road,Worsley, Manchester, M28 3PT |
| NEWTON ABBOTT | EX1-17PL1-9, 16, 19, 20, 21TQ | 01626-65909 | Tricity Bendix After Sales ServiceSouth West Domestic Service, Unit 2 Zealley Industrial Estate,Kingsteignton, Newton Abbott, South Devon, TQ12 3SJ |
| NORTH WALES | LL | 01745-59161601745-590096 | Tricity Bendix After Sales ServiceGMS (Cymru), Unit 2 Coed - Parc, Abergle Road,Rhuddlan, Clwyd, Wales, LL18 5UG |
| NORTHERN | DL TS DH YO21,22DH NE SR | 01325-3014000191-493-2025 | Tricity Bendix After Sales ServicePO Box 40 Preston Road, Aycliffe Industrial Estate,Newton Aycliffe, Co Durham, DL5 6XA |
| NORTHERNIRELAND EAST | BT1-30, 36-57, 63-67 | 01232-746591 | Tricity Bendix After Sales ServiceUnit C3, Edenderry Industrial Estate,326 Crumlin Road, Belfast, BT14 7EE |
| NORTHERNIRELAND WEST | BT31-35, 60-62, 68-82, 92-94 | 01861-510400 | Tricity Bendix After Sales ServiceG & O (Armagh) Service, Owenmore House, Kilwee Business Park, UpperDunmurray Lane, Belfast, BT17 0HD |
| NUNEATON | B1-48 62-79, 90-94, DY STWR15 WS WVNN CV LE | 0121-358-70760121-358-70760121-358-505101203-354424 | Tricity Bendix After Sales ServiceUnit 23-24 Alliance Business Park, Townsend Drive,Nuneaton, Warwickshire, CV11 6RX |
| ORKNEY | KW15-17 | 01856-875457 | Tricity Bendix After Sales ServiceRefrigeration Sales and Services, Hatson Ind. Estate,Kirkwall, Orkney |
| REDDITCH | GL OX WR (Not WR15) SNB49, 50, 60, 61, 80, 95-98 | 01527-512919 &01993.704411 | Tricity Bendix After Sales ServiceHeming Road, Washford, Redditch, Worcestershire, B98 0DH |
| REDRUTH | TR1-20, 26, 27PL10-15, 17, 18, 22-35 | 01209-314407 | Tricity Bendix After Sales ServiceCornwall Domestic Service, Unit 7D Pool Industrial Estate, Wilson Way,Redruth, Cornwall, TR15 3QW |
| ROTHESAY | PA20 | 01700-504777 | Tricity Bendix After Sales ServiceD McGlashan Walker Engineering, Glenmhor,Upper Serpentine, Rothesay, PA20 |
| SHETLAND | Own Sales | 01595-692225 | Tricity Bendix After Sales ServiceTait Electronic Systems Ltd, Homsgarth Road,Lerwick, Shetland, ZE1 0PW |
| SHETLAND | Own Sales | 01595-692915 | Tricity Bendix After Sales ServiceG Robertson Ltd, 3/4 Carlton PlaceLerwick, Shetland, ZE1 0ED |
| SHETLAND | Own Sales | 01595-692855 | Tricity Bendix After Sales ServiceBolts Shetland Ltd, 26 North Road, Lerwick, Shetland, ZE1 0PE |
| SHETLAND | ZE2 | 01806-566546 | Tricity Bendix After Sales ServiceLeask Electrical, Harsdale, Symbister, Shetland, ZE2 9AA |
| SHREWSBURY | SY1-6 SY8-17 SY19-22 TF | 01743-450279 | Tricity Bendix After Sales ServiceBLI Service, 6 Harlescott Barn, Harlescott Lane,Shrewsbury, Shropshire, SY1 3SY |
| SOUTH COAST | BH DT PO1-22 SOTR21-25 | 01705-6674110117-9211876 | Tricity Bendix After Sales ServiceLimberline Road, Hilsea, Portsmouth, Hampshire, PO3 5JJ |
| SOUTH HUMBERSIDE | DN8, 9 DN15-20DN21 Subcodes 3, 4 onlyDN31-40 - LN3 (Subcode 6 only),LN7, 11-13 | 01472-267978 | Tricity Bendix After Sales ServiceJohn Robinson (Electrical), 81 Pasture Street,Grimsby, DN32 9EP |
| TONBRIDGE | GU1-35 RG SLCT DA ME TNBN1-18 20-27 RHTW BR CR SE SW SM KT | 0252-24505 &01732-35772201273-6943410181-658-90690181-658-9069 | Tricity Bendix After Sales ServiceUnit 30, Deacon Trading Estate, Morley Road,Tonbridge, Kent, TN9 1RA |
| WESTERN ISLES | HS9 | 01871-890206 | Tricity Bendix After Sales ServiceMr J Zertahs, 244 Bruernish, Isle of BarraWestern Islands, HS9 5QY |
TRICITY BENDIX

Better Products. Better Value.
Tricity Bendix, 99 OAKLEY ROAD, Luton, Beds LU4 9QQ
Model No.
BK 450
A DIVISION OF EMACO LIMITED REGISTERED IN ENGLAND NO. 176547
Part No.
152994 - 88/0
- CONTENTS
- Positioning
- Levelling
- Water Supply Connections
- Water Outlet Connection
- The electrical connections
- WARNING: THIS APPLIANCE MUST BE EARTHED.
- The manufacturer declines any liability should this safety measure not be observed.
- Important
- ON/OFF Pushbutton ☐ I ☐ O
- Programme Guide
- Programme marker ■
- Programme Selector Dial
- The Water Softener
- Level 1
- Filling with Salt
- Caution:
- Rinse Aid
- Filling with Rinse Aid
- Caution
- Adjusting the Dose
- Use of Detergent
- Phosphate free detergents with enzymes
- Loading your Machine
- Use of the Lower Basket
- Use of the Upper Basket
- Adjusting the Height of the Upper Basket
- HELPFUL HINTS
- For Best Washing Results:
- To Save Energy
- Items not Suitable for Dishwashers
- Operating Instructions
- Check that the filters are clean
- Check that there is salt and rinse aid
- Load the dishes
- Measure out detergent
- Set the programme
- Start the programme
- At the end of the washing programme
- Cleaning the Central Filters
- (After each wash)
- Cleaning the Large Filter
- (Once a month)
- Internal and External Cleaning
- Prolonged Periods of Non-Operation
- Frost Precautions
- Moving the Machine
- The machine will not start
- The machine will not fill with water
- The machine will not drain
- The dishes are not clean (poor wash)
- Visible lime deposits or white film on the dishes
- The machine is noisy
- The dishes are not quite dry
- The door is difficult to close
- Building-in features
- Fitting under a counter (kitchen worktop or sink)
- Fitting the panel onto the door
- Note:
- Mounting of decor panel onto the door
- Securing under a counter
- Important!
- Attention!
- Adjusting the door balance
- Kitchen plinth adjustment
- Guarantee conditions
- Exclusions
- TRICITY BENDIX
Brand : Tricity Bendix
Model : BK450
Category : Dishwasher