
V7446X2GB - Tumble dryer NEFF - Free user manual and instructions
Find the device manual for free V7446X2GB NEFF in PDF.


| Product Type | Tumble Dryer |
| Brand | Neff |
| Model | V7446X2GB |
| Capacity | 8 kg |
| Energy Efficiency Class | A+++ |
| Drying Type | Condenser (Heat Pump) |
| Dimensions (H x W x D) | 84.2 cm x 59.8 cm x 61.3 cm |
| Weight | 50 kg |
| Power Consumption (annual) | 176 kWh |
| Voltage / Frequency | 220-240 V / 50 Hz |
| Number of Programs | 15 |
| Special Functions | Anti-crease, Delicates, Quick Dry, Timed Drying, Iron Dry, Cupboard Dry, Extra Dry |
| Noise Level | 66 dB(A) |
| Condensation Efficiency | A |
| Filter Type | Lint filter with fine mesh |
| Heat Pump | Yes |
| Warranty | 2 years |
| Color | White |
| Door Type | Reversible hinge |
| Control Type | Electronic with LED display |
| Installation Type | Freestanding |
| Approved Accessories | Condensation drain hose, stacking kit |
Frequently Asked Questions - V7446X2GB NEFF
User questions about V7446X2GB NEFF
0 question about this device. Answer the ones you know or ask your own.
Ask a new question about this device
Download the instructions for your Tumble dryer in PDF format for free! Find your manual V7446X2GB - NEFF and take your electronic device back in hand. On this page are published all the documents necessary for the use of your device. V7446X2GB by NEFF.
USER MANUAL V7446X2GB NEFF

EFF
WASHER DRYER
en Instruction Manual and Installation Instructions
V7446X2GB

Your new washer dryer
You have chosen a Neff washer dryer.
Please take a few minutes to read and become familiar with the advantages of your washer dryer.
To meet the high quality demands required by Neff, every washer dryer that leaves our factory is carefully checked to ensure that it functions correctly and is in perfect condition.
For more information on our products, accessories, replacement parts and services, see our website www.neff-international.com or contact our after-sales service centres.
If the operating and installation instructions describe different models, any differences will be pointed out at the relevant points in the text.

Read these operating and installation instructions before switching on the washer dryer.
Display rules
⚠ Warning!
This combination of symbol and signal word indicates a possibly dangerous situation. Not heeding the warning can cause death or injuries.
Caution!
This signal word indicates a possibly dangerous situation. Not heeding the caution can cause property and/or environmental damage.
Note/tip
Information about the optimum use of the appliance/any other useful information.
1. 2. 3. / a) b) c)
The steps are represented by numbers or letters.
/ -
Lists are represented by a small box or a dash.
Contents

Intended use. 4

Safety instructions .....5
Children/people/pets 5
Installation. 6
Operation 8
Cleaning/Maintenance ..... 10

Protection of the environment .11
Packaging/old appliance ..... 11
Hints and tips ..... 11

Positioning and connecting ..... 12
Included with the appliance ..... 12
Safety instructions ..... 12
Installation surface ..... 13
Installing the appliance on a base or on a wooden joist ceiling ..... 13
Installing the appliance in a kitchenette ..... 13
Removing the transport locks ..... 13
Hose and cable lengths ..... 14
Water inlet ..... 15
Water outlet ..... 16
Alignment ..... 17
Electrical connection ..... 17
Before washing/drying for the first time ..... 18
Transportation. 18

The main points in brief .....19

Getting to know your appliance20
Washer dryer 20
Control panel 21
Display panel 22

Laundry....24
Preparing laundry for washing ..... 24
Preparing laundry for drying ..... 25

Operating the appliance .....26
Preparing the washer dryer. . . . . . . 26
Selecting the programme/Switching on the appliance.....26
Adjusting the washing programme . .26
Adjusting the drying programme . . . .27
Loading the laundry. . . . . . . . . . . . . . . . . 28
Dosing and adding detergent and care product....28
Starting the programme .....29
Childproof lock ....30
Reloading the laundry .....30
Changing the programme .....30
Interrupting or ending the programme 30
End of the programme .....31
After washing/drying .....31

Overview of programmes ..... 32
Programme on the programme selector 32
Drying table .....35
Starching 36
Dyeing/Bleaching .....36
Soaking 36

Changing programme default settings. 36
°C Temp ....36
© rpm .....36
⑨ Finished in. 37
Dry 37

Selecting additional functions . 38
=SpeedPerfect....38
©EcoPerfect....38
Aqua Plus. 38

Setting the signal ..... 39

Cleaning and maintenance. . . . 40
Appliance housing/control panel. . . .40
Drum 40
Descaling 40
Cleaning the detergent dispenser . . .40
Drain pump blocked .....41
Drainage hose on the siphon blocked 41 Filter in the water inlet hose blocked 42

Faults and what to do about them 42
Emergency release, e.g. if a power failure occurs ..... 42 Information on the display panel ... 43 Faults and what to do about them .. 43

Customer service ..... 46

Technical specifications ..... 46

Consumption values ..... 47

Intended use
■ This appliance is intended for private domestic use only. - Do not install or operate this appliance anywhere that is liable to experience frost and/or outdoor conditions. There is a risk that the appliance will be damaged if residual water in it freezes. If hoses freeze up, they may crack/burst. This appliance must only be used for washing domestic laundry, consisting of machine-washable items and hand-washable woollens (see label on item). Using the appliance for any other purpose is outside of the scope of its intended application and is forbidden. This appliance must only be used for drying and freshening up domestic laundry, consisting of items that have been washed with water and are suitable for tumble drying (see label on item). Using the appliance for any other purpose is outside of the scope of its intended application and is forbidden. ■ This appliance is suitable for operation with mains water and commercially available detergents and care products (must be suitable for use in washing machines). ■ This appliance is intended for use up to a maximum height of 4000 metres above sea level.
Before you switch on the appliance:
Check that there is no visible damage to the appliance. Do not operate the appliance if it is damaged. Should you have any problems, please contact your specialist dealer or our customer service.
Read and follow the operating and installation instructions and all other information provided with this appliance.
Retain the documents for subsequent use or for subsequent owners.

Safety instructions
The following safety information and warnings are provided to protect you from injury and to prevent material damage to your surroundings.
It is nevertheless important to take the necessary precautions and to proceed with care when installing, maintaining, cleaning and operating the appliance.
Children/people/pets

Warning
Risk of death!
Children and other people who are unable to assess the risks involved when using the appliance may injure themselves or may find themselves in life-threatening situations. Therefore please note:
■ The appliance may be used by children over the age of 8 years and by persons with reduced physical, sensory or mental capacity or by persons with a lack of experience or knowledge as long as they are supervised or have received instruction on how to use the appliance safely and they have understood the potential risks of using the appliance.
■ Children must not play with this appliance.
■ Do not allow children to clean or maintain this appliance unsupervised. - Keep children under 3 years and pets away from this appliance. ■ Do not leave the appliance unattended when children or other people who are unable to assess the risks are in the vicinity.

Warning
Risk of death!
Children may lock themselves inside appliances and find themselves in a life-threatening situation.
■ Do not position the appliance behind a door, as this may obstruct the appliance door or prevent it from opening completely. ■ Once an appliance has reached the end of its life, pull the mains plug from the socket before severing the mains cable, and then destroy the lock on the appliance door.

Warning
Risk of suffocation!
If allowed to play with the packaging/plastic film or packing components, children may become caught in these or pull them over their heads and suffocate. Keep packaging, plastic film and packing components away from children.
Warning
Risk of poisoning!
Detergents and care products may result in poisoning if consumed.
If accidentally swallowed, seek medical advice. Keep detergents and care products out of the reach of children.
Warning
Eye/skin irritation!
Contact with detergents or care products may cause eye/skin irritation.
Rinse eyes/skin thoroughly if they/it come(s) into contact with detergents or care products. Keep detergents and care products out of the reach of children.
Installation
Warning
Risk of electric shock/fire/material damage/damage to the appliance!
If the appliance is not installed properly, this may lead to a dangerous situation. Ensure the following:
■ The mains voltage on your power socket must match the rated voltage specified on the appliance (identification plate). The connected loads and the required fuse protection are specified on the identification plate.
■ The mains plug and the protective contact socket must match and the earthing system must be correctly installed. ■ The installation must have an adequate cross section. ■ The mains plug must be freely accessible at all times. If this is not possible, in order to comply with the relevant safety regulations, a switch (all pole disconnection) must be built into the permanent installation in accordance with electrical installation regulations. If using a residual current circuit breaker, only use one that bears the following mark: z. The presence of this mark is the only way to be sure that it fulfils all the applicable regulations.
Warning
Risk of electric shock/fire/material damage/damage to the appliance!
If the appliance's mains cable is altered or damaged, this may result in electric shock, short circuiting or fire due to overheating.
The mains cable must not be kinked, crushed or altered, and must not come into contact with any heat sources.
Warning
Risk of fire/material damage/ damage to the appliance!
The use of extension cords or power strips may result in fire due to overheating or short circuiting.
Connect the appliance directly to an earthed socket that has been correctly installed. Do not use extension cords, power strips or multi-way couplers.
Warning
Risk of injury/material damage/damage to the appliance!
■ The appliance may vibrate or move when in operation, potentially resulting in injury or material damage. Place the appliance on a clean, even, solid surface and, using a spirit level to guide you, level it with the screw-in feet.
If you take hold of any of the appliance's protruding parts (e.g. the appliance door) in order to lift or move it, these parts may break off and cause injury.
Do not take hold of any of the appliance's protruding parts in order to move the appliance.
Warning
Risk of injury!
■ The appliance is very heavy. Lifting it may result in injury. Do not lift the appliance on your own.
■ The appliance has sharp edges on which you could cut your hands. Do not take hold of the appliance by its sharp edges. Wear protective gloves to lift it.
If the hoses and mains cables are not correctly routed, they may constitute a tripping hazard, which may result in injury. Route hoses and cables such that they do not constitute a tripping hazard.
Caution!
Material damage/damage to the appliance
If the water pressure is too high or too low, the appliance may not be able to operate properly, and it may also result in material damage or damage to the appliance. Make sure that the water pressure in the water supply facility is at least 100 kPa (1 bar), and does not exceed 1000 kPa (10 bar).
If the water hoses are altered or damaged, this may result in material damage or damage to the appliance. The water hoses must not be kinked, crushed, altered or severed.
The use of hoses supplied by other brands to connect to the water supply may result in material damage or damage to the appliance. Use the hoses supplied with the appliance or genuine spare part hoses only.
The appliance is secured for transportation by transport locking devices. If the transport locking devices are not removed before the appliance is operated, this may result in damage to the appliance.
It is important to completely remove all transport locking devices before using the appliance for the first time. Make sure that you retain these transport locking devices separately. It is important to refit the transport locking devices if the appliance is to be transported, in order to prevent the appliance from being damaged in transit.
Operation
⚠ Warning Risk of explosions/fire!
Laundry that has come into contact with solvents, oil, wax, wax remover, paint, grease or stain remover may ignite when dried in the machine, or even cause the appliance to explode. Therefore please note:
Rinse the laundry thoroughly with warm water and detergent before drying it in the machine. Do not place laundry in this appliance to be dried if the laundry has not been washed first. Do not use the appliance if industrial chemicals have been used to clean the laundry.
⚠ Warning Risk of explosions/fire!
Laundry that has been pretreated with cleaning agents that contain solvents, e.g. stain remover/cleaning solvent, may cause an explosion in the drum. Rinse the laundry thoroughly with water before washing it in the machine.
Certain objects may ignite when drying is in progress, or even cause the appliance to catch fire or explode. Remove any lighters or matches from pockets on items of clothing.
If there is coal dust or flour in the air around the appliance, this may cause an explosion. Make sure that the area around the appliance is kept clean when it is in operation.
Warning
Risk of fire/material damage/damage to the appliance!
If a program is terminated before the drying cycle has finished, this prevents the laundry from cooling down sufficiently and may cause the laundry to ignite, or may result in material damage or damage to the appliance.
During the last part of the drying cycle, the laundry in the drum is not heated (cooling cycle). This is to ensure that it remains at a temperature at which it will not be damaged.
Do not switch off the appliance before the drying cycle has finished unless you remove all items of laundry from the drum immediately and spread them out (to dissipate the heat).
Warning
Risk of poisoning!
Poisonous fumes may be given off by cleaning agents that contain solvents, e.g. cleaning solvent. Do not use cleaning agents that contain solvents.
Warning
Risk of injury!
If you support your weight/sit on the appliance door when it is open, the appliance may tip over, which may result in injury.
Do not support your weight on the appliance door when it is open.
If you climb onto the appliance, the worktop may break, which may result in injury. Do not climb onto the appliance.
If you reach into the drum while it is still rotating, you risk injuring your hands. Wait until the drum has stopped rotating.
Warning
Risk of scalding!
When washing at high temperatures, there is a risk of scalding if you come into contact with hot detergent solution (e.g., when draining hot detergent solution into a washbasin). Do not reach into the hot detergent solution.
Warning
Eye/skin irritation!
Detergent and care products may spray out if the detergent drawer is opened while the appliance is in operation. Rinse eyes/skin thoroughly if they/it come(s) into contact with detergents or care products. If accidentally swallowed, seek medical advice.
Caution!
Material damage/damage to the appliance
If the amount of laundry in the appliance exceeds its maximum load capacity, it may not be able to operate properly, or this may result in material damage or damage to the appliance. Do not exceed the maximum load capacity of dry laundry. Make sure you comply with the maximum load capacities specified for each of the programs. → Page 32
Foam and foam rubber may deform or melt if dried in the appliance. Do not dry laundry items that contain foam or foam rubber in the appliance.
If you pour the wrong quantity of detergent or cleaning agent into the appliance, this may result in material damage or damage to the appliance. Use detergents/care products/cleaning agents and softeners in accordance with the manufacturers' instructions.
Cleaning/Maintenance
Warning
Risk of death!
The appliance is powered by electricity. There is a risk of electric shock if you come into contact with live components. Therefore please note:
Switch off the appliance. Disconnect the appliance from the power supply (pull out the plug). Never take hold of the mains plug with wet hands. When removing the mains plug from the socket, always take hold of the plug itself and never the mains cable, otherwise this may damage the mains cable. Do not make any technical modifications to the appliance or its features. Repairs and any other work on the appliance must only be conducted by our customer service or by an electrician. The same applies for replacing the mains cable (when necessary). Spare mains cables can be ordered from our customer service.
Warning
Risk of poisoning!
Poisonous fumes may be given off by cleaning agents that contain solvents, e.g. cleaning solvent.
Do not use cleaning agents that contain solvents.
Warning
Risk of electric shock/material damage/damage to the appliance!
If moisture penetrates the appliance, this may cause it to short circuit.
Do not use a pressure washer, steam cleaner, hose or spray gun to clean your appliance.
Warning
Risk of injury/material damage/damage to the appliance!
The use of spare parts and accessories supplied by other brands is dangerous and may result in injury, material damage or damage to the appliance. For safety reasons, use genuine spare parts and accessories only.
Caution!
Material damage/damage to the appliance
Cleaning agents and agents for pretreating laundry (e.g. stain removers, prewash sprays, etc.) may cause damage if they come into contact with the surfaces of the appliance.
Therefore please note:
■ Do not allow these agents to come into contact with the surfaces of the appliance. ■ Clean the appliance with nothing but water and a soft, damp cloth. ■ Remove any detergent, spray or other residues immediately.

Protection of the environment
Packaging/old appliance
Dispose of packaging in an environmentally friendly manner.
This appliance has been identified in accordance with the European Directive 2012/19/EU on Waste Electrical and Electronic Equipment (WEEE). The Directive specifies the framework for an EU-wide valid return and recycling of waste appliances.
Hints and tips
- Utilise the maximum amount of washing for the particular programme. Overview of programmes → Page 32 ■ Wash normally soiled laundry without prewash. ■ Energy saving mode: The display panel light goes out after several minutes, ▷ flashes. To reactivate the display, select any button. The energy-saving mode is not activated if a programme is running. ■ The selectable temperatures apply to the care labels on the textiles. The temperatures in the machine may deviate from this so that you get the optimum mix of energy-saving and washing results. If the laundry is then dried in the appliance, select the maximum possible spin speed. The less water the laundry contains, the less time and energy are required for drying. Do not dry dripping wet laundry.

Positioning and connecting
Included with the appliance
Note: Check the machine for transport damage. Never use a damaged machine. If you have any complaints, contact the dealer from whom you purchased the appliance or our customer services. → Page 46

1 Mains cable
2 Bag:
■ Installation and operating instructions ■ Customer services location directory* Warranty* ■ Cover caps for openings after the transport braces have been removed
3 Water supply hose on Aqua-Stop models
4 Water drain hose 5 Elbow for securing the water drain hose* 6 Water supply hose on standard/Aqua-Secure models * depending on the model
In addition, a hose clamp (24 - 40 mm diameter, available from specialist dealers) is required to connect the water drain hose to a siphon.
Useful tools
■ Spirit level for aligning ■ Spanner with: - WAF13 for loosening the transport braces, and - WAF17 for aligning the appliance feet
Safety instructions
Warning
Risk of injury!
■ The washer dryer is very heavy. Be careful when lifting/transporting the washer dryer. - When the washer dryer is lifted by its protruding parts (e.g. the washer dryer door), the components may break off and cause injuries. Do not lift the washer dryer by protruding parts. If the hose and mains cables are not routed properly, there is a risk of tripping and injury. Lay hoses and cables in such a way that there is no risk of tripping.
Caution!
Damage to the appliance
Frozen hoses may rip/burst. Do not install the washer dryer in areas exposed to frost or outdoors.
Caution!
Water damage
The connection points for the water supply hose and water drain hose are under high water pressure. To prevent leaks and water damage, you must follow the instructions in this section.
Notes
In addition to the safety information listed here, the local water and electricity supplier may have special requirements. ■ If in doubt, have the appliance connected by a specialist.
Installation surface
Note: The washer dryer must be stable so that it does not move around.
■ The installation surface must be firm and level. ■ Soft floors/floor coverings are not suitable.
Installing the appliance on a base or on a wooden joist ceiling
Caution!
Damage to the appliance
The washer dryer may wander during the spin cycle and topple or fall off its base.
Always secure the washer dryer feet with holding brackets.
Holding brackets: order no.
WMZ 2200, WX 975600, CZ 110600, Z 7080X0.
Note: If installing on a wooden joist ceiling:
■ If possible, install the washer dryer in a corner. ■ Screw water-resistant wooden board (min. 30 mm thick) to the floor.
Installing the appliance in a kitchenette
Warning
Danger of death!
There is a risk of electric shock if you touch live components.
Do not remove the appliance covering plate.
Notes
■ Recess width of 60 cm required. ■ Only install the washer dryer underneath a continuous worktop that is securely connected to adjacent cabinets.
Removing the transport locks
Caution!
Damage to the appliance
■ The machine is secured for transportation using transport locks. If the transport locks are not removed, the drum, for example, may become damaged when the machine is operated. Before using the appliance for the first time, make sure that you completely remove all four transport locks. Keep the locks in a safe place. ■ To prevent transport damage from occurring if the appliance is moved at a later date, you must refit the transport locks before transporting the appliance.
en Positioning and connecting
Note: Keep the screws and sleeves in a safe place.

- Take the hoses out of the holders.

- Unscrew and remove all four transportation securing bolts with a wrench (WAF 13). Remove the sleeves. Remove the mains cable from the holders.

- Insert the covers. Lock the covers firmly in place by applying pressure to the snap-in hooks.

Hose and cable lengths
Connection on left side
or Connection on right side

Note: If the hose holders are used, the possible hose lengths are reduced!
Available from dealer/customer service:
■ Extension for Aqua-Stop or cold water inlet hose (approx. 2.50 m). Order no. WMZ 2380, WZ 10130, CZ 11350, Z 7070X0. ■ Longer supply hose (approx. 2.20 m), for standard model.
Water inlet
Warning
Danger of death!
There is a risk of electric shock if you touch live components.
Do not immerse the Aqua-Stop safety valve in water (it contains an electric valve).
Notes
■ Only operate the washer dryer using cold mains water. - Do not connect the machine to the mixer tap of an unpressurised hot-water boiler. - Do not use a used supply hose. Only use the supply hose supplied or one that was purchased from an authorised specialist retailer. ■ Do not kink or squash the water supply hose. ■ Do not alter (shorten, cut through) the water supply hose (otherwise its strength is no longer guaranteed). ■ Only tighten the screw connections by hand. If the screw connections are tightened too much with a tool (pliers), the thread may become damaged.
Optimum water pressure in the supply network
At least 100 kPa (1 bar)
Maximum 1000 kPa (10 bar)
When the tap is open, the water flow rate is at least 8 l/min.
If the water pressure is higher than this, a pressure-reducing valve must be installed.
Connection
Connect the water supply hose to the tap (26.4 mm = 3/4") and to the appliance (not necessary for Aqua-Stop models as this is permanently installed):
■ Model: Standard
Note: Turn on the tap carefully, checking the leak tightness of the connection points. The screw connection is under mains water pressure.
Water outlet

Warning
Risk of scalding!
When you are washing at high temperatures, there is a risk of scalding if you come into contact with hot water (e.g. when draining hot water into a washbasin).
Do not reach into the hot water.
Caution!
Water damage
If the drain hose slips out of the washbasin or the connection point during draining due to high water pressure, any escaping water may cause water damage. Secure the drain hose so that it cannot slip out.
Caution!
Damage to the appliance/fabrics
If the end of the drain hose is immersed in the drained water, water may be sucked back into the appliance and may damage the appliance/fabrics. Make sure that:
■ The plug does not block drainage from the washbasin. ■ The end of the drain hose is not immersed in the drained water. ■ The water drains away quickly enough.
Note: Do not kink the water drain hose or put strain on it lengthways.
Connection
- Drainage into a washbasin

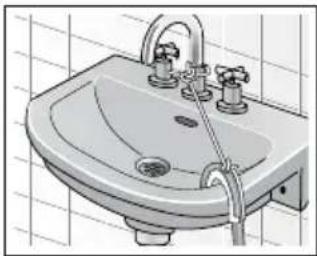
- Drainage into a siphon
The connection point must be secured using a hose clamp with a diameter of 24 - 40 mm (available from specialist dealers).

- Drainage into a plastic pipe with rubber bushing or into a drainage pit
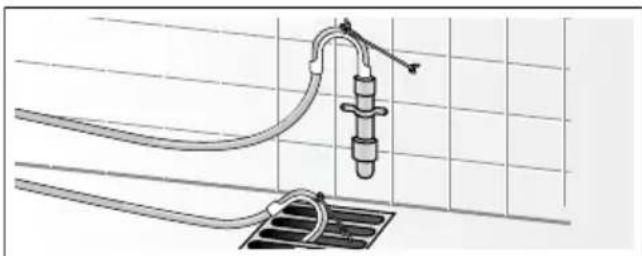
Alignment
- Loosen the lock nut in a clockwise direction with a wrench.
- Check the alignment of the washer dryer with a spirit level and, if required, correct. Adjust the height by rotating the appliance foot.
Note: All four appliance feet must be firmly on the floor.
The washer dryer must not wobble!
- Tighten the lock nut against the housing.
Grip the foot and do not adjust the height.

Notes
■ The lock nuts on all four appliance feet must be screwed tightly against the housing! - Any loud noises, intense vibrations or “wandering” may be due to incorrect alignment!
Electrical connection
Electrical safety
Warning
Risk of electric shock!
Risk of death if live parts are touched.
- When disconnecting the main plug, always pull the plug itself and not the cable, otherwise the cable could be damaged. ■ Never touch or hold the mains plug with wet hands. ■ Never pull out the mains plug during operation. ■ Only connect the washer dryer to an alternating current using a correctly installed earthed socket. ■ The mains voltage must be the same as the voltage specifications on the washer dryer (appliance rating plate). ■ The connected load and the required fuse are also indicated on the appliance rating plate.
Ensure that:
■ The mains plug and socket match. ■ The cable cross-section is adequate. ■ The earthing system has been installed correctly.
■ A damaged power cord is only replaced by an electrician. A replacement mains cable can be obtained from customer service.
■ You do not use multiple plugs/couplings or extension cables.
If a residual-current-operated circuit breaker is used, you use only a type which features this symbol: ☑. Only this symbol guarantees compliance with the currently valid regulations.
■ The mains plug is always accessible.
■ The power cord is not kinked, crushed, altered or severed and has not come into contact with any heat sources.
Before washing/drying for the first time
The washer dryer was inspected thoroughly before leaving the factory. To remove any residual test water, run the Drum Clean programme the first time without laundry.
Note:
■ The washer dryer must have been installed and connected properly. Installation and connection ■ Never switch on a damaged washer dryer. Inform your customer service.→ Page 46
- Insert mains plug.
- Turn the tap on.
- Switch on the appliance.
- Close the door. Do not load any laundry.
- Select the Drum Clean 40°C programme.
- Open the detergent drawer.
- Pour approx. 1 litre of water into dispenser II.
- Add standard detergent to dispenser II according to manufacturer's instructions for light soiling. Note: To prevent frothing, use only half the recommended amount of detergent. Do not use any woollens or mild detergents.
- Close the detergent drawer.
- Select Start/Reload ▷□□.
- When the programme ends, switch off the appliance.
Your washer dryer is now ready for use.
Transportation
Preparatory work
- Turn off the tap.
- Release the water pressure in the supply hose. Filter in the water inlet hose blocked → Page 42
- Drain any residual washing water. Drain pump blocked → Page 41
- Disconnect the washer dryer from the power supply.
- Remove the hoses.
Installing transportation protection devices:
- Remove the covers and keep in a safe place. If required, use a screwdriver.

- Insert all 4 sleeves. Clamp the mains cable on the holders. Insert and tighten the bolts.

Before switching on the appliance:
Notes
Always remove the transportation protection devices! To prevent unused detergent from flowing into the outlet during the next wash: Pour 1 litre of water into dispenser II and start the Spin/Drain programme.

The main points in brief
![graph LR A["Plug into the mains.<br>Turn the tap on."] --> B["Open the washer<br>dryer door."] B --> C["Select the washing/<br>drying programme"] C --> D["Max. load and/or<br>remaining time in<br>minutes"]](/content/2026/05/966768/images/7fba3dcf2ad39551dedcd920f9760d8d5126b99a903c4322657a31fa339773b9.jpg)

If required, change the programme default settings and/or select additional functions.
Sort the laundry. Load the laundry.

Open the detergent drawer.
Dose detergent according to the dosing recommendation. → Page 28

Close the washer dryer door.

Select Start/Reload
00.
![graph LR A["End"] --> B(( )) B --> C["?"] C --> D["水 tap symbol"]](/content/2026/05/966768/images/02241575abab42a3947737118e1e6d3a6d85a9d279f07200d6301eda091f44a4.jpg)
End of the programme.

Set programme selector to Off.

Open the door and remove the laundry.

Turn off the water tap (for models without Aqua-Stop), and disconnect the mains plug.

Getting to know your appliance
Washer dryer
1 Detergent drawer
2 Operating/display panel
3 Door with handle
3a Open the door
3b Close the door
4 Service flap
Control panel

Change the default settings for the selected programme and select additional functions:
1 Select a programme. Can be rotated in either direction. To switch off the washer dryer, set the programme selector to o Off. 2 Select buttons °C Temp. (Temperature), ⓞ rpm (Spin speed), ⏱ Finished in and ⚙ Dry for changing default settings. Select buttons ≡ SpeedPerfect/ Ⓗ EcoPerfect and 🌐 Aqua Plus for additional functions. 3 Display panel for information. 4 Start programme. Select the Start/Reload ▷ button to start, interrupt (e.g. reload laundry) and cancel the programme.
Display panel

| 1: Temperature for washing programme | *(cold) - 90° Temperature in °C | |
| 2: Programme information 1:50* | Programme duration after programme selection in h:min (hours:minutes) | |
| 1 - 24 h Finish in time in h (h=hour) | ||
| 7.0 kg* Max. load for selected programmes | ||
| 0 - 1500 Spin speed in revolutions per minute. If spin speed is selected as 0, all spinning processes will be cancelled and the water after final rinse cycle will be pumped out. | ||
| Programme status: End Programme end | ||
| 0:00 Wrinkle guard process is running → Page 31 | ||
| ---- End of programme with spin speed setting ---- | ||
| Further information: E : - -* Fault display | ||
| 0* Setting the signal→ Page 39 | ||
| 3: Programme progress symbols | Washing | |
| Rinsing | ||
| Draining/Spinning | ||
| Drying | ||
| Wrinkle guard | ||
| 4: Programme information and additional function symbols | ∞ lights up On if childproof lock has been activated → Page 30 | |
| ∞ flashes The childproof lock is activated, and if the pro-gramme selector has been adjusted or the buttons have been pressed | ||
| © lights up When the door is locked | ||
| © flashes When pressing the Start/Reload button to start the programme, the door is not closed properly. | ||
| © lights up Water pressure too low. This extends the programme duration | ||
| © flashes The tap has not been turned on or there is no water pressure | ||
| © On if too much foam detected, additional rinse cycle added on | ||
| © On if finish in time was selected | ||
| SpeedPerfect ≈ On if the desired additional function is | selected, see details → Page 38 | |
| EcoPerfect © | ||
| Aqua Plus 🌐 | ||
| Dry ⚙️ On if drying function is activated. | ||
| Start/Reload | ▷00 | On if the appliance is running; flashes if the appliance is ready or paused. |
| 5: Selectable drying mode and dry time | ‡ | Cupboard dry (Auto dry) |
| ※ | Extra Dry (Auto dry) | |
| 20 20 minutes machine cooling | ||
| 60, 120 | 60/120 minutes time dry | |
| * Depends on selected programmes/additional functions. | ||

Laundry
Preparing laundry for washing
Sorting laundry according to:
Sort your laundry according to the care instructions and specifications of the manufacturer on the care labels:
■ Type of fabric/fibre Colour
Note: Laundry can discolour or not be cleaned correctly. Wash white and coloured items separately. Wash new bright fabrics separately the first time you wash them.
Soiling
- light
do not prewash; if necessary select the ≡ Speed Perfect additional function.
- normal
Select programme with prewash. If required, pretreat stains.
- heavy
Load less washing. Select programme with prewash. If required, pretreat stains.
- Stains: Remove/pretreat stains while they are fresh. Firstly, dab with a soap water; do not rub. Then select the appropriate programme and wash the items. Stubborn or dried-in stains can sometimes only be removed by washing several times.
- Symbols on the care labels
Note: The numbers in the symbols indicate the maximum washing temperature that may be used.

Suitable for normal washing process; e.g. Cottons programme

A gentle washing process is required; e.g. Easy-Care programme

An especially gentle washing process is required; e.g. Delicates/Silk programme

Suitable for washing by hand; e.g. Wool programme

Do not machine wash.
Protecting your laundry and appliance
Caution!
Damage to the appliance/textiles
Foreign objects (e.g. coins, paper clips, needles, nails) may damage the washing or components of the appliance.
The following instructions must be observed when preparing your laundry:
■ Always follow the manufacturer's instructions when dosing all detergents, cleaning aids, care products and cleaning agents. - Do not exceed maximum load. Overfilling will impair the washing result. - Keep detergents and agents for the pretreatment of laundry (e.g. stain remover, prewash sprays, etc.) away from the surfaces of the appliance. Using a damp cloth, immediately remove any fine spray residue and other residue or droplets.
■ Empty any pockets. Remove any foreign objects.

■ Remove metal parts (paper clips, etc.). ■ Trousers, knitwear and knitted textiles, e.g. jersey garments, T-shirts or sweatshirts, should be turned inside out. ■ Ensure that underwired bras are appliance-washable. ■ Wash delicates in a net or bag (tights, underwired bras, etc). ■ Close zips, button up covers. ■ Brush sand out of pockets and collars. ■ Remove curtain fittings or include in the net/bag.
Preparing laundry for drying
Note: To ensure an even drying result, sort the laundry according to the:
■ Type of fabric ■ Drying programme ■ Care symbols which are indicated on the care labels.
Only dry laundry which is labelled "dryer-proof" or which has the following care symbols:
■ = Dry at normal temperature (Intensive Dry)
■ = Dry at low temperature (Gentle Dry)
The following textiles must not be dried:
■ = care symbol "Do not dry" ■ Wool or textiles containing wool. ■ Delicates (silk, synthetic curtains). ■ Textiles which contain foam rubber or similar materials.
■ Textiles which were treated with flammable liquids, e.g. with stain remover, petroleum ether, thinners. Risk of explosion!
■ Textiles which still contain hairspray or similar substances.
Notes
■ Before drying, hand-washed textiles must be spun at the appropriate spin speed. ■ Before drying, spin at the optimum speed. A spin speed of more than 1000 rpm is recommended for cotton, more than 800 rpm for easy-care textiles. - Do not iron washing immediately after drying. It is recommended to roll the washing up first to distribute residual moisture evenly. ■ To ensure a good drying performance, quilts, terry cloths and other large textiles should be dried separately. Do not dry more than 5 terry cloths (or 4 kg). ■ Do not exceed the maximum load.

Operating the appliance
Preparing the washer dryer
The washer dryer was tested before delivery. To remove residual water from the test procedure, the first wash cycle should be run without laundry using the Drum Clean programme.
Before washing/drying for the first time
Note:
■ Never switch on a damaged washer dryer! ■ Inform your customer service!→ Page 46
- Insert mains plug.
- Turn the tap on.
Due to the use of the water condensation technology for drying, please keep the connected water tap open during the drying process, otherwise proper drying cannot be guaranteed.

- Open the door.
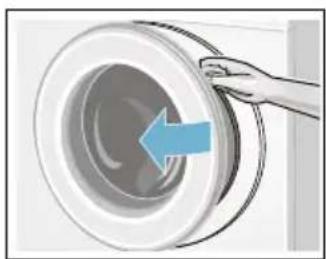

Selecting the programme/ Switching on the appliance
Note:
If you have activated the childproof lock, you must deactivate it before you can set a programme.
- Select the required programme with the programme selector. Can be rotated in either direction. The washer dryer is switched on.

The following figures are indicated continuously on the display panel for the selected programme:
■ the programme duration, ■ the preset temperature, ■ the maximum load (if the door is open), ...
Adjusting the washing programme
You can use the displayed default settings or adjust the selected programme optimally to the laundry items by changing the default settings or selecting additional functions. The selectable settings and additional functions depend on the selected washing/drying programme.
Overview of programmes→ Page 32
Notes
■ Options can be selected, deselected or changed depending on the progress of the programme. - The buttons are sensitive, they only need to be touched gently. If the button °C Temp., ⓞ rpm, Finished in is held down, the setting options are automatically scrolled through.
Changing default settings for a washing programme, e. g. washing temperature:
■ Touch the °C Temp. button to set desired washing temperature.

Changing the additional functions for a washing programme, e.g. select ≡ SpeedPerfect:
■ Touch the ≡ SpeedPerfect/ Ⓠ EcoPerfect button until the ≡ indicator light comes on.

Note:
After changing the programme default settings and/or additional functions, the programme duration may change.
Adjusting the drying programme
Note:
If an individual drying programme or washing and drying without interruption is selected, you can change the default settings for the drying programme if required.
Overview of programmes→ Page 32
Changing the default settings for a drying programme:
■ Touch the ⚙ Dry button to set the desired drying mode or drying time (only for an individual drying programme).
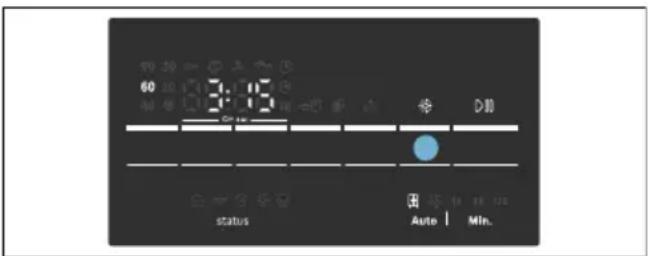
Note:
After changing the default settings for the drying programme, the programme duration may change.
Loading the laundry

Warning
Danger of death!
Laundry items pretreated with solvent-based detergents, e.g. stain remover/petroleum ether, may cause an explosion if loaded into the washer dryer.
Thoroughly rinse laundry items by hand before washing.
Notes
■ Mix large and small items. Laundry items of different sizes distribute themselves better during the spin cycle. Individual laundry items may cause an unbalanced load. - Observe the indicated maximum load. Overfilling adversely affects the washing result and promotes creasing.
- Unfold presorted laundry items and place in the drum.
- Ensure that no laundry items are trapped between the door and rubber seal.


3. Close the door.
Note: The indicator light on the Start/Reload button flashes and the default settings for the programme appear continuously on the display panel. Changes may be made to the default settings.
Dosing and adding detergent and care product
Caution!
Damage to the appliance
Detergents and agents for the pretreatment of laundry (e.g. stain remover, prewash sprays, etc.) may damage the surfaces of the washer dryer.
Keep these agents away from the surfaces of the washer dryer. Using a damp cloth, immediately remove any fine spray residue and other residue/droplets.
Dosing
Dose the detergents and care products according to:
■ water hardness (ask your water supply company), - the manufacturer's specifications on the packaging, ■ the amount of laundry, ■ soiling.
Filling the dispensers
- Pull out the detergent drawer.

Warning
Eye / skin irritation!
If the detergent drawer is opened while the appliance is running, detergent/care product may run out. Carefully open the drawer. If detergent/care product comes into contact with eyes or skin, rinse thoroughly. If accidentally swallowed, seek medical advice.
- Pour in detergent and/or cleaning product.
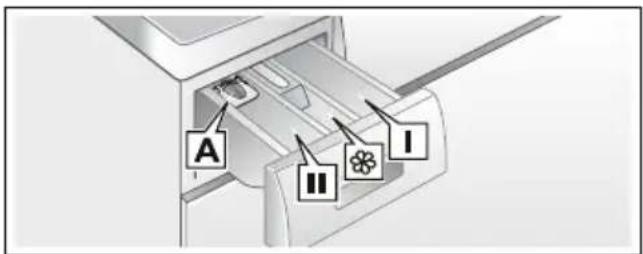
Dispenser I Detergent for prewash.
Dispenser ✿ Softener, starch. Do not exceed the maximum load.
Dispenser II Detergent for main wash, water softener, bleach, stain remover.
Dispenser A* For dosing liquid detergent.
*depending on the model
Notes
■ Always follow the manufacturer's instructions when dosing all detergents, cleaning aids, care products and cleaning agents. - Dilute viscous fabric softener and fabric conditioner with water. This will prevent blockages. ■ Be careful when opening the detergent drawer while the appliance is running. If an individual drying programme is selected, please do not add detergent and/or care product in the appliance.
Measuring aid* for liquid detergent
*depending on the model
Position the measuring aid for measuring the correct amount of liquid detergent:
- Pull out the detergent drawer. Press down the insert and fully remove the drawer.
- Slide the measuring aid forwards, fold it down and click it into place.
- Reinsert the drawer.

Note: Do not use the measuring aid for gel detergents and washing powder, or for programmes with prewash or when "Finish in" time is selected.
For models without a measuring aid, pour the liquid detergent into the appropriate dispenser and place it in the drum.
Starting the programme
Touch the Start/Reload button. The indicator lamp is lit and the programme starts.
Note: If you want to secure the programme to prevent it from being adjusted inadvertently, select the childproof lock.
The display panel shows the Finished in time while the programme is running or the programme duration and the programme progress symbols when the washing programme has started.
Display panel→ Page 22
Childproof lock
You can secure the washer dryer to prevent the set functions from being changed inadvertently. To do this, activate the childproof lock when the programme has started.
Activating/deactivating: Touch and hold the buttons Ⓤ rpm and ⏱ Finished in for approx. 3 seconds. The symbol ∞ is indicated in the display. If the button signal is activated, an acoustic signal sounds.
- lights up: The childproof lock is activated. ■ ⇌ flashes: The childproof lock is active and the programme selector has been adjusted. To prevent the ≈ symbol from flashing, reset the programme selector to the initial programme. The symbol lights up again.
Note:
The childproof lock may remain activated until the next programme starts, even after the washer dryer has been switched off. If this is the case, deactivate the childproof lock before the programme starts and, if required, reactivate after the programme starts.
Reloading the laundry
When the programme has started, the laundry can be reloaded or taken out as required.
Touch the Start/Reload ▷□ button. The washer dryer checks whether reloading is possible.
Notes
If there is a high water level, high temperature or if the drum is rotating, the door remains locked for safety reasons and reloading is not possible. If the following is indicated on the display panel: © is lit → Reloading is not possible. To continue the programme, select the Start/Reload ▷ button. - Do not open the door until the door lock symbol Ⓐ goes out. - Do not leave door open for a prolonged period – water could run out of the laundry. ■ The reloading function cannot be activated during the drying phase.
Changing the programme
If you have started the wrong programme by mistake, you can change the programme as follows:
- Select Start/Reload ▷□□.
- Select another programme. If required, adjust the default settings and/or select additional functions.
- Select Start/Reload ▷□□. The new programme starts from the beginning.
Interrupting or ending the programme
For washing programmes at high temperature:
- Touch the ▷□□ button.
- To cool down laundry: Select Rinse.
- Touch the ▷□□ button.
For washing programmes at low temperature:
- Touch the ▷□□ button.
- Select Spin/Drain.
- Touch the ▷□□ button.
For drying programmes:
- Select Intensive Dry or Gentle Dry.
- Touch button ✅ Dry and set drying time to 20 minutes.
- Touch the ▷□□ button.
End of the programme
End or ---- (Rinse stop = without final drain/spin cycle) is indicated in the display and an acoustic signal sounds.
Setting the signal
If ---- (Rinse stop = without final drain/spin cycle) was selected, press
Start/Reload button to start the final drain/spin cycle.
Notes
■ The programme continues by pumping out the water and spinning the laundry (the standard spin speed can be changed beforehand).
If only the water is to be pumped out, approx. 1 minute after the programme starts, touch the Start/Reload button before the spin cycle starts. The programme is interrupted and the door lock is released. The laundry can be removed.
If Hot flashes in the display before the drying programme ends, the temperature in the drum is high. The programme for cooling the drum runs until the temperature in the drum has dropped.
■ Wrinkle guard process starts after drying process is finished to prevent laundry getting wrinkled if you do not take laundry out in time. The process lasts about 30 minutes. 0:00 will be displayed in time display and 😊 symbol will be displayed as the status symbol. You can press any button or rotate the programme selector to another position to terminate this process, then the door will be released and laundry can be taken out.
After washing/drying
- Open the door and remove the laundry.
- Turn the programme selector to o Off. The appliance is switched off.
- Turn off the tap. Not required for Aqua-Stop models.

Notes
- Do not leave any items of laundry in the drum. In the next wash they may shrink or discolour another item. ■ Remove any foreign objects from the drum and the rubber seal – risk of rust.
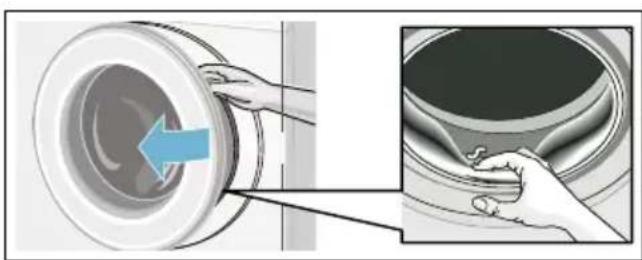
■ Leave the detergent drawer and door open so that residual water can evaporate. ■ Always remove the laundry. ■ Always wait until the programme ends, as the appliance could still be locked. Then switch the appliance on and wait for the unlocking device. - When the display panel has gone out at the end of the programme, energy-saving mode is active. To activate the display again, select any button.

Overview of programmes
Programme on the programme selector
| Programme/Type of washing Options/Information | |
| Name of the programmeBrief explanation of the programme and which textiles it is suitable for. | maximum load according to EN50229maximum load for washing/maximum load for dryingselectable temperature in °Cselectable spin speeds in rpmpossible additional functions for washingpossible settings for drying |
| CottonsStandard washing program for hard-wearing textiles made of cotton or linen.Note:* Reduced load for =additional functions. | max. 7.0(5.0)* kg/4.0 kg*(cold) - 90 °C----, 400 - 1500 rpm=U, @, UH, * |
| + PrewashEnergy-intensive program for heavily soiled hard-wearing textiles made of cotton or linen.Note:* Reduced load for =additional functions. | max. 7.0(5.0)* kg/4.0 kg*(cold) - 90 °C----, 400 - 1500 rpm=U, @, UH, * |
| Easy-CareTextiles made of synthetic materials or blended fabrics. | max. 4.0 kg/2.5 kg*(cold) - 60 °C----, 400 - 1200 rpm=U, @, UH, * |
| Mixed LoadMixed load consisting of textiles made of cotton and synthetics. | max. 4.0 kg/2.5 kg*(cold) - 40 °C----, 0 - 1500 rpm=U, @, UH, * |
| Allergy+ | max. 6.5(5.0)* kg/4.0 kg |
| Hardwearing textiles made of cotton or linen. | *(cold) - 60 °C |
| Notes | |
| ■ Especially suitable for increased hygienic demands or particularly sensitive skin on account of prolonged washing at a defined temperature, with a higher water level and longer rinsing cycle. | - - - -, 400 - 1500 rpm |
| =U, @, ↑ | |
| H, ⬆ | |
| ■ * Reduced load for =U additional functions. | |
| Hygiene Care | max. 4.0 kg/4.0 kg |
| An innovative program, pretreat dry laundry by hot air (up to 70°C) to for increased hygienic demands, followed by a low temperature washing cycle. Achieves both hygiene effect and fabric care. Suitable for most non-delicate textile. | *(cold) - 30 °C |
| - - - -, 0 - 1500 rpm | |
| =U, @, ↑ | |
| H, ⬆ | |
| Down | max. 1.5 kg/1.0 kg |
| Machine-washable fabrics that are filled with down. | *(cold) - 60 °C |
| Notes | |
| ■ Wash large items separately. | - - - -, 0 - 1200 rpm |
| ■ Use special down washing detergent. | =U, @, ↑ |
| H, ⬆ | |
| Rinse | - /max. 4.0 kg |
| Washable textiles, Extra rinse with spin. | - |
| - - - -, 0 - 1500 rpm | |
| ↑ | |
| H | |
| Spin/Drain | - /max. 4.0 kg |
| Single spinning program with selectable spin speed. | - |
| To select the Drain programme, set the spin speed to 0. | 0 - 1500 rpm |
| - | |
| H | |
| Super Rapid 15'/Wash&Dry 60' | max. 2.0 kg/1.0 kg |
| For small amount (≤1kg) lightly soiled garments made of cotton, linen, synthetic or blended fabrics. Approx. 15 mins for washing. If drying function is selected, it's followed by another approx. 45 mins drying process. | *(cold) - 40 °C |
| - - - -, 0 - 1200 rpm | |
| - | |
| H | |
| [32Y4] Wool | max. 2.0 kg/- |
| Hand and machine-washable fabrics made of wool or wool blend; particularly gentle wash programme to prevent shrinkage of laundry, with longer programme breaks (soaking garments in the detergent solution). | *(cold) - 40 °C |
| - - - -, 0 - 800 rpm | |
| Note:■ Wool is of animal origin, e.g.: Angora, alpaca, llama, sheep.■ Use a detergent suitable for machine washable wool. | - |
| Delicate/Silk | max. 2.0 kg/- |
| For delicate, washable textiles, e.g.made of silk, satin, synthetic fibres or blended fabrics. | *(cold) - 40 °C |
| - - - -, 0 - 800 rpm | |
| Note:Use a detergent suitable for machine washable delicate fabrics or silk. | ≡, ⚫, ⚫ |
| - | |
| Drum Clean | max. 0.0 kg/- |
| Special program for drum hygiene or fluff removal:90 °C = antibacterial program, do not use detergent.40 °C = antibacterial program; special drum cleaning detergent can be used.※ (cold)= rinsing programme for the removal of fluff which has collected in the washer drum during the drying phase. | *(cold), 40, 90 °C |
| 1200 rpm | |
| - | |
| - | |
| Gentle Dry | - /max. 2.5 kg |
| Single gentle dry programme for drying garments with lower temperature,- by selecting ☐ to achieve automatic cupboard dry result,- by selecting ※ to achieve automatic extra dry result,- self-defined drying time selectable from 20, 60 to 120 mins. | - |
| - | |
| - | |
| ☐, ⚫, Time dry** | |
| Note:** 20 min drying time is for cooling down the laundry and machine after drying process. | |
| Intensive Dry | - /max. 4.0 kg |
| Single normal dry program for drying garments with higher temperature,- by selecting ☐ to achieve automatic cupboard dry result,- by selecting ※ to achieve automatic extra dry result,- self-defined drying time selectable from 20, 60 to 120 mins. | - |
| - | |
| - | |
| ☐, ⚫, Time dry** | |
| Note:** 20 min drying time is for cooling down the laundry and machine after drying process. | |
Note:
Delicate/Silk
Note:
Drum Clean
Gentle Dry
Note:
Intensive Dry
Note:
Drying table
| Estimated drying time (min) | |||
| Load type Recommended | drying pro-gramme | Drying load (kg) | Cupboard dry ➕ Extra dry ➕ |
| Cottons/coloureds (color fast tex-tiles made of cotton or linen such as underwear, T-shirts, pullover,kitchen towels, terry cloths, bed sheets, table cloths, work clothes,bath towels) | Intensive dry 0.5 - 2.0 40 - 90 60 - 100 | ||
| Easy-care (textiles made of syn-thetic materials or blended fabrics such as shirts, sportswear) | Gentle Dry 0.5 - 1.5 35 - 75 40 - 120 | ||
| Drying pro-gramme | Drying load (kg) | Adjustable drying time (min) | |
| Time Dry ~1.0 60 | |||
| i The times are approximate and refer to a normal load, standard spin programme and room tempera-ture. | |||
| i The maximum selectable drying time is 120 min. If the laundry weighs more than 2.5 kg, select auto-matic drying. This function is recommended to ensure good drying results and save energy. The 20-min-ute drying programme is used to cool the laundry. | |||
| i To get evenly dried result, separate thick layered fabric from lightweight ones. For example, separate terry cloth from shirts. | |||
| i Extra dry ➕ is recommended for terry cloth and other large or thick layered textiles. | |||
| i Reduce the maximum load mass for terry cloth to 4kg for throughout drying. | |||
| i Wool must not be dried in the washer dryer. | |||
| i To receive less wrinkled drying result, load less laundry. | |||
Starching
Note: The laundry should not be treated with fabric softener.
Liquid starch can be used in all wash programmes. Pour starch into the dispenser ⚙ according to manufacturer's specifications (if required, clean beforehand).
Dyeing/Bleaching
Dye in household quantities only. Salt may attack stainless steel! Observe specifications of the dye manufacturer! Do not bleach laundry in the washer dryer!
Soaking
- Pour soaking agent/detergent into dispenser II according to the manufacturer's instructions.
- Set the programme selector to Cottons 60°C and select Start/Reload.
- After approximately 10 minutes select Start/Reload to pause the programme.
- After the required soaking time, reselect Start/Reload if the programme is to be continued or change the programme.
Note: Load laundry of the same colour. No additional detergent is required, the soaking solution is used for washing.

Changing programme default settings
You can change the default settings for selected programmes. The settings can be changed even while the selected programme is running. The effects depend on the progress of the programme.

°C Temp.
☐1: The indicated washing temperature can be changed. The maximum selectable washing temperature varies depending on the selected programme.
Overview of programmes → Page 32
rpm
2: The spin speed can be changed before and during the programme (in rpm, revolutions per minute) depending on the progress of the programme.
Setting ---- (Rinse stop = without final drain/spin cycle), laundry remains in the water after the last rinse cycle.
Setting 0 (Without any spin cycle), drain the rinsing water only, no spin cycle.
The maximum spin speed depends on the programme and model.
Overview of programmes→ Page 32
Finished in
3: Define the Finish in time (end of programme).
Note: The respective programme duration is displayed by selecting the programme. The programme duration is automatically adjusted while the programme is running if the programme duration needs to be changed, e.g. due to changes in the programme default settings.
Before the programme starts, the end of the programme can be preselected in hourly increments up to a maximum of 24h.
When the programme has started, the preselected time is displayed e.g. 8h and counts down until the programme starts. Then the programme duration is displayed, e.g. 2:30.
When the programme has started, the preselected time can be changed as follows:
- Touch the Start/Reload button.
- Touch the Ⓛ Finished in button and change the Finish in time.
- Touch the Start/Reload button.

Dry
4: The drying function can be activated, deactivated and set with this button. Washing and drying without interruption is possible in automatic mode only. If the programme for individual drying is selected, automatic drying or timed drying with a required drying duration is available.
Notes
■ Programme selection in Intensive Dry or Gentle Dry position to select an individual drying programme.
Overview of programmes
→ Page 32
The standard drying mode is ☐. In this mode the drying time is automatically set according to the amount of laundry to be dried. The result is cupboard-dry laundry.
Drying mode can be set to ✝ in order to obtain an extra dry result; or preselect the drying time which can be specified by selecting the ✝ Dry button.
Cupboard dry (☐): For single-layer fabrics. Garments can be folded or hung up in a cupboard.
Extra dry (※): For fabrics made of thick, multilayered items of clothing, which need to be dried longer.
Garments can be folded or hung up in a cupboard. Laundry more dry than Cupboard dry.
■ Programme selection in washing programmes and if washing and drying is required without interruption (for Optional drying programmes):
- Touch button 🙏 Dry and activate the function ⊕ or ⚙️.
- Do not exceed the maximum loads for drying.
Overview of programmes
→ Page 32
- Maximum spin speed for the washing programme will be selected automatically to obtain a good drying result.
P+ Selecting additional functions
You can select your desired additional functions by touching the respective buttons.

SpeedPerfect
☐1: For a shorter wash time with a comparable washing result to the standard programme.
Note: Do not exceed maximum load. Overview of programmes→ Page 32
EcoPerfect
☐2: Energy-optimised washing by reducing the temperature while achieving a consistent washing result.
Note: The washing temperature is lower than the selected temperature. For special hygiene requirements, the Allergy+ programme is recommended.
Water Plus
3: Increased water level and extended wash time. For areas with very soft water or for further enhancing the washing result.

Setting the signal
Setting signal volume
- Activate setting mode for signal volume
![graph LR A["Signal Input"] --> B["Adder"] B --> C["Amplifier"] C --> D["Video Control"] D --> E["Output Stage"]](/content/2026/05/966768/images/fd3858a1a4e9e75f20a59b0ea882a68957966860f6d77d369344ca412968ec78.jpg)
Turn to Off
1 step clockwise
Touch and hold
1 step clockwise
Release
- a) Set volume for information signals

![graph TD A["Monitor Icon"] --> B((Signal Wave)) B --> C((Circular Dial)](/content/2026/05/966768/images/ad58640a7501683308eb894e2f7cc73d087afadbb9b27141b46e783ff778e73d.jpg)
Touch the Finished button and set volume
Set to Off, setting mode for signal volume is left
- b) Selecting volume of the button signals
![graph LR A["Input Data"] --> B["Processing Unit"] B --> C["Output Processing Unit"] style A fill:#f9f,stroke:#333 style B fill:#ccf,stroke:#333 style C fill:#cfc,stroke:#333](/content/2026/05/966768/images/0f3fe611f6d6791336cee6108cd85cca0e80d9f1cc33a2ca9c2857da72738192.jpg)
1 step clockwise, touch the Finished button and set volume
Set to Off, setting mode for signal volume is left

Cleaning and maintenance
Warning
Risk of electric shock!
Danger of death if live parts are touched.
Switch off the appliance and disconnect at the mains plug.
Warning
Risk of poisoning!
Solvent-based cleaning agents, e.g. petroleum ether, in the washer dryer may cause toxic vapours.
Do not use solvent-based cleaning agents.
Caution!
Damage to the appliance
Solvent-based cleaning agents, e.g. petroleum ether, may damage the surfaces and components of the washer dryer.
Do not use solvent-based cleaning agents.
Appliance housing/control panel
■ Remove the detergent residue immediately. ■ Wipe the housing and the control panel with a soft, damp cloth. - Do not use abrasive cloths, sponges or detergents (stainless steel cleaner). - Do not clean the appliance with a water jet.
Drum
Use chlorine-free cleaning agents, do not use steel wool.
Descaling
Not required if detergent dosed correctly. However, if this does occur, follow the instructions of the descaling agent manufacturer. Suitable descalers can be purchased on our website or from customer service. → Page 46
Cleaning the detergent dispenser
If it contains detergent or fabric softener residue:
- Pull out the detergent drawer. Depress the insert and remove the drawer completely.
- Take out insert: using your finger, press insert upwards.

- Clean the detergent dispenser and insert with water and a brush and dry.
- Attach the insert and lock into position (push the cylinder onto the guide pin).
- Insert detergent drawer.
Note: Leave the detergent drawer open so that residual water can evaporate.
Drain pump blocked
Warning
Risk of scalding!
When you wash at high temperatures, the water gets very hot. If you come into contact with the hot water, you may be scalded.
Allow the water to cool down.
- Turn off the tap so that no more water can flow in and has to be drained via the drain pump.
- Switch off the appliance. Pull out the mains plug.
- Open and remove the service flap.


- Take the drain hose out of the retainer.
Remove the sealing cap and pour the water out into a suitable container.
Replace the sealing cap and place the drain hose back in the retainer.

- Carefully unscrew the pump cover; residual water may leak out.
Clean the interior, pump-cover thread and pump housing. The impeller in the drain pump must be able to rotate.
Refit the pump cover and screw it on tightly. The handle must be in a vertical position.


- Place the service flap back on, lock it into place, and close it.


Note: To prevent unused detergent from flowing into the outlet during the next wash: Pour 1 litre of water into dispenser II and start the Spin/Drain programme (if only a drained cycle is required, set the spin speed to 0).
Drainage hose on the siphon blocked
- Turn the programme selector to Off. Pull out the mains plug.
- Loosen the hose clip, carefully remove the drainage hose. Residual water may run out.
- Clean the drainage hose and siphon spigot.

- Re-attach the drainage hose and secure the connection point with the hose clip.
Filter in the water inlet hose blocked

Warning
Danger of death!
Do not immerse the Aqua-Stop safety device in water (it contains an electric valve).
First, reduce the water pressure in the supply hose:
- Turn off the tap.
- Select any programme (except Spin/Drain).
- Select Start/Reload. Allow the programme to run for approx. 40 seconds.
- Turn the programme selector to Off. Pull out the mains plug.
- Clean the filter on the tap: Disconnect the hose from the water tap. Clean the filter with a small brush.

- Clean the filter on the back of the appliance:
Remove the hose from the rear of the appliance.
Take out the filter with pliers and clean it.


- Connect the hose and check for leaks.

Faults and what to do about them
Emergency release, e.g. if a power failure occurs
e.g. in the event of a power cut
The programme will continue running when the power supply has been restored.
However, if the laundry has to be removed, the washer dryer door can be opened as follows:

Warning
Risk of scalding!
When you are washing at high temperatures, there is a risk of scalding if you come into contact with detergent solution and laundry. If possible, leave it to cool down.

Warning
Risk of injury!
You may injure your hands if you reach into the drum while it is turning. Do not reach into the drum when it is turning. Wait until the drum has stopped turning.
Caution!
Water damage
Any escaping water may cause water damage. Do not open the washer dryer door if water can be seen through the glass.
- Switch off the appliance. Disconnect the mains plug.
- Drain the detergent solution.
- Pull the emergency release downwards with a tool and release. The washer dryer door can then be opened.

Information on the display panel
| Information Cause/Remedy | |
| ■ Flashes fast + signal: The door was opened and the water level is too high. Close the door, continue the programme with ▷Start/Reload button or select Drain programme.■ Flashes slowly: The door lock temperature is too high to open the door. Wait approx. 30 seconds until the door lock cools down. | |
| Hot The door cannot be opened after the drying programme due to the high temperature. The cooling process continues until the display disappears, after which the door can be opened. | |
| ■ Flashes (no water supply): Tap turned on? Water inlet filter blocked? Clean the water inlet filter. → Page 42Water hose kinked or blocked?■ Lights up (low water pressure): For information only. This will not affect the programme progress. The programme duration is extended. | |
| E:18 Drain pump blocked; clean the drain pump. Clean the drainage hose on the siphon. | |
| E:32 | Alternating display with End when programme is finished: unbalance problem, spinning phase is aborted. |
| E:95 | Alternating display with End when programme is finished: no water detected in drying phase, may get bad drying result. |
| Other displays | Turn the programme selector to o Off. The appliance is switched off. Wait 5 s and switch on again. If the display is indicated again, call customer service. |
Faults and what to do about them
| Faults Cause/Remedy | |
| Water is running out. ■ Correctly attach/replace drainage hose.■ Tighten screw-fitting on the supply hose. | |
| Water not flowing in. Detergent not dispensed. | ▶ Start/Reload not selected?■ Tap not open?■ Filter blocked? Clean the filter→ Page 42■ Supply hose kinked or jammed? |
| The washer dryer door cannot be opened. | Safety function active.Note: For safety reasons, the washing machine door remains locked when the water level or temperature is high (See → Cancel the programme → Page 30) or while the drum is rotating.■ - - - - (Rinse stop = without final drain/spin) selected?■ Can be opened with emergency lock release only? → Page 42■ Childproof lock active? Deactivate. → Page 30 |
| Programme does not start. | ▶ Start/Reload or Finished in selected?■ Door closed?■ Childproof lock active? Deactivate. → Page 30 |
| Detergent solution is not drained. | ■ - - - - (Rinse stop = without final drain/spin) selected?■ Clean the drain pump. → Page 41■ Clean outlet pipe and/or drainage hose. |
| Water not visible in the drum. | Not a fault - water below the visible area. |
| Spin result not satisfactory.Laundry wet/too damp. | ■ Not a fault - unbalance detection system has stopped the spin cycle, washing unevenly distributed. Distribute small and large items of laundry in the drum.■ Too low speed selected? |
| Spin cycle activated several times. | Not a fault - unbalanced load detection system adjusts imbalance. |
| Residual water in the dispenser for care product. | ■ Not a fault - effect of the care product not impaired.■ If required, remove the insert. Clean the detergent drawer and re-insert it. |
| Compartment ✉ is not rinsed out completely. | Remove the insert. Clean the detergent drawer and reinsert it. |
| Odour formation in the washer dryer. | ■ Run the Drum Clean 90°C programme without laundry and detergent.■ Use appropriate detergent for daily washing.■ keep the door and detergent dispenser open after using. |
| Status display 🔊 is on.Foam may come out of the detergent drawer. | Too much detergent used?■ Mix 1 tablespoon of fabric softener with 1⁄2 litre of water and pour into dispenser II. (Not for outdoor, sports and down-filled textiles!)■ Reduce detergent dosage for the next wash cycle.■ Use commercially available low foam detergent and care products which are suitable for washer dryers. |
| Excessive noise, vibrations and “wandering” during the spin cycle. | ■ Appliance aligned? Align the appliance.■ Appliance feet fixed? Secure appliance feet.■ Transportation bolts are removed? Removing the transportation bolts.→ Page 13 |
| Display panel/indicator lights do not function while the appliance is running. | ■ Power failure?■ Fuse tripped? Switch on/replace fuse.■ If the fault occurs repeatedly, call customer service. → Page 46 |
| The programme duration changes during the wash cycle. | ■ Not a fault - unbalanced load detection system adjusts imbalance.■ Not a fault - foam detection function active. Additional rinse cycle. |
| Detergent residue on the laundry. | ■ Occasionally phosphate-free detergents contain water-insoluble residue.■ Select Rinse or brush items when the laundry is dry. |
| Spin noise during the drying phase. | This is an innovative process known as thermal spinning used to reduce energy consumption during the drying phase. |
| Fluff found on the washed laundry. | Run the Drum Clean ✉ (cold) programme without laundry and detergent to remove fluff which have accumulated inside the drum during the previous drying cycle. |
| Water inlet noise during the drying phase. | The washer dryer uses water condensation technology, water is constantly needed to dry the laundry. Therefore the tap must be on all the time, till the end of drying phase. |
| Drying duration extended. | ■ Run the Drum Clean (cold) programme to remove fluff which has collected in the washer drum during the drying phase. |
| Drying programme does not start. | ■ Drying programme not selected? Overview of programmes → Page 32■ Door not closed properly? |
| The drying result is not satisfactory (laundry is not dry enough). | ■ Excessively high ambient temperature (above 30 °C) or inadequate ventilation in the room in which the washer dryer is situated.■ The laundry has not been spun well enough before drying. Always set the highest selectable spin speed for the particular washing programme.■ Washer dryer overloaded: Observe the recommendations for the maximum load in the programme table and on the load display. Do not overload the washer dryer, as the maximum load for the drying phase is less than the maximum load for the wash cycle. Unload the washer dryer after washing with the maximum load and divide the laundry into two drying cycles.■ The power supply voltage is too low (below 200 V) – provide a suitable power supply.■ The water pressure is low. According to water condensing principle, low water pressure will cause evaporated steam not condensed totally.■ The tap is closed during drying. Due to the use of the water condensation technology for drying, please keep the connected water tap open during the drying process, otherwise proper drying cannot be guaranteed.■ Thick multilayered textiles or textiles with thick fillings dry easily on the surface, but not inside. This equalisation process may take longer. For these types of textiles, select drying mode (Extra dry), or select additional time drying via Intensive Dry or Gentle Dry programmes. |
If a fault cannot be rectified (switching the machine on and off) or a repair is required: - Set the programme selector to o Off and pull out the mains plug. ■ Turn off the tap and call customer service. → Page 46

Customer service
If you cannot correct the fault yourself, see section, Faults and what to do about them → Page 43
Please contact our customer service. We will always find a suitable solution and aim to avoid unnecessary visits by technicians
Please give customer service the product number (E-Nr.) and the production number (FD) of the appliance.
E-Nr. FD
Product number Production number
You can find this information on: the inside of the door */opened service flap * and the back of the appliance.
*depending on model
Rely on the competence of the manufacturer.
Contact us. You can therefore be sure that the repair is carried out by trained service technicians who carry original spare parts.

Technical specifications
Dimensions:
850 x 600 x 590 mm
(height x width x depth)
Weight:
80 kg
Mains connection:
Nominal voltage 220 - 240 V/50 Hz
Minimum installation protection (≡) 10 A
Nominal power 1900 - 2300 W
Water pressure:
100 - 1000 kPa (1 - 10 bar)
Drain height:
60 - 100 cm
Power consumption when switched off:
0.12 W
Power consumption when switched on:
0.48 W
Consumption values
| Programme Option Load | (kg) | Energy consumption * (kWh) | Water Consumption * (liter) | Programme duration * (hours) |
| Cottons 20 °C 7,0 0,30 77 3 | ||||
| Cottons 40 °C 7,0 1,08 77 3 | ||||
| Cottons 60 °C 7,0 1,38 77 3 1⁄4 | ||||
| Cottons 90 °C 7,0 2,35 87 3 | ||||
| Easy-Care 40 °C 4,00 0,76 65 2 | ||||
| Mixed Load 40 °C 4,00 0,62 46 1 1⁄4 | ||||
| Delicates/Silk 30 °C 2,00 0,16 36 | 3⁄4 | |||
| Wool 30 °C | 2,00 0,20 40 | 3⁄4 | ||
| Intensive Dry | 4,00 2,50 21 3 | |||
| Gentle Dry | 2,50 1,49 25 2 | |||
| Cottons 60 °C ** EcoPerfect | 7,0 | 0,73 | 58 | 5 1⁄2 |
| Cottons 60 °C + EcoPerfect | 7,0/4,0 | 4,76 | 103 | 11 |
| Intensive Dry *** | ||||
Values determined according to the valid version of EN50229.
* Observed values may deviate from the indicated values due to influence of water pressure, hardness and inlet temperature, ambient temperature, type, amount and soiling of laundry, detergent used, fluctuations in power supply and selected additional functions.
** EU energy label performance tests according to the valid version of EN50229 and Directive 96/60/EC for washing with max. load, cold water (15°C) and maximum spin speed.
*** EU energy label performance tests according to the valid version of EN50229 and Directive 96/60/EC for washing and drying, maximum washing load is divided into 2 parts for 2 drying cycles. Each drying load is dried by using Intensive Dry + Cupboard dry (default) option.
Repair order and advice in the event of faults
GB 0344 892 8989 Calls charged at local or mobile rate.
IE 01450 2655 0.03 € per minute at peak. Off peak 0.0088 € per minute.
You can find the contact information for all countries in the attached after-sales service directory:


REGISTER YOUR PRODUCT ONLINE NEFF-HOME.COM



- YOUR NEW WASHER DRYER
- DISPLAY RULES
- ⚠ WARNING
- CAUTION
- NOTE/TIP
- A) B) C)
- CONTENTS
- FAULTS AND WHAT TO DO ABOUT THEM
- INTENDED USE
- BEFORE YOU SWITCH ON THE APPLIANCE
- SAFETY INSTRUCTIONS
- CHILDREN/PEOPLE/PETS
- WARNING
- RISK OF DEATH
- RISK OF SUFFOCATION
- RISK OF POISONING
- EYE/SKIN IRRITATION
- INSTALLATION
- RISK OF ELECTRIC SHOCK/FIRE/MATERIAL DAMAGE/DAMAGE TO THE APPLIANCE
- RISK OF FIRE/MATERIAL DAMAGE/ DAMAGE TO THE APPLIANCE
- RISK OF INJURY/MATERIAL DAMAGE/DAMAGE TO THE APPLIANCE
- RISK OF INJURY
- MATERIAL DAMAGE/DAMAGE TO THE APPLIANCE
- OPERATION
- ⚠ WARNING RISK OF EXPLOSIONS/FIRE
- RISK OF FIRE/MATERIAL DAMAGE/DAMAGE TO THE APPLIANCE
- RISK OF SCALDING
- CLEANING/MAINTENANCE
- RISK OF ELECTRIC SHOCK/MATERIAL DAMAGE/DAMAGE TO THE APPLIANCE
- PROTECTION OF THE ENVIRONMENT
- PACKAGING/OLD APPLIANCE
- HINTS AND TIPS
- POSITIONING AND CONNECTING
- INCLUDED WITH THE APPLIANCE
- USEFUL TOOLS
- DAMAGE TO THE APPLIANCE
- WATER DAMAGE
- NOTES
- INSTALLATION SURFACE
- INSTALLING THE APPLIANCE ON A BASE OR ON A WOODEN JOIST CEILING
- INSTALLING THE APPLIANCE IN A KITCHENETTE
- DANGER OF DEATH
- REMOVING THE TRANSPORT LOCKS
- EN POSITIONING AND CONNECTING
- HOSE AND CABLE LENGTHS
- AVAILABLE FROM DEALER/CUSTOMER SERVICE
- WATER INLET
- OPTIMUM WATER PRESSURE IN THE SUPPLY NETWORK
- CONNECTION
- WATER OUTLET
- DAMAGE TO THE APPLIANCE/FABRICS
- DRAINAGE INTO A SIPHON
- ALIGNMENT
- ELECTRICAL CONNECTION
- ELECTRICAL SAFETY
- RISK OF ELECTRIC SHOCK
- BEFORE WASHING/DRYING FOR THE FIRST TIME
- NOTE
- TRANSPORTATION
- PREPARATORY WORK
- INSTALLING TRANSPORTATION PROTECTION DEVICES
- BEFORE SWITCHING ON THE APPLIANCE
- THE MAIN POINTS IN BRIEF
- GETTING TO KNOW YOUR APPLIANCE
- CONTROL PANEL
- DISPLAY PANEL
- LAUNDRY
- PREPARING LAUNDRY FOR WASHING
- SORTING LAUNDRY ACCORDING TO
- PROTECTING YOUR LAUNDRY AND APPLIANCE
- DAMAGE TO THE APPLIANCE/TEXTILES
- PREPARING LAUNDRY FOR DRYING
- OPERATING THE APPLIANCE
- PREPARING THE WASHER DRYER
- SELECTING THE PROGRAMME/ SWITCHING ON THE APPLIANCE
- ADJUSTING THE WASHING PROGRAMME
- CHANGING DEFAULT SETTINGS FOR A WASHING PROGRAMME, E. G. WASHING TEMPERATURE
- CHANGING THE ADDITIONAL FUNCTIONS FOR A WASHING PROGRAMME, E.G. SELECT ≡ SPEEDPERFECT
- ADJUSTING THE DRYING PROGRAMME
- CHANGING THE DEFAULT SETTINGS FOR A DRYING PROGRAMME
- LOADING THE LAUNDRY
- CLOSE THE DOOR
- DOSING AND ADDING DETERGENT AND CARE PRODUCT
- DOSING
- FILLING THE DISPENSERS
- EYE / SKIN IRRITATION
- MEASURING AID* FOR LIQUID DETERGENT
- STARTING THE PROGRAMME
- CHILDPROOF LOCK
- RELOADING THE LAUNDRY
- CHANGING THE PROGRAMME
- INTERRUPTING OR ENDING THE PROGRAMME
- END OF THE PROGRAMME
- AFTER WASHING/DRYING
- OVERVIEW OF PROGRAMMES
- PROGRAMME ON THE PROGRAMME SELECTOR
- DELICATE/SILK
- DRUM CLEAN
- GENTLE DRY
- INTENSIVE DRY
- STARCHING
- DYEING/BLEACHING
- SOAKING
- CHANGING PROGRAMME DEFAULT SETTINGS
- °C TEMP
- RPM
- FINISHED IN
- DRY
- P+ SELECTING ADDITIONAL FUNCTIONS
- SPEEDPERFECT
- ECOPERFECT
- WATER PLUS
- SETTING THE SIGNAL
- SETTING SIGNAL VOLUME
- CLEANING AND MAINTENANCE
- APPLIANCE HOUSING/CONTROL PANEL
- DRUM
- DESCALING
- CLEANING THE DETERGENT DISPENSER
- DRAIN PUMP BLOCKED
- DRAINAGE HOSE ON THE SIPHON BLOCKED
- FILTER IN THE WATER INLET HOSE BLOCKED
- EMERGENCY RELEASE, E.G. IF A POWER FAILURE OCCURS
- INFORMATION ON THE DISPLAY PANEL
- CUSTOMER SERVICE
- RELY ON THE COMPETENCE OF THE MANUFACTURER
- TECHNICAL SPECIFICATIONS
- DIMENSIONS
- WEIGHT
- MAINS CONNECTION
- WATER PRESSURE
- DRAIN HEIGHT
- POWER CONSUMPTION WHEN SWITCHED OFF
- POWER CONSUMPTION WHEN SWITCHED ON
Brand : NEFF
Model : V7446X2GB
Category : Tumble dryer