
D807E - Tumble dryer Campomatic - Free user manual and instructions
Find the device manual for free D807E Campomatic in PDF.


| Product Type | Tumble Dryer |
| Brand | Campomatic |
| Model | D807E |
| Energy Class | B |
| Drying Capacity | 7 kg |
| Dimensions (H x W x D) | 850 x 600 x 600 mm |
| Net Weight | 40 kg |
| Power Supply | 230 V ~ 50 Hz |
| Power Consumption | 2500 W |
| Noise Level | 65 dB(A) |
| Drying Programs | Cotton, Synthetics, Delicates, Mix, Timed Drying, Anti-crease |
| Features | Reverse tumbling, Anti-crease function, Adjustable drying levels |
| Filter Type | Lint filter (clean after each use) |
| Condenser Cleaning | Periodic cleaning of condenser unit (every 6 months) |
| Safety Features | Child lock, Overheat protection, Door safety switch |
| Spare Parts Availability | Available from Campomatic authorized service centers |
| Reparability | Repairable by qualified technician; spare parts stocked for 10 years |
Frequently Asked Questions - D807E Campomatic
User questions about D807E Campomatic
0 question about this device. Answer the ones you know or ask your own.
Ask a new question about this device
Download the instructions for your Tumble dryer in PDF format for free! Find your manual D807E - Campomatic and take your electronic device back in hand. On this page are published all the documents necessary for the use of your device. D807E by Campomatic.
USER MANUAL D807E Campomatic
natural_image
Line drawing of a microwave oven with control panel and door (no text or symbols)Made in China
English 2
French 22
Contents
Safety information
Product description
Control panel
Use
Drying hints
Drying programmes
Care and cleaning
Something not working
Technical data
Installation
Environment concerns
Guarantee/Customer Service
Electric diagram
Safety Information
Before Use

WARNING
Read and understand thoroughly this safety instructions before use. The items Indicated here are very important safety precautions, which must be followed. Any failure and losses caused by ignoring the above mentioned items and cautions mentioned in the operation and installation instruction are not covered by our warranty and any liability.

natural_image
Illustration of a person pointing upward with one finger (no text or symbols)The appliance is not to be used by children or persons with reduced physical, sensory or mental capabilities, or lack of experience and knowledge, unless they have been given supervision or instruction. Children should be supervised not to play with the appliance.

Possible electric shocks
- Disassembly, reparation or modification cannot be carried out by people other than professional maintenance staffs.
- The household electrical supply system (the current, the voltage, the cable) such as a fuse with suitable specifications should be provided. should meet requirements of the dryer under normal load, and safety devices.
- The power plug must be connected to a three-core socket with an earth wire and is grounded properly and reliably.
- If the supply cord is damaged, it must be replaced by the manufacturer, its service agent or similarly qualified persons in order to avoid a hazard.
- Do not disconnect the power plug by pulling the supply cord. Hold the power plug with your hand.
- Do not use the supply cord when connection of the power plug and the supply cord is loose.
- Do not touch the power plug with wet hands. Wipe dust or water drops over the power plug off with dry cloth.
- Do not over-bend the supply cord or put it under heavy weight.
- Do not use the supply cord / socket / power plug if it is damaged or broken.

Possible Explosions
- Do not put combustible liquid such as gasoline, petrol and alcohol into the appliance or nearby. Don't put clothes with that liquid into the appliance.
- Do not connect / disconnect the power plug when leakage of gas or other combustible gas occurs.
Safety Information
Before Use
Fire accidents / short circuit or electric leakage may occur
- Do not install the appliance close to fire sources or heat sources.
- Do not rest any burning candles or cigarettes on the appliance.
- Do not install the appliance in places with dampness or suffering from rainfalls, lest igniting damages or other accidents occur easily due to gathered water drops on electrical components.
- Do not install the dryer in places under direct sunshine, lest the plastic components and rubber components become aged.
- Do not use water shooting at the appliance when cleaning it.
- In order to avoid danger of fires caused by excessive drying, do not use the appliance to dry the following items: Cushions, quilts and the like (these items accumulate heat).

- Items that have been spotted or soaked with vegetable or cooking oil constitute a fire hazard and should not be placed in the tumble dryer.
- If you have washed your laundry with stain remover, you must execute an extra rinse cycle before loading your tumble dryer.
- Please make sure that no gas lighters or matches have accidentally been left in pockets of garments to be loaded into appliance

Warning
Never stop a tumble dry before the end of the drying cycle unless all items are quickly removed and spread out so that the heat is dissipated.
Personal injury may occur
- This appliance is not intended for use by persons (including children) with reduced physical, sensory or mental capabilities, or lack of experience and knowledge, unless they have been given supervision or instruction concerning use of the appliance by a person responsible for their safety.
● This machine is not intended for use by young children or infirm persons without supervision.
● The package materials may be dangerous to children. Put all package materials (e.g. the plastic bag) to places unreachable to children.
- Do not touch laundries in the drying drum till the dryer stops working completely.
- Do not keep children or pets nearby when the dryer is working, for they may be trapped into the dryer. Please check carefully the drum before closing the door.

Safety Information
Before Use

Other instructions
- This appliance is designed for domestic use. It must not be used for purposes other than those for which it was designed.
- Only wash fabrics which are designed to be machine dried.Follow the instructions on each garment label
- Any electrical work required to install this appliance should be carried out by a qualified electrician or competent person.
- If the machine is situated on a carpeted floor, please adjust the feet in order to allow air to circulate freely under the appliance.
- Do not climb onto the dryer or rest heavy objects/heating devices or items with water or liquid leakage on the dryer, lest deformation of the face panel and the plastic component occur.
- Any objects such as coins, safety pins, nails, screws, stones or any other hard, sharp material can cause extensive damage and must not be placed into the machine.
- After having installed the appliance, check that it is not pressing or standing on its electrical supply cable, or vent hose.
- Items such as foam rubber(latex foam), shower caps, waterproof textiles, rubber backed articles and clothes or pillows fitted with foam rubber pads should not be dried in the tumble dryer.
● Always unplug the appliance after use, clean and maintenance. - Do not overload the appliance.See the relevant section in the user manual.
• Clothes which are dripping wet should not be placed in the dryer. - Garments which have been in contact with volatile petroleum products should not be machine dried. If volatile cleaning fluids are used, care should be taken to ensure that the fluid is removed from the garment before placing in the machine.
- Never use the tumble dryer if the power supply cable, the control panel, the working surface or the base are damaged so that the inside of the tumble dryer is accessible.
● The tumble dryer is not to be used if industrial chemicals have been used for cleaning. - The lint must not to be allowed to accumulate around the tumble dryer.
- Do not dry unwashed items in the tumble dryer.
● Fabric softeners or similar products should be used as specified by the fabric softener instructions. - The final part of a tumble dryer cycle occurs without heat (cool down cycle) to ensure that the items are left at a temperature that ensures that the items will not be damaged.
- That exhaust air must not be discharged into a flue which is used for exhausting fumes from appliances burning gas or other fuels.
- That the appliance must not be installed behind a lockable door, a sliding door or a door with a hinge on the opposite side to hat of the tumble dryer, in such a way that a full opening of the tumble dryer door is restricted.
- That adequate ventilation has to be provided to avoid the back flow of gases into the room from appliances burning other fuels, including open fires.
- The exhaust air must not be discharged into a fule which is used for exhausting fumes from appliances burning gas or other fuels.
Product description
Before Use
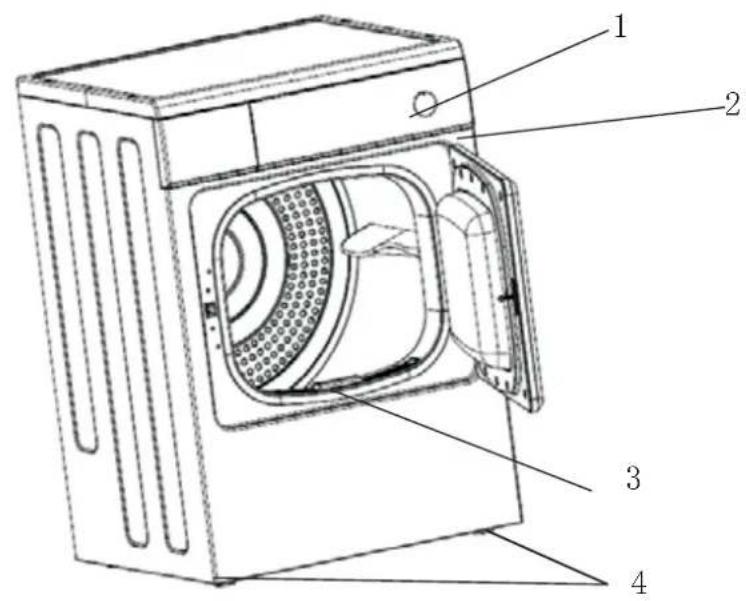

natural_image
Line drawing of a server rack unit with ventilation slots and a circular component labeled '5' (no text or symbols beyond label)-
Control Panel
-
C a bin te
-
Filter
-
Adjustable Feet
-
Rear Vent Outlet
Control panel
Use Process

flowchart
graph TD
    A["Input Port 6"] --> B["Control Bus"]
    C["Input Port 5"] --> B
    D["Control Bus 4"] --> E["Delay"]
    F["Control Bus 3"] --> E
    G["Control Bus 2"] --> E
    H["Control Bus 1"] --> I["Circular Component"]
- Programme selector Dial
2.Sequence lindicator Lights
Drying
Cooling
End
Filter
3.Start/Pause
4.Delay Button and Lights
5.Delicate
6.Quick
Use
Use Process

First Use
- Ensure that the electrical connections comply with the installation instructions.
- Remove the polystryrene block and any material from the drum.
- Before using your tumble dryer for the first time, we recommend that you place a few damp cloths inside the appliance and dry for 30 minutes. There may be dust inside a brand new tumble dryer.

Daily Use
Connect the appliance
- Open the door (see picture).
- Place the laundry in the drum, one item at a time, shaking them out as much as possible.
- Close the door. Please check the laundry does not get caught between the door and filter.

natural_image
Simple line drawing of a window with a hand holding a paper, no text or symbols presentSelect the required programme
- Turn the programme selector dial to the required programme. The programme indicator will be put out and turn to standby mode if you have not pressed the Start/Pause button for 10 minutes. The filter indication light will still keep on until power off.
The selector dial is divided into following sections:
- Cottons
- Time
- Synthetics
- Special

natural_image
Line drawing of a garment inside a door frame, showing fabric and accessories (no text or symbols)
Automatic controlled drying
- The appliance detects the moisture in the load automatically adjust the drying time for optimal drying. Just select the programme according to fabrics. This drying system holds good for cottons, synthetics sections and Anti-Bacterial, silk programme.
Time controlled drying
- Can be used to finish off drying if necessary. Select the 90 or 60 minute programme for cottons or the 30 minute programme for synthetics. To cancel a programme which is running, turn the programme selector dial to "O". At the end of drying, turn the selector dial to "O" to switch the machine off before removing the laundry.
Programme Option buttons
- Depending on the programme, different functions can be combined. These must be selected after choosing the desired programme and before depressing the Start/Pause button. When these buttons are pressed, the corresponding pilot lights come on. When they are pressed again, the pilot lights go out.
Incorrect Option Selection
If you select an option that is not compatible with the programme you have selected, the option will not be selected.
Select Delay start
This button allows you to delay the starting of the programme by 12 hours max. This option must be selected after having selected the programme and before pressing Start/Pause to start the programme. The program is for 3, 6 or 12 hours.
Delay

(3h)
(6h)
(12h)

flowchart
graph LR
    A["Delay cancelled"] --> B["3h"]
    B --> C["6h"]
    C --> D["12h"]
It can be selected in both cases before and after selecting option programme (Quick, Delicate).
The countdown begins after you have pressed the Start/Pause button and the corresponding light illuminates. Press the button repeatedly to choose the programme 3,6 or 12 hours. This option can not be selected when special programme was selected.
If you have selected a delay time by means of the relevant button, the light shows it. The
Use
Use Process
countdown is calculated automatically after you press the "Start/Pause" button. The appliance will start the delayed process. If you
(a)press one more "start/pause", the unit will not pause and still countdown.
(b)turn the rotation knob be "off", the program will be cancelled.
(c) want to change the program, then you have to turn the rotation knob be "off" and make the program selection again.
Select Quick
The option can be selected in the following programme: "Heavy", "Strong", "Normal". By depressing this button the drying time will be reduced by 3-5 minutes. The corresponding light illuminates. This option cannot be selected together with "Delicate" option.
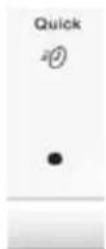
Select Delicate
The option can be selected in the following sections: "Cottons", "Synthics". Pressing this button allows drying to be performed at a lower temperature, for delicate items. The corresponding pilot light comes on. This function cannot be used with "Quick" and program "30min", "60min" and "90min".

Select the Start/Pause
Press this button to start the dryer after having selected the programme and the options. If the door of the appliance is opened while the programme is running, this button must be pressed again after closing the door in order to restart the programme from the point at which it was interrupted. In this cases the lights flashes to remind you that the start button needs to be pressed again.
Indicator lights
These lights indicate the following functions:
- "Drying" light
Use
Use Process
This light indicates that the appliance is in the drying phase.
- "Cooling" light
This light indicates that the appliance is in the cooling phase. At the end of drying, there is a 5 or 10 minutes cooling phase to cool the laundry.
- "End of programme"light
This light is on at the end of the cooling phase, during the anti-creasing phase.
- "Filter" light
It comes on every cycle to remind you that the filter must be cleaned and at the end of the programme.
At the end of the programme
All drying programmes end with a 5 or 10 minutes cooling phase. If the laundry is not removed at the end of the cycle, the dryer performs an anti-creasing phase (duration: 30 minutes maximum). If you do not remove the laundry, the dryer will stop automatically at the end of the anti-creasing phase. The display light "Filter" shows. 10 minutes later, all the lights go out.
After each use
Clean the filter.
Important!
If the drying programme has to be stopped before it reaches the end, we recommend that you turn the programme selector dial to position “Air Dry” and wait until the end of this cooling phase before removing the laundry. This will avoid a build-up of heat inside the appliance. To do this first turn the dial to “O” and then to “Air Dry” and depress the “Start” button.
Modifying the programme
To change a programme which is running, first cancel it by turning the programme selector dial to "O". Select the new programme and press the Start button.
i Drying Hints
Before loading the laundry
Use
Use Process
Never tumble dry the following: Particularly delicate items such as net curtains, woollen, silk, fabrics with metal trim, nylon tights, bulky materials such as anoraks, blankets, eiderdowns, sleeping bags, feather quilts and any items containing rubber foam or materials similar to rubber foam.
● Always follow the instructions on garment labels:

may be tumble dried

normal drying (high temperature)

delicate drying (low temperature)

do not tumble dry
- Close pillowcases and covers with fasteners to prevent small laundry items getting tangled inside them. Close press studs, zips and hooks and tie belts and apron strings. Sort laundry according to type and degree of drying required.
- Do not over-dry laundry, this avoids creasing and saves energy.
- Avoid drying dark clothes with light coloured fluffy items such as towels as they could attract the fluff.
● The laundry must be thoroughly spun before tumble drying.
Drying Hints
Use Process
- Close pillowcases and covers with fasteners to prevent small laundry items getting tangled inside them. Close press studs, zips and hooks and tie belts and apron strings. Sort laundry according to type and degree of drying required.
- Do not over-dry laundry, this avoids creasing and saves energy.
- Avoid drying dark clothes with light coloured fluffy items such as towels as they could attract the fluff.
● The laundry must be thoroughly spun before tumble drying. - Easy-care items, too, e.g. shirts, should be briefly pre-spun before drying.
- Knitted textiles (knitted underwear) may shrink a little during drying. Please do not overdry items of this type. It is advisable to allow for shrinkage when choosing the size of new purchases.
- You can also put starched items into your dryer. However, to achieve the desired starched effect, choose the programme "Iron dry". To remove any starch residues, wipe out the internal drum after drying with a moist cloth and then rub it dry.
- To avoid a static charge when drying is completed, use either a fabric softener when you are washing the laundry or a fabric conditioner specifically for tumble dryers.
- Remove the laundry when the dryer has finished drying.
- If individual items are still damp after drying, set a brief post-drying time, but at least 30 minutes. This will be necessary particularly for multilayered items (e.g. collars, pockets, etc.).
- Clothes that have been soiled with substances such as cooking oil, acetone, alcohol, petrol, kerosene, spot removers, turpentine, waxes and wax removers should be washed in hot water with an extra amount of detergent before being dried in the tumble dryer.
Make sure that no metal objects are left in the laundry (e.g. hair clips, safety pins, pins)
Button up pillowcases, close zip fasteners, hooks and poppers. Tie any belts or long tapes.
To avoid laundry becoming tangled:
Close zips, button up duvet covers and tie loose ties or ribbons (e.g. of aprons).
Turn items with double-layered fabrics inside out(e.g.with cottonlined anoraks,the cotton layer should be outermost).These fabrics will then dry better.
Remove all objects from pockets such as lighters and matches.
Maximum loads
Recommended loads are indicated in the programme charts:
General rules:
• Cotton, linen: drum full but not too tightly packed;
• Synthetics: drum no more than half full;
- Delicate fabrics and woollens: drum no more than quarter full.
Try to load to the maximum capacity of the machine as small loads are uneconomical
Laundry weights
The following weights are indicative:
Drying programmes
Use Process
| Bathrobe | 1200g | night dress | 200g |
| napkin | 100g | ladies' briefs | 100g |
| quilt cover | 700g | men's work shirt | 600g |
| sheet | 500g | men's shirt | 200g |
| pillow case | 200g | men's pyjamas | 500g |
| tablecloth | 250g | blouse | 100g |
| towelling towel | 200g | men's underpants | 100g |
| tea cloth | 100g |
Drying programmes
| Section | Course | Max load | Description of programme |
| Cottons | Heavy | 8kg | Drying bathrobe, toweling towel, Jeans, work clothes. |
| Strong | 8kg | Drying bathrobe, toweling towel, Jeans, work clothes. | |
| Normal | 8kg | Drying shirt, T-shirt, cotton trousers | |
| Humid | 8kg | Drying knitted items, cotton shirt. | |
| Iron | 8kg | Drying sheet, bed linen, table linen, starched laundry | |
| Synthetics | Heavy | 3kg | For sheet, tablecloth, synthetics items. |
| Normal | 3kg | For synthetics items | |
| Iron | 3kg | For knitted items, shirt | |
| Time | 30',60',90' | 8kg | Drying thick or multi-layered textiles, e.g.terry towelling items.For drying individual items of laundry or for small volumes. |
| Specials | Anti-Bacterial | 3kg | For men's underpants, pantywaist, winter cbthing |
| Silk | 1.5kg | For silk items | |
| Fresh Dry | 3kg | For men's underpants, shirt . | |
| Air Dry | 2kg | For refreshing or gently cleaning textiles. |
Care and cleaning
Use Process
Care and cleaning
You must DISCONNECT the appliance from the electricity supply, before you can carry out any cleaning or maintenance work.
External cleaning
Use only soap and water and then dry thoroughly. Important: do not use methylated spirit, diluents or similar products.
Cleaning the door
Clean periodically the interior part of the door to remove any fluff. Accurate cleaning ensures correct drying.
Cleaning the filter
Your dryer will only function well if the filter is clean. The filter collects all the fluff which accumulates during drying and they must therefore be cleaned at the end of each programme, before removing the laundry, with a damp cloth.
The filter must be removed for cleaning. (See picture)

natural_image
Technical diagram of a mechanical device with internal components and an arrow indicating direction (no text or symbols)
natural_image
Technical line drawing of a mechanical component with concentric circular features and a rectangular housing (no text or symbols)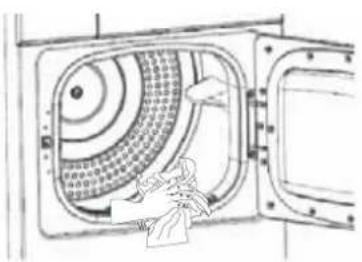
natural_image
Technical line drawing of a mechanical component with concentric circular features and a hand holding a tool (no text or symbols)Warning
Do not use the appliance without filter.
Something not working
Use Process
Something not working
- Certain problems are due to lack of simple maintenance or oversights, which can be solved easily without calling out an engineer. Before contacting your local Service Centre, please carry out the checks listed below.
- During machine operation it is possible that the pilot light flashes to indicate that the machine is not working. Once the problem has been eliminated, press the Start/Pause button to restart the programme. If after all checks, the problem persists, contact your local Service Centre.
| Malfunction | Possible cause | Solution |
| Dryer does not work | Mains plug is not plugged in.Loading door is open.Have you pressed the ▷Button? | Plug in at mains socket.Close loading door.Press the ▷button again. |
| Drying results unsatisfactory | Wrong programme selected.Filter clogged.Incorrect volume of laundry. | Select a different programme the next time you dry(see “Drying programmes”section).Clean lint filter.Observe recommended loading volumes. |
| Drum light(option) does not work | Light bulb is defective. | Replace light bulb. |
| Drying cycle lasts an unusually long time. | Load volume is too big. | Reduce load volume. |
If you are unable to identify or solve the problem, contact our service centre. Before telephoning, make a note of the model, serial number and purchase date of your machine: the Service Centre will require this information.
Technical data
Appendix
IMPORTANT:
If you call out an engineer to a fault listed below, or to repair a fault caused by incorrect use or installation, a charge will be made even if the appliance is under guarantee.

Technical data
| Dry Capacity (kg) | 8.0 |
| Electrical connection Voltage-Overall power-Fuse | Information on the electrical connection is given on the rating plate |
| Depth with loading door open(mm) | 1030 |
| Use | The room temperature must not be lower than +5°C and higher than +35°C |
| Dimensions(W*D*H) (mm) | 595*555*850 |

It is dangerous to alter the specifications or attempt to modify this product in any way.

Care must be taken to ensure that the appliance does not stand on the electrical supply cable.

Any electrical work required to install this appliance should be carried out by a qualified electrician or competent person.

IMPORTANT: The appliance must not built-in.
- Unpacking
All packing must be removed before using the appliance.
- Check accessory
Open the accessory bag and check the accessories.
| Accessory | Name | Quantity |
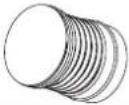 | Vent Hose | 1 |
 | Manual | 1 |

Should the appliance be moved, it must be transported vertically.
Installation
Appendix
Positioning
It is recommended that, for your convenience, the machine is positioned close to your washing machine. Whilst drying, the tumble dryer will expel a certain amount of warm, very moist air, and this should be removed from the room as quickly as possible to prevent condensation. In an extremely well ventilated room or close to an open window, this may occur naturally. However, in general, it is better to carry the dryer's exhaust outside via the vent hose supplied with the appliance; ending either temporarily at an open window, or permanently at a fixed ventilation grille, fitted to an exterior wall or window.
The tumble dryer must be installed in a clean place, where dirt does not build up. Make sure there are no obstructing items or material near the air-intake louvres provided at the back (e.g. paper, rags etc.). To keep vibration and noise to a minimum when the dryer is in use, it should be placed on a firm, level surface.

Note
If the floor is uneven, adjust the adjustable feet. Do not put any wooden pieces or other objects under foot bases.
Level adjustment
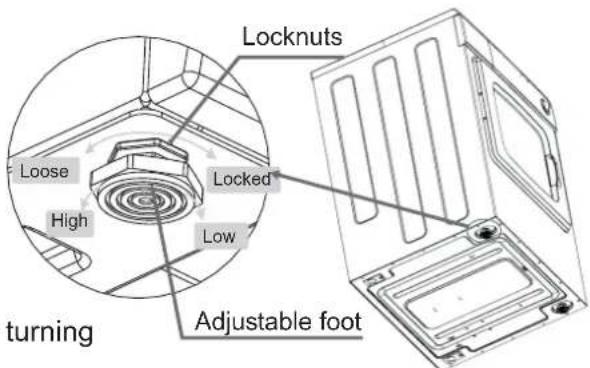
When pushing down the edges of the dryer top plate diagonally, the machine should not move up and down at all.( please check both of two directions) if the machine rocks when pushing the machine top plate diagonally, adjust the feet again.
- Loosen the locknuts
- Adjust the adjustable feet to lower the dryer by turning right and to ascend it by turning left.
- Tighten the locknut after insuring the dryer is level.

Note
The locknuts must be tightened after adjustment. Any looseness can cause vibration and noise.
The feet must never be removed. Do not restrict the floor clearance through deep pile carpets, strips of wood or similar. This might cause heat build-up which would interfere with the operation of the appliance.
Installation
Appendix

IMPORTANT:
The hot air emitted by the tumble dryer can reach temperatures of up to 60^ C. The appliance must therefore not be installed on floors which are not resistant to high temperatures. When operating the tumble dryer, the room temperature must not be lower than +5^ C and higher than +35^ C, as it may affect the performance of the appliance.

Fitting the vent hose

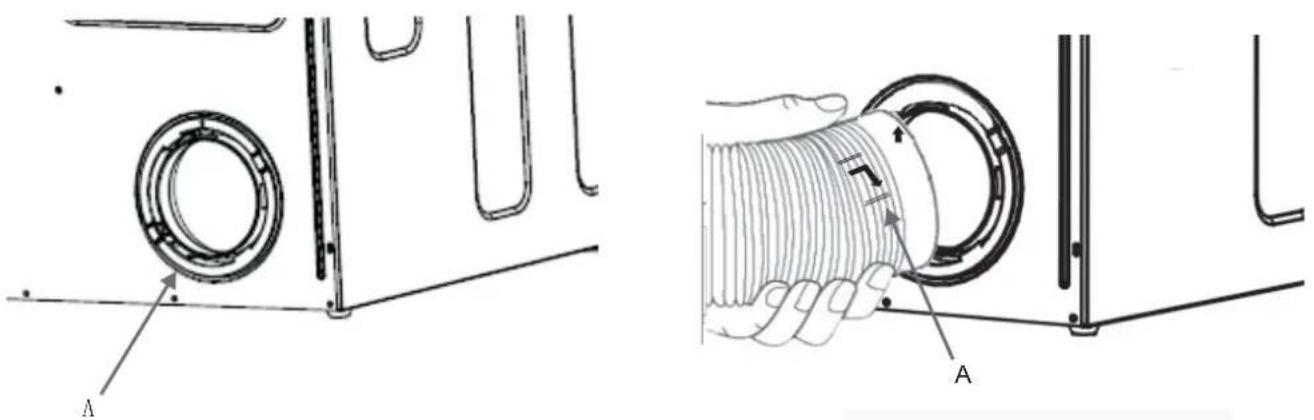
Connect the hose to whichever is the more convenient by pulling the ring nut (A) from the vent let at the back, aligning arrows of hose and ring nut, fastening by screwing hose to the direction row and pushing it firmly back into place.
Advice:
If the hose is long and the room temperature low, the moisture might condense inside the hose. This is an unavoidable natural phenomenon. To prevent this water from lying in the hose or flowing back into the tumble dryer, it is advisable to drill a small hole (dia. 3 mm) in the lowest point of the hose and to place a small container below it.(See picture, point B).
Once connected to the dryer, run the vent hose to the desired outlet point, it contains no more than two bends. As to the outlet itself, if you have decided on a fixed wall/window grille, a good local builder's merchant should be able to supply you with the necessary fittings and installation advice.

natural_image
Diagram of a microwave oven with coiled insulation and labeled component B (no text or symbols beyond label)Installation
Appendix

It is important not to connect the vent hose to, for example, a cooker hood, or a chimney or flue pipe designed to carry the exhaust from a fuel burning appliance.
Note that to avoid condensation problems, it is essential that the dryer be fitted with the flexible hose to carry its auste outside the kitchen.
In order to prevent the appliance from overheating, it is important that the steam exhaust is unobstructed.
If the dryer is fitted next to kitchen units, make sure that the vent hose is not squashed. If the hose is partially squashed, drying efficiency will be reduced, resulting in longer drying times and higher energy consumption. If the hose is completely squashed, the safety cut-outs with which the machine is fitted may operate.
When operating the tumble dryer, the room temperature must not be lower than +5°C and higher than +35°C, as it may affect the performance of the appliance.
That adequate ventilation has to be provided to avoid the back flow of gases into the room from appliances burning other fuels, including open fires.
For appliances with ventilation openings in the base, that a carpet must not obstruct the openings.

Stacking kit
- Door reversal
To make it easier to load or unload the laundry the door can be reversed. This operation must be carried out by qualified personnel. Please contact the nearest our Service Centre. This will be a chargeable option.
• Electrical connection
Any electrical work required to install this appliance should be carried out by a qualified electrician or competent person.

Warning
THIS APPLIANCE MUST BE EARTHED.

The manufacturer declines any liability should this safety measure not be observed.
Before switching on, make sure the electricity supply voltage is the same as that indicated on the appliance's rating plate.
Should the plug need to be replaced for any reason, proceed as described below.
The wires in the mains lead are coloured in accordance with the following code:
• Green and Yellow-Earth
- Blue-Neutral
- Brown-Live
The wire coloured green and yellow must be connected to the terminal marked with the letter ⏻ or by the earth symbol or coloured green and yellow.
Electric diagram
Appendix
Electric diagram

flowchart
graph TD
    A["Thermos"] --> B["Heater"]
    B --> C["Control board"]
    C --> D["CN3"]
    C --> E["CN1"]
    C --> F["CN2"]
    G["Lam"] --> H["Door"]
    I["E"] --> J["L"]
    K["N"] --> L["N"]
    M["M"] --> N["Capacitan"]
    O["Operation panel"] --> P["P2"]
    Q["Earth"] --> R["Guides ensor"]
    S["Temperatures ensor"] --> T["Ground"]
Sommaire
natural_image
Simple line drawing of a hand holding a tool inside concentric circles (no text or symbols)Choisir le programme requis
natural_image
Pure geometric diagram of concentric circles with a vertical line, no text or symbols present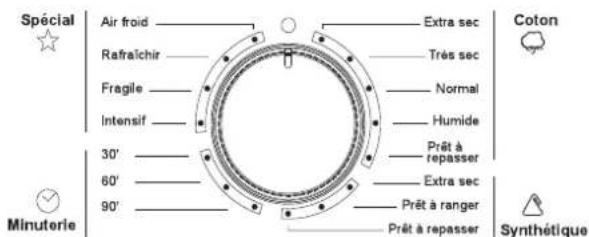
natural_image
Technical line drawing of a washing machine showing inner and outer casing components (no text or symbols)
Nettoyage du filtre
natural_image
Technical line drawing of a washing machine with open door and side panel (no text or symbols)natural_image
Diagram of a hand opening a large circular device with internal components, showing no text or symbols.
natural_image
Technical diagram of a mechanical component with labeled parts A and B, showing internal components and alignment lines (no text or symbols beyond labels)
Conseil :
natural_image
Diagram of a washing machine with a coiled tubing and labeled component 'C' (no text or symbols beyond label)Installation
Annexes

- Contents
- Safety Information
- Before Use
- WARNING
- Possible electric shocks
- Possible Explosions
- Fire accidents / short circuit or electric leakage may occur
- Personal injury may occur
- Other instructions
- Product description
- Control panel
- Use
- Use Process
- First Use
- Daily Use
- Connect the appliance
- Select the required programme
- Automatic controlled drying
- Time controlled drying
- Programme Option buttons
- Incorrect Option Selection
- Select Delay start
- Select Quick
- Select Delicate
- Select the Start/Pause
- Indicator lights
- At the end of the programme
- After each use
- Important!
- Modifying the programme
- i Drying Hints
- Before loading the laundry
- Drying Hints
- Make sure that no metal objects are left in the laundry (e.g. hair clips, safety pins, pins)
- Maximum loads
- Laundry weights
- Drying programmes
- Care and cleaning
- External cleaning
- Cleaning the door
- Cleaning the filter
- Something not working
- Technical data
- Appendix
- IMPORTANT:
- Installation
- Positioning
- Note
- Level adjustment
- Fitting the vent hose
- Advice:
- Stacking kit
- - Door reversal
- • Electrical connection
- THIS APPLIANCE MUST BE EARTHED.
- Electric diagram
- Sommaire
- Choisir le programme requis
- Nettoyage du filtre
- Conseil :
- Annexes
Brand : Campomatic
Model : D807E
Category : Tumble dryer