
Total Control Set 402052EE - Hand blender MORPHY RICHARDS - Free user manual and instructions
Find the device manual for free Total Control Set 402052EE MORPHY RICHARDS in PDF.


| Product Type | Hand Blender Set |
| Model | Total Control Set 402052EE |
| Brand | Morphy Richards |
| Power | 700 W |
| Voltage | 220-240 V, 50/60 Hz |
| Speed Settings | Variable speed with turbo boost |
| Attachments Included | Blending shaft, whisk, chopper (500 ml), beaker (600 ml) |
| Blending Shaft Material | Stainless steel |
| Beaker Material | BPA-free plastic |
| Chopper Bowl Material | Stainless steel blade, plastic bowl |
| Cord Length | 1.2 m |
| Weight | 1.1 kg (set) |
| Dimensions (Motor Unit) | H 38 x W 7 x D 7 cm |
| Dishwasher Safe Parts | Blending shaft, whisk, chopper bowl, beaker |
| Safety Features | Overheat protection, non-slip base, safety lock on chopper |
| Warranty | 2 years |
| Cleaning | Wipe motor unit with damp cloth; other parts dishwasher safe |
| Repairability | Spare parts available via authorized service centers |
Frequently Asked Questions - Total Control Set 402052EE MORPHY RICHARDS
User questions about Total Control Set 402052EE MORPHY RICHARDS
0 question about this device. Answer the ones you know or ask your own.
Ask a new question about this device
Download the instructions for your Hand blender in PDF format for free! Find your manual Total Control Set 402052EE - MORPHY RICHARDS and take your electronic device back in hand. On this page are published all the documents necessary for the use of your device. Total Control Set 402052EE by MORPHY RICHARDS.
USER MANUAL Total Control Set 402052EE MORPHY RICHARDS
smart ideas for your home


TOTAL
CONTROL Hand Blender Pro Set
Please read and keep these instructions for future use


download the free app

Download on the App Store

ANDROID APP ON Google play
For competitions, product hints and tips and more join us at

www.morphyrichards.co.uk/blog

www.facebook.com/morphyrichardsuk

@loveyourmorphy
www.morphyrichards.com
* Register online for your 2 year guarantee. See the back of this instruction book for details (UK and Ireland customers only).
** Applies to serrator blade only. See back of this instruction book for details.
*** Independently tested by CATRA using the International Standard Cutting Test System to ISO 8442.5 vs a standard plain edge blade.
The use of any electrical appliance requires the following common sense safety rules.
Please read these instructions carefully before using the product.
This appliance can be used by persons with reduced physical, sensory or mental capabilities, or lack of experience and knowledge, if they have been given supervision or instruction concerning the use of the appliance in a safe way and understand the hazards involved.
Children shall not play with the appliance.
This appliance shall not be used by children.
Keep the appliance and cord out of reach of children.
Do not blend for longer than the time periods recommended in 'Usage' on page 10.
Always disconnect from the supply if left unattended and before assembling, dissembling or cleaning.
For care and cleaning refer to page 11.
Avoid touching moving parts. Keep hands, hair and clothing, and utensils away from the attachment blades during operation, to prevent personal injury and/or damage to the appliance.
If the supply cord is damaged, it must be replaced by the manufacturer, its service agent or similarly qualified persons in order to avoid a hazard.
In addition, we offer the following safety advice.
Do not use outdoors or in a bathroom.
Always locate your appliance away from the edge of the worktop.
Do not place the bowl used with the appliance on a highly polished wooden surface as damage may occur to the surface.
Do not let the mains cable hang over the edge of the worktop where a child could reach it.
Do not let the lead run across an open space e.g. between a low socket and a table.
Do not let the cable run across a cooker or other hot area which might damage the cable.
The mains cable should reach from the socket to the base unit without straining the connections.
Care shall be taken when handling the sharp cutting blades, emptying the bowl and during cleaning.
Do not use the appliance for anything other than its intended purpose.
WARNING: The blender blades are very sharp. Handle with care when using and cleaning.
Do not clean the attachments under running water while they are in position.
IMPORTANT: Allow hot liquids to cool before adding to the blender, always ensure the lid is fitted correctly.
Be careful whilst hot liquid is blending or poured onto the blender as it can be ejected due to sudden steaming.
Check that the voltage on the rating plate of your appliance corresponds with your house electricity supply which must be A.C. (Alternating Current).
Should the fuse in the mains plug require changing, a 3 amp BS1362 fuse must be fitted.
Thank you for your recent purchase of this Morphy Richards Total Control Hand Blender Pro Set.
Your Hand Blender Pro Set comes with a number of attachments and a locking connection for safety. Please read the instructions for information on how to use each attachment thoroughly before use.
Remember to visit www.morphyrichards.co.uk to register your product's two year guarantee.
Health And Safety ....
Introduction ....
Total Control ....
Product Overview ....
Before First Use ....
Using Your Hand Blender ....
Using Your Chopping Bowl ....
Using Your Potato Masher......
Using Your Balloon Whisk ....
Suitable Foods ....
Usage ....
Attachments ....
Turbo Button ....
Blending In A Saucepan ....
Hints & Tips ....
Care And Cleaning ....
Contact Us ....
Notes ......
Recipes ....
Notes ......
Guarantee ....


TOTAL CONTROL
Introducing the Total Control Hand Blender – the simple way to bring confidence to your cooking.
The Total Control Hand Blender allows you to create delicious smoothies and shakes, blend soups and sauces with the confidence and reassurance that Smart Response Technology delivers.
Smart Response Technology allows you to have Total Control of the blending process with the simple squeeze of a button. The Smart Response Technology gently feeds power into the blender as you need it, so there are no sudden jerks or splatters, giving you complete confidence in the kitchen.

Choose the speed that best suits the job at hand using the simple twist motion Variable Speed Control, there are 8 to choose from. Even when using a higher speed you can feel assured that the Smart Response Technology feeds power in gradually building to your chosen speed for the job at hand.
When you have blended to your desired consistency simply release the button and the Total Control Hand Blender will steadily slow down and stop, ensuring no splashing and no suction.
Total Control Hand Blender, giving you the power to create with confidence.

Variable Speed Control
Precision Control Trigger Ergonomic Soft Grip Handle
650 Watt Motor
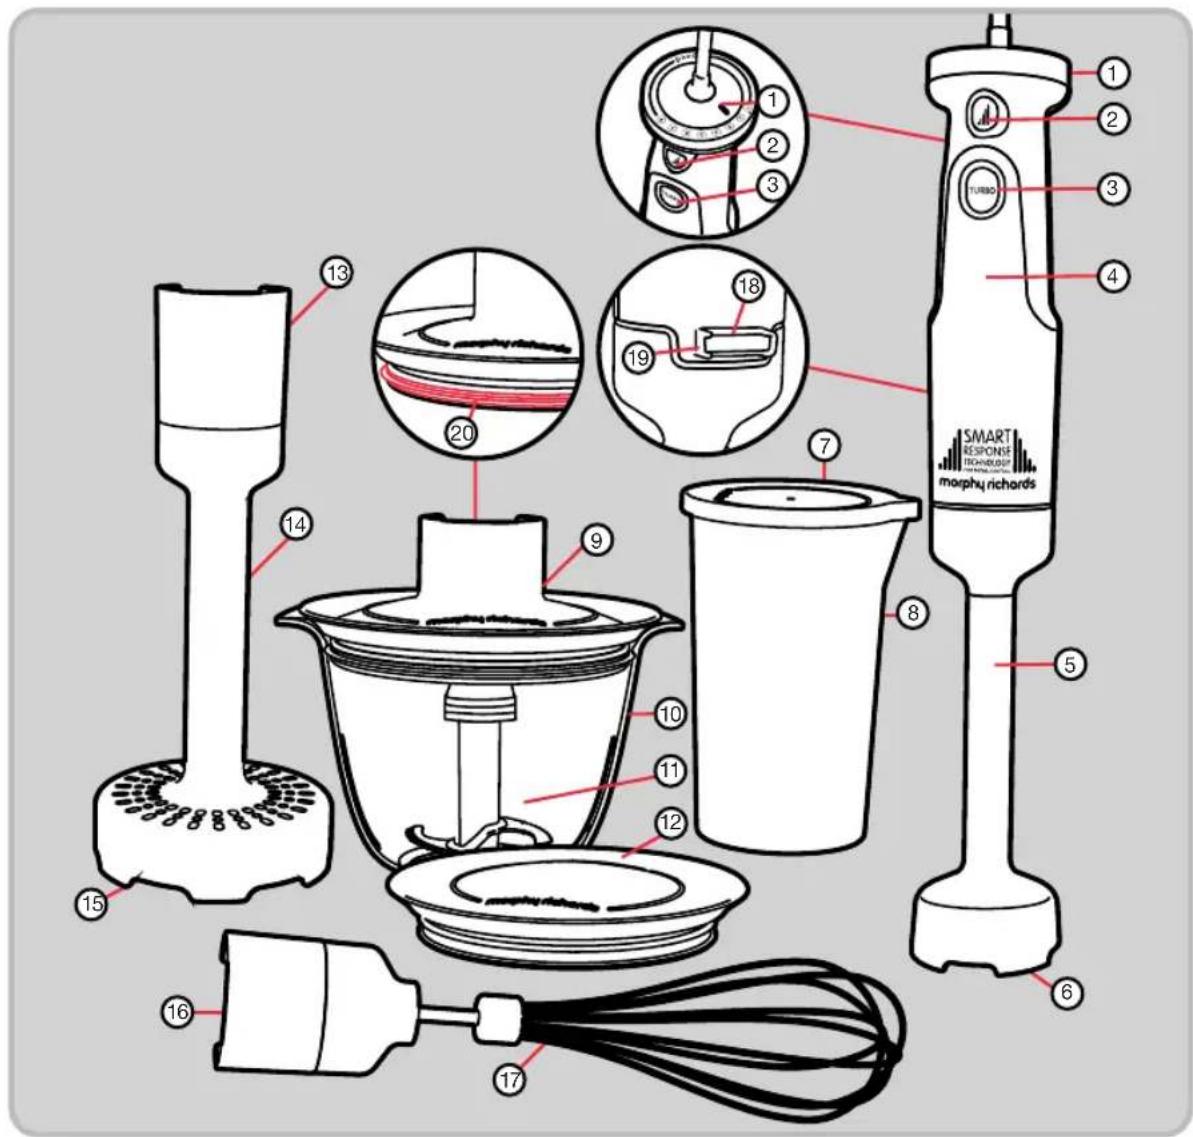
(1) Variable Speed Control
(2) Precise Control Trigger
(3) Turbo Button
(4) Main Unit
(5) Blending Leg
(6) Serrator Blade
(7) Beaker Lid
(8) Beaker
(9) Chopping Bowl
Blending Lid
(10) Chopping Bowl
(11) Chopping Serrator Blade
(12) Chopping Bowl Lid
(13) Potato Masher Gearbox
(14) Potato Masher
(15) Paddle
(16) Whisk Gearbox
(17) Balloon Whisk
(18) Attachment Release Button
(19) Heel Rest
(20) Safety Seal
(19) Heel Rest
(20) Safety Seal
WARNING: Carefully unpack your Hand Blender Pro Set as the blades are very sharp.
Wash all parts except the Main Unit, Blending Leg, Chopping Bowl Blending Lid and Gearboxes, with hot soapy water before use. Dry all parts thoroughly before use.
Do not fully submerge the Blending Leg in water. Wash only the Serrator Blade head .
Wash the Chopping Bowl Blending Lid with hot soapy water and rinse. Do not immerse in water.
Do not immerse the Main Unit or Chopping Bowl Lid in water.
Wipe the Chopping Bowl Blending Lid with a hot damp cloth to clean. Do not immerse in water.
Wipe the Gearboxes with a hot damp cloth. Do not immerse in water.

Attach the Blending Leg (5) to the Main Unit (4) and push to lock into place.

Select the speed on the Variable Speed Control (1). The Hand Blender will not start unless the Precise Control Trigger (2) or Turbo Button (3) is pressed.

Place the Blending Leg into the food to be blended. We recommend using the Beaker (8) for the best results.

Press the Precise Control Trigger to begin blending. The speed will increase the harder you press the button.

Release the Precise Control Trigger to stop. Allow the blades to slow and stop BEFORE removing the Hand Blender from the food.
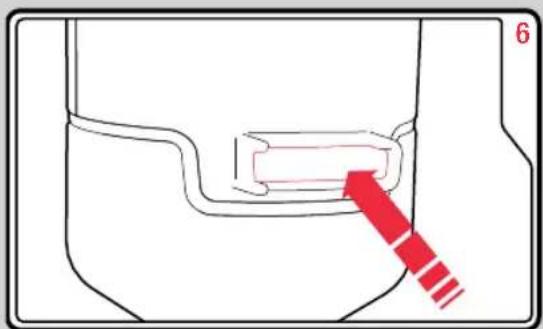
Unplug the Main Unit from the mains. Press the Attachment Release Button (18) and remove the Blending Leg from the Main Unit for cleaning.

CAREFULLY insert the Chopping Serrator Blade (11) into the Chopping Bowl (10). WARNING: Blades are sharp.
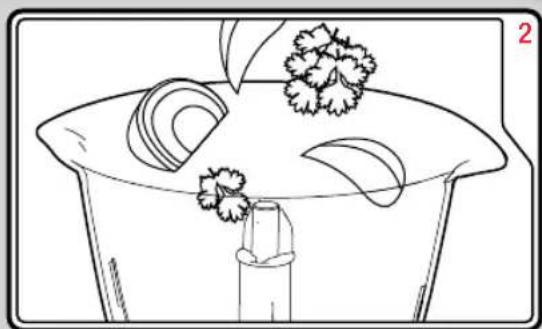
Place the food you wish to chop into the Chopping Bowl. Do not fill more than half full.
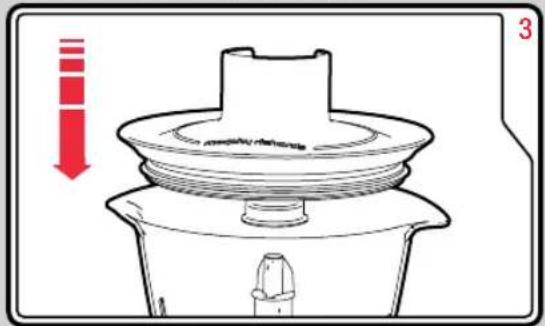
Ensure the Safety Seal (20) is in place and push the Chopping Bowl Blending Lid (9) onto Chopping Bowl. Push to secure into place.
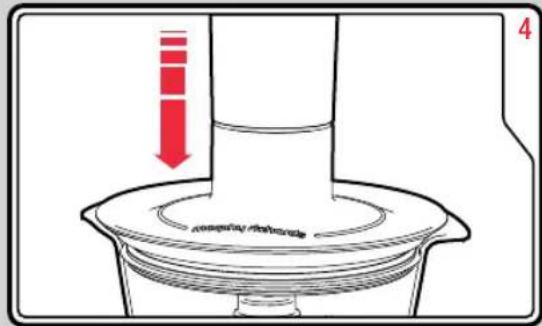
Attach the Main Unit (4) onto the Lid. The Main Unit will not lock onto the Chopping Bowl Blending Lid for safety reasons.
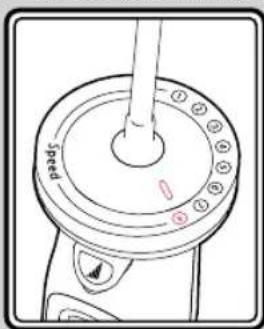
Select a high speed on the Variable Speed Control (1) and press and hold the Precise Control Trigger (2) to start. Do not open the Lid while in use.

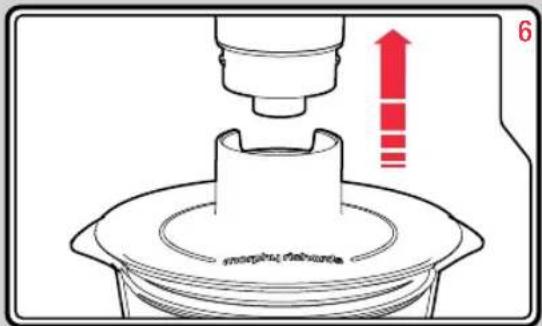
Allow the Hand Blender to completely stop before detaching the Main Unit from the Chopping Bowl Blending Lid. Lift away to remove.

Remove the Chopping Bowl Blending Lid from the Chopping Bowl.
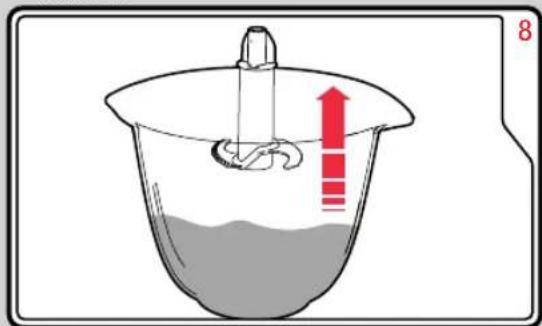
CAREFULLY remove the Chopping Serrator Blade before emptying the food from the bowl.
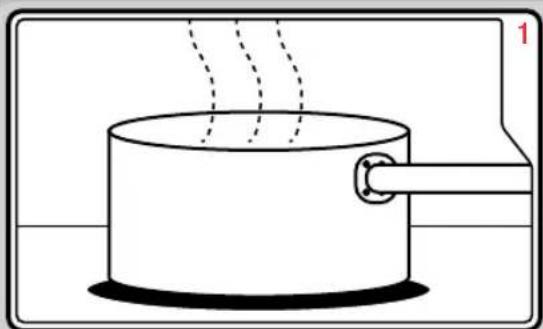
Prepare your potatoes as normal, drain, place in a saucepan or flat bottomed bowl (see page 10). Add any milk or butter as required.

Attach your Potato Masher Gearbox (13) and Potato Masher (14) onto the Main Unit.
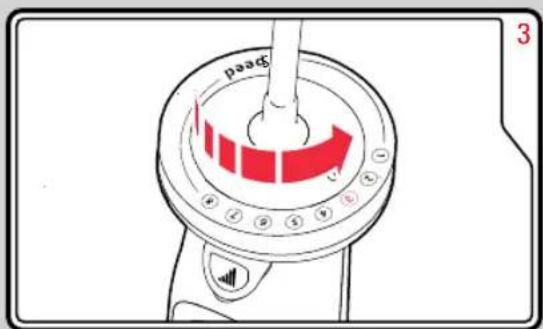
Select speed 3 on the Variable Speed Control (1).

Press the Precise Control Trigger (2) to begin mashing. The speed will vary - the harder you press the trigger - the more the speed will increase.

Plunge the head of the Potato Masher (14) into the potatoes. Lift and repeat at a different place in the pan/bowl Continue until all the potatoes are mashed to your liking.

Release the Precise Control Trigger to stop and remove the Potato Masher from your food. Unplug your Hand Blender from the mains. Press the Attachment Release Button (18) and remove the Masher. The Paddle (15) can be removed for ease of cleaning (see page 11).

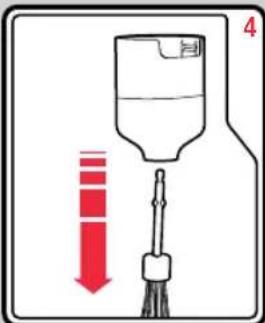
Push the Balloon Whisk (17) into the Whisk Gearbox (16), then attach the Whisk Gearbox onto the Main Unit (4).
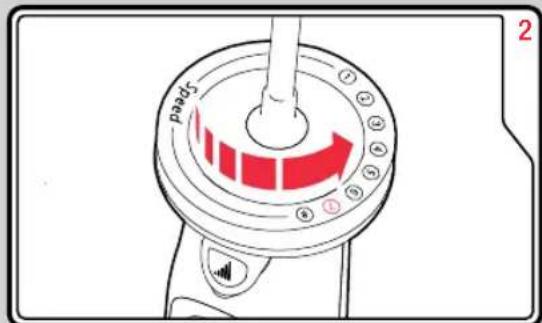
Select a high speed on the Variable Speed Control (1). Place the Balloon Whisk (17) into the ingredients.

Press the Precise Control Trigger (2) to begin whisking. The speed will vary - the harder you press the trigger - the speed will increase. Release the Precise Control Trigger to stop BEFORE removing the Balloon Whisk from the food.
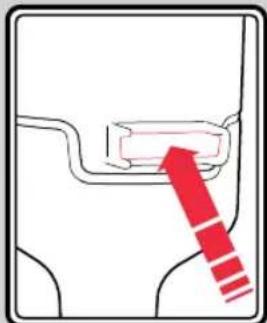
Unplug your Hand Blender from the mains. Press the Attachment Release Button (18) and remove the Balloon Whisk for cleaning. Pull the Balloon Whisk body from the Whisk Gearbox for cleaning.
The amounts listed below should be used as a guide.
The Chopping Bowl should not be filled more than half full.
| Blending Leg | Soup or Sauce | 4 | 40-60 seconds | |
| Blending Leg^* | Milkshake | 450ml | 4-5 | 20-30 seconds |
| Blending Leg^* | Ice | 3 cubes | 8 | 5-15 seconds |
| Blending Leg^* | Carrots with water | 200g 300ml | 6 | 40-60 seconds |
| Balloon Whisk | Whipping Cream | 7 | 90 seconds | |
| Balloon Whisk | Egg Whites | 7 | 60-90 seconds - see recipes | |
| Potato Masher | Boiled Potatoes | 1kg | 3 | 20-30 seconds |
| Chopping Bowl | Onion | 200g | 7 | 5-10 seconds |
| Chopping Bowl | Carrot | 200g | 7 | 5-15 seconds |
| Chopping Bowl | Herbs | 50g | 7 | 5-15 seconds |
| Chopping Bowl | Raw Beef | 100g | 8 | 25-30 seconds |
| Chopping Bowl | Nuts | 100g | 8 | 15-20 seconds |
*When using the Beaker supplied
WARNING: Your Total Control Hand Blender Pro Set is designed for intermittent use. Do not use the attachments (except the Whisk) continuously for more than 60 seconds.
Do not use the Whisk for more than 90 seconds.
The Blending Leg is designed for pureeing foods such as soups, sauces, milkshakes, smoothies, baby food or crushing ice.
The Blending Leg is not suitable for grinding hard items such as coffee beans.
The Chopping Bowl is suitable for chopping nuts, vegetables, meat, herbs, boiled eggs and dried bread. The chopping bowl should be used on higher speeds for optimal performance.
The Potato Masher is only suitable for mashing potatoes or similar. You can add milk, butter, oil or seasoning to the potatoes prior to mashing to combine with the potatoes.
The Potato Masher is not suitable for raw potatoes or any other vegetables or foods.
Do not use in a hot pan direct from the stove top. Transfer the potatoes into a cooler pan or flat bottom bowl if required.
The Balloon Whisk is ideal for whipping cream or eggs.
It is not suitable for stiffer mixtures such as bread dough or cake mixtures.
If you have any leftovers, use the Bowl and Beaker with the supplied Lids to store food safely.
WARNING: No attachments are suitable for use in a freezer, microwave, oven or dishwasher.
Your Hand Blender has 8 different speeds utilising Total Control technology, as well as a Turbo Button . Press the Turbo Button to run the Hand Blender at high speed for intermittent bursts.
Note: The Chopping Bowl attachment works best with the Variable Speed Control set to a high speed setting or when using the Turbo Button.
Do not use a non stick pan. The Blending Leg may damage the non stick coating.
Remove the saucepan from the heat.
To avoid excessive splashing, place the Blending Leg into the food before switching your Hand Blender on.
Hold the pan steady with your other hand and lightly press the Precise Control Trigger . Start slowly, and increase the speed as needed using the Precise Control Trigger.
Move the Blades through the food using an up and down motion.
Allow the Blades to stop moving before removing from the pan.
WARNING: Lifting the Serrator Blade out of the food while running, or using a high speed setting in a small pan could splash hot liquid. Extra care should be taken when using the Hand Blender in this manner.
Do not insert your Hand Blender into the food past the join between the Main Unit and the Blending Leg.
Ensure the power cable does not touch any hot surfaces (including the side of the pan).
When blending foods with strong colour (eg. carrots), the plastic parts of the appliance may become discoloured. Wipe with cooking oil to clean any discoloured parts. Wash thoroughly in hot soapy water before re-using.
When blending using the Blending Leg , start the process by inserting the Blending Leg into the ingredients. This will ensure all the ingredients are pulled into the blade to be processed. Gently rotate the Blending Leg, lifting it up and down in the ingredients. Continue this movement until the mixture is of the desired consistency. Do not remove from the liquid while the blades are in motion.
Do not lift the Blending Leg out of the mixture completely when running, as splashing may occur.
While using the Chopping Bowl you may need to scrape the sides of the bowl down using a silicone spatula partway through blending.
WARNING: Always unplug the appliance from the mains socket before cleaning and maintenance.
WARNING: Handle the blades with care as they are sharp.
Wash all parts except the Main Unit , Blending Leg , Chopping Bowl Blending Lid and Gearboxes , with hot soapy water before use. Dry all parts thoroughly before use.
Clean the Main Unit with a damp cloth and dry all the parts thoroughly.
Do not fully submerge the Blending Leg in water. Wash only the Serrator Blade head .
Wash the Chopping Bowl Blending Lid with hot soapy water and rinse. Do not submerge.
Do not immerse the Main Unit or Chopping Bowl Lid in water.
Wipe the Gearboxes with a hot damp cloth. Do not immerse in water.
WARNING: Never immerse the Main Unit in water or any other liquid.

For ease of cleaning the Paddle in the Potato Masher Attachment can be removed.
To remove, unplug the Main Unit from the power supply. Do not disconnect the Potato Masher from the Main Unit.
Hold the Main Unit in your hand. Grip the Paddle and twist clockwise. The Paddle will 'click' and remove from the head of the Potato Masher for cleaning.
To replace, fit the Paddle and twist anti-clockwise until it clicks into place.
The Chopping Bowl Blending Lid and Chopping Bowl Lid both feature a rubber Safety Seal. This is to prevent leakage from your Chopping Bowl when in use and for during storage.
Always ensure the Safety Seal is in place before use. Failure to do so could cause damage to the appliance.
The Safety Seal only needs to be removed for cleaning (if required). After cleaning ensure the seal is reattached as directed before using your Total Control Hand Blender.

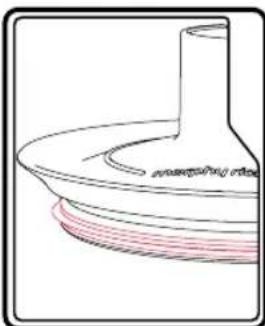
When reattaching the Safety Seal, ensure that it is pressed tightly into the first channel in the Lids (see diagram). The 'lip' on the Safety Seal should be pointed outwards, and not twisted within the channel. Ensure the Safety Seal is correctly located before use.
If you are having a problem with your appliance, please call our Helpline, as we are more likely to be able to help than the store you purchased the item from.
Please have the product name, model number and serial number to hand when you call to help us deal with your enquiry quicker.
UK Helpline: 0344 871 0944
IRE Helpline: 1800 409 119
Spares: 0344 873 0710
If you have any questions or comments, or want some great tips or recipe ideas to help you get the most out of your products, join us online:
Blog: www.morphyrichards.co.uk/blog
Facebook: www.facebook.com/morphyrichardsuk
Twitter: @loveyourmorphy
Website: www.morphyrichards.com



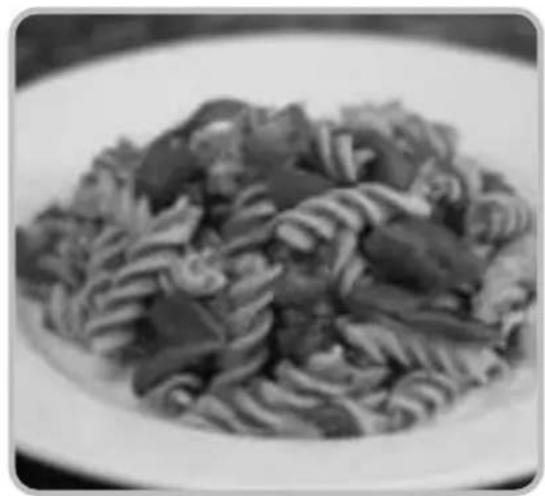


We have developed delicious recipes for you to try with your new Total Control Hand Blender Pro Set. From smoothies to pesto there is something to suit every taste.
The recipes provided give you only a few suggestions of what you can make with your Hand Blender and its attachments. When you are used to working with your Hand Blender you will be able to easily adapt recipes for use from your favourite cookbooks.
1 ripe banana (approx 90g) peeled, cut into chunks
65g strawberries washed, dried, hulled
2 ice cubes
135ml apple juice
200g low fat vanilla yogurt
Add all the ingredients to the Beaker in the order listed.
Fit the Blending Leg to the Main Unit and select speed 4 on the Variable Speed Control.
Place the Blending Leg into the bottom of the beaker and gently press the Precise Control Trigger. Move the Hand Blender up and down in the Beaker for 20-30 seconds, until the smoothie is blended.
80g fresh raspberries
100g vanilla ice cream
200ml semi skimmed milk
Add all the ingredients to the Beaker in the order listed.
Fit the Blending Leg to the Main Unit and select speed 4 on the Variable Speed Control.
Place the Blending Leg into the bottom of the beaker and gently press the Precise Control Trigger. Move the Hand Blender up and down in the Beaker for 20-30 seconds, until the milkshake is blended.
Serves: 4
25g butter or margarine
2 medium leeks (285g), sliced
1 small onion (100g), finely chopped
500g potatoes, thinly sliced
1.1 litres vegetable stock
1 tsp mixed herbs
1 tsp salt
Black pepper
Chives to garnish
Crusty bread to serve
Melt the butter in a large saucepan (do not use non-stick), and add the leeks and onion. Gently fry without browning for 10 minutes, stirring occasionally.
Add the potatoes, stock, herbs and seasoning, bring to the boil. Cover and simmer gently for 30 minutes or until tender.
Allow to cool slightly then fit the Blending Leg to the Main Unit. Turn the Variable Speed Control to 4.
Place the Blending Leg into the pan and using the Precise Control Trigger, blend the soup until smooth, approximately 50 – 60 seconds. This can be done in the pan as long as the pan does not have a non stick coating.
Check the seasoning and garnish with a few snipped chives and serve with crusty bread.
Serves: 4
1 onion (130g) finely chopped
1 garlic clove, crushed
1/2 green chilli, de-seeded and finely chopped
1½ tbsp extra virgin olive oil
100g bacon, rind removed and chopped
400g can plum tomatoes
100ml (120g) passata
2 tbsp white wine
Salt and freshly ground black pepper
Fresh boiled pasta to serve
Parmesan cheese to serve
Place the oil in a large saucepan (do not use non-stick), and heat for a few minutes.
Gently fry the onion, garlic and chilli for 2-3 minutes without browning, stirring occasionally with a wooden spoon.
Add the chopped bacon to the pan and fry for a further minute. Place the lid on the pan and cook over a medium heat for 5 minutes.
Add the plum tomatoes, passata and wine, season with a little salt and pepper to taste.
Place the lid on the pan and simmer gently for 25 minutes, or until the onions are tender.
Ten minutes before the sauce is ready, cook the pasta according to the pack instructions.
Use the Blending Leg at speed 4 on the Variable Speed Control to make a smooth sauce. This can be done in the pan as long as the pan does not have a non stick coating. Start the hand blender using the Precise Control Trigger, gently moving it across the pan until the desired consistency is achieved. For a smooth sauce, this should take about a minute.
Drain the pasta then stir the sauce through it. Heat through if necessary then serve immediately with Parmesan cheese.
Serves: 4
2 tbsp olive oil
1 onion (130g), chopped
2 carrots (160g), diced, small
2 celery sticks (80g), finely chopped
1 garlic clove, crushed
1 leek (120g), chopped
1 yellow pepper, diced
1 red pepper, diced
2x 400g cans chopped tomatoes
1/2 tbsp balsamic vinegar
1/2 tbsp caster sugar
2 tsp oregano
1 tsp mixed herbs
Salt and pepper
Fresh boiled pasta to serve
Parmesan cheese to serve
Heat the oil in a large saucepan (do not use non-stick) and gently cook the onion, carrot, celery, garlic and leek for 5 minutes without browning. Stir occasionally.
Place the lid on the pan and cook for 20 minutes, stirring occasionally. Add the chopped peppers and cook gently for a further 10 minutes with the lid on.
Add the tomatoes, herbs, sugar and vinegar to the pan. Season with salt and pepper and simmer with the lid on for 45 minutes, or until the carrot and celery are softened.
Cook the pasta according to the pack instructions.
Use the Blending Leg at speed 4 on the Variable Speed Control to make a smooth sauce. This can be done in the pan as long as the pan does not have a non stick coating. Start the hand blender using the Precise Control Trigger, gently moving it across the pan until the desired consistency is achieved. For a smooth sauce, this should take about a minute.
Drain the pasta then stir the sauce through it. Heat through if necessary then serve immediately with Parmesan cheese.
250ml 350ml
| 1/2-1 | 1/2-1 | red chilli, halved with a few seeds |
| 150g | 225g | ripe cherry tomatoes, halved |
| 1 | 11/2 | limes, juiced |
| 20g | 30g | fresh coriander,roughly cut to fitinside the Bowl |
Pinch Pinch Sea salt
Pinch Pinch Fresh ground pepper
Fit the blade into the Chopping Bowl.
Put all ingredients into the bowl in the order listed left.
Attach the Chopping Bowl Blending Lid and Main Unit. Blend using the Precise Control Trigger on speed 7 for 10 seconds. Scrape down the bowl with a spatula if necessary then blend again for a further 5-10 seconds.
Pour into a serving bowl and allow to stand for an hour or so before serving. This allows flavour to develop and froth to subside.
Serve with tortilla chips.
Note: It is possible to make a 350ml quantity in the bowl if desired.
50g pine nuts
1/2 garlic clove
25g Parmesan, grated
30g fresh basil, leaves only
50ml extra virgin olive oil
Juice of half a lemon
Salt and fresh ground pepper
Fit the blade into the Chopping Bowl.
Put all ingredients into the bowl in the order listed.
Attach the Chopping Bowl Blending Lid and Main Unit. Blend using the Precise Control Trigger on speed 7 for 15 seconds. Scrape down the bowl with a spatula if necessary then blend again for a further 15-30 seconds.
Note: The consistency of the pesto may be thinned by adding a little lemon juice and olive oil, according to taste.
Serve as an accompaniment to spaghetti bolognese, or stirred through mashed potatoes.
Note: To store fresh pesto place in an airtight container and cover the surface with a little olive oil before refrigerating.
75g cherry tomatoes
1/2 fresh red chilli, de seeded
65g fresh coriander with stalks
1 ripe avocado, halved, stoned and skin removed
Juice of 1/2 - 1 lime (according to taste)
Salt and pepper to taste
Fit the Blade into the Chopping Bowl.
Cut each avocado half into two.
Put all the ingredients into the bowl in the order listed. Fit the Chopping Bowl Blending Lid and Main Unit.
Blend using the Precise Control Trigger on speed 7 for 15 seconds. Scrape down the sides of the bowl with a spatula then blend again for a further 15 seconds until smooth.
Adjust seasoning to taste.
Serves: 4
1kg Maris Piper or Desiree potatoes, peeled
1 tsp salt
30ml – 125ml milk according to recipe
Cut the peeled potatoes into even sized pieces, rinse in fresh cold water and drain.
Place in a large pan and cover with cold water. Add the salt and cover with the lid.
Bring to the boil and cook for 20-25 minutes until softened. Drain and then cover the pan with a clean tea towel for 5 minutes.
Add the milk, according to personal taste, use 2 tbsp milk for a firm mash, or up to 125ml milk for a softer, creamier mash.
Attach the Potato Masher and Gearbox to the Main Unit, mash the potatoes using the Precise Control Trigger on speed 3 for approximately 25 seconds.
Serves: 4
1kg Maris Piper or Desiree potatoes, peeled
1 tsp salt
125ml milk
2 tbsp fresh pesto
Cut the peeled potatoes into even sized pieces, rinse in fresh cold water and drain.
Place in a large pan and cover with cold water. Add the salt and cover with the lid.
Bring to the boil and cook for 20-25 minutes until softened. Drain and then cover the pan with a clean tea towel for 5 minutes.
Add the milk to the pan, attach the Potato Masher and Gearbox to the Main Unit and mash the potatoes using the Precise Control Trigger on speed 3 for approximately 25 seconds
Turning the potato over gently with a spatula, add two tablespoons of fresh pesto, carefully folding in to give the potatoes a marbled appearance. (The pesto may be thinned with a tbsp each of lemon juice and olive oil to make it easier to work with).
Serves: 4
1kg Maris Piper or Desiree potatoes, peeled
1 tsp salt
Black pepper
4 tbsp olive oil
100g pitted black olives in brine, drained well and patted dry with kitchen paper
Cut the peeled potatoes into even sized pieces. Rinse in fresh cold water and drain.
Place in a large pan and cover with cold water. Add the salt and cover with the lid.
Bring to the boil and cook for 20-25 minutes until softened. Drain and then cover the pan with a clean tea towel for 5 minutes.
While boiling, place the Chopping Blade into the Chopping Bowl. Add the olives and attach the Lid and Main Unit. Pulse the olives using the Precise Control Trigger on speed 8 in 2-3 short pulses until the olives are roughly chopped. This should take 5-6 seconds.
Add the oil and black pepper to the pan. Attach the Potato Masher and Gearbox to the Main Unit, mash the potatoes using the Precise Control Trigger on speed 3 for approximately 25 seconds.
Very lightly fold in the chopped olives, so the mash doesn't take on any colour.
4 egg whites
Place the egg whites in a large, clean bowl.
Fit the Balloon Whisk and Gearbox to the Main Unit.
Whisk using the Precise Control Trigger on speed 7 for approximately 1 to 1 1/2 minutes, until soft peaks form.
Serves: 6
3 large eggs
175g caster sugar
450g strawberries, hulled
1 tbsp icing sugar
570ml whipping cream
Line a large baking tray with non stick baking parchment and preheat the oven to 120° C / Gas Mark 1.
Attach the Balloon Whisk to the Main Unit.
Separate the eggs and place the whites in a large, clean bowl and whisk on speed 7 with the Precise Control Trigger fully depressed until soft peaks form. Approximately 1 - 1½ minutes.
Add the caster sugar to the egg whites 1 tbsp at a time, whisking well after each addition. This should take approximately 2 1/2 minutes.
Place rounded dessert spoons of the meringue in rows on the lined baking sheet and bake for 1 hour in the oven.
Turn the oven off and allow the meringues to dry out overnight or until the oven is completely cold.
Place the strawberries in a bowl with the icing sugar and lightly mash with a fork (you want the strawberries to remain quite chunky).
Lightly whip the cream with the Balloon Whisk on speed 7 until a spoonable consistency is achieved (approximately 1 1/2 minutes).
Break the meringues into pieces and lightly fold into the whipped cream with a tablespoon then fold in the strawberries.
Serve in 6 individual serving dishes / glasses.
Serves: 4
230g dark chocolate
4 eggs, separated
2 tbsp brandy or rum (optional)
Grated chocolate, to serve
Whipped cream, to serve
Break the chocolate into pieces and place in a bowl over a pan of simmering water and slowly heat until melted, stirring occasionally.
Remove from the heat and allow to cool before beating in the egg yolks and brandy or rum (if using).
Fit the Balloon Whisk to the Main Unit and whisk the egg whites using the Precise Control Trigger on speed 7 for approximately 1 1/2 minutes until firm. Fold gently into the chocolate mixture with a tablespoon.
Spoon into 4 ramekins and chill in the fridge for 2-3 hours until set.
Using the Balloon Whisk, whip the cream using the Precise Control Trigger on speed 7. Decorate the mousse with a swirl of cream and sprinkle on a little grated chocolate.







FP402052 MUK Rev 3 05/15
The 'Serrator Blade' is warranted to be free from defects in materials and workmanship for life. This warranty covers the original purchaser only and is not assignable or transferable to any other party. This warranty is available to consumers who use the 'Serrator Blades' for non-commercial household purposes. This warranty does not cover any damage caused by accident, misuse or any use other than as described in your owner's manual, or damage resulting from failure to maintain and clean this product as specified in your owner's manual.
Your standard one year product guarantee is extended for an additional 12 months when you register the product within 28 days of purchase with Morphy Richards. If you do not register the product with Morphy Richards within 28 days, your product is guaranteed for 1 year. To validate your 2 year guarantee register with us online at
Or call our customer registration line
N.B. Each qualifying product needs to be registered with Morphy Richards individually.
Please note that the 2 year guarantee is only available in the UK and Ireland. Please refer to the one year guarantee for more information.
It is important to retain the retailer's receipt as proof of purchase. Staple your receipt to this back cover for future reference.
Please quote the following information if the product develops a fault. These numbers can be found on the base of the product.
Model no.
Serial no.
All Morphy Richards products are individually tested before leaving the factory. In the unlikely event of any appliance proving to be faulty within 28 days of purchase, it should be returned to the place of purchase for it to be replaced. If the fault develops after 28 days and within 12 months of original purchase, you should contact the Helpline number quoting Model number and Serial number on the product, or write to Morphy Richards at the address shown.
You may be asked to return a copy of proof of purchase. Subject to the exclusions set out below (see Exclusions), the faulty appliance will then be repaired or replaced as appropriate and dispatched usually within 7 working days of receipt.
If, for any reason, this item is replaced or repaired during the 1 year guarantee period, the guarantee on the new item will be calculated from original purchase date. Therefore it is vital to retain your original till receipt or invoice to indicate the date of initial purchase.
To qualify for the 1 year guarantee, the appliance must have been used according to the instructions supplied. For example, crumb trays should have been emptied regularly.
Morphy Richards shall not be liable to replace or repair the goods under the terms of either the Lifetime Blade Guarantee or the 1 or 2 Year Guarantee where:
The fault has been caused or is attributable to accidental use, misuse, negligent use or used contrary to the manufacturer's recommendations or where the fault has been caused by power surges or damage caused in transit.
The appliance has been used on a voltage supply other than that stamped on the products.
Repairs have been attempted by persons other than our service staff (or authorised dealer).
The appliance has been used for hire purposes or non domestic use.
The appliance is second hand.
Morphy Richards reserves the right not to carry out any type of servicing under the guarantee at its discretion
Batteries and damage from leakage are not covered by the guarantee.
These guarantees do not confer any rights other than those expressly set out above and do not cover any claims for consequential loss or damage. These guarantees are offered as an additional benefit and do not affect your statutory rights as a consumer. Morphy Richards products are intended for household use only. See usage limitations within the location safety instructions.
Morphy Richards has a policy of continuous improvement in product quality and design. The company, therefore reserves the right to change the specification of it's models at any time.

For electrical products sold within the European Community. At the end of the electrical products useful life, it should not be disposed of with household waste.
Please recycle where facilities exist. Check with your Local Authority or retailer for recycling advice in your country
morphy richards
The After Sales Division
Morphy Richards Ltd
Mexborough, South Yorkshire,
England, S64 8AJ
Helplines (office hours)
UK 0344 871 0944
Spare Parts 0344 873 0710
Republic of Ireland 1800 409 119
www.morphyrichards.com
CE



Brand : MORPHY RICHARDS
Model : Total Control Set 402052EE
Category : Hand blender