USER MANUAL SV-SD81 PANASONIC
Thank you for purchasing this product. For optimum performance and safety, please read these instructions carefully.
CAUTION for UK, Continental Europe, and Asia:
The AC voltage is different according to the area. Be sure to set the proper voltage in your area before using the AC adaptor.
(For details, refer to the "Batteries" section.)
READ BEFORE USE
After checking the included accessories (see page 2), follow these steps to record onto (checkout) the SD Memory Card.
- Install the Panasonic SD-Jukebox software from the included CD-ROM.
- Connect the USB Reader/Writer to your personal computer.
- Record (checkout) some music to the SD Memory Card with Panasonic SD-Jukebox.
Read the operating instructions (PDF) for Panasonic SD-Jukebox for details.
Before connecting, operating or adjusting this product, please read these instructions completely. Please keep this manual for future reference.
Note: "EB" on the packaging indicates the United Kingdom.
Matsushita Electric Industrial Co., Ltd.
Web site: http://www.panasonic.co.jp/global/
En
RQT7096-B M0503SF0
WARNING:
TO REDUCE THE RISK OF FIRE, ELECTRIC SHOCK OR PRODUCT DAMAGE, DO NOT EXPOSE THIS APPARATUS TO RAIN, MOISTURE, DRIPPING OR SPLASHING AND THAT NO OBJECTS FILLED WITH LIQUIDS, SUCH AS VASES, SHALL BE PLACED ON THE APPARATUS.
This product may receive radio interference caused by mobile telephones during use. If such interference is apparent, please increase separation between the product and the mobile telephone.
For UK, Continental Europe
THIS UNIT IS INTENDED FOR USE IN MODERATE CLIMATES.
For Asia
THIS UNIT IS INTENDED FOR USE IN TROPICAL CLIMATES.
SUOMI
VAROITUS:
TULIPALO-, SÄHKÖISKUVAARAN TAI TUOTETTA KOHTAAVAN MUUN VAHINGON VÄHENTÄMISEKSI EI LAITETTA SAA ALTISTAA SATEELLE, KOSTEUDELLE, VESIPISAROILLE TAI ROISKEELLE, EIKÄ NESTETTÄ SISÄLTÄVIÄ ESINEITÄ, KUTEN ESIMERKIKSI MALJAKOITA, SAA ASETTAA LAITTEEN PÄÄLLE.
TÄMÄ LAITE ON TARKOITETTU KÄYTETTÄVÄKSI LEUDOSSA ILMASTOSSA.
NORSK
ADVARSEL:
TO REDUCE THE RISK OF FIRE, ELECTRIC SHOCK, OR DAMAGE TO THE PRODUCT, THIS APPARATUS MUST NOT BE EXPOSED TO RAIN, MOISTURE, DRIPPING OR SPLASHING WATER. OBJECTS FILLED WITH LIQUIDS, SUCH AS VASES, MUST NOT BE PLACED ON THE APPARATUS.
THIS APPARATUS IS INTENDED FOR USE IN MODERATE CLIMATES.
Caution for AC Mains Lead
(For United Kingdom)
("EB" area code model only)
For your safety, please read the following text carefully.
This appliance is supplied with a moulded three pin mains plug for your safety and convenience. A 5-ampere fuse is fitted in this plug. Should the fuse need to be replaced please ensure that the replacement fuse has a rating of 5-ampere and that it is approved by ASTA or BSI to BS1362. Check for the ASTA mark or the BSI mark on the body of the fuse.
If the plug contains a removable fuse cover you must ensure that it is refitted when the fuse is replaced. If you lose the fuse cover the plug must not be used until a replacement cover is obtained. A replacement fuse cover can be purchased from your local dealer.
CAUTION!
IF THE FITTED MOULDED PLUG IS UNSUITABLE FOR THE SOCKET OUTLET IN YOUR HOME THEN THE FUSE SHOULD BE REMOVED AND THE PLUG CUT OFF AND DISPOSED OF SAFELY.
THERE IS A DANGER OF SEVERE ELECTRICAL SHOCK IF THE CUT OFF PLUG IS INSERTED INTO ANY 13-AMPERE SOCKET.
If a new plug is to be fitted please observe the wiring code as stated below.
If in any doubt please consult a qualified electrician.
IMPORTANT
The wires in this mains lead are coloured in accordance with the following code:
Blue: Neutral, Brown: Live.
As these colours may not correspond with the coloured markings identifying the terminals in your plug, proceed as follows:
The wire which is coloured Blue must be connected to the terminal which is marked with the letter N or coloured Black or Blue.
The wire which is coloured Brown must be connected to the terminal which is marked with the letter L or coloured Brown or Red.
WARNING: DO NOT CONNECT EITHER WIRE TO THE EARTH TERMINAL WHICH IS MARKED WITH THE LETTER E, BY THE EARTH SYMBOL = OR COLOURED GREEN OR GREEN/YELLOW.
THIS PLUG IS NOT WATERPROOF-KEEP DRY.
Before use
Remove the connector cover.
How to replace the fuse
The location of the fuse differ according to the type of AC mains plug (figures A and B). Confirm the AC mains plug fitted and follow the instructions below. Illustrations may differ from actual AC mains plug.
- Open the fuse cover with a screwdriver.

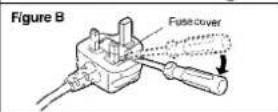
- Replace the fuse end close or attach the fuse cover.

Marking sign is located on bottom of the unit.


![graph LR F["Function State"] --> A["Step 1"] A --> B["Step 2"] B --> C["Step 3"] C --> D["Step 4"] D --> E["Final State"] G["HOLD MODE NORMAL"]](/content/2026/05/966042/images/39576498fb356d1599ac8f8a4e5a08da94a729d20bbf2ae92babff3818941448.jpg)


![graph TD A["N"] --> B["MODE NORMAL"] B --> C["VOLUME"] C --> D["1-→→→→→→→→→→→→→→→→→→→→→→→→→→→→→→→→→→→→→→→→→→→→→→→→→→→→→→→→→→→→→→→→→→→→→→→→→→→→→→→→→"] --> E["1-"] F["Q"] --> G["MODE NORMAL"] G --> H["VOLUME"] H --> I["1-"] J["P"] --> K["1-"] L["1-"] --> M["+VOLUME"] M --> N["1-"] O["1-"] --> P["+VOLU…](/content/2026/05/966042/images/6eca2de66337b28c23817cdfc2073a5360eaefe33f6c06af5b7d99bb94ba06c1.jpg)

S 1 2


3

4

5

6
T![graph TD A["Track TITLE"] --> B["16:24 DEFAULT P"] B --> C["ARTIST INFO"] D["128kbps"] --> E["ADC"] E --> F["①"] E --> G["②"] E --> H["③"] E --> I["④"]](/content/2026/05/966042/images/c2f9c708a9cf674f830e6bcf341f9fe492332bd1e41e16b9d8a6b8b884bd6954.jpg)
U

V
W
X

Supplied accessories
A
- Use numbers indicated when asking for replacement parts.
- The rechargeable battery, marked ×1, is available commercially. Part number: HHF-AZ10E • The AC adaptor, marked ※2, is NOJDCE000001 for Continental Europe and Asia.
For other areas, the configurations and part numbers are different.
UK: NOJDCE000002
B Using the supplied neck lanyard
Press the earphone cord ① to the slots of the cord holders ② after moving the holders to comfortable positions.
Take care that the lanyard does not get caught and choke you.
Care and use
- Keep the SD Memory Card and the rechargeable battery out of reach of children to prevent swallowing.
- Discontinue use if you experience discomfort with the earphones or any other parts that directly contact your skin.
Continued use may cause rashes or other allergic reactions.
- Leave some slack in the cord of the earphones and the neck lanyard if you wind them around the unit.
Do not:
- play your headphones or earphones at a high volume. • disassemble, remodel, drop, or allow the unit to get wet.
- use or store in locations directly exposed to sunlight, corrosive gases, a heat vent, or a heating appliance.
- use or store in humid or dusty locations.
- insert objects other than SD Memory Cards.
- use force to open the battery lid or card cover.
- use cracked or warped cards.
- short-circuit the power supply terminals of the unit, the charger, or the battery case.
- detach the label on the card or attach other labels or stickers.
Batteries
- Remove the battery if the unit is not to be used for a long time.
- Carry and store the rechargeable battery in the supplied rechargeable-battery case to prevent contact with metal objects.
- Do not recharge ordinary dry cell batteries.
- Do not disassemble, short-circuit, or put in a fire or water.
- Do not peel off the cover or use if the cover has been peeled off.
Mishandling of batteries can cause electrolyte leakage which can damage items the fluid contacts and may cause a fire.
If electrolyte leaks from the battery, consult your dealer.
Wash thoroughly with water if electrolyte comes in contact with any part of your body.
Batteries
● Charging the included rechargeable battery
For UK, Continental Europe, and Asia, check the setting of the voltage adjustor (a). If the setting does not correspond to your AC mains voltage, reset it with a screwdriver to prevent risk of fire or electric shock and damage to the unit.
For UK, see "Caution for AC Mains Lead" over.
For Asia, if the power plug does not fit your socket, use the power plug adaptor (b).
1 Insert the rechargeable battery.
2 Connect the AC adaptor.
① Plug in firmly. ② Connect to a household mains socket.
3 Put the unit into the charger ⓒ.
The lock pins ⓣ into the holes of the unit and the CHARGE lamp
lights as shown below.
While charging:
blinks briefly every two seconds.
When fully charged:
lights briefly every five seconds.
4 hours after fully charged:
goes out.
Notes:
- Charge before initial use after purchase or after an interval of three months or longer.
- It takes approximately 3 hours to fully charge the included battery. • The included battery can be re-charged about 300 times. The battery has reached the end of its life if play time dramatically reduces after recharging.
- Replace the rechargeable battery within 30 seconds. The clock stops while the unit is without power. Reset the clock if necessary (see "Setting the clock").
- Separate from radios while charging as the charger can cause interference.
- You can play the unit while charging, but the battery cannot be fully charged. Stop play to charge fully.
- You cannot operate the unit if the rechargeable battery is not inserted, even if you put it into the charger.
- The unit is in the standby condition when the AC adaptor is connected. The primary circuit is always "live" as long as the AC adaptor is connected to an electrical outlet. If the unit is not to be used for a long time, unplug the AC adaptor from the household mains socket. The AC adaptor consumes 2 W even when the unit is turned off.
D Removing the unit from the charger
Press [▲] (EJECT) and lift the unit out. (Do not try to remove the unit while the lock pins are engaged.)
E Using dry cell batteries
Only SV-SD85 for Asia
Insert an alkaline battery (R03, AAA, AM-4) into the battery case along with the unit (remove the lanyard first).
Press the battery in and down on the minus end.
To extend play time
Only SV-SD85 for Asia
You can get up to 50 hours of play by using the rechargeable battery and dry cell battery together.
F Battery indicator
When the indicator flashes, charge the rechargeable battery or replace the dry cell battery.
Hold function
This function stops the unit from responding when a button is pressed.
It prevents the following:
- The unit turning on unexpectedly, causing the battery to go dead.
- Play being interrupted when a button is accidentally pressed.
Listening
1 Set the mode switch to NORMAL.
2 Connect the stereo earphones firmly.
3 Insert an SD Memory Card with tracks recorded.
① Open the cover.
② Insert the card so the label is facing up and the end with the corner cut off is facing in.
③ Push on the center of the card so it locks into place and close the cover.
4 Press [ ]/■
The unit comes on and starts play.
5 Press [+ or [ ] to adjust the volume.
Press and hold to adjust continuously.
Note:
The following can occur if there is a problem with the card:
- “Now Busy” or “EMERGENCY STOP” appears on the display frequently
- "Please Wait" appears on the display for 20 seconds or longer
- No sound continues for 20 seconds or longer after pressing [▶▶ play
You can remedy the problem by formatting the card with SD-Jukebox. Before formatting the card, check in any data on the card to your computer. See the operating instructions for SD-Jukebox for details.
To stop play and turn the unit off
Press [▶]
The unit turns off about ten seconds later.
Resume
When you next press [▶/■], play resumes from where you stopped it. Play starts from track 1 if you replace the card or battery.
To remove the SD Memory Card
After stopping play, open the card cover, and push on the center of the card to unlock it.
Other operations
K Skipping tracks
Press [◀◀] or [▶▶] during play at the NORMAL position (U).
Search
Press and hold [I◄◄] or [►►I] during play at the NORMAL position (J).
The operation display flashes during search ("◀◀" or "▶◀").
M Direct play
1 Press [ ] during play at the NORMAL position ( ) Play stops.
2 Press [◀◀] or [▶▶] to select the track.
Tracks change faster if you press and hold [◀◀] or [▶▶].
3 Press [▶] play the track.
If the unit is left stopped for about ten seconds, even after selecting a track, it turns off.
- Repeat play and Random play
Press [+] during play at the MODE position (N).
Each time you press the button, play mode will change.
1-○: 1-track repeat
: All-track repeat
RANDOM: All tracks played once in random order; no display: Cancel
After changing, set the mode switch to NORMAL (☐)
Changing sound quality
Press [+] during play at the MODE position (N
Each time you press the button, sound quality will change.
NORMAL : Normal
S-XBS 1 : Adds powerful bass
S-XBS 2 : Further increases the power of the bass
TRAIN: Reduces sounds that may annoy others
After changing, set the mode switch to NORMAL (☐)
Using playlists
1 Press [▶▶] during play at the MODE position.(N)
“?” flashes and the total number of playlists is displayed.
2 Press [▶▶].
3 Press [-] or [+] to select the playlist number ⓑ.
The number of tracks ①, the total play time ②, and the playlist title ③ are displayed.
4 Press [▶▶].
The tracks in the playlist are played.
- If you select a playlist while the unit is stopped, press [▶/■] to start play.
- To play all the tracks on the SD Memory Card, select “dP” (default playlist) in step 3.
- If you want to stop the above operation partway, set the mode switch to NORMAL.
After changing, set the mode switch to NORMAL. (☐)
Setting the clock
S
1 During play, set the mode switch to MODE.
If you want to stop the following operation partway, set to NORMAL.
2 Press [▶▶].
"PLAYLIST?" is displayed.
3 Press [+] or [ ] to select
“TIME?”, then press [▶▶].
This is the clock setting mode.
4 Press [ ] or [ ] to select
“12 HOUR” or “24 HOUR”, then press [▶▶].
5 Press [ ] or [ ] to set the time, then press [▶▶].
6 Set the mode switch to NORMAL.
- To display the clock, set the mode switch to HOLD during play or press [▶/■] while the switch is set to HOLD.
- Adjust the clock regularly to maintain accuracy.
Adjusting and changing the display
Changing the display
1 During play, set the mode switch to MODE.
2 Press [◀◀] to change the display.
- The display changes with each press.
(a): Track number
⑥ : Elapsed play time
©: Total number of tracks
(e): Bitrate display when playing AAC audio data (shows the display when playing other types of data.)
- A few seconds after changing, the display returns to the track title indication automatically. If you want to maintain the display, press and hold [◀◀◀].
- Track titles ①, playlist titles ⑨, and artist information ⑬ roll from right to left if they do not fit on the display.
- Titles including text data the unit doesn't support cannot be displayed.
3 Set the mode switch to NORMAL.
Adjusting the contrast
1 During play, set the mode switch to HOLD.
2 While pressing and holding [press [ ] (darker) or [-] (lighter).
3 Set the mode switch to NORMAL.
Maintenance
Clean with a soft, dry cloth.
Do not use any type of abrasive pad, scouring powder or solvent such as alcohol or benzine.
SD-Jukebox Features
SD-Jukebox is a software program for recording and managing music CDs on your PC and transferring recorded tracks to an SD Memory Card so you can enjoy the music on your player.
SD-Jukebox incorporates copyright protection technology using encryption technology in order to protect copyrights, to ensure the healthy development of music culture, and to protect the rights of valid purchasers.
- SD-Jukebox records music data in encrypted form onto your hard disk drive. Encrypted music cannot be moved/copied to other folders, drives, and other PCs for use.
- Unique information pertaining to your PC's processor and hard disk drive is used in the encryption process. Therefore, if either the processor or hard disk drive is replaced, previously created music data will no longer be available for use.
- Depending on your computer system, you may experience problems such as being unable to record or use recorded music data. Please note that Matsushita is in no way liable for any music data you lose, or for any other direct or indirect damages.
- SD-Jukebox cannot work with MMC (MultiMediaCard).
- SD-Jukebox cannot play and record music CDs that do not have a disc mark on the disc label.
System Requirements
In order to use SD-Jukebox, you need a personal computer satisfying the system requirements shown below.
- Compatible PC: IBM PC/AT compatible personal computers with one of the following operating systems preinstalled. SD-Jukebox does not run on Macintosh systems.
- OS: Microsoft
* Windows® 98 Second Edition
Microsoft® Windows® Millennium Edition
Microsoft® Windows® 2000 (Professional SP2/SP3)*
Microsoft® Windows® XP (Home Edition or Professional, as well as each version after updating with SP1)*
SD-Jukebox may not run properly if your computer has been upgraded from Windows 3.1/95 to Windows 98 SE, Windows 2000, Windows Me, or Windows XP. If you are upgrading from Windows 98/98 SE or Windows Me to Windows XP, select "Upgrade installation (recommended)". If you select "New installation", music data created with SD-Jukebox prior to upgrading to Windows XP will no longer be available for use.
※ Not compatible with multi-CPU models or multi-boot environments. Only available when the user is logged in as the system administrator.
- CPU: Windows 98 SE, Windows Me: Intel Pentium II 333 MHz or higher
Windows 2000, Windows XP: Intel Pentium III 500 MHz or higher
- RAM: Windows 98 SE, Windows Me: 128 MB or more
Windows 2000, Windows XP: 256 MB or more
- Hard disk drive: 100 MB or more
- Display: 800 x 600 or better resolution (1024 x 768 or better recommended), set to High Colour (16-bit) or higher
- Sound device: Creative Labs Sound Blaster 16 or compatible device
- CD-ROM drive (required for installation and for CD recording): A CD-ROM drive capable of digital recording is required. Four-speed or higher is recommended. (Recording may not work properly with CD-ROM drives connected through an IEEE1394 or USB connection.)
- USB port (required for connecting an SD Memory Card) (SD-Jukebox may not run properly if the SD Memory Card is connected through a USB hub or USB extension cable.)
- Internet Explorer 5.01 or higher, DirectX 8.1 or higher installed on your computer.
- If you are using the CDDB function, then an Internet connection is also required.
(1) SD-Jukebox may not run properly on all computers meeting the recommended system specifications.
(2) SD-Jukebox may not run properly on user-built computers.
Installing SD-Jukebox
SD-Jukebox can be found on the included CD-ROM. Follow these steps to install it.
1. Turn on the computer and start Windows.
2. Insert the included CD-ROM into the CD-ROM drive.
The installer program starts automatically.
3. Follow the on-screen instructions.
4. Click on "Finish".
The SD-Jukebox icon appears on the desktop.

Note:
If the installation does not start automatically on your computer, follow these steps: From the Windows "Start" menu, choose "Run". The "Run" dialog box will open. Type "#:\autorun.exe" and click on "OK". (#: Use the correct CD-ROM drive ID.)
Using the Operating Instructions
■ The PDF Operating Instructions for SD-Jukebox
The operating instructions for SD-Jukebox are installed along with the application as a PDF.
Open the PDF from the "Start" menu, select "All Programs" → "Panasonic" → "SD-JukeboxV4" → "SD-JukeboxV4 Operating Instructions".
- You will need Adobe Acrobat Reader to read the file containing the operating instructions.
- Install Adobe Acrobat Reader from the included SD-Jukebox CD-ROM if you do not have it or if your version cannot correctly open the file.
From the "start" menu, select "Run...", then select the .exe file for installing Acrobat Reader from the CD-ROM.
Starting SD-Jukebox
Double click on the SD-Jukebox icon on the desktop.

SD-Jukebox starts and the main window is shown.
For your reference
If the icon is not on the desktop, from the "start" menu, select "All Programs" → "Panasonic" → "SD-JukeboxV4" → "SD-JukeboxV4".
Connecting an SD Memory Card
Connect the included USB Reader/Writer to checkout (record) tracks to your SD Memory Card.
Note:
- Connect to an AC main socket when using a portable computer. Data can be lost or errors can occur if the computer turns off during operation. • Operation cannot be guaranteed under the following circumstances:
- When you have connected two or more USB Reader/Writers to your computer or are using another USB device.
- When you have connected another SD Memory Card adapter.
- When you are using a USB hub or extension cord.
1 Turn on the computer and start Windows.
2 Connect the USB Reader/Writer to the computer's USB port. (See V over.)
The "New Hardware Found" screen appears.
The driver for the USB Reader/Writer is enabled automatically.
Check that it appears in Windows Explorer as a removable drive.
3 Taking care that the card is facing the right way, insert the SD Memory Card into the USB Reader/Writer. (See W over.)
Insert label-up with the cut-off corner facing in.
Note:
You can damage the card and USB Reader/Writer's slot if you insert the card incorrectly.
Ensure the USB Reader/Writer's ACCESS lamp (a) off before inserting or ejecting SD Memory Cards.
Do not remove the SD Memory Card while checking out even if the ACCESS lamp is off.
The USB Reader/Writer
- Do not wet, drop, or expose the USB Reader/Writer to impacts.
- Do not use or store in locations directly exposed to sunlight, a heat vent, or a heating appliance.
- Do not disassemble or modify.
- Do not insert foreign objects into the slot.
■ Protecting the data on your SD Memory Card
Performing the following actions before SD-Jukebox has started completely, while the USB Reader/Writer's ACCESS lamp is on, and while checking out tracks can damage your SD Memory Card and corrupt the data it contains.
- Inserting or ejecting the SD Memory Card
- Connecting or disconnecting the USB Reader/Writer
- Shutting down SD-Jukebox or Windows forcefully
- Turning the computer off forcefully (for example, unplugging the AC mains lead)
■To protect your data (See ✗ over.)
- Switch the write-protect switch @ the SD Memory Card to "LOCK". Unlock when you want to record or edit the card again.
- Do not touch the metal terminals of the card with your hands or metal objects.
- Use an oil-based felt pen to write on the card. Do not use pencil or ballpoint pen as these can damage the card.
Display messages Specific
| NO CARD | • You haven't inserted a card. |
| NotSDAUDIO | • There is no SD-audio data on the card. |
| NO LIST | • You haven't created a playlist. |
| NO TITLE | • The track or playlist doesn't have a title. |
| NO INFO. | • There is no information entered for the artist. |
| NO TRACK | • You haven't checked out tracks for the playlist. |
| UNFORMAT | • The card isn't formatted. |
| DATA ERROR | • The data format isn't standard. |
| LOCKED | • The unit cannot play the card you inserted. |
| NotPLAY | • Non-AAC,non-MP3, or non-WMA data is on the card.(Appears during play.) |
| NotDISPLAY | • Text data the unit cannot display is on the card. |
| NotSUPPORT | • Non-AAC,non-MP3, or non-WMA data is on the card.(Appears on the bitrate display.) |
| U01 | • The battery is dead. |
| NO BATTERY | • You haven't inserted the rechargeable battery into the unit. |
| ERROR | • An error has occurred.Remove and reinsert the card. If this doesn't correct the display, turn the unit off and on.If this still doesn't correct the display, try removing and reinserting the battery. |
| Now Busy | • The unit is manipulating data. Wait a moment. |
| EMERGENCY STOP | • Because the unit cannot manipulate irregular data on the card, the power is turned off. |
Troubleshooting guide
Before requesting service, make the below checks. If you are in doubt about some of the check points, or if the remedies indicated in the chart do not solve the problem, consult your dealer for instructions.
| Problems | Check points or causes |
| No operation. | • Is the hold function on?• Did you insert a card?• Is the battery fully charged?(If so, try removing the battery and reinserting it.)• Are the power supply terminals of the unit, charger, and battery case dirty or are there dust or obstacles on the terminals? |
| Cannot hear sound. | • Is the volume too low?• Is the earphone plug inserted correctly?(Try plugging it in again.)• Is the earphone plug dirty? |
| Play doesn’t start from the first track. | • Is the play mode set to RANDOM?• See “Resume”.• Is a playlist used? |
| There is a lot of noise. | • Are you using the unit near a television or mobile phone? |
For United Kingdom and Republic of Ireland
| shop@Panasonic | www.panasonic.co.uk(for UK customers only) |
| ·Order accessory and consumable items for your product with ease and confidence by telephoning our Customer Care Centre Mon–Friday 9:00am–5.30pm.(Excluding public holidays.)·Or go on line through our Internet Accessory ordering application.·Most major credit and debit cards accepted.·All enquiries transactions and distribution facilities are provided directly by Panasonic UK Ltd.·It couldn't be simpler! |
| Customer Care CentreFor UK customers: 08705 357357For Republic of Ireland customers: 01 289 8333 |
| Technical SupportFor UK customers: 0870 1 505610This Technical Support Hot Line number is for Panasonic PC software related products only.For Republic of Ireland, please use the Customer Care Centre number listed above for all enquiries.For all other product related enquiries, please use the Customer Care Centre numbers listed above. |
Sampling rate:
32 kHz, 44.1 kHz, and 48 kHz
Compression/decompression:
AAC, MP3 and WMA
No. of channels:
Stereo, 2 channels
Frequency response:
20 Hz to 20,000 Hz (+0 dB, -6 dB)
Output:
3.5 mW + 3.5 mW (16 Ω, M3 jack)
Power supply:
DC 1.2 V (one rechargeable battery)
DC 1.5 V (one LR03, AAA, AM-4 battery) : (SV-SD85 for Asia)
Approximate play times:
| Battery type | Play time | |
| Rechargeable※ | 18 hours |
| Panasonic alkaline | 32 hours | SV-SD85 for Asia |
| Both together※ | 50 hours |
※When the included rechargeable battery is fully recharged.
Maximum dimensions (WxHxD):
43.3 x 44.5 x 17.3 mm
Cabinet dimensions (WxHxD):
42.2 x 41.6 x 15.8 mm
Mass:
38 g with battery
26 g without battery
AC adaptor input:
- Specifications are subject to change without notice. • The play times shown depend on operating conditions.
- Mass and dimensions are approximate.
- SD logo is a trademark.
- Microsoft, Microsoft logo, Windows, Windows logo, Windows NT, Windows Media and DirectX are either trademarks or registered trademarks of Microsoft Corporation in the United States and/or other countries.
- WMA is a compression format developed by Microsoft Corporation. It achieves the same sound quality as MP3 with a file size that is smaller than that of MP3.
- MPEG Layer-3 audio decoding technology licensed from Fraunhofer IIS and Thomson multimedia.
- Portions of this product are protected under copyright law and are provided under license by ARIS / SOLANA /4C.
- Intel and Pentium are trademarks or registered trademarks of Intel Corporation in the United States and other countries.
- IBM and PC/AT are registered trademarks of International Business Machines Corporation of the U.S.
- Macintosh is a registered trademark of Apple Computer, Inc. of the U.S. in both the United States and other countries.
- Adobe, the Adobe logos, Acrobat, and Acrobat Reader are trademarks or registered trademarks of Adobe Systems Incorporated.
- CDDB is a registered trademark and GraceNote is a trademark of CDDB, Inc. (dba GraceNote)
- Other names of systems and products mentioned in these instructions are usually the registered trademarks or trademarks of the manufacturers who developed the system or product concerned.
The TM and ® marks are not used to identify registered trademarks and trademarks in these instructions.
- Licensed AAC Patents (U.S. patent numbers);
| 08/937,950 | 5,394,473 | 5,579,430 | 5,481,614 | 5,299,238 | 5,581,654 |
| 5848391 | 5,583,962 | 08/678,666 | 5,592,584 | 5,299,239 | 05-183,988 |
| 5,291,557 | 5,274,740 | 98/03037 | 5,781,888 | 5,299,240 | 5,548,574 |
| 5,451,954 | 5,633,981 | 97/02875 | 08/039,478 | 5,197,087 | 08/506,729 |
| 5 400 433 | 5 297 236 | 97/02874 | 08/211,547 | 5,490,170 | 08/576,495 |
| 5,222,189 | 4,914,701 | 98/03036 | 5,703,999 | 5,264,846 | 5,717,821 |
| 5,357,594 | 5,235,671 | 5,227,788 | 08/557,046 | 5,268,685 | 08/392,756 |
| 5 752 225 | 07/640,550 | 5,285,498 | 08/894,844 | 5,375,189 | |