
GV-RX580IXEB-8GD - Computer accessory GIGABYTE - Free user manual and instructions
Find the device manual for free GV-RX580IXEB-8GD GIGABYTE in PDF.


| Product type | Graphics card (ITX form factor) |
| Model | GV-RX580IXEB-8GD |
| GPU | AMD Radeon RX 580 8GB |
| Memory | 8GB GDDR5, 256-bit interface |
| Core clock | 1340 MHz (boost) |
| Memory clock | 8000 MHz effective |
| Dimensions (L x W x H) | 170 x 105 x 37 mm (approx.) |
| Weight | ~450 g (approx.) |
| Power consumption | 185 W TDP |
| Power connector | 1 x 6-pin PCIe |
| Recommended PSU | 500 W minimum |
| Output ports | 1 x HDMI 2.0b, 1 x DisplayPort 1.4, 1 x DVI-D |
| Cooling | Single 80mm fan with heatsink |
| Operating system support | Windows 10 / 11, Linux (driver dependent) |
| DirectX support | 12 (12_0) |
| Special features | PCIe 3.0 x16, AMD FreeSync, GIGABYTE WINDFORCE 2X cooling (custom ITX) |
| Cleaning instructions | Use compressed air to remove dust; avoid liquids |
| Safety | Install in turned-off system; avoid static discharge |
| Spare parts & repairability | Fan replacement possible; thermal paste renewal recommended every 2-3 years |
| General information | Compact design for small form factor builds; single-fan layout |
Frequently Asked Questions - GV-RX580IXEB-8GD GIGABYTE
User questions about GV-RX580IXEB-8GD GIGABYTE
0 question about this device. Answer the ones you know or ask your own.
Ask a new question about this device
Download the instructions for your Computer accessory in PDF format for free! Find your manual GV-RX580IXEB-8GD - GIGABYTE and take your electronic device back in hand. On this page are published all the documents necessary for the use of your device. GV-RX580IXEB-8GD by GIGABYTE.
USER MANUAL GV-RX580IXEB-8GD GIGABYTE
AMD® Graphics Accelerator
User's Manual
Rev. 107
Copyright
© 2018 GIGABYTE TECHNOLOGY CO., LTD
Copyright by GIGA-BYTE TECHNOLOGY CO., LTD. ("GBT"). No part of this manual may be reproduced or transmitted in any form without the expressed, written permission of GBT.
Trade manager
Table of Contents
- Introduction ...... 1
1.1. Minimum System Requirements .... 1
-
Hardware Installation 3
-
Software Installation 4
3.1. Driver and Utility Installation 4
3.1.1. Driver and AORUS ENGINE Installation....4
3.1.2. GIGABYTE AORUS ENGINE 9
-
Troubleshooting Tips ...... 12
-
Appendix ...... 13
5.1. Regulatory Statements ...... 13
1. Introduction
1.1. Minimum System Requirements
- Hardware
- Motherboard with one or above PCI-Express x 16 slot
- 2GB system memory (4GB recommended)
- Optical drive for software installation (CD-ROM or DVD-ROM drive)
- Operating System
- Windows ^® 10
- Windows ^® 8
- Windows ^® 7
※ Expansion cards contain very delicate Integrated Circuit (IC) chips. To protect them against damage from static electricity, you should follow some precautions whenever you work on your computer.
- Turn off your computer and unplug power supply.
- Use a grounded wrist strap before handling computer components. If you do not have one, touch both of your hands to a safely grounded object or to a metal object, such as the power supply case.
- Place components on a grounded antistatic pad or on the bag that came with the components whenever the components are separated from the system.
The card contains sensitive electric components, which can be easily damaged by static electricity, so the card should be left in its original packing until it is installed. Unpacking and installation should be done on a grounded anti-static mat. The operator should be wearing an anti-static wristband, grounded at the same point as the anti-static mat. Inspect the card carton for obvious damage. Shipping and handling may cause damage to your card. Be sure there are no shipping and handling damages on the card before proceeding.
DO NOT APPLY POWER TO YOUR SYSTEM IF THE GRAPHICS CARD IS DAMAGED.
In order to ensure that your graphics card can work correctly, please use
2. Hardware Installation
Now that you have prepared your computer, you are ready to install your graphics card.
Step 1.
Locate the PCI Express x16 slot. If necessary, remove the cover from this slot; then align your graphics card with the PCI Express x16 slot, and press it in firmly until the card is fully seated.

Make sure that the gold edge connector of the graphics card is securely inserted.
Step 2.
Replace the screw to fasten the card in place, and replace the computer cover.

natural_image
Close-up of industrial equipment components including a fan, circuit board, and electronic components (no visible text or symbols)If there are power connectors on your card, remember to connect the power cable to them, or the system will not boot. Do not touch the card when it's operating to prevent
3. Software Installation
Notice the following guidelines before installing the drivers:
- First make sure your system has installed DirectX 11 or later version.
- Make sure your system has installed the appropriate motherboard drivers (For the motherboard drivers, please contact the motherboard manufacturer.)
※ Notice : The photos in this manual are for reference only and may not match what you exactly see on your screen
3.1. Driver and Utility Installation
3.1.1. Driver and AORUS ENGINE Installation
After installing the operating system, insert the driver disk into your optical drive. The driver Autorun screen is automatically displayed which looks like that shown in the screen shot on the right. (If the driver Autorun screen does not appear automatically, go to My Computer, double-click the optical drive and execute the setup.exe program.)

The window of AORUS ENGINE installation would appear first as the following picture.

Step 2:
Click the Next button.

Step 4:
Click Browse to choose where you'd like to place the shortcuts in Start Menu. And then click Next.

Step 5:
Check the box if you'd like to create a desktop icon, and then click Next.

Step 6:
Click the Install button.

Step 7:
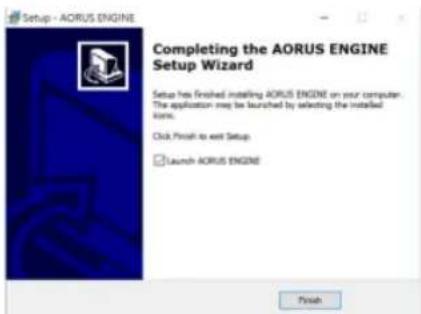
Click the Finish button to complete AORUS ENGINE installation.
Step 8:
After installing AORUS ENGINE, the window of AMD Driver Installer would appear.
Click Install.

Step 10:
Installation begins.

Step 11:
Click Restart Now to restart your computer in order to complete the driver installation.

3.1.2. GIGABYTE AORUS ENGINE
Users could adjust clock speeds, memory speeds, fan performance, and LED etc. according to their own preference through this intuitive interface.
※ The interface and functionality of the software is subject to each model.
Easy setting
- OC mode
High performance over clocking mode - Gaming mode
Default setting gaming mode - ECO mode
Energy saving, silent ECO mode
Advanced Setting
Choose PROFESSIONAL MODE, and then click on +/- or drag the control button to adjust GPU clock, memory clock, fan speed, power target, and target temperature.
Click on APPLY, the adjusted data will be saved in the profile on the upper left, click RESET to return to previous setting. Click DEFAULT to return to default setting.
Users could also choose CUSTOMIZED for fan setting, and move the white dots on the line chart to adjust fan speed and temperature.

LED
Choose LED on the lower right, users could choose different styles, brightness, colors; they could also turn off the LED effects through this software.

Fan control
Choose SEMI PASSIVE/ACTIVE FAN on the lower right to switch the fan mode between semi passive and continuous spin.
4. Troubleshooting Tips
The following troubleshooting tips may help if you experience problems. Contact your dealer or GIGABYTE for more advanced troubleshooting information.
- Check whether the card is seated properly in the PCI Express x16 slot.
- Ensure that the display cable is securely fastened to the card's display connector.
● Make sure that the monitor and computer are plugged in and receiving power. - If necessary, disable any built-in graphics capabilities on your motherboard. For more information, consult your computer's manual or manufacturer.
(NOTE: Some manufacturers do not allow the built-in graphics to be disabled or to become the secondary display.)
● Make sure you selected the appropriate display device and graphics card when you install the graphics driver.
- Restart your computer.
Press
- If you are not able to find the desired monitor color/resolution settings: The color and screen resolution options available for selection depend on the graphics card being installed.
※ If necessary, adjust your monitor's setting using monitor's adjust panel to make the screen looks focused, crisp, and sharp.
5. Appendix
5.1. Regulatory Statements
Regulatory Notices
This document must not be copied without our written permission, and the contents there of must not be imparted to a third party nor be used for any unauthorized purpose. Contravention will be prosecuted. We believe that the information contained herein was accurate in all respects at the time of printing. GIGABYTE cannot, however, assume any responsibility for errors or omissions in this text. Also note that the information in this document is subject to change without notice and should not be construed as a commitment by GIGABYTE.
Our Commitment to Preserving the Environment
In addition to high-efficiency performance, all GIGABYTE VGA Cards fulfill European Union regulations for RoHS (Restriction of Certain Hazardous Substances in Electrical and Electronic Equipment) and WEEE (Waste Electrical and Electronic Equipment) environmental directives, as well as most major worldwide safety requirements. To prevent releasing harmful substances into the environment and to maximize the use of our natural resources, GIGABYTE provides the following information on how you can responsibly recycle or reuse most of the materials in your "end of life" product:
- Restriction of Hazardous Substances (RoHS) Directive Statement
GIGABYTE products have not intended to add hazardous substances (Cd, Pb, Hg, Cr+6, PBDE and PBB). The parts and components have been carefully selected to meet RoHS requirement. Moreover, we at GIGABYTE are continuing our efforts to develop products that do not use internationally banned toxic chemicals.
● Waste Electrical & Electronic Equipment (WEEE) Directive Statement
GIGABYTE will fulfill the national laws as interpreted from the 2002/96/EC WEEE (Waste Electrical and Electronic Equipment) directive. The WEEE Directive specifies the treatment, collection, recycling and disposal of electric and electronic devices and their components. Under the Directive, used equipment must be marked, collected separately, and disposed of properly.
● WEEE Symbol Statement
The symbol shown on the left is on the product or on its packaging, which indicates that this product must not be disposed of with other waste. Instead, the device should be taken to the waste collection centers for activation of the treatment, collection, recycling and disposal procedure.
The separate collection and recycling of your waste
equipment at the time of disposal will help to conserve natural resources and ensure that it is recycled in a manner that protects human health and the environment. For more information about where you can drop off your waste equipment for recycling, please contact your local government office, your household waste disposal service or where you purchased the product for details of environmentally safe recycling.
When your electrical or electronic equipment is no longer useful to you, "take it back" to your local or regional waste collection administration for recycling.
If you need further assistance in recycling, reusing in your "end of life" product, you may contact us at the Customer Care number listed in your product's user's manual and we will be glad to help you with your effort.
Finally, we suggest that you practice other environmentally friendly actions by understanding and using the energy-saving features of this product (where applicable), recycling the inner and outer packaging (including shipping containers) this product was delivered in, and by disposing of or recycling used batteries properly. With your help, we can reduce the amount of natural resources needed to produce electrical and electronic equipment, minimize the use of landfills for the disposal of "end of life" products, and generally improve our quality of life by ensuring that potentially hazardous substances are not released into the environment and are disposed of properly.
● China Restriction of Hazardous Substances Table
The following table is supplied in compliance with China's Restriction of Hazardous Substances (China RoHS) requirements:

Management Methods on Control of Pollution from Electronic Information Products (China RoHS Declaration)
Address: No.6, Baoqiang Rd., Xindian Dist.,
New Taipei City 231, Taiwan
TEL: +886-2-8912-4888
FAX: +886-2-8912-4003
Tech. and Non-Tech. Support
(Sales/Marketing):
G.B.T. INC. - U.S.A.
TEL: +1-626-854-9338
FAX: +1-626-854-9339
Web address:
https://www.gigabyte.com/us/
● G.B.T. INC (USA) - Mexico
Web address:
https://www.gigabyte.com/mx/
● Giga-Byte SINGAPORE PTE. LTD. - Singapore
WEB address :
tps://www.gigabyte.com/sg/
- Thailand
WEB address :
https://www.gigabyte.com/th/
Vietnam
WEB address :
https://www.gigabyte.com/vn/
● GIGABYTE TECHNOLOGY (INDIA) LIMITED - India
WEB address :
https://www.gigabyte.com/in/
● NINGBO G.B.T. TECH. TRADING
CO., LTD. - China
WEB address : http://www.gigabyte.cn/
- Shanghai
TEL: +86-21-63400912
FAX: +86-21-63410100
Beijing
TEL: +86-10-62102838
FAX: +86-10-62102848
♦ Wuhan
TEL: +86-27-87851061
FAX: +86-27-87851330
◆ GuangZhou
TEL: +86-20-87540700
FAX: +86-20-87509080
♦ Chengdu
TEL: +86-28-85236930
FAX: +86-28-85256822
♦ Xian
TEL: +86-29-85531943
FAX: +86-29-85510930
♦ Shenyang
TEL: +86-24-83992901
FAX: +86-24-83992909
Saudi Arabia
WEB address :
https://www.gigabyte.com/sa/
● Gigabyte Technology Pty. Ltd. - Australia
WEB address :
https://www.gigabyte.com/au/
● G.B.T. TECHNOLOGY TRADING GMBH - Germany
WEB address :
https://www.gigabyte.com/de/
● G.B.T. TECH. CO., LTD. - U.K.
WEB address :
https://www.gigabyte.com/uk/
● Giga-Byte Technology B.V. - The Netherlands
WEB address :
https://www.gigabyte.com/nl/
● GIGABYTE TECHNOLOGY FRANCE - France
WEB address :
https://www.gigabyte.com/se/
Italy
WEB address : http://it.gigabyte.com/
- Spain
https://www.gigabyte.com/ro/
Serbia
WEB address : http://www.gigabyte.rs/
- Kazakhstan
WEB address : http://www.gigabyte.kz/
You may visit the GIGABYTE website, select your language in the language list at the bottom left corner of the website.
GIGABYTE Global Service System
To submit a technical or non-technical (Sales/Marketing) question, please link to: https://esupport.gigabyte.com


- AMD® Graphics Accelerator
- Table of Contents
- Introduction
- Minimum System Requirements
- Hardware Installation
- Step 1.
- Step 2.
- Software Installation
- Driver and Utility Installation
- Driver and AORUS ENGINE Installation
- Step 2:
- Step 4:
- Step 5:
- Step 6:
- Step 7:
- Step 8:
- Step 10:
- Step 11:
- GIGABYTE AORUS ENGINE
- Easy setting
- Advanced Setting
- LED
- Fan control
- Troubleshooting Tips
- Appendix
- Regulatory Statements
- Regulatory Notices
- Our Commitment to Preserving the Environment
- - Restriction of Hazardous Substances (RoHS) Directive Statement
- ● Waste Electrical & Electronic Equipment (WEEE) Directive Statement
- ● WEEE Symbol Statement
- ● China Restriction of Hazardous Substances Table
- G.B.T. INC. - U.S.A.
- ● G.B.T. INC (USA) - Mexico
- ● Giga-Byte SINGAPORE PTE. LTD. - Singapore
- - Thailand
- Vietnam
- ● GIGABYTE TECHNOLOGY (INDIA) LIMITED - India
- ● NINGBO G.B.T. TECH. TRADING
- - Shanghai
- Beijing
- ♦ Wuhan
- ◆ GuangZhou
- ♦ Chengdu
- ♦ Xian
- ♦ Shenyang
- Saudi Arabia
- ● Gigabyte Technology Pty. Ltd. - Australia
- ● G.B.T. TECHNOLOGY TRADING GMBH - Germany
- GIGABYTE Global Service System
Brand : GIGABYTE
Model : GV-RX580IXEB-8GD
Category : Computer accessory