
Gardian G12 - Treadmills inSPORTline - Free user manual and instructions
Find the device manual for free Gardian G12 inSPORTline in PDF.


| Product Type | Treadmill |
| Brand | inSPORTline |
| Model | Gardian G12 |
| Motor Power | 2.5 HP (continuous) |
| Speed Range | 0.8 - 16 km/h |
| Incline Range | 0 - 12% (electric) |
| Running Surface | 140 x 50 cm |
| Display | 5-inch LCD with time, distance, speed, calories, pulse |
| Heart Rate Monitoring | Hand grip sensors and Bluetooth chest belt compatible |
| Programs | 12 preset programs + 3 user-defined |
| Foldability | Yes, hydraulic folding with soft drop |
| Dimensions (folded) | 95 x 85 x 150 cm |
| Dimensions (unfolded) | 190 x 85 x 145 cm |
| Product Weight | 85 kg |
| Max User Weight | 130 kg |
| Power Supply | 220-240 V, 50/60 Hz |
| Safety Features | Safety key, emergency stop, child lock |
| Maintenance | Lubricate belt every 3 months; clean with damp cloth |
| Spare Parts Availability | Motor, belt, deck, console available from inSPORTline service |
| Warranty | 2 years (motor), 1 year (parts) |
Frequently Asked Questions - Gardian G12 inSPORTline
User questions about Gardian G12 inSPORTline
0 question about this device. Answer the ones you know or ask your own.
Ask a new question about this device
Download the instructions for your Treadmills in PDF format for free! Find your manual Gardian G12 - inSPORTline and take your electronic device back in hand. On this page are published all the documents necessary for the use of your device. Gardian G12 by inSPORTline.
USER MANUAL Gardian G12 inSPORTline
IN 13971 Motorized treadmill inSPORTline Gardian G12
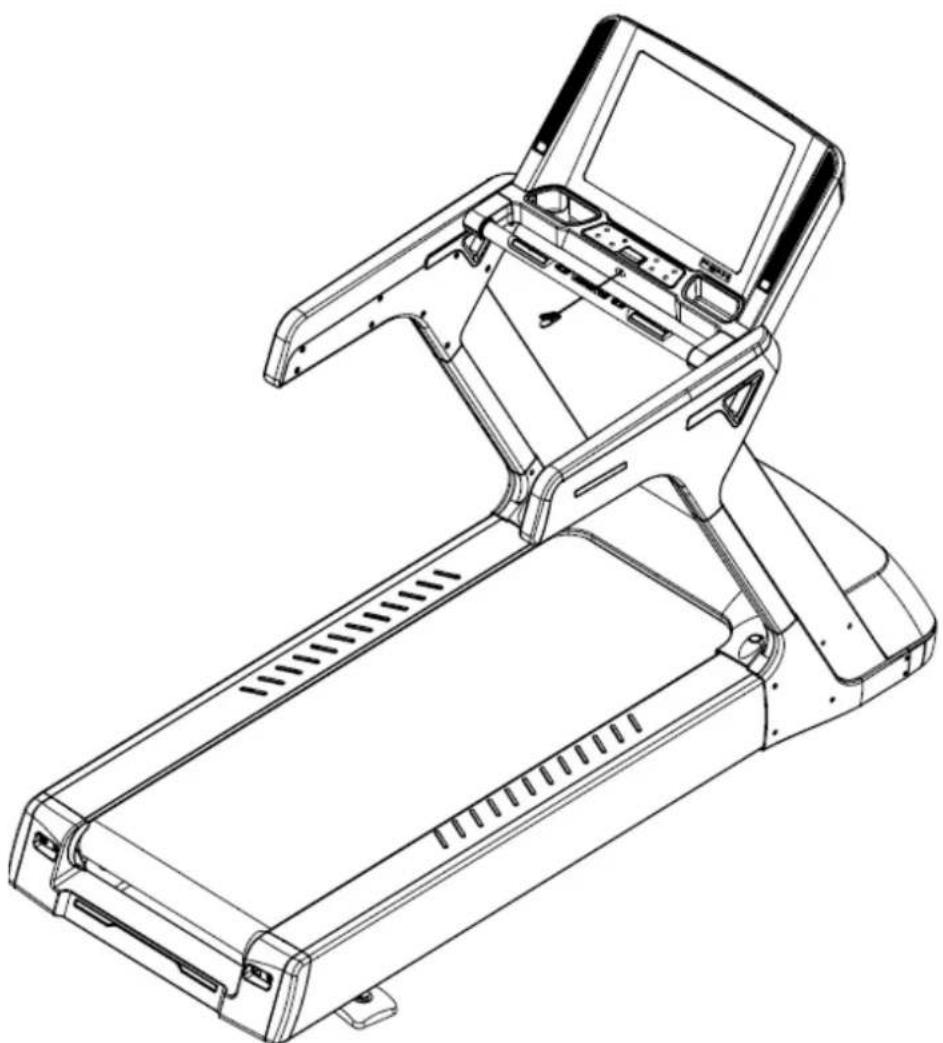
CONTENTS
SAFETY PRECAUTIONS.... 3
ATTENTION 3
SAFE USE 3
ASSEMBLY INSTRUCTIONS .... 4
TECHNICAL PARAMETERS 11
GETTING START 11
WARM – UP EXERCISE 12
OPERATION INSTRUCTIONS 14
DISPLAY....14
BUTTONS FUNCTIONS....15
OPERATION INSTRUCTIONS 15
MANUAL MODE 15
COUNTDOWN MODE 15
PRESET PROGRAMS....16
USER PROGRAM 17
PULSE TEST 17
POWER SAVING MODE 18
MP3....18
METRIC-INCH SYSTEM CHANGE AND INCLINE ADJUSTMENT 18
TROUBLESHOOTING (DISPLAY ERRORS) 18
SAFE EXERCISING....19
MAINTENANCE INSTRUCTIONS 20
MAINTENANCE GUIDELINES....20
BELT MIDDLE PLACEMENT AND TIGHTNESS ADJUSTMENT 20
BELT ADJUSTMENT 21
ADJUSTING METHOD 21
EXPLODED DRAWING....22
PART LIST....23
TERMS AND CONDITIONS OF WARRANTY, WARRANTY CLAIMS 26
SAFETY PRECAUTIONS
WARNING!
In order to avoid an accident, you have to pay attention to the following instructions:
- Attach the safety key clip tightly to your clothes before exercising.
- Swing your arms naturally when you are exercising. Don't look downwards.
- Accelerate the speed gradually. Adapt to the current speed before the acceleration.
- In case of emergency press the emergency stop button or pull out the safety key.
- Only leave the device when it is completely stopped.
Note: Strictly follow the assembly instructions.
ATTENTION
- Ask your physician for advice before starting any exercise program.
- Check if all the bolts fit well. No adjustable part should protrude. It could obstruct the user's movements.
- Don't place this treadmill in damp environment. Humidity can cause damage. (We take no responsibility for any damage or injury caused by the above reasons.)
- Wear sports clothes and sports shoes during exercising.
- Don't use this device at least 40 minutes after having a meal.
- Warm up before exercise to avoid injury.
- If you suffer from hypertension, consult your doctor before exercising.
- Keep children away from the device.
- This treadmill is intended to be used only by adults.
- Don't insert anything into parts or holes of this device to avoid damage or injury.
SAFE USE
Connect the power line only after the assembly is complete (the protect cover must be put on). Plug in the power line into the power socket, which has the 16A safety grounding. We suggest that you use the over current protector (to ensure the safety of the user and treadmill).
- Place this treadmill on clear and level ground. Don't place it on thick carpet so you do not block the ventilation under the device. Don't place it near water or moisture and don't use it outdoors. The power line is specific. If it is damaged, purchase a new one from the dealer or contact our company directly. For your safety keep a minimal clearance of 0.6 m around this treadmill.
- When you place the treadmill, make sure it doesn't cover the socket on the wall, which is convenient to plug in the power line.
- Never start the treadmill while you are standing on the running belt. After connecting the power, there may be a pause after the running belt begins to move. You should always stand on the non-slip side rails until the belt starts moving.
- Do not wear long or loose clothes when you exercise. they may get caught in the treadmill. Usually you need to wear running shoes or sports shoes with rubber soles.
- Never remove the protective cover casually. If you need to open it for maintenance, make sure to unplug the power line first.
-
Keep children away from the device.
-
When you use the treadmill for the first time, hold the handrails until you are familiar with the device.
-
The treadmill equipment is made for special use. Please do not modify it and don't make any improper maintenance. If the treadmill suddenly or continually increases its speed due to an electronic system problem, pull out the safety switch. The treadmill will stop immediately.
-
Weight limit: 200 kg
-
Category: SB (according to EN957 norm) suitable for professional and/or commercial use.
-
WARNING! The heart rate frequency monitoring may not be completely accurate. Overexertion during training can lead to a serious injury or even death. If you start to feel faint, stop the exercise immediately.
ASSEMBLY INSTRUCTIONS
When you open the box, you'll find the following already-assembled parts.
Installation tools:
 |  |   |  |
| 3L/R. Upright | 35L/R. Upright cover | 49L/R. Storage box | 73. Bolt M12*25 |
 |  |  |  |
| 77. Bolt M5*25 | 81. Bolt M8*15 | 86. Bolt M12*65 | 89. Flat washer § 13* §24*t2.5 |
 |  |  |  |
| 98. Flat washer § 9* §16*t1.6 | 116. Screw BT4.0*15L | 119. 4#wrench | 120. 5#wrench |
 | [0Y6C] |  |  |
| 121. 6. #wrench | 122. 8#wrench | 123. 10#wrench | 124. wrench |
| [0x6T] | [HDTY] |  |  |
| 125. wrench 17-22 | 126. wrench 34 | 141. spring line | 172. Frame assembly |
 | |||
| 173. meter assembly | -5- |
Step 1
First, use a coin to push into the key hole on the motor cover and turn it by 90° When the motor cover is open, it will raise automatically.

Step 2
Fix the left and right upright on the frame assembly (172) with M12*65 bolts (86). To lock it inside use 12*25 (73) bolt with flat washer (89). Don't tighten the connections too much.

Step 3
Connect the right side signal wire (151) with upright upper wire (150). Connect the left end light wire with to the signal wire.

Step 4
After putting the motor cover back to its original place by hands, use a coin to push into the key hole on the motor cover and turn it by 90° to lock it tightly.


Step 5
Plug the left and right handrail wire to the control panel connecting wire. Then fix the control panel on the frame assembly. Use M6 wrench from the toolkit. Lock the four screws M8*15 (81) and flat washers φ 9φ 16*t1.6 (98) tightly.
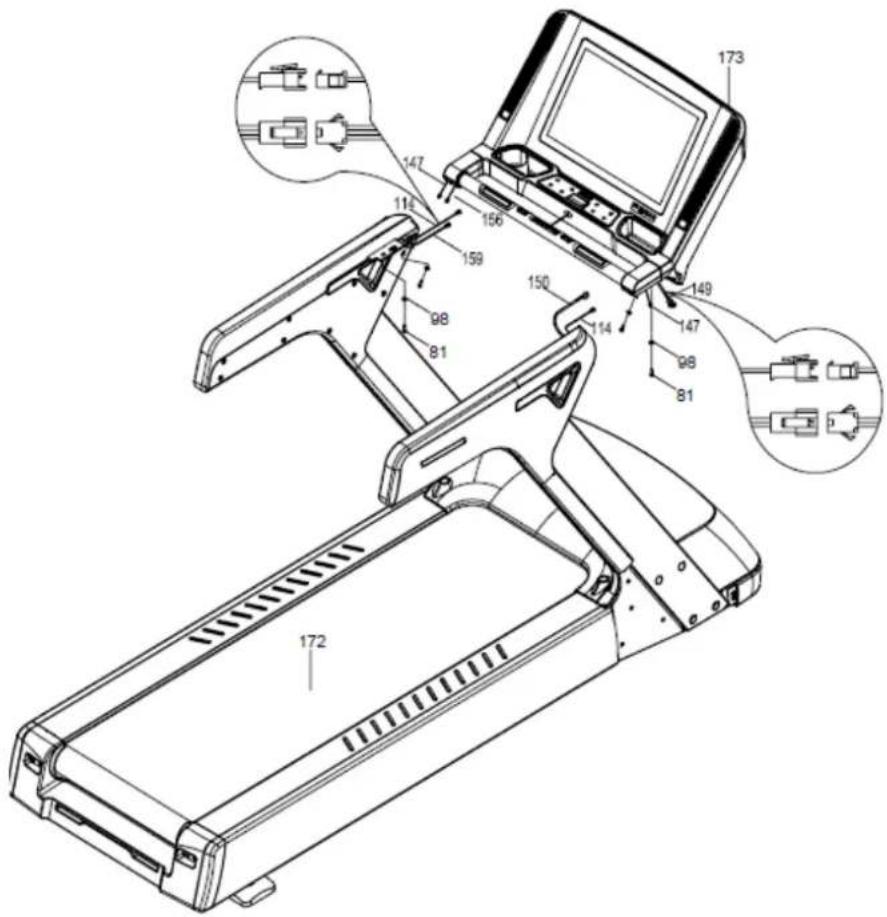
Wire connecting specification
- Picture 1: Control panel assembly.
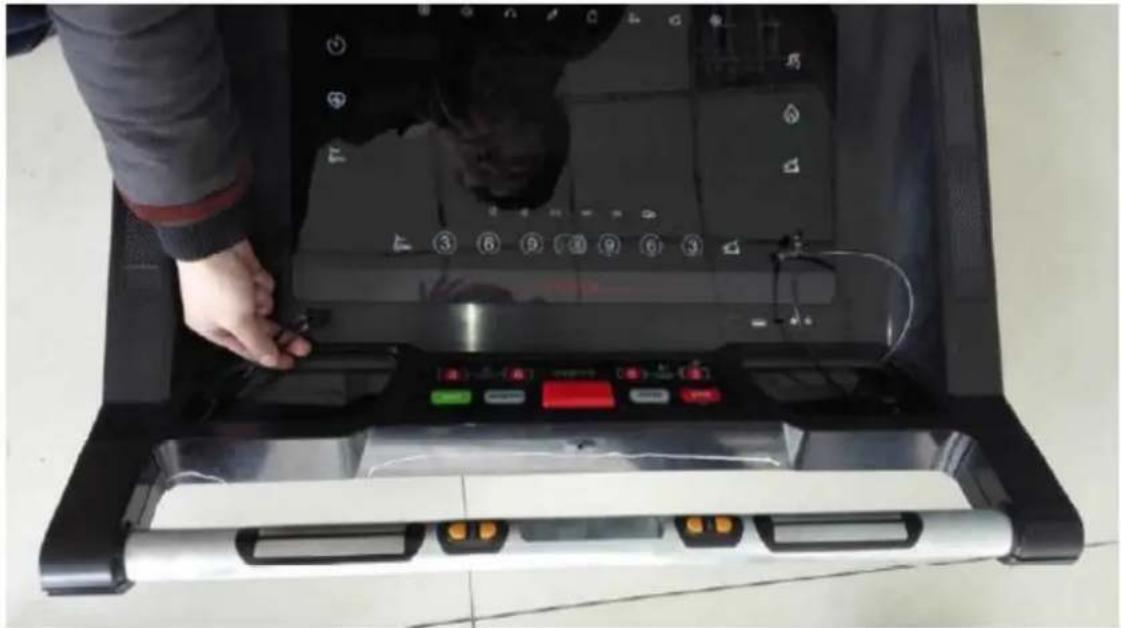
- Picture 2: Left end light and handrail light wire.

- Picture 3: Right signal wire and handrail light wire.

Step 6
First take out the wire that needs to be connected (as shown in pictures 2 and 3).
Step 7
Then put the left end light and handrail light wire in the hole on the left side of the control panel (as shown in pictures 4 and 5). Then connect the wire (as shown in picture 6).

Step 8
Then insert the middle wire handrail light to the right side port of the control panel (as shown in pictures 7 and 8) and connect them (as shown in picture 9).

Step 9
Then affix the control panel onto the frame using M6 toolkit and a wrench. Lock tightly each of the four bolts M8*15 with flat washers φ 9φ 16t1.6 (as shown in pictures 10 and 11).

Pic. 10

Pic. 11
Step 10
Put the wires into the control panel. At last assemble the storage box which is in the control panel accessory box (as pictures 12 and 13).

Pic. 12
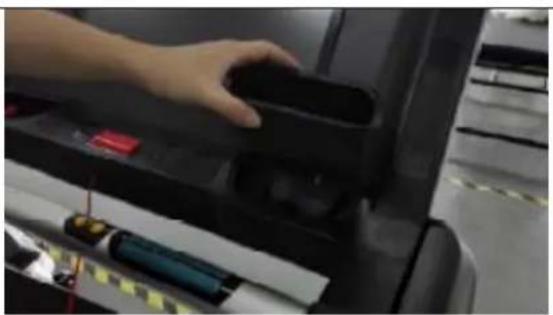
Pic. 13
Step 11
First lock all the screws on the upright (including the inner), then lock tightly the front covers (39L/R) with M5*25 bolts (77). Then lock the inside screw M4*15 (116) on the frame.

Step 12
As the picture shows, if the treadmill is uneven, you can use the toolkit 17-22, 34 wrench to fine-tune it. Turn anti-clockwise to raise height, clockwise to lower the height.

TECHNICAL PARAMETERS
| Assembly size (mm) | 2280*945*1500 mm | Speed range | 1 — 23 Km/h |
| Incline range | 1 - 20% | Motor spec. (HP) | 8 HP (PEAK) |
| Running size (mm) | 1650*600 mm | Input Volt (V) | 220 – 240 V |
| N.W. | 265 Kgs | Max. output power | 3000 W |
| Max. user weight | 200 Kgs | Operating temperature | 0 – 28 °C |
| IPS screen play | Speed, Time, Distance, Calories, Pulse | ||
| Safety Protection and Product Advantage | A. Red safety switches on the panel (function based on magnetic plate).B. Overcurrent and overload function set in the microcomputer.C. LED screen and control panel display clearly; the angle of the view has no effect.D. 1.0—23 km/h speed range.E. Frequency control method, speed adjusting is very smooth and convenient.F. The buffer system makes the exercise natural and smooth at the same time and cushions the impact to the user's foot, ankle joint and other parts of their body.G. The over current protector can only continue to function when reset manually, which can prevent motor damage.H. Intelligent explosion-proof circuit reacts in 0,3 seconds, providing maximum protection. | ||
GETTING START
PREPARATION
If you are more than 45 years old or have health problems and this is your first time using a treadmill, please consult your doctor before exercising.
Before you use the motorized treadmill, please stand aside and learn how to use it, e.g. how to start, stop and adjust the speed. You can use it after you familiarize yourself with its functions. Then stand on the plastic non-slip side rails and grip the handrail with both hands. Turn the treadmill on and set a low speed (1.6 – 3.2 km/h), stand straight, look forward and try to step onto the running belt a few times with one foot. Then step onto the running belt and start exercising. After you are adapted, you can slowly increase the speed to 3 – 5 km/h and maintain this speed for about 10 minutes. After that, stop the treadmill slowly.
EXERCISE
Stand aside to learn how to operate the machine (adjusting the speed and inclination). Start exercising after you familiarize yourself with the functions. Walk 1 km in a constant tempo and record the time it takes, which may be about 15 - 25 minutes. Walk 1 km by 4.8 km/h (you need about 12 minutes). After successfully completing this exercise a few times you can adjust to a higher speed and inclination. Have a good 30-minute exercise. When you do walking exercises do not rush. The exercise improves your health.
FREQUENCY
The optimal exercise frequency is 3 - 5 times per week for 15 - 60 min. It is better to make a schedule first and not exercise randomly. You can control the intensity of the movement through adjusting the speed and inclination. We suggest not to set the inclination when at the start of the exercise. When you want to increase the intensity of the exercise, change in inclination will be the most effective.
HOW TO EXERCISE
It is best for each exercise to last 15 – 20 min. Warm up for 2 minutes by walking 4.8 km/h, then increase the speed to 5.3 km/h, and then 5.8 km/h. Each section should take about 2 minutes. Then add 0.3 km/h per 2 mins, until your breathing quickens (You should have no difficulty though). Keep exercising at this speed. if you feel it is hard to breathe, lower the speed by 0.3 km/h. Finally, leave 4 minutes to reduce the speed at last. If you find increasing the intensity by increasing speed too hard, you can slowly increase the inclination. Just a small adjustment can increase the intensity greatly.
BURNING CALORIES - This way allows you to burn calories. Warm up for 5 minutes at 4 – 4.8 km/h speed, then add 0.3 km/h per every 2 minutes. Keep increasing the speed until you feel it is a challenge to do the exercise continually for 45 minutes. In order to increase intensity, you can try to exercise for 1 hour at this speed. You can exercise while watching TV. Add 0.3 km/h speed every time you see advertisements, and return to the former speed by the end of the advertisement so that you increase the intensity only during advertisements. Slow down for at least 4 minutes.
CLOTHING
All you need is a pair of shoes, which let you stretch your feet fully and at the same time don't stick to foreign matters under your shoes soles, so that you do not carry dirt onto the running belt and running board. The dirt and other foreign matter could damage them both. You should wear comfortable clothes.
WARM – UP EXERCISE
It is better to do some warm-up exercises before running. Warmed muscles are easy to stretch, so take the time to do 5 – 10-minute warm-up. Repeat each exercise shown in the pictures below.
 | Touch toesBend your knees slightly and slowly stretch your body downwards.Relax your back and shoulders. Try to touch the toes. Keep the position for 10 - 15 seconds.Repeat approx. 3 times. | ||
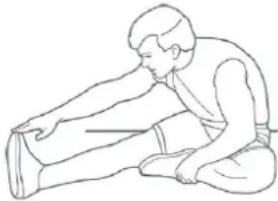 | Hamstring stretchesSitting on a cushion, stretch one leg straight and fold the other inward. Pull it as close to your body as you can. Try your best to touch the toes and keep the stretch for 10 – 15 seconds. Repeat 3 times for each leg. |
 | Calves and Achilles tendon stretchesSupport yourself with two hands on a wall or a tree with one leg stretched behind you. Keep the leg straight and the heel on the ground. Keep the position for 10 - 15 seconds. Repeat 3 times for each leg. | |
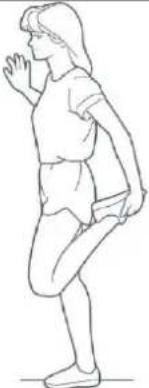 | Quadriceps stretchesSupport yourself with your right hand on the wall or a table and stretch your left hand backwards to hold your ankle. Pull it towards your buttocks until you feel tension in your thigh. Keep the position for 10 - 15 seconds. Repeat 3 times for each leg. | |
 | Inner thigh stretchesSit down with your soles touching and knees outward. Pull your feet towards your groin. Keep the position for 10 - 15 seconds. Repeat 3 times. |
OPERATION INSTRUCTIONS
DISPLAY
![graph LR A["Start"] --> B["incline"] B --> C["Speed"] C --> D["stop"] E["start"] --> F["program"] G["mode"] --> H["stop"]](/content/2026/05/965673/images/5120fc06d83d916c422bfe94082fc5a479fce1945d278fa0fa41b86f9922c743.jpg)
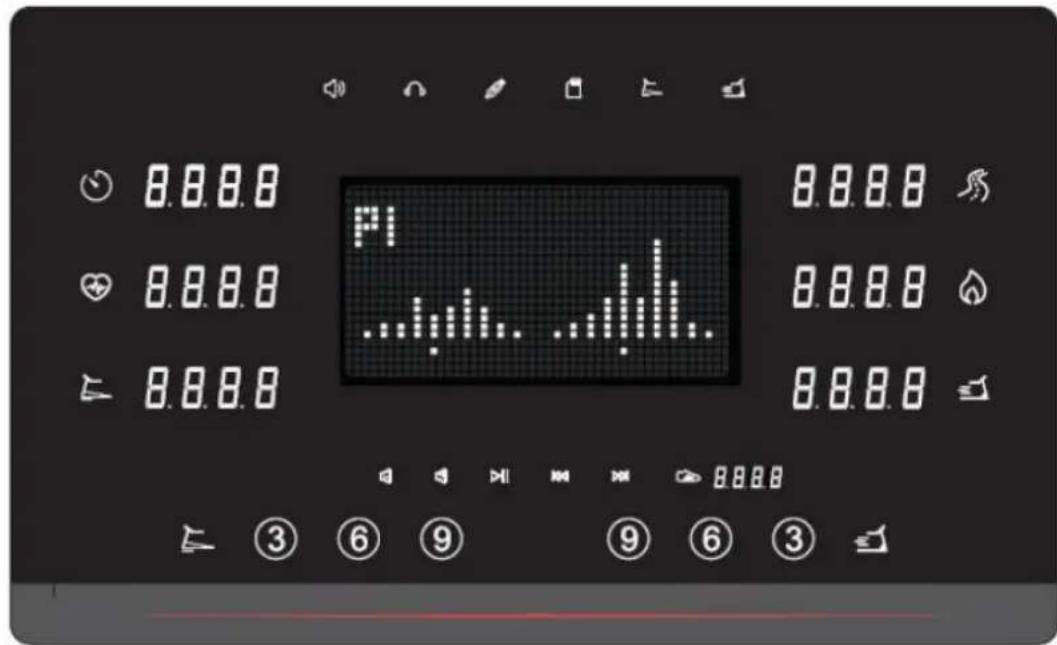
- Time window: Displays the running time, counting from 0:00 - 99:59 min. When the limit is reached, it starts counting from 0:00 again. Countdown mode – counts from the set time to zero. When it counts down to 0:00, the treadmill slows down steadily and then stops moving. When the treadmill stops completely it will enter the standby mode.
- Distance window: Displays the running distance, counting from 0.00 - 99.90 km. When the limit is reached, it starts counting from 0:00 again. Countdown mode – counts down the distance from the set value to zero. When it counts down to 0.00, the treadmill slows down steadily and then stops moving. When the treadmill stops completely it will enter the standby mode.
- Pulse window: Displays the user's current pulse. If the user puts their hands onto the handrails, the system will detect their current heart rate and display it on screen. The range of heart rate frequency is 22 - 250 bpm. This data is only for reference and cannot be used for medicinal purposes.
- Calories window: Displays the amount of burned calories, counting from 0 – 9999 cal. When the limit is reached, it starts counting from 0 again. Countdown mode – counts down the burned calories from the set value to zero. When it counts down to 0:00, the treadmill slows down steadily and then stops moving. When the treadmill stops completely it will enter the standby mode.
-
Speed window: Displays the current speed. The range of the speed display is 1.0 – 20 km/h.
-
Incline window: Displays the current inclination. The range of the inclination display is 0 - 18°.
-
Matrix window: Displays a race track in the manual mode. The inclination and speed values are displayed in the middle of the screen. At the preset programs, it displays speed and incline changing image.
BUTTONS FUNCTIONS
- "Start" - Press this button once to start the treadmill.
- "Stop" – Press the button to stop the treadmill while it's running.
- "Mode" – Selects a mode. Press the button and select time countdown, distance countdown or calories countdown.
- "Programs" – Select one of the 24 pre-set programs and 2 user programs by repeatedly pressing this button.
- "Speed +" - Press this button while running and the speed will increase by 0.1km / h . You can also increase the value when setting time, distance or calories.
- "Speed -" - Press this button while running and the speed will decrease by 0.1 km/h. You can also decrease the value when setting time, distance or calories.
- "Incline +" - Press this button while running and the incline will increase.
- "Incline -" - Press this button while running and the incline will decrease.
- "Volume start and stop" - Press this button to start to play or pause playing.
- "Sound +" - Press this button to increase the volume.
- "Sound –" - Press this button to decrease the volume.
- "Former music" - Press this button play previous song.
- "Next music" - Press this button to play the next song.
OPERATION INSTRUCTIONS
MANUAL MODE
When you turn the machine on, the control panel will beep and after 2 seconds the treadmill will enter the standby mode. Plug in the safety key and press "START" to start the treadmill. The running belt will start to move very slowly and the time, distance and calorie windows will begin to count the corresponding values. You can change the speed and inclination by pressing "SPEED +", "SPEED -", "INCLINE +" and "INCLINE -".
COUNTDOWN MODE
TIME COUNTDOWN MODE
- While in the standby mode, press the "MODE" button once so that the time window starts blinking. The default time is pre-set to 30 minutes. Press "SPEED +" and "SPEED -" to set the time you want. By each press the value increases/decreases by 1 minute. The adjustable time range is 5:00 - 99:00 min.
- Press "START" and start exercising. When the countdown is complete, the treadmill will stop automatically. You can adjust speed and incline while running.
DISTANCE COUNTDOWN MODE
-
While in the standby mode, press the "MODE" button twice so that the distance window starts blinking. The default distance is pre-set to 5 km. Press "SPEED +" and "SPEED -" to set the distance you want. By each press the value increases/decreases by 0.1 km. The adjustable range is 0.50 - 99.00 km.
-
Press "START" and start exercising. When the countdown is complete, the treadmill will stop automatically. You can adjust speed and incline while running.
CALORIES COUNTDOWN MODE
-
While in the standby mode, press the "MODE" button twice so that the calories window starts blinking. The default distance is pre-set to 100 cal. Press "SPEED +" and "SPEED -" to set the calories amount you want. By each press the value increases/decreases by 10 cal. The adjustable range is 20 - 990 calories.
-
Press "START" and start exercising. When the countdown is complete, the treadmill will stop automatically. You can adjust speed and incline while running.
PRESET PROGRAMS
While in the standby mode, press the "PROGRAM" button. You can choose from 24 preset programs. The default time of a program is 30 minutes. Press "SPEED +" and "SPEED -" to choose a time you want, press "START" and begin exercising. When the time counts down to zero, the treadmill stop running. See the program chart below:
| Program/Time | Fixed time 30 minutes/10 = each phase | ||||||||||
| 1 | 2 | 3 | 4 | 5 | 6 | 7 | 8 | 9 | 10 | ||
| P1 | Speed | 1 | 1 | 4 | 3 | 4 | 3 | 5 | 4 | 2 | 5 |
| Incline | 1 | 1 | 2 | 3 | 3 | 1 | 2 | 2 | 3 | 2 | |
| P2 | Speed | 2 | 5 | 4 | 6 | 4 | 6 | 4 | 2 | 5 | 2 |
| Incline | 1 | 2 | 3 | 3 | 2 | 2 | 3 | 5 | 2 | 2 | |
| P3 | Speed | 2 | 5 | 4 | 5 | 4 | 5 | 4 | 4 | 3 | 2 |
| Incline | 1 | 2 | 2 | 3 | 1 | 2 | 2 | 2 | 2 | 1 | |
| P4 | Speed | 3 | 6 | 7 | 5 | 8 | 5 | 9 | 6 | 4 | 3 |
| Incline | 2 | 2 | 3 | 3 | 2 | 2 | 4 | 6 | 2 | 2 | |
| P5 | Speed | 3 | 6 | 7 | 5 | 8 | 6 | 7 | 6 | 4 | 3 |
| Incline | 1 | 2 | 4 | 3 | 2 | 2 | 4 | 5 | 2 | 1 | |
| P6 | Speed | 2 | 8 | 6 | 4 | 5 | 9 | 7 | 5 | 4 | 3 |
| Incline | 2 | 2 | 6 | 2 | 3 | 4 | 2 | 2 | 2 | 1 | |
| P7 | Speed | 2 | 6 | 7 | 4 | 4 | 7 | 4 | 2 | 6 | 2 |
| Incline | 4 | 5 | 6 | 6 | 9 | 9 | 10 | 10 | 6 | 3 | |
| P8 | Speed | 2 | 4 | 6 | 8 | 7 | 8 | 6 | 2 | 3 | 2 |
| Incline | 3 | 5 | 4 | 4 | 3 | 4 | 4 | 3 | 3 | 2 | |
| P9 | Speed | 2 | 4 | 5 | 5 | 6 | 5 | 6 | 3 | 3 | 2 |
| Incline | 3 | 5 | 3 | 4 | 2 | 3 | 4 | 2 | 3 | 2 | |
| P10 | Speed | 2 | 3 | 5 | 3 | 3 | 5 | 3 | 6 | 3 | 3 |
| Incline | 4 | 4 | 3 | 5 | 6 | 7 | 7 | 5 | 3 | 3 | |
| P11 | Speed | 3 | 5 | 8 | 8 | 9 | 5 | 7 | 6 | 3 | 2 |
| Incline | 4 | 5 | 6 | 6 | 9 | 9 | 10 | 10 | 6 | 3 | |
| P12 | Speed | 3 | 5 | 5 | 4 | 4 | 6 | 4 | 2 | 3 | 4 |
| Incline | 3 | 5 | 6 | 7 | 10 | 10 | 10 | 10 | 6 | 3 | |
| P13 | Speed | 3 | 5 | 7 | 8 | 9 | 10 | 8 | 5 | 4 | 4 |
| Incline | 1 | 2 | 3 | 4 | 5 | 5 | 4 | 3 | 2 | 1 | |
| P14 | Speed | 2 | 4 | 6 | 8 | 10 | 10 | 8 | 6 | 4 | 2 |
| Incline | 4 | 5 | 6 | 7 | 8 | 8 | 7 | 6 | 5 | 4 | |
| P15 | Speed | 3 | 4 | 7 | 8 | 10 | 9 | 8 | 6 | 5 | 4 |
| Incline | 3 | 4 | 5 | 6 | 7 | 8 | 8 | 5 | 3 | 2 | |
| P16 | Speed | 2 | 3 | 5 | 4 | 5 | 5 | 7 | 5 | 4 | 2 |
| Incline | 0 | 2 | 2 | 4 | 4 | 6 | 6 | 1 | 1 | 0 | |
| P17 | Speed | 2 | 6 | 8 | 3 | 9 | 4 | 10 | 4 | 3 | 2 |
| Incline | 6 | 6 | 10 | 10 | 3 | 3 | 3 | 7 | 1 | 0 | |
| P18 | Speed | 1 | 5 | 4 | 5 | 9 | 5 | 4 | 5 | 3 | 2 |
| Incline | 5 | 5 | 8 | 8 | 10 | 10 | 10 | 7 | 1 | 0 | |
| P19 | Speed | 3 | 4 | 8 | 4 | 3 | 8 | 6 | 4 | 4 | 1 |
| Incline | 2 | 4 | 4 | 4 | 4 | 2 | 3 | 3 | 1 | 0 | |
| P20 | Speed | 3 | 2 | 3 | 6 | 6 | 6 | 6 | 5 | 2 | 2 |
| Incline | 3 | 3 | 5 | 5 | 5 | 5 | 2 | 2 | 1 | 0 | |
| P21 | Speed | 2 | 6 | 5 | 6 | 8 | 6 | 7 | 4 | 3 | 2 |
| Incline | 2 | 3 | 3 | 3 | 4 | 4 | 1 | 1 | 2 | 0 | |
| P22 | Speed | 2 | 4 | 6 | 8 | 10 | 8 | 6 | 4 | 6 | 6 |
| Incline | 2 | 3 | 6 | 6 | 3 | 5 | 9 | 3 | 5 | 3 | |
| P23 | Speed | 2 | 4 | 6 | 8 | 4 | 2 | 7 | 8 | 10 | 1 |
| Incline | 3 | 6 | 5 | 3 | 5 | 3 | 5 | 5 | 4 | 2 | |
| P24 | Speed | 2 | 4 | 6 | 4 | 6 | 8 | 10 | 8 | 6 | 4 |
| Incline | 2 | 5 | 5 | 3 | 5 | 5 | 3 | 3 | 4 | 2 | |
USER PROGRAM
While in the standby mode, press the "PROGRAM" button and choose one of the two user programs (U1, U2). The default time of a program is 30:00 min. Press "SPEED +" and "SPEED -" to choose the time you want. Press the "MODE" button to confirm the setting and set the speed and inclination for each phase of the program. Press "SPEED +" and "SPEED -" to choose speed and "INCLINE +" and "INCLINE -" to choose inclination. Press the "MODE" button to confirm your settings and enter the next program setting. After setting everything, press "START" and begin exercising. When the time counts down to zero, the treadmill will stop automatically.
PULSE TEST
If the controller detects any pulse (heart rate), it will display its value on the screen.
- Measure before exercising
Step onto the side rails with both feet and grip the pulse sensor with both hands. Hold for 20 seconds. Pulse screen will display an accurate pulse value.
- Measure after exercising
Step onto the side rails with both feet and grip the pulse sensor with both hands. Hold for 20 seconds. Pulse screen will display an accurate pulse value.
NOTICE: Don't measure your heart rate while exercising. It could influence the final value.
POWER SAVING MODE
This device has a power saving function. It will automatically enter power saving mode after 4 minutes without any activity. The display will shut down. To turn it on again, press any key.
MP3
While the machine is turned on, connect a MP3 device or another audio device. You can play music on the control panel.
- When you plug a SD card or a USB, the volume and song selection is done through the control panel.
- When you connect the machine to an external MP3 device, the volume and song selection is done on the device itself.
METRIC-INCH SYSTEM CHANGE AND INCLINE ADJUSTMENT
A. Press the "START" button and pull out the safety key. Then connect the safety key again and you can set the metric/inch system with the "SPEED +" or "SPEED -" buttons. Select either "SI" (metric system) or "Eng" (inch system) in the speed window. Then press "START" to confirm and the machine will enter the standby mode.
B. While in the standby mode, press "SPEED +", "SPEED -", "INCLINE +", "INCLINE -" button at the same time for 3 seconds and enter the automatic incline adjustment. After you finish, the device will enter the standby mode.
TROUBLESHOOTING (DISPLAY ERRORS)
Er-1: Power on, no computer reaction
- Check the computer power line.
- Check the connections between the computer and the controller.
Er-2: Incline system failure
- Check the signal line of the incline motor.
- Check if the incline motor is damaged.
- Check if the controller is damaged.
Er-3: Over-voltage protection.
- Make sure the power voltage is in the optimal range: AC220-240V.
Er-4: Over-current protection
- Check if the moving parts of the treadmill aren't stuck.
- Check the state of oil. Insufficient lubrication can increase the friction between the running belt and the running board.
- Check whether the running belt or running board is worn.
- Check the controller or motor for damage.
Er-5: Over-load protection
- Check if the moving parts are stuck.
- Check the state of lubrication. If there is insufficient lubrication, it can increase the friction between the running belt and the running board.
- Check the running belt or the running board for wear.
- Check the controller or the motor for damage.
Er-6: Motor doesn't work
- Check the connection of the motor. Check the wires and the plug and make sure the connection is well.
- Check the controller or the motor for damage.
Er-7: The controller failed to detect signal
- Check the computer power line.
- Check the connection line between the computer and the controller.
SAFE: Safety key doesn't work
- Check whether the safety key is in the right place.
- Check whether the magnetic reed switches are well connected.
Nothing displayed on the computer
- Check the power outlet.
- Check whether the power switch is on.
- Check the power socket and the fuses. Replace the fuses if necessary.
A. Safety lock function
If you pull out the safety key, the screen will display "SAFE" and there will be an alarm sound. If the treadmill is running, it will immediately stop. If the safety key is not inserted into the control panel, the buttons won't work.
B. Power saving mode
This system has a power saving function. If there is no command input within 10 minutes, the system will enter the power saving mode and automatically turn off the display. Press any button to restart the system.
C. MP3 function (customized)
Connect the MP3 device or other audio equipment after you turn on the machine. The computer will play the music and you can adjust the volume with the button on the audio equipment.
D. USB function (customized)
The USB interface can be used to connect to an external device, such as USB disc or a smartphone. With USB disc connected, the treadmill can play MP3 songs. Connect the phone via its charging cable.
E. Shutdown
You can turn off the treadmill at any time. That this will not damage the treadmill.
F. Attention
- Check the power and safety key before you start exercising.
- During any emergency, pull the safety key out to immediately stop the treadmill. After inserting the safety key again, the system enters the standby mode.
- If you have any problems, contact the distributor. Don't attempt to disassemble or to repair the treadmill by yourself. Improper maintenance can cause damage or injury.
SAFE EXERCISING
Please consult your doctor before starting any exercise program. They can recommend the frequency, intensity and duration of the exercise based on your age and health condition. If you feel any or similar symptoms during exercising – pain or tightness on the chest, irregular heart rate, shortness of breath, dizziness or other discomfort - please stop immediately! Consult your doctor before you continue exercising. If you use the treadmill often, you can choose regular walking speed or jogging speed. If you have no experience or aren't sure what the best initial speed for you is, refer to the data below:
Speed 1 - 3.0 km/h people with weak constitution
Speed 3.0 - 4.5 km/h people who do not exercise often
Speed 4.5 - 6.0 km/h normal walking speed
Speed 6.0 - 7.5 km/h fast walking
Speed 7.5 - 9.0 km /h jogging
Speed 9.0 - 12.0 km/h intermediate speed runner
Speed 12.0 - 14.5 km/h experienced runner
Speed over 14.5 km/h e excellent runner
ATTENTION:
- Users who want to exercise while walking should choose 6 km/h speed or lower.
- Users who want to exercise while running should choose 8 km/h speed or higher.
MAINTENANCE INSTRUCTIONS
WARNING: Please make sure the treadmill's is pulled out of the power supply before cleaning or maintenance.
1. CLEANING (Fully cleaning will lengthen the usage of the treadmill.)
Keep the treadmill clean by dusting it regularly. Be sure to clean the exposed parts on both sides of the running belt, which can reduce the piling of dust under the it. Make sure your shoes are clean and avoid putting things onto the running belt. It could damage both the running belt and the running deck. The top of the belt needs to be cleaned with a wet, soapy cloth. Be careful to keep any liquid away from the electrical components and the underside of the running belt.
WARNING: Remember to unplug the treadmill from the electrical outlet before removing the motor cover. Remove the motor cover and vacuum under the motor cover at least once a year.
2. LUBRICATION (Running belt and the special lubricating oil of the motorized treadmill.)
This treadmill's running belt and deck are already pre-lubricated. The belt/deck friction may play a major role in the function and life of your treadmill, thus requiring regular lubrication. We recommend a inspecting the deck regularly. If the deck is worn, please contact our client service centre.
Recommended lubrication of the running deck and the running belt:
- Light user (less than 3 hours/week) annually
- Medium user (3 - 5 hours/week) every six months
- Heavy user (more than 5 hours/week) every three months
We suggest buying the lubrication oil from local distributors or contacting our company directly.
MAINTENANCE GUIDELINES
- In order to maintain and prolong the working life of your treadmill, we suggest that you power off for 10 minutes after every 2 hours of running.
- A loose running belt will slip when you are running; a too tight running belt will affect the performance of the motor and may also increase the wear of the rollers and the running belt. The ideal position is if you can lift the belt from the running deck to about 50 – 75 mm.
BELT MIDDLE PLACEMENT AND TIGHTNESS ADJUSTMENT
It is necessary to adjust the belt to the best condition for the better use of the treadmill. Put the treadmill running belt at the centre. Put the motorized treadmill on the level ground and let the treadmill run at the speed of 6 - 8 miles per hour. Observe the deviation of the running belt. If the running belt deviates to the right, pull off the safety key and unplug the power. Turn the right adjusting bolt
clockwise by 1/4 turn, plug in the power cord and the safety key – belt starts to run. Watch the running belt deviations. Repeat the above steps until the running belt is in the middle.
- Picture A If the running belt drifts to the left, pull off the safety key and unplug the treadmill from power. Turn the left adjusting bolt clockwise by 1/4 turn, then plug in the power cord and the safety key. The belt starts running. Watch if the belt still drifts to the side. Repeat the above steps until the running belt is centred.
- Picture B. After the above adjustment or long time use, the running belt could become loose and you will need to adjust it. Pull off the safety key and the power cord and turn the left and right adjusting bolts clockwise by 1/4 turn. Plug the treadmill back into power and insert the safety key – the belt starts running. Then stand on the treadmill to confirm its tightness. Repeat the above steps, until the running belt is tightened correctly (picture C).

BELT ADJUSTMENT
The poly V-Belt will gradually loosen and change shape after a long time usage and you will need to adjust it for safe use. How to judge: when you are running as usual, and your feet stamp on the running belt and you feel the pause sometimes, it indicates the V-Belt or running belt is loose. You need to make a further confirmation to see which part is loose: Take down the four screws on the motor cover. Then let the treadmill work at the speed of 1 km/h. Stand on the running belt, hang on to the foam handrails and try to press the running belt harder with your feet. (We suggest that the user stamps with his own body weight).
- If the running belt doesn't stop when you press it, then the running belt and motor belt is not flabby or too tight. They are just right.
- If the running belt stops when you press it, but the front roller doesn't stop, then the running belt is a little loose. Then you need to adjust the running belt for the safe use (to adjust running belt see the maintenance guideline on the previous page).
- If the running belt and front roller stop when press the running belt, the motor still runs, the motor belt and running belt stops, then the V-belt is flabby, you need to adjust it for safe using.
ADJUSTING METHOD
Step 1: Use a coin to push into the key hole of a motor cover and turn it by 90° . Open the motor cover.
Step 2: Unscrew the four bolts of the motor base (do not remove it) and adjust the adjusting bolt on the motor base with a winch. You can use your hand to reverse the motor belt between the motor axis and the front roller. If it is too loose you can reverse the poly V-Belt by 100%. If it is too tight, the degree you can turn the V-belt is very limited. If you can reverse the motor belt after adjustment by about 80%, then the motor belt is tightened. Please adjust the V-belt tightness so that it can turn by 80%.
Step 3: Lock the motor base frame and use a coin to close the motor cover.
EXPLODED DRAWING

PART LIST
| NO. | ITEM | DESCRIPTION | Q'TY | NO. | ITEM | DESCRIPTION | Q'TY | |
| 1 | Main frame | 1 | 2 | Incline bracket | 1 | |||
| 3L/R | L/R Upright | 2 | 4 | Control panel bracket | 1 | |||
| 5L/R | L/R Handrail welded elbow | 2 | 6 | Transporting wheel screw cover | 4 | |||
| 7 | Motor cover fixed board | 1 | 8L/R | Motor cover connecting sheer left right | 2 | |||
| 9L/R | Cover connecting base left right | 2 | 10 | Incline connecting shaft | 6# | 2 | ||
| 11 | Handrail connecting tube | 2 | 12 | Motor cover strengthen base | 1 | |||
| 13 | Universal joint | 2 | 14 | Nut | 2 | |||
| 15 | Motor cover fixing pin | 2 | 16 | Handrail PC compression sheet | 2 | |||
| 17 | Pc Board compression sheet | 1 | 18 | Handrail tube | 1 | |||
| 19 | Transporting wheel axis | 2 | 20 | Upright decorative bar | 2 | |||
| 21L/R | Frame side rail left right | 2 | 22L/R | Side rail Left/Rgiht | 2 | |||
| 23 L/R | Side rail inserting piece | 2 | 24 | Earthen wire mounting panel | 1 | |||
| 25 | Running board | 1 | 26 | Running belt | 1 | |||
| 27 | Multi groove belt | 1 | 28 | Meter upper cover | 1 | |||
| 29 | Meter under cover | 1 | 30 | Keyboard | 1 | |||
| 31L/R | Loudspeaker net left right | 2 | 32 | Emergency stop button | 1 | |||
| 33 | Safety lock clip | 1 | 34 | Hand pulse components | 2 | |||
| 35 | Rear cover | 1 | 36 | Motor upper cover | 1 | |||
| 37L/R | Left upright small site decorative cover | 2 | 38 | Moving wheel | 2 | |||
| 39L/R | L/R upright cover | 2 | 40 | Front decorative cover | 1 | |||
| 41 | Flat washer | φ 6.6*φ 16*t1.6 nickle | 12 | 42 | Ring wire plug | 2 | ||
| 43 | Cushion | 2 | 44 | Wire cover board | 2 | |||
| 45 | Salix leaf type anti-slip mat | 24 | 46 | Joint spad screw set | 4 | |||
| 47 | Stopple G | 11 | 48 | Loudspeaker fixed parts | 4 | |||
| 49L/R | Storage box left right | 2 | 50 | Safety switch socket | 1 | |||
| 51 | Left handrail side cover L | 1 | 52 | Left handrail side cover R | 1 | |||
| 53 | Right Handrail side cover L | 1 | 54 | Right handrail side cover R | 1 | |||
| 55L/R | Left handrail decorative sheet LR | 2 | 56L/R | Right handrail triangle decorative sheet L/R | 2 | |||
| 57 | Safety key switch board | 1 | 58L/R | Small pulse tube decorative left | 2 | |||
| 59 | Pulse tube under cover | 1 | 60 | TFT fixing frame | 1 | |||
| 61L/R | Rear cover end light decorating sheet L/R | 2 | 62L/R | Handrail decorating light L/R | 2 | |||
| 63 | Handrail decorating light presser | 2 | 64 | Mat anti-slip topple | 16 | |||
| 65 | Foot plate | 2 | 66 | Silicon | 1 | |||
| 67 | Brush | 1 | 68 | Oil-fill plug | 1 | |||
| 69 | USB sticker | 1 | 70 | Loudspeaker sticker | 2 | |||
| 71 | Keyboard sticker | 1 | 72 | Bolt | M6*10 | 4 | ||
| 73 | Screw | M12*25 | 4 | 74 | Bolt | M10*45 | 1 | |
| 75 | Bolt | M10*65 | 1 | 76 | Screw | M5*10 | 4 | |
| 77 | Screw | M5*25 | 10 | 78 | Screw | M6*10 | 6 | |
| 79 | Screw | M6*12 | 16 | 80 | Screw | M6*15 | 23 | |
| 81 | Screw | M8*15 | 22 | 82 | Screw | M10*60 | 2 | |
| 83 | Screw | M10*50 | 2 | 84 | Screw | M10*85 | 2 | |
| 85 | Screw | M10*90 | 1 | 86 | Screw | M12*65 | 4 | |
| 87 | Screw | M10*45 | 2 | 88 | Washer | φ 6.6*12*t1.6 nickle | 26 | |
| 89 | Washer | φ 13*φ 24*t2.5 nickle | 4 | 90 | Washer | φ 11*20*t2.0 nickle | 10 | |
| 91 | Nut | M4 nickle | 2 | 92 | Nut | M8 nickle | 4 | |
| 93 | Nut | M10 nickle | 9 | 94 | Screw | M8*10 | 2 | |
| 95 | Screw | M8*80 | 2 | 96 | Screw | M10*12 | 6 | |
| 97 | Screw | M6*40 | 1 | 98 | Washer | φ 9*16*t1.6 nickle | 16 | |
| 99 | Screw | M10*25 | 4 | 100 | Single earthen wire | 400 mm | 2 | |
| 101 | Screw | M4*8 | 12 | 102 | Compress spring | 2 | ||
| 103 | Screw | ST0.4*15 | 14 | 104 | Screw | M6*12 | 4 | |
| 105 | Washer | φ 16*φ 23*t0.4 nickle | 2 | 106 | Screw | M6*40 | 18 | |
| 107 | Screw | M10*35 | 6 | 108 | Washer | φ 4.1*4.4*t1 | 4 | |
| 109 | Spring washer | φ 16*φ 23*t0.4 nickle | 6 | 110 | Screw | ST0.3*10nickle | 14 | |
| 111 | Screw | M4*15 | 6 | 112 | Screw | M2.5*8 | 15 | |
| 113 | Screw | M3*8 | 34 | 114 | Meter back cover sticker | 1 | ||
| 115 | Motor locating pin | φ 6*22 | 2 | 116 | Screw | ST4.0*15 | 50 | |
| 117 | Screw | ST3.0*15 | 16 | 118 | Nut | M5 nickle | 4 | |
| 119 | Wrench | M4 | 1 | 120 | Wrench | M5 | 1 | |
| 121 | Wrench | M6 | 1 | 122 | Wrench | M8 | 1 | |
| 123 | Wrench | M10 | 1 | 124 | Wrench | 13#14#17# | 1 | |
| 125 | Wrench | 17-22 opening | 1 | 126 | Wrench | 34 opening | 1 | |
| 127 | Screw | M6*8 | 4 | 128 | Compress spring | 2 | ||
| 129 | Front roller | 1 | 130 | Rear roller | 1 | |||
| 131 | Single wire | 150 mm | 3 | 132 | Single wire | 450 mm | 2 | |
| 133 | Single earthen wire | 450 mm | 1 | 134 | Single earthen wire | 500 mm | 1 | |
| 135 | Filter | 1 | 136 | Power cord | 1 | |||
| 137 | End socket | 1 | 138 | Overload protector | 1 | |||
| 139 | AC motor | 1 | 140 | Incline motor | 1 | |||
| 141 | MP3 line | 1 | 142 | Controller | 1 | |||
| 143 | Meter | 1 | 144 | Lower handrail decorating light | 2 | |||
| 145 | Convex point type cushion | 8 | 146 | Shock absorber spring | 4 | |||
| 147 | Upper handrail decorating light | 2 | 148 | USB-PC board | 1 | |||
| 149 | Upper signal wire | 1 | 150 | Signal middle wire | 1 | |||
| 151 | Lower signal wire | 1 | 152 | Keyboard PC board | 1 | |||
| 153 | Micro switch | 1 | 154 | Loudspeaker | 4 | |||
| 155 | Highlighted light | 1 | 156 | Upper rear cover end light wire | 1 | |||
| 157 | Rear cover end light | 1 | 158 | Rear cover end light bracket wire | 1 | |||
| 159 | Rear cover end light upright wire | 1 | 160 | Speed shortcut key assembly | 1 | |||
| 161 | Incline shortcut key | 1 | 162 | Incline shortcut key lower wire | 1 | |||
| 163 | Speed shortcut key lower wire | 1 | 164 | Incline shortcut key upper wire | 1 | |||
| 165 | Speed shortcut key upper wire | 1 | 166 | Upper pulse wire left | 1 | |||
| 167 | Upper pulse wire right | 1 | 168 | Lower pulse wire | 2 | |||
| 169 | Panel sticker | 1 | 170 | Grommet | 1 | |||
| 171 | Screw | M6*8 | 2 | 172 | Frame assembly | 1 | ||
| 173 | Meter assembly | 1 | 174 | Foot plate | 1 |
TERMS AND CONDITIONS OF WARRANTY, WARRANTY CLAIMS
General Conditions of Warranty and Definition of Terms
All Warranty Conditions stated hereunder determine Warranty Coverage and Warranty Claim Procedure. Conditions of Warranty and Warranty Claims are governed by Act No. 40/1964 Coll. Civil Code, Act No. 513/1991 Coll., Commercial Code, and Act No. 634/1992 Coll., Consumer Protection Act, as amended, also in cases that are not specified by these Warranty rules.
The seller is SEVEN SPORT s.r.o. with its registered office in Borivojova Street 35/878, Prague 13000, Company Registration Number: 26847264, registered in the Trade Register at Regional Court in Prague, Section C, Insert No. 116888.
According to valid legal regulations it depends whether the Buyer is the End Customer or not.
"The Buyer who is the End Customer" or simply the "End Customer" is the legal entity that does not conclude and execute the Contract in order to run or promote his own trade or business activities.
"The Buyer who is not the End Customer" is a Businessman that buys Goods or uses services for the purpose of using the Goods or services for his own business activities. The Buyer conforms to the General Purchase Agreement and business conditions to the extent specified in the Commercial Code.
These Conditions of Warranty and Warranty Claims are an integral part of every Purchase Agreement made between the Seller and the Buyer. All Warranty Conditions are valid and binding, unless otherwise specified in the Purchase Agreement, in the Amendment to this Contract or in another written agreement.
Warranty Conditions
Warranty Period
The Seller provides the Buyer a 24 months Warranty for Goods Quality, unless otherwise specified in the Certificate of Warranty, Invoice, Bill of Delivery or other documents related to the Goods. The legal warranty period provided to the Consumer is not affected.
By the Warranty for Goods Quality, the Seller guarantees that the delivered Goods shall be, for a certain period of time, suitable for regular or contracted use, and that the Goods shall maintain its regular or contracted features.
The Warranty does not cover defects resulting from (if applicable):
- User's fault, i.e. product damage caused by unqualified repair work, improper assembly, insufficient insertion of seat post into frame, insufficient tightening of pedals and cranks
- Improper maintenance
- Mechanical damages
- Regular use (e.g. wearing out of rubber and plastic parts, moving mechanisms, joints etc.)
- Unavoidable event, natural disaster
- Adjustments made by unqualified person
- Improper maintenance, improper placement, damages caused by low or high temperature, water, inappropriate pressure, shocks, intentional changes in design or construction etc.
Warranty Claim Procedure
The Buyer is obliged to check the Goods delivered by the Seller immediately after taking the responsibility for the Goods and its damages, i.e. immediately after its delivery. The Buyer must check the Goods so that he discovers all the defects that can be discovered by such check.
When making a Warranty Claim the Buyer is obliged, on request of the Seller, to prove the purchase and validity of the claim by the Invoice or Bill of Delivery that includes the product's serial number, or eventually by the documents without the serial number. If the Buyer does not prove the validity of the Warranty Claim by these documents, the Seller has the right to reject the Warranty Claim.
If the Buyer gives notice of a defect that is not covered by the Warranty (e.g. in the case that the Warranty Conditions were not fulfilled or in the case of reporting the defect by mistake etc.), the Seller is eligible to require a compensation for all the costs arising from the repair. The cost shall be calculated according to the valid price list of services and transport costs.
If the Seller finds out (by testing) that the product is not damaged, the Warranty Claim is not accepted. The Seller reserves the right to claim a compensation for costs arising from the false Warranty Claim.
In case the Buyer makes a claim about the Goods that is legally covered by the Warranty provided by the Seller, the Seller shall fix the reported defects by means of repair or by the exchange of the damaged part or product for a new one. Based on the agreement of the Buyer, the Seller has the right to exchange the defected Goods for a fully compatible Goods of the same or better technical characteristics. The Seller is entitled to choose the form of the Warranty Claim Procedures described in this paragraph.
The Seller shall settle the Warranty Claim within 30 days after the delivery of the defective Goods, unless a longer period has been agreed upon. The day when the repaired or exchanged Goods is handed over to the Buyer is considered to be the day of the Warranty Claim settlement. When the Seller is not able to settle the Warranty Claim within the agreed period due to the specific nature of the Goods defect, he and the Buyer shall make an agreement about an alternative solution. In case such agreement is not made, the Seller is obliged to provide the Buyer with a financial compensation in the form of a refund.

insportline
SEVEN SPORT s.r.o.
Registered Office: Borivojova 35/878, 130 00 Praha 3, Czech Republic
Headquarters: Delnicka 957, 749 01 Vitkov, Czech Republic
Warranty & Service Centre: Cermenska 486, 749 01 Vitkov, Czech Republic
CRN: 26847264
VAT ID: CZ26847264
Phone: +420 556 300 970
E-mail: eshop@insportline.cz
Headquarters, Warranty & Service centre: Elektricna 6471, 911 01 Trencin, Slovakia
CRN: 36311723
VAT ID: SK2020177082
Phone: +421(0)326 526 701
E-mail: objednavky@insportline.sk
reklamacie@insportline.sk
servis@insportline.sk
Web: www.insportline.sk
Date of Sale: Stamp and Signature of Seller:

- IN 13971 MOTORIZED TREADMILL INSPORTLINE GARDIAN G12
- CONTENTS
- SAFETY PRECAUTIONS
- WARNING
- ATTENTION
- SAFE USE
- ASSEMBLY INSTRUCTIONS
- STEP 1
- STEP 2
- STEP 3
- STEP 4
- WIRE CONNECTING SPECIFICATION
- STEP 6
- STEP 7
- STEP 8
- STEP 9
- STEP 10
- STEP 11
- STEP 12
- TECHNICAL PARAMETERS
- GETTING START
- PREPARATION
- EXERCISE
- FREQUENCY
- HOW TO EXERCISE
- CLOTHING
- WARM – UP EXERCISE
- OPERATION INSTRUCTIONS
- DISPLAY
- BUTTONS FUNCTIONS
- MANUAL MODE
- COUNTDOWN MODE
- TIME COUNTDOWN MODE
- DISTANCE COUNTDOWN MODE
- CALORIES COUNTDOWN MODE
- PRESET PROGRAMS
- USER PROGRAM
- PULSE TEST
- POWER SAVING MODE
- MP3
- METRIC-INCH SYSTEM CHANGE AND INCLINE ADJUSTMENT
- TROUBLESHOOTING (DISPLAY ERRORS)
- ER-1: POWER ON, NO COMPUTER REACTION
- ER-2: INCLINE SYSTEM FAILURE
- ER-3: OVER-VOLTAGE PROTECTION
- ER-4: OVER-CURRENT PROTECTION
- ER-5: OVER-LOAD PROTECTION
- ER-6: MOTOR DOESN'T WORK
- ER-7: THE CONTROLLER FAILED TO DETECT SIGNAL
- SAFE: SAFETY KEY DOESN'T WORK
- NOTHING DISPLAYED ON THE COMPUTER
- SAFETY LOCK FUNCTION
- MP3 FUNCTION (CUSTOMIZED)
- USB FUNCTION (CUSTOMIZED)
- SHUTDOWN
- SAFE EXERCISING
- MAINTENANCE INSTRUCTIONS
- CLEANING (FULLY CLEANING WILL LENGTHEN THE USAGE OF THE TREADMILL.)
- LUBRICATION (RUNNING BELT AND THE SPECIAL LUBRICATING OIL OF THE MOTORIZED TREADMILL.)
- RECOMMENDED LUBRICATION OF THE RUNNING DECK AND THE RUNNING BELT
- MAINTENANCE GUIDELINES
- BELT MIDDLE PLACEMENT AND TIGHTNESS ADJUSTMENT
- BELT ADJUSTMENT
- ADJUSTING METHOD
- EXPLODED DRAWING
- TERMS AND CONDITIONS OF WARRANTY, WARRANTY CLAIMS
- GENERAL CONDITIONS OF WARRANTY AND DEFINITION OF TERMS
- WARRANTY CONDITIONS
- WARRANTY PERIOD
- THE WARRANTY DOES NOT COVER DEFECTS RESULTING FROM (IF APPLICABLE)
- WARRANTY CLAIM PROCEDURE
- INSPORTLINE
- SEVEN SPORT S.R.O
Brand : inSPORTline
Model : Gardian G12
Category : Treadmills