
inCondi T6000i treadmill - Treadmills inSPORTline - Free user manual and instructions
Find the device manual for free inCondi T6000i treadmill inSPORTline in PDF.


| Product Type | Motorized Treadmill |
| Brand | inSPORTline |
| Model | inCondi T6000i |
| User Weight Capacity | 160 kg (352 lbs) |
| Speed Range | 0.5 - 22 km/h (0.3 - 13.7 mph) |
| Incline Range | 0 - 18 levels |
| Display | 6 windows: Time, Distance, Calories, Pulse, Speed, Incline; Plus Matrix track display |
| Programs | 24 preset programs (P1-P24), 3 user-defined (U1-U3), 2 heart rate control (HP1-HP2), Body Fat Test |
| Safety Features | Emergency stop button, safety key with rope, auto-stop on key removal, handrails |
| Self-Lubrication System | Automatic lubrication every ~20 km; oil tank capacity ~400 ml; indicator light at 3000 km |
| Entertainment | MP3 input, USB playback, headphone jack, controls: Prev/Next/Vol+/Vol-/Play/Pause |
| Motor | AC motor |
| Power Requirements | Grounded outlet, do not use extension cord, not on GFCI |
| Assembly | Required; includes 5# and 8# Allen wrenches, T-shape Allen wrench, open wrench, Phillips screwdriver |
| Maintenance | Clean with damp cloth; vacuum monthly; lubricate belt/deck; check belt alignment |
| Warranty | 60 months on main frame, 24 months on other components |
| Contact | SEVEN SPORT s.r.o., Czech Republic / Slovakia |
| Standards | Category SB (EN957) suitable for professional/commercial use |
| Weight of Machine | Not specified |
Frequently Asked Questions - inCondi T6000i treadmill inSPORTline
User questions about inCondi T6000i treadmill inSPORTline
0 question about this device. Answer the ones you know or ask your own.
Ask a new question about this device
Download the instructions for your Treadmills in PDF format for free! Find your manual inCondi T6000i treadmill - inSPORTline and take your electronic device back in hand. On this page are published all the documents necessary for the use of your device. inCondi T6000i treadmill by inSPORTline.
USER MANUAL inCondi T6000i treadmill inSPORTline
IN 13149 Motorized Treadmill inSPORTline inCondiT6000i

CONTENTS
SAFETY INSTRUCTIONS.... 3
IMPORTANT ELECTRICAL INFORMATION 4
IMPORTANT OPERATION INSTRUCTIONS .... 4
ASSEMBLY INSTRUCTIONS 5
ASSEMBLY STEPS....6
EMERGENCY BUTTON INSTRUCTIONS 11
GROUNDING METHODS 11
OPERATION GUIDE 12
EXERCISE INSTRUCTIONS 20
THE WARM UP PHASE 20
THE EXERCISE PHASE 20
EXPLODED DRAWING....23
PARTS LIST 24
TROUBLE SHOOTING 27
TERMS AND CONDITIONS OF WARRANTY, WARRANTY CLAIMS 28
Special tips:
- Before installation and operation, please read this operation manual carefully.
- Please save this manual for future reference.
- Product may vary slightly from the item pictured due to model upgrades.
SAFETY INSTRUCTIONS
WARNING - Read all instructions before using this treadmill. It is important your treadmill receives regular maintenance to prolong its useful life. Failing to regularly maintain your treadmill may void your warranty.
Danger – To reduce the risk of electric shock disconnect your treadmill from the electrical outlet prior to cleaning and/or service work.
DO NOT USE AN EXTENSION CORD: DO NOT ATTEMPT TO DISABLE THE GROUNDED PLUG BY USING IMPORPER ADAPTERS OR IN ANY WAY MODIFY THE CORD SET.
1) Install the treadmill on a flat level surface with access to correct voltage and frequency, grounded outlet.
2) Do not operate treadmill on deeply padded, plush or shag carpet. Damage to both carpet and treadmill may result.
3) Do not block the rear of the treadmill. Provide a minimum of 0.6 meter clearance between the rear of the treadmill and any fixed object.
4) Place your unit on a solid, level surface when in use.
5) Never allow children on or near the treadmill.
6) When running, make sure the plastic clip is fastened on your clothing. It is for your safety, should you fall or move too far back on the treadmill.
7) Keep hands away from all moving parts.
8) Never operate the treadmill if it has a damaged cord or plug.
9) Keep the cord away from heated surfaces.
10) Do not operate where aerosol spray products are being used or where oxygen is being administered. Sparks from the motor may ignite a highly flammable environment.
11) Never drop or insert any object into any openings.
12) To disconnect, turn all controls to the off position, remove the safety key, and then remove the plug from the outlet.
13) The pulse sensors are not medical devices. Various factors, including the user's movement, may affect the accuracy of heart rate readings. The pulse sensors are intended only as exercise aids in determining heart rate trends in general.
14) Use handrails provided; they are for your safety.
15) Wear proper shoes. High heels, dress shoes, sandals or bare feet are not suitable for use on your treadmill. Quality athletic shoes are recommended to avoid leg fatigue.
16) No adjustable part has to stand out. It could obstruct movements.
17) Allowed temperature: 5 to 40°C.
18) Weight limit: 160 kg
19) Category: SB (EN957 standard) suitable for professional and/or commercial use.
20) WARNING! The hart rate monitor may not be accurate. Overloading during training may cause serious injury or death. If you feel any discomfort, immediately stop the exercise!
21) Remove the safety key after use to prevent unauthorized treadmill operation.
IMPORTANT ELECTRICAL INFORMATION
WARNING!
1) NEVER use a ground fault circuit interrupt (GFCI) wall outlet with this treadmill. Route the power cord away from any moving part of the treadmill including the elevation mechanism and transport wheels.
2) NEVER operate treadmill on Generator or UPS power supply.
3) NEVER remove any cover without first disconnecting AC power.
4) NEVER expose this treadmill to rain or moisture. This treadmill is not designed for use outdoors, near a pool, or in any other high humidity environment.
IMPORTANT OPERATION INSTRUCTIONS
1) Insert the power plug into the socket directly.
2) The constant running time is less than 2 hours. Be sure to read the entire manual before operating your machine.
3) Understand that changes in speed and incline do not occur immediately. Set your desired speed on the computer console and release the adjustment key. The computer will obey the command gradually.
4) Use caution while participating in other activities while walking on your treadmill; such as watching television, reading, etc. These distractions may cause you to lose balance or stray from walking in the centre of the belt; which may result in serious injury.
5) In order to prevent losing balance and suffering unexpected injury, NEVER mount or dismount the treadmill while the belt is moving. This unit starts with a very low speed. Simply standing on the belt during slow acceleration is proper after you have learned to operate this machine.
6) Always hold on to handrail while making control changes.
7) A safety key is provided with this machine. Remove the safety key will stop the walking belt immediately; the treadmill will shut off automatically. Insert the safety key will reset the display.
8) Do not use excessive pressure on console control keys. They are precision set to function properly with little finger pressure.
9) This appliance is not intended for use by persons (including children) with reduced physical, sensory or mental capabilities, or lack of experience and knowledge, unless they have been given supervision or instruction concerning use of the appliance by a person responsible for their safety. Children should be supervised to ensure that they do not play with the appliance.
10) Add silicone oil into the tank before first using (more on page 14 – self-lubrication). Exhaust the oil, before other than horizontal manipulation (you can use a syringe). Not to do it should cause damage of electronic components.
11) Please consult your doctor at first before running, if you have one of the following diseases:
a. Cardiopathy, hypertension, sugar diabetes, respiratory disease, smoking, and other chronic diseases, complication disease.
b. If you are over 35 years old and heavier than common weight.
c. Women in pregnant or in breastfeeding period.
12) Please stop exercising immediately and consult your doctor when you feel giddy, surfeit, thorax ache or other symptoms.
13) Please drink adequate water after taking exercises on our treadmill for more than 20 minutes.
Warning: Now here we suggest that you should consult with your physician or health professional before starting your workout, especially for the age up to 35 old or once-health problem people. We take no responsible for any troubles or hurts if you don't follow our specification. Treadmill will be carefully assembled and covered the motor shield, then connect to the power.
ASSEMBLY INSTRUCTIONS
When you open the carton, you will find the below spare parts:
 |  |  |  |  |
| C | D | 100 | 126 | |
 |  |  |  |  |
| 120 | B | 96 | 15 | |
 |  |  |  |  |
| 16 | E | F | .33 | 124 |
 |  |  |  |  |
| 138 | 7 | 79 | 80 | |
 | ||||
| 81 |
Parts List:
| NO. | DES. | Specification | Nos. |
| 1 | Main Frame | 1 | |
| C | Left upright tube | 1 | |
| D | Right upright tube | 1 | |
| 106 | Bolt | M10*20 | 14 |
| 126 | Spring washer | 10 | 14 |
| 120 | Flat Washer | 10 | 14 |
| A | Console top cover | 1 | |
| B | Console panel | 1 | |
| 96 | Screw | ST4.2*12 | 8 |
| 15 | Left upright tube cover | 1 | |
| 16 | Right upright tube cover | 1 | |
| E | Left handle bar | 1 | |
| F | Right handle bar | 1 | |
| 133 | Bolt | M8*15 | 8 |
| 124 | Washer | 8 | 8 |
| 138 | Bolt | M5*16 | 4 |
| 77 | T shape Allen wrench | 6mm | 1 |
| 78 | Open wrench | 19mm | 1 |
| 79 | 8#Allen wrench | 8 | 1 |
| 80 | 5#Allen wrench | 5 | 1 |
| 81 | Phillips screwdriver | 1 |
Assembly tools:
5#Allen wrench 5mm 1pc, 8#Allen wrench 8mm 1pc, T shape Allen wrench 6mm 1pc, Open wrench 1pc, Phillips screwdriver 1pc
Notice: Do not get through power before complete assembly
ASSEMBLY STEPS
Step 1:
- Open the carton, get out the above spare parts, and put the main frame on the level ground.
- Use the Phillips screwdriver (81) to remove the screw ST4.2*20 (116).
- Use the 8#Allen wrench (79) to remove the bolt M10*20 (106) and the spring washer (126), remove the L shape board (G), fasten the bolt M10*20 (106) and spring washer (126) by using the 8#Allen wrench (79).


Step 2:
Lift up the left and right motor side covers (13, 14) by using Phillips screwdriver (81) and ST4.2*12 screw (96).

Step 3:
- Connect the middle signal wire (47) and lower signal wire (48).
- Fix the left and right upright tubes (C, D) to the main frame (1) with bolts M10*20 (106), spring washer (126) and flat washer (120) by using 8#Allen wrench (79).

Step 4 :
-
Connect the wire ports of panel B to the wire ports of console top cover A first. Please choose same color wire for port to port connection.
-
Fix the console panel (B) to the console top cover (A) with screw ST4.2*12 (96) by using the Phillips screwdriver (81).

Step 5:
- Connect the top signal wire (46) and middle signal wire (47) first.
- Insert the left and right upright tube covers (15, 16) into left and right upright tubes (C, D).
- Fix the console (A) to the left and right upright tubes (C, D) with bolt M10*20 (106), spring washer (126) and flat washer (120) by using 8#Allen wrench (79).

Step 6:
Fix left and right motor side cover (13, 14) to the motor top cover (11) with screw ST4.2*12 (96) by using Phillips screwdriver (81).

Step 7:
Fix the Left and right upright tube covers (15, 16) to the motor top cover (11).

Step8:
Fix the left and right handle bar (E, F) to the console (A) with bolt M8*15(133) and washer (124) by using 5# Allen Wrench (80).

Step 9:
- Assemble the left and right handle bar (69, 70) to the console (A).
- Fix the left and right handle bar (69, 70) to the console(A) with Bolt M5*16 (138) by using the Phillips screwdriver (81).

EMERGENCY BUTTON INSTRUCTIONS

Attach the clip of the safety pulling rope (64) to your cloth.
For any emergency situation, press the emergency button (63) or pull out the safety pulling rope (64), the treadmill will stop immediately.
GROUNDING METHODS
This product must be grounded. If there is any fault, grounding can reduce the risk of electric shock. The plug of machine is equipped with grounding conductor, to ensure your safety; please insert the plug into correct electrical outlet.
DANGER – Please follow all instruction of manual. Wrong operation may lead to leakage of electricity. If you cannot make sure the machine is grounded with right way, please consult with professional electrical engineer. If you find the plug cannot match electrical outlet at home, please also consult with professional electrical engineer, disassemble of plug is dangerous.

OPERATION GUIDE

WINDOW DISPLAY
- "Time" window: Display running time. Display the exercise time positive direction clock from 0:00 - 18 hours and 12 mins., when count to the end, the machine will not stop and count again from 0:00; when count down, it will show from the setting time to 0:00, when down to 0:00, the machine will stop smoothly and show "End", and will enter into standby mode.
- "Distance" window: Under the standby mode press the "Program" button, the window will display "P1, P2,......,P23-P24-U01-U02-U03-FAT" circulatory; During operation, display the running distance positive direction clock from 0.00-99.9, when up to 99.9, it will count again from 0; When count down, it will show from setting data to 0; When down to 0, the machine will stop smoothly and show "End", enter into the initial situation after 5 seconds.
-
"Calories" window: Display runner's calories. When display calories, it will count from 0 to 999, when up to 999, it will count again from 0; when count down, it will count from the setting data to 0, when down to 0, the machine will stop smoothly and enter into standby mode.
-
"Pulse "window: When the runner holds handle pulse with two hands, the system can calculate the runner's heart beat and window will display the runner heartbeat, the range is 50-200 beats/min (this data is just for reference, cannot be used as the medical data).
- "Speed "window: Under the initial situation, this window will show speed, the speed range is 0.5-22 km/h. Under the program setting mode, display the speed date of the first section for each program.
- "Incline" window: When display incline, this window will show inline from level 0 to level 18. Under the program setting mode, display the incline date of the first section for each program.
- "MATRIX" window: When press "START" button, the matrix window will show "3-2-1". Under standby mode, this matrix window will show 400 m running track. Once you finish running a circle, the machine will remind with sound of BI and show the number of circles you have run. When press the "program" button, the window will display MATRIX of program. Under the countdown situation of time, distance, calories, this window will show "T", "D", "C".
BUTTON FUNCTION
- "Program" button: Under initial situation, press this button to choose the program from "0:00". "P1-P2-P3-P4-P5.....P24-U1-U2-U3-FAT" 28 programs; "0:00" is the system default running mode, "P1-P24" are pre-set programs, FAT is the body fat test function.
- "MODE" button: Press this button to choose "0 : 00", "15 : 00", "1.0", "50" circularly (0:00 is the manual running mode, "15:00" is time counting down mode, "1.0" is distance counting down mode, "50" is calories counting down mode). When setting each mode, you can press speed +/- and incline +/- to set the data, press "START" to start the machine
- "START" button: When getting through the power and safety key attached, press this button at any time to start the machine.
- "STOP" button: This button has functions of PAUSE and STOP. Under running mode, press this button, the machine will pause, and all data will be kept, matrix window will show "PAU"; Under pause mode, if you press "START" button, the machine will continue to work. If you press "STOP" button again, the machine will stop and all date recover to initial setting.
- "SPEED +", "SPEED -" button: Under initial situation, set the data with this button. When the machine is running, press the button to adjust the speed, 0.1 KM at each press, when press the button over 0.5 seconds, the speed will be up or down continuously.
- "INCLINE+", "INCLINE-" Button: Under initial situation, set the data with this button. When the machine is running, press the button to adjust the incline, 1 level at each press, when press the button over 0.5 seconds, the incline will be up or down continually.
- "INCLINE": "3, 6, 9, 12" are shortcut buttons to set incline quickly.
- "SPEED": "3, 6, 9, 12" are shortcut buttons to set speed quickly.
- Entertainment functions:
 | MP3 function: You can connect external MP3 with MP3 wire to play the music |
 | USB function: You can insert USB card to USB card slot to play the music. |
 | Headphone function: If you insert your headphone to headphone jack, the voice from USB or MP3 will transfer to headphone.Notice: The priority for the functions of USB and MP3 display is: The later function choice will instead the previous function choice. |
 | “PREV” button: Press this button can search the previous song. (Available only through USB connection) |
 | “NEXT” button: Press this button can search the next song. (Available only through USB connection) |
 | “VOL+” Press this button can increase the volume. (Available for both MP3 and USB connection). | |
 | “VOL-” Press this button can reduce the volume. (Available for both MP3 and USB connection). | |
 | “PLAY/ PAUSE” button: Press this button, you can stop or restart the music. | |
 | Self-lubrication function:In order to ensure a better maintenance, this machine has a self-lubrication function system, which will make the machine lubricate the running belt automatically with stored oil. The machine will lubricate automatically approximately every 20 kilometers with 2 – 3 ml of the lubricant.When the total running distance reaches 3 000 km, the oil indication light on the console will turn on and remind you that the machine needs to be lubricated. Oil indication light is on the right side of the “SPEED” window.How to add oil to the tank: The volume of the oil tank is approximately 400 ml. After running a total of 3 000 km, the oil indication light will turn on.Please open the top motor cover and check the oil tank. If there is no oil inside the tank, please replenish the oil. Before adding oil to the tank, first remove the plug (C) and insert the oil pipe (A) to the hole the plug was inserted in. Fill the oil pipe (A) with oil from the bottle (B) – the oil bottle is part of the package. The oil will flow into the oil tank. The maximum tank volume is 400 ml. While replenishing oil, please do not exceed 350 ml.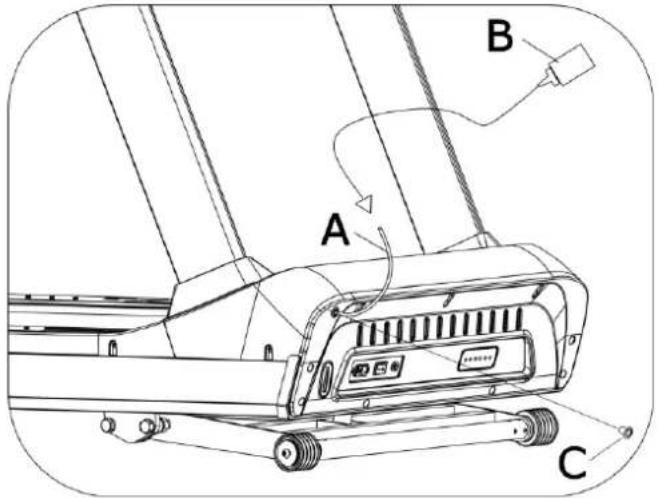 After replenishing the oil, please insert the plug (C) back, press “STOP” and hold the button for about 3 seconds under standby mode. The oil indication light will turn off. After replenishing the oil, please insert the plug (C) back, press “STOP” and hold the button for about 3 seconds under standby mode. The oil indication light will turn off. |
START-UP QUICKLY (MANUAL)
- Open the power switch, enter into the standby mode.
- Press STATR/STOP button, the system will enter into 3 seconds count down, the buzzer will make sound and the MATRIX window display count down, the speed will run 0.5km/hour after 3 seconds.
- After start-up, you can use "SPEED+", "SPEED-" or speed quick buttons to adjust the speed up or down. You can use" INCLINE+/INCLINE-" button or incline quick buttons to adjust the incline up or down.
- Press speed-down will reduce the running speed.
-
Press speed-up will increase the running speed.
-
Press incline down will reduce the incline section.
- Press incline up will increase the incline section.
- Press speed shortcut button will adjust speed correspondingly.
- Press incline shortcut button will adjust incline correspondingly.
-
Press STOP will reduce until it stopped.
-
When the user holds the hand pulse by both hands, the computer will show the user's pulse data after 5 seconds.
MANUAL MODE
- Under standby mode, press "START" button directly, the treadmill will work from the speed 0.5 km/h, incline 0. The other windows will start to count from positive direction from windows default, press "SPEED+", "SPEED-" change the speed, press "INCLINE+", "INCLINE-" to change the incline;
- Under standby mode, press "MODE" button to enter time count down, the "TIME" window will display "15:00" and glittering. Press "SPEED+", "SPEED-", "INCLINE+", "INCLINE—" to set up the time what you need. The setting range is 5:00-99:00.
- Under Time setting mode, press "MODE" button to enter into distance count down, the DISTANCE window will display "1.0" and glittering. Press "SPEED+", "SPEED-", "INCLINE+", "INCLINE—" to set up the distance what you need. The setting range is 0.5—99.9.
- Under Distance setting mode, press "MODE" button to enter into calories count down, the CAL window will display "50' and glittering. Press "SPEED+", "SPEED-", "INCLINE+", "INCLINE—" to set up the calories what you need. The setting range is 10-999.
- When setting is finished, press "START" button to start up, the treadmill will run after 3 seconds, press "SPEED+", "SPEED-", "INCLINE+", "INCLINE—" to adjust the speed and the incline; press the "STOP", the treadmill will stop.
INNER INSTALL PROGRAM
Press "PROGRAM" button "DISTANCE" window will display P1-P24 to choose the program you like. Setting of running time, then the TIME window display glittering. Display the advance setting time10:00, press "SPEED+", "SPEED-", "INCLINE+", "INCLINE—" to set up the exercise time what you need. Press "START" button to start the inner install program, the inner install program is divided into 10 sect. Each exercise time = the setting time/10. When the system enter into the next sect will make 3 sound "Bi—" and the speed will be changed according to the setting program, then press "SPEED+", "SPEED-", "INCLINE+", "INCLINE—" to change the SPEED and INCLINE, When the program enter next section will come back to the current speed and incline, when the machine finish the whole program that user has set, the system will make sound "Bi—Bi—Bi" and stop steadily, then show "END" in window display. The machine will enter standby mode after 5 seconds.
PROGRAM EXERCISE CHART
Each program will divide into 10 grades for the exercise time and each time section has the speed and incline accordingly.
| TIME INTERVAL=SETTING TIME/10 | |||||||||||
| 1 | 2 | 3 | 4 | 5 | 6 | 7 | 8 | 9 | 10 | ||
| P1 | SPEED | 2 | 4 | 3 | 4 | 3 | 5 | 4 | 2 | 5 | 3 |
| INCLINE | 1 | 2 | 3 | 3 | 1 | 2 | 2 | 3 | 2 | 2 | |
| P2 | SPEED | 2 | 6 | 7 | 8 | 3 | 6 | 8 | 7 | 5 | 2 |
| INCLINE | 1 | 2 | 3 | 3 | 2 | 2 | 3 | 4 | 2 | 2 | |
| P3 | SPEED | 3 | 8 | 3 | 8 | 5 | 9 | 5 | 9 | 12 | 6 |
| INCLINE | 1 | 3 | 5 | 7 | 9 | 10 | 8 | 6 | 5 | 2 | |
| P4 | SPEED | 8 | 10 | 11 | 12 | 12 | 11 | 10 | 10 | 9 | 8 |
| INCLINE | 1 | 2 | 2 | 3 | 1 | 2 | 2 | 2 | 2 | 1 | |
| P5 | SPEED | 6 | 10 | 12 | 9 | 11 | 8 | 12 | 7 | 9 | 3 |
| INCLINE | 1 | 2 | 4 | 3 | 2 | 2 | 4 | 5 | 2 | 1 | |
| P6 | SPEED | 2 | 8 | 6 | 10 | 10 | 9 | 11 | 8 | 5 | 3 |
| INCLINE | 2 | 2 | 3 | 2 | 3 | 4 | 5 | 6 | 5 | 3 | |
| P7 | SPEED | 2 | 6 | 7 | 9 | 7 | 9 | 6 | 5 | 4 | 2 |
| INCLINE | 4 | 5 | 6 | 6 | 9 | 9 | 10 | 12 | 6 | 3 | |
| P8 | SPEED | 2 | 4 | 6 | 8 | 7 | 8 | 9 | 6 | 4 | 2 |
| INCLINE | 3 | 5 | 4 | 4 | 3 | 4 | 4 | 3 | 3 | 2 | |
| P9 | SPEED | 2 | 4 | 5 | 7 | 6 | 5 | 8 | 6 | 3 | 2 |
| INCLINE | 3 | 5 | 3 | 4 | 2 | 3 | 4 | 2 | 3 | 2 | |
| P10 | SPEED | 2 | 3 | 5 | 3 | 3 | 5 | 3 | 6 | 3 | 3 |
| INCLINE | 4 | 4 | 3 | 6 | 7 | 8 | 8 | 6 | 3 | 3 | |
| P11 | SPEED | 2 | 5 | 8 | 10 | 6 | 9 | 5 | 3 | 2 | 2 |
| INCLINE | 1 | 3 | 5 | 8 | 10 | 7 | 6 | 3 | 2 | 3 | |
| P12 | SPEED | 2 | 5 | 5 | 4 | 4 | 6 | 4 | 2 | 3 | 4 |
| INCLINE | 3 | 5 | 6 | 7 | 12 | 9 | 11 | 11 | 6 | 3 | |
| P13 | SPEED | 2 | 7 | 4 | 7 | 8 | 9 | 4 | 5 | 3 | 2 |
| INCLINE | 5 | 6 | 6 | 4 | 6 | 5 | 8 | 9 | 4 | 2 | |
| P14 | SPEED | 2 | 6 | 5 | 4 | 8 | 6 | 5 | 2 | 3 | 3 |
| INCLINE | 5 | 6 | 5 | 8 | 4 | 5 | 5 | 10 | 6 | 3 | |
| P15 | SPEED | 2 | 6 | 5 | 4 | 8 | 7 | 5 | 3 | 3 | 2 |
| INCLINE | 3 | 4 | 5 | 6 | 3 | 5 | 5 | 6 | 4 | 3 | |
| P16 | SPEED | 2 | 5 | 7 | 5 | 8 | 6 | 5 | 2 | 4 | 2 |
| INCLINE | 1 | 5 | 6 | 8 | 12 | 9 | 10 | 9 | 5 | 3 | |
| P17 | SPEED | 2 | 5 | 6 | 7 | 8 | 9 | 8 | 5 | 3 | 4 |
| INCLINE | 3 | 5 | 6 | 8 | 6 | 5 | 8 | 7 | 5 | 3 | |
| P18 | SPEED | 2 | 3 | 5 | 6 | 8 | 6 | 9 | 6 | 5 | 2 |
| INCLINE | 5 | 7 | 5 | 8 | 6 | 5 | 9 | 10 | 6 | 2 | |
| P19 | SPEED | 3 | 7 | 6 | 5 | 9 | 7 | 6 | 3 | 5 | 2 |
| INCLINE | 3 | 5 | 6 | 8 | 5 | 6 | 5 | 12 | 8 | 3 | |
| P20 | SPEED | 3 | 7 | 9 | 10 | 11 | 12 | 10 | 8 | 5 | 2 |
| INCLINE | 2 | 5 | 6 | 7 | 6 | 5 | 8 | 6 | 3 | 2 | |
| P21 | SPEED | 3 | 6 | 8 | 7 | 9 | 10 | 5 | 8 | 3 | 2 |
| INCLINE | 3 | 6 | 8 | 9 | 9 | 6 | 8 | 10 | 6 | 3 | |
| P22 | SPEED | 3 | 5 | 8 | 6 | 9 | 10 | 8 | 12 | 6 | 3 |
| INCLINE | 2 | 6 | 8 | 10 | 12 | 10 | 12 | 8 | 5 | 2 | |
| P23 | SPEED | 3 | 5 | 9 | 11 | 12 | 8 | 6 | 5 | 3 | 2 |
| INCLINE | 2 | 6 | 8 | 10 | 9 | 7 | 8 | 10 | 6 | 3 | |
| P24 | SPEED | 3 | 8 | 10 | 11 | 12 | 10 | 10 | 8 | 5 | 3 |
| INCLINE | 3 | 6 | 8 | 9 | 10 | 12 | 9 | 6 | 3 | 2 | |
SELF-DEFINE PROGRAM
Besides 24 inner installed programs, there are 3 user self-define programs: U1, U2, U3
- User self-define program setting:
In the initial situation, press "PROGRAM" continuously till U1,U2,U3, and the "TIME" window glitter, show the time 15:00, press "INCLINE+", "INCLINE-", "SPEED+", "SPEED-" to set the running time; press "MODE" to set program data, set the first interval time, press "SPEED+", "SPEED-" or press speed shortcut button to set the speed; press "INCLINE+", "INCLINE-" or incline shortcut button to set the incline; then press "mode" button to finish the first interval time and enter into the second interval time, until finish 10 interval time. The data will be kept till the next setting. The data will be not lost for power off.
- User self-define program starting:
When the machine is waiting for operation, press the "program" button continuously till U1, U2, U3, set the running time then press "start" to start the machine.
- User self-define program instruction:
Each program will be divided into 10 time sections, set the speed and incline in each interval time, then press "START" to run the machine.
HEART RATE CONTROL PROGRAM:
HRC PARAMETER FORM (ONLY FOR REFERENCE)
| AGE | BPM | ||
| H | DEFAULT | L | |
| 15 | 195 | 123 | 123 |
| 16 | 194 | 122 | 122 |
| 17 | 193 | 122 | 122 |
| 18 | 192 | 121 | 121 |
| 19 | 191 | 121 | 121 |
| 20 | 190 | 120 | 120 |
| 21 | 189 | 119 | 119 |
| 22 | 188 | 119 | 119 |
| 23 | 187 | 118 | 118 |
| 24 | 186 | 118 | 118 |
| 25 | 185 | 117 | 117 |
| 26 | 184 | 116 | 116 |
| 27 | 183 | 116 | 116 |
| 28 | 182 | 115 | 115 |
| AGE | |||
| H | DEFAULT | L | |
| 35 | 176 | 111 | 111 |
| 36 | 175 | 110 | 110 |
| 37 | 174 | 110 | 110 |
| 38 | 173 | 109 | 109 |
| 39 | 172 | 109 | 109 |
| 40 | 171 | 108 | 108 |
| 41 | 170 | 107 | 107 |
| 42 | 169 | 107 | 107 |
| 43 | 168 | 106 | 106 |
| 44 | 167 | 106 | 106 |
| 45 | 166 | 105 | 105 |
| 46 | 165 | 104 | 104 |
| 47 | 164 | 103 | 103 |
| 48 | 163 | 103 | 103 |
| AGE | |||
| H | SEFAULT | L | |
| 58 | 154 | 97 | 97 |
| 59 | 153 | 97 | 97 |
| 60 | 152 | 96 | 96 |
| 61 | 151 | 95 | 95 |
| 62 | 150 | 95 | 95 |
| 63 | 149 | 94 | 94 |
| 64 | 148 | 94 | 94 |
| 65 | 147 | 93 | 93 |
| 66 | 146 | 92 | 92 |
| 67 | 145 | 92 | 92 |
| 68 | 144 | 91 | 91 |
| 69 | 143 | 91 | 91 |
| 70 | 143 | 90 | 90 |
| 71 | 142 | 90 | 89 |
| 29 | 181 | 115 | 115 |
| 30 | 181 | 114 | 114 |
| 31 | 180 | 113 | 113 |
| 32 | 179 | 113 | 113 |
| 33 | 178 | 112 | 112 |
| 34 | 177 | 112 | 112 |
| 49 | 162 | 103 | 103 |
| 50 | 162 | 102 | 102 |
| 51 | 161 | 101 | 101 |
| 52 | 160 | 101 | 101 |
| 53 | 159 | 100 | 100 |
| 54 | 158 | 100 | 100 |
| 55 | 157 | 99 | 99 |
| 56 | 156 | 98 | 98 |
| 57 | 155 | 98 | 98 |
| 72 | 141 | 90 | 89 |
| 73 | 140 | 90 | 88 |
| 74 | 139 | 90 | 88 |
| 75 | 138 | 90 | 87 |
| 76 | 137 | 90 | 86 |
| 77 | 136 | 90 | 86 |
| 78 | 135 | 90 | 85 |
| 79 | 134 | 90 | 85 |
| 80 | 133 | 90 | 84 |
L-H: Min to Max heart rate available adjustment range
- Press "HRC" button under standby mode, you can choose heart rate control from HP1 to HP2.
HP1: The max speed will be 10.0KM/H, and the default heart rate is 120hypo/min.
HP2: The max speed will be 12.0KM/H, and the default heart rate is 130hypo/min.
If you press "START" button under HP1 or HP2 mode, the system will recommend a heart rate control parameter to owner, and age is 30 years old, target heart rate is 114.
- Press "MODE" button to enter age setting. Time window will show default age of 30. Owner can press "INCLINE+", "INCLINE-", "SPEED+", "SPEED-" button to choose actual age, and age range is from 15 to 80 years old.
- After owner finish choice of age, press "MODE" button, system will recommend a suitable target hear rate and show in screen for owner's reference. Owner can also press "INCLINE+", "INCLINE-", "SPEED+", "SPEED-" button to choose expected target heart rate according to owner's physical condition, and available option range is from 80 to 180.
- After owner finish option of age and target heart rate, press "MODE" to enter time setting. "TIME" window will show preset time of 15:00, press "INCLINE+", "INCLINE-", "SPEED+", "SPEED-" button to adjust time, and available range is from 5:00 to 99:00.
- Press "START" button directly to start up.
- Under HP1-HP2 mode, if you do not set any value and press "START" button directly, the system will adjust speed and incline automatically as per the default target heart rate value.
- Under the operation of HP1 or HP2 program, "INCLINE+", "INCLINE-", "SPEED+", "SPEED-" buttons are available to adjust speed and incline, but the system can also adjust speed and incline automatically to achieve owner's target heart rate value.
- The first 1 min of your running is warm-up, the system will not adjust speed and incline automatically, only manual adjustment is available in the first min. After 1 min, the system will add speed under frequency of 0.5KM each time, when the value reaches the max speed, and still does not achieve target heart rate value, system will add incline with frequency of 1 section each time in order to reach owner's target heart rate value, when the setting time finish, the machine will stop automatically
- Note: Heart rate control program can only be available when chest belt is used, and chest belt must put closely to chest and skin.
RANGE OF SPECIFICATION
| Initial | Initial Data | Set Range | Display Range | |
| TIME (MIN:SECOND) | 0:00 | 15:00 | 5:00-99:00 | 0:00—99:59 |
| INCLINE (LEVEL) | 0 | 0 | 0-18 | 0-18 |
| SPEED (KM/H) | 0.5 | 0.5 | 0.5-22 | 0.5-22 |
| DISTANCE (KM) | 0.00 | 1.00 | 0.50-99.9 | 0.00-99.9 |
| PULSE (HYPO/MIN) | P | N/A | N/A | 50-200 |
| CALORIE (THERM) | 0 | 50 | 10-999 | 0-999 |
BODY TESTER
At the beginning state, press "PROGRAM" Continuously entering FAT body fat tester, press "MODE", enter F-1, F-2, F-3, F-4, F-5 (F-1 SEX, F-2 AGE, F-3 HEIGHT, F-4 WEIGHT, F-5 FAT TESTER).
Press “SPEED+”, “SPEED-” to set F-1 – F4 (refer to the following chart), after that, press “MODE” to set F-5, grasp the hand pulse, the window will display your body quality index after 3 seconds. The body quality index is to test the relation between height and weight. The body FAT suits for any male and female, to adjust the weight according it together with other body quality index. The idea FAT should be 20-25, if under 19, it means too thin. If between 25 and 29, it means overweight, if over 30, it means obesity (the data is just for reference, cannot be as medicinal data).
| F-1 | Sex | 01 male | 02 female |
| F-2 | Age | 10----99 | |
| F-3 | Height | 100----200 | |
| F-4 | Weight | 20----150 | |
| F-5 | FAT | ≤19 | Under weight |
| FAT | =(20---25) | Normal weight | |
| FAT | =(26---29) | Overweight | |
| FAT | ≥30 | Obesity | |
SAFETY LOCK FUNCTION:
Press the emergency stop button the treadmill will stop immediately. Then the treadmill will enter into standby mode
POWER SAVE FUNCTION:
The machine is with energy saving function. Under standby mode, at the state of waiting for operation, if without any operation, the saving on power function will be available after 10 minutes, the display will be closed up. You can press any button to turn on the display.
TURN OFF:
Switch off the power: You can switch off the power to stop the treadmill, which won't be damaged at any time.
CAUTION:
- We recommend that you maintain a slow speed at the beginning of a session and hold on to the handrails until you become comfortable and familiar with the treadmill.
- Attach the magnet end of the safety pulling rope to the computer and also attach the clip of the safety pulling rope to your clothing.
- To end your workout safely, press the "STOP" button or pull out the safety pulling rope, then the treadmill will stop immediately.
EXERCISE INSTRUCTIONS
THE WARM UP PHASE
This stage helps to get the blood flowing around the body and the muscles working properly. It will also reduce the risk of cramp and muscle injury. It is advisable to do a few stretching exercises as shown below. Each stretch should be held and count to approximately 30 seconds, do not force or jerk your muscles into a stretch - if it hurts, STOP.
THE EXERCISE PHASE
This is the stage where you put the effort in. After regular use, the muscles in your legs will become stronger. Work to you but it is very important to maintain a steady tempo throughout. The rate of work should be sufficient to raise your heart beat into the target zone.

This stage should last for a minimum of 12 minutes although most people start at about 15-20 minutes.
THE COOL DOWN PHASE
This stage is to let your Cardio-vascular System and muscles wind down. This is a repeat of the warm up exercise e.g. reduce your tempo, continue for approximately 5 minutes. The stretching exercises should now be repeated, again remembering not to force or jerk your muscles into the stretch.
As you get fitter you may need to train longer and harder. It is advisable to train at least three times a week, and if possible space your workouts evenly throughout the week
To tone muscle while on your treadmill you will need to have the resistance set quite high. This will put more strain on our leg muscles and may mean you cannot train for as long as you would like. If you are also trying to improve your fitness you need to alter your training program. You should train as normal during the warm up and cool down phases, but towards the end of the exercise phase you should increase resistance, making your legs work harder than normal. You may have to reduce your speed to keep your heart rate in the target zone.
The important factor here is the amount of effort you put in. The harder and longer you work the more calories you will burn. Effectively this is the same as if you were training to improve your fitness, the difference is the goal.
MAINTENANCE
Reasonable cleaning/lubrication should be made to extend the life time of this unit. Performance is maximized when the belt and deck are kept as clean as possible.
WARNING: THE BELT/DECK FRICTION MAY PLAY A MAJOR ROLE IN THE FUNCTION AND LIFE OF YOUR TREADMILL AND THAT IS WHY WE RECOMMEND YOU CONSTANTLY LUBRICATE THIS FRICTION POINT TO PROLONG THE USEFUL LIFE OF YOUR TREADMILL. FAILING TO DO THIS MAY VOID YOUR WARRANTY.
WARNING: UNPLUG POWER CORD BEFORE MAINTENANCE.
WARNING: STOP TREADMILL BEFORE FOLDING.
AFTER EACH USE
After each use, clean and inspect, following these steps:
1) Turn off the treadmill with the on/off switch, and then unplug the power cord at the wall outlet.
2) Wipe down the running belt, deck, motor cover, and console casing with a damp cloth. Never use solvents, as they can cause damage to the treadmill.
3) Inspect the power cord.
4) Make sure the power cord is not underneath the treadmill or in any other area where it can become pinched or cut.
5) Check the tension and alignment of the running belt. Make sure that the treadmill belt will not damage any other components on the treadmill by being misaligned.
GENERAL CLEANING
1) Use a soft, damp cloth to wipe the edge of the belt and the area between the belt edge and frame. A mild soap and water solution along with a nylon scrub brush will clean the top of the textured belt. This task should be done once a month. Allow to dry before using.
2) On a monthly basis, vacuum underneath your treadmill to prevent dust build up. Once a year, you should remove the black motor shield and vacuum out dirt that may accumulate.
GENERAL CARE
1) Check parts for wear before use.
2) Pay particular attention to the fixing knobs and make sure they are tight.
3) Always replace the mat if worn and any other defective parts.
4) If in doubt do not use the treadmill and contact our helpline.
TAKE CARE TO PROTECT CARPETS AND FLOOR in case of leakages. This product is a machine that contains moving parts which have been greased / lubricated and could leak.
IDENTIFICATION WAYS FOR THE DEGREE OF TIGHTNESS OF RUNNING BELT AND MOTOR BELT
When the running belt skips, please follow the steps as follows to make sure which belt needs to be adjusted, running belt or motor belt.
a) Cut off power, screw off the bolt on cover of protection. Then take down the protecting cover from the treadmill
b) Turn the speed to be around 3kph, step on the running belt by pressure and try your best to make the running belt stop. If running belt stops, together with the front roll, but the motor still runs, under this condition, it means the motor belt needs to be adjusted.
CENTERING THE RUNNING BELT
DO NOT OVERTIGHTEN THE RUNNING BELT. This may cause reduced motor performance and excessive roller wear.
TO CENTER WALRUNNING BELT
- Place treadmill on a level surface
- Run treadmill with speed of 6km/h/3.5 mph.
- If the belt moves to the right, turn the right adjusting bolt quarter circle with clockwise, if the belt does not run to central position, adjust again. (Picture A)
- If the belt moves to the left, turn the left adjusting bolt quarter circle with clockwise, if the belt does not run to central position, adjust again. (Picture B)

Picture A If the belts move to the RIGHT

Picture B If the belts move to the LEFT
WARNING: ALWAYS UNPLUG THE TREADMILL FROM THE ELECTRICAL OUTLET BEFORE CLEANING OR SERVICING THE UNIT.
EXPLODED DRAWING

PARTS LIST
| PART NO. | Description | Qty | |
| 1 | Main Frame | 1 | |
| 2 | Incline Bracket | 1 | |
| 3 | Console Bracket | 1 | |
| 4 | Left upright tube | 1 | |
| 5 | Right upright tube | 1 | |
| 6 | Front roller | 1 | |
| 7 | Rear roller | 1 | |
| 8 | Motor belt | 1 | |
| 9 | Running desk | 1 | |
| 10 | Running belt | 1 | |
| 11 | Motor top cover | 1 | |
| 12 | Motor front cover | 1 | |
| 13 | Left motor side cover | 1 | |
| 14 | Right motor side cover | 1 | |
| 15 | Left upright tube cover | 1 | |
| 16 | Right motor trim cover | 1 | |
| 17 | Left side rail | 1 | |
| 18 | Right side rail | 1 | |
| 19 | Top side rail | 2 | |
| 20 | Left back end cover | 1 | |
| 21 | Right back end cover | 1 | |
| 22 | Rear top cover | 2 | |
| 23 | Side rail anti-slip pad | 2 | |
| 24 | Cushion | 4 | |
| 25 | Pipe cushion | 6 | |
| 26 | Spring I | 6 | |
| 27 | Versatile Foot pad | 2 | |
| 28 | Side rail fix plate | 6 | |
| 29 | Brush | 1 | |
| 30 | Power line | 1 | |
| 31 | Square switch | 1 | |
| 32 | Power socket | 1 | |
| 33 | Overload protector | 1 | |
| 34 | Pressure plate frame | 1 | |
| 35 | Ball bearing | 2 | |
| 36 | Incline tube | 2 | |
| 37 | Tension bolt | 1 | |
| 38 | Tension spring | 1 | |
| 39 | AC motor | 1 | |
| 40 | Incline motor | 1 | |
| 41 | Inverter | 1 | |
| 42 | Error code board | 1 | |
| 43 | Wheel | 2 | |
| 44 | Ball bearing with prismatic base | 2 | |
| 45 | PCB board | 1 | |
| 46 | Top signal wire | 1 | |
| 47 | Middle signal wire | 1 | |
| 48 | Bottom signal wire | 1 | |
| 49 | Console top cover | 1 | |
| 50 | Console bottom cover | 1 | |
| 51 | Console middle top cover | 1 | |
| 52 | Console middle bottom cover | 1 | |
| 53 | Console panel | 1 | |
| 54 | bookrack | 1 | |
| 55 | Speaker | 2 | |
| 56 | Speaker cover | 1 | |
| 57 | Speaker net | 1 | |
| 58 | Hand pulse frame | 1 | |
| 59 | Hand pulse top cover | 1 | |
| 60 | Hand pulse bottom cover | 1 | |
| 61 | Hand pulse left cover | 1 | |
| 62 | Hand pulse right cover | 1 | |
| 63 | Emergency button | 1 | |
| 64 | Safety key with rope | 1 | |
| 65 | Emergency inside on/off button | 1 | |
| 66 | Rope press plate | 1 | |
| 67 | Spring II | 2 | |
| 68 | Hand pulse iron piece | 4 | |
| 69 | Left handle bar | 1 | |
| 70 | Right handle bar | 1 | |
| 71 | Handle bar decoration strip | 2 | |
| 72 | Wheel bushing | 4 | |
| 73 | AC single wire | Brown | 2 |
| 74 | AC single wire | Blue | 1 |
| 75 | Magnetic ring | 1 | |
| 76 | Magnetic core | 1 | |
| 77 | T shape Allen Wrench | 6mm | 1 |
| 78 | Open Wrench | 19mm | 1 |
| 79 | 8# Allen Wrench | 8mm | 1 |
| 80 | 5# Allen Wrench | 5mm | 1 |
| 81 | Phillips screwdriver | 1 | |
| 82 | Big washer | 2 | |
| 83 | Square oil bottle | 1 | |
| 84 | Oil driving system top cover | 1 | |
| 85 | Oil driving system bottom cover | 1 | |
| 86 | Oil bottle fix plate | 1 | |
| 87 | Oil control protect cover | 1 | |
| 88 | Oil pipe 1 | 1 | |
| 89 | Oil pipe 2 | 1 | |
| 90 | Oil pipe 3 | 2 | |
| 91 | Oil pipe 4 | 1 | |
| 92 | Glass tube fix button | 3 | |
| 93 | Speed sensor | 1 | |
| 94 | Bolt | M5*10 | 22 |
| 95 | Screw | ST3.5*10 | 19 |
| 96 | Screw | ST4.2*12 | 61 |
| 97 | Screw | ST2.9*8 | 33 |
| 98 | Nut | M8 | 17 |
| 99 | Nut | M10 | 7 |
| 100 | Nut | M16 | 4 |
| 101 | Bolt | M16*50 | 4 |
| 102 | Bolt | M10*45 | 4 |
| 103 | Bolt | M8*100 | 6 |
| 104 | Bolt | M10*70 | 1 |
| 105 | Bolt | M10*45 | 1 |
| 106 | Bolt | M10*20 | 16 |
| 107 | Bolt | M8*35 | 4 |
| 108 | Bolt | M8*16 | 1 |
| 109 | Bolt | M8*65 | 1 |
| 110 | Bolt | M8*80 | 2 |
| 111 | Bolt | M10*70 | 1 |
| 112 | Bolt | M8*12 | 4 |
| 113 | Bolt | M6*12 | 10 |
| 114 | Screw | ST4.2*12 | 16 |
| 115 | Screw | ST4.2*13 | 9 |
| 116 | Screw | ST4.2*20 | 2 |
| 117 | Screw | ST4.2*8 | 8 |
| 118 | Extra-large washer C | (φ11*φ34*3.0) | 1 |
| 119 | Flat washer C | 16 | 4 |
| 120 | Flat washer C | 10 | 24 |
| 121 | Flat washer C | 8 | 6 |
| 122 | Flat washer C | 5 | 1 |
| 123 | Lock washer | 10 | 2 |
| 124 | Lock washer | 8 | 12 |
| 125 | Lock washer | 16 | 4 |
| 126 | Lock washer | 10 | 21 |
| 127 | Lock washer | 8 | 14 |
| 128 | Bolt | M6*10 | 4 |
| 129 | Screw | ST4.2*30 | 4 |
| 130 | Screw | ST4.2*12 | 2 |
| 131 | Left handle bar frame | 1 | |
| 132 | Right handle bar frame | 1 | |
| 133 | Bolt | M8*15 | 8 |
| 134 | Upright tube clamping washer 1 | 2 | |
| 135 | Upright tube clamping washer 2 | 2 | |
| 136 | Rubber pad | φ105*φ40*3.0 | 2 |
| 137 | Oil pipe | 1 | |
| 138 | Bolt | M5*16 | 4 |
TROUBLE SHOOTING
There are some indication lights on the right of on/off button, if there is something wrong with machine, the light will indicate the problem, you can check as below:
- Signal transfer problem: The signal light will be on, please check by following steps:
A. Please check the connection of top and middle and lower sign wires are well connected.
B. Please change a new PCB board.
C. Please change a new inverter.
- Inverter problem: The inverter light will be on, please check by following steps:
A. The inverter is too hot, please stop the machine and make inverter cool down.
B. Please change a new inverter.
- Incline problem: The incline light will be on, please check by following steps:
A. Please check incline signal wire is well connected, change a new wire.
B. Please check the incline AC wire is well connected with inverter wire.
C. Change a new incline motor.
D. Change a new inverter.
- Over voltage problem: The over voltage light will be on, please check by following steps:
Please make sure the voltage is right working.
- Over current problem: The over current light will be on, please check by following steps:
A. The loading current is too heavy, please restart machine after some minutes.
B. Possible part of machine is blocked, and AC motor cannot move which leads to heavy current, please restart machine after some minutes, or lubricate the machine.
C. Please change a new AC motor.
- There is no display on LED.
A. Please check the overload protect button, and press this button to start machine again.
B. Please check the wires of electronic parts are well connected.
C. Please check the connection of top and middle and lower sign wires are well connected.
TERMS AND CONDITIONS OF WARRANTY, WARRANTY CLAIMS
General Conditions of Warranty and Definition of Terms
All Warranty Conditions stated hereunder determine Warranty Coverage and Warranty Claim Procedure. Conditions of Warranty and Warranty Claims are governed by Act No. 40/1964 Coll. Civil Code, Act No. 513/1991 Coll., Commercial Code, and Act No. 634/1992 Coll., Consumer Protection Act, as amended, also in cases that are not specified by these Warranty rules.
The seller is SEVEN SPORT s.r.o. with its registered office in Borivojova Street 35/878, Prague 13000, Company Registration Number: 26847264, registered in the Trade Register at Regional Court in Prague, Section C, Insert No. 116888.
According to valid legal regulations it depends whether the Buyer is the End Customer or not.
"The Buyer who is the End Customer" or simply the "End Customer" is the legal entity that does not conclude and execute the Contract in order to run or promote his own trade or business activities.
"The Buyer who is not the End Customer" is a Businessman that buys Goods or uses services for the purpose of using the Goods or services for his own business activities. The Buyer conforms to the General Purchase Agreement and business conditions to the extent specified in the Commercial Code.
These Conditions of Warranty and Warranty Claims are an integral part of every Purchase Agreement made between the Seller and the Buyer. All Warranty Conditions are valid and binding, unless
otherwise specified in the Purchase Agreement, in the Amendment to this Contract or in another written agreement.
Warranty Conditions
Warranty Period
The Seller provides the Buyer Warranty for Goods Quality (60 months for the main frame and 24 months for other components), unless otherwise specified in the Certificate of Warranty, Invoice, Bill of Delivery or other documents related to the Goods. The legal warranty period provided to the Consumer is not affected.
By the Warranty for Goods Quality, the Seller guarantees that the delivered Goods shall be, for a certain period of time, suitable for regular or contracted use, and that the Goods shall maintain its regular or contracted features.
The Warranty does not cover defects resulting from:
- User's fault, i.e. product damage caused by unqualified repair work and improper assembly
- Improper maintenance
- Mechanical damages
- Regular use (e.g. wearing out of rubber and plastic parts, joints etc.)
- Unavoidable event, natural disaster
- Adjustments made by unqualified person
- Improper maintenance, improper placement, damages caused by low or high temperature, water, inappropriate pressure, shocks, intentional changes in design or construction etc.
Warranty Claim Procedure
The Buyer is obliged to check the Goods delivered by the Seller immediately after taking the responsibility for the Goods and its damages, i.e. immediately after its delivery. The Buyer must check the Goods so that he discovers all the defects that can be discovered by such check.
When making a Warranty Claim the Buyer is obliged, on request of the Seller, to prove the purchase and validity of the claim by the Invoice or Bill of Delivery that includes the product's serial number, or eventually by the documents without the serial number. If the Buyer does not prove the validity of the Warranty Claim by these documents, the Seller has the right to reject the Warranty Claim.
If the Buyer gives notice of a defect that is not covered by the Warranty (e.g. in the case that the Warranty Conditions were not fulfilled or in the case of reporting the defect by mistake etc.), the Seller is eligible to require a compensation for all the costs arising from the repair. The cost shall be calculated according to the valid price list of services and transport costs.
If the Seller finds out (by testing) that the product is not damaged, the Warranty Claim is not accepted. The Seller reserves the right to claim a compensation for costs arising from the false Warranty Claim.
In case the Buyer makes a claim about the Goods that is legally covered by the Warranty provided by the Seller, the Seller shall fix the reported defects by means of repair or by the exchange of the damaged part or product for a new one. Based on the agreement of the Buyer, the Seller has the right to exchange the defected Goods for a fully compatible Goods of the same or better technical characteristics. The Seller is entitled to choose the form of the Warranty Claim Procedures described in this paragraph.
The Seller shall settle the Warranty Claim within 30 days after the delivery of the defective Goods, unless a longer period has been agreed upon. The day when the repaired or exchanged Goods is handed over to the Buyer is considered to be the day of the Warranty Claim settlement. When the Seller is not able to settle the Warranty Claim within the agreed period due to the specific nature of the Goods defect, he and the Buyer shall make an agreement about an alternative solution. In case such agreement is not made, the Seller is obliged to provide the Buyer with a financial compensation in the form of a refund.

insportline
SEVEN SPORT s.r.o.
Registered Office: Borivojova 35/878, 130 00 Praha 3, Czech Republic
Headquarters: Delnicka 957, 749 01 Vitkov, Czech Republic
Warranty & Service Centre: Cermenska 486, 749 01 Vitkov, Czech Republic
CRN: 26847264
VAT ID: CZ26847264
Phone: +420 556 300 970
E-mail: eshop@insportline.cz
Headquarters, Warranty & Service centre: Elektricna 6471, 911 01 Trencin, Slovakia
CRN: 36311723
VAT ID: SK2020177082
Phone: +421(0)326 526 701
E-mail: objednavky@insportline.sk
reklamacie@insportline.sk
servis@insportline.sk
Web: www.insportline.sk
Date of Sale: Stamp and Signature of Seller:

- CONTENTS
- SPECIAL TIPS
- SAFETY INSTRUCTIONS
- IMPORTANT ELECTRICAL INFORMATION
- WARNING
- IMPORTANT OPERATION INSTRUCTIONS
- ASSEMBLY INSTRUCTIONS
- ASSEMBLY TOOLS
- ASSEMBLY STEPS
- STEP 1
- STEP 2
- STEP 3
- STEP 4
- STEP 5
- STEP 6
- STEP 7
- STEP8
- STEP 9
- EMERGENCY BUTTON INSTRUCTIONS
- GROUNDING METHODS
- OPERATION GUIDE
- WINDOW DISPLAY
- BUTTON FUNCTION
- START-UP QUICKLY (MANUAL)
- MANUAL MODE
- INNER INSTALL PROGRAM
- PROGRAM EXERCISE CHART
- SELF-DEFINE PROGRAM
- HEART RATE CONTROL PROGRAM
- BODY TESTER
- SAFETY LOCK FUNCTION
- POWER SAVE FUNCTION
- TURN OFF
- CAUTION
- EXERCISE INSTRUCTIONS
- THE WARM UP PHASE
- THE EXERCISE PHASE
- THE COOL DOWN PHASE
- MAINTENANCE
- AFTER EACH USE
- GENERAL CLEANING
- GENERAL CARE
- IDENTIFICATION WAYS FOR THE DEGREE OF TIGHTNESS OF RUNNING BELT AND MOTOR BELT
- CENTERING THE RUNNING BELT
- TO CENTER WALRUNNING BELT
- EXPLODED DRAWING
- TROUBLE SHOOTING
- TERMS AND CONDITIONS OF WARRANTY, WARRANTY CLAIMS
- GENERAL CONDITIONS OF WARRANTY AND DEFINITION OF TERMS
- WARRANTY CONDITIONS
- WARRANTY PERIOD
- THE WARRANTY DOES NOT COVER DEFECTS RESULTING FROM
- WARRANTY CLAIM PROCEDURE
- SEVEN SPORT S.R.O
Brand : inSPORTline
Model : inCondi T6000i treadmill
Category : Treadmills