
EB-3650 - Smartphone PANASONIC - Free user manual and instructions
Find the device manual for free EB-3650 PANASONIC in PDF.


| Product Type | Personal Cellular Telephone (TACS) |
| Network Compatibility | System A (Vodafone) and System B (Cellnet) |
| Battery Type | Ni-Cd rechargeable (900mAh or 600mAh) or 4x AA alkaline dry batteries |
| Talk Time (900mAh) | Approximately 90 minutes |
| Standby Time (900mAh) | Approximately 20 hours |
| Memory Locations | 99 speed dial, 1 one-touch, scratch pad, last 5 numbers |
| Name Tag Length | Up to 16 characters |
| Display | Alphanumeric LCD with service and status indicators |
| Volume Levels | 5 levels each for earpiece, keytone, and ring |
| Charging Time (900mAh rapid) | Approximately 2.5 hours |
| Charging Time (600mAh rapid) | Approximately 1.5 hours |
| Security Features | Full/partial lock, lock code, identification PIN, automatic lock, digit restriction |
| Call Features | Automatic retry, automatic answer, call metering, mute, keytone sending, flash, last system feature |
| Operating Temperature Range | -10°C to +55°C (charging 5°C to 40°C) |
| Cleaning Instructions | Soft cloth dampened with mild detergent and water; avoid petroleum-based cleaners |
| Included Accessories | Handheld telephone, 900mAh battery pack, rapid charger, AC adaptor, quick reference, operating instructions |
| Optional Accessories | Car mount kit, headset adaptor, trickle charger, dry battery case, 600mAh battery, carry case |
Frequently Asked Questions - EB-3650 PANASONIC
User questions about EB-3650 PANASONIC
0 question about this device. Answer the ones you know or ask your own.
Ask a new question about this device
Download the instructions for your Smartphone in PDF format for free! Find your manual EB-3650 - PANASONIC and take your electronic device back in hand. On this page are published all the documents necessary for the use of your device. EB-3650 by PANASONIC.
USER MANUAL EB-3650 PANASONIC
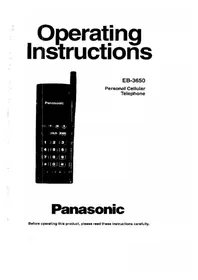
Operating Instructions

EB-3650
Personal Cellular
Telephone
Panasonic
Before operating this product, please read these instructions carefully.
CONTENTS
1 BEFORE USING YOUR TELEPHONE .... 1
1.1 Optimal Service Information ..... 3 1.2 Location of Controls 5 1.3 Display Indicators 6
2 TELEPHONE OPERATION .....7
2.1 Power ON/OFF 7 2.2 Call Operations 8
2.2.1 Making a call 8 2.2.2 Receiving a call 8 2.2.3 Unanswered calls 8 2.2.4 Ending a call 9 2.2.5 Automatic retry 9 2.2.6 Automatic answer 9 2.2.7 Calling line identification . . . . . 10 2.2.8 Mute 10 2.2.9 Indicator tones ..... 11 2.2.10 Sending keytones ..... 11 2.2.11 Sending keytones from memory . . 11 2.2.12 Flash function ..... 11 2.2.13 Last system feature ..... 12
2.3 Adjusting the Volume 12
2.3.1 Keytone volume 12 2.3.2 Silent keytone 13 2.3.3 Earpiece volume ..... 13 2.3.4 Ring volume 14
2.4 Call Metering ..... 14
2.4.1 Call timer 14 2.4.2 Call charge metering ..... 15
3 MEMORY 17
3.1 Speed Dial Memory Storage 17
3.1.1 Storing a telephone number manually ..... 17 3.1.2 Storing a telephone number automatically ..... 18 3.1.3 Making a call from memory ..... 19
3.1.4 Making a call using Name Tags .. 20
3.1.5 Changing memory contents ..... 21
3.2 One Touch Dial Memory ..... 22
3.2.1 Storing a telephone number ..... 22
3.2.2 Making a call 23
3.2.3 Checking memory contents ..... 23
3.2.4 Changing memory contents ..... 23
3.3 Scratch Pad Memory 24
3.3.1 Storing digits 24
3.3.2 Making a call from scratch pad memory 25
3.4 Last Number Memory 25
3.5 Pause Dial 26
3.5.1 Pause dial programming ..... 26
3.5.2 Sending pause dial numbers ..... 26
4 SECURITY 27
4.1 Lock Code 27
4.1.1 Setting locks 27
4.1.2 Changing the lock code ..... 28
4.2 Identification PIN 28
4.3 Automatic Lock 30
4.4 Dialling Digit Restriction 30
5 SYSTEM OPERATIONS ..... 31
5.1 System Select 31
5.2 Changing Your Current Telephone Number 32
6 BATTERY INFORMATION 33
6.1 Battery Specifications 33
6.2 Fitting a New Battery 33
6.3 Using a Dry Battery Case 34
6.4 Battery Level Indicator 34
6.5 Low Battery During Use 35
6.6 Battery Charging 35
7 KIT COMPOSITION 37
7.1 Main Kit Composition 37
7.2 Optional Accessories 38
7.2.1 Headset adaptor 39
7.3 Installation of Car Mount Kit 39
1 BEFORE USING YOUR TELEPHONE
General precautions
- This apparatus is intended for use when supplied with power from:
Rapid charger EB-P70022 with AC adaptor EB-P70024 or Trickle charger EB-H70034. Other usage will invalidate any approval and warranty given to this apparatus and may be dangerous.
- Pressing any of the keys produces a loud tone. Avoid holding the telephone close to your ear when pressing the keys.
- Avoid contact between your face (especially eyes) and the antenna while the telephone is in use.
- Always use Vodac approved accessories (cables etc.) in order to maintain full performance of your telephone and avoid damage.
- This apparatus is approved for connection to any TACS cellular radio network run by Vodafone Limited and Cellnet (Telecom Securicor Cellular Radio Limited). The facilities offered by the apparatus are identical on any network in so far as a network is able to support any particular facility.
- Switch off your cellular telephone when in an aircraft. The use of cellular telephones in aircraft may be dangerous to the operation of the aircraft, disrupt the cellular network and is illegal. Failure to observe this instruction may lead to suspension or denial of cellular telephone services to the offender, or legal action or both.
- Users are advised to turn off the equipment when at a refuelling point, or where there are signs posted restricting the use of two-way communications equipment, such as at construction and blast sites.
- Speed dial memory may be corrupted or lost if the battery or external power source is disconnected for a long period of time (approximately 30 days) or when your telephone is new.
Use of cellular telephones in a vehicle
- Do not install or connect your telephone if the vehicle uses a positive (+) grounding system. • Always disconnect the telephone before attempting to jump start your vehicle. • Acquaint yourself thoroughly with applicable highway code guidelines regarding the use of mobile radios and radio telephones in the areas where you drive and observe them at all times.
Battery and battery charger precautions
- Intermittent use between short charges will seriously reduce battery life. Users are recommended to use a battery until the low battery warning tone sounds before replacement. It is more efficient to recharge fully discharged batteries. If the battery charge capacity has deteriorated through such imprudent use, completely discharge the battery by using the telephone until the power shuts off automatically, then charge it several times. If the battery fails to recover to its original capacity, a new battery should be obtained.
- The use of any battery charging equipment other than that specified may damage your telephone or result in inferior performance. • Always disconnect the AC adaptor from the mains when not in use.
- Do not store or carry batteries with any metallic items that may accidentally connect across any terminals.
- Do not attempt to disassemble the charging apparatus. There are no user serviceable parts inside.
- Charge the battery before operation.
- If the charger becomes damaged in any way, do not use it. Take it to a qualified service centre for repair.
- The charger and batteries may become warm during charging. This is normal.
- Always charge the batteries in a well-ventilated area. It is not possible to recharge the batteries at temperatures below +5°C or above +40°C.
- Batteries that are not used for a long time should be fully recharged at least once every two months.
- Old batteries should be disposed of in accordance with local legislation. They must not be incinerated, or disposed of as ordinary rubbish. It is possible to recycle the Ni-Cd batteries that are used with this telephone.
1.1 Optimal Service Information
DON'T use this equipment in environments of extremely high temperatures or humidity.
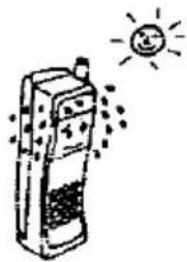
Use the equipment within the temperature range of -10°C to +55°C. Battery recharging must be performed within the temperature range of +5°C to +40°C.
DON'T attempt to disassemble this equipment. There are no user-serviceable parts inside.

Refer servicing to qualified service and repair personnel, or refer to your local dealer.
DON'T strike, shake or subject the equipment to excessive vibration.

Handle the equipment with care.
DON'T expose the equipment to rain and avoid contact with any liquids.

Take immediate action if the equipment becomes wet. Turn the power off, remove the battery and contact a service centre as soon as possible.
- The display on your telephone may at times change slightly in colour, or take somewhat longer than usual to display characters in extreme temperatures. This is normal and does not indicate a defect in the display.
- When making or receiving telephone calls, either fully extend or retract the antenna for best reception.
- To prevent your telephone from being used when you are absent, it is recommended that you memorize your lock code so as to avoid having to write it down, where it might be accessible to others.
- If, when you turn the power on, an "OFF/ON" message is displayed, switch the power off and then turn it on again. Contact your dealer if the "OFF/ON" message does not disappear.
- If the display shows "NO SVC", you have moved outside the service coverage area. Move towards a radio coverage area until the "NO SVC" message disappears. The telephone may then be used.
- If your telephone operates with two telephone numbers, check to ensure that the telephone number you are trying to use is the proper one for the network in your current location. If you have two telephone numbers, you will only receive calls for the number currently selected on your telephone.
- The telephone may be cleaned with a soft cloth dampened with a mild detergent and water. Avoid the use of petroleum based cleaners or any other chemical cleaners such as benzine or thinner, which may damage the telephone.
- When using the telephone with the Car Mount Kit, clean the external antenna connector, at the top of the telephone, with a cotton bud and methylated spirit.
1.2 Location of Controls

- Antenna
- Earpiece
- Display
- ⑪ Switches power ON or OFF.
⑧ Makes a call with the telephone number in One Touch Dial Memory. Make a call. Stores telephone number and Name Tag into memory. Recalls memory contents. Function confirmation key. Ends a call. Accesses functions. Clears last digit entered or all digits when pressed and held down. Exits functions. or Adjusts the volume. Scrolls letters and displays. Switches function on or off.
Digit Keys 0 to 9. * and #.
- Microphone
1.3 Display Indicators

STATUS INDICATORS
Lights up when you are outside a service area.
Lights when you are in a service area; 1 bar for a weak signal and 5 bars for a strong signal.
Lights up when charge function is activated.
Lights up when a call is in progress.
MUTE Lights up when the MUTE function is activated.
ROAM: Lights up when you are out of your home area, but on the preferred system. Flashes when you are out of your home area but on the non-preferred system.
A Lights up during operation on system A (Vodafone).
B Lights up during operation on system B (Cellnet).
NOTE: Following some operations the display will automatically clear after three seconds.
To turn the power on:


A wake-up tone will be heard.
The telephone number for the network which you are currently using will be indicated momentarily. When a lock function is set, an appropriate message will be displayed. (For details of lock functions refer to "Lock Code", section 4.1).
If a "PIN Corrupted" message is displayed after power ON, pressing any key will clear this message. A new pin number must be entered before the telephone is switched off.
If an "OFF/ON" error message is displayed, turn the power off and then turn it back on. If the message remains contact your dealer.
During handheld use, if no key is pressed for seven seconds, the backlight will turn off. During car-mount use, the backlight will be on constantly.
If "NO SVC" (No Service) indicator remains on, you are beyond range of a service area. Move into a radio coverage area and operate your telephone after "NO SVC" indicator turns off. The telephone is ready for use when the "NO SVC" indicator disappears and the Received Signal Strength indicator appears.
To turn the power off:
① (Hold)
2.2 Call Operations
2.2.1 Making a call

- the required number (up to 32 digits). In case of errors: To erase the last digit: CLR (Once) To erase the entire entry: CLR (Hold)
2. SHD
To make a call.
"IN USE" indicator lights. When the call is connected, the display is cleared.
If you enter more than 17 digits:

The digits are identified by €. Example: 912233445566778899001122.
To display the first digits:
F (Hold)
While depressing Ⓔ for the second time, the display indicates the upper digits with a 1/2.
2.2.2 Receiving a call
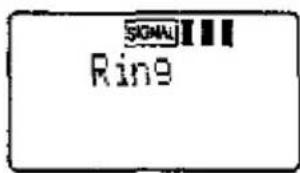
- When an incoming call is received, a ring tone will be heard and a "Ring" message will flash.
- Any key except Ⓓ When the call is successful, the "IN USE" indicator lights and the display is cleared. You can talk to the other party.
2.2.3 Unanswered calls

The number of calls that have been received but not answered will be displayed.
To clear this display: Any key except ①
2.2.4 Ending a call

2.2.5 Automatic retry
If a call is unsuccessful and the System Busy Tone sounds, the telephone will redial the telephone number automatically up to three times at one minute intervals. After three retries the function is automatically cancelled.
To cancel this function during its operation, press B0.
2.2.6 Automatic answer
This feature allows an incoming call to be automatically connected six seconds after the ring tone starts, without pressing any keys. Two short tones will sound just before the call is connected.
If any key, except Ⓣ, is pressed within the six seconds you can answer the call immediately.
To set this function:

- F 5
- or -
On = To set.
Off = To cancel.
3.
To store the selected setting.
This function setting is retained even after turning the power off.
2.2.7 Calling line identification

When an incoming call is received the caller's telephone number will be displayed, if it is available. If a call is received by the telephone, but not answered, the telephone will automatically store the number. Up to five callers details can be stored in this way. The most recently stored number will overwrite to oldest. Press any key to clear the display.
To recall a caller's telephone number:
- M #
To recall the number list.
- or -
To scroll through the last 5 numbers.
- SHD
To call a selected number.
2.2.8 Mute
The mute function turns the telephone microphone off during a call, so that you can hear the caller but the caller cannot hear you.

To set:
F+
"MUTE" indicator appears.
To cancel:
F+
"MUTE" indicator will disappear.
Mute will automatically be cancelled when the call has ended.
2.2.9 Indicator tones
System: A rapid dual tone (every 1/2 second) will be heard when a call cannot be accepted due to a busy channel within the radio coverage area.
Intercept Tone: A rapid alternating high/low tone will be heard when a call is rejected because the system has detected an error, or is otherwise unable to accept the call.
2.2.10 Sending keytones
If any of the digit keys are pressed during conversation, the keytones associated with the key will sound and be sent.
2.2.11 Sending keytones from memory
- Recall the number sequence to be sent as keytones from memory. (Refer to "Memory", section 3).
- F
- SNC: To send the tones.
You can activate network facilities such as Call Waiting and Conference Calls using this function. For more information, refer to the Subscriber Information Booklet or contact your dealer.
2.2.12 Flash function
This feature can be used for vertical services that may be provided by your network operator. To activate a flash request, simply press 📄, otherwise enter the desired number and press 📄.
For more information, refer to the Subscriber Information Booklet or contact your dealer.
2.2.13 Last system feature
This feature can be used for repeating the last successful system feature; for example, Call Diversion or Call Holding.

To carry out last system feature.
For more information, refer to the Subscriber Information Booklet or contact your dealer.
2.3 Adjusting the Volume
All volume settings will be retained after power OFF. Except for earpiece volume which will be set to level 3 at power ON.
2.3.1 Keytone volume

This function is not available when the telephone is in use.
Five keytone volume levels are available.

To increase or reduce the volume level.
2.3.2 Silent keytone
This function allows you to turn off the keytone volume.
When silent keytone is set, you cannot adjust the keytone volume.
Although keytones will not be sent while this function is set, it is possible to send tones using the keytone from memory function. (Refer to "Sending keytones", section 2.2.10).
To set this function:
- F 6
- or -
On = Keytone Volume Off.
Off = Keytone Volume On.
3.
To store the setting.
2.3.3 Earpiece volume

This function is only available when the telephone is in use.
Five earpiece volume levels are available on your telephone.
+ or -
To increase or reduce the volume level while in conversation.
2.3.4 Ring volume
The telephone has five levels of ring volume.
In car-mount use, you cannot set the ring volume to off.
To adjust the ring volume:
- F 4

- or -
To increase or reduce the volume level.
- CLR
To escape from this mode.
2.4 Call Metering
2.4.1 Call Timer
This telephone has three types of timer:
Last Timer: Indicates the talk time elapsed during the current, or last call.
Updated every ten seconds during a call.
TTL Timer 1: Indicates the total talk time. It cannot be reset.
TTL Timer 2: Indicates the total talk time. This timer can be reset.
The Last Timer counts up to 99 minutes, 59 seconds. If the Last Timer exceeds the maximum value, the display will continue to show 99 minutes, 59 seconds until the call has ended.
Each TTL Timer counts up to 999 hours and 59 minutes. If the TTL Timer exceeds the maximum value, the timer will reset to 000 hours and 00 minutes.
Whether both TTL Timers display the duration of incoming and outgoing calls, or outgoing calls only, is dependent on your dealer's programming.
Checking a call timer
- F 1
- or -
To scroll between the 3 timers.

Resetting TTL Timer 2
- F 1
- or -
To scroll to TTL Timer 2
- 0
The display will indicate "Reset"
- M
To confirm.
If you press 18 , the display will be cleared without resetting the timer.

2.4.2 Call charge metering
This function gives four types of call charging based on a rate given by your network operator. The function will only operate if special charging signals are provided by the network. The call charge metering function may not be identical to the network billing because of differences in call duration timings.
NOTE: If charge metering is provided, the call charge meter MUST be enabled on your telephone. If it is not, calls may be dropped.
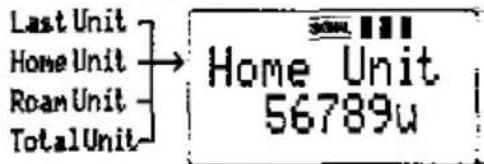
The four types of metering are:
Last Unit: Whilst in conversation the charge for the current call is displayed and updated every five seconds. Whilst not in conversation the charge for the last call is displayed.
Home Unit: Indicates the total charge for calls made on your preferred system.
Roam Unit: Indicates the total charge for calls made on your non-preferred system.
Total Unit: Indicates the total charge for all calls made on both preferred and non-preferred systems.
Whilst in conversation, Home Unit, Roam Unit and Total Unit are not updated.
Each charging meter counts up to 99 999 units. If a counter exceeds this value it will reset to zero.
To read the call charge meters:
- F 2
- or -
- CLR
To clear the display.
If the call charging counter is corrupted, the meter will reset to zero and the display will flash. To stop the flashing press Ⓜ and then CLR.
3 MEMORY
Your telephone has capacity to store over 99 telephone numbers.
A Name Tag can be assigned to most stored telephone numbers to help remind you of its use at a later date. The Name Tag can be up to sixteen characters in length and can include capital letters, full stops, commas and digits.
3.1 Speed Dial Memory Storage
There are 99 memory locations available to store telephone numbers, with Name Tags if they are required.
3.1.1 Storing a telephone number manually
- M 2.

3. To assign a Name Tag:

To scroll through the available characters.

To store the letter and move the cursor to the next column.
- M
- Telephone number (up to 32 digits).
- M
- The desired memory location (01 to 99).

Example:
- Vacant memory locations in the series from 10 to 19 will be displayed. ("..." indicates that the memory location is occupied)
- The information will be stored.
If a memory location is occupied, the display will flash.
To store new information, press Ⓜ.
To leave existing information, press CLR and the display will return to "Memory STO". Enter a different memory location.
3.1.2 Storing a telephone number automatically
- M
- M

- To assign a Name Tag:

To scroll through the available characters.

To store the letter and move the cursor to the next column.
- M
- Telephone number (up to 32 digits).
- M 7.
The lowest vacant memory location from 01 to 99 will be indicated and the telephone number will be stored automatically at that location.

Automatically storing numbers in specified memory blocks:
This feature could be used to store related numbers in blocks.
Example: 10 to 19 for personal numbers, 20 to 29 for office etc.
When the display "Memory STO" appears:
- Memory block (0 to 9)
Example: Enter 1 for memory block 10 to 19. Enter 2 for memory block 20 to 29.
The memory content is automatically stored in the lowest vacant memory location within the desired block.
If a desired memory block is occupied.
"Memory Occupied" message is displayed. Wait three seconds and the display will return to "Memory STO". Repeat steps 1 and 2 above to store the number in a different memory block.
3.1.3 Making a call from memory
Method 1:
- M
- Speed Dial memory location (01 to 99) Pressing ⊕ or — allows you to check the next or previous telephone number.
- M (Hold) To display the Name Tag.
- 📋 SND To make a call.
Method 2:
- Speed Dial memory location (01 to 99).
- SNO
To make a call.
3.1.4 Making a call using Name Tags
- M
- Search for the first letter of the Name Tag:
⊕ or ⊖ (Hold).
Each letter of the alphabet is scrolled. When the first letter of the Name Tag that you require is displayed release the key.
Search for the Name Tag:
or (Once).
Each Name Tag, starting with the selected letter, will be displayed in alphabetical order.
- Ⓜ (Hold)
To display the telephone number.
- SND
To make the call.
NOTE: If no telephone numbers are stored in memory, the display will ask for a Name Tag.
3.1.5 Changing memory contents
- M
- Speed Dial memory location (01 to 99)
- F
- M
- To change Name Tag contents:
* Moves cursor to the left.
Moves cursor to the right.
To correct errors:

or
To move the cursor onto the error.
+ or -
To scroll to the correct character.
To erase characters:
(Once)
To erase a single character.
(Hold)
To erase all the characters.
CLR (Hold)
With no entry, memory editing will be left.
6.
- Change the telephone number
- Ⓜ
The information will be stored.
3.2 One Touch Dial Memory
One touch dialing is the fastest method of making a call from memory. A frequently dialed telephone number may be stored in one touch dial memory and a call made automatically by pressing Ⓢ. Ⓧ is not available during conversation.
It is only possible to store one telephone number in one touch dial memory.
3.2.1 Storing a telephone number
- M

- To assign a Name Tag:
+ or -
To scroll through the available characters.
To store the letter and move the cursor to the next column.
- M
- Telephone number (up to 32 digits)
- M
- Ⓢ
The information is now stored in Ⓢ.

If the memory location is occupied, the display will flash.
To store the new information press Ⓜ.
To leave the existing information; press CLR and the display will return to "Memory STO". Enter a different memory location.
3.2.2 Making a call

3.2.3 Checking memory contents

- M
- S
The Name Tag will be displayed.
- Ⓜ (Hold)
The telephone number will be displayed.
NOTE: If a Name Tag is not stored, pressing Ⓢ will display the telephone number.
3.2.4 Changing memory contents
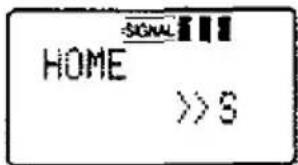
- M
- ⑤
The Name Tag or telephone number will be displayed.
- F
4.
- To change Name Tag contents:
* Moves cursor to the left.
Moves cursor to the right.
To correct errors:

or
To move the cursor onto the error.
+ or -
To scroll to the correct character.
To erase characters:
CLR (Once)
To erase a single character.
CLR (Hold)
To erase all the characters.
CLR (Hold)
With no entry will leave memory editing.
6.
- Telephone number
- M
Changed memory content will be stored.
3.3 Scratch Pad Memory
Scratch Pad memory is used to enter a telephone number during conversation. The telephone number is automatically stored after ending the call. One memory location has been designated for scratch pad.
The scratch pad memory will be automatically overwritten next time it is used.
This memory is retained after turning the power off.
3.3.1 Storing digits
During conversation:

The desired digits (Up to 32 digits).
The digits will be stored automatically and the display will be cleared at the end of the call.
3.3.2 Making a call from scratch pad memory
- M *
The telephone number that has been stored in Scratch Pad memory will appear.
2.
To make a call.
The scratch pad information can be saved to One Touch Dial and Speed Dial memory by pressing Ⓗ, after recalling the memory contents. (Refer to "Speed Dial Memory Storage", section 3.1, and "One Touch Dial Memory", section 3.2)
3.4 Last Number Memory
Last Number memory automatically stores the last five telephone numbers that have been dialled.
Making a call from the Last Number memory:
- M O Q
The last telephone number dialled will be displayed.
- ⊕ or -
To scroll through the last five dialled numbers.
3.
To make a call when the required number has been selected.
If you used the Pause Dial on your last call, only the digits up to the pause will be dialled.
The Last Number memory contents can be saved in to One Touch Dial and Speed Dial memory by pressing F M. after recalling the memory contents. (Refer to "Speed Dial Memory Storage", section 3.1, and "One Touch Dial Memory", section 3.2)
3.5 Pause Dial
The Pause Dial function uses the keytones generated by your telephone to access functions outside the cellular network, such as voice mail retrieval. The pause dial sequence may contain up to 32 digits, including the pause character, "P", it may be stored in One Touch and Speed Dial Memory. (Refer to "Speed Dial Memory Storage", section 3.1, and "One Touch Dial Memory", section 3.2)
3.5.1 Pause dial programming

- Telephone number
- F # The "P" will be displayed.
- The additional digits.
- Repeat 2 and 3 until the pause dial has been entered.
3.5.2 Sending pause dial numbers
- The pause dial number (or recall from memory).
2.
The digits up to the first "P" will be sent.
When the call is connected:
- SND
The numbers up to the next "P" will be sent.
- SND
Until all the digits have been sent.
The last digits sent will be indicated on the display even after the above sequence has been completed.
NOTE: Only the number from the first digit to the first "P" will be stored in Last Number Memory.
4 SECURITY
4.1 Lock Code
Two levels of password controlled locks are available, to enable you to limit the way in which your telephone is used.
If you forget your lock code, contact your dealer.
Full lock: Incoming calls may be answered, but no outgoing calls may be made.
Partial lock: Incoming calls may be answered. Outgoing calls can only be made from One Touch, Speed Dial Last Number and Scratch Pad memory.
NOTE: Your normal emergency numbers can be dialled directly at any lock setting. without having to enter a lock code.
4.1.1 Setting locks
- F 3
- The lock code If you enter the wrong lock code start again.
To scroll through the lock menu.

- M
To select the lock setting.
4.1.2 Changing the lock code
Factory setting for the lock code is 0000.
The lock code may be changed to any 2, 3 or 4 digit number combination, including the * and # characters.
The lock code is retained after power OFF.
- F 0
- The current lock code
- The new lock code If you make an error, press CLR.
- M
The new lock code will be stored.
If you forget your lock code, contact your dealer.

4.2 Identification PIN
IMPORTANT: DO NOT alter the identification PIN unless advised by your network operator, as this may prevent you from making or receiving telephone calls. This facility MAY NOT be available from all network operators.
The telephone has the facility for an identification PIN. This provides improved protection against fraudulent use of a mobile telephone. If fraudulent use is detected by the network operator, the authorised user will be issued with a new PIN. The telephone is already programmed with an identification PIN when it is purchased. DO NOT alter this PIN unless advised by your network operator.
For security reasons it is not possible to check the PIN.
To program a new Identification PIN:
- ①
To turn the power on.
- 2539FF
To enter PIN programming mode.
- Lock code
If you have two telephone numbers programmed your first telephone number will then be displayed.
- or - to display the desired telephone number.
M to select.
Each telephone network that you subscribe to may supply a 16 figure identification PIN. You must select the correct telephone number for that network supplier's identification PIN.
- 16 digit PIN
The number will be shown on the display. If an incorrect digit is entered press CLR and re-enter the correct digit.
- M
To enter the PIN.
NOTE: ☐ can be used at any time to exit from PIN Programming mode.
If you should make a mistake entering your identification PIN repeat steps 2 through to 6.
4.3 Automatic Lock

If the automatic lock function is programmed by your dealer the telephone will be set to Auto Lock at power on, even it was previously unlocked. Auto Lock operates in the same way as full lock.

Lock code
When the lock code is entered, the display will be cleared. However Auto Lock will be active again the next time power is switched on.
To cancel the automatic lock function, contact your dealer.
4.4 Dialling Digit Restriction
The Dialling Digit Restriction feature allows you to limit the number of digits that may be dialled from your telephone and could be used, for example, to prevent the dialling of long distance calls. The restriction can be set to any number between 1 and 31.
- F 9
- Lock code
The current digit restriction will flash.
- The new digit limit.
The display will stop flashing.
To set: 01 to 31
To cancel: 00
If you make an error, press CLR.
- M
To confirm.
SIGNAL Dial Limit 00 digits
5 SYSTEM OPERATIONS
The following functions are only available if you are registered to both a preferred and non-preferred system.
5.1 System Select
The cellular radio network to which you have registered is known as the preferred system. It may be possible to use your telephone on another network; the non-preferred system. This facility is known as roaming and may be programmed into your telephone by your dealer. Two networks are available, system A (Vodafone) and system B (Cellnet). Either of these can be your preferred system.
Normal Mode (System A or B mode):
If the telephone is located in a System A or System B area, it will automatically select the correct network, provided your telephone is programmed for use on both networks. If both networks are available, your preferred system is given priority.
System A Mode:
The telephone selects system A only.
System B Mode:
The telephone selects system B only.
Selecting the system
- F 7
- or -
To scroll through the system select menu.

3.
The setting will be stored.
If programmed by the dealer, the system setting may be retained after power off. Otherwise, the system setting will always go to your preferred system at power on.
5.2 Changing Your Current Telephone Number
This function cannot be changed during a conversation.
Using this function, you can select the telephone number you wish to operate on.
- F B
- ⊕ or ⊖
To display your second telephone number.
- To use the second telephone number:

or to clear the display:

SIGA III
Phone No2
Set
6 BATTERY INFORMATION
6.1 Battery Specifications
| Battery pack (900mAh - Ni-Cd) | Battery pack (600mAh - Ni-Cd) | Alkaline Dry Batteries | |
| Standby Time | ≈20 h | ≈13 h | ≈32 h |
| Talk Time | ≈90 min | ≈50 min | ≈50 min |
These figures are based on fully charged batteries or new alkaline dry batteries.
6.2 Fitting a New Battery
Turn the telephone face downwards.
Fitting the battery
Place the battery on the back of the telephone, positioned approximately 1cm from lower battery retainers. Slide the battery to lock into position.

Removing the battery
Press the two battery release latches. Slide the battery towards the antenna to release. Lift the battery from the telephone.
6.3 Using a Dry Battery Case
Using the dry battery case it is possible to power your telephone from 4 AA size alkaline dry batteries.
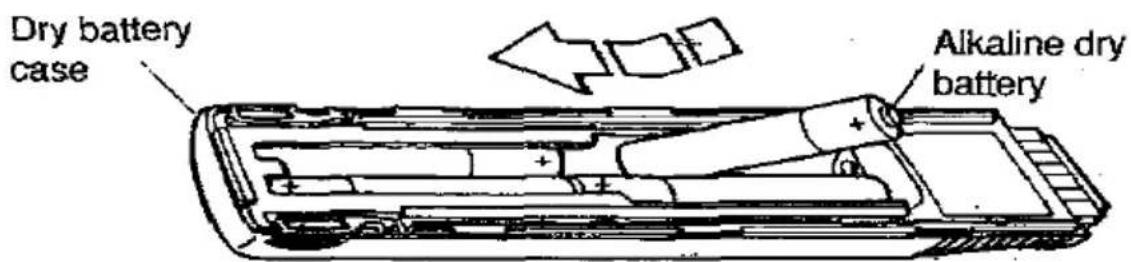
Insert the first dry battery into the wide part of the battery compartment, following the polarity (+ and -) indications. Slide the battery toward the narrow part of the battery compartment. Place the next battery into the same side of the battery compartment, ensuring that the polarity is the same as the first, and push home. Repeat for the batteries in the other side of the battery compartment.
Do not attempt to recharge the dry batteries.
6.4 Battery Level Indicator
During Handheld use, you can check the remaining battery life. Battery power level is indicated on a four bar meter.
To check the battery power level:


If the battery power level falls below one bar, a low battery message will flash and a low battery warning tone will sound.
6.5 Low Battery During Use
If during conversation a low battery warning tone is given, it is possible to exchange the battery with a fully charged one, without dropping the call. This operation must be carried out within approximately four seconds.
6.6 Battery Charging
Dry batteries must not be recharged.
| Battery pack(900mAh - Ni-Cd) | Battery pack(600mAh - Ni-Cd) | |
| Rapid charger | ≈ 2.5 h | ≈ 1.5 h |
| Trickle charger | ≈ 10 h | ≈ 6 h |
| Handsfreecharger | ≈ 2.5 h | ≈ 1.5 h |
Charging time will be longer if the telephone is switched on, or if the temperature is lower than normal room temperature. Batteries that have never been charged or have not been charged for several months will take longer to charge.
Rapid charger (standard)
- Connect the AC adaptor plug to the rapid charger.
- Connect the AC adaptor to the mains supply.
- Set the telephone, with battery, into the slot.
- Charging will begin immediately and the battery charge indicator on the display will light.
- When the indicator turns off, indicating full recharge, remove the battery from the charger.

NOTE: The battery charge indicator may not light if the battery is totally discharged, this is no cause for concern. Leave the telephone in the charger as it may take several hours for the battery to have sufficient power to light the battery charge indicator.
Trickle charger (Option)
This is an extension to the Rapid charger supplied with the telephone and provides an additional charger slot for another battery.

- Set the battery into the trickle charger slot.
- Charging will begin immediately and the power indicator will light.
- Remove the battery from the charger when it is fully charged.
- If the rapid charger is used at the same time as the trickle charger, trickle charging will stop.
Handsfree charger (Option)
The optional Car Mount Kit contains a Handsfree charger, microphone, power supply cable and adjustable angle bracket. The optional Car Mount Kit contains an integral battery charger, that will recharge the telephone battery during car mount use. It is not possible to place the telephone in the Handsfree charger with the dry battery case fitted.
7 KIT COMPOSITION
Optional accessories may be changed without notice.
7.1 Main Kit Composition
| Description | Part Number |
| Handheld Portable (Telephone) | EB-3650 |
| Battery pack (900mAh - Ni-Cd) | EB-P70020 |
| Rapid charger | EB-P70022 |
| AC adaptor | EB-P70024 |
| Quick Reference | ZD70131A |
| Operating Instructions | — |

7.2 Optional Accessories
| Description | Part Number |
| Headset kit | EB-KJ0290 |
| Car mount kit | EB-KJ0287 |
| AC adaptor | EB-P70024 |
| Rapid charger | EB-P70022 |
| Trickle charger | EB-H70034 |
| Carny case | EB-B70005 |
| Battery pack (900mAh - Ni-Cd) | EB-P70020 |
| Battery pack (600mAh - Ni-Cd) | EB-P70021 |
| Dry battery case | EB-P70023 |
7.2.1 Headset adaptor


7.3 Installation of Car Mount Kit
- Select a charger installation position that will not obstruct driving. It is possible to attach the charger to the adjustable angle bracket using 4mm screws.
- Connect the power supply cable.
| Cable | Fuse | Connection |
| Black | 10A | Battery (-) |
| Red | 5A | Battery (+) |
| Blue | 3.15A | Ignition |
- Connect the microphone, ensuring that the microphone is 50cm from the Handsfree charger, and the antenna.
- Switch the telephone power off and insert the telephone into the Handsfree charger. It is not possible to place the telephone in the Handsfree charger with the dry battery case fitted.
NOTE: When using the telephone with the Car Mount Kit clean the external antenna connector, at the top of the telephone, with a cotton bud and methylated spirit.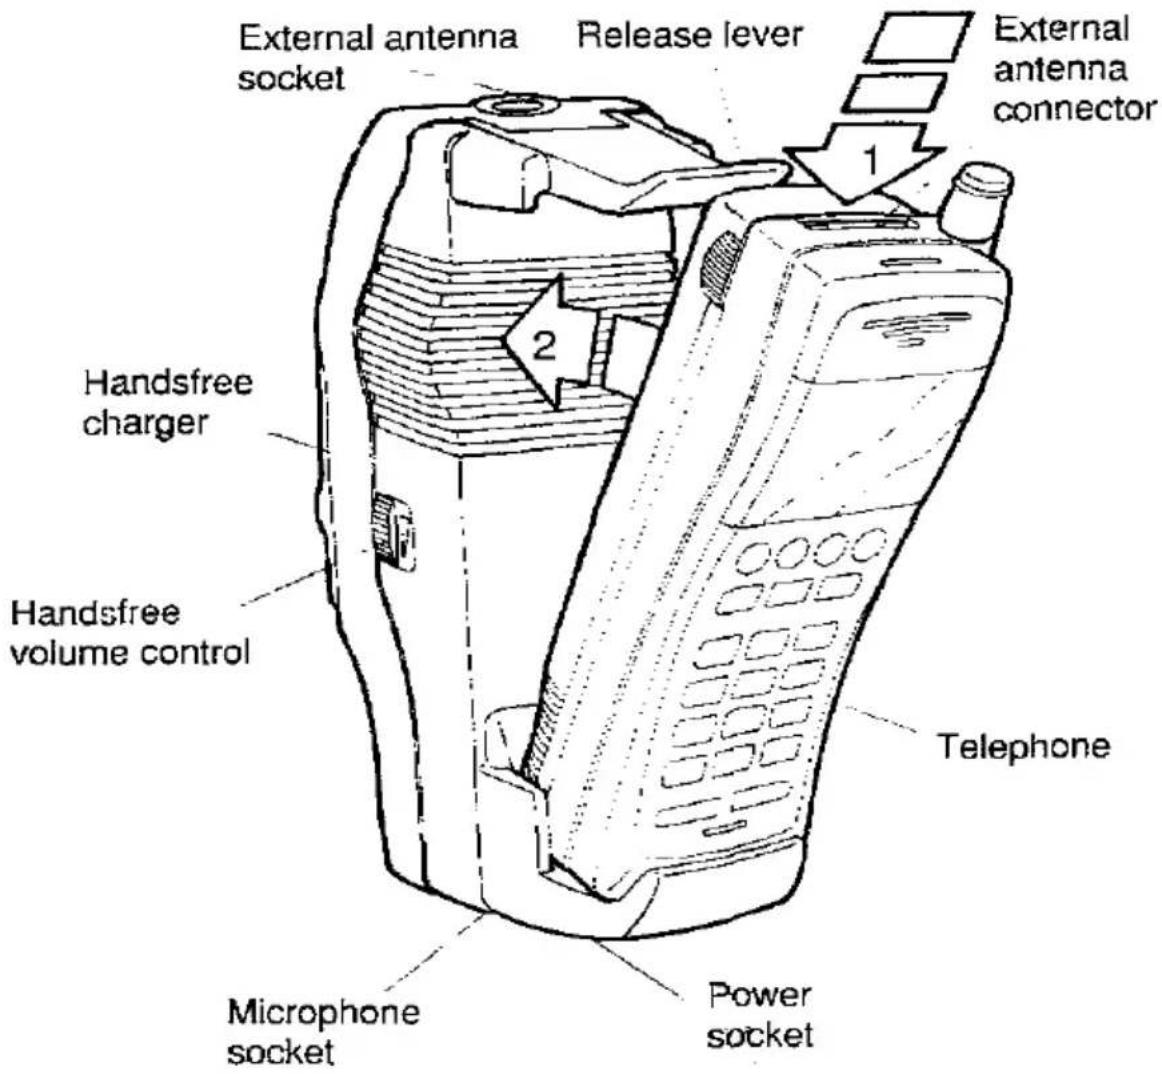

Panasonic Business Systems U.K. A Division of Panasonic U.K. Ltd.
Panasonic House, Willoughby Road, Bracknell, Berkshire. RG12 8FP
Tel: 0344 853240
Fax: 0344 853705
Printed in U.K.
- OPERATING INSTRUCTIONS
- PANASONIC
- CONTENTS
- BEFORE USING YOUR TELEPHONE
- TELEPHONE OPERATION
- MEMORY
- KIT COMPOSITION
- GENERAL PRECAUTIONS
- USE OF CELLULAR TELEPHONES IN A VEHICLE
- BATTERY AND BATTERY CHARGER PRECAUTIONS
- OPTIMAL SERVICE INFORMATION
- LOCATION OF CONTROLS
- DISPLAY INDICATORS
- CALL OPERATIONS
- MAKING A CALL
- SHD
- IF YOU ENTER MORE THAN 17 DIGITS
- RECEIVING A CALL
- UNANSWERED CALLS
- ENDING A CALL
- AUTOMATIC RETRY
- AUTOMATIC ANSWER
- CALLING LINE IDENTIFICATION
- TO RECALL A CALLER'S TELEPHONE NUMBER
- MUTE
- INDICATOR TONES
- SENDING KEYTONES
- SENDING KEYTONES FROM MEMORY
- FLASH FUNCTION
- LAST SYSTEM FEATURE
- ADJUSTING THE VOLUME
- KEYTONE VOLUME
- SILENT KEYTONE
- EARPIECE VOLUME
- RING VOLUME
- CALL METERING
- CALL TIMER
- RESETTING TTL TIMER
- CALL CHARGE METERING
- TO READ THE CALL CHARGE METERS
- SPEED DIAL MEMORY STORAGE
- STORING A TELEPHONE NUMBER MANUALLY
- TO ASSIGN A NAME TAG
- EXAMPLE
- STORING A TELEPHONE NUMBER AUTOMATICALLY
- AUTOMATICALLY STORING NUMBERS IN SPECIFIED MEMORY BLOCKS
- IF A DESIRED MEMORY BLOCK IS OCCUPIED
- MAKING A CALL FROM MEMORY
- METHOD
- MAKING A CALL USING NAME TAGS
- CHANGING MEMORY CONTENTS
- MOVES CURSOR TO THE RIGHT
- ONE TOUCH DIAL MEMORY
- STORING A TELEPHONE NUMBER
- CHECKING MEMORY CONTENTS
- TO ERASE CHARACTERS
- SCRATCH PAD MEMORY
- STORING DIGITS
- MAKING A CALL FROM SCRATCH PAD MEMORY
- LAST NUMBER MEMORY
- PAUSE DIAL
- PAUSE DIAL PROGRAMMING
- SENDING PAUSE DIAL NUMBERS
- SECURITY
- LOCK CODE
- SETTING LOCKS
- CHANGING THE LOCK CODE
- IDENTIFICATION PIN
- TO PROGRAM A NEW IDENTIFICATION PIN
- AUTOMATIC LOCK
- DIALLING DIGIT RESTRICTION
- SYSTEM OPERATIONS
- SYSTEM SELECT
- NORMAL MODE (SYSTEM A OR B MODE)
- SYSTEM A MODE
- SYSTEM B MODE
- SELECTING THE SYSTEM
- CHANGING YOUR CURRENT TELEPHONE NUMBER
- BATTERY INFORMATION
- BATTERY SPECIFICATIONS
- FITTING A NEW BATTERY
- FITTING THE BATTERY
- REMOVING THE BATTERY
- USING A DRY BATTERY CASE
- BATTERY LEVEL INDICATOR
- LOW BATTERY DURING USE
- BATTERY CHARGING
- RAPID CHARGER (STANDARD)
- TRICKLE CHARGER (OPTION)
- HANDSFREE CHARGER (OPTION)
- HEADSET ADAPTOR
- INSTALLATION OF CAR MOUNT KIT
Brand : PANASONIC
Model : EB-3650
Category : Smartphone