
XD-DW7 - DVD player AIWA - Free user manual and instructions
Find the device manual for free XD-DW7 AIWA in PDF.


| Product Type | DVD Player |
| Brand | Aiwa |
| Model | XD-DW7 |
| Dimensions (approx.) | 430 x 250 x 60 mm |
| Weight (approx.) | 2.5 kg |
| Power Supply | AC 220-240V, 50/60 Hz |
| Power Consumption | 15 W (standby < 1 W) |
| Disc Types Supported | DVD, DVD±R/RW, CD, CD-R/RW, MP3, JPEG |
| Video Outputs | Composite, S-Video, Component, SCART |
| Audio Outputs | Stereo RCA, Digital Optical, Coaxial |
| Playback Functions | Play, Pause, Stop, FF, FR, Slow, Zoom, Repeat, Shuffle |
| Region Code | Region 2 (Europe) or multi-region |
| Remote Control | Included |
| Display | Front panel LED display |
| Parental Control | Yes |
| Cleaning & Maintenance | Clean lens with soft cloth; do not use solvents |
| Safety | Class 1 laser product; no user-serviceable parts inside |
| Spare Parts & Repairability | Contact Aiwa support for remote or power cord; repair by qualified technician |
| General Information | Aiwa XD-DW7 DVD player with progressive scan and Dolby Digital |
Frequently Asked Questions - XD-DW7 AIWA
User questions about XD-DW7 AIWA
0 question about this device. Answer the ones you know or ask your own.
Ask a new question about this device
Download the instructions for your DVD player in PDF format for free! Find your manual XD-DW7 - AIWA and take your electronic device back in hand. On this page are published all the documents necessary for the use of your device. XD-DW7 by AIWA.
USER MANUAL XD-DW7 AIWA
natural_image
Line drawing of an open laptop computer with visible screen, ports, and ventilation slots (no text or symbols)ENGLISH
ESPAÑOL
FRANÇAIS
CORRECTION
Please note the following corrections to the Operating Instructions:
Page 43
You do not remember the code number set in “Ratings”.
| INCORRECT | ■ → TITLE → RETURN → Q SURROUND |
| CORRECT | ■ → TOP MENU → RETURN → Q SURROUND |
CORRECCIÓN
This equipment has been tested and found to comply with the limits for a Class B digital device, pursuant to Part 15 of the FCC Rules.
These limits are designed to provide reasonable protection against harmful interference in a residential installation.
This equipment generates, uses, and can radiate radio frequency energy and, if not installed and used in accordance with the instructions, may cause harmful interference to radio communications. However, there is no guarantee that interference will not occur in a particular installation. If this equipment does cause harmful interference to radio or television reception, which can be determined by turning the equipment off and on, the user is encouraged to try to correct the interference by one or more of the following measures:
- Reorient or relocate the receiving antenna.
- Increase the separation between the equipment and receiver.
- Connect the equipment into an outlet on a circuit different from that to which the receiver is connected.
- Consult the dealer or an experienced radio/ TV technician for help.
CAUTION
Modifications or adjustments to this product, which are not expressly approved by the manufacturer, may void the user's right or authority to operate this product.
WARNING
TO REDUCE THE RISK OF FIRE OR ELECTRIC SHOCK, DO NOT EXPOSE THIS APPLIANCE TO RAIN OR MOISTURE.
CAUTION
< Note for high temperatures >
- To prevent a malfunction, deformation, or discoloration, please avoid placing the product in direct sunlight, near any heat sources, or inside your car in the summer time.
- The surface of the product becomes hot if used for a long time. This is not a malfunction.
- Please do not rest it on your body for a long time to avoid mild heat irritation.
Precautions
To maintain good performance
- Do not use the unit in places which are extremely hot, cold, dusty or humid. In particular, do not use or keep the unit in the following places.
- in a high humidity area such as a bathroom
- near a heater
- in an area exposed to direct sunlight (Example: inside a parked car, where it can become extremely hot)
- where it is very dusty or sandy
- near sources of strong magnetism, such as televisions, speakers, or magnets
- where there is a lot of movement or vibration, such as on a car dashboard or unstable shelf
For safety
- Do not attempt to disassemble the unit. Laser rays from the optical pickup are dangerous to the eyes and the unit contains high voltage.
• Take care not to drop the unit or subject it to strong shocks. - To keep dust from the pickup lens, keep the disc holder closed after use. Never touch the lens.
- Do not touch the lens. Doing so may cause malfunctions.
- If you hear no sound when playing a disc, DO NOT turn the volume up too high since the music could suddenly start. Turn the volume to the lowest level before starting playback and slowly turn it up to the desired level.
Note on listening with the headphones
- Listen at a moderate volume to avoid hearing damage.
- Do not wear the headphones while driving or cycling. It may create a traffic hazard.
- You should use extreme caution or temporarily discontinue use in potentially hazardous situations, such as walking, jogging, etc.
- Wear them properly; L is left, R is right.
Table of contents
Note on condensation
If the unit is suddenly moved from a cold place to a warm one, it may result in condensation on the pickup lens causing malfunction or playback difficulties.
Should this occur, leave the unit for a few hours, then try playback again.
To clean the cabinet
Use a soft cloth lightly moistened with a detergent solution.
Do not use strong solvents such as alcohol, benzine or thinner.
NOTE
Video CD:
Some discs cannot be played back in this unit due to their conditions. In some discs, track numbers are displayed differently from the ones printed in their packages due to conditions of readings.
CD-R/RW:
- The unit may not play a CD-R/RW disc that is recorded on personal computers or some kinds of CD-R/RW recorders because of differences in recording platforms.
- Do not attach any seal or label to either side (the recordable side or the labeled side) of a CD-R/RW disc. It may cause malfunction.
- The unit cannot play back an MP3 recorded on a CD-R/RW disc.
Owner's record
For your convenience, record the model number and serial number (you will find them on the bottom of your set) in the space provided below. Please refer to them when you contact your Aiwa dealer in case of difficulty.
| Model No. Serial No. (Lot No.) | |
PREPARATIONS
Parts and controls.... 3
Remote control 6
Using the AC adaptor 6
Using the battery pack 7
PLAYBACK (THE BASICS)
Playing back 10
OPERATION WITH OSD
Information about On Screen Display (OSD).... 15
Title search (DVD)/Track search
(Video CD with PBC off, audio CD) 16
Chapter search (DVD) 17
Time search (DVD) 18
Mark function (DVD, Video CD with PBC off, audio CD) 19
Checking ON or OFF of PBC (Video CD) 20
Programed playback
(Video CD with PBC off, audio CD) ... 21
Random playback
(Video CD with PBC off, audio CD) ... 22
Repeat playback 23
Changing the angle (DVD).... 25
Displaying and changing subtitles ..... 26
Changing the audio track.... 27
SET UP OPERATION
Changing setup values 30
CONNECTION
Connecting to external equipment ..... 38
OTHERS
Troubleshooting 43
Language codes 45
Explanation of terms 46
Specifications.... 47
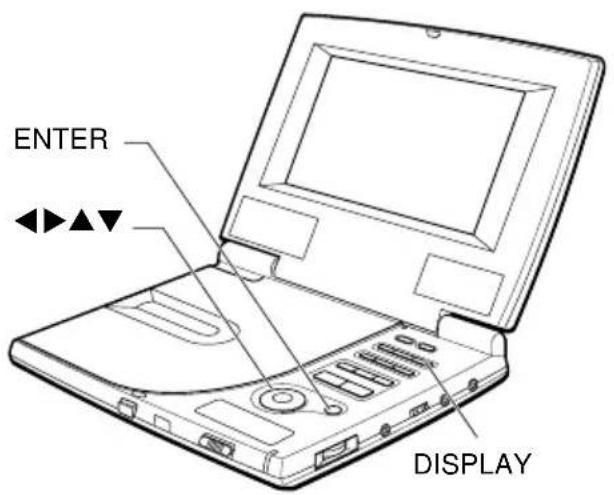
Main unit (front and right side)
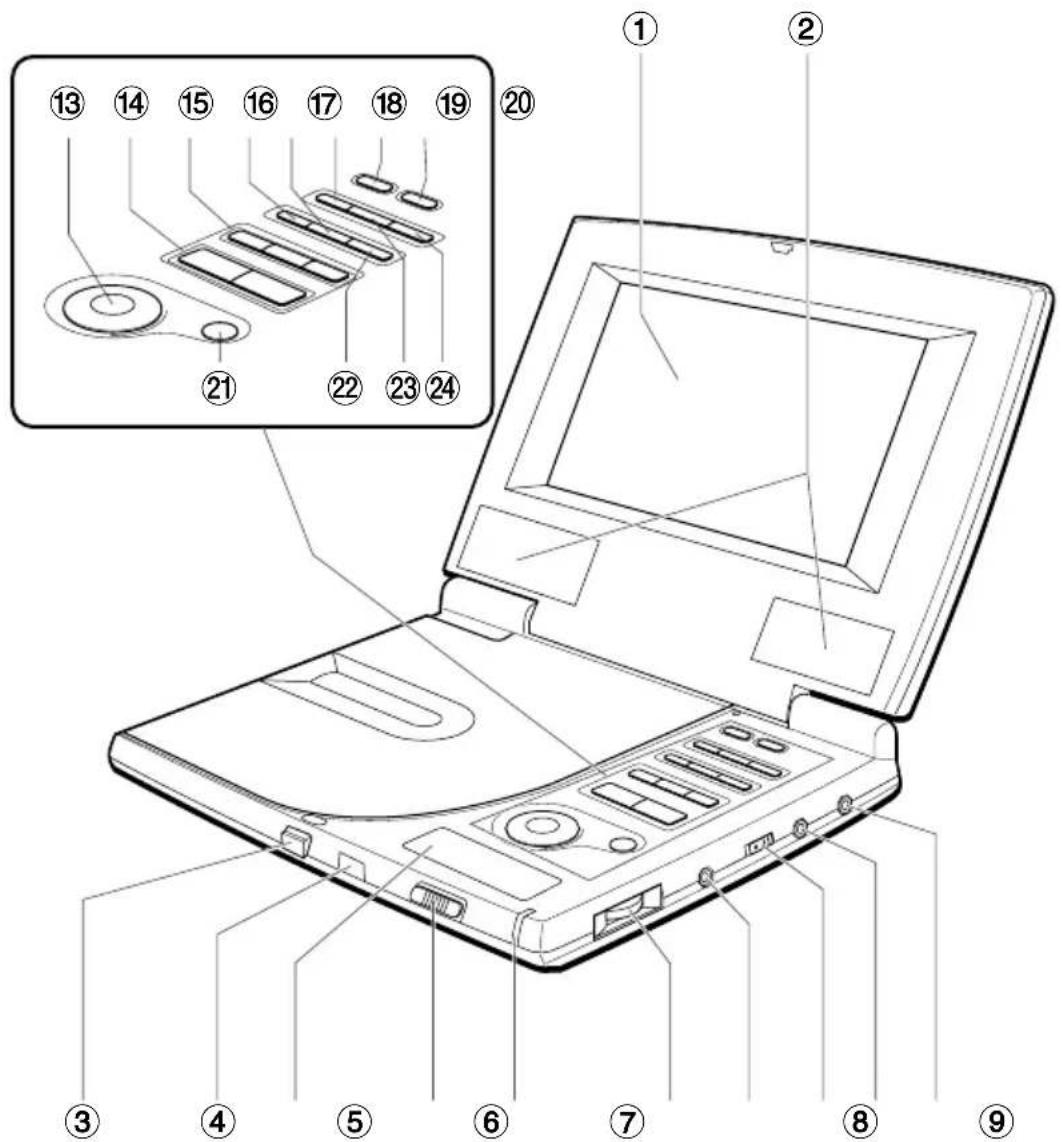
① Liquid crystal display
Do not push the liquid crystal display hard.
② Stereo speakers
③ ▲OPEN button
④ Remote sensor
⑤ Display window
⑥ POWER ON/OFF/HOLD switch
⑦ Power indicator
⑧ VOLUME control
⑨ PHONES jack
⑩ PAL/NTSC switch
⑪ VIDEO IN/OUT jack
⑫ AUDIO/OPT OUT jack
⑬ ◀, ▶, ▲, ▼ buttons
⑭ ■, ▶(Play) buttons
⑮ ◀◀◀, Ⅱ, ▶▶▶I buttons
⑯ RETURN button
⑰ MENU button
⑱ IN/OUT button
⑲ MODE button
⑳ TFT SW button
②1 ENTER button
⑳ TOP MENU button
②3 SET UP button
⑳ DISPLAY button
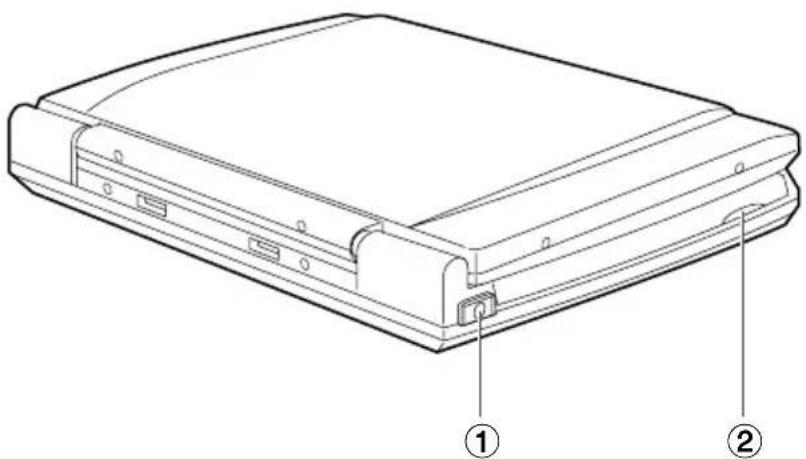
Main unit (left side)
natural_image
Technical line drawing of a rectangular electronic device with labeled parts (① and ②), showing internal structure without any text or symbols beyond labels.① DC IN 9V jack
② ▲DISC OPEN portion
Display window

① Playback indicator
② DVD indicator
③ Q SURROUND indicator
④ Angle indicator
⑤ Repeat playback indicators
CD : Disc repeat
1CD : Chapter/title/track repeat
A-B : A-B repeat
⑥ Battery indicator
⑦ Chapter indicator
⑧ Title/chapter/track number indication/Time indication
The SET UP button is used to change the display to title or chapter during DVD playback.
Remote control

① PROGRAM button
② MARK button
③ 0-9 buttons
④ +10 button
⑤ TOP MENU button
⑥ ◀, ▶, ▲, ▼, ENTER buttons
⑦ RETURN button
⑧ II button
⑨ ONSCREEN DISPLAY ON/OFF button
⑩ POWER button
⑪ REPEAT button
⑫ Q SURROUND button
⑬ A-B button
⑭ ANGLE button
⑮ AUDIO SELECT button
⑯ SUBTITLE SELECT button
⑰ SUBTITLE ON/OFF button
⑱ C(Clear) button
⑲ T-SEARCH button
⑳ MENU button
②1 SETUP button
⑳ ▶(Play) button
②3 ▶▶ button
24 ◀ button
②5 ▶▶▶ button
②6 ■ button
⑳ button
Remote control
Installing batteries
Detach the battery cover on the rear of the remote control, and insert two R6 (size AA) batteries with + and - aligned correctly.

When to replace the batteries
The maximum operational distance between the remote control and the sensor of the units should be approximately 5 meters (16 feet). If this operational distance decreases, replace the batteries with new ones.
NOTES
- When operating with the remote control, point the top of the remote control toward the player.
- If the unit is not going to be used for an extended period of time, remove the batteries to prevent possible electrolyte leakage.
-
The remote control may not operate correctly when:
-
The line of sight between the remote control and the unit is exposed to intense light, such as direct sunlight
- There is fluorescent lighting near the remote sensor.
- Other remote controls are used nearby (those of a TV set, etc.).
Using the AC adaptor
Two adaptors are supplied with this unit. To make this unit work, use the smaller one (AC-D918U).

1 Connect the AC adaptor to the main unit.
Insert the AC adaptor plug to the DC IN 9V jack of the main unit.
2 Insert one end of the supplied AC power cord to the AC adaptor socket.
Use only the supplied AC power cord.
3 Insert the AC plug to the AC outlet (120V, 60Hz).
Connecting to the cigarette lighter socket in the car
Firmly connect the DC IN 9V jack of this unit and the cigarette lighter socket of your car with the car power adaptor (AIWA DC-901) commercially available.
NOTES
- This unit is not usable with car power adaptors other than the AIWA DC-901. If you use another one, it will cause a malfunction.
- This unit is designed for indoor use. To maintain good performance, do not use and keep this unit in extremely hot place indoors or in the car, or in the place exposed to direct sunlight.
- When this unit is connected to the cigarette lighter socket in the car, this unit will be turned off if the engine is started. To start playback again, turn the power on and press ▶(Play).
Using the battery pack
Charging the battery pack
Charge the battery pack fully at the first time of use.
Two adaptors are supplied with this unit. To recharge the battery pack, use the larger one (AC-D920U). Do not recharge the battery pack when it is connected to the DVD player. It may not be recharged enough or the player may be turned off.

1 Connect the AC adaptor to the battery pack.
2 Insert one end of supplied AC power cord to the AC adaptor socket.
Use only the supplied AC power cord.
3 Insert the AC plug to the AC outlet (120V, 60Hz).
After 3 seconds, the charge indicator lights.
When recharge is finished
The charge lamp turns off. After making sure the indicator is turned off, disconnect the AC adaptor and the supplied power cord.
Time to recharge the battery
The battery indicator changes the indication based on the remaining power in the battery as follows:

Recharge the battery when 📁 appears.
After is lit for a while, the power is shut off.
Recharge time
Recharging takes approximately 2 hours, 40 minutes at 20^ C ( 68^ F). Continuous playback time is approximately 2 hours, depending on usage patterns and the temperature condition.
Notes on using the battery pack
- This battery pack can be recharged approximately 300 times.
- When the unit is powered by the battery pack, the unit automatically enters the standby mode 5 minutes after operation stops. (Auto power saving)
- The battery pack becomes warm while using. When the battery pack is warmed too much, safety circuit works to prevent you from using continuously.
- Do not carry the battery pack in a pocket or handbag together with metal objects such as pendants or key holders.
- Do not short-circuit the terminals.
- Do not disassemble the battery pack, heat it, or put it in water.
- To prolong the performance of the battery pack, recharge it in an ambient temperature of 10 to 30^ (50 to 86^ ) and keep it in a cool location when not using. In temperatures out of the range above, recharging may not be carried out even if the Charge indicator is lit.
- To maintain the performance of the battery pack, recharge it at least once a year even when it is not used for a long period of time.
Notes on recharging
- Use only the supplied AC adaptor to recharge the battery pack.
- If the battery pack is too warm, it may take more time to charge than usual, or charging may not be done even if the charge indicator lights. Cool it down and charge it again.
- Should the charge indicator not light up, connect the battery pack to the AC adaptor again, or connect it to the AC adaptor again after connecting to the unit and letting it run for 10 to 20 minutes.
- When you connect or disconnect the battery pack during charging, the indicator may turn off for a moment, but it is not a malfunction.
- The battery pack and the AC adaptor become warm during charging, but it is not a malfunction.
- Noises may occasionally occur inside the AC adaptor during charging, it is not a malfunction.
- Be sure to unplug from the wall outlet after charging.
NOTES
- A new battery pack which is not used yet, or one which is not used for more than one month may not be recharged enough. This is due to the characteristic of this battery, and is not a malfunction. In this case, recharge it two or three times before the first use.
- When the charge indicator of the battery pack starts to blink, it is nearly exhausted. Refer servicing to qualified service personnel.
- Noises may be generated on the TV or the radio during recharging. In this case, use a more distant power socket from them.
- Do not recharge or discharge the battery near a heating element such as a heater or direct sunlight.
Using the battery pack (continued)
Connecting the battery pack to the unit
1 Fit the claws of the battery pack into the latch slots on the bottom of this unit.
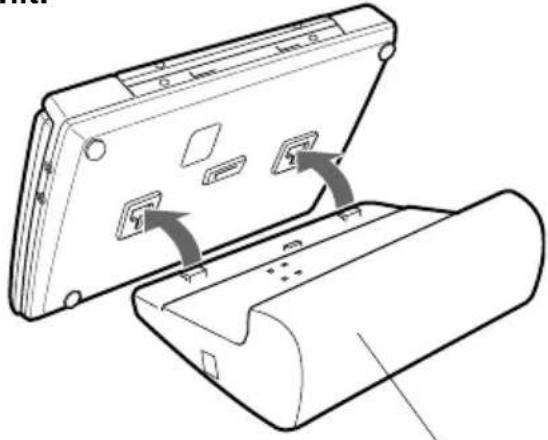
natural_image
Diagram of a laptop case with two buttons and a partially open lid, showing internal components (no text or symbols)Battery pack
2 Push the battery pack up and into the latch slots as shown below.
Make sure that the battery pack is connected firmly.

natural_image
Line drawing of a mechanical component with a curved base and flange, showing a directional arrow (no text or symbols)Disconnecting the battery pack
Slide the latch release Ⓐ and slide the battery pack off as shown below.

natural_image
Technical diagram of a device with labeled component A and directional arrows indicating movement (no text or symbols beyond labels)When the player is not used for an extended period of time, disconnect the battery pack from the unit. When it is connected, a small amount of current continues to flow to the player, even when the power is turned off. If left connected for a long time, the battery may become over-discharged.
Caution
When you carry or hold the battery pack, take care not to touch the electrode with metals.

When disposing of the battery pack please check and follow local regulations regarding disposal and recycling for Nickel-Metal Hydride batteries.
Playing back
1 Slide POWER switch on the main unit toward ON to turn the power on.
The power indicator lights.
The power cannot be turned on by POWER of the remote control.
When using with the battery pack, the power may not be turned on at once. In this case, turn the power on again after 3 seconds. If the unit is still not turned on, recharge the battery pack.

2 Press OPEN▲ to open the display panel.

3 Put your finger on the pit DISC OPEN▲ on the left side of this unit and open the disc cover.
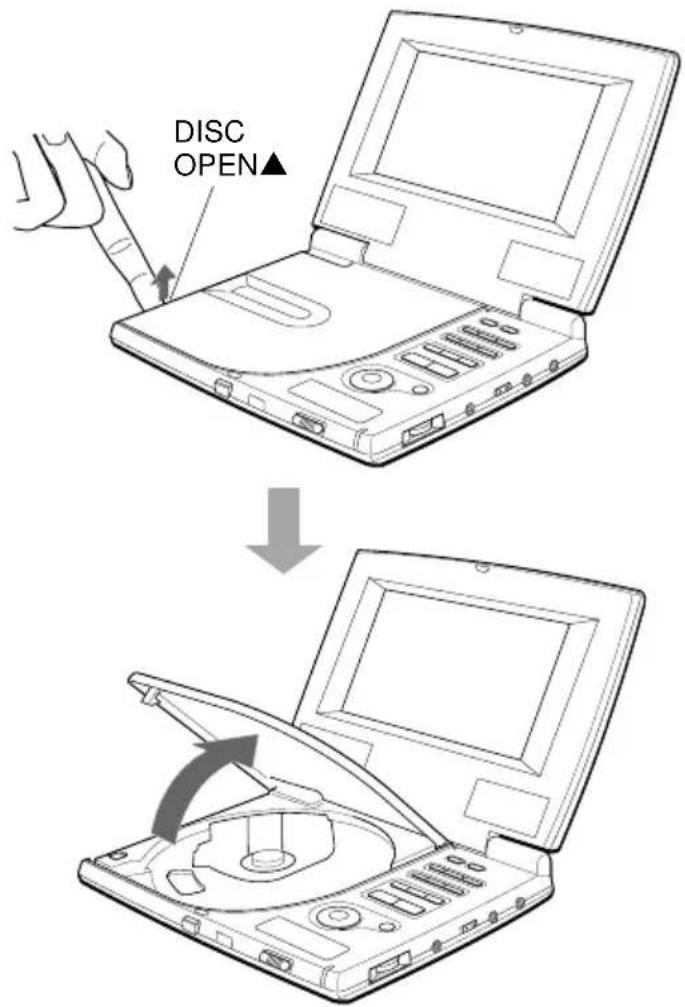
4 Load a disc with the label side up and push down around the center of it.
The disc is fixed with a click.

CONTINUE
5 Close the disc cover.
This unit automatically begin playing the disc.

natural_image
Line drawing of a laptop with an open CD and a disc, showing the lid removed from its screen (no text or symbols)If the disc does not begin to play, press ▶(Play).
When the remote control is used
The instructions in this manual refer mainly to the buttons on the main unit. Buttons on the remote control with the same names as those on the main unit can be used as well.
NOTES
- Load only one disc.
• After loading or removing a disc, make sure to close the disc cover. If the inside the unit becomes dusty, it will cause a malfunction. - When playing a DVD disc, set the PAL/NTSC switch on the right side to suit the color system of the disc playing during stop or power off. Otherwise, the full potential of the disc may not be realized.
When the menu screen is displayed
The menu screen may be displayed first after loading a DVD or video CD 2.0 with PBC ON which contains a menu.
You cannot select the program in the menu screen while the on screen display appears. Turn off the on screen display before playing a disc. See page 15.
DVD: Use ▲▼◀▶ or the number buttons to select the program you would like to view, then press ENTER to begin playback. Press TOP MENU or MENU to return to the menu screen.
Video CD: Use the number buttons to select the program you would like to view. Playback begins. Press RETURN to return to the menu screen. When PBC is set to ON, you cannot select the program with the main unit.
For either DVD or Video CDs, menu continuations and the exact operating procedures for using the menu may vary from disc to disc. Follow the instructions on the menu screen.
To turn the power off
Slide the POWER switch on the main unit toward OFF, or press POWER on the remote control.
To avoid the accidental operation
Slide the POWER switch to HOLD.
After playing back a disc
Slide the POWER switch toward OFF to turn the power off. If stop mode or pause mode lasts for more than 5 minutes, the unit automatically enters standby mode (Auto power saving). While the liquid crystal display is off, the power indicator remains lit. Press ▶(Play) to turn on the power again.
Removing the disc
Caution
Make sure that the disc stops and is completely still before you remove the disc. If you touch the spinning disc, you may hurt your finger.
1 Press ■ to stop playback.
2 Put your finger on the pit DISC OPEN▲ on the left side of this unit and open the disc cover.
3 Remove the disc from the groove.
Do not touch the surface of the disc.
groove for 8cm disc

groove for 12cm disc
4 Close the disc cover.
About the Ⓧ symbol display
The symbol will be displayed on the screen if your operation is prohibited by the unit or the disc.
NOTES
- During playback, some of the basic functions may not work with some DVD discs. This is not a malfunction. Operate it referring to the instructions of the discs.
- When the display panel is closed, the liquid crystal display and the speakers are turned off.
- When you do not use the liquid crystal display, close the display panel to save AC power or the battery pack. Make sure that the display panel is locked with a click.
- During playback of an audio CD, set the display mode of the liquid crystal display to off to save AC power or the battery pack. (See page 14).
- A disc with the function to change the language in its menu may not be played back correctly. In this case, start play from the menu, then return to the menu and change the language.


Stopping playback
Press ■.
This unit remembers the point at which playback stopped (Resume function). When ▶(Play) is pressed, playback begins from the resumed point.
To clear the resumed point
Press ■ again during stop. It is also cleared when the disc cover is opened.
Still (Pause)
Press II during playback.
To return to normal playback
Press ▶(Play) or ||.
NOTE
This unit remembers the point at which playback was paused.
Fast Forward, Reverse
Press ◀◀ or ▶▶ on the remote control during playback.
The program is fast forwarded or in rewound at high speed.
- When ◀◀ or ▶▶ is pressed repeatedly during DVD or video CD playback, the playback speed changes each time the button is pressed, as shown below.

flowchart
graph LR
    A["→ ▶▶·2\n(◀◀·2)"] --> B["▶▶·4\n(◀◀·4)"]
    B --> C["▶▶·8\n(◀◀·8)"]
To return to normal playback
Press ▶(Play).
NOTE
There is no audio during fast forward or reverse (DVD and Video CD only). During audio CD play, the sound is heard intermittently.
Skipping
Press ◀◀◀ or ▶▶▶ during playback.
- Skip to the next chapter or track: ▶▶ The disc position advances one chapter or track each time the button is pressed.
- Return to the previous chapter or track: For DVD, video CD with PBC on, and audio CD: Pressing once skips to the beginning of the chapter (track) currently being played, and pressing twice skips to the previous chapter (track).
For video CD with PBC off:
Pressing ◀◀◀ once skips to the previous track.
To skip to the desired chapter or track directly using the remote control (video CD, audio CD)
Enter the desired track number using the number buttons on the remote control.
Example: To play track 10
Press +10, 0 on the remote control.
Playback begins.
Switching the brightness of the liquid crystal display
The liquid crystal display can be brightened or be dimmed.
Press TFT SW on the unit.
The brightness is switched as follows.

NOTE
When using with the AC adaptor, the liquid crystal display is bright when the power is turned on.
When using with the battery pack, the liquid crystal display is dim when the power is turned on.
Display mode on the liquid crystal display
Each time you press MODE, the display changes as follows.
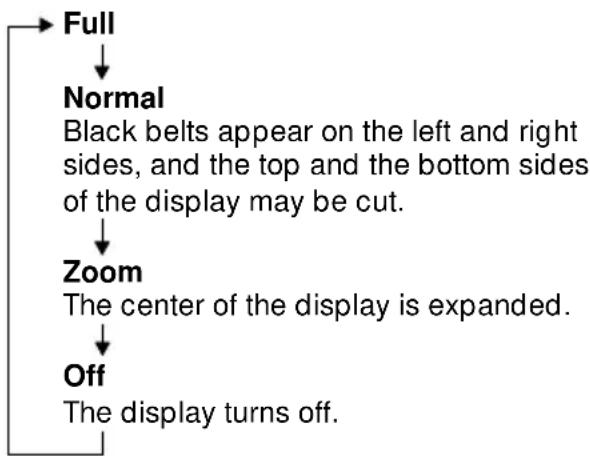
flowchart
graph TD
    A["Full"] --> B["Normal"]
    B --> C["Zoom"]
    C --> D["The center of the display is expanded."]
    D --> E["Off"]
    E --> F["The display turns off."]
Information about On Screen Display (OSD)
This unit features OSD Menu Icons showing disc information (title/chapter/track number, elapsed playing time, audio/subtitle language, angle, and sound) and player information (repeat play, play mode, marker, etc.). Some icons only show the indicated information. Other icons allow the settings to be changed.

Either when playing, or while the resume function is active, press DISPLAY on the main unit or ONSCREEN DISPLAY ON/OFF on the remote control repeatedly.
When the button is pressed repeatedly during playback, the information displays are shown as follows.
During a DVD playback:

flowchart
graph LR
    A["①②③④⑤"] --> B["10:00:00 EN 2ch OFF"]
    B --> C["⑦⑧⑨"]
    C --> D["OFF OFF"]
    D --> E["Cancel (Normal display)"]
① shows the title number.
(See page 16.)
② shows the chapter number. (See page 17.)
③ shows the elapsed playing time during playback, or the time to be searched. (See page 18.)
④ shows the audio information. (See page 27.)
⑤ shows the subtitle information. (See page 26.)
⑥ shows the angle information. (See page 25.)
⑦ shows the repeat mode. (See page 23.)
⑧ shows the A-B repeat mode. (See page 24.)
⑨ shows the memorized mark points information. (See page 19.)
During Video CD or an audio CD playback:

flowchart
graph LR
    A["① ② ③ ④ ⑤"] --> B["STEREO OFF ON"]
    B --> C["⑥ ⑦ ⑧"]
    C --> D["Cancel (Normal display)"]
①shows the track number. (See page 16.)
While playing a video CD Version 2.0, if the “--” appears instead of the track number, the PBC function is set to ON.
② shows the elapsed playing time during playback.
③ shows the audio information (Video CD only). (See page 28.)
④ shows the playback mode. (See page 21.)
⑤ shows the PBC is on or off (Video CD only). (See page 20.)
⑥ shows the repeat mode. (See page 24.)
⑦ shows the A-B repeat mode. (See page 24.)
⑧ shows the memorized mark points information. (See page 19.)
Title search (DVD)/ Track search (Video CD with PBC off, audio CD)
1 Either when playing, or while the resume function is active, press DISPLAY on the main unit or ONSCREEN DISPLAY ON/OFF on the remote control repeatedly.
The menu icons are displayed.
To operate with the T-SEARCH button Press T-SEARCH on the remote control either when playing, or while the resume function is active. Then go to step 3.
2 Press ◀ or ▶ to select the icon of "Title search (DVD)" or "Track search (Video CD with PBC off, audio CD)".
Title search Track search

3 Press ▲ or ▼ to enter the desired title/track number.
- The number buttons on the remote control can also be used.
Example: To play title (track) number 2 press 2.
Example: To play title (track) number 12 Press 1, 2 (or +10, 2).
If you enter the wrong number
Press C to delete the number you entered.
Then enter the correct number.
4 Press ENTER.
Playback begins with the specified title/track.
NOTE
Title/track search will not work if you specify a title/track number which does not exist on the disc.

Chapter search (DVD)
1 While playing, press DISPLAY on the main unit or ONSCREEN DISPLAY ON/OFF on the remote control repeatedly.
The menu icons are displayed.
To operate with the T-SEARCH button
Press T-SEARCH on the remote control while playing. Then go to step 2.
2 Press ◀ or ▶ to select the “Chapter search” icon.

3 Press ▲ or ▼ to enter the desired chapter number.
- The number buttons on the remote control can also be used.
Example: to play chapter number 17
press 1, 7 (or +10, 7).
If you enter the wrong number
Press C to delete the number you entered.
Then enter the correct number.
4 Press ENTER.
Playback begins with the specified chapter.
NOTE
Chapter search will not work if you specify a chapter number which does not exist on the disc.
With a DVD which allows displaying of elapsed time, you can specify a time on the disc to search for a desired location.
1 While playing, press DISPLAY on the main unit or ONSCREEN DISPLAY ON/OFF on the remote control repeatedly.
The menu icons are displayed.
To operate with the T-SEARCH button
Press T-SEARCH on the remote control while playing. Then go to step 2.
2 Press ◀ or ▶ to select the "Time search" icon.

3 Use the number buttons to enter the time of the desired location.
Example:
• To start play at 1 hour, 17 minutes, 30 seconds (1:17:30)
Press 1 (hour), 1, 7 (minutes), then 3, 0 (seconds).

• To start play at 8 minutes 7 seconds (0:08:07)
Press 8 (minutes), then 0, 7 (seconds).
If you enter the wrong number
Press C to delete the number you entered.
Then enter the correct number.
4 Press ENTER.
Playback begins from the specified time.
NOTES
- Time search does not work if you specify a time greater than the length of the disc.
- Time search may not work with some discs.


Mark function (DVD, Video CD with PBC off, audio CD)
Playback can restart from a memorized point. The mark cannot span a title boundary, but must be within a single title.
To memorize the points
1 While playing, press DISPLAY on the main unit or ONSCREEN DISPLAY ON/OFF on the remote control repeatedly.
The menu icons are displayed.
To memorize the points with the MARK button
Press MARK on the remote control while playing. Then go to step 3.
2 Press ◀ or ▶ to select the "Mark function" icon.

3 Press ENTER at the desired point. A point is memorized.
To memorize other points
Press ◀ or ▶ to move the cursor (the yellow-colored area). Then press ENTER.
NOTE
The mark function may not work with some discs.
To restart play from the memorized point
1 While the "Mark function" icon is displayed, press ◀ or ▶ to select a point.
You can also use the number buttons (1-5) to select a point.
2 Press ▶(Play) to start play.
To restart play from the memorized point with the MARK button
1 Press MARK while playing.
2 Use the number buttons (1-5) to select a point.
To clear a memorized point
1 While the "Mark function" icon is displayed, press ◀ or ▶ to select a point to be cleared.
2 Press C on the remote control. The selected point is cleared.
- When the disc cover is opened, all the memorized points are also cleared.
- With DVDs, the memorized point is canceled by pressing ■ twice during playback.
Checking ON or OFF of PBC (video CD)
When using menu playback with a video CD, the player returns to the menu display when the selected scene finishes (PBC ON).
You can also set the player to play the entire CD without returning to the menu screen, just like with normal audio CDs and video CDs with no menu capabilities (PBC OFF).
On OSD, PBC ON or OFF can be checked but cannot be set. Change it in the SETUP menu. (See page 37.)
Either when playing, or while the resume function is active, press DISPLAY on the main unit or ONSCREEN DISPLAY ON/OFF on the remote control repeatedly.
The menu icons are displayed.

Programed playback (Video CD with PBC off, audio CD)
With video and audio CDs, you can select the tracks you would like to play, and play them in any order. You can specify up to 30 tracks. You can also repeat programmed selections.
1 Either when playing, or while the resume function is active, press DISPLAY on the main unit or ONSCREEN DISPLAY ON/OFF on the remote control repeatedly.
The menu icons are displayed.
To program with the PROGRAM button
Press PROGRAM on the remote control either when playing, or while the resume function is active. Within 10 seconds press ▲ or ▼ to select "PRG", then press ENTER. Then go to step 4.
2 Press ◀ or ▶ to select the "Playback mode" icon, then press ▲ or ▼ to select "PRG".

3 Press ENTER.
A programing screen is displayed on the display.
4 Press ◀ or ▶ to select the number of the track you want to program. Then press ENTER.

If you enter the wrong number
Press C to delete the number.
5 Repeat step 4 to program other tracks.
6 Press ▲▼◀▶ to select "START", then press ENTER.
Playback begins from the specified track. You can also start playback with ▶(Play).

To delete a programmed track
On the programing screen, select "C" with ◀ or
▶. Then press ENTER. The last programmed number is canceled.
You can also delete the last program with C on the remote control.
To clear the programmed contents
At the programing screen, select "AC" with ◀ or ▶. Then press ENTER. All the programmed contents are cleared.
When ■ is pressed twice, the disc cover is opened, or the power is turned off, all the programmed contents are also cleared.
Adding a programmed track in stop mode
Show the programing screen and select tracks. Then press ENTER. The selected track is programmed to the last position.
To cancel programmed playback
Press ■.
Programed playback is canceled by stopping playback.
NOTE
During programmed playback, the on screen display cannot be used.
Random playback (Video CD with PBCoff, audio CD)
You can playback tracks in random order. (Random playback)
1 Either when playing, or while the resume function is active, press DISPLAY on the main unit or ONSCREEN DISPLAY ON/OFF on the remote control repeatedly.
The menu icons are displayed.
2 Press ◀ or ▶ to select the "Playback mode" icon.

3 Press ▲ or ▼ to select "RND".

4 Press ENTER.
Random playback begins.
To operate with the PROGRAM button
Press PROGRAM on the remote control either when playing, or while the resume function is active. Within 10 seconds, press ▲ or ▼ to select "RND", then press ENTER.
To cancel random playback
Press ■.
Random playback is canceled by stopping playback.
NOTE
During random playback, the on screen display cannot be used.

Repeating a DVD
1 Either when playing, or while the resume function is active, press DISPLAY on the main unit or ONSCREEN DISPLAY ON/OFF on the remote control repeatedly.
The menu icons are displayed.
2 Press ◀ or ▶ to select the “Repeat playback” icon.

3 Press ▲ or ▼ to select the repeat mode.
The repeat mode will change each time you press the button.
C(Chapter): Repeat of the chapter being played.

T(Title): Repeat of the title being played.
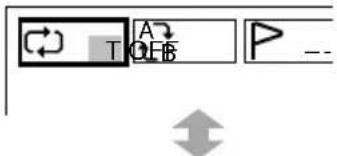
D(Disc): Repeat the whole disc being played.

OFF: Cancel repeat mode. (Normal playback)

When using the REPEAT button
Press REPEAT on the remote control repeatedly. The repeat mode will change each time you press the button.
Repeating a Video CD with PBC off /an audio CD
1 Either when playing, or while the resume function is active, press DISPLAY on the main unit or ONSCREEN DISPLAY ON/OFF on the remote control repeatedly.
The menu icons are displayed.
2 Press ◀ or ▶ to select the “Repeat playback” icon.
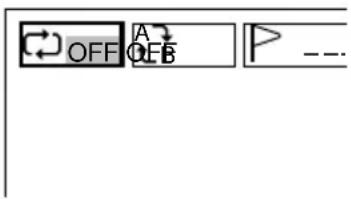
3 Press ▲ or ▼ to select the repeat mode.
The repeat mode will change each time you press the button.
T(Track): Repeat of the track being played.

D(Dics): Repeat of all tracks on a disc being played.
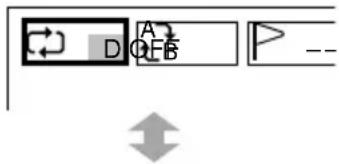
OFF: Cancel repeat mode. (Normal playback)
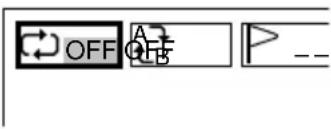
When using the REPEAT button
Press REPEAT repeatedly. The repeat mode will change each time you press the button.
A-B repeat
Allows you to select a portion of a disc to be repeated. The portion to be repeated may not span a track boundary, but must be within a single track.
A-B repeat function may not work with some DVDs.
1 While playing, press DISPLAY on the main unit or ONSCREEN DISPLAY ON/OFF on the remote control repeatedly.
The menu icons are displayed.
2 Press ◀ or ▶ to select the "A-B repeat" icon.

3 Press ENTER at the starting point of the section you want to repeat.
The Repeat indicator is displayed in the display window.

4 Press ENTER again at the ending point of the section you want to repeat.
The player returns to point A and plays the section between A and B.
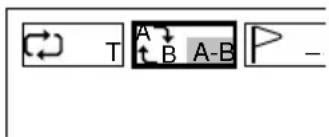
To cancel the repeat
Press A-B on the remote control.
When using the A-B button
Press A-B at the starting point of the section you want to repeat and at the ending point.
NOTES
- The track or the specified points may change if the DVD player is jarred while playing with Repeat or Repeat A-B.
- Repeat playback may not work with some discs.

Changing the angle (DVD)
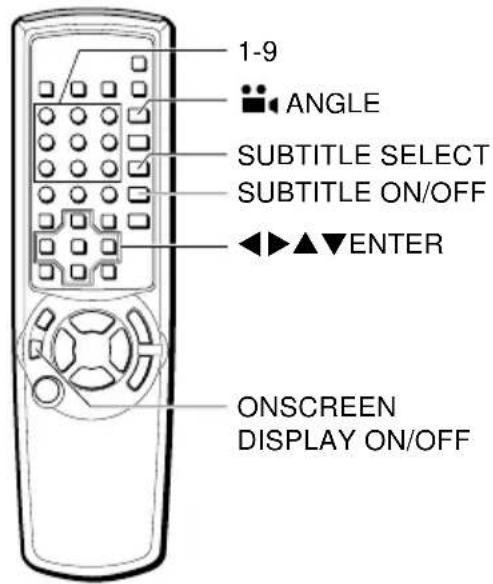
When playing a DVD which has been recorded in multi-angle (photographed from several different angles), you can select which angle you would like to view the action from.
When a multi-angle scene comes on during playback, the indicator will be displayed on the display window to let you know that you can change the angle.
1 While playing, press DISPLAY on the main unit or ONSCREEN DISPLAY ON/OFF on the remote control repeatedly.
The menu icons are displayed.
2 Press ◀ or ▶ to select the "Angle" icon.
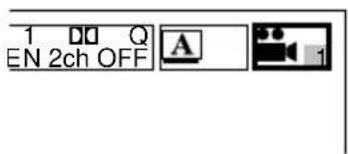
3 Press ▲ or ▼ to select the angle.
You can also use the number buttons to select the angle.

flowchart
graph TD
    A["Start"] --> B["Speed/Level: 0:06:30 EN 2ch OFF"]
    B --> C["Step 1: Speed/Level: 0:06:30 EN 2ch OFF"]
    C --> D["Step 2: Speed/Level: 0:06:30 EN 2ch OFF"]
    D --> E["Step 3: Speed/Level: 0:06:30 EN 2ch OFF"]
    E --> F["End"]
When using the ANGLE button
Press ANGLE on the remote control to change viewing angle when the indicator is shown on the display window. The angle will change each time you press ▲ or ▼.
NOTES
- The symbol will be displayed if you select the Angle while viewing a disc which does not have multiple viewing angles, or if viewing a part of the disc which does not allow angle selection.
25 ENGLISH
- Depending on the disc, the symbol may not be displayed or the indicator may appear, even if the angle function does not work.
Displaying and changing subtitles
When playing discs which contain subtitles, you can display the subtitles on the screen or change the language of the subtitles.
Displaying subtitles
1 While playing, press DISPLAY on the main unit or ONSCREEN DISPLAY ON/OFF on the remote control repeatedly.
The menu icons are displayed.
2 Press ◀ or ▶ to select the "Subtitle on/off" icon.

3 Press ▲ or ▼ to select "ON".

To turn off the subtitles
Press ▲ or ▼ to select "OFF".
When using the SUBTITLE ON/OFF button
Press SUBTITLE ON/OFF on the remote control during playback.
Subtitles will be displayed.
NOTE
Some discs have subtitles which are on by default. With such discs, SUBTITLE ON/OFF may not allow you to remove the subtitles.
Changing the subtitles
1 While playing, press DISPLAY on the main unit or ONSCREEN DISPLAY ON/OFF on the remote control repeatedly.
The menu icons are displayed.
2 Press ◀ or ▶ to select the "Subtitle" icon.
3 Press ▲ or ▼ to select the desired subtitles.

flowchart
graph TD
    A["1 EN 2ch OFF"] --> B["1 N 2ch OFF"]
    B --> C["1 N 2ch OFF"]
    style A fill:#f9f,stroke:#333
    style B fill:#ccf,stroke:#333
    style C fill:#cfc,stroke:#333
NOTES
- The first subtitles displayed will be in the subtitle language selected with the subtitle setting. (See page 33.) If there are no subtitles in that language on the disc, the disc will determine which subtitles are shown.
- Subtitles may only be changed with discs which contain more than one set of subtitles.
- The number of subtitle languages varies from disc to disc.
- With some discs, it may take a few moments after you press SUBTITLE SELECT for the new subtitles to be displayed.
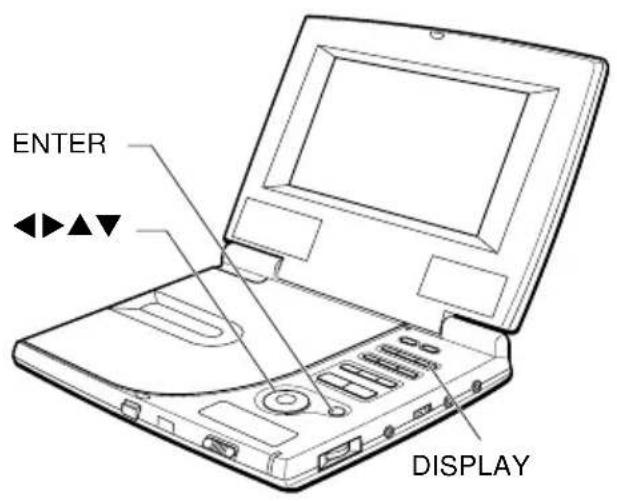

Selecting audio tracks (DVD)
Some DVDs have more than one audio track, such as soundtracks with different languages. While playing such a disc, you can change the audio track to hear the different soundtracks.
1 While playing, press DISPLAY on the main unit or ONSCREEN DISPLAY ON/OFF on the remote control repeatedly.
The menu icons are displayed.
2 Press ◀ or ▶ to select the "Audio track" icon.

3 Press ▲ or ▼ to select the audio track.
The audio track will change each time you press ▲ or ▼.

When using the AUDIO SELECT button
Press AUDIO SELECT on the remote control during playback.
The audio track will change each time you press the button.
Information on the sound mode
When a disc is in this DVD player, the sound mode information below is shown with the "Audio track" icon.
• shows the channel of Dolby system (2ch/5.1ch).
• shows the "dts" during playback of a DVD with dts.
NOTES
- When playing a DVD with soundtracks in multiple languages, the audio will automatically be played in the language which was selected when the DVD player was set up. If there is not a soundtrack in that language on the disc, the disc will determine which audio track is played.
- The audio track may only be changed for discs which contain multiple audio tracks.
- The number of audio tracks available differs from disc to disc.
Selecting karaoke audio (video CD, DVD)
The method of recording the vocal audio may differ from disc to disc. This DVD player allows you to select the right method for the disc, so that you can use any karaoke disc.
Video CD karaoke:
1 Either when playing, or while the resume function is active, press DISPLAY on the main unit or ONSCREEN DISPLAY ON/OFF on the remote control repeatedly.
The menu icons are displayed.
2 Press ◀ or ▶ to select the "Audio track" icon.

When using the AUDIO SELECT button
Press AUDIO SELECT on the remote control when playing or while the resume function is active. Then go to step 3.
3 Press ▲ or ▼ to select the audio track.
The audio track will change each time you press ▲ or ▼.

flowchart
graph TD
    A["06:30 LEFT"] --> B["06:30 RIGHT"]
    B --> C["06:30 STEREO"]
Video CD karaoke discs typically have the vocals recorded on the right channel. Select "LEFT" to play back music without vocals.
Refer to the instructions with the karaoke disc for more information.
DVD karaoke:
1 While playing, press DISPLAY on the main unit or ONSCREEN DISPLAY ON/OFF on the remote control repeatedly.
The menu icons are displayed.
2 Press ◀ or ▶ to select the "Audio track" icon.

3 Press ▲ or ▼ to select the audio track. Then press ENTER.
The audio track will change each time you press ▲ or ▼.
Example:
A disc has 2 audio tracks (track 1 and track 2), and track 1 has 2 vocal channels.

flowchart
graph TD
    A["00:06:30"] --> B["1 KARAOKE Q EN VOCAL 1 OFF"]
    B --> C["00:06:30"] --> D["1 KARAOKE Q EN VOCAL 2 OFF"]
    D --> E["00:06:30"] --> F["1 KARAOKE Q EN VOCAL 1+2 OFF"]
    F --> G["00:06:30"] --> H["1 KARAOKE Q EN — — OFF"]
NOTES
- Refer to the instructions with the karaoke disc for more information.
- This function is available only when the “Digital Output” is set to “2 CH 48 kHz 16 bit PCM”.
Selecting Q surround (DVD)
Even when only two speakers are used for the left and right, Q SURROUND makes the sounds rich and wide as if you are surrounded by two front speakers and two rear speakers.
1 Either when playing, or while the resume function is active, press DISPLAY on the main unit or ONSCREEN DISPLAY ON/OFF on the remote control repeatedly.
The menu icons are displayed.
2 Press ◀ or ▶ to select the "Q surround" icon.

3 Press ▲ or ▼ to select "ON" or "OFF".

When using the Q SURROUND button
When pressing Q SURROUND on the remote control during playback, the Q surround mode can be selected directly. To cancel Q SURROUND, press Q SURROUND again.
NOTE
When ■ is pressed twice, or the disc cover is opened, Q SURROUND is canceled.
Changing setup values


Basic operations
Your DVD player comes from the factory with all the basic items set properly.
Change any other settings according to your individual setup and preferences.
1 Press SET UP while the player is stopped.
The setup screen is displayed.
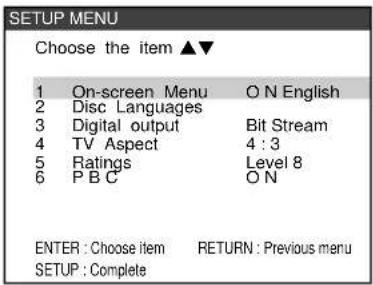
The setup screen cannot be displayed while the On Screen Display is selected. Press ONSCREEN DISPLAY ON/OFF to turn off the On Screen Display.
2 Use ▲ or ▼ to move the cursor (the yellow area) to the setting to be changed.
On-screen Menu (Page 31)
- Sets whether the on-screen guide messages are to be displayed or not.
- Sets the on-screen menu language to English or Spanish.
Disc Languages (Page 32)
Sets the audio soundtrack language, subtitle language, and the language used in the menu screen.
* If the language selected by these settings does not exist on the disc, the disc's default language is used.
Digital output (Page 34)
Sets the optical digital out to output either by bitstream or by linear PCM.
TV Aspect (Page 35)
Sets the aspect ratio of the television set to which the DVD player is connected.
Ratings (Page 36)
When playing discs with preset restriction level encoding, this setting allows the player to automatically cut scenes of excessive violence, etc.
PBC (Page 37)
Sets the default PBC (Play back control) mode on or off for playing a video CD with PBC function.
3 Press ENTER.
The menu screen for the item you selected will be displayed.
4 Use ▲ or ▼ to move the cursor (the yellow area) to the desired setting.
5 Press ENTER.
The selected setting will be saved, and the main setup screen of step 1 will be displayed again. However, for some settings the screen will display a more detailed menu instead. Follow the directions shown on the screen.
6 Press SET UP to exit the setup menu.
To exit the setup menu without making any changes:
Press one of the following buttons instead of pressing ENTER.
RETURN: Return to the previous screen with no changes.
SET UP: Exit the setup menus.
NOTE
When setting the setup menu item, make sure to close the disc cover.
On-screen Menu
There are 2 items you can set.
Guide Message:
Sets whether the on-screen guide messages at the upper right side of the TV screen are to be displayed or not.
1 At the initial setting screen, select "On-screen Menu" by using ▲ or ▼. Then press ENTER.
2 Use ▲ or ▼ to move the cursor (the yellow area) to "Guide Message".
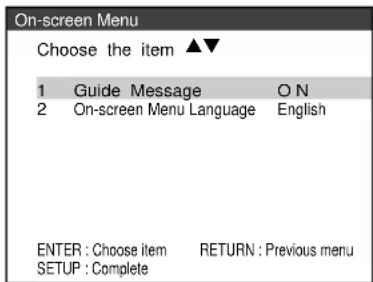
3 Press ENTER.
4 Use ▲ or ▼ to move the cursor (the yellow area) to the desired setting.

5 Press ENTER.
Your entry is saved.
6 Press RETURN to return to the previous screen or press SET UP to exit the setup menu.
On-screen Menu Language:
Sets the on-screen menu language to English or Spanish.
1 At the initial setting screen, select "On-screen Menu" by using ▲ or ▼. Then press ENTER.
2 Use ▲ or ▼ to move the cursor (the yellow area) to "On-screen Menu Language".

3 Press ENTER.
4 Use ▲ or ▼ to move the cursor (the yellow area) to the desired setting.

5 Press ENTER.
Your entry is saved.
6 Press RETURN to return to the previous screen or press SET UP to exit the setup menu.
Disc Languages
Sets the language for displaying DVD disc menus.
There are 3 items you can set.
Audio Language:
1 At the initial setting screen, select "Disc Languages" by using ▲ or ▼. Then press ENTER.
2 Use ▲ or ▼ to move the cursor (the yellow area) to select "Audio language".

3 Press ENTER.
4 Use ▲ or ▼ to move the cursor (the yellow area) to the desired language. And press ENTER.

Original: Play discs in the language specified as the default on the disc. Then go to step 7.
Spanish: Play discs in Spanish. Then go to step 7.
English: Play discs in English. Then go to step 7.
Other: The language code setting screen appears. Then go to step 5.
5 When “Other” is selected in step 4, enter a four-digit language code by using ▲, ▼ and number buttons.
Please refer to the list of language codes on page 45.
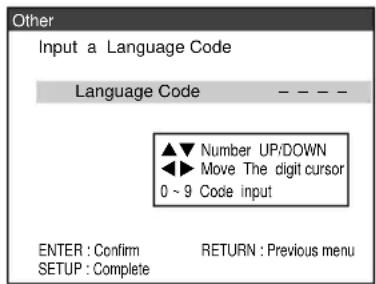
To correct the input number, press ◀ or ▶ to move the cursor to the number to be corrected, and then input new number.
6 Press ENTER.
Your entry is saved.
7 Press RETURN to return to the previous screen or press SET UP to exit the setup menu.
If the language selected by these settings does not exist on the disc, then the disc's default language will be used.
Subtitle Language:
1 At the initial setting screen, select "Disc Languages" by using ▲ or ▼. Then press ENTER.
2 Use ▲ or ▼ to move the cursor (the yellow area) to "Subtitle Language".
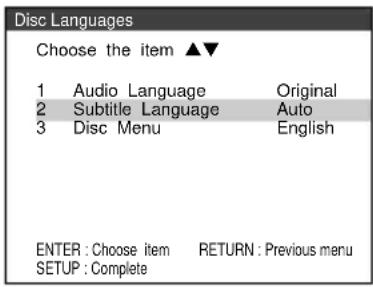
3 Press ENTER.
4 Use ▲ or ▼ to move the cursor (the yellow area) to the desired language. And press ENTER.

Auto:
Subtitles will be automatically displayed in the default language specified on the disc.
Spanish:
Play discs in Spanish
English:
Play discs in English.
Others:
The language code setting screen appears. The procedure for setting the language code is the same as for “Audio Language” setting. Refer to the steps 5 and 6 of “Audio Language” setting.
5 Press RETURN to return to the previous screen or press SET UP to exit the setup menu.
If the language selected by these settings does not exist on the disc, then the disc's default language will be used.
Disc Menu:
1 At the initial setting screen, select "Disc Languages" by using ▲ or ▼. Then press ENTER.
2 Use ▲ or ▼ to move the cursor (the yellow area) to "Disc Menu".

3 Press ENTER.
4 Use ▲ or ▼ to move the cursor (the yellow area) to the desired language. And press ENTER.
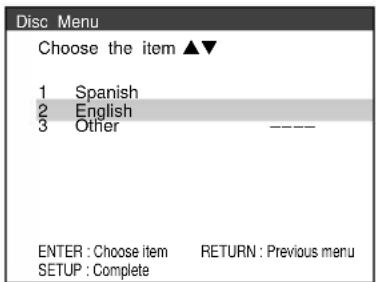
Spanish:
Show the Disc menu in Spanish.
English:
Show the Disc menu in English.
Other:
The language code setting screen appears. The procedure for setting the language code is the same as for “Audio Language” setting. Refer to the steps 5 and 6 of “Audio Language” setting.
5 Press RETURN to return to the previous screen or press SET UP to exit the setup menu.
If the language selected by these settings does not exist on the disc, then the disc's default language will be used.
Digital Output
Sets the audio output to be output from AUDIO/OPT OUT jack of the unit according to the type of audio equipment connected to the unit.
1 At the initial setting screen, select "Digital output" by using ▲ or ▼. Then press ENTER.
2 Use ▲ or ▼ to move the cursor (the yellow area) to the suitable setting.
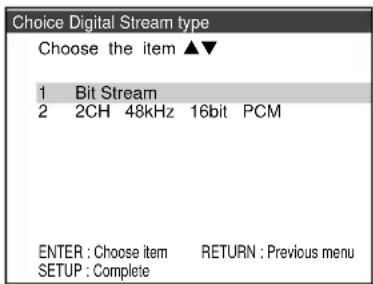
Bit Stream (See page 40.):
Digital output is applied only for DVDs with 48 kHz/16 bit linear PCM audio, and is impossible for DVDs with 48 kHz/20 bit/24 bit, 96 kHz linear PCM audio during playback. When they are played back, signals are converted into 48 kHz/16 bit with digital output. Due to secured copyrights, DVDs with PCM audio are played back at 48 kHz/16 bit or below. DVDs recorded in Dolby Digital (AC-3) format will be played back with Dolby Digital (AC-3) Bitstream (2ch-5.1ch) audio output. Select this option if your DVD player is connected to a Dolby Digital (AC-3) decoder.
When the DTS audio is selected and played, DTS bitstream is output to Bit-stream.
2CH 48KHz 16bit PCM:
Converts output into 48 kHz/16 bit PCM (2ch) when a DVD recorded in Dolby Digital (AC-3) format is played back.
3 Press ENTER.
Your entry is saved.
4 Press SET UP to exit the setup menu.
TV Aspect
There are 2 options for the television aspect ratio.
When your television is connected to this unit with the connecting cable has a conventional size screen (4:3), refer to "NORMAL TV". If the connected TV has a wide-screen (16:9), refer to "WIDE TV".
NORMAL TV:
1 At the initial setting screen, select "TV Aspect" by using ▲ or ▼. Then press ENTER.
2 Use ▲ or ▼ to move the cursor (the yellow area) to "NORMAL TV 4:3".
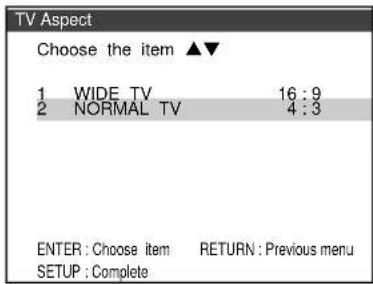
3 Press ENTER.
4 Use ▲ or ▼ to move the cursor (the yellow area) to the suitable setting.
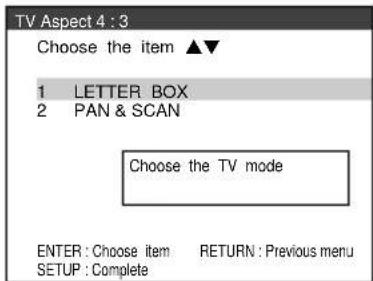
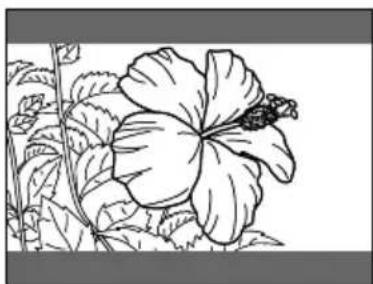
LETTER BOX
Media recorded in wide (16:9) format will be played in "letterbox" style, with black bands at the top and bottom of the screen.
natural_image
Line drawing of a flower with leaves and a small insect, no text or symbols presentPAN & SCAN
Media recorded in wide (16:9) format with pan-scan encoding will be played at the full screen height, with the left and right portions cut off. Other media will be played in "letterbox" style.

natural_image
Line drawing of a flower with leaves and a small insect, enclosed in a square frame (no text or symbols)5 Press ENTER.
Your entry is saved.
6 Press SET UP to exit the setup menu.
WIDE TV:
1 At the initial setting screen, select "TV Aspect" by using ▲ or ▼. Then press ENTER.
2 Use ▲ or ▼ to move the cursor (the yellow area) to "WIDE TV 16:9".

3 Press ENTER.
Your entry is saved.
4 Press SET UP to exit the setup menu.
Ratings
Caution
In some discs, the rating level mentioned on the disc label is not registered inside the disc. To check whether the lock setting is functional in this unit, carry out the lock setting procedures.
1 At the initial setting screen, select
"Ratings" by using ▲ or ▼. Then press ENTER.
2 Use ▲ or ▼ to move the cursor (the yellow area) to the level you would like to set.
The smaller the number, the higher the level of restriction. For instance, setting the rating level to 1 will make it impossible to play any disc with a rating level from 2 to 8.
The rating scheme may vary from disc to disc. Check the actual disc.

3 Press ENTER.
A password entry screen is displayed.

4 Use the number buttons, ▲ or ▼ to enter a four-digit password.
To correct the input number, press ◀ or ▶ to move the cursor to the number to be corrected, and then input new number.
5 Press ENTER.
Confirm your password.
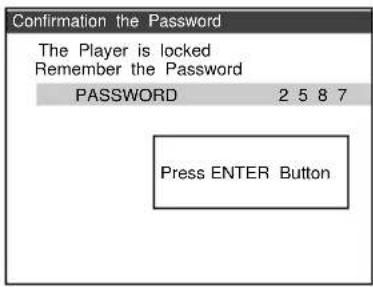
Do not forget the password you set!
If you forget the password
Reset the unit to default condition and set all the settings again including the "Ratings" setting (see page 43).
6 After confirming the password, press ENTER again.
Your entry is saved.
7 Press SET UP to exit the setup menu.
To change the settings
1 At the initial setting screen, select "Ratings" by using ▲ or ▼. Then press ENTER.
2 Input four-digit password and press ENTER.
3 Select an item: "Unlock Player" (lift the limitation.), "Change Password", or "Change Level".

4 Carry out the procedure according to the instruction on the liquid crystal display.
5 Press SET UP to exit the setup menu.
PBC
Sets the default PBC (Play back control) mode on or off for playing a video CD with PBC function.
1 At the initial setting screen, select "PBC" by using ▲ or ▼. Then press ENTER.
2 Use ▲ or ▼ to move the cursor (the yellow area) to "ON" or "OFF".

3 Press ENTER.
Your entry is saved.
4 Press SET UP to exit the setup menu.
Connecting to external equipment
Before connecting
- Turn off the power of this unit and the equipment to be connected.
• Refer to the instructions for the equipment to be connected.
Connecting to a wide TV/an AV TV
According to the type of connected TV, set the initial TV mode referring to "TV Aspect" on page 35.

To connect to a TV set equipped with S-video input
Use the supplied S-video connecting cable instead of the video connecting cable to connect the VIDEO IN/OUT jack of this unit and the S-VIDEO input jack of the TV set.
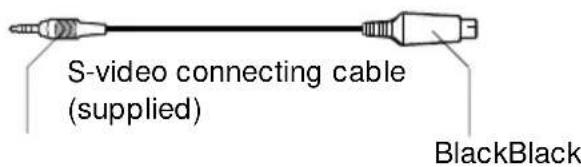
To set to the color system of the connected TV
Slide the PAL/NTSC switch on the right side according to the TV during stop or power off.
Connecting to audio equipment without digital audio input terminals

Connecting to audio equipment with digital audio input terminals

Connecting to an active speaker system
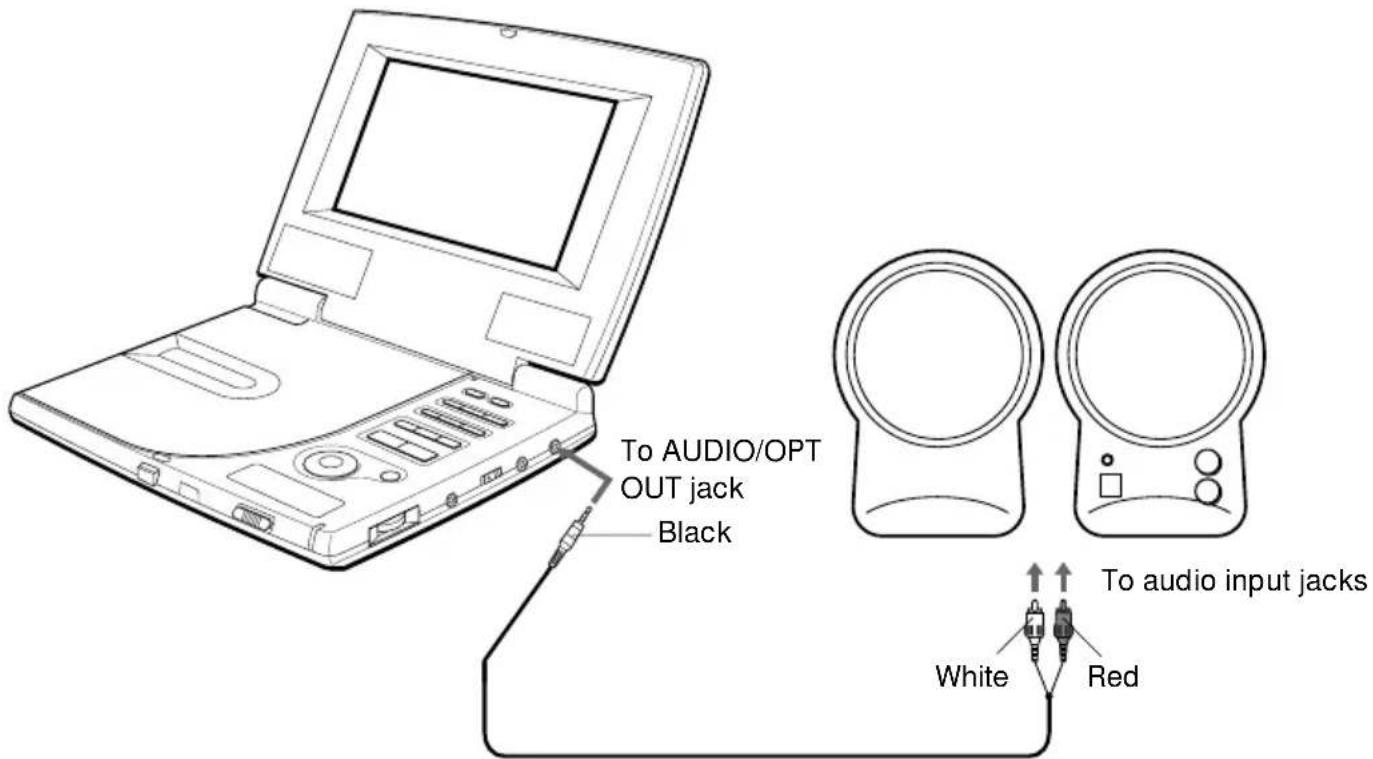
Audio connecting cable (supplied)
Output sound from the optical output terminals of this unit
| Playing disc | Audio recording system | Output audio signals |
| DVD | Dolby digital (AC-3) | Bit stream of Dolby digital (AC-3) (2ch-5.1ch)PCM (48 kHz/16 bit) (2ch)*1Select it in the initial setting “Digital output”. |
| Linear PCM 48 kHz/96 kHz16/20/24 bit | Linear PCM (48 kHz/16 bit) (2ch)*2 | |
| DTS | Bit stream of DTS (1ch-5.1ch)No output PCM signal | |
| Video CD | MPEG 1 | PCM (44.1 kHz)*1 |
| Audio CD | Linear PCM | Linear PCM (44.1 kHz) |
*2 When a 96 kHz-24 bit disc is played, the audio signals are output in 48 kHz-16 bit.
*1 This changes condensed audio signals to PCM and outputs them.
Connecting to a dolby digital (AC-3) decoder
During playback of a DVD recorded in Dolby Digital (AC-3)/5.1ch surround, bit streams of Dolby Digital are output from the optical audio output terminals of this unit. By connecting to a dolby digital decoder, you can enjoy theater-quality realistic audio sound right in your own home. Set the “Digital output” to “Bit Stream”.

flowchart
graph TD
    A["Laptop"] -->|To AUDIO/OPT OUT jack| B["Audio jack"]
    A -->|Optical connecting cable (not supplied)| C["Audio jack"]
    C --> D["Audio input"]
    D --> E["Computer"]
    D --> F["Computer"]
Connecting to a video camera
You can enjoy contents of an external video camera through the liquid crystal display and stereo speakers of this unit.

To set to the color system of connected equipment
Slide the PAL/NTSC switch on the right side according to the color system of connected equipment.
NOTES
- When you switch the PAL/NTSC switch, turn off the power first.
- During playback, do not connect equipment which outputs sound signals such as a game.
If something seems to be wrong with your DVD player, first check the items in the table below.
General
The power does not turn on.
- Connect the AC adaptor correctly or insert the battery pack correctly. (page 6-9)
- Check that POWER switch is not set to HOLD. (page 11)
- The power cannot be turned on by POWER of the remote control.
The power automatically turns off.
- In stop mode, the unit automatically enters the power saving mode after 5 minutes when using with the AC adaptor, and using with the battery pack (Auto power saving). (page 11)
Press ▶(Play) to turn on the power again.
Buttons on the main unit or on the remote control do not function.
- In some discs, the operation may be prohibited.
- Check that POWER switch is not set to HOLD. (page 11)
The unit does not work correctly.
- Remove the AC adaptor and the rechargeable battery, then attach them again.
The unit is warmed during playback.
• This is not a malfunction.
You do not remember the code number set in "Ratings".
- Reset this unit as follows to restore the default condition. When the disc cover is open, press the buttons shown below on the remote control in the following order.
No sound comes out from the connected speakers.
- Check if the connection is correct. (page 40)
- Check that "LInE In" is not displayed in the display window.
No picture appears on the TV screen.
- Check if the connection is correct. (page 38)
- Set the input switch on the TV set to "video".
- Check that "LInE In" is not displayed in the display window.
No picture appears on the liquid crystal display when the video camera is connected.
- Check if the connection is correct. (page 42)
- Check that the video camera is turned on.
- Check that "LInE In" is displayed in the display window. (page 42)
- Check that the display mode of the liquid crystal display is not set to off. (page 14)
The picture of the TV set connected to the VIDEO jacks is not stable.
- Check that the PAL/NTSC switch on the right side of this unit is set to match the color system of the TV set. (page 38)
Pictures are distorted during forward/backward search.
• This is not a malfunction.
The liquid crystal display
- For the liquid crystal display of this unit, high quality wide screen liquid crystal, composed of 280 thousand pixels. Sometimes a few of pixels may appear black or some other color due to the property of the liquid crystal parts, but this is not a malfunction.
Operations
Playback does not start by pressing ▶(Play). Playback stops immediately.
- The player is affected by condensation. (page 2) Wait approximately one or two hours.
- If the disc is dirty, wipe it with a cleaning cloth.
- Insert the disc correctly with the label side up. (page 10)
Playback does not start when a title is selected.
- Check the setting of "Ratings". (page 36)
When operating with buttons, no message appears on the display.
- Set "Guide Message" of initial setting to ON. (page 31)
Menu playback cannot be done in a video CD.
- Menu playback can be done only on a video CD with PBC function. (page 37)
Menu display is not in specified language.
- Check "Disc Menu" of "Disc language" in initial settings. (page 34)
Subtitles are not displayed.
- Subtitles are not displayed in a DVD in which subtitles are not recorded.
- If the subtitle is set to "OFF", set it to "ON" (page 26)
Audio/subtitle language cannot be changed.
- It cannot be changed on a disc that only one language is recorded.
- The menu display may be used to change the language instead of the audio/subtitle change operation. (page 32)
Audio/subtitle language is different from the one set in initial setting.
- Check that the disc contains the specified language. (page 26)
Screen size of the connected TV set does not turn to 4:3 (16:9).
- Set "TV Aspect" correctly according to your TV set. (page 35)
Remote control
The remote control does not work.
- Make sure the batteries are inserted with the correct polarity. (page 6)
- If the batteries have very little power, replace them with new ones. (page 6)
- Point it toward the remote sensor. (page 6)
- Operate it within 5 meters from the remote sensor. (page 6)
- Remove any object put between the remote control and the remote sensor. (page 6)
- Check that the POWER switch is not set to HOLD. (page 11)
The DVD player is a piece of precision equipment. Take care not to bump or jar the player during playback, or at any other time.
Language codes
| Code Language Code Language Code Language | |||||
| 6565 Afar 7285 Hungarian 8084 Portuguese | |||||
| 6566 Abkhazian 7289 Armenian 8185 Quechua | |||||
| 6570 Afrikaans 7365 Interlingua 8277 Rhaeto-Romance | |||||
| 6577 Amharic 7378 Indonesian 8279 Romanian | |||||
| 6582 Arabic 7383 Icelandic 8285 Russian | |||||
| 6583 Assamese 7384 Italian 8365 Sanskrit | |||||
| 6588 Aymara 7387 Hebrew 8368 Sindhi | |||||
| 6590 Azerbaijani 7465 Japanese 8372 Serbo-Croatian | |||||
| 6665 Bashkir 7473 Yiddish 8373 Singhalese | |||||
| 6669 Byelorussian 7487 Javanese 8375 Slovak | |||||
| 6671 Bulgarian 7565 Georgian 8376 Slovenian | |||||
| 6672 Bihari 7575 Kazakh 8377 Samoan | |||||
| 6678 Bengali; Bangla 7576 Greenlandic 8378 Shona | |||||
| 6679 Tibetan 7577 Cambodian 8379 Somali | |||||
| 6682 Breton 7578 Kannada 8381 Albanian | |||||
| 6765 Catalan 7579 Korean 8382 Serbian | |||||
| 6779 Corsican 7583 Kashmiri 8385 Sundanese | |||||
| 6783 Czech 7585 Kurdish 8386 Swedish | |||||
| 6789 Welsh 7589 Kirghiz 8387 Swahili | |||||
| 6865 Danish 7665 Latin 8465 Tamil | |||||
| 6869 German 7678 Lingala 8469 Telugu | |||||
| 6890 Bhutani 7679 Laothian 8471 Tagik | |||||
| 6976 Greek 7684 Lithuanian 8472 Thai | |||||
| 6978 English 7686 Latvian; Lettish 8473 Tigrinya | |||||
| 6979 Esperanto 7771 Malagasy 8475 Turkmen | |||||
| 6983 Spanish 7773 Maori 8476 Tagalog | |||||
| 6984 Estonian 7775 Macedonian 8479 Tonga | |||||
| 6985 Basque 7776 Malayalam 8482 Turkish | |||||
| 7065 Persian 7778 Mongolian 8484 Tatar | |||||
| 7073 Finnish 7779 Moldavian 8487 Twi | |||||
| 7074 Fiji 7782 Marathi 8575 Ukrainian | |||||
| 7079 Faroese 7783 Malay 8582 Urdu | |||||
| 7082 French 7784 Maltese 8590 Uzbek | |||||
| 7089 Frisian 7789 Burmese 8673 Vietnamese | |||||
| 7165 Irish 7865 Nauru 8679 Volapük | |||||
| 7168 Scots Gaelic 7869 Nepali 8779 Wolof | |||||
| 7176 Galician 7876 Dutch 8872 Xhosa | |||||
| 7178 Guarani 7879 Norwegian 8979 Yoruba | |||||
| 7185 Gujarati 7982 Oriya 9072 Chinese | |||||
| 7265 Hausa 8065 Punjabi 9085 Zulu | |||||
| 7273 Hindi 8076 Polish | |||||
| 7282 Croatian 8083 Pashto; Pushto | |||||
Interactive DVD
With this DVD disc, the story is changeable by user's selection, and/or the direction of view is changeable.
Title, chapter (DVD)
A DVD disc is divided into large parts (title) and smaller parts (chapter).
Each part has a number which is called title number or chapter number.
OPT OUT jack
The OPT OUT jack changes electric signals into optical signals before transmitting them to the amplifier. According to this, the signals flow without electric effect from outside, and noise is suppressed and produces little effect for outside.
Track (video CD/audio CD)
A video CD or an audio CD is divided into some parts (track).
Each part has a number which is called a track number.
Dolby digital (AC-3)
A technique for digital audio compression developed by Dolby Corporation. Not only stereo (2 ch) sound, but also 5.1 ch sound can be compressed by it. A large amount of data can be held in a disc efficiently.
Dolby pro logic decoder
Equipment in which 4 channel signals recorded in 2 channels by dolby surround (pro logic) are reverted to signals in 4 channels when playing them back. As compared with the surround sounds of 5.1 ch of dolby digital (AC-3), separation between channels is worse and surround signal is played back only within 7 kHz.
Pan & scan screen
This signifies that the screen recorded in wide-screen format is displayed with left and right portions cut off.
Playback control (video CD Version 2.0)
A video CD with the playback control function can be played back by following the menu display interactively.
Letter box screen
This signifies that the screen recorded in wide-screen format is displayed with black bands at the top and bottom of the screen.
Linear PCM audio (LPCM)
This is the signal recording system for audio CD.
While the signals are recorded by 44.1 kHz/16 bit in audio CD, by 48 kHz/16 bit - 96 kHz/24 bit in DVD. As a result, DVD is played back in higher quality sound than in audio CD.
MPEG (Moving Picture Experts Group)
MPEG is the international standard format for moving pictures provided by the Moving Picture Experts Group organized under ISO (International Organization for Standardization) and IEC (International Electro-technical Commission). MPEG provided MPEG1 in 1991, and MPEG2 in 1994. MPEG2 enables play in higher quality than MPEG1.
S-VIDEO OUT terminal
As this terminal divides the video signals into color signal and brightness signal to transmit them to the TV set, the picture becomes clearer. We recommend connecting an S-VIDEO cord (supplied) to the TV set and S-VIDEO terminal.
Main unit
Power supply DC 9 V
Power consumption
18 W
Weight Main unit: 670 g (23.5 oz)
Battery pack: 560 g (19.6 oz)
External dimensions
XD-DW7:
12 cm (single-sided single-layer, single-sided double-layer, double-sided-double layer)
8 cm (single-sided single-layer, single-sided double-layer, double-sided-double layer)
Compact discs (CD-DA, video CD)
12 cm and 8 cm discs
S1 video output Y output: 1 Vp-p (75 ohms,
sync negative)
C output: 0.286 Vp-p
Video output Video composite output
1 Vp-p (75 ohms, sync
negative)
RCA jacks
Audio output DOWN MIXING AUDIO OUT
connector
1.5 Vrms (1 kHz)
2 RCA jacks (L/R)
Fiber optical connector (IEC
958)
Audio output characteristics
Frequency range:
CD/VCD: 20 Hz to 20 kHz
DVD: 4 Hz to 22 kHz
(48 kHz sampling)
Wow and flutter: unmeasurable
Operating conditions
5^ C to 35^ C (41°F to 95°F)
Accessories Remote control (1)
Battery pack (1)
AC adaptor (2)
AC power cord (2)
Audio connecting cable (1)
Video connecting cable (1)
S-Video connecting cable (1)
AC adaptor (for the main unit)
Model No. AC-D918U
Input 100-240 V AC, 50/60 Hz, 30 W
Output DC 9 V, 2 A
AC adaptor (for recharging the battery pack)
Model No. AC-D920U
Input 100-240 V AC, 50/60 Hz, 36 W
Output DC 9 V, 2.2 A
Specifications are subject to change without notice.
- Manufactured under license from Dolby Laboratories. "Dolby" and the double-D symbol are trademarks of Dolby Laboratories. Confidential unpublished works. ©1992-1997 Dolby Laboratories. All rights reserved.
- Manufactured under license from Digital Theater Systems, Inc. US Pat. No. 5,451,942 and other worldwide patents issued and pending. "DTS" and "DTS Digital Surround" are trademarks of Digital Theater Systems, Inc. ©1996 Digital Theater systems, Inc. All rights reserved.
Region Management Information
Region Management Information: This DVD Player is designed and manufactured to respond to the Region Management Information that is recorded on a DVD disc. If the Region number described on the DVD disc does not correspond to the Region number of this DVD player, this DVD player cannot play that disc.
The region number of this DVD player is 1.

Note on Unauthorized Discs
You may not be able to play back some DVD video discs on this player if they were purchased from outside your geographic area or made for business purposes.
Note on Copyright
It is forbidden by law to copy, broadcast, show, broadcast on cable, play in public, and rent copyrighted material without permission. DVD video discs are copy protected, and any recordings made from these discs will be distorted. This product incorporates copyright protection technology that is protected by method claims of certain U.S. patents and other intellectual property rights owned by Macrovision Corporation and other rights owners. Use of this copyright protection technology must be authorized by Macrovision Corporation, and is intended for home and other limited viewing uses only, unless otherwise authorized by Macrovision Corporation. Reverse engineering or disassembly is prohibited.
Playback k of a CD-R/CD-R W
A CD-R/CD-RW may not be played back because its reflectance is lower than a CD.
In addition, playback may not be carried out because of a disc's condition, a spot, a scratch, condensation on the pick up lens, etc.
This unit cannot play any CD-R/RW disc.
Some CD-R/RW discs may be played back, however, we do not guarantee their operations.
< Note for high temperatures >
- To prevent a malfunction, deformation, or discoloration, please avoid placing the product in direct sunlight, near any heat sources, or inside your car in the summer time.
- The surface of the product becomes hot if used for a long time. This is not a malfunction.
- Please do not rest it on your body for a long time to avoid mild heat irritation.
PRECAUCIÓN
When listening with headphones
Important
You must use the supplied extension cable to suit to the Part 15 of the FCC rules, when listening with headphones (not supplied).
To connect your headphones
(1) Connect headphones (not supplied) to the supplied extension cable.
(2) Insert the plug of the supplied extension cable to PHONES jack of this unit.
- CORRECTION
- Page 43
- CORRECCIÓN
- CAUTION
- WARNING
- Precautions
- To maintain good performance
- For safety
- Note on listening with the headphones
- Table of contents
- Note on condensation
- To clean the cabinet
- NOTE
- Video CD:
- CD-R/RW:
- Owner's record
- PREPARATIONS
- PLAYBACK (THE BASICS)
- OPERATION WITH OSD
- SET UP OPERATION
- CONNECTION
- OTHERS
- Main unit (front and right side)
- Main unit (left side)
- Display window
- Remote control
- Installing batteries
- When to replace the batteries
- NOTES
- Using the AC adaptor
- Connecting to the cigarette lighter socket in the car
- Using the battery pack
- Charging the battery pack
- When recharge is finished
- Time to recharge the battery
- Recharge time
- Notes on using the battery pack
- Notes on recharging
- Using the battery pack (continued)
- Connecting the battery pack to the unit
- Fit the claws of the battery pack into the latch slots on the bottom of this unit.
- Push the battery pack up and into the latch slots as shown below.
- Disconnecting the battery pack
- Playing back
- Slide POWER switch on the main unit toward ON to turn the power on.
- Press OPEN▲ to open the display panel.
- Put your finger on the pit DISC OPEN▲ on the left side of this unit and open the disc cover.
- Load a disc with the label side up and push down around the center of it.
- Close the disc cover.
- When the remote control is used
- When the menu screen is displayed
- To turn the power off
- To avoid the accidental operation
- After playing back a disc
- Removing the disc
- About the Ⓧ symbol display
- Stopping playback
- Press ■.
- To clear the resumed point
- Still (Pause)
- Press II during playback.
- To return to normal playback
- Fast Forward, Reverse
- Press ◀◀ or ▶▶ on the remote control during playback.
- Skipping
- Press ◀◀◀ or ▶▶▶ during playback.
- To skip to the desired chapter or track directly using the remote control (video CD, audio CD)
- Switching the brightness of the liquid crystal display
- Press TFT SW on the unit.
- Display mode on the liquid crystal display
- Information about On Screen Display (OSD)
- During Video CD or an audio CD playback:
- Title search (DVD)/ Track search (Video CD with PBC off, audio CD)
- Chapter search (DVD)
- While playing, press DISPLAY on the main unit or ONSCREEN DISPLAY ON/OFF on the remote control repeatedly.
- Press ◀ or ▶ to select the "Time search" icon.
- Use the number buttons to enter the time of the desired location.
- Press ENTER.
- Mark function (DVD, Video CD with PBC off, audio CD)
- To memorize the points
- To restart play from the memorized point
- While the "Mark function" icon is displayed, press ◀ or ▶ to select a point.
- Press ▶(Play) to start play.
- To restart play from the memorized point with the MARK button
- To clear a memorized point
- Checking ON or OFF of PBC (video CD)
- Either when playing, or while the resume function is active, press DISPLAY on the main unit or ONSCREEN DISPLAY ON/OFF on the remote control repeatedly.
- Programed playback (Video CD with PBC off, audio CD)
- To program with the PROGRAM button
- Press ▲▼◀▶ to select "START", then press ENTER.
- To delete a programmed track
- To clear the programmed contents
- Adding a programmed track in stop mode
- To cancel programmed playback
- Random playback (Video CD with PBCoff, audio CD)
- Either when playing, or while the resume function is active, press DISPLAY on the main unit or ONSCREEN DISPLAY ON/OFF on the remote control repeatedly.
- Press ◀ or ▶ to select the "Playback mode" icon.
- Press ▲ or ▼ to select "RND".
- To operate with the PROGRAM button
- To cancel random playback
- Repeating a DVD
- When using the REPEAT button
- Repeating a Video CD with PBC off /an audio CD
- A-B repeat
- To cancel the repeat
- When using the A-B button
- Changing the angle (DVD)
- When using the ANGLE button
- ENGLISH
- Displaying and changing subtitles
- Displaying subtitles
- When using the SUBTITLE ON/OFF button
- Changing the subtitles
- Selecting audio tracks (DVD)
- When using the AUDIO SELECT button
- Information on the sound mode
- Selecting karaoke audio (video CD, DVD)
- Video CD karaoke:
- DVD karaoke:
- Selecting Q surround (DVD)
- When using the Q SURROUND button
- Changing setup values
- Basic operations
- Press SET UP while the player is stopped.
- Use ▲ or ▼ to move the cursor (the yellow area) to the setting to be changed.
- On-screen Menu (Page 31)
- Disc Languages (Page 32)
- Digital output (Page 34)
- TV Aspect (Page 35)
- Ratings (Page 36)
- PBC (Page 37)
- Press ENTER.
- To exit the setup menu without making any changes:
- On-screen Menu
- Guide Message:
- On-screen Menu Language:
- Disc Languages
- Audio Language:
- Subtitle Language:
- Auto:
- Spanish:
- English:
- Others:
- Disc Menu:
- Digital Output
- TV Aspect
- NORMAL TV:
- LETTER BOX
- PAN & SCAN
- WIDE TV:
- Ratings
- PBC
- Connecting to external equipment
- Before connecting
- Connecting to a wide TV/an AV TV
- To connect to a TV set equipped with S-video input
- To set to the color system of the connected TV
- Connecting to audio equipment without digital audio input terminals
- Connecting to audio equipment with digital audio input terminals
- Connecting to an active speaker system
- Connecting to a dolby digital (AC-3) decoder
- Connecting to a video camera
- To set to the color system of connected equipment
- General
- The power does not turn on.
- The power automatically turns off.
- Buttons on the main unit or on the remote control do not function.
- The unit does not work correctly.
- The unit is warmed during playback.
- You do not remember the code number set in "Ratings".
- No sound comes out from the connected speakers.
- No picture appears on the TV screen.
- No picture appears on the liquid crystal display when the video camera is connected.
- The picture of the TV set connected to the VIDEO jacks is not stable.
- Pictures are distorted during forward/backward search.
- The liquid crystal display
- Operations
- Playback does not start by pressing ▶(Play). Playback stops immediately.
- Playback does not start when a title is selected.
- When operating with buttons, no message appears on the display.
- Menu playback cannot be done in a video CD.
- Menu display is not in specified language.
- Subtitles are not displayed.
- Audio/subtitle language cannot be changed.
- Audio/subtitle language is different from the one set in initial setting.
- Screen size of the connected TV set does not turn to 4:3 (16:9).
- The remote control does not work.
- Interactive DVD
- Title, chapter (DVD)
- OPT OUT jack
- Track (video CD/audio CD)
- Dolby digital (AC-3)
- Dolby pro logic decoder
- Pan & scan screen
- Playback control (video CD Version 2.0)
- Letter box screen
- Linear PCM audio (LPCM)
- MPEG (Moving Picture Experts Group)
- S-VIDEO OUT terminal
- Main unit
- AC adaptor (for the main unit)
- AC adaptor (for recharging the battery pack)
- Region Management Information
- Note on Unauthorized Discs
- Note on Copyright
- Playback k of a CD-R/CD-R W
- < Note for high temperatures >
- PRECAUCIÓN
- When listening with headphones
- Important
- To connect your headphones
Brand : AIWA
Model : XD-DW7
Category : DVD player