
21609 - AV Extender MONOPRICE - Free user manual and instructions
Find the device manual for free 21609 MONOPRICE in PDF.


| Product Type | AV Extender |
| Brand | Monoprice |
| Model | 21609 |
| Dimensions (W x D x H) | 95 x 70 x 25 mm |
| Weight | 0.18 kg |
| Power Supply | 5V DC via included adapter |
| Max Transmission Distance | Up to 50 meters (164 ft) via CAT6 |
| Supported Resolutions | Up to 1080p@60Hz |
| Input Connector | HDMI Type A (female) |
| Output Connector | HDMI Type A (female) + RJ45 (for extension) |
| IR Pass-through | Yes, via included IR cables |
| HDCP Compliance | HDCP 1.2 |
| Audio Support | Stereo LPCM up to 2 channels |
| Operating Temperature | 0°C to 45°C (32°F to 113°F) |
| Housing Material | Metal and plastic |
| Included Accessories | Transmitter, receiver, power adapters, IR emitter & receiver, user manual |
| Repairability | Limited; not user-serviceable. Contact Monoprice support for issues. |
| Warranty | 1 year limited |
| Installation | Plug and play; no software required |
Frequently Asked Questions - 21609 MONOPRICE
User questions about 21609 MONOPRICE
0 question about this device. Answer the ones you know or ask your own.
Ask a new question about this device
Download the instructions for your AV Extender in PDF format for free! Find your manual 21609 - MONOPRICE and take your electronic device back in hand. On this page are published all the documents necessary for the use of your device. 21609 by MONOPRICE.
USER MANUAL 21609 MONOPRICE
natural_image
Two gray network switch devices labeled TX and RX, each with ports and connectors (no visible text or symbols beyond branding)P/N 21609
User's Manual
SAFETY WARNINGS AND GUIDELINES
Please read this entire manual before using this device, paying extra attention to these safety warnings and guidelines. Please keep this manual in a safe place for future reference.
- This device is intended for indoor use only.
- Do not expose this device to water or moisture of any kind. Do not place drinks or other containers with moisture on or near the device. If moisture does get in or on the device, immediately unplug it from the power outlet and allow it to fully dry before reapplying power.
- Do not touch the device, the power cord, or any other connected cables with wet hands.
- Do not expose this device to excessively high temperatures. Do not place it in, on, or near heat sources, such as a fireplace, stove, radiator, etc. Do not leave it in direct sunlight.
- Do not expose this device to excessive vibration.
- Use only in a well-ventilated area. Do not use in close, confined spaces.
- Never unplug the unit by pulling on the power cord. Always grasp the connector head or adapter body.
- Ensure that power is turned off and disconnected before making any electrical connections.
- Clean using a soft, dry cloth only. Do not use chemical cleaners, solvents, or detergents. For stubborn deposits, moisten the cloth with warm water.
- This device has no user serviceable parts. Do not attempt to open, service, or modify this device.
INTRODUCTION
Thank you for purchasing this Blackbird™ 4K Pro HDBaseT™ Extender Kit! This kit allows you to extend High Speed HDMI® signals using a single Cat6 Ethernet cable. It supports extension of 4K video to distances up to 115 feet (35 meters) and 1080p video to distances up to 230 feet (70 meters). It delivers 10.2Gbps bandwidth and is compliant with HDCP 2.2. It supports the Power over Cable (PoC) feature, which uses the Cat6 cable to deliver power to either the transmitter or receiver, so it can be installed without the need for a nearby AC power outlet.
FEATURES
• Supports HDMI ^® video to resolutions up to 4K@60Hz 4:2:0, including 1080p@60Hz
- Delivers 10.2 Gbps bandwidth
- HDCP 2.2 compliant
- Extends 4K video to distances up to 115 feet (35m) and 1080p video to distances up to 230 feet (70m)
- Extends RS232 serial data to distances up to 230 feet (70m)
• Supports bi-directional IR control signals
- Supports the Power over Cable feature, which allows either the transmitter or receiver to be installed in locations without an AC power outlet
CUSTOMER SERVICE
The Monoprice Customer Service department is dedicated to ensuring that your ordering, purchasing, and delivery experience is second to none. If you have any problem with your order, please give us an opportunity to make it right. You can contact a Monoprice Customer Service representative through the Live Chat link on our website www.monoprice.com during normal business hours (Mon-Fri: 5am-7pm PT, Sat-Sun: 9am-6pm PT) or via email at support@monoprice.com
PACKAGE CONTENTS
Please take an inventory of the package contents to ensure you have all the items listed below. If anything is missing or damaged, please contact Monoprice Customer Service for a replacement.
1x HDBaseT ^TM Transmitter
1x HDBaseT Receiver
4x Mounting Brackets
4x Screws
8x Plastic feet
2x 3-pin Euroblock/Phoenix Connectors
1x AC Power Adapter (12 VDC, 1A)
1x User's Manual
PRODUCT OVERVIEW
Transmitter
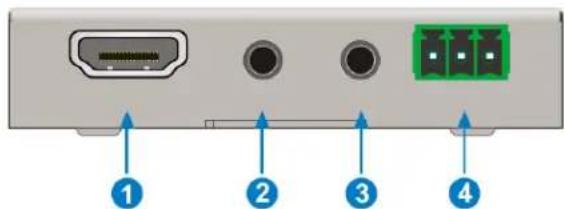
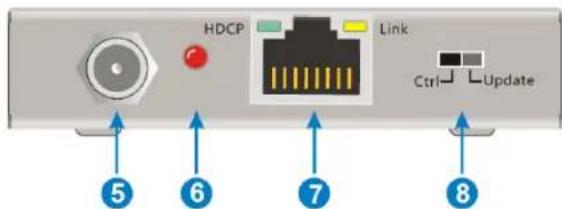
- HDMI In: HDMI® port for connecting the video source device (e.g., Blu-ray Disc™ or DVD player).
- IR In: 3.5mm jack for connecting an IR Receiver (not included).
- IR Out: 3.5mm jack for connecting an IR Transmitter (not included).
- RS232: Euroblock/Phoenix connector for connecting an RS232 data device.
-
DC 12V: DC barrel connector for connecting the included AC power adapter.
-
Power LED: Illuminates red when power is applied.
-
HDBT Out: RJ45 jack for connecting the Cat6 cable to the Receiver.
-
RS232 Mode Switch: Switch for determining the behavior of the RS232 connection. When in the Ctrl position, it serves as an RS232 serial extender. When in the Update position, it allows you to update the Valens IC program by connecting to a PC and running the batch file.
Receiver
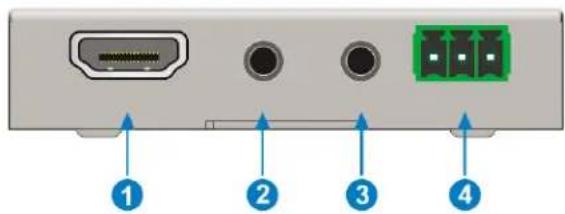
-
HDMI Out: HDMI® port for connecting the video display.
-
IR In: 3.5mm jack for connecting an IR Receiver (not included).
-
IR Out: 3.5mm jack for connecting an IR Transmitter (not included).
-
RS232: Euroblock/Phoenix connector for connecting an RS232 data device.
-
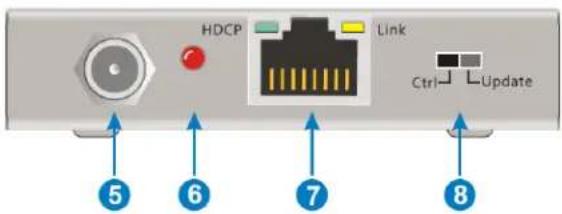
DC 12V: DC barrel connector for connecting the included AC power adapter.
-
Power LED: Illuminates red when power is applied.
-
HDBT In: RJ45 jack for connecting the Cat6 cable to the Transmitter.
-
RS232 Mode Switch: Switch for determining the behavior of the RS232 connection. When in the Ctrl position, it serves as an RS232 serial extender. When in the Update position, it allows you to update the Valens IC program by connecting to a PC and running the batch file.
SAMPLE CONNECTION DIAGRAM
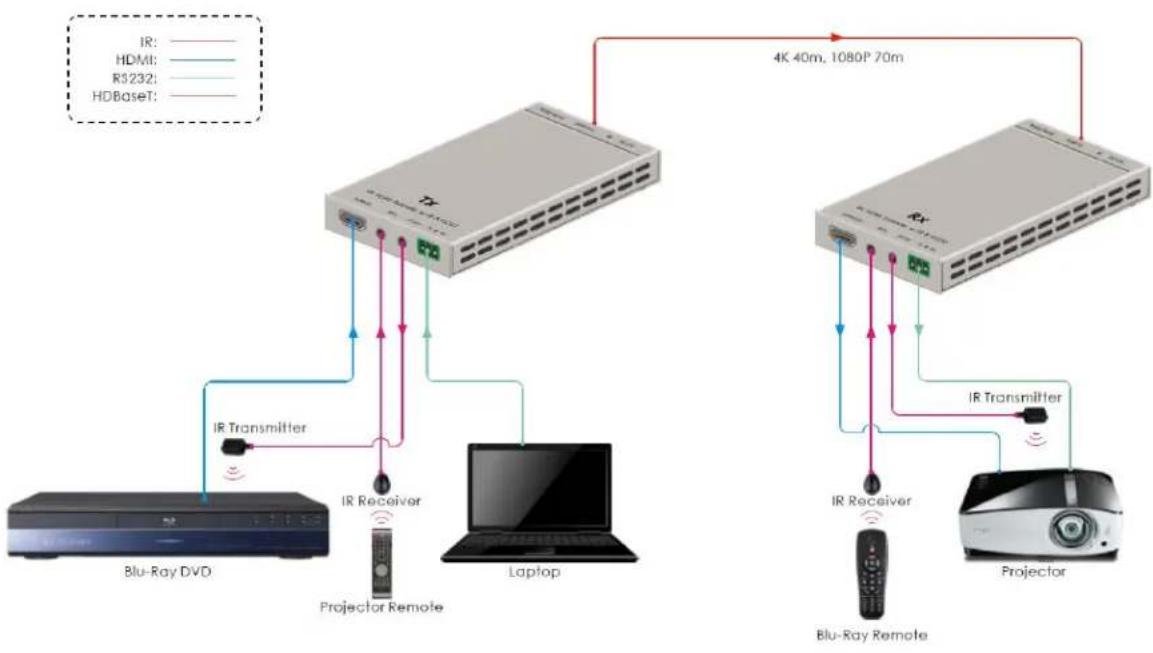
flowchart
graph TD
    A["Blu-Ray DVD"] -->|IR Transmitter| B["Router"]
    B -->|4K 40m, 1080P 70m| C["Router"]
    C -->|IR Transmitter| D["Blu-Ray Remote"]
    D -->|IR Receiver| B
    D -->|Projector Remote| B
    B -->|HDMI:| E["Router"]
    C -->|HDBaseT:| F["Router"]
    B -->|R$232:| G["Router"]
    C -->|R$232:| H["Router"]
    B --> I["Laptop"]
    C --> J["Projector"]
INSTALLATION
Perform the following steps to install this extender kit.
-
Ensure that all equipment to be connected is powered off and unplugged from its power source.
-
Place or mount the receiver and transmitter in their intended locations.
-
Using a High Speed HDMI Cable (not included), plug one end into the HDMI® input on your display, then plug the other end into the HDMI Out port on the Receiver.
-
(Optional) Using a 3-pin Euroblock connector (not included), construct an RS232 serial cable to connect to your computer or other RS232 enabled device. Plug the Euroblock connector into the RS232 port on the Receiver, then plug the other end into your RS232 enabled device.
-
(Optional) Plug an IR receiver (not included) into the IR In jack on the Receiver, then position the receiving "eye" so that it can receive infrared signals from your remote control.
-
(Optional) Plug an IR transmitter (not included) into the IR Out jack on the Receiver, then position the IR emitter so that it can transmit infrared signals to the display.
- Route a Cat6 Ethernet cable (not included) between the Receiver and the Transmitter. If the cable will be routed inside or through walls, the cable must be rated for in-wall use. The cable must be no longer than 230 feet (70m). If you will be transmitting 4K video signals, the cable must be no longer than 115 feet (35m). Plug one end of this cable into the HDBT In port on the Receiver, then plug the other end into the HDBT Out port on the Transmitter.
- (Optional) Using a 3-pin Euroblock connector (not included), construct an RS232 serial cable to connect to your computer or other RS232 enabled device. Plug the Euroblock connector into the RS232 port on the Transmitter, then plug the other end into your RS232 enabled device.
- (Optional) Plug an IR receiver (not included) into the IR In jack on the Transmitter, then position the receiving "eye" so that it can receiver infrared signals from your remote control.
- (Optional) Plug an IR transmitter (not included) into the IR Out jack on the Transmitter, then position the IR emitter so that it can transmit infrared signals to the video source device (e.g., Blu-ray Disc™ or DVD player).
- Using a High Speed HDMI Cable (not included), plug one end into the HDMI In port on the Transmitter, then plug the other end into the HDMI ^® output on your video source device (e.g., Blu-ray Disc or DVD player).
- Plug the DC barrel connector on the included AC power adapter into the DC 12V port on either the Receiver or Transmitter, then plug the adapter into a nearby AC power outlet. The device not connected to the AC power adapter will receive its power over the Cat6 Ethernet cable via the Power over Cable feature.
- Plug in and power on all connected devices. Start video playback on your video source device and verify that video can be seen on the remote display.
-
(Optional) If you are using the RS232 extender function, verify that you have serial data at each end.
-
(Optional) If you are using the infrared repeater function, use your remote control(s) to verify that you can control the video source and/or display from the other end.
Congratulations, your extender is installed and fully operational!
TECHNICAL SUPPORT
Monoprice is pleased to provide free, live, online technical support to assist you with any questions you may have about installation, setup, troubleshooting, or product recommendations. If you ever need assistance with your new product, please come online to talk to one of our friendly and knowledgeable Tech Support Associates. Technical support is available through the online chat button on our website www.monoprice.com during regular business hours, 7 days a week. You can also get assistance through email by sending a message to tech@monoprice.com
SPECIFICATIONS
| Model | 21609 |
| Maximum Video Resolution | 4K@60Hz 4:2:0, including 1080p@60Hz |
| Transmission Medium | HDBaseT ^TM |
| Transmission Distance | 1080p signals to 70m, 4K signals to 35m |
| Bandwidth | 10.2 Gbps |
| Video Standard | HDMI ^ 1.4 with HDCP 2.2 |
| Input Power | 12 VDC, 1A or Power over Cable (PoC) |
| AC Adapter Input Power | 100 ~ 240 VAC, 50/60 Hz |
| Power Consumption | 10 watts |
| Operating Temperature | +14 ~ +122°F (-10 ~ 50°C) |
| Operating Humidity | 0 ~ 90% RH, non-condensing |
| Dimensions (each) | 4.7" x 0.6" x 2.9" (120 x 16 x 74 mm) |
| Weight (each) | 8.5 oz. (240g) |
REGULATORY COMPLIANCE
Notice for FCC

This device complies with Part 15 of the FCC rules. Operation is subject to the following two conditions: (1) this device may not cause harmful interference, and (2) this device must accept any interference received, including interference that may cause undesired operation.
Modifying the equipment without Monoprice's authorization may result in the equipment no longer complying with FCC requirements for Class B digital devices. In that event, your
right to use the equipment may be limited by FCC regulations, and you may be required to correct any interference to radio or television communications at your own expense.
This equipment has been tested and found to comply with the limits for a Class B digital device, pursuant to Part 15 of the FCC Rules. These limits are designed to provide reasonable protection against harmful interference in a residential installation. This equipment generates, uses and can radiate radio frequency energy and, if not installed and used in accordance with the instructions, may cause harmful interference to radio communications. However, there is no guarantee that interference will not occur in a particular installation. If this equipment does cause harmful interference to radio or television reception, which can be determined by turning the equipment off and on, the user is encouraged to try to correct the interference by one or more of the following measures:
- Reorient or relocate the receiving antenna.
- Increase the separation between the equipment and receiver.
- Connect the equipment into an outlet on a circuit different from that to which the receiver is connected.
- Consult the dealer or an experienced radio/TV technician for help.
Notice for Industry Canada
This Class B digital apparatus complies with Canadian ICES-003.
Blackbird ^™ is a trademark of Monoprice Inc.
HDBaseT ^™ is a trademark of HDBaseT Alliance.
HDMI ^® , the HDMI Logo, and High-Definition Multimedia Interface are trademarks or registered trademarks of HDMI Licensing LLC in the United States and other countries.
Blu-ray Disc ^™ , Blu-ray ^™ , and the logos are trademarks of the Blu-ray Disc Association.
Brand : MONOPRICE
Model : 21609
Category : AV Extender