
X420 - Video projector CANON - Free user manual and instructions
Find the device manual for free X420 CANON in PDF.


| Product Type | Video Projector |
| Brand | Canon |
| Model | X420 |
| Display Technology | 3LCD |
| Resolution | 1024 x 768 (XGA) |
| Brightness | 3000 ANSI Lumens |
| Contrast Ratio | 1000:1 |
| Lamp Life (Normal Mode) | 4000 hours |
| Lamp Life (Eco Mode) | 6000 hours |
| Dimensions (W x D x H) | 315 x 233 x 97 mm |
| Weight | 2.6 kg |
| Power Consumption | 310 W (max) |
| Standby Power | 0.5 W |
| Inputs | HDMI, VGA, Composite, USB |
| Built-in Speaker | 16 W mono |
| Noise Level (Eco Mode) | 29 dB |
| Keystone Correction | Vertical +/- 30 degrees |
| Projection Lens | Manual zoom & focus |
| Maintenance | Clean air filter every 500 hours; replace lamp as needed |
| Safety Features | Auto power off, high temperature shutdown |
| Spare Parts | Lamp module (RS-LP03), Air filter kit |
| Repairability | User-replaceable lamp and filter |
| General Information | Free user manual available in PDF; supports multiple languages |
Frequently Asked Questions - X420 CANON
User questions about X420 CANON
0 question about this device. Answer the ones you know or ask your own.
Ask a new question about this device
Download the instructions for your Video projector in PDF format for free! Find your manual X420 - CANON and take your electronic device back in hand. On this page are published all the documents necessary for the use of your device. X420 by CANON.
USER MANUAL X420 CANON
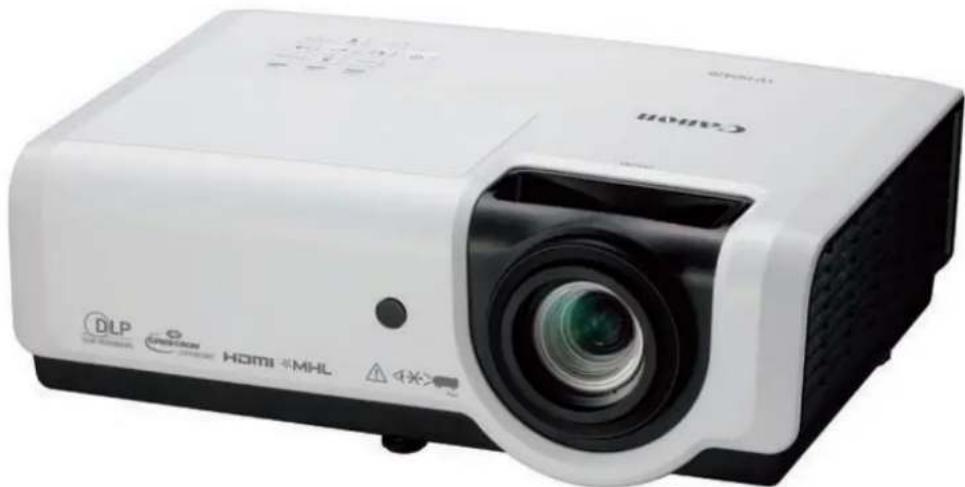
MULTIMEDIA PROJECTOR LV-HD420 / LV-X420 User's Manual
natural_image
White DLP projector with visible lens and control buttons (no text or symbols on body)HDMI ^TM
HIGH DEFINITION MULTIMEDIA INTERFACE
*MHL
PICTURE BY DLP® TEXAS INSTRUMENTS
CRESTRON connected
BEFORE USING, BE SURE TO READ THIS USER'S MANUAL.
Read the "Safety Instructions" in this manual thoroughly and use correctly the projector.
Store this user's manual in a convenient location where you can refer to it easily.
Table of Contents
SAFETY INSTRUCTIONS....1
FOR SAFE USE 10
GETTING STARTED....13
PACKING CHECKLIST 13
VIEWS OF PROJECTOR PARTS....14
Front-right View 14
Top view—On-screen Display (OSD) buttons and LEDs....15
Rear view....16
Bottom view....18
REMOTE CONTROL PARTS 19
REMOTE CONTROL OPERATING RANGE....20
PROJECTOR AND REMOTE CONTROL BUTTONS....20
SETUP AND OPERATION....21
INSERTING THE REMOTE CONTROL BATTERIES ....21
STARTING AND SHUTTING DOWN THE PROJECTOR ....22
HOW TO STORE THE PROJECTOR IN THE SOFT CARRYING CASE (LV-SC02) 23
SETTING AN ACCESS PASSWORD (SECURITY LOCK)....24
ADJUSTING THE PROJECTOR LEVEL 26
ADJUSTING THE ZOOM, FOCUS AND KEYSTONE....27
ADJUSTING THE VOLUME 28
ON-SCREEN DISPLAY (OSD) MENU SETTINGS....29
OSD MENU CONTROLS 29
Navigating the OSD....29
SETTING THE OSD LANGUAGE....30
OSD MENU OVERVIEW....31
IMAGE MENU....34
Analog setting Menu....35
Advanced Feature 36
White Balance 37
Color Manager....38
SETTINGS 1 MENU....39
Keystone....40
Audio....40
Advanced 1 Feature ....41
Advanced 2 Feature ....43
4 Corner....44
SETTINGS 2 MENU....45
Status....46
Advanced 1 Feature 47
Advanced 2 Feature ....59
MAINTENANCE AND SECURITY....61
REPLACING THE PROJECTION LAMP 61
Resetting the Lamp Hour 64
CLEANING THE PROJECTOR 65
Cleaning the Lens....65
Cleaning the Case....65
USING THE KENSINGTON LOCK....66
Using the Kensington Lock....66
Using the Security Bar....66
TROUBLESHOOTING....67
COMMON PROBLEMS AND SOLUTIONS....67
TIPS FOR TROUBLESHOOTING 67
LED ERROR MESSAGES....68
PROBLEM AND COUNTERMEASURES....68
SPECIFICATIONS....71
SPECIFICATIONS....71
PROJECTION DISTANCE VS. PROJECTION SIZE....73
Projection Distance and Size Table 73
TIMING MODE TABLE 75
PROJECTOR DIMENSIONS 77
REGULATORY COMPLIANCE....78
FCC WARNING 78
CANADA....78
SAFETY CERTIFICATIONS 78
APPENDIX I....79
RS-232 PROTOCOL....79
Before installing and operating the projector, read this manual thoroughly.
This projector provides many convenient features and functions. Operating the projector properly enables you to manage those features and maintain it in good condition for many years to come.
Improper operation may result in not only shortening the product life, but also malfunctions, fire hazards, or other accidents.
If your projector does not seem to be operating properly, read this manual again, check operations and cable connections, and try the solutions in the “Troubleshooting” section in the user’s manual. If the problem still persists, contact the Canon Customer Support Center.

CAUTION
RISK OF ELECTRIC SHOCK DO NOT OPEN


THIS SYMBOL INDICATES THAT DANGEROUS VOLTAGE CONSTITUTING A RISK OF ELECTRIC SHOCK IS PRESENT WITHIN THIS UNIT.

THIS SYMBOL INDICATES THAT THERE ARE IMPORTANT OPERATING AND MAINTENANCE INSTRUCTIONS FOR THIS UNIT IN THE USER'S MANUAL.
CAUTION
Not for use in a computer room as defined in the Standard for the Protection of Electronic Computer / Data Processing Equipment, ANSI / NFPA 75.
Ver.:01

Safety Precautions
WARNING:
• THIS APPARATUS MUST BE GROUNDED.
- TO REDUCE THE RISK OF FIRE OR ELECTRIC SHOCK, DO NOT EXPOSE THIS APPLIANCE TO RAIN OR MOISTURE.
- This projector produces intense light from the projection lens. Do not stare directly into the lens, otherwise eye damage could result. Be especially careful that children do not stare directly into the beam.
• Install the projector in a proper position. Otherwise it may result in a fire hazard.
- Do not cover the ventilation slots on the projector. Heat build-up can reduce the service life of your projector, and can also be dangerous.
- If the projector is unused for an extended time, unplug the projector from the power outlet.
- Do not project the same image for a long time.
An afterimage may remain on the DMD panel due to the characteristics of the panel of the projector.

WARNING ON HANGING FROM THE CEILING
When hanging the projector from the ceiling, clean the air intake vents and top of the projector periodically with a vacuum cleaner. If you leave the projector unclean for a long time, the cooling fans can be clogged with dust, and it may cause a breakdown or a disaster.
Make sure to implement anti-fall measures such as an anti-fall wire when installing the projector in high places, for example, installing it on the ceiling.
DO NOT SET THE PROJECTOR IN GREASY, WET, OR SMOKY CONDITIONS SUCH AS IN A KITCHEN TO PREVENT A BREAKDOWN OR A DISASTER. IF THE PROJECTOR COMES IN CONTACT WITH OIL OR CHEMICALS, IT MAY BECOME DETERIORATED.
■ READ AND KEEP THIS MANUAL FOR LATER USE.
All the safety and operating instructions should be read before beginning to operate the product.
Read all of the instructions given here and retain them for later use. Unplug this projector from the AC power supply before cleaning. Do not use liquid or aerosol cleaners on the projector. Use a damp cloth for cleaning.
Follow all warnings and instructions marked on the projector.
For added protection of the projector during a lightning storm, or when it is left unattended or unused for long periods of time, unplug it from the wall outlet. This will prevent damage due to lightning and power surges.
Do not expose this unit to rain or use near water. For example, in a wet basement, near a swimming pool..., etc.
Do not use attachments not recommended by the manufacturer as they may result in hazards.
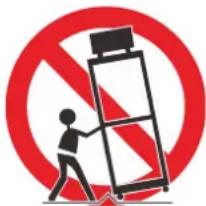
Do not place this projector on an unstable cart, stand, or table. The projector may fall, causing serious injury to a child or adult, and serious damage to the projector. Use only with a cart or stand recommended by the manufacturer, or sold with the projector. For wall or shelf mounting, use a tool such as a mounting kit to secure the projector.
An appliance and cart combination should be moved with care.
Sudden stops, excessive force, and uneven surfaces may cause the appliance and cart combination to overturn.
Slots and openings in the rear and front of the cabinet are provided for ventilation, to insure reliable operation of the equipment and to protect it from overheating.
The openings should never be covered with cloth or other materials, and the bottom opening should not be blocked by placing the projector on a bed, sofa, rug, or other similar surface. This projector should never be placed near or over a radiator or heat register.
natural_image
Symbolic illustration of a person pushing a laptop on a ladder, enclosed in a red circle with a no-smoking symbol (no text present)This projector should not be placed in a built-in installation such as a book case unless proper ventilation is provided.
Never push objects of any kind into this projector through cabinet slots as they may touch dangerous voltage points or short out parts that could result in a fire or electric shock. Never spill liquid of any kind onto the projector.
Do not install the projector near the ventilation duct of air-conditioning equipment.
This projector should be operated using only the type of power source indicated on the marking label. If you are not sure of the type of power supplied, contact the Canon Customer Support Center or local power company.
Do not overload wall outlets and extension cords as this can result in fire or electric shock. Do not allow anything to rest on the power cord. Do not locate this projector where the cord may be damaged by people walking on it.
Do not attempt to service this projector yourself as opening or removing covers may expose you to dangerous voltages or other hazards. Refer all servicing to qualified service personnel.
Unplug this projector from the wall outlet and refer servicing to qualified service personnel under the following conditions:
a. When the power cord or plug is damaged or frayed.
b. If liquid has been spilled into the projector.
c. If the projector has been exposed to rain or water.
d. If the projector does not operate normally after following the operating instructions. Adjust only those controls that are covered in the operating instructions as improper adjustment of other controls may result in damage and will often require extensive work by a qualified technician to restore the projector to normal operating condition.
e. If the projector has been dropped or the cabinet has been damaged.
f. When the projector exhibits a distinct change in performance-this indicates a need for servicing.
When replacement parts are required, be sure the service technician uses replacement parts specified by the manufacturer that have the same characteristics as the original parts. Unauthorized substitutions may result in fire, electric shock, or injury.
Upon completion of any service or repairs to this projector, ask the service technician to perform routine safety checks to determine that the projector is in safe operating condition.
AC Power Cord Requirement
The AC Power Cord supplied with this projector meets the requirements for use in the country you purchased it.
AC Power Cord for the United States and Canada:
The AC Power Cord used in the United States and Canada is listed by the Underwriters Laboratories (UL) and certified by the Canadian Standard Association (CSA).
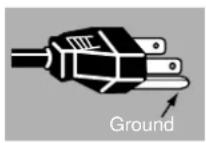
The AC Power Cord has a grounding-type AC line plug. This is a safety feature to ensure the plug fits into the power outlet. Do not try to tamper with this safety feature. Should you be unable to insert the plug into the outlet, contact your electrician.
THE SOCKET-OUTLET SHOULD BE INSTALLED NEAR THE EQUIPMENT AND EASILY ACCESSIBLE.

For the U.S. and Canada, LAMP(S) INSIDE THIS PRODUCT CONTAIN MERCURY AND MUST BE RECYCLED OR DISPOSED OF ACCORDING TO LOCAL, MUNICIPAL, STATE, PROVINCIAL, OR FEDERAL LAWS.
For lamp recycling and disposal information please call 1-800-OK-CANON for the U.S. and Canada.

natural_image
Symbol of a trash bin crossed with a diagonal line, no text or numbers presentOnly for European Union and EEA (Norway, Iceland and Liechtenstein)
These symbols indicate that this product is not to be disposed of with your household waste, according to the WEEE Directive (2012/19/EU), the Battery Directive (2006/66/EC) and/or national legislation implementing those Directives.
If a chemical symbol is printed beneath the symbol shown above, in accordance with the Battery Directive, this indicates that a heavy metal (Hg = Mercury, Cd = Cadmium, Pb = Lead) is present in this battery or accumulator at a concentration above an applicable threshold specified in the Battery Directive.

This product should be handed over to a designated collection point, e.g., on an authorized one-for-one basis when you buy a new similar product or to an authorized collection site for recycling waste electrical and electronic equipment (EEE) and batteries and accumulators. Improper handling of this type of waste could have a possible impact on the environment and human health due to potentially hazardous substances that are generally associated with EEE. Your cooperation in the correct disposal of this product will contribute to the effective usage of natural resources.
For more information about the recycling of this product, please contact your local city office, waste authority, approved scheme or your household waste disposal service or visit www.canon-europe.com/weee, or www.canon-europe.com/battery.
For CA, USA only
Included lithium battery contains Perchlorate Material - special handing may apply.
See www.dtsc.ca.gov/hazardouswaste/perchlorate/ for details.
Federal Communication Commission Notice
Multimedia Projector, Model: LV-HD420 / LV-X420
This device complies with Part 15 of the FCC Rules. Operation is subject to the following two conditions:
(1) This device may not cause harmful interference, and
(2) this device must accept any interference received, including interference that may cause undesired operation.
Note: This equipment has been tested and found to comply with the limits for a Class B digital device, pursuant to Part 15 of the FCC Rules. These limits are designed to provide reasonable protection against harmful interference in a residential installation. This equipment generates, uses and can radiate radio frequency energy and, if not installed and used in accordance with the instructions, may cause harmful interference to radio communications. However, there is no guarantee that interference will not occur in a particular installation. If this equipment does cause harmful interference to radio or television reception, which can be determined by turning the equipment off and on, the user is encouraged to try to correct the interference by one or more of the following measures:
- Reorient or relocate the receiving antenna.
- Increase the separation between the equipment and receiver.
- Connect the equipment into an outlet on a circuit different from that to which the receiver is connected.
- Consult the dealer or an experienced radio / TV technician for help.
The cable with a ferrite core provided with the projector must be used with this equipment in order to comply with Class B limits in Subpart B of Part 15 of the FCC Rules.
Use of a shielded cable is required to comply with class B limits in Subpart B of Part 15 of FCC Rules.
Do not make any changes or modifications to the equipment unless otherwise specified in the instructions. If such changes or modifications should be made, you could be required to stop operation of the equipment.
Canon U.S.A. Inc.
One Canon Park, Melville, New York 11747, U.S.A.
Tel No. (1) 631-330-5000
Safety Symbols in this Manual
This section describes the safety symbols used in this manual. Important projector safety information is identified by the following symbols. Always observe the safety information by these symbols.

Warning
Denotes the risk of death or serious injury from improper handling if the information is not observed. To ensure safe use, always observe this information.

Caution
Denotes the risk of injury from improper handling if the information is not observed. To ensure safe use, always observe this information.
Precautions for Use
As this section contains important safety-related information, be sure to read the following carefully beforehand in order to use your projector correctly and safely.
Warning
During installation, keep the projector plug easily accessible so that the projector can be unplugged immediately if necessary, or keep a circuit breaker within reach.
If the following situations occur, turn the power off, remove the power plug from the power outlet and contact the Canon Customer Support Center. Failure to do so may result in fire or electric shock.
• If smoke is emitted
• If an unusual smell or noise is emitted
• If water or other liquid has entered the projector
- If metal or any other foreign material has entered the projector
- If the projector is knocked over or dropped and the cabinet is damaged
- If the projector is physically damaged through uses prohibited in this document, etc.
Take the following precautions when handling the power cord. Failure to do so may result in fire or electric shock.
- Do not place any objects on the power cord and do not allow it to become trapped under the projector.
- Do not cover the power cord with a carpet.
- Do not modify or excessively bend, twist, pull, wind, or bundle the power cord.
- Keep the power cord away from heaters and other sources of heat.
- Do not use a damaged power cord. If the power cord is damaged, purchase a replacement from your dealer.
- The power cord included with this projector is for use exclusively with this product. Do not use this cord for other products.
Warning
Take the following precautions regarding the power supply, power plug, and connector. Failure to do so may result in fire or electric shock.
- Do not use any power source with a voltage other than the voltage indicated (AC 100–240 V).
- Do not pull the power cord and be sure to hold the power plug or connector when removing. Incorrect handling may damage the power cord.
- Do not insert any metal objects into the contact parts of the power plug or connector.
- Do not remove the power plug or connector with wet hands.
- Insert the power plug and connector securely up to the base. Additionally, do not use a damaged power plug or an outlet that is loose.
- When using an extension cord, do not exceed the cord's rated capacity.
- Periodically inspect the power plug and outlet and remove any dust or dirt from between the plug and the outlet.
Installation and Handling Precautions
Take the following precautions regarding installation and handling of the projector. Failure to do so may result in a fire, electric shock or personal injury.
- Do not use the projector where it might get wet, such as outdoors or by bathtubs or showers.
- Do not place containers containing liquid on top of the projector.
- Do not touch the projector itself, the power cord, or the cable if there is lightning outside.
- Do not move the projector until you have switched off the power, removed the power plug from the power outlet and unplugged any other cables.
- Unplug the projector before cleaning or maintenance.
- Do not install the projector in a location that is damp or dusty, or where there is a lot of oily smoke or steam. Oil can degrade the plastic, which could result in a ceiling-mounted projector falling from its mounting.
- Do not remove the cabinet from the projector or disassemble it. The interior of the projector contains high-voltage components as well as parts that are hot. If inspection, maintenance or repair is required, contact the Canon Customer Support Center.
- Do not disassemble or modify the projector (including consumable parts) or the remote control.
Warning
Take the following precautions regarding installation and handling of the projector. Failure to do so may result in a fire, electric shock or personal injury.
- Do not look directly into the exhaust vents during use.
- Do not insert any object into vents in the projector, such as the air intake vent or exhaust vents.
- Do not place a pressurized can in front of the exhaust vents. The pressure of the contents of the can may increase due to heat from the exhaust vents and this could result in an explosion.
- When cleaning off dust or dirt from projector parts such as the lens, never use any spray that is flammable. Internal parts that become hot may ignite and cause a fire.
- Do not use adhesives, lubricants, oils, or alkaline detergents for maintenance of the projector. They could adhere to the cabinet and damage it, possibly resulting in the projector falling from its mounting and causing an accident or personal injury.
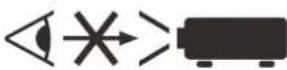
- As strong light beams are emitted while the projector is in use, do not look directly into the projector lens. Doing so could cause an eye injury. Pay particular attention to prevent small children from doing so.
• Light from the projector is classified as Risk Group 2 (RG2) according to IEC 62471-5:2015.
- If children may approach the projector or touch it, always ensure the projector is used under adult supervision.
- Do not hold or install optical instruments (such as magnifying glasses, reflectors, or glasses) in the path of light from the projector. If projected light is refracted or reflected and enters people's eyes, it may result in eye injury.
- When setting the projector on a high surface for projection, be sure the surface is flat and stable.
- Do not install the projector on a soft surface such as a carpet or foam mat. Doing so could cause heat to build up inside the projector and this could result in a fire.

RG2
Precautions on the lamp
Warning
This projector uses a high-pressure mercury lamp as a light source. The mercury lamp has the following characteristics.
• The lamp will gradually become darker over time.
- Impact, abrasion, or use of worn-out lamps may cause lamps to rupture (accompanied by a loud noise) or burn out.
- Lamps are more likely to rupture once the lamp replacement message has been displayed. Replace the lamp with a new one as soon as possible. For details, refer to the user's manual.
- Useful life of lamps varies widely from lamp to lamp and depending on the environment of use. Some lamps may fail or rupture soon after they are first used.
Take the following precautions during lamp replacement or when a lamp has ruptured. Failure to do so may result in electric shock, burns, or other injury.

- Before replacing the lamp, always unplug the projector and wait at least 45 minutes.
- Ruptured lamps may emit dust and gas (containing mercury vapor) out of the exhaust vents. If so, immediately open windows and doors to ventilate the room. Additionally, shards of glass may be scattered. Do not attempt lamp replacement yourself. Instead, contact an installer or Canon Customer Support Center for internal cleaning, inspection, and lamp replacement.
- If you accidentally inhale gas from the lamp or get any pieces in your eyes or mouth, consult a doctor immediately.
Take the following precautions when replacing lamps that stop working. Failure to do so may result in injury.
- If illumination suddenly stops, either when you turn the projector on or during use, the lamp may have ruptured. In this case, never attempt replacement yourself. Request replacement from an installer or Canon Customer Support Center.
- With ceiling-mounted projectors, the lamp may fall out when you open the lamp cover, or during replacement. During replacement, stand to the side of the lamp cover, not directly under it.
Precautions for the Batteries of the Remote Control
Warning
Take the following precautions regarding handling of batteries. Failure to do so may result in a fire or personal injury.
- Do not heat, short circuit or disassemble the batteries, or place them in a fire.
- Do not attempt to recharge the batteries that are included with the remote control.
- Remove the batteries when they are flat or when the remote control will not be used for a long period of time.
- Insert the batteries with the + and - terminals in the correct directions.
- If any liquid from inside the batteries leaks out and contacts your skin, be sure to wash the liquid off thoroughly.

Caution
Take the following precautions regarding installation and handling of the projector.
- If the projector will not be used for a long period of time, be sure to remove the power plug from the power outlet to ensure safety. Failure to do so presents a risk of fire if dust accumulates on the plug or outlet.
- Do not touch parts of the cabinet around and above the exhaust vents, which may become hot during projection or for a while after projection. Be especially careful to keep children away from these parts. Additionally, do not place any metal objects around or above the exhaust vents. Such objects may become hot from the projector, which may result in burns or other injury.
- Do not place any heavy objects on top of the projector or sit / stand on it. Pay particular attention to prevent small children from doing so. The projector may be knocked over and this could result in damage or a personal injury.
- Do not place the projector on an unstable or slanted surface. Doing so may cause the projector to fall or be knocked over and could result in a personal injury.
- Do not place any objects in front of the lens during projection. This may result in a fire.
When handling the lamp, take the following precautions.
- Lamps are more likely to rupture once the lamp replacement message has been displayed. Replace the lamp with a new one as soon as possible.
- Before removing the lamp, wait at least 45 minutes after turning off the projector and confirm that the lamp and projector have cooled down sufficiently. Failure to do so may result in burns or other injury.
- Be prepared by keeping a spare lamp.
- Dispose of used mercury lamps in accordance with local regulations.
Caution for viewing 3D content

Caution
Pay attention to the following points when viewing 3D content.
- Photosensitive patients, patients with heart disease, pregnant women, elderly people, and people with serious illness and/or with a history of epilepsy should not view 3D content.
- We advise that you should refrain from viewing 3D content if you are in bad physical condition, need sleep or have been drinking alcohol.
- Stop watching 3D content if you experience the following symptoms. If you experience such symptom, immediately stop viewing 3D content and take a break until the symptom has subsided.
- You see doubly-blurred images or you cannot view the image stereoscopically.
- You feel fatigue or discomfort.
- Take breaks when viewing 3D content for an extended period of time. As this may cause eye fatigue. Viewing 3D content for an extended period of time or viewing them from an oblique angle can cause eye strain.
- Parents should accompany and monitor their children as children cannot properly express discomfort with 3D content viewing. Children who are six year of age or younger should not view 3D content.
- The optimum 3D viewing distance from the screen is about 3 times of the vertical screen size or more and your eyes should be level with the screen.
Caution
Take the following precautions when carrying or transporting the projector.
- This projector is a precision instrument. Do not knock it over or subject it to impacts. Doing so may cause a malfunction.
- Protection of the projector cannot be guaranteed if used packaging or shock-absorbent materials are reused. Fragments from shock-absorbent material may also enter the interior of the projector which could cause a malfunction.
- Disconnect the cables connected to the projector. Carrying the projector while the cables are attached may cause an accident.
- Retract the adjustable feet before moving the projector. Leaving the feet extended may cause damage.
- Do not touch the lens with bare hands. Doing so may result in deterioration of image quality.
Take the following precautions when installing or using the projector.
- Be careful of condensation.
If the projector is abruptly taken to a warmer location, or if the room temperature rises abruptly, moisture in the air may condense on the lens and mirror, causing the image to become blurred. - Do not install the projector in a location where the temperature changes rapidly such as in front of a cooling and heating machine. Otherwise, it may damage the projector due to condensation or a rapid change in temperature.
- Do not install the projector in extremely hot or cold locations. This may damage the projector. Ranges for the environment of use and storage are as follows.
- Environment of use: 5^ (41°F) to 40^ (104°F), up to 85% RH
• Storage temperature: -10°C (14°F) to 60°C (140°F)
- When using the projector at an altitude of 1,500 m (4,921') or higher: Adjust projector menu settings accordingly (Page 47).
- Do not block the air intake or exhaust vents. Blocking the vents may trap heat inside the projector, which may shorten the useful life of optical components or other parts and damage the projector.
- Install the projector leaving at least 50 cm (1.6') between air intake/exhaust vents and walls. Failure to do so may trap heat inside the projector and damage it.
- Do not place any objects on top of the projector that may change shape or color due to heat.
- Do not install the projector in a location that is damp, or where there is a lot of dust, oily smoke or tobacco smoke. Doing so could cause contamination of optical components such as the lens and the mirror and may result in deterioration of image quality. And oil can degrade the plastic, which could result in a ceiling-mounted projector falling from its mounting.
- Do not install the projector near high-voltage electrical power lines or an electrical power source.
Projector Installation Notice
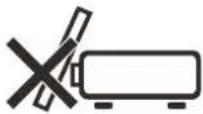
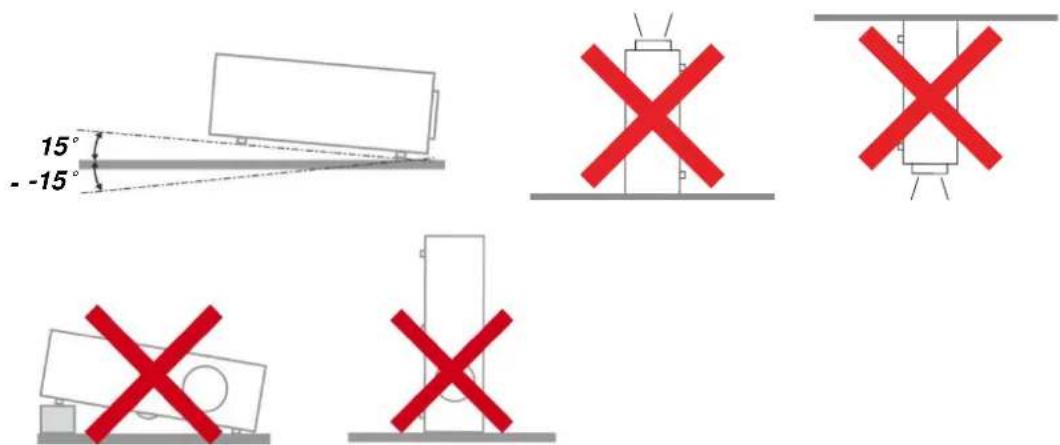
➢ Place the projector in a horizontal position
The tilt angle of the projector should not exceed 15 degrees, nor should the projector be installed in any way other than the desktop and ceiling mount, otherwise lamp life could decrease dramatically, and may lead to other unpredictable damages.
- Allow at least 50 cm clearance around the exhaust vent.
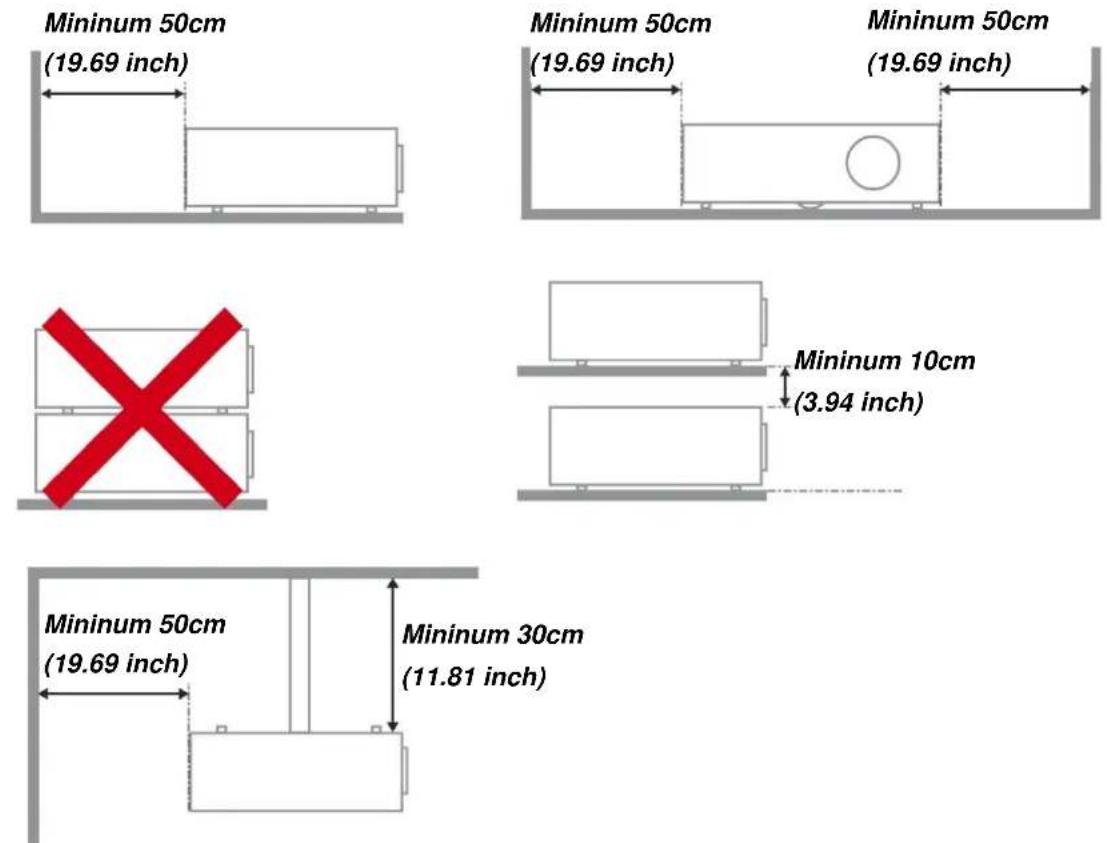
➢ Ensure that the intake vents do not recycle hot air from the exhaust vent.
When operating the projector in an enclosed space, ensure that the surrounding air temperature within the enclosure does not exceed operation temperature while the projector is running, and the air intake and exhaust vents are unobstructed.
All enclosures should pass a certified thermal evaluation to ensure that the projector does not recycle exhaust air, as this may cause the device to shutdown even if the enclosure temperature is with the acceptable operation temperature range.
Make sure to implement anti-fall measures such as an anti-fall wire when installing the projector in high places, for example, installing it on the ceiling.
Copyright Notice
Please note that enlarging or reducing the size of an image for commercial purposes or public presentation may infringe on the legally protected copyright or the copyright holder of the original material.
Ensure Network Security
Take measures to ensure network security. Note that Canon is not liable in any way for direct or indirect loss from network security incidents, such as unauthorized access.
Before using the projector, configure the appropriate projector, computer, and network security settings. Install the projector in a network protected by a firewall or other security measures. Do not connect it directly to the Internet.
About Trademarks
➢ Ethernet is a registered trademark of Xerox Corporation.
➢ Microsoft, Windows, Windows Vista, Windows 7, Windows 8, Windows 8.1 and Windows 10 are registered trademarks or trademarks of Microsoft Corporation in the United States and / or other countries.
Mac, Mac OS and Macintosh are trademarks of Apple Inc., registered in the United States and / or other countries.
HDMI, the HDMI logo and High-Definition Multimedia Interface are trademarks or registered trademarks of HDMI Licensing, LLC.
PJLink is a registered trademark of JBMIA and pending trademark in some countries.
PJLink is a registered trademark, or an application has been submitted for trademark, in Japan, the United States and / or other countries or regions.
- AMX is a trademark of AMX Corporation.
Crestron®, Crestron RoomView®, and Crestron Connected™ are registered trademarks of Crestron Electronics, Inc.
MHL, the MHL logo, and Mobile High-Definition Link are trademarks or registered trademarks of MHL, LLC in the United States and other countries.
All other trademarks are the property of their respective owners.
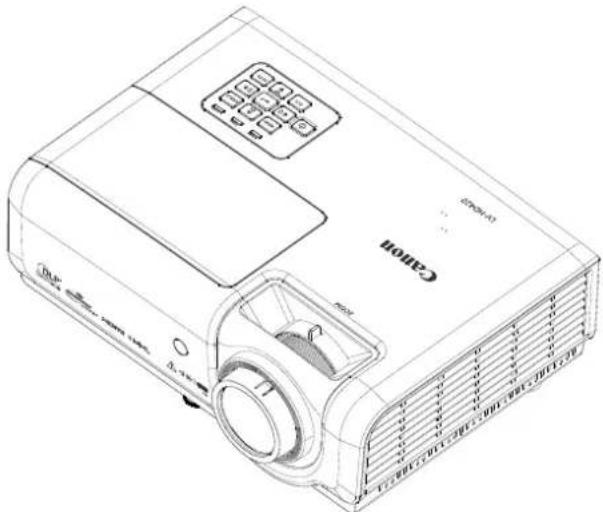
Packing Checklist
Carefully unpack the projector and check that the following items are included:
natural_image
Line drawing of a Canon projector with visible lens, control panel, and ventilation slots (no text or symbols)PROJECTOR
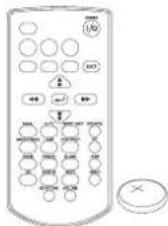
REMOTE CONTROL
(WITH ONE CR2025 BATTERY)
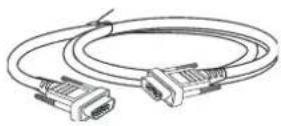
RGB CABLE(1.8 M / 5.9')
(MINI D-SUB 15-PIN / MINI D-SUB 15-PIN)
(P/N: 3081409201)
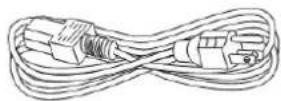
POWER CORD (1.8 M/5.9')

CD-ROM
(T HIS USER'S MANUAL)
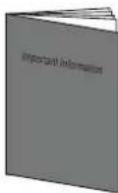
IMPORTANT INFORMATION
WARRANTY CARD
Views of Projector Parts
Front-right View
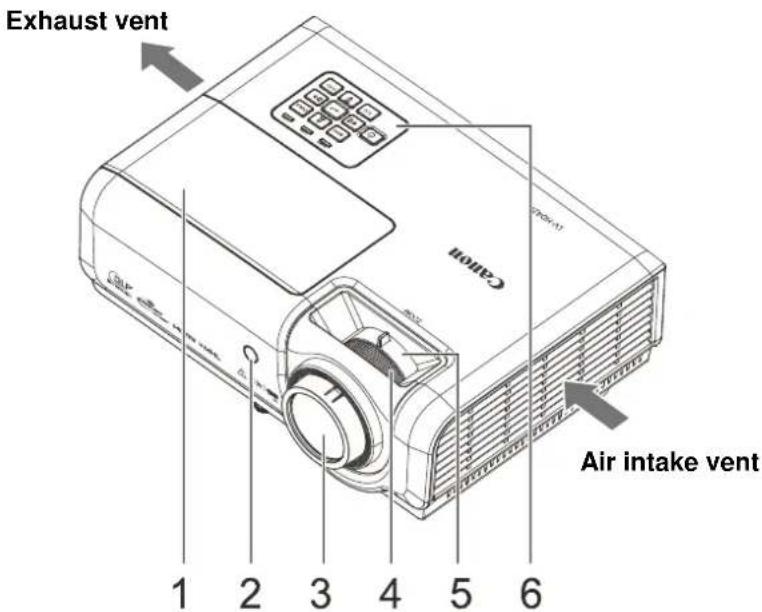
| ITEM | LABEL | DESCRIPTION | SEE PAGE |
| 1. | Lamp Cover Remove to change the lamp. | 61 | |
| 2. | IR receiver | Receive IR signal from remote control. | |
| 3. | Projection Lens | ||
| 4. | Focus ring Focuses the projected image. | 27 | |
| 5. | Zoom ring Enlarges the projected image. | ||
| 6. | Function keys | See Top view—On-screen Display (OSD) buttons and LEDs. | 15 |
Install at a Sufficient Distance from Walls and Other Obstructions
If the air intake or exhaust vent is blocked, heat will accumulate inside the projector, possibly resulting in a shortened projector lifetime or a malfunction.
Top view—On-screen Display (OSD) buttons and LEDs
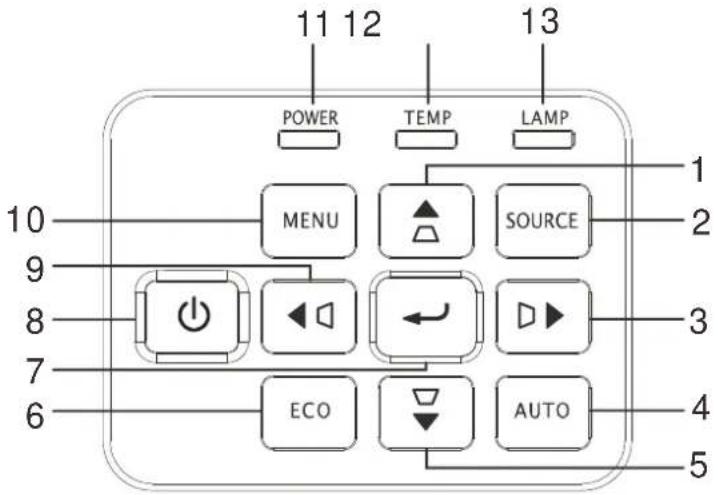
| ITEM | LABEL | DESCRIPTION | SEE PAGE | |
| 1. |  | Navigates and changes settings in the OSD Quick Menu – For Keystone | 29 | |
| 2. | SOURCE | Navigates and changes settings in the OSD Enter the Source menu | ||
| 3. |  | Navigates and changes settings in the OSD Quick Menu – For Keystone | ||
| 4. | AUTO Optimizes image | size, position, and resolution | ||
| 5. |  | Navigates and changes settings in the OSD Quick Menu – For Keystone | ||
| 6. | ECO | Enter the lamp mode menu | ||
| 7. |  | Enter or confirm highlighted OSD menu item | 29 | |
| 8. |  | Turns the projector On or Off. | ||
| 9. |  | Navigates and changes settings in the OSD Quick Menu – For Keystone | ||
| 10. | MENU Opens and exits | OSD menus | ||
| 11. | POWER LED | Solid Standby, Lamp Lit, over temperature | 68 | |
| Flashing | System Initialized, System Power On , Cooling , Error code | |||
| 12. | TEMP LED Solid Over temperature | |||
| 13. | LAMP LED | Solid | Lamp Fail. | |
| Flashing | Error code | |||
Rear view
Before connecting the projector to other equipment, turn off both the projector and the other equipment.
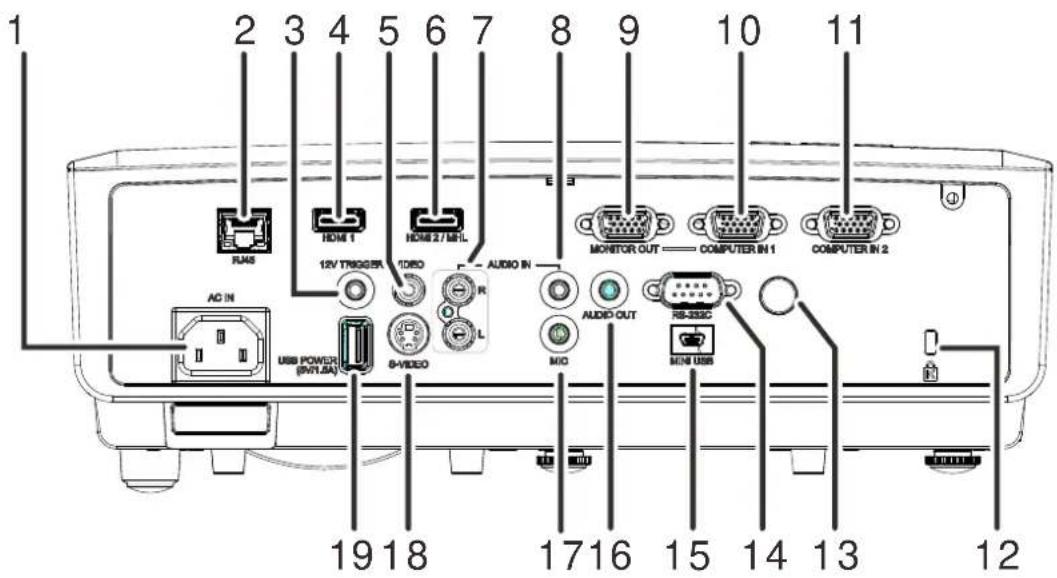
| ITEM | LABEL | DESCRIPTION | SEE PAGE |
| 1. | AC IN Connect the POWER cable | 22 | |
| 2. | RJ45 Connect a LAN cable from Ethernet | ||
| 3. | 12V TRIGGER | Connect the 12V OUT (Screen Trigger-- For screen controllers used) | |
| 4. | HDMI 1 | Connect the HDMI cable from a HDMI device(*) | |
| 5. | VIDEO Connect the COMPOSITE cable from a video device | ||
| 6. | HDMI 2 / MHL | Connect the HDMI cable from a HDMI device. (*)Connect the MHL cable from a MHL-compatible device.Note:A dedicated adapter is required if your projector does not support the standard MHL cable.Use a MHL cable (available on the market) and MHL-HDMI conversion adapter (available on the market) that certified with the MHL standard. When non-compliant items are used, image projection may not be possible, or the connected device may malfunction or generate heat.Images may not be displayed correctly depending on the connected device type and the settings.When images cannot be projected properly, disconnect and reconnect the MHL cable.Operation is not guaranteed for all connected devices. | |
| 7. | AUDIO IN (R/L) Connect | an AUDIO cable from the audio device | |
| 8. | AUDIO IN | Connect an AUDIO cable from the audio device | |
| 9. | MONITOR OUT | Connect the RGB cable from a computer(Loop Thru only for COMPUTER IN-1) | |
| 10. | COMPUTER IN 1 Connect the RGB cable from a computer or components device | ||
* When connecting to HDMI device, use an HDMI certified cable.
| ITEM | LABEL | DESCRIPTION | SEE PAGE |
| 11. | COMPUTER IN 2 | Connect the RGB cable from a computer or components device | |
| 12. | Kensington Lock | Secure to permanent object with a Kensington Lock system | 66 |
| 13. | IR receiver | Receive IR signal from remote control. | |
| 14. | RS-232 | Connect RS-232 serial port cable to control the projector with control commands | |
| 15. | MINI USB | Connect the USB cable from a computer (For service only) | |
| 16. | AUDIO OUT | Connect an AUDIO cable to audio amplifier | |
| 17. | MIC | Connect the Microphone for use | |
| 18. | S-VIDEO | Connect the S-VIDEO cable from a video device | |
| 19. | USB POWER (5V/1.5A) | Connect the USB cable for power supply. | |
Bottom view
![46mm [1.8"] 00 55mm [2.2"] 126mm [5"] 145mm [5.7"] M4 M4 3 155mm [6.1"] 31mm [1.2"]](/content/2026/05/964626/images/0e76c093a805da52cc90df81aaae4741032241161711d99f7584424d240e15be.jpg)
| ITEM | LABEL | DESCRIPTION | SEE PAGE |
| 1. | Ceiling support holes | Contact your dealer for information on mounting the projector on a ceiling | |
| 2. | Adjustable feet Rotate adjuster lever to adjust angle position. | 26 | |
| 3. | Fixed foot | ||
Remote Control Parts
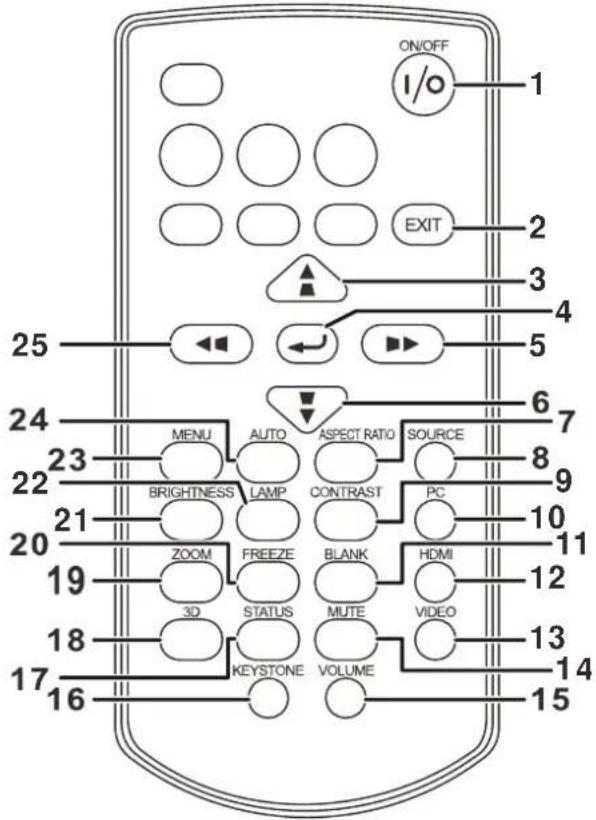
Note:
If buttons on the remote control are inoperative when you attempt to operate the projector, replace the batteries with new ones.
Do not drop the remote control or subject it to impact.
Do not spill any liquids on the remote control. Doing so may cause a malfunction.
| ITEM | LABEL | DESCRIPTION | SEE PAGE |
| 1. | ON/OFF Turns the | projector On or Off. | 29 |
| 2. | EXIT | Goes back to previous OSD menu, exits and saves menu settings.Goes back to previous page. | |
| 3. |  | Navigates and changes settings in the OSD.Keystone correction. | 29 |
| 4. |  | Enters and confirms settings in the OSD. | |
| 5. |  | Navigates and changes settings in the OSD.Keystone correction. | |
| 6. |  | Navigates and changes settings in the OSD.Keystone correction. | |
| 7. | ASPECT RATIO Displays the ASPECT RATIO selections. | ||
| 8. | SOURCE Displays the source selection bar. | 29 | |
| 9. | CONTRAST Displays the contrast setting bar. | ||
| 10. | PC Toggles the input sources for display between PC sources. | ||
| 11. | BLANK | Toggles the screen between blank and normal.Also, toggles the built-in speaker between off and on. | |
| 12. | HDMI | Toggles the input sources for display between HDMI sources. | |
| 13. | VIDEO | Toggles the input sources for display between Video and S-Video. | |
| 14. | MUTE | Toggles the built-in speaker between off and on. | |
| 15. | VOLUME | Displays the volume setting bar. | 28 |
| 16. | KEYSTONE | Displays the keystone setting bar. | 27 |
| 17. | STATUS | Opens the OSD Status menu. (the menu only opens when an input device is detected) | 46 |
| 18. | 3D | Opens the 3D function OSD. | |
| 19. | ZOOM | Displays the zoom setting bar. | |
| 20. | FREEZE | Freeze/unfreezes the on-screen picture. | |
| 21. | BRIGHTNESS | Displays the brightness setting bar. | |
| 22. | LAMP | Displays the lamp mode selection. | |
| 23. | MENU | Opens and exits OSD menus. | 29 |
| 24. | AUTO | Auto adjustment for frequency, phase, position. | |
| 25. | Navigates and changes settings in the OSD.Keystone correction. | ||
Remote Control Operating Range
The remote control is an infrared type. Point it at the infrared remote receiver on the front or rear of the projector to operate it. Remote control range is up to approximately 5 m (16'). Use the remote control within an angle approximately 15^ in any direction from directly in front of the infrared remote receiver. But the effective control range may be reduced.
Projector and Remote Control Buttons
The projector can be operated using the remote control or the buttons on the top of the projector. All operations can be carried out with the remote control; however, the buttons on the projector are limited in use.
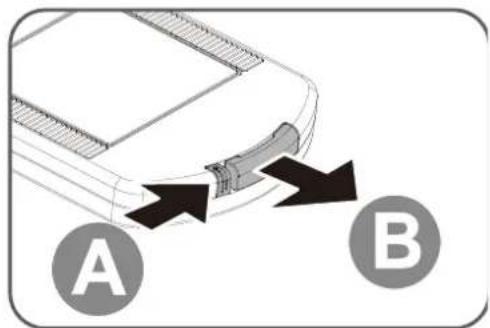
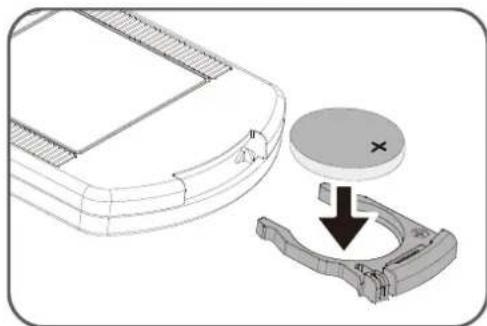
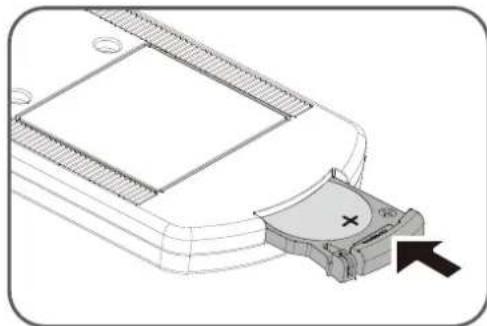
Inserting the Remote Control Batteries
- Remove the battery compartment cover by sliding the cover in the direction of the arrow (A). Pull out the cover (B)..
- Insert the battery with the positive side facing up.
natural_image
Diagram showing a device with a circular component and a mechanical clamp, no text or symbols present- Replace the cover.
natural_image
Technical illustration of a mobile phone with a close button and arrow indicator (no text or symbols)
Warning:
Pay attention to the following points regarding handling of battery. Failing to do so could result in a fire or personal injury.
- Do not heat, short circuit or disassemble the battery, or place them in a fire.
• Do not attempt to recharge the battery that is included with the remote control. - Remove the battery when they are flat or when the remote control will not be used for a long period of time.
- Insert the battery with the + and - terminals in the correct directions.
• If any liquid from inside the battery leaks out and contacts your skin, be sure to wash the liquid off thoroughly.

Caution:
• RISK OF EXPLOSION IF BATTERY IS REPLACED BY AN INCORRECT TYPE.
• DISPOSE OF USED BATTERIES IN ACCORDANCE WITH LOCAL REGULATIONS.
Starting and Shutting down the Projector
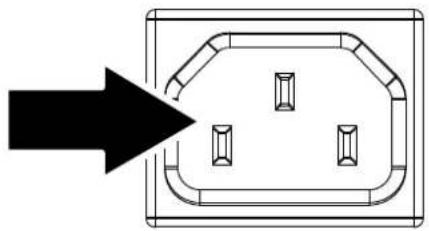
- Connect the power cord to the projector. Connect the other end to a wall outlet. The POWER LED on the projector light.
- Turn on the connected devices.
- Ensure the POWER LED not a flashing. Then press the ⬆POWER button to turn on the projector.
The projector splash screen displays and connected devices are detected.
See Setting an Access Password (Security Lock) on page 24 if security lock is enabled.
natural_image
Pure electrical outlet diagram without any text, numbers, or symbols
- If more than one input device is connected, press the SOURCE button and use ▲▼ to scroll among devices. (Component is supported through the RGB to COMPONENT ADAPTER.)
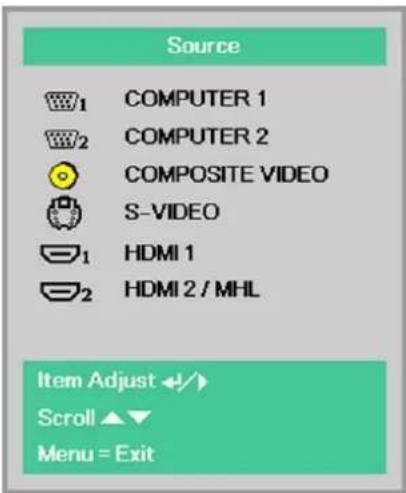
• COMPUTER1, COMPUTER2: Analog RGB
• COMPOSITE VIDEO: Traditional composite video
• S-VIDEO: Super video (Y/C separated)
- HDMI HDMI
• HDMI 2/MHEDMI, MHL
- Press the POWER button.
When the "Power Off? /Press Power again" message appears, press the ⏻ POWER button. The projector turns off.
Note:
Do not unplug the power cord until the POWER LED stops flashing-indicating the projector has cooled down.
How to store the projector in the soft carrying case (LV-SC02)
The soft carrying case is not provided with the projector. Please contact with a store if you want to purchase it.
Note:
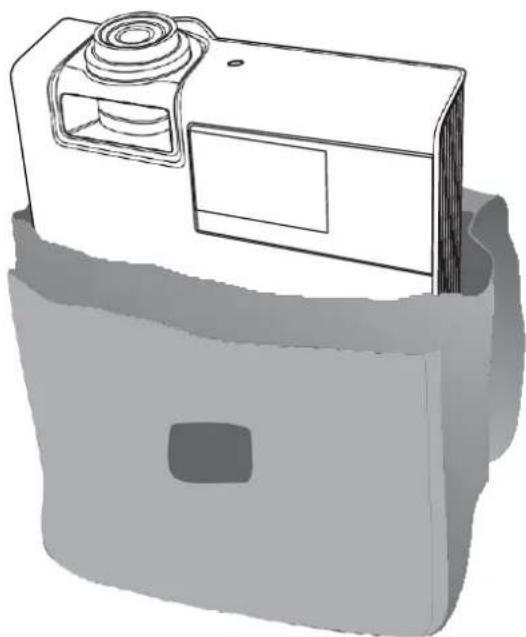
To protect lens of the projector, make sure to store the projector with its lens up as shown below.
natural_image
3D illustration of a camera module with lens and frame (no text or symbols)Setting an Access Password (Security Lock)
You can use the four (arrow) buttons to set a password and prevent unauthorized use of the projector.
When enabled, the password must be entered after you power on the projector. (See Navigating the
OSD on page 29 and Setting the OSD Language on page 30 for help on using OSD menus.)
Note:
Keep the password strictly. Without the password, you will not be able to use the projector. If you lose the password, contact Canon Customer Support Center for information on clearing the password.
- Press the MENU button to open the OSD menu.
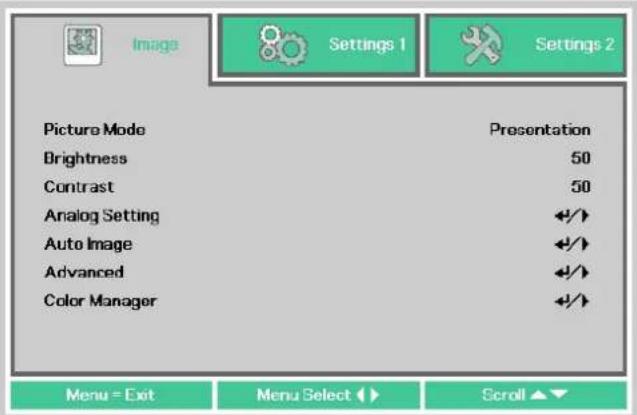
- Press the cursor ◀▶ button to move to the Settings 1 menu, press the cursor ▲▼ button to select Advanced 1.
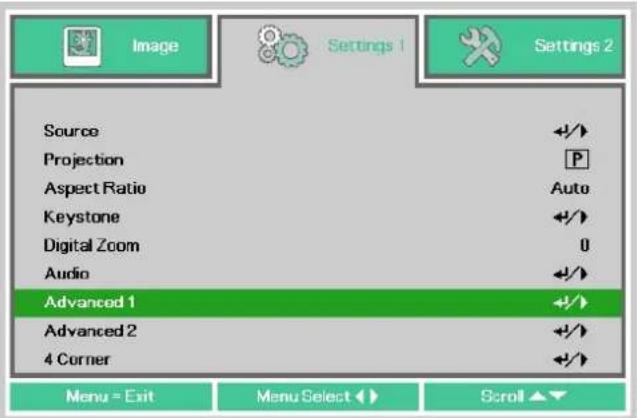
- Press ←(Enter) / ▶ to enter the Advanced 1 sub menu. Press the cursor ▲▼ button to select Security Lock.
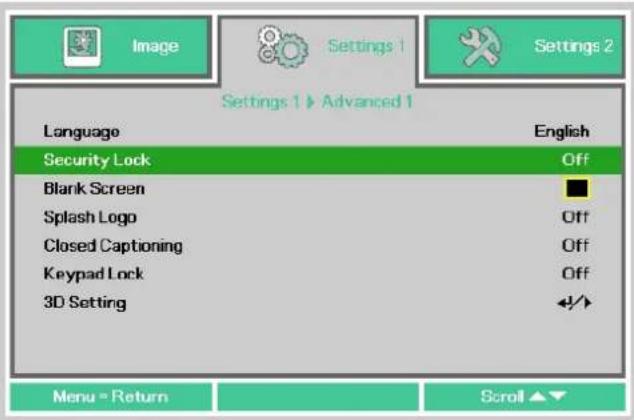
- Press the cursor ◀▶ button to enter and enable or disable security lock function.
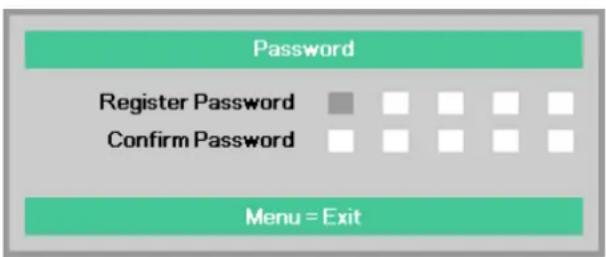
A password dialog box automatically appears.
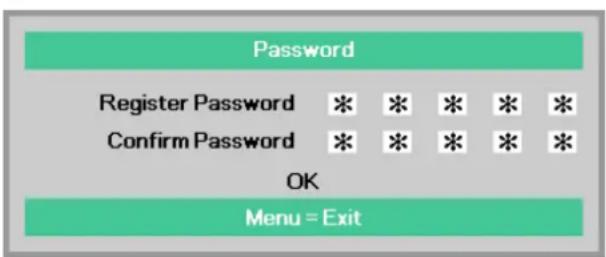
5. You can use the cursor buttons

either on keypad or IR remote control for password entry. You can use any combination including the same arrow five times, but not less than five.
Press the cursor buttons in any order to set the password. Push the MENU button to exit the dialog box.
flowchart
graph TD
    A["Password"] --> B["Register Password"]
    A --> C["Confirm Password"]
    D["Menu = Exit"] --> E["End"]
flowchart
graph TD
    A["Password"] --> B["Register Password"]
    A --> C["Confirm Password"]
    B --> D["* * * * * *"]
    C --> E["* * * * * *"]
    D --> F["OK"]
    E --> F
    F --> G["Menu = Exit"]
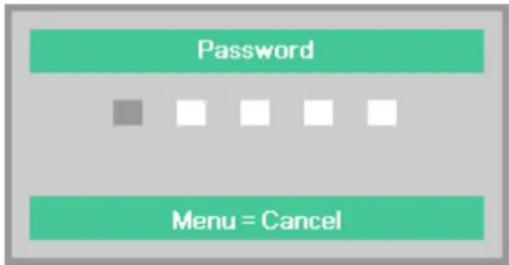
6. The password confirm menu appears when user presses the power-on key in case the Security Lock is enabled. Enter the password in the order you set it at step 5. In case you forget the password, please contact the Canon Customer Support Center.
flowchart
graph TD
    A["Password"] --> B["Gray Square"]
    B --> C["White Square"]
    C --> D["White Square"]
    D --> E["White Square"]
    E --> F["Menu = Cancel"]
Adjusting the Projector Level
Take note of the following when setting up the projector:
- The projector table or stand should be level and sturdy.
• Position the projector so that it is perpendicular to the screen.
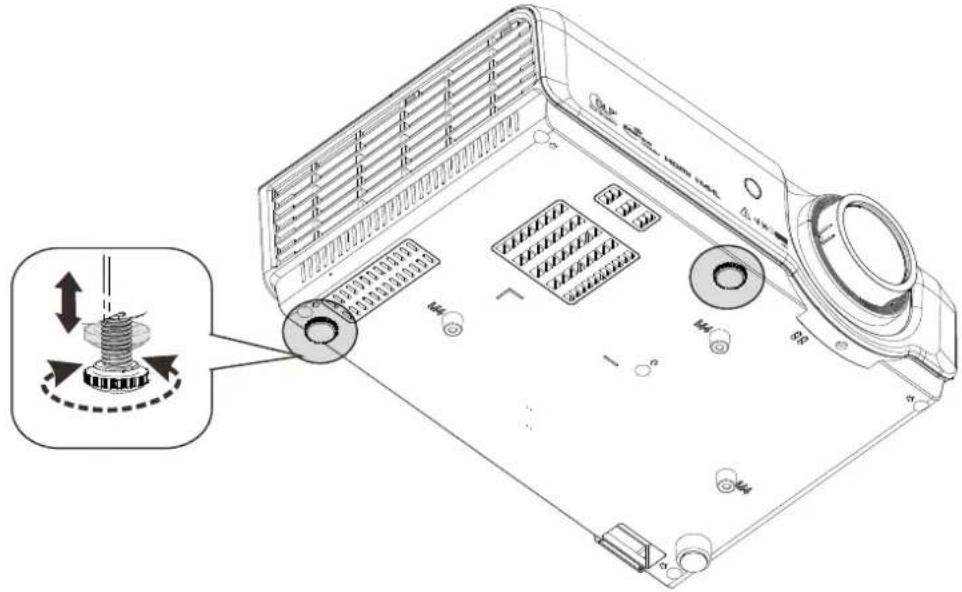
To adjust the angle of the picture, turn the Adjustable feet right or left until the desired angle has been achieved.
Adjusting the Zoom, Focus and Keystone
- Use the zoom ring to resize the projected image Ⓐ
Use the Focus ring to sharpen the projected image.
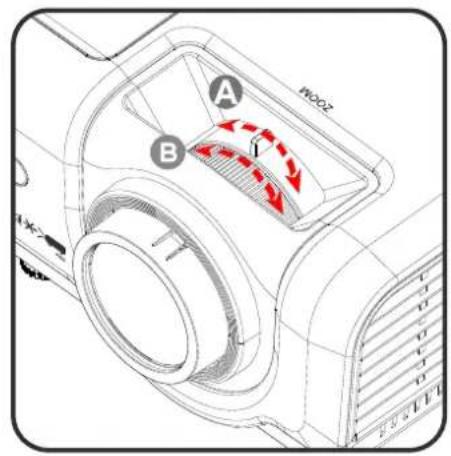
- Use the KEYSTONE buttons to correct image-trapezoid (wider top, bottom, left side or right side).
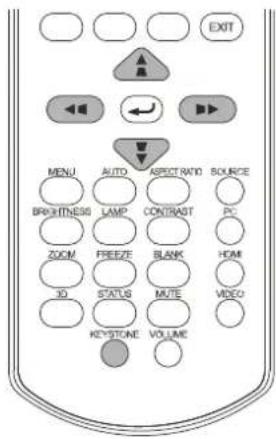
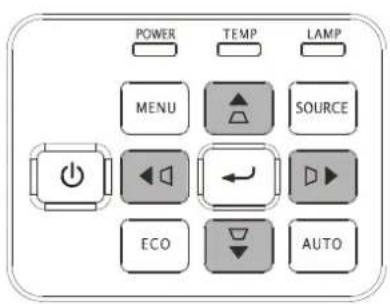
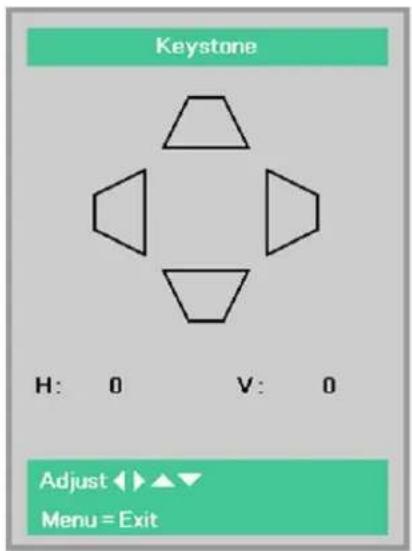
The keystone control appears on the display.
Press ▲/ ▼ for V
Keystone correcting image.
Press √ for H
Keystone correcting image.
Adjusting the Volume
- Press the Volume buttons on the remote control. The volume control appears on the display.
Press the ◀/▶ buttons on the remote control to adjust volume.
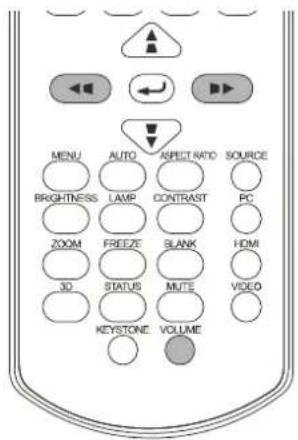

- Press the MUTE button to turn off the volume. (This feature is available only on the remote).

ON-SCREEN DISPLAY (OSD) MENU SETTINGS
OSD Menu Controls
The projector has an OSD that lets you make image adjustments and change various settings.
Navigating the OSD
You can use the remote control cursor buttons or the projector keypad to navigate and make changes to the OSD.
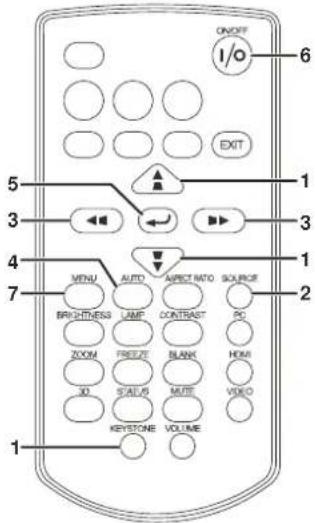
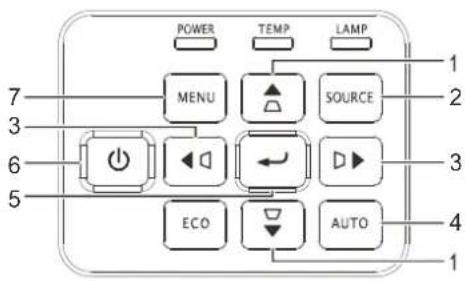
- To enter the OSD, press the MENU button.
- There are three menus. Press the cursor ◀▶ button to move through the menus.
- Press the cursor ▲▼ button to move up and down in a menu.
- Press ◀▶ to change values for settings.
- Press MENU to close the OSD or leave a submenu.
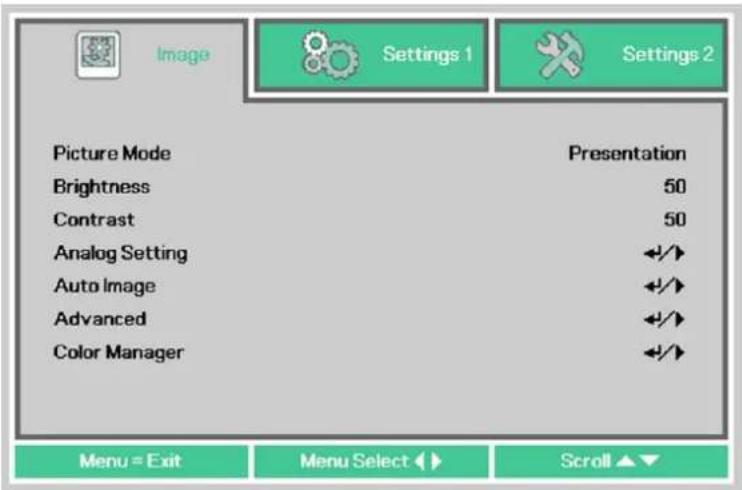
Note: Depending on the video source, not all items in the OSD are available. For example, the Horizontal/Vertical Position items in the Analog Setting menu can only be modified when connected to a PC. Items that are not available cannot be accessed and are grayed out.
Setting the OSD Language
Set the OSD language to your preference before continuing.
- Press the MENU button. Press the cursor ◀▶ button to navigate to Settings 1. Press the cursor ▲▼ button to move to the Advanced 1 menu.
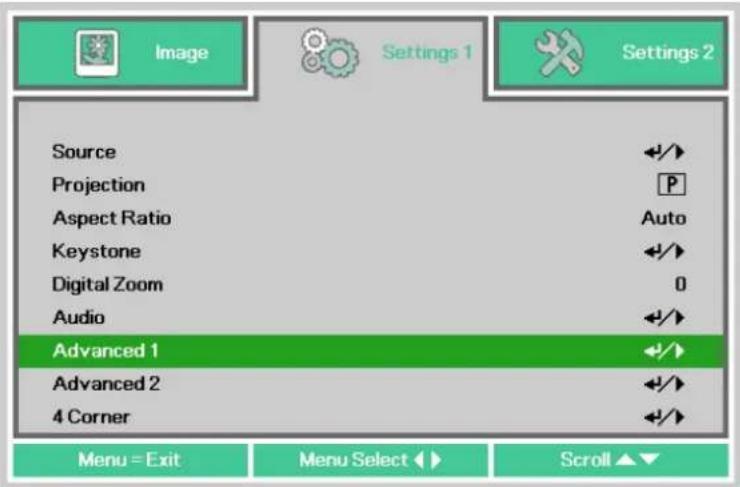
- Press ← (Enter) / ▶ to enter the Advanced 1 sub menu. Press the cursor ▲▼ button until Language is highlighted.
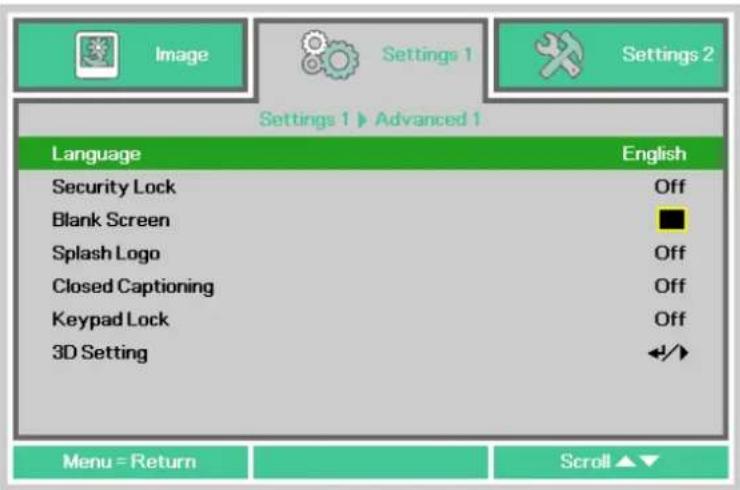
- Press the cursor ▼▲◀▶ button until the language you want is highlighted.
- Press the MENU button four times to close the OSD.
OSD Menu Overview
Use the following illustration to quickly find a setting or determine the range for a setting.
| Main Menu | Sub Menu | Settings | ||
| Image | Picture Mode | Standard(*1), Presentation, Movie(*2), sRGB, User *1:When computer signal input *2:When other signal input | ||
| Brightness | 0~100 | |||
| Contrast | 0~100 | |||
| Analog setting | Horizontal Position | -5~0~5 (depend on Autolock) | ||
| Vertical Position | -5~0~5 (depend on Autolock) | |||
| Frequency | 0~31 | |||
| Tracking | -5~0~5 | |||
| Auto Image | ||||
| Advanced | Brilliant Color | 0~10 | ||
| Sharpness | 0~31 | |||
| Gamma | 1.8, 2.0, 2.2, 2.4, Linear | |||
| Color Temperature | 6500K, 7500K, 8300K | |||
| Video AGC | On, Off | |||
| Video Saturation | 0~50~100 | |||
| Video Tint | 0~50~100 | |||
| White Balance | RGain | 0~100~200 | ||
| GGain | 0~100~200 | |||
| BGain | 0~100~200 | |||
| ROffset | -256~0~255 | |||
| GOffset | -256~0~255 | |||
| BOffset | -256~0~255 | |||
| Color Manager | Red | Hue, Saturation, Gain | 0~100 | |
| Green | Hue, Saturation, Gain | 0~100 | ||
| Blue | Hue, Saturation, Gain | 0~100 | ||
| Cyan | Hue, Saturation, Gain | 0~100 | ||
| Magenta | Hue, Saturation, Gain | 0~100 | ||
| Yellow | Hue, Saturation, Gain | 0~100 | ||
| White | Red, Green, Blue | 0~100 | ||
| Settings 1 | Source | Source | COMPUTER 1, COMPUTER 2, COMPOSITE VIDEO, S-VIDEO, HDMI 1 , HDMI 2 / MHL | |
| Projection | Front, Rear, Ceiling, Rear+Ceiling | |||
| Aspect Ratio | Fill, 4:3, 16:9, Letter Box, Real, 2.35:1 | |||
| Keystone | H | -30~0~30 | ||
| V | -30~0~30 | |||
| Digital Zoom | -10~0~10 | |||
| Audio | Volume | 0~5~10 | ||
| Mute | Off, On | |||
| MIC | Off, On | |||
| Advanced 1 | Language | English, Français, Deutsch, Español, 簡体中文,繁體中文, Italiano, Svenska, Nederlands, Русский, Polski, 한국어, Čeština, Türkçe, Việt, 日本語, İme | ||
| Security Lock | Off, On | |||
| Blank Screen | Blank, Red, Green, Blue, White | |||
| Splash Logo | On, Off | |||
| Closed Captioning | Off, On | |||
| KeypadLock | Off, On | |||
| 3D Setting | 3D Off, DLP-Link | |||
| 3D Sync Invert Off, On | ||||
| 3D Format Frame Sequential, Top/Bottom, Side-By-Side, Frame Packing | ||||
| Advanced 2 | Test Pattern | None, Grid, White, Red, Green, Blue, Black | ||
| H Image Shift | -50~0~50 | |||
| V Image Shift | -50~0~50 | |||
| 4 Corner | Upper Left | H:0~60, V:0~60 | ||
| Upper Right | H:0~60, V:0~60 | |||
| Lower Left | H:0~60, V:0~60 | |||
| Lower Right | H:0~60, V:0~60 | |||
| Settings 2 | Auto Source | Off, On | ||
| Auto Power Off | 0(Off), 1~180 | |||
| Direct Power On | Off, On | |||
| Lamp Mode | ECO, Normal, Smart Eco | |||
| Reset All | ||||
| Status | Active Source | |||
| Video Information | ||||
| Lamp Hours (ECO, Normal, Smart Eco) | ||||
| Software Version | ||||
| Advanced 1 | Menu Position | Left, Right, Center, Down, Up | ||
| Translucent Menu | 0%, 25%, 50%, 75%, 100% | |||
| Standby Power | Full Standby, RS-232, Network | |||
| Fan Speed | Normal, High | |||
| Lamp Hour Reset | ||||
| Projector ID | 0-98 | |||
| Network | DHCP | Off, On | ||
| IP Address | 0~10~255, 0~10~255, 0~10~255, 0~10~255 | |||
| Subnet Mask | 0~255, 0~255, 0~255, 0~255 | |||
| Gateway | 0~255, 0~255, 0~255, 0~255 | |||
| DNS | 0~255, 0~255, 0~255, 0~255 | |||
| Apply | ||||
| Advanced 2 | Sleep Timer | 0(Off), 1~600 | ||
| Source Filter | COMPUTER 1 | Disable, Enable | ||
| COMPUTER 2 | Disable, Enable | |||
| COMPOSITE VIDEO | Disable, Enable | |||
| S-VIDEO | Disable, Enable | |||
| HDMI 1 | Disable, Enable | |||
| HDMI 2/MHL | Disable, Enable | |||
| Screen Color | Off, Light Yellow, Pink, Light Green, Blue, Blackboard | |||
| Color Space | Auto, RGB, YUV | |||
| Input Level | Auto, Full, Limited | |||
Image Menu
Note:
All of picture mode parameters when changed will be saved to user mode.
Press the MENU button to open the OSD menu. Press the cursor ◀▶ button to move to the Image Menu. Press the cursor ▲▼ button to move up and down in the Image menu. Press ◀▶ to enter and change values for settings.
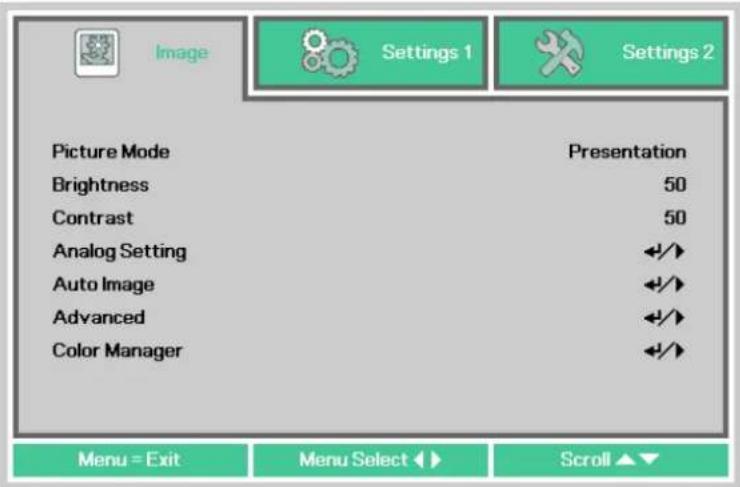
| ITEM | DESCRIPTION |
| Picture Mode | Press the cursor ◀► button to enter and set the Picture Mode.Note:Standard mode: Suitable for projecting computer screens or colorful images (movies), etc.Presentation mode: Suitable for projecting images with a lot of text.It is recommended to use the Standard, Movie, or sRGB mode if you want to emphasize the color temperature since the Presentation mode prioritizes brightness.Movie mode: Suitable for projecting movies.sRGB mode: Suitable for projecting photos from a digital camera that supports sRGB. |
| Brightness | Press the cursor ◀► button to enter and adjust the display brightness. |
| Contrast | Press the cursor ◀► button to enter and adjust the display contrast. |
| Analog Setting | Press ←(Enter)/ ► to enter the Analog Setting menu. See Analog setting Menu on page 35. |
| Auto Image | Press ←(Enter) / ► to automatically adjustment for phase, tracking, size and position. |
| Advanced | Press ←(Enter) / ► to enter the Advanced menu. See Advanced Feature on page 36. |
| Color Manager | Press ←(Enter) / ► to enter the color manager menu. See page 38 for more information on Color Manager. |
Analog setting Menu
Press the MENU button to open the OSD menu. Press ◀▶ to move to the Image menu. Press ▲▼ to move to the Analog setting menu and then press Enter or ▶. Press ▲▼ to move up and down in the Analog setting menu.
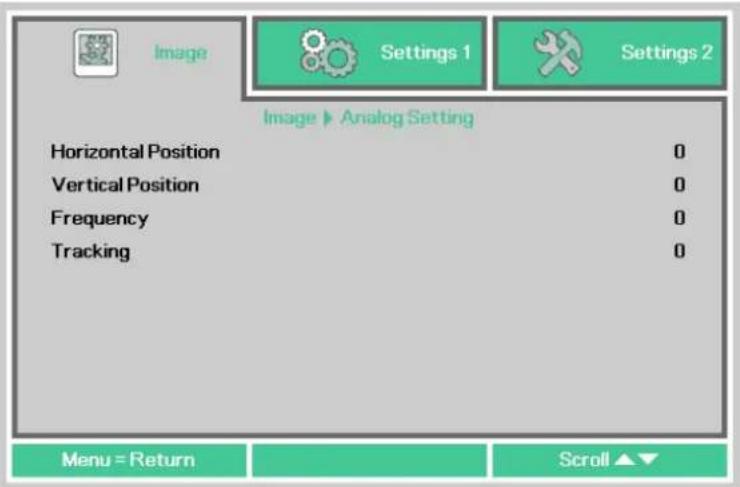
| ITEM | DESCRIPTION |
| Horizontal Position | Press the cursor ◀▶ button to enter and adjust the display position to left or right. |
| Vertical Position | Press the cursor ◀▶ button to enter and adjust the display position to up or down. |
| Frequency | Press the cursor ◀▶ button to adjust the total number of dots in the horizontal direction. Adjust this when stripes are displayed on the screen. |
| Tracking | Press the cursor ◀▶ button to adjust a timing to reproduce the projected image based on a video signal. Adjust this when the image is corrupted or flickers. |
Advanced Feature
Press the Menu button to open the OSD menu. Press ◀▶ to move to the Image menu. Press ▼▲ to move to the Advanced menu and then press Enter or ▶. Press ▼▲ to move up and down in the Advanced menu.
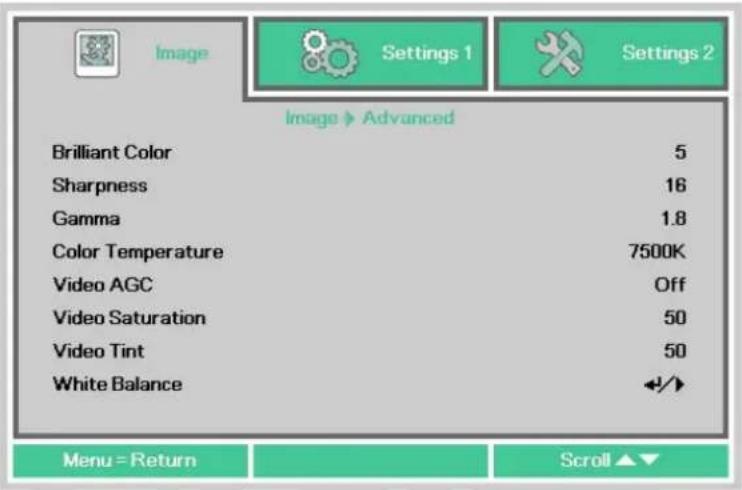
| ITEM | DESCRIPTION |
| Brilliant Color | Press the cursor ◀▶ button to enter and adjust the Brilliant Color value. |
| Sharpness | Press the cursor ◀▶ button to enter and adjust the display Sharpness. |
| Gamma | Press the cursor ◀▶ button to enter and adjust the gamma correction of the display. |
| Color Temperature | Press the cursor ◀▶ button to enter and adjust the color temperature. |
| Video AGC | Press the cursor ◀▶ button to enter and enable or disable the Automatic Gain Control for video source. |
| Video Saturation | Press the cursor ◀▶ button to enter and adjust the video saturation. |
| Video Tint | Press the cursor ◀▶ button to enter and adjust the video tint/hue. |
| White Balance | Press ← (Enter) / ▶ to enter the White Balance sub menu.See White Balance on page 37 |
White Balance
Press the ENTER button to enter the White Balance sub menu.
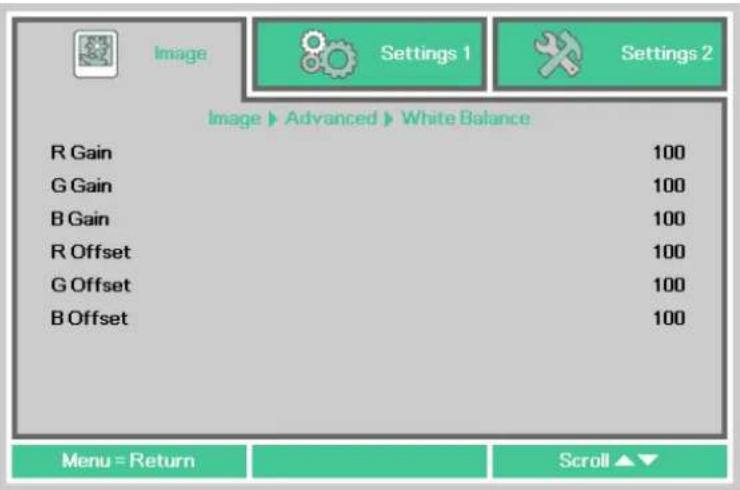
| ITEM | DESCRIPTION |
| R Gain | Press the ◀▶ buttons to adjust the Red Gain. |
| G Gain | Press the ◀▶ buttons to adjust the Green Gain. |
| B Gain | Press the ◀▶ buttons to adjust the Blue Gain. |
| R Offset | Press the ◀▶ buttons to adjust the Red Offset. |
| G Offset | Press the ◀▶ buttons to adjust the Green Offset. |
| B Offset | Press the ◀▶ buttons to adjust the Blue Offset. |
Color Manager
Press the Menu button to open the OSD menu. Press ◀▶ to move to the Image menu. Press ▼▲ to move to the Color Manager menu and then press Enter or ▶. Press ▼▲ to move up and down in the Color Manager menu.
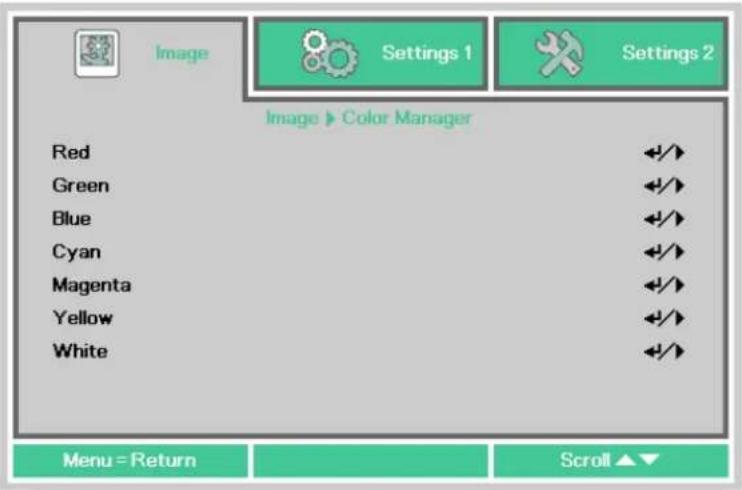
| ITEM | DESCRIPTION |
| Red | Select to enter the Red Color Manager.Press the ◀▶ buttons to adjust the Hue, Saturation, and Gain. |
| Green | Select to enter the Green Color Manager.Press the ◀▶ buttons to adjust the Hue, Saturation, and Gain. |
| Blue | Select to enter the Blue Color Manager.Press the ◀▶ buttons to adjust the Hue, Saturation, and Gain. |
| Cyan | Select to enter the Cyan Color Manager.Press the ◀▶ buttons to adjust the Hue, Saturation, and Gain. |
| Magenta | Select to enter the Magenta Color Manager.Press the ◀▶ buttons to adjust the Hue, Saturation, and Gain. |
| Yellow | Select to enter the Yellow Color Manager.Press the ◀▶ buttons to adjust the Hue, Saturation, and Gain. |
| White | Select to enter the White Color Manager.Press the ◀▶ buttons to adjust the Red, Green, and Blue. |
Settings 1 Menu
Press the MENU button to open the OSD menu. Press the cursor ◀▶ button to move to the Settings 1 menu. Press the cursor ▲▼ button to move up and down in the Settings 1 menu. Press ◀▶ to enter and change values for settings.
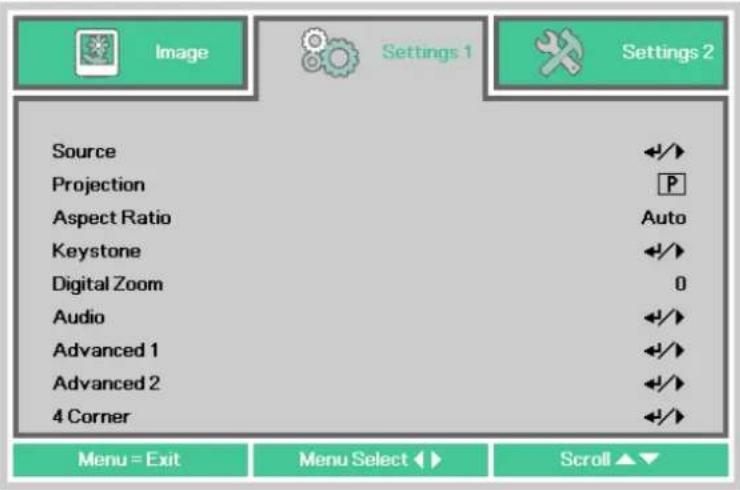
| ITEM | DESCRIPTION |
| Source | Press the cursor ◀► button to enter the Source menu. Reference input Source select (IR / Keypad). |
| Projection | Press the cursor ◀► button to enter and choose from four projection methods. |
| Aspect Ratio | Press the cursor ◀► button to enter and adjust the video aspect ratio. |
| Keystone | Press ← (Enter) / ► to enter the keystone menu. See Keystone on page 40. |
| Digital Zoom | Press the cursor ◀► button to enter and adjust the Digital Zoom menu. |
| Audio | Press ← (Enter) / ► to enter the Audio menu. See Audio on page 40. |
| Advanced 1 | Press ← (Enter) / ► to enter the Advanced 1 menu. See Advanced 1 Feature on page 41. |
| Advanced 2 | Press ← (Enter) / ► to enter the Advanced 2 menu. See Advanced 2 Feature on page 43. |
| 4 Corner | Press ← (Enter) / ► to enter the 4 Corner menu. See 4 Corner on page 44. |
Keystone
Press the Menu button to open the OSD menu. Press ◀▶ to move to the Settings 1 menu. Press ▼▲ to move to the Keystone menu and then press Enter or ▶. Press ▼▲ to adjust vertical values from -30 to 30. Press ◀▶ to adjust horizontal values from -30 to 30.
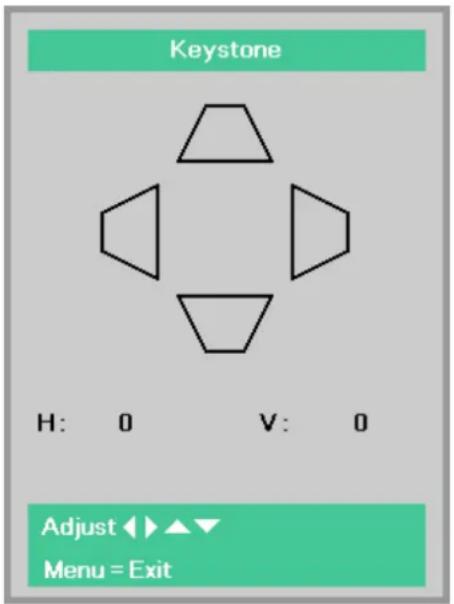
Audio
Press the Menu button to open the OSD menu. Press ◀▶ to move to the Settings 1 menu. Press ▼▲ to move to the Audio menu and then press Enter or ▶. Press ▼▲ to move up and down in the Audio menu.
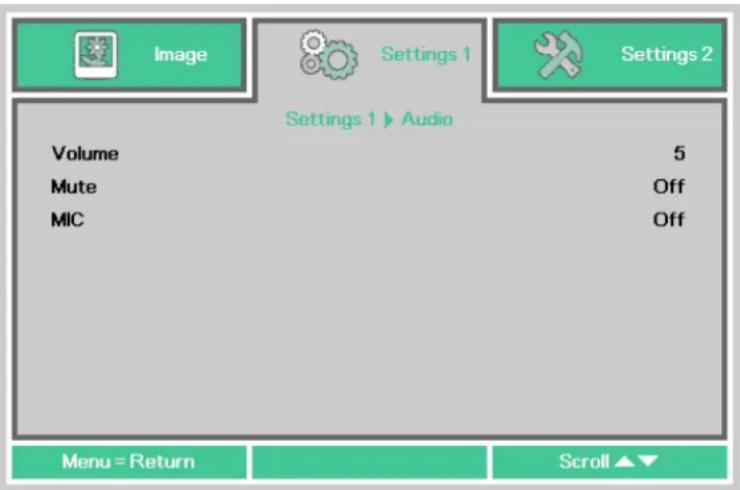
| ITEM | DESCRIPTION |
| Volume | Press the ◀▶ buttons to enter and adjust the audio volume. |
| Mute | Press the ◀▶ buttons to enter and turn on or off the speaker. |
| MIC | Press the ◀▶ buttons to enter and turn MIC Mode Off or On.Note: When MIC plug in, OSD MIC item can be turn on. |
Advanced 1 Feature
Press the Menu button to open the OSD menu. Press ◀▶ to move to the Settings 1 menu. Press ▲▼ to move to the Advanced 1 menu and then press Enter or ▶. Press ▲▼ to move up and down in the Advanced 1 menu. Press ◀▶ to enter and change values for setting.
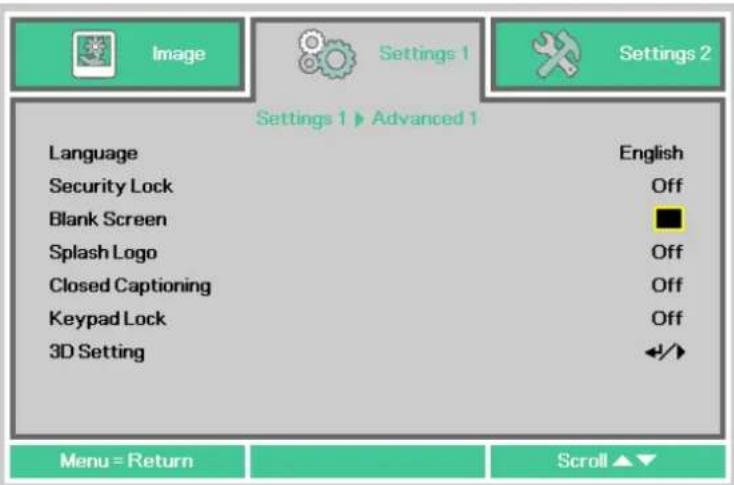
| ITEM | DESCRIPTION |
| Language | Press the cursor ◀▶ button to enter and select a different localization Menu. |
| Security Lock | Press the cursor ◀▶ button to enter and enable or disable security lock function. |
| Blank Screen | Press the cursor ◀▶ button to enter and select different color to blank the screen. |
| Splash Logo | Press the cursor ◀▶ button to enter and select splash logo. |
| Closed Captioning | Press the cursor ◀▶ buttons to enter and enable or disable Closed Captioning. |
| Keypad Lock | Press the cursor ◀▶ button to enter and enable or disable keys can be work on keypad.When keypad locked, press ▼ button 5 sec can be unlock. |
| 3D Setting | Press ← (Enter) / ▶ to enter the 3D menu. See page 42 for more information on 3D Setting. |
Note:
To enjoy the 3D function, first enable the Play Movie in 3D setting found in your DVD device under the 3D Disc Menu.
3D Setting
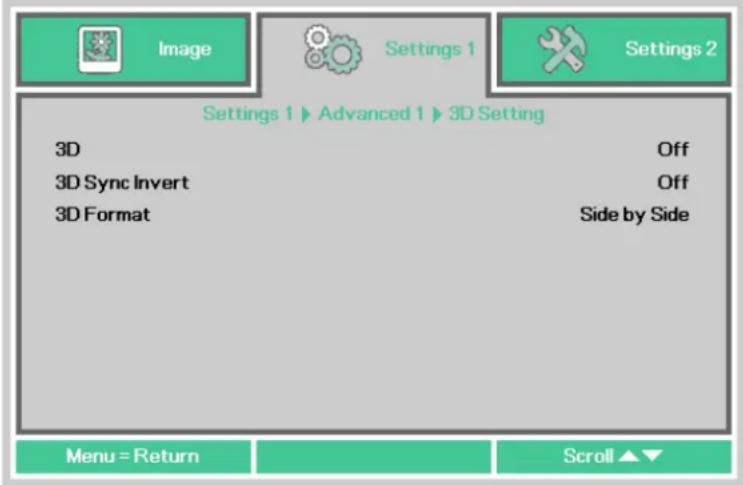
| ITEM | DESCRIPTION |
| 3D | Press the cursor ◀▶ button to enter and select different 3D mode. |
| 3D Sync Invert | Press the cursor ◀▶ button to enter and enable or disable 3D Sync Invert. |
| 3D Format | Press the cursor ◀▶ button to enter and enable or disable different 3D Format. |
Note:
- If an input signal is not a 3D image, the 3D menu items are grayed out in OSD. The default setting for the 3D is "Off."
- If an input signal is a displayable 3D image, the 3D menu items are disabled in OSD.
- Please use 3D glasses for DLP Link projectors when watching a 3D image.
- A 3D content in 3D DVD or 3D media file format is required.
- Some 3D DVD contents have a 3D on-off selection feature. If some case, turn on the 3D feature.
- Turn on and set up the 3D glasses in accordance with the setup instructions in the document for the 3D glasses..
Note:
There are various types of 3D glasses (for DLP Link projectors). Please set up your 3D glasses in accordance with the corresponding setup instructions.
Advanced 2 Feature
Press the Menu button to open the OSD menu. Press ◀▶ to move to the Settings 1 menu. Press ▲▼ to move to the Advanced 2 menu and then press Enter or ▶. Press ▲▼ to move up and down in the Advanced 2 menu. Press ◀▶ to enter and change values for setting.
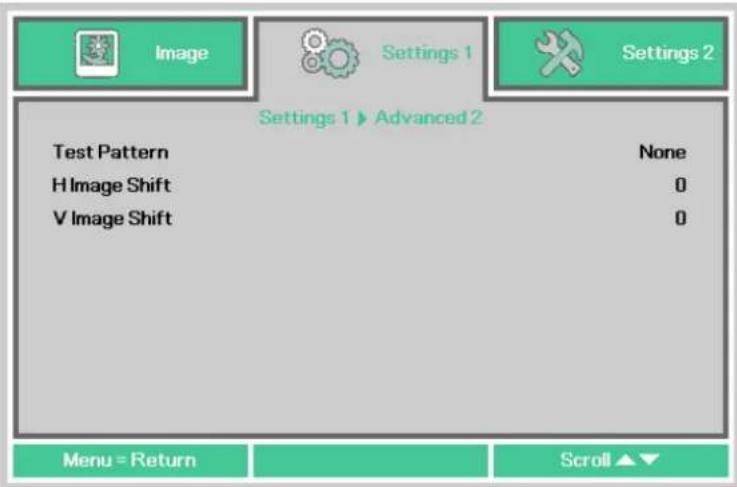
| ITEM | DESCRIPTION |
| Test Pattern | Press the cursor ◀▶ button to enter and select internal test pattern. |
| H Image Shift | Press the cursor ◀▶ button to enter and select H Image Shift. |
| V Image Shift | Press the cursor ◀▶ button to enter and select V Image Shift. |
4 Corner
Press ◀(Enter) / ▶ to enter the 4 Corner sub menu.
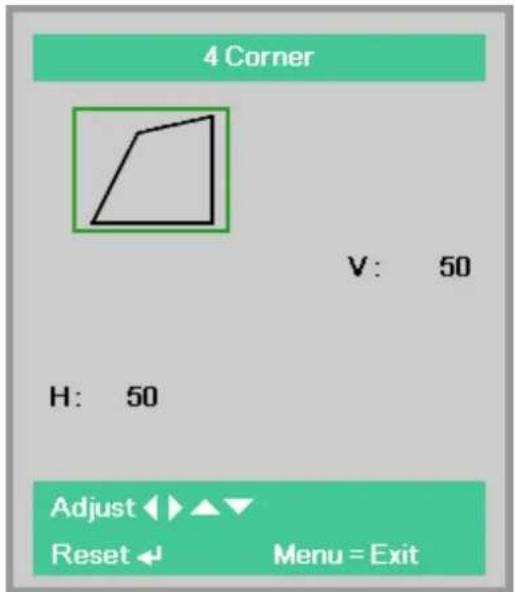
- Press the cursor ▲ / ▼ buttons to select a corner and press ENTER.
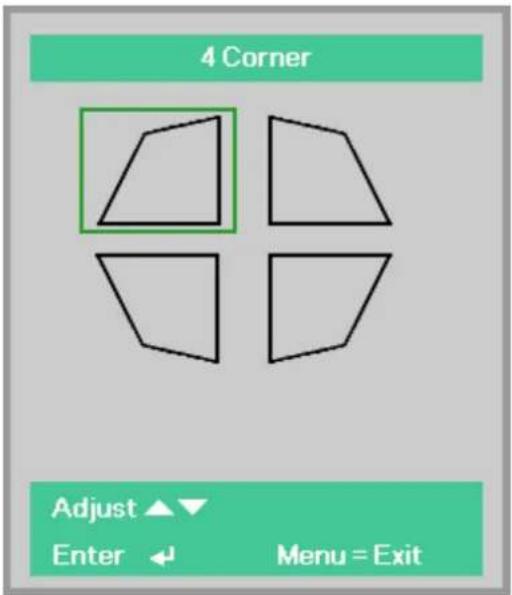
- Press the cursor ▲ / ▼ buttons to adjust vertical and press the cursor ◀ / ▶ buttons to adjust horizontal.
- Press MENU to save and Exit the settings.
Settings 2 Menu
Press the MENU button to open the OSD menu. Press the cursor ◀▶ button to move to the Settings 2 menu. Press the cursor ▲▼ button to move up and down in the Settings 2 menu.
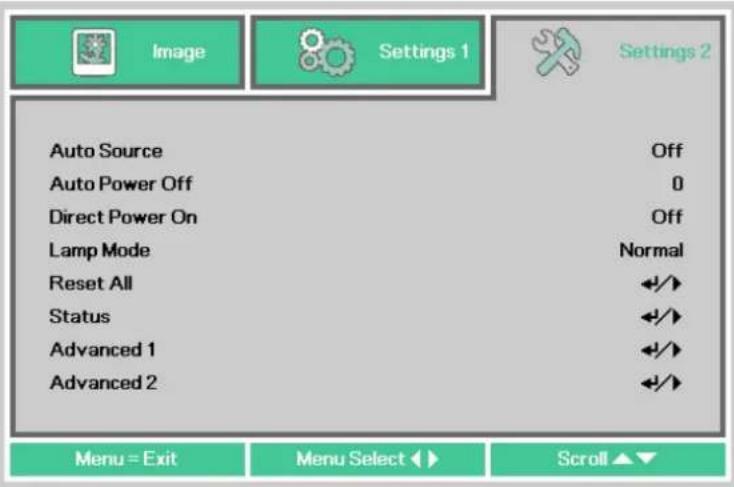
| ITEM | DESCRIPTION |
| Auto Source | Press the cursor ◀► button to enter and enable or disable automatic source detection. |
| Auto Power Off | Press the cursor ◀► button to enter and enable or disable automatic shutdown of lamp when no signal.The standby mode is started if there is no input signal and the selected time period (minutes) has elapsed with no operation. This function is disabled if "0" is selected. |
| Direct Power On | Press the cursor ◀► button to enter and enable or disable a function to power on the projector only by connecting the AC power cable. |
| Lamp Mode | Press the cursor ◀► button to enter and select the lamp mode for higher brightness or lower brightness to save lamp life. |
| Reset All | Press ◀Enter) / ► to reset all settings to default values.Reset All will not reset the following settings.·Language·Network·Lamp Hour |
| Status | Press ◀Enter) / ► to enter the Status menu. See page 46 for more information on Status. |
| Advanced 1 | Press ←(Enter) / ► to enter the Advanced 1 menu. See Advanced 1 Feature on page 47. |
| Advanced 2 | Press ←(Enter) / ► to enter the Advanced 2 menu. See Advanced 2 Feature on page 59. |
Note : The lamp is automatically dimmed to 30% if the BLANK button is pressed or it is there is no input signal for 30 seconds.
Status
Press the cursor ▲▼ button to move up and down in the Settings 2 menu. Select the Status menu and press Enter or ▶ to enter.
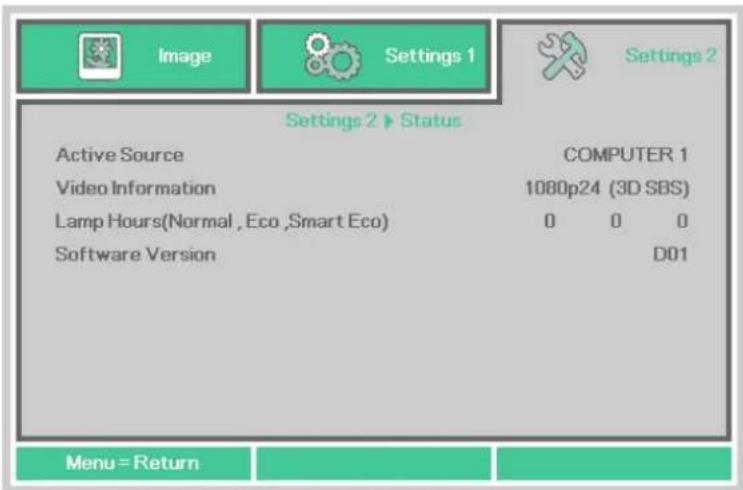
| ITEM | DESCRIPTION |
| Active Source | Display the activated source. |
| Video Information | Displays resolution/video information for RGB source. |
| Lamp Hours (Eco, Normal, Smart Eco) | Lamp hour used information is displayed. (Eco, Normal, Smart Eco) |
| Software Version | Showing system software version. |
Advanced 1 Feature
Press the Menu button to open the OSD menu. Press ◀▶ to move to the Settings 2 menu. Press ▲▼ to move to the Advanced 1 menu and then press Enter or ▶. Press ▲▼ to move up and down in the Advanced 1 menu. Press ◀▶ to enter and change values for setting.
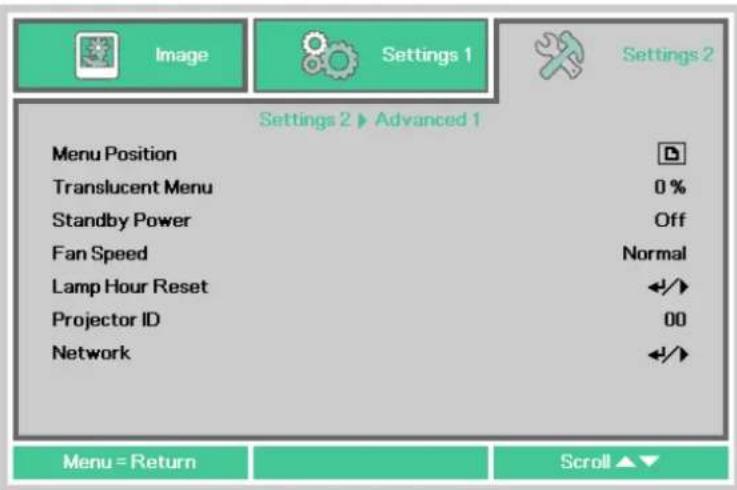
| ITEM | DESCRIPTION |
| Menu Position | Press the cursor ◀▶ button to enter and select different OSD location. |
| Translucent Menu | Press the cursor ◀▶ button to enter and select OSD background translucent level. |
| Standby Power | Press the cursor ◀▶ button to select the operation state during the standby mode.Full standby: Both network and RS-232 functions are enabled.RS-232: The RS-232 function is enabled. The network function is disabled. Network:The network function is enabled. The RS-232 function is disabled. |
| Fan Speed | Press the cursor ◀▶ button to enter and toggle between Normal and High fan speeds.Note: We recommend selecting high speed in high altitude (1,500m/4,921' or higher) areas. |
| Lamp Hour Reset | After replacing the lamp, the Lamp Hour should be reset. See page 48 for more information on Lamp Hour Reset. |
| Projector ID | Press the cursor ◀▶ button to enter and adjust a two digit projector ID from 0 through 98. |
| Network | Press ←(Enter) / ▶ to enter the Network menu. See page 48 for more information on Network. |
Note: About "Network": Standby state that can use a network with under 2W.
Lamp Hour Reset
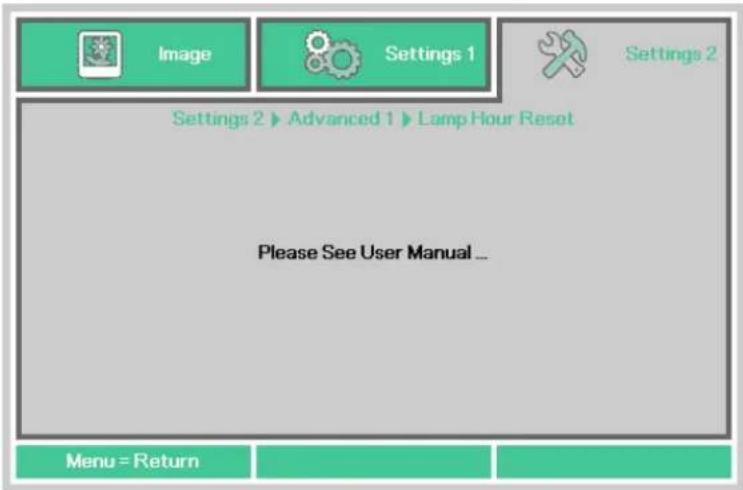
Please refer to Resetting the Lamp Hour on page 64 to reset the lamp hour counter.
Network
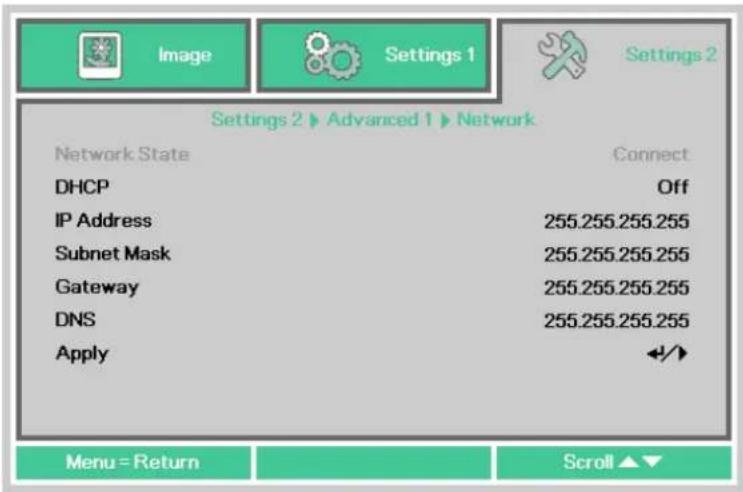
| ITEM | DESCRIPTION |
| DHCP | Press the cursor ◀▶ button to turn DHCP On or Off.Note: If you select DHCP Off, complete the IP Address, Subnet Mask, Gateway, and DNS fields. |
| IP Address | Enter a valid IP address if DHCP is turned off. |
| Subnet Mask | Enter a valid Subnet Mask if DHCP is turned off. |
| Gateway | Enter a valid Gateway address if DHCP is turned off. |
| DNS | Enter a valid DNS name if DHCP is turned off. |
| Apply | Press ◀(Enter) / ▶ to confirm settings. |
LAN\_RJ45
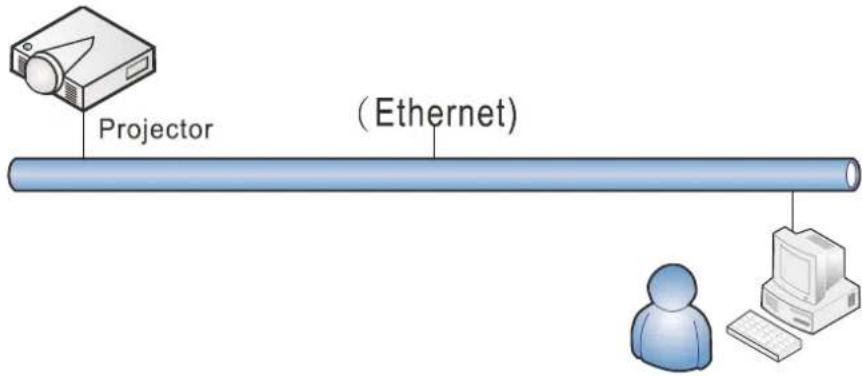
Wired LAN Terminal functionalites
Remote control and monitoring of a projector from a PC (or Laptop) via wired LAN is also possible. Compatibility with Crestron / AMX (Device Discovery) control boxes enables not only collective projector management on a network but also management from a control panel on a PC (or Laptop) browser screen.
★ Crestron is a registered trademark of Crestron Electronics, Inc. of the United States.
★ AMX is a registered trademark of AMX LLC of the United States.
★ PJLink applied for trademark and logo registration in Japan, the United States of America, and other countries by JBMIA.
Supported External Devices
This projector is supported by the specified commands of the Crestron Electronics controller and related software (ex, RoomView®). http://www.crestron.com/
This projector is supported by AMX (Device Discovery). http://www.amx.com/
This projector supports all commands of PJLink Class1 (Version 1.00). http://pjlink.jbmia.or.jp/english/
For more detail of information about the diverse types of external devices which can be connected to the LAN/RJ45 port and remote/control the projector, as well as the related control commands supporting for each external device, kindly please get contact with the Canon Customer Support Center directly.
LAN RJ45
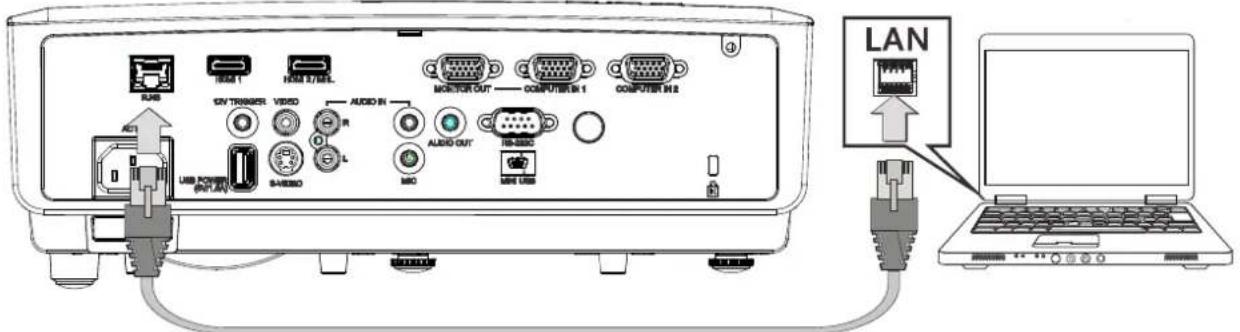
- Connect an RJ45 cable to RJ45 ports on the projector and the PC (Laptop).
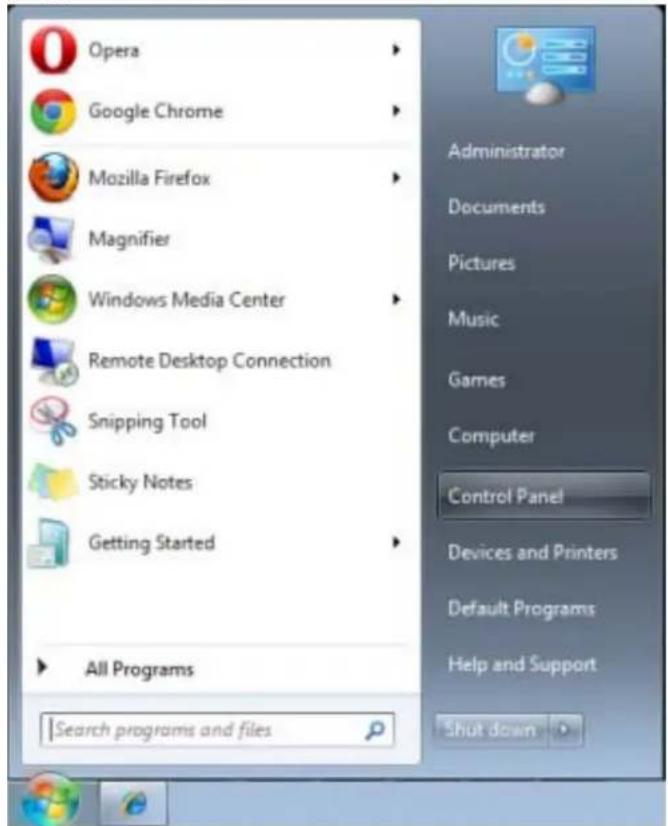
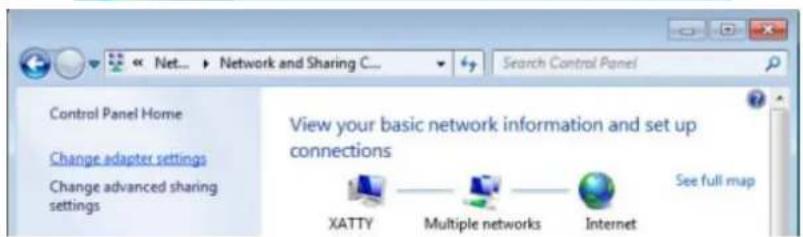
- On the PC (Laptop), select Start → Control Panel → Network and Internet.
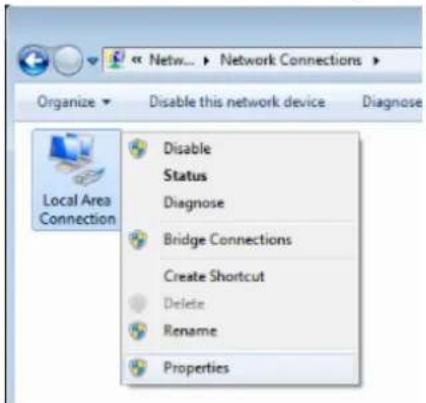
- Right-click on Local Area Connection, and select Properties.
-
In the Properties window, select the Networking tab, and select Internet Protocol (TCP/IP).
-
Click Properties.
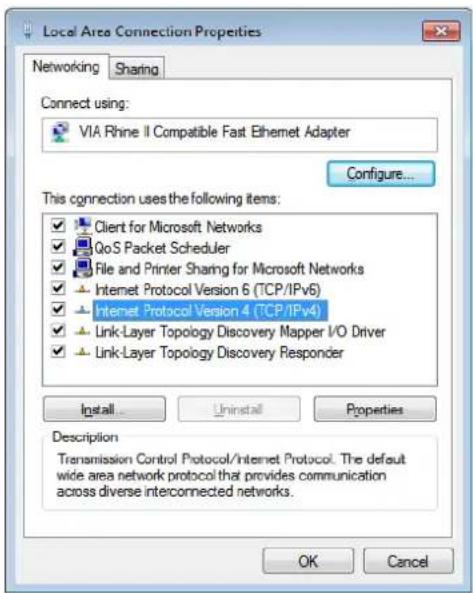
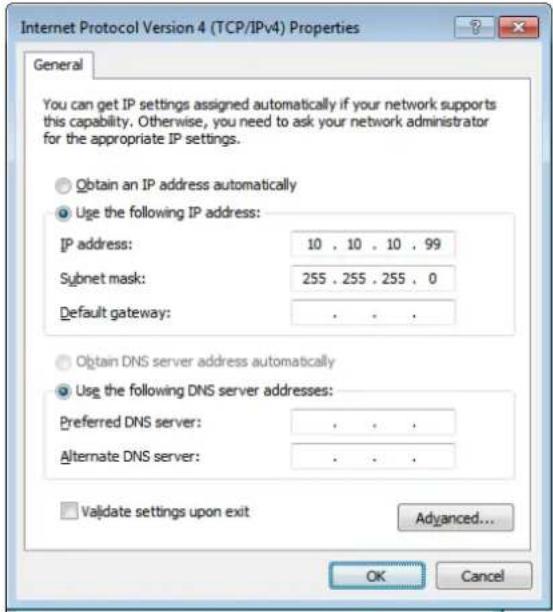
- Click Use the following IP address and fill in the IP address and Subnet mask, then click OK.
- Press the Menu button on the projector.
- Select Settings2→ Advanced1 → Network
- After getting into Network, input the following:
▶ DHCP: Off
▶ IP Address: 10.10.10.10
▶ Subnet Mask: 255.255.255.0
▶ Gateway: 0.0.0.0
▶ DNS Server: 0.0.0.0
- Press ←Enter) / ▶ to confirm settings.
Open a web browser
(for example, Microsoft Internet Explorer with Adobe Flash Player 9.0 or higher).


Navigation to the webpage was canceled
What you can try:
- Refresh the page.
- In the Address bar, input the IP address: 10.10.10.10.
- Press ←Enter) / ▶.
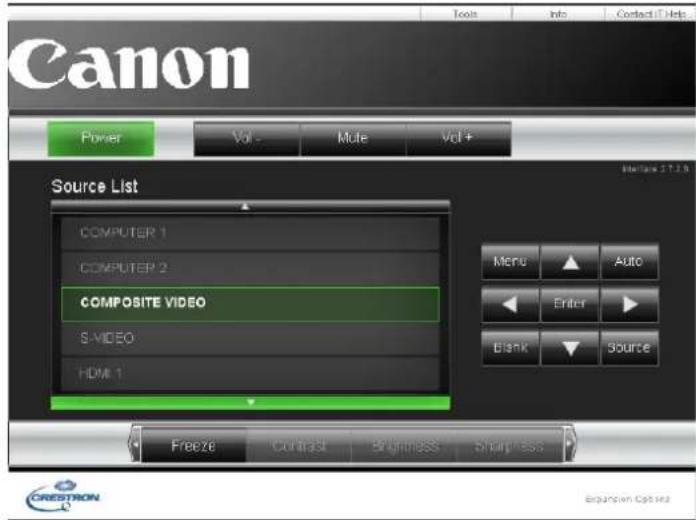
The projector is setup for remote management. The LAN/RJ45 function displays as follows.
Canon
Projector Info
Alert Mail Settings
P Link Settings
Crestron
| Model Name | LV-HD420 |
| System | |
| System Status | Power On |
| Display Source | COMPOSITE VIDEO |
| Lamp Hours | 93 |
| Picture Mode | Movie |
| Error Status | No Error |
| LAN Status | |
| IP address | 10.10.10.10 |
| Subnet mask | 255.255.255.0 |
| Default gateway | 0.0.0.0 |
| DNS Server | 0.0.0.0 |
| MAC address | 00:18:23:2F:DA:12 |
| Version | |
| LAN Version | MHD03 |
| F/W Version | D04 |
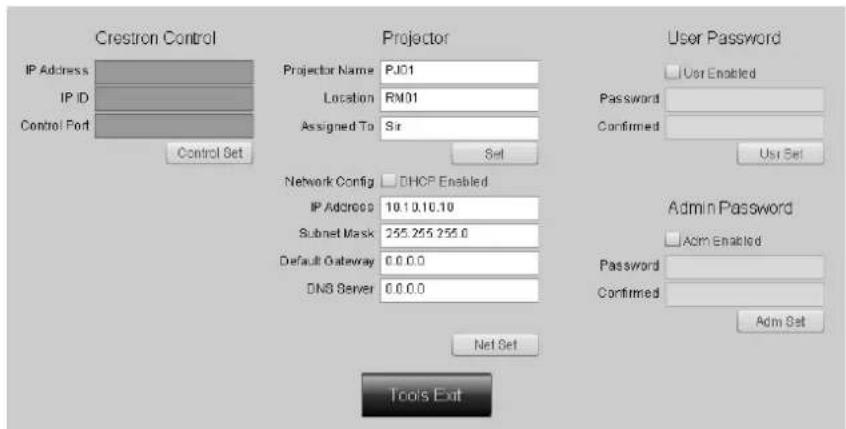
| CATEGORY | ITEM | INPUT-LENGTH |
| Crestron Control | IP Address | 15 |
| IP ID | 3 | |
| Port | 5 | |
| Projector | Projector Name | 10 |
| Location | 10 | |
| Assigned To | 10 | |
| Network Configuration | DHCP (Enabled) | (N/A) |
| IP Address | 15 | |
| Subnet Mask | 15 | |
| Default Gateway | 15 | |
| DNS Server | 15 | |
| User Password | Enabled | (N/A) |
| New Password | 10 | |
| Confirm | 10 | |
| Admin Password | Enabled | (N/A) |
| New Password | 10 | |
| Confirm | 10 |
For more information, please visit http://www.crestron.com.
Preparing Email Alerts
- Make sure that user can access the homepage of LAN RJ45 function by web browser (for example, Microsoft Internet Explorer).
- From the Homepage of LAN/RJ45, click Alert Mail Settings.
Canon
Projector Info
Alert Mail Settings
POLink Settings
Crestron
| Model Name | LV-HD420 |
| System | |
| System Status | Power On |
| Display Source | COMPOSITE VIDEO |
| Lamp Hours | 93 |
| Picture Mode | Movie |
| Error Status | No Error |
 | |
| IP address | 10.10.10.10 |
| Subnet mask | 255.255.255.0 |
| Default gateway | 0.0.0.0 |
| DNS Servar | 0.0.0.0 |
| MAC address | 00:19:23:2F:DA:12 |
 | |
| LAN Version | MHD03 |
| F/W Version | D04 |
| IP address | 10.10.10.10 |
| Subnet mask | 255.255.255.0 |
| Default gateway | 0.0.0.0 |
| DNS Server | 0.0.0.0 |
| MAC address | 00:13:23:2F:DA:12 |
| LAN Version | MHD03 |
| F/W Version | D04 |
- By default, these input boxes in Alert Mail Settings are blank.
Canon
Projector Info
Alert Mail Settings
PJLink Settings
Crestron
Send E-Mail
Enter the appropriate settings in the fields below: (Your SMTP server may not require a user name or password.)
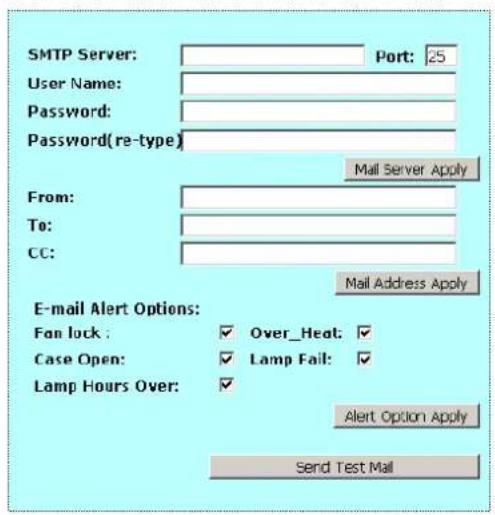
- For Sending alert mail, input the following:
The SMTP field is the mail server for sending out email (SMTP protocol). This is a required field.
The To field is the recipient's email address (for example, the projector administrator). This is a required field.
The Cc field sends a carbon copy of the alert to the specified email address. This is an optional field (for example, the projector administrator's assistant).
The From field is the sender's email address (for example, the projector administrator). This is a required field.
Select the alert conditions by checking the desired boxes.
Note: Fill in all fields as specified. User can click Send Test Mail to test what setting is correct. For sending an e-mail alert, you must select alert conditions and enter a correct e-mail address.
RS232 by Telnet Function
Besides projector connected to RS232 interface with "Hyper-Terminal" communication by dedicated RS232 command control, there is alternative RS232 command control way, so called "RS232 by TELNET" for LAN/RJ45 interface.
Quick Start-Guide for "RS232 by TELNET"
- Check and get the IP-Address on OSD of the projector.
- Make sure that laptop/PC can access the web-page of the projector.
- Have the TELNET function enabled.
See How to have TELNET enabled in Windows 7/8/10 on page 57.
- Start => All Programs => Accessories => Command Prompt
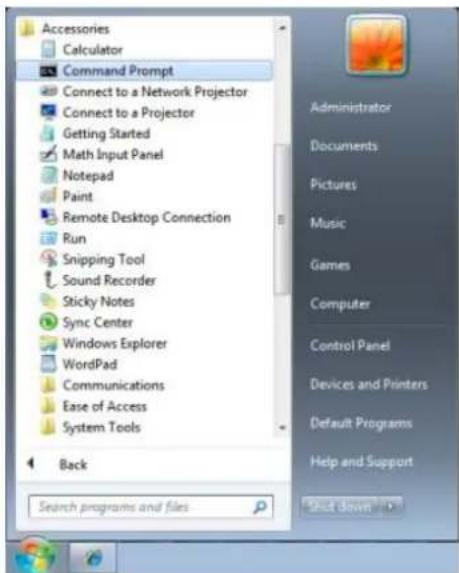
- Input the command format like the below:
telnet ttt.xxx.yyy.zzz 23 ("Enter" key pressed)
(ttt.xxx.yyy.zzz: IP-Address of the projector)
If Telnet-Connection ready, and user can have RS232 command input, then "Enter" key pressed, the RS232 command will be workable.
How to have TELNET enabled in Windows 7/8/10
By default installation for Windows, "TELNET" function is not included. But end-user can have it by way of "Turn Windows features On or Off" to be enabled.
- Open "Control Panel" in Windows
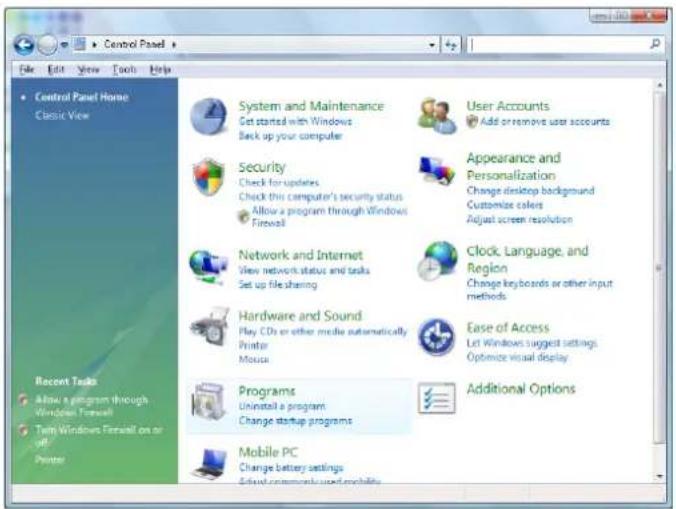
- Open "Programs"
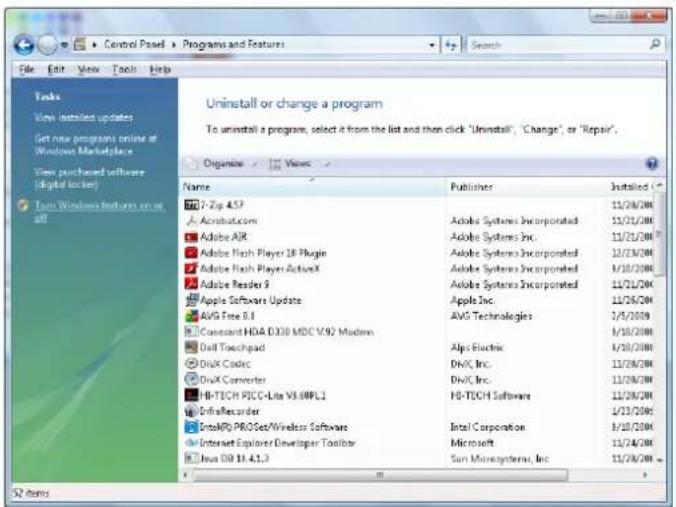
- Select "Turn Windows features on or off" to open
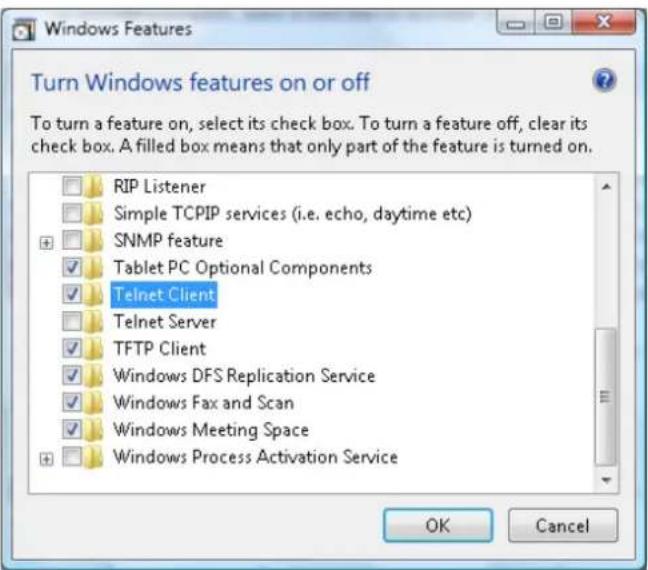
- Have "Telnet Client" option checked, then press "OK" button.
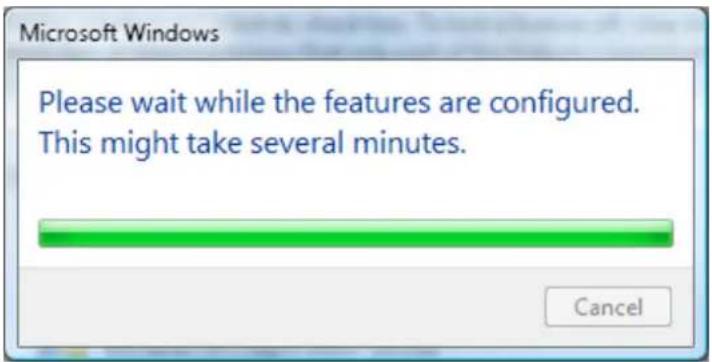
Specsheet for "RS232 by TELNET":
- Telnet: TCP
- Telnet port: 23
(for more detail, kindly please get contact with the Canon Customer Support Center) - Telnet utility: Windows "TELNET.exe" (console mode)
- Disconnection for RS232-by-Telnet control normally: Close Windows Telnet utility directly after TELNET connection ready
- Limitation 1 for Telnet-Control: there is less than 50 bytes for successive network payload for Telnet-Control application.
Limitation 2 for Telnet-Control: there is less than 26 bytes for one complete RS232 command for Telnet-Control.
Limitation 3 for Telnet-Control: Minimum delay for next RS232 command must be more than 200 (ms).
(*, In Windows built-in "TELNET.exe" utility, "Enter" key pressed will have "Carriage-Return" and "New-Line" code.)
Advanced 2 Feature
Press the Menu button to open the OSD menu. Press ◀▶ to move to the Settings 2 menu. Press ▲▼ to move to the Advanced 2 menu and then press Enter or ▶. Press ▲▼ to move up and down in the Advanced 2 menu. Press ◀▶ to enter and change values for setting.
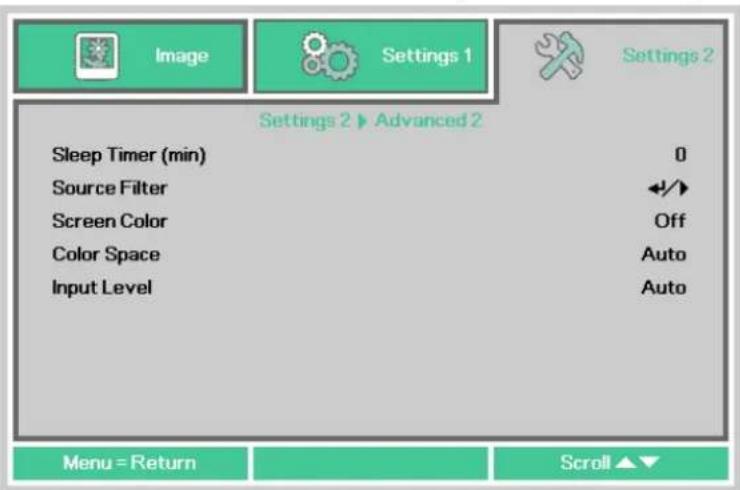
| ITEM | DESCRIPTION |
| Sleep Timer | Press the cursor ◀▶ button to enter and set Sleep timer. The projector automatically turns off after the preset period of time. |
| Source Filter | Press ← (Enter) / ▶ to enter the Source Filter menu. See page 60 for more information on Source Filter. |
| Screen Color | Press the cursor ◀▶ button to enable or disable the Screen Color function. |
| Color Space | Press the cursor ◀▶ button to enter and adjust the Color Space. |
| Input Level | Press the cursor ◀▶ button to enter and adjust the Input Level |
Source Filter
Press the ENTER button to enter the Source Filter sub menu.
If Enable is selected, the source becomes the object of Auto search.
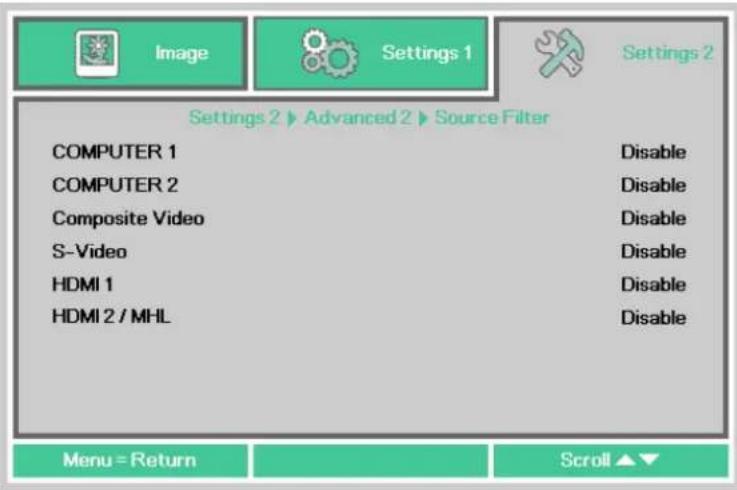
| ITEM | DESCRIPTION |
| COMPUTER 1 | Press the ◀▶ buttons to enter and enable or disable the COMPUTER 1 source. |
| COMPUTER 2 | Press the ◀▶ buttons to enter and enable or disable the COMPUTER 2 source. |
| Composite Video | Press the ◀▶ buttons to enter and enable or disable the Composite Video source. |
| S-Video | Press the ◀▶ buttons to enter and enable or disable the S-Video source. |
| HDMI 1 | Press the ◀▶ buttons to enter and enable or disable the HDM 1 source. |
| HDMI 2 / MHL | Press the ◀▶ buttons to enter and enable or disable the HDMI 2 / MHL-compatible source. |
Replacing the Projection Lamp
This projector uses the following lamps.
■ Replacement Lamp LV-LP42
Contact the Canon Customer Support Center when purchasing a replacement lamp.

Warning:
Precautions when replacing lamps that stop working
If the illumination suddenly stops when the projector is in use or after you turn it on, the lamp may be broken. In this case, never attempt to replace the lamp by yourself. Always request service from the Canon Customer Support Center.
Additionally, with ceiling-mounted projectors, the lamp may fall out when you open the lamp cover or while you are attempting to replace it. During replacement, stand to the side of the lamp cover, not directly under it. If the lamp breaks and any glass shards or other pieces get in your eyes or mouth, consult a doctor immediately.

Caution:
Before replacing the lamp, always turn off the projector, unplug it after the cooling fan stops, and wait at least 45 minutes. Do not touch the lamp immediately after turning the projector off. It is very hot initially and poses a risk of burns.
- Be sure to use the specified lamp.
- Contact the Canon Customer Support Center for further information. This can also be purchased from the Canon website.
- Do not touch the inner glass surface when you replace the lamp. Doing so may cause deterioration to the projector's performance.
- Handle lamps with care. Impact or abrasion may cause lamps to rupture while they are in use. If a lamp ruptures, contact the Canon Customer Support Center and follow the instructions in "Precautions when replacing lamps that stop working" (P8).
-
When replacing the lamp, do not remove any screws other than those specified.
-
Remove two screws on the lamp cover.
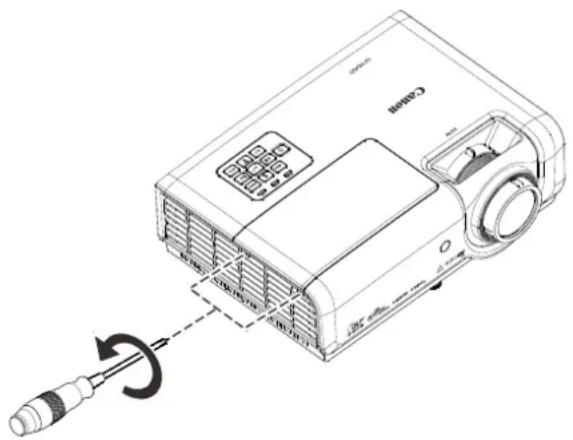
- Remove the lamp cover.
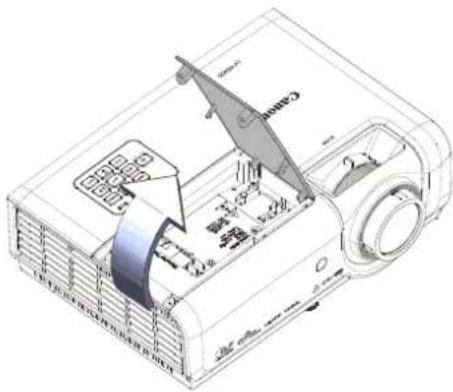
- Disconnect the lamp connector
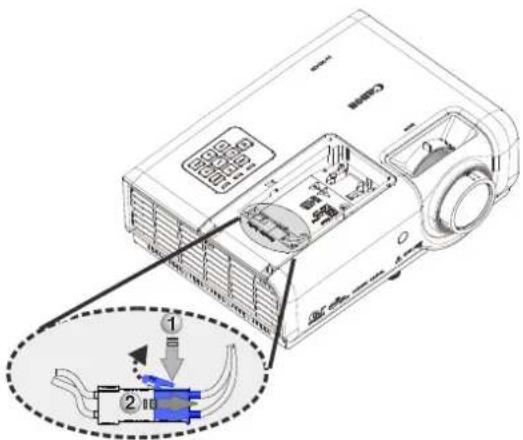
- Remove the two screws from the lamp module.
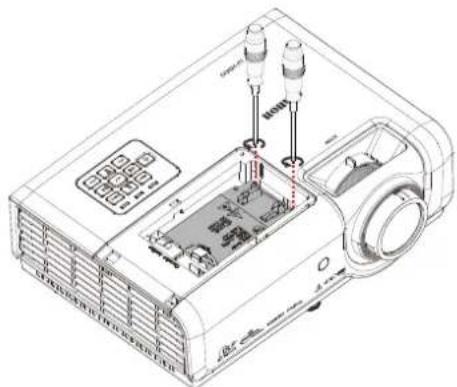
natural_image
Isometric line drawing of a projector with labeled components and wiring (no text or symbols)-
Lift the module handle up.
-
Pull firmly on the module handle to remove the lamp module.
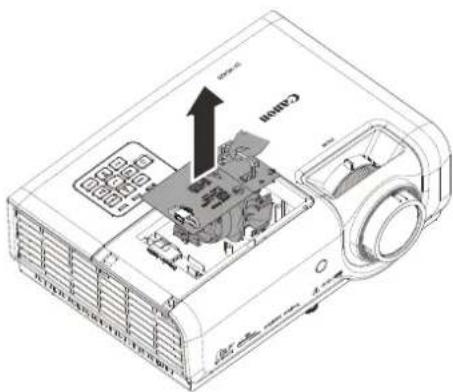
- Reverse steps 1 to 6 to install the new lamp module. While installing, align the lamp module and ensure it is level to avoid damage.
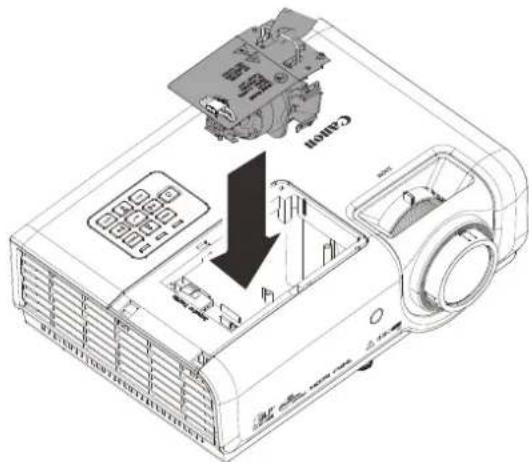
Note:
The lamp module must sit securely in place before tightening the screws.
The lamp connector must be connected properly and place as drawing before Lamp cover installation back.
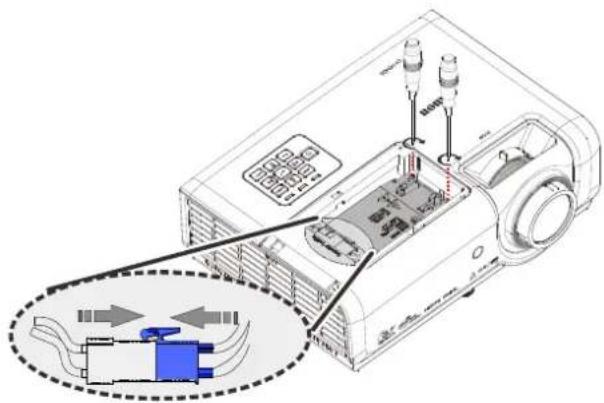
Note:
Lamp Connector must be installed flush with the connector base as shown in the image below. A gap between the Lamp Connector and the connector base will cause damage to the projector. The following images illustrate correct and incorrect Lamp Connector installations.
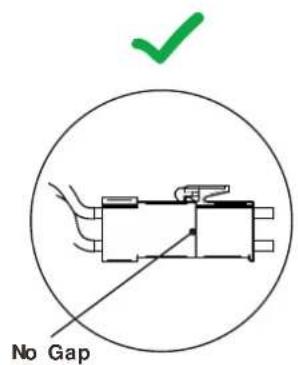
Correct
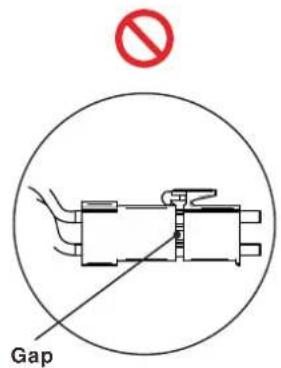
Incorrect
- Close the lamp cover and tighten the screws.
Resetting the Lamp Hour
After replacing the lamp, you should reset the lamp hour counter to zero. Refer to the following:
- Press the MENU button to open the OSD menu.
- Press the cursor ◀▶ button to move to the Settings 2 menu. Press the cursor ▼▲ button to move down to Advanced 1 and press enter.
- Press the cursor ▼▲ button to move down to Lamp Hour Reset.
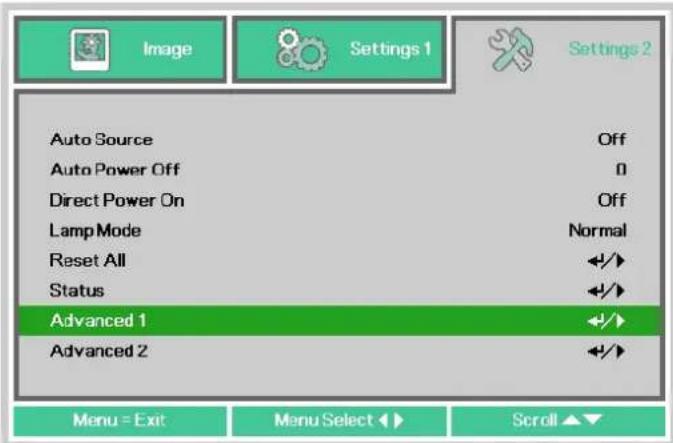
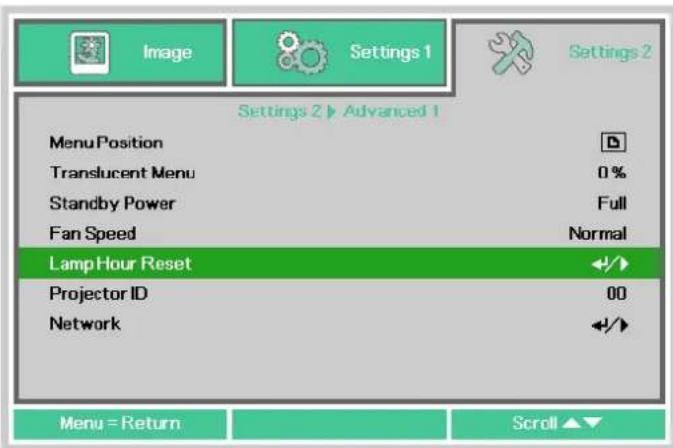
- Press the cursor ▶ or Enter button. A message screen appears.
- Press the four buttons (▼▲◀▶) in order, to reset the lamp hour.
- Press the MENU button to get back to Settings 2.
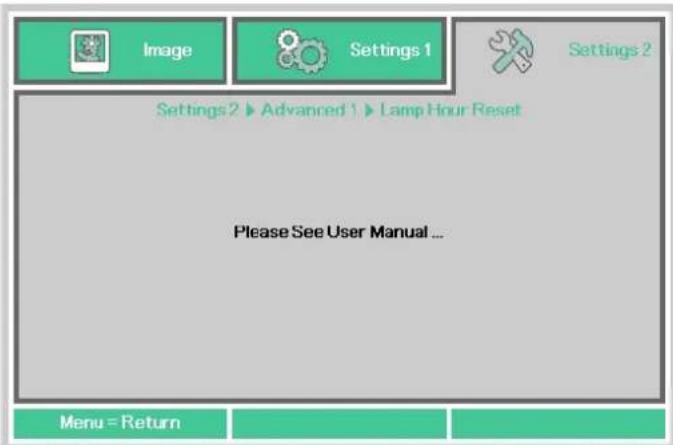
Cleaning the Projector
Clean the projector frequently to prevent dust from settling on the surface. A dirty lens may ruin the quality of the projected image.

Caution:
Before cleaning the projector, always turn it off, unplug it after the cooling fan stops, and wait at least 45 minutes. Otherwise, you may get burned because the main unit is very hot immediately after the projector is turned off.
Do not use adhesives, lubricants, oils, or alkaline detergents for maintenance of the projector. They could adhere to the cabinet and damage it, possibly resulting in the projector falling from its mounting and causing an accident or personal injury.
Wipe the projector's main unit softly with a soft cloth.
If the projector is heavily soiled, soak the cloth in water with a small amount of Neutral detergent in it, squeeze the cloth thoroughly, and then wipe the projector with it.
After cleaning, wipe the projector with a dry cloth.
Cleaning the Lens
When cleaning the projector's lens, use a commonly available air blower or lens cleaning paper. The lens surface is easily damaged, so do not use a hard cloth or tissues.
Cleaning the Case
Refer to the following to clean the projector case.
- Wipe off dust with a clean dampened cloth.
- Moisten the cloth with warm water and mild detergent (such as used to wash dishes), and then wipe the case.
- Rinse all detergent from the cloth and wipe the projector again.
Note:
To prevent discoloration or fading of the case, do not use abrasive alcohol-based cleaners.
Using the Kensington Lock
Using the Kensington Lock
If you are concerned about security, attach the projector to a permanent object with the Kensington slot and a security cable.
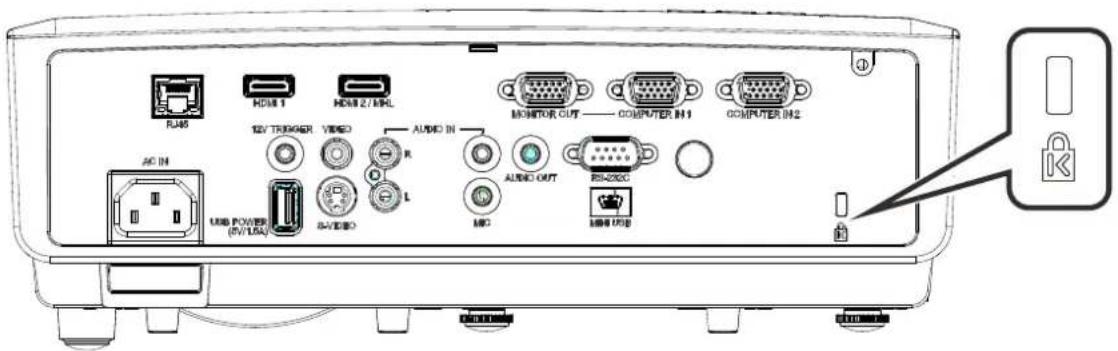
Note:
Contact your vendor for details on purchasing a suitable Kensington security cable. The security lock corresponds to Kensington's MicroSaver Security System. If you have any comment, contact: Kensington, 2853 Campus Drive, San Mateo, CA 94403, U.S.A. Tel: 800-535-4242, http://www.Kensington.com.
Using the Security Bar
In addition to the Kensington lock, the Security Bar helps protect the projector from unauthorized removal. See the following picture.
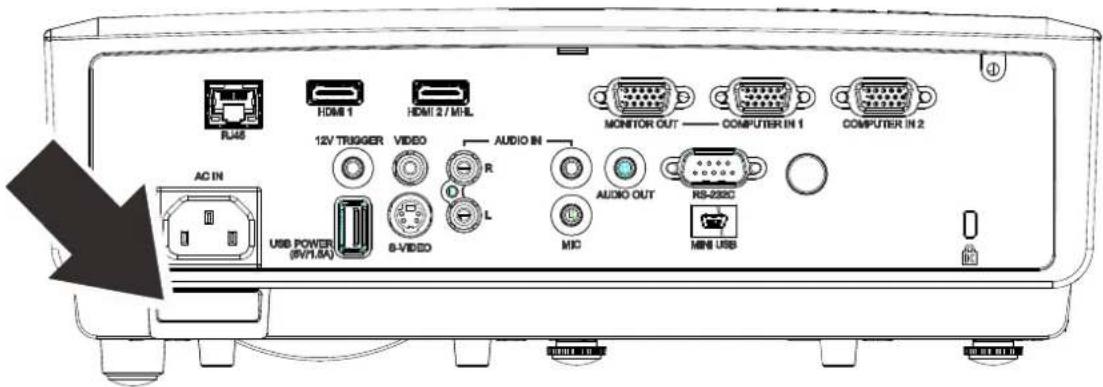
Common problems and solutions
These guidelines provide tips to deal with problems you may encounter while using the projector. If the problem remains unsolved, contact Canon Customer Support Center.
Often after time spent troubleshooting, the problem is traced to something as simple as a loose connection. Check the following before proceeding to the problem-specific solutions.
• Use some other electrical device to confirm that the electrical outlet is working.
- Ensure the projector is turned on.
- Ensure all connections are securely attached.
- Ensure the attached device is turned on.
- Ensure a connected PC is not in suspending mode.
- Ensure a connected PC is configured for an external display. (This is usually done by pressing an Fn-key combination on the PC.)
Tips for Troubleshooting
In each problem-specific section, try the steps in the order suggested. This may help you to solve the problem more quickly.
Try to pin point the problem and thus avoid replacing non-defective parts.
For example, if you replace batteries and the problem remains, put the original batteries back and go to the next step.
Keep a record of the steps you take when troubleshooting: The information may be useful when calling for technical support or for passing on to service personnel.
LED Error Messages
| ERROR CODE MESSAGES | POWER LED GREEN | LAMP LED RED | TEMP LED RED |
| System Initial | Flashing | OFF | OFF |
| Ready to Power on (Standby) | ON | OFF | OFF |
| System Power on | Flashing | OFF | OFF |
| Lamp Lit, System stable | ON | OFF | OFF |
| Cooling | Flashing | OFF | OFF |
| 1W MCU detects scaler stops working (initial fail) | 2 blinks | OFF | OFF |
| Over Temperature | OFF | OFF | ON |
| Thermal Break Sensor error | 4 blinks | OFF | OFF |
| Lamp Fail | 5 blinks | OFF | OFF |
| Lamp Temperature shut down | 5 blinks | 1 blinks | OFF |
| Lamp Short circuit in output detected | 5 blinks | 2 blinks | OFF |
| Lamp End of lamp life detected | 5 blinks | 3 blinks | OFF |
| Lamp did not ignite | 5 blinks | 4 blinks | OFF |
| Lamp extinguished normal | 5 blinks | 5 blinks | OFF |
| Lamp extinguished run-up | 5 blinks | 6 blinks | OFF |
| Lamp voltage too low | 5 blinks | 7 blinks | OFF |
| Lamp ballast Fail | 5 blinks | 8 blinks | OFF |
| Lamp ballast Communication error | 5 blinks | 10 blinks | OFF |
| Fan-1 error | 6 blinks | 1 blinks | OFF |
| Fan-2 error | 6 blinks | 2 blinks | OFF |
| Fan-3 error | 6 blinks | 3 blinks | OFF |
| Fan-4 error | 6 blinks | 4 blinks | OFF |
| Lamp Cover Open | 7 blinks | OFF | OFF |
| DMD error | 8 blinks | OFF | OFF |
| Color wheel error | 9 blinks | OFF | OFF |
In the event of an error, please disconnect the AC power cord and wait for one (1) minute before restarting the projector. If the Power or Lamp LEDs are still blinking or any other situation that isn't listed in the chart above, please contact Canon Customer Support Center.
Problem and Countermeasures
Image Problems
Problem: No image appears on the screen
- Verify the settings on your notebook or desktop PC.
- Turn off all equipment and power up again in the correct order.
Problem: The image is blurred
- Adjust the Focus on the projector.
- Press the Auto button on the remote control or the projector.
- Ensure the projector-to-screen distance is within the specified range.
- Check that the projection lens is clean.
Problem: The image is wider at the top or bottom (trapezoid effect)
- Position the projector so it is as perpendicular to the screen as possible.
- Use the Keystone button on the remote control or the projector to correct the problem.
Problem: The image is reversed
Check the Projection setting on the Settings 1 menu of the OSD.
Problem: The image is streaked
- Set the Frequency and Tracking settings on the Image->Analog setting menu of the OSD to the default settings.
- To ensure the problem is not caused by a connected PC's video card, connect to another computer.
Problem: The image is flat with no contrast
Adjust the Contrast setting on the Image menu of the OSD.
Problem: The color of the projected image does not match the source image.
Adjust the Color Temperature and Gamma settings on the Image->Advanced menu of the OSD.
Lamp Problems
Problem: There is no light from the projector
- Check that the power cable is securely connected.
- Ensure the power source is good by testing with another electrical device.
- Restart the projector in the correct order and check that the Power LED is on.
- If you have replaced the lamp recently, try resetting the lamp connections.
Problem: The lamp goes off
Power surges can cause the lamp to turn off. Re-plug power cord. When the Power LED is on, press the power button.
Remote Control Problems
Problem: The projector does not respond to the remote control
- Direct the remote control towards remote sensor on the projector.
- Ensure the path between remote and sensor is not obstructed.
- Turn off any fluorescent lights in the room.
- Check the battery polarity.
- Replace the battery.
- Turn off other Infrared-enabled devices in the vicinity.
- Have the remote control serviced.
Audio Problems
Problem: There is no sound
- Adjust the volume on the remote control.
- Adjust the volume of the audio source.
- Check the audio cable connection.
- Test the audio source output with other speakers.
- Have the projector serviced.
Problem: The sound is distorted
- Check the audio cable connection.
- Test the audio source output with other speakers.
- Have the projector serviced.
Having the Projector Serviced
If you are unable to solve the problem, you should have the projector serviced. Pack the projector in the original carton. Include a description of the problem and a checklist of the steps you took when trying to fix the problem: For servicing, return the projector to the place you purchased it or Canon Customer Support Center.
Specifications
| Model name | LV-HD420 | LV-X420 | |
| Display system | 1-chip DLP ^TM | ||
| Optical system | Time division color extraction, sequential display | ||
| Display device | Effective display area size | 0.65" / 16:9 | 0.55" / 4:3 |
| Number of pixels | 2,073,600 (1920 X 1080) X 1 panel | 786,432 (1024 X 768) X 1 panel | |
| Projection lens | Zoom | Manual (X 1.5) | |
| Focus | Manual | ||
| Lens shift | V:65%, Fixed | V:64%, Fixed | |
| Focal length | f=20.7 - 31.1mm | ||
| F number | F=2.42 - 2.97 | ||
| Light source (Lamp mode normal / eco) | High-pressure mercury lamp : 310/245W | ||
| Image size / Projection distance | Minimum: 76 cm (30"); maximum: 813 cm (320") Projection distance: 1.2 m - 10.0 m (3.9 - 32.8') | Minimum: 76 cm (30"); maximum: 660 cm (260") Projection distance: 1.2 m - 10.0 m (3.9 - 32.8') | |
| Number of colors | 16,770,000 colors | ||
| Brightness (*1) (*2) | 4200lm | ||
| Contrast ratio (Fully white: fully black) (*2)(*3) | 8000:1 | 10000:1 | |
| Ratio of brightness at periphery to center (*2) | 80% | ||
| Speaker | 10W, monaural | ||
| Supported input signal types | See “Timing Mode Table” (page 75). | ||
| Display resolution | Computer signal input | Maximum input resolution 1920×1200 dot (Re-sizing display) Panel display resolution 1920×1080 | Maximum input resolution 1920×1200 dot (Re-sizing display) Panel display resolution 1024×768 |
| Video signals | Analog PC input | WUXGA / WSXGA+ / UXGA / SXGA+ / WXGA+ / WXGA / SXGA / XGA / SVGA / VGA / MAC | |
| Digital PC input | WUXGA / WSXGA+ / UXGA / SXGA+ / WXGA + / WXGA / SXGA / XGA / SVGA / VGA | ||
| Digital video input | 1080p / 1080i / 720p / 576p / 480p | ||
| MHL input | 1080p / 1080i / 720p / 576p / 480p / 576i / 480i | ||
| Component video input | 1080p / 1080i / 720p / 576p / 576i / 480p / 480i | ||
| Video input / S-video | NTSC / PAL / SECAM / NTSC4.43 / PAL-M / PAL-N | ||
| Video signal input/output terminal | D-sub 15 x 2 | Analog PC / component video input | |
| D-sub 15 | Analog PC / component video output | ||
| HDMI / MHL | Digital PC / digital video / MHL input | ||
| HDMI | Digital PC / digital video input | ||
| Mini DIN4 | S-video input | ||
| RCAx1 | Video input | ||
| Other terminals and connectors | RCA x 2 | Audio-L / Audio-R input | |
| Mini jack x 3 | Audio input x1, audio output x1, microphone input x1 | ||
| Mini jack | Trigger output (12 V) | ||
| Dsub9 | RS-232 connection | ||
| RJ-45 | Network connection (100BASE-TX / 10BASE-T) | ||
| Mini USB | Service port | ||
| USB A | Power feeding (1.5A) | ||
| Noise | 40/36 dB (Lamp mode: Normal/Eco) | ||
| Operation temperature | 5°C – 40°C | ||
| Power supply | AC100V – 240V 50 / 60Hz | ||
| Maximum power consumption (Lamp mode: Normal) | 410W | ||
| Power consumption (Lamp mode: Eco) | 320W | ||
| Power consumption in standby | RS-232 | 0.5W | |
| Network | 2.0W | ||
| Standard dimensions | W: 314 mm (12.4"), H: 112 mm (4.4"), D: 231 mm (9.1") | ||
| Weight | 3.4 kg | ||
| Accessories | Remote control, battery for remote control, power cord, computer cable, User's Manual(CD-ROM), Important Information and Warranty Card | ||
*1: Picture mode: Presentation
*2: Compliance with ISO21118-2012
*3: Optimizes the contrast depending on the brightness of each scene by adjusting lamp output.
• Using the projector continuously for an extended period of time may accelerate the deterioration of optical parts.
- Product specifications and appearance are subject to change without notice.
Projection Distance vs. Projection Size
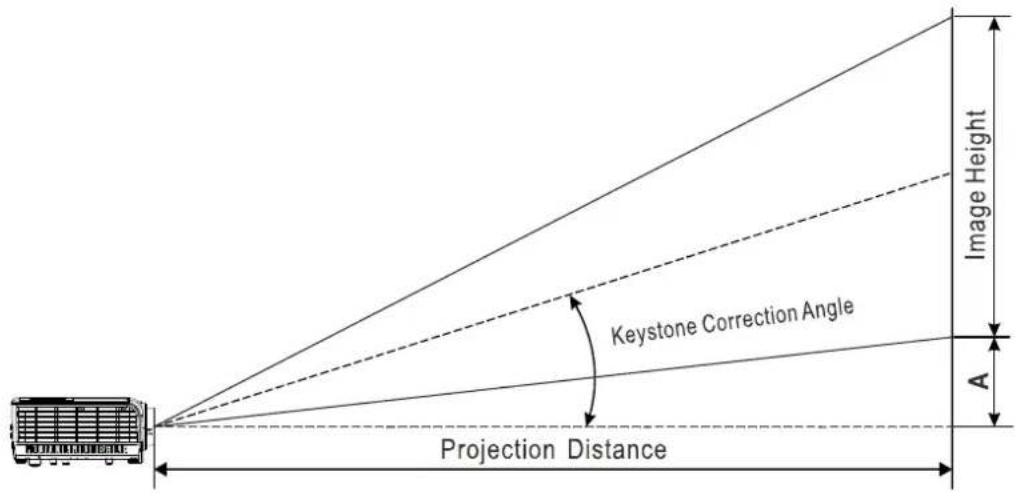
Projection Distance and Size Table
LV-HD420
| Image size (16:9) Projection Distance | Offset-A | ||||||
| Diagonal | Width | Height | Wide | Table | |||
| inch | cm | cm | m | inch | m | inch | mm |
| 30 | 66 | 37 | — — | 1.39 | 55 | 56 | |
| 40 | 89 | 50 | 1.23 | 48 | 1.85 | 73 | |
| 60 | 133 | 75 | 1.85 | 73 | 2.78 | 109 | 113 |
| 80 | 177 | 100 | 2.46 | 97 | 3.7 | 146 | |
| 100 | 221 | 125 | 3.08 | 121 | 4.63 | 182 | 188 |
| 120 | 266 | 149 | 3.69 | 145 | 5.55 | 219 | 224 |
| 140 | 310 | 174 | 4.31 | 170 | 6.48 | 255 | 261 |
| 160 | 354 | 199 | 4.92 | 194 | 7.4 | 291 | 299 |
| 180 | 398 | 224 | 5.54 | 218 | 8.33 | 328 | 336 |
| 200 | 443 | 249 | 6.15 | 242 | 9.25 | 364 | 374 |
| 210 | 465 | 262 | 6.46 | 254 | 9.72 | 383 | 393 |
| 220 | 487 | 274 | 6.77 | 267 | — — | 411 | |
| 240 | 531 | 299 | 7.39 | 291 | — — | 449 | |
| 260 | 576 | 324 | 8 | 315 | — — | 486 | |
| 280 | 620 | 349 | 8.62 | 339 | — — | 524 | |
| 300 | 664 | 374 | 9.23 | 363 | — — | 561 | |
| 320 | 708 | 398 | 9.85 | 388 | — — | 597 | |
LV-X420
| Image size (16:9) | Projection Distance | Offset-A | |||||
| Diagonal | Width | Height | Wide | Table | |||
| inch | cm | cm | m | inch | m | inch | mm |
| 30 | 61 | 46 | — | — | 1.68 | 66 | 64 |
| 40 | 81 | 61 | 1.49 | 59 | 2.24 | 88 | 85 |
| 60 | 122 | 91 | 2.23 | 88 | 3.35 | 132 | 126 |
| 80 | 163 | 122 | 2.97 | 117 | 4.47 | 176 | 170 |
| 100 | 203 | 152 | 3.72 | 146 | 5.59 | 220 | 211 |
| 120 | 244 | 183 | 4.46 | 176 | 6.71 | 264 | 254 |
| 140 | 284 | 213 | 5.21 | 205 | 7.82 | 308 | 296 |
| 160 | 325 | 244 | 5.95 | 234 | 8.94 | 352 | 339 |
| 170 | 346 | 249 | 6.32 | 249 | 9.5 | 374 | 346 |
| 180 | 366 | 274 | 6.69 | 263 | — | — | 381 |
| 200 | 406 | 305 | 7.44 | 293 | — | — | 424 |
| 220 | 447 | 335 | 8.18 | 322 | — | — | 466 |
| 230 | 467 | 351 | 8.55 | 337 | — | — | 488 |
| 240 | 188 | 366 | 8.92 | 351 | — | — | 509 |
| 260 | 528 | 396 | 9.67 | 381 | — | — | 550 |
Timing Mode Table
| SIGNAL | RESOLUTION | H-SYNC (KHz) | V-SYNC (Hz) | COMPOSITE / S-VIDEO | COMPONENT | RGB | DVI/ HDMI |
| NTSC | — | 15.734 | 60.0 | O | — | — | — |
| PAL/SECAM | — | 15.625 | 50.0 | O | — | — | — |
| VESA | 720 x 400 | 37.9 | 85.0 | — | — | O | O |
| 640 x 480 | 31.5 | 60.0 | — | — | O | O | |
| 640 x 480 | 37.9 | 72.8 | — | — | O | O | |
| 640 x 480 | 37.5 | 75.0 | — | — | O | O | |
| 640 x 480 | 43.3 | 85.0 | — | — | O | O | |
| 800 x 600 | 35.2 | 56.3 | — | — | O | O | |
| 800 x 600 | 37.9 | 60.3 | — | — | O | O | |
| 800 x 600 | 46.9 | 75.0 | — | — | O | O | |
| 800 x 600 | 48.1 | 72.2 | — | — | O | O | |
| 800 x 600 | 53.7 | 85.1 | — | — | O | O | |
| 800 x 600 | 76.3 | 120.0 | — | — | O | O | |
| 1024 x 768 | 48.4 | 60.0 | — | — | O | O | |
| 1024 x 768 | 56.5 | 70.1 | — | — | O | O | |
| 1024 x 768 | 60.0 | 75.0 | — | — | O | O | |
| 1024 x 768 | 68.7 | 85.0 | — | — | O | O | |
| 1024 x 768 | 97,6 | 120.0 | — | — | O | O | |
| 1280 x 720 | 45.0 | 60.0 | — | — | O | O | |
| 1280 x 720 | 91.5 | 119.9 | — | — | O | O | |
| 1280 x 800 | 49.7 | 59.8 | — | — | O | O | |
| 1280 x 800 | 62.8 | 74.9 | — | — | O | O | |
| 1280 x 800 | 71.6 | 84.8 | — | — | O | O | |
| 1280 x 800 | 101.6 | 119.9 | — | — | O | O | |
| 1280 x 1024 | 64.0 | 60.0 | — | — | O | O | |
| 1280 x 1024 | 80.0 | 75.0 | — | — | O | O | |
| 1280 x 1024 | 91.1 | 85.0 | — | — | O | O | |
| 1280 x 960 | 60.0 | 60.0 | — | — | O | O | |
| 1280 x 960 | 85.9 | 85.0 | — | — | O | O | |
| 1400 x 1050 | 65.3 | 60.0 | — | — | O | O | |
| 1440 x 900 | 70.6 | 75.0 | — | — | O | O | |
| 1440 x 900 | 55.9 | 60.0 | — | — | O | O | |
| 1600 x1200 | 75.0 | 60.0 | — | — | O | O | |
| 1680 x1050 | 64.7 | 59.9 | — | — | O | O | |
| 1680 x1050 | 65.3 | 60.0 | — | — | O | O | |
| 1920 x1200 | 74.0 | 60.0 | — | — | O | O | |
| Apple Mac | 640 x 480 | 35.0 | 66.7 | — | — | O | O |
| 832 x 624 | 49.7 | 74.5 | — | — | O | O | |
| 1024 x 768 | 60.2 | 74.9 | — | — | O | O | |
| 1152 x 870 | 68.7 | 75.1 | — | — | O | O | |
| SDTV | 480i | 15.734 | 60.0 | — | O | — | O |
| 576i | 15.625 | 50.0 | — | O | — | O | |
| EDTV | 576p | 31.3 | 50.0 | — | O | — | O |
| 480p | 31.5 | 60.0 | — | O | — | O | |
| HDTV | 720p | 37.5 | 50.0 | — | O | — | O |
| 720p | 45.0 | 60.0 | — | O | — | O | |
| 1080i | 33.8 | 60.0 | — | O | — | O | |
| 1080i | 28.1 | 50.0 | — | O | — | O | |
| 1080p | 67.5 | 60.0 | — | O | — | O | |
| 1080p | 56.3 | 50.0 | — | O | — | O | |
| 1080p | 27 | 24.0 | — | O | — | O | |
| 1080p | 28 | 25.0 | — | O | — | O | |
| 1080p | 33.7 | 30.0 | — | O | — | O |
O : Frequency supported
— : Frequency not supported
* : LV-HD420 native resolution of the panel is 1920 x 1080
LV-X420 native resolution of the panel is 1024 x 768
The aspect ratio of an input signal may be changed if its resolution is different with the panel resolution.
* : The color of mean Displayable only. (4:3 only)
* : The color of mean may have a little noise
Projector Dimensions
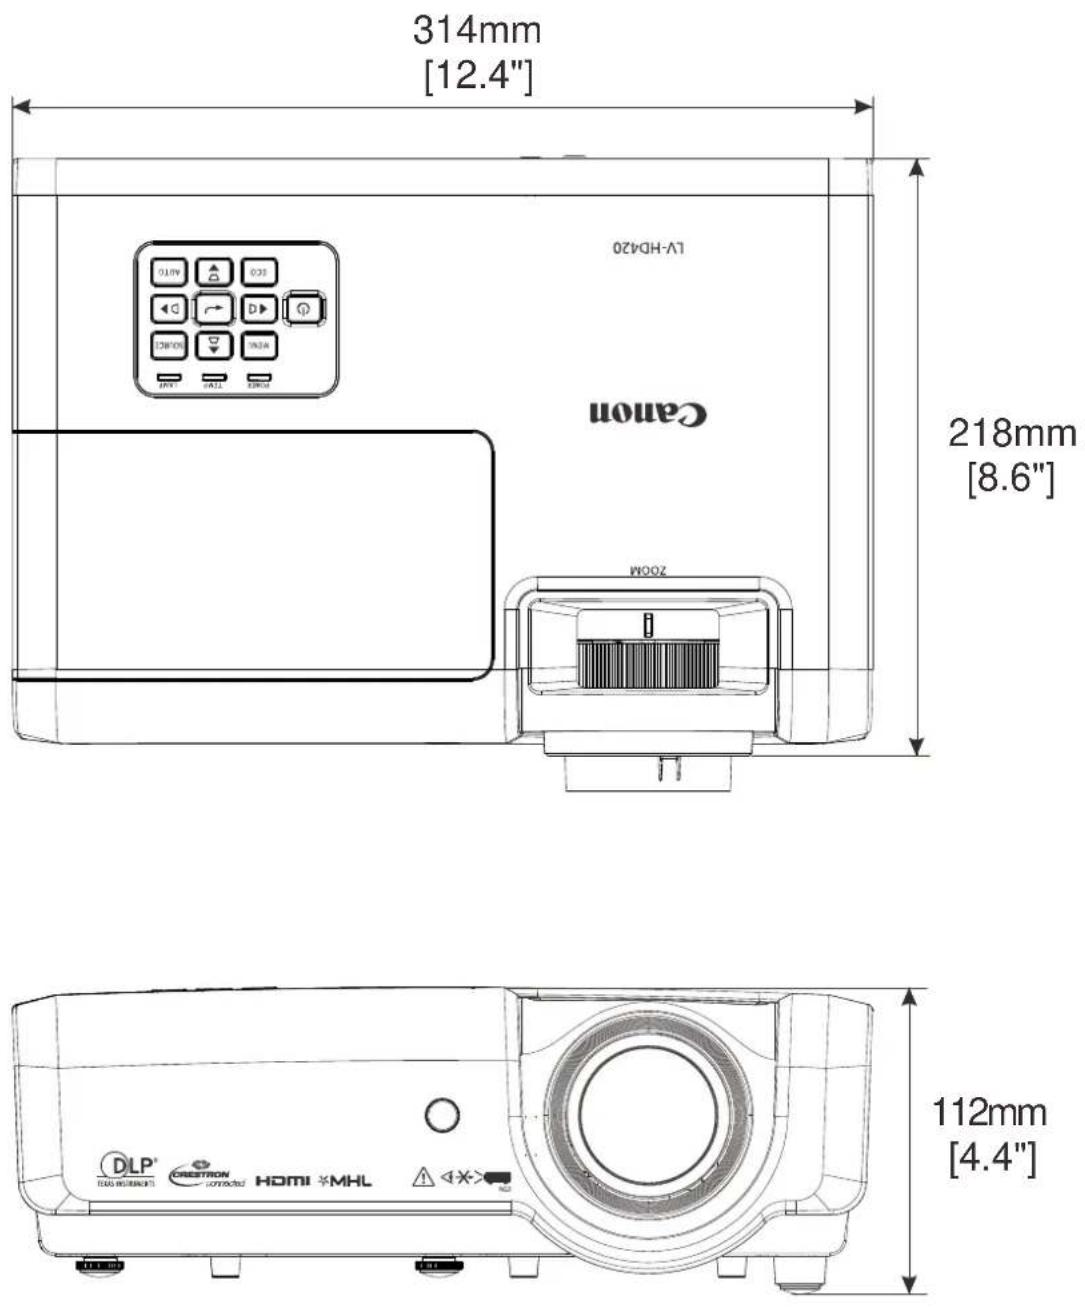
FCC Warning
This equipment has been tested and found to comply with the limits for a Class B digital device pursuant to Part 15 of the FCC Rules. These limits are designed to provide reasonable protection against harmful interference when the equipment is operated in a commercial environment.
This equipment generates, uses, and can radiate radio frequency energy and, if not installed and used in accordance with the instruction manual, may cause harmful interference to radio communications. Operation of this equipment in a residential area is likely to cause harmful interference in which case the user will be required to correct the interference at his/her own expense.
Changes or modifications not expressly approved by the parties responsible for compliance could void the user's authority to operate the equipment.
Canada
This class B digital apparatus complies with Canadian ICES-003.
Safety Certifications
FCC-B, cUL, UL, CCC, CECP, PSB, EAC, KC, CE, RCM
RS-232 Protocol
RS232 Setting
| Baud rate: | 9600 |
| Parity check: | None |
| Data bit: | 8 |
| Stop bit: | 1 |
| Flow Control | None |
Minimum delay for next command: 1ms
Control Command Structure
| Header code | Command code | Data code | End code | |
| HEX | Command | Data | 0Dh | |
| ASCII | ‘V’ | Command | Data | CR |
Operation Command
| Note: |
| "CR" mean Carriage Return |
| XX=00-98, projector's ID, XX=99 is for all projectors |
| Return Result P=Pass / F=Fail |
| n: 0:Disable/1: Enable/Value(0~9999) |
| Command Group 00 | ||||
| ASCII | HEX | Function | Description | Return Result |
| VXXS0001 | 56h Xh Xh 53h 30h 30h 30h 31h 0Dh | Power On | P/F | |
| VXXS0002 | 56h Xh Xh 53h 30h 30h 30h 32h 0Dh | Power Off | P/F | |
| VXXS0003 | 56h Xh Xh 53h 30h 30h 30h 33h 0Dh | Resync | P/F | |
| VXXG0004 | 56h Xh Xh 47h 30h 30h 30h 34h 0Dh | Get Lamp Hours | Pn/F | |
| VXXS0006 | 56h Xh Xh 53h 30h 30h 30h 36h 0Dh | System Reset | P/F | |
| VXXG0007 | 56h Xh Xh 47h 30h 30h 30h 37h 0Dh | Get System Status | 0:Reset1:Standby2:Operation3:Cooling | Pn/F |
| VXXG0008 | 56h Xh Xh 47h 30h 30h 30h 38h 0Dh | Get F/W Version | Pn/F | |
| Command Group 01 | ||||
| ASCII | HEX | Function | Description | Return Value |
| VXXG0101 | 56h Xh Xh 47h 30h 31h 30h 31h 0Dh | Get Brightness | n=0~100 | Pn/F |
| VXXS0101n | 56h Xh Xh 53h 30h 31h 30h 31h nh 0Dh | Set Brightness | n=0~100 | P/F |
| VXXG0102 | 56h Xh Xh 47h 30h 31h 30h 32h 0Dh | Get Contrast | n=0~100 | Pn/F |
| VXXS0102n | 56h Xh Xh 53h 30h 31h 30h 32h nh 0Dh | Set Contrast | n=0~100 | P/F |
| VXXG0103 | 56h Xh Xh 47h 30h 31h 30h 33h 0Dh | Get Color | n=0~100 | Pn/F |
| VXXS0103n | 56h Xh Xh 53h 30h 31h 30h 33h nh 0Dh | Set Color | n=0~100 | P/F |
| VXXG0104 | 56h Xh Xh 47h 30h 31h 30h 34h 0Dh | Get Tint | n=0~100 | Pn/F |
| VXXS0104n | 56h Xh Xh 53h 30h 31h 30h 34h nh 0Dh | Set Tint | n=0~100 | P/F |
| VXXG0105 | 56h Xh Xh 47h 30h 31h 30h 35h 0Dh | Get Sharpness | 0~31 | Pn/F |
| VXXS0105n | 56h Xh Xh 53h 30h 31h 30h 35h nh 0Dh | Set Sharpness | 0~31 | P/F |
| VXXG0106 | 56h Xh Xh 47h 30h 31h 30h 36h 0Dh | Get Color Temperature | 0:6500K1:7500K2:8300K | Pn/F |
| VXXS0106n | 56h Xh Xh 53h 30h 31h 30h 36h nh 0Dh | Set Color Temperature | 0:6500K1:7500K2:8300K | P/F |
| VXXG0107 | 56h Xh Xh 47h 30h 31h 30h 37h 0Dh | Get Gamma | 0:1.81:2.02:2.23:2.45:Linear | Pn/F |
| VXXS0107n | 56h Xh Xh 53h 30h 31h 30h 37h nh 0Dh | Set Gamma | 0:1.81:2.02:2.23:2.45:Linear | P/F |
| VXXG0108 | 56h Xh Xh 53h 30h 33h 31h 38h 0Dh | Adjust the Picture mode | 0:Standard1:Presentation3:Movie5:sRGB7:User | Pn/F |
| VXXS0108n | 56h Xh Xh 47h 30h 33h 31h 38h nh 0Dh | Adjust the Picture mode | 0:Standard1:Presentation3:Movie5:sRGB7:User | P/F |
| Command Group 02 | ||||
| ASCII | HEX | Function | Description | Return Value |
| VXXS0201 | 56h Xh Xh 53h 30h 32h 30h 31h 0Dh | Select COMPUTER1 | P/F | |
| VXXS0202 | 56h Xh Xh 53h 30h 32h 30h 32h 0Dh | Select COMPUTER2 | P/F | |
| VXXS0204 | 56h Xh Xh 53h 30h 32h 30h 34h 0Dh | Select Video | P/F | |
| VXXS0205 | 56h Xh Xh 53h 30h 32h 30h 35h 0Dh | Select S-Video | P/F | |
| VXXS0206 | 56h Xh Xh 53h 30h 32h 30h 36h 0Dh | Select HDMI | P/F | |
| VXXS0208 | 56h Xh Xh 53h 30h 32h 30h 38h 0Dh | Select Component | P/F | |
| VXXS0209 | 56h Xh Xh 53h 30h 32h 30h 39h 0Dh | Select HDMI 2/MHL | P/F | |
| VXXG0220 | 56h Xh Xh 47h 30h 32h 30h 0Dh | Get Current Source | Return1:COMPUTER12:COMPUTER24:Video5:S-Video6:HDMI8:Component9:HDMI 2/MHL | Pn/F |
| Command Group 03 | ||||
| ASCII | HEX | Function | Description | Return Value |
| VXXG0301 | 56h Xh Xh 47h 30h 33h 30h 31h 0Dh | Get Scaling | 0:Fill1:4:32:16:93:Letter Box4:Real5:2.35:1 | Pn/F |
| VXXS0301n | 56h Xh Xh 53h 30h 33h 30h 31h nh 0Dh | Set Scaling | 0:Fill1:4:32:16:93:Letter Box4:Real5:2.35:1 | P/F |
| VXXG0302 | 56h Xh Xh 47h 30h 33h 30h 32h 0Dh | Get Blank | Pn/F | |
| VXXS0302n | 56h Xh Xh 53h 30h 33h 30h 32h nh 0Dh | Set Blank | P/F | |
| VXXG0304 | 56h Xh Xh 47h 30h 33h 30h 34h 0Dh | Get Freeze On | Pn/F | |
| VXXS0304n | 56h Xh Xh 53h 30h 33h 30h 34h nh 0Dh | Set Freeze On | P/F | |
| VXXG0305 | 56h Xh Xh 47h 30h 33h 30h 35h 0Dh | Get Volume | n=0~10 | Pn/F |
| VXXS0305n | 56h Xh Xh 53h 30h 33h 30h 35h nh 0Dh | Set Volume | n=0~10 | P/F |
| VXXG0308 | 56h Xh Xh 47h 30h 33h 30h 38h 0Dh | Get Projection Mode | 0:Front1:Rear2:Ceiling3:Rear+Ceiling | Pn/F |
| VXXS0308n | 56h Xh Xh 53h 30h 33h 30h 38h nh 0Dh | Set Projection Mode | 0:Front1:Rear2:Ceiling3:Rear+Ceiling | P/F |
| VXXG0309 | 56h Xh Xh 47h 30h 33h 30h 39h 0Dh | Get vertical keystone value | n=-30~+30 | Pn/F |
| VXXS0309n | 56h Xh Xh 53h 30h 33h 30h 39h nh 0Dh | Set vertical keystone value | n=-30~+30 | P/F |
| VXXG0310 | 56h Xh Xh 47h 30h 33h 31h 30h 0Dh | Get horizontal keystone value | n=-30~+30 | Pn/F |
| VXXS0310n | 56h Xh Xh 53h 30h 33h 31h 30h nh 0Dh | Set horizontal keystone value | n=-30~+30 | P/F |
| VXXG0315 | 56h Xh Xh 47h 30h 33h 31h 35h 0Dh | Get 3D Mode | n=0~1 | Pn/F |
| VXXS0315n | 56h Xh Xh 53h 30h 33h 31h 35h nh 0Dh | Set 3D Mode | 0:Off1:DLP | P/F |
| VXXG0316 | 56h Xh Xh 47h 30h 33h 31h 36h 0Dh | Get 3D sync inverter | n=0~1 | Pn/F |
| VXXS0316n | 56h Xh Xh 53h 30h 33h 31h 36h nh 0Dh | Set 3D sync inverter | 0:Off1:On | P/F |
| VXXG0317 | 56h Xh Xh 53h 30h 33h 31h 37h 0Dh | Get 3D format | n=0~3 | Pn/F |
| VXXS0317n | 56h Xh Xh 47h 30h 33h 31h 37h nh 0Dh | Set 3D format | 0:FS1:TB2:SBS3:FP | P/F |
| VXXG0319 | 56h Xh Xh 47h 30h 33h 31h 39h 0Dh | Get Lamp mode | n=0~2 | Pn/F |
| VXXS0319n | 56h Xh Xh 53h 30h 33h 31h 39h nh 0Dh | Set Lamp mode | 0:Eco1:Normal2:Smart ECO | P/F |
| VXXG0322 | 56h Xh Xh 47h 30h 33h 32h 32h 0Dh | Get Fan Speed | n=0~1 | Pn/F |
| VXXS0322n | 56h Xh Xh 53h 30h 33h 32h 32h nh 0Dh | Set Fan Speed | 0:Normal1:High Speed | P/F |
| VXXG0331 | 56h Xh Xh 47h 30h 33h 33h 31h 0Dh | Get the R gain | n=0~200 | Pn/F |
| VXXS0331n | 56h Xh Xh 53h 30h 33h 33h 31h nh 0Dh | Set the R gain | n=0~200 | P/F |
| VXXG0332 | 56h Xh Xh 47h 30h 33h 33h 32h 0Dh | Get the G gain | n=0~200 | Pn/F |
| VXXS0332n | 56h Xh Xh 53h 30h 33h 33h 32h nh 0Dh | Set the G gain | n=0~200 | P/F |
| VXXG0333 | 56h Xh Xh 47h 30h 33h 33h 33h 0Dh | Get the B gain | n=0~200 | Pn/F |
| VXXS0333n | 56h Xh Xh 53h 30h 33h 33h 33h nh 0Dh | Set the B gain | n=0~200 | P/F |
| VXXG0334 | 56h Xh Xh 53h 30h 33h 31h 37h 0Dh | Get the R offset | n=-100~100 | Pn/F |
| VXXS0334n | 56h Xh Xh 47h 30h 33h 31h 37h nh 0Dh | Set the R offset | n=-100~100 | P/F |
| VXXG0335 | 56h Xh Xh 47h 30h 33h 31h 39h 0Dh | Get the G offset | n=-100~100 | Pn/F |
| VXXS0335n | 56h Xh Xh 53h 30h 33h 31h 39h nh 0Dh | Set the G offset | n=-100~100 | P/F |
| VXXG0336 | 56h Xh Xh 47h 30h 33h 32h 32h 0Dh | Get the B offset | n=-100~100 | Pn/F |
| VXXS0336n | 56h Xh Xh 53h 30h 33h 32h 32h nh 0Dh | Set the B offset | n=-100~100 | P/F |
| VXXG0337 | 56h Xh Xh 47h 30h 33h 33h 37h 0Dh | Get the white R gain | n=0~100 | Pn/F |
| VXXS0337n | 56h Xh Xh 53h 30h 33h 33h 37h nh 0Dh | Set the white R gain | n=0~100 | P/F |
| VXXG0338 | 56h Xh Xh 47h 30h 33h 33h 38h 0Dh | Get the white G gain | n=0~200 | Pn/F |
| VXXS0338n | 56h Xh Xh 53h 30h 33h 33h 38h nh 0Dh | Set the white G gain | n=0~200 | P/F |
| VXXG0339 | 56h Xh Xh 47h 30h 33h 33h 39h 0Dh | Get the white B gain | n=0~200 | Pn/F |
| VXXS0339n | 56h Xh Xh 53h 30h 33h 33h 39h nh 0Dh | Set the white B gain | n=0~200 | P/F |
| VXXG0340 | 56h Xh Xh 53h 30h 33h 34h 30h 0Dh | Get the Red Hue | n=-100~100 | Pn/F |
| VXXS0340n | 56h Xh Xh 47h 30h 33h 34h 30h nh 0Dh | Set the Red Hue | n=-100~100 | P/F |
| VXXG0341 | 56h Xh Xh 47h 30h 33h 34h 31h 0Dh | Get the Red Saturation | n=-100~100 | Pn/F |
| VXXS0341n | 56h Xh Xh 53h 30h 33h 34h 31h nh 0Dh | Set the Red Saturation | n=-100~100 | P/F |
| VXXG0342 | 56h Xh Xh 47h 30h 33h 34h 32h 0Dh | Get the Red Gain | n=-100~100 | Pn/F |
| VXXS0342n | 56h Xh Xh 53h 30h 33h 34h 32h nh 0Dh | Set the Red Gain | n=-100~100 | P/F |
| VXXG0343 | 56h Xh Xh 53h 30h 33h 34h 33h 0Dh | Get the Green Hue | n=-100~100 | Pn/F |
| VXXS0343n | 56h Xh Xh 47h 30h 33h 34h 33h nh 0Dh | Set the Green Hue | n=-100~100 | P/F |
| VXXG0344 | 56h Xh Xh 47h 30h 33h 34h 34h 0Dh | Get the Green Saturation | n=-100~100 | Pn/F |
| VXXS0344n | 56h Xh Xh 53h 30h 33h 34h 34h nh 0Dh | Set the Green Saturation | n=-100~100 | P/F |
| VXXG0345 | 56h Xh Xh 47h 30h 33h 34h 35h 0Dh | Get the Green Gain | n=-100~100 | Pn/F |
| VXXS0345n | 56h Xh Xh 53h 30h 33h 34h 35h nh 0Dh | Set the Green Gain | n=-100~100 | P/F |
| VXXG0346 | 56h Xh Xh 53h 30h 33h 34h 36h 0Dh | Get the Blue Hue | n=-100~100 | Pn/F |
| VXXS0346n | 56h Xh Xh 47h 30h 33h 34h 36h nh 0Dh | Set the Blue Hue | n=-100~100 | P/F |
| VXXG0347 | 56h Xh Xh 47h 30h 33h 34h 37h 0Dh | Get the Blue Saturation | n=-100~100 | Pn/F |
| VXXS0347n | 56h Xh Xh 53h 30h 33h 34h 37h nh 0Dh | Set the Blue Saturation | n=-100~100 | P/F |
| VXXG0348 | 56h Xh Xh 47h 30h 33h 34h 38h 0Dh | Get the Blue Gain | n=-100~100 | Pn/F |
| VXXS0348n | 56h Xh Xh 53h 30h 33h 34h 38h nh 0Dh | Set the Blue Gain | n=-100~100 | P/F |
| VXXG0349 | 56h Xh Xh 53h 30h 33h 34h 39h 0Dh | Get the Cyan Hue | n=-100~100 | Pn/F |
| VXXS0349n | 56h Xh Xh 47h 30h 33h 34h 39h nh 0Dh | Set the Cyan Hue | n=-100~100 | P/F |
| VXXG0350 | 56h Xh Xh 47h 30h 33h 35h 30h 0Dh | Get the Cyan Saturation | n=-100~100 | Pn/F |
| VXXS0350n | 56h Xh Xh 53h 30h 33h 35h 30h nh 0Dh | Set the Cyan Saturation | n=-100~100 | P/F |
| VXXG0351 | 56h Xh Xh 47h 30h 33h 35h 31h 0Dh | Get the Cyan Gain | n=-100~100 | Pn/F |
| VXXS0351n | 56h Xh Xh 53h 30h 33h 35h 31h nh 0Dh | Set the Cyan Gain | n=-100~100 | P/F |
| VXXG0352 | 56h Xh Xh 53h 30h 33h 35h 32h 0Dh | Get the Magenta Hue | n=-100~100 | Pn/F |
| VXXS0352n | 56h Xh Xh 47h 30h 33h 35h 32h nh 0Dh | Set the Magenta Hue | n=-100~100 | P/F |
| VXXG0353 | 56h Xh Xh 47h 30h 33h 35h 33h 0Dh | Get the Magenta Saturation | n=-100~100 | Pn/F |
| VXXS0353n | 56h Xh Xh 53h 30h 33h 35h 33h nh 0Dh | Set the Magenta Saturation | n=-100~100 | P/F |
| VXXG0354 | 56h Xh Xh 47h 30h 33h 35h 34h 0Dh | Get the Magenta Gain | n=-100~100 | Pn/F |
| VXXS0354n | 56h Xh Xh 53h 30h 33h 35h 34h nh 0Dh | Set the Magenta Gain | n=-100~100 | P/F |
| VXXG0355 | 56h Xh Xh 53h 30h 33h 35h 35h 0Dh | Get the Yellow Hue | n=-100~100 | Pn/F |
| VXXS0355n | 56h Xh Xh 47h 30h 33h 35h 35h nh 0Dh | Set the Yellow Hue | n=-100~100 | P/F |
| VXXG0356 | 56h Xh Xh 47h 30h 33h 35h 36h 0Dh | Get the Yellow Saturation | n=-100~100 | Pn/F |
| VXXS0356n | 56h Xh Xh 53h 30h 33h 35h 36h nh 0Dh | Set the Yellow Saturation | n=-100~100 | P/F |
| VXXG0357 | 56h Xh Xh 47h 30h 33h 35h 37h 0Dh | Get the Yellow Gain | n=-100~100 | Pn/F |
| VXXS0357n | 56h Xh Xh 53h 30h 33h 35h 37h nh 0Dh | Set the Yellow Gain | n=-100~100 | P/F |
| VXXG0358 | 56h Xh Xh 47h 30h 33h 35h 38h 0Dh | Get IR On/Off Status | n=0~3 | Pn/F |
| VXXS0358n | 56h Xh Xh 53h 30h 33h 35h 38h nh 0Dh | Set IR On/Off Status | 0:Both on1:Front on2:Back on3:Both off | P/F |
Canon
CANON INC.
30-2, Shimomaruko 3-chome, Ohta-ku, Tokyo 146-8501, Japan
CANON U.S.A. INC.
One Canon Park, Melville, New York 11747, U.S.A.
For all inquires concerning this product, call toll free in the U.S. 1-800-OK-CANON
CANON EUROPE LTD.
3 The Square, Stockley Park, Uxbridge, Middlesex, UB11 1ET United Kingdom
CANON EUROPA N.V.
Bovenkerkerweg 59, 1185 XB Amstelveen, The Netherlands
- MULTIMEDIA PROJECTOR LV-HD420 / LV-X420 User's Manual
- Table of Contents
- CAUTION
- RISK OF ELECTRIC SHOCK DO NOT OPEN
- Safety Precautions
- WARNING:
- WARNING ON HANGING FROM THE CEILING
- ■ READ AND KEEP THIS MANUAL FOR LATER USE.
- AC Power Cord Requirement
- AC Power Cord for the United States and Canada:
- THE SOCKET-OUTLET SHOULD BE INSTALLED NEAR THE EQUIPMENT AND EASILY ACCESSIBLE.
- Only for European Union and EEA (Norway, Iceland and Liechtenstein)
- For CA, USA only
- Federal Communication Commission Notice
- Safety Symbols in this Manual
- Precautions for Use
- Warning
- Installation and Handling Precautions
- Precautions on the lamp
- Precautions for the Batteries of the Remote Control
- When handling the lamp, take the following precautions.
- Caution for viewing 3D content
- Projector Installation Notice
- Copyright Notice
- Ensure Network Security
- About Trademarks
- Packing Checklist
- Views of Projector Parts
- Front-right View
- Install at a Sufficient Distance from Walls and Other Obstructions
- Rear view
- Remote Control Parts
- Note:
- Remote Control Operating Range
- Projector and Remote Control Buttons
- Inserting the Remote Control Batteries
- Caution:
- Starting and Shutting down the Projector
- How to store the projector in the soft carrying case (LV-SC02)
- Setting an Access Password (Security Lock)
- You can use the cursor buttons
- The password confirm menu appears when user presses the power-on key in case the Security Lock is enabled. Enter the password in the order you set it at step 5. In case you forget the password, please contact the Canon Customer Support Center.
- Adjusting the Projector Level
- Adjusting the Zoom, Focus and Keystone
- Adjusting the Volume
- ON-SCREEN DISPLAY (OSD) MENU SETTINGS
- OSD Menu Controls
- Navigating the OSD
- Setting the OSD Language
- OSD Menu Overview
- Image Menu
- Analog setting Menu
- Advanced Feature
- White Balance
- Color Manager
- Settings 1 Menu
- Keystone
- Audio
- Advanced 1 Feature
- Advanced 2 Feature
- Corner
- Settings 2 Menu
- Status
- LAN\_RJ45
- Wired LAN Terminal functionalites
- Supported External Devices
- LAN RJ45
- Canon
- Preparing Email Alerts
- Send E-Mail
- RS232 by Telnet Function
- Quick Start-Guide for "RS232 by TELNET"
- Specsheet for "RS232 by TELNET":
- Source Filter
- Replacing the Projection Lamp
- ■ Replacement Lamp LV-LP42
- Resetting the Lamp Hour
- Cleaning the Projector
- Cleaning the Lens
- Cleaning the Case
- Using the Kensington Lock
- Using the Security Bar
- Common problems and solutions
- Tips for Troubleshooting
- Problem and Countermeasures
- Image Problems
- Problem: No image appears on the screen
- Problem: The image is blurred
- Problem: The image is wider at the top or bottom (trapezoid effect)
- Problem: The image is reversed
- Problem: The image is streaked
- Problem: The image is flat with no contrast
- Problem: The color of the projected image does not match the source image.
- Lamp Problems
- Problem: There is no light from the projector
- Problem: The lamp goes off
- Remote Control Problems
- Problem: The projector does not respond to the remote control
- Audio Problems
- Problem: There is no sound
- Problem: The sound is distorted
- Having the Projector Serviced
- FCC Warning
- Canada
- Safety Certifications
- RS-232 Protocol
- CANON INC.
- CANON U.S.A. INC.
- CANON EUROPE LTD.
- CANON EUROPA N.V.
Brand : CANON
Model : X420
Category : Video projector