
DZ3600U - Video projector CANON - Free user manual and instructions
Find the device manual for free DZ3600U CANON in PDF.


| Product Type | Digital Document Camera (Visualizer) |
| Model | Canon DZ-3600U |
| Dimensions (Assembled) | 28.4 x 20.7 x 22.5 in (722 x 524.8 x 572.4 mm) |
| Dimensions (Knocked-down) | 19.1 x 20.7 x 8.1 in (486 x 524.8 x 205.5 mm) |
| Weight | Approximately 22 lbs (10 kg) |
| Power Supply | AC 120 V ±10%, 60 Hz, max 1.4 A |
| Power Consumption | Maximum approx. 42 W |
| Pickup Element | 1/3-inch CCD, approx. 410,000 total pixels |
| Resolution (Still Images) | 640 x 480 to 1900 x 1424 pixels |
| Zoom | 12x electric zoom (f=5.4mm to 64.8mm) |
| Key Functions | High-resolution imaging with VAROS, remote control, front lights and backlight, negative film mode, TWAIN driver, USB and video outputs |
| Computer Connection | USB (Type B) and RS-232C |
| Video Output | BNC (x1) and S-Video (x1), NTSC |
| Accessories Included | Power cord, USB cable, remote control, software CD, quick reference guide, warranty card |
| Cleaning | Wipe with soft cloth; use mild detergent if needed; avoid benzene, thinners |
| Safety Features | Grounded plug, auto power-off, fuse protection, no user-serviceable parts |
| Repairability | Refer all servicing to qualified personnel; use only Canon-specified replacement parts |
Frequently Asked Questions - DZ3600U CANON
User questions about DZ3600U CANON
0 question about this device. Answer the ones you know or ask your own.
Ask a new question about this device
Download the instructions for your Video projector in PDF format for free! Find your manual DZ3600U - CANON and take your electronic device back in hand. On this page are published all the documents necessary for the use of your device. DZ3600U by CANON.
USER MANUAL DZ3600U CANON
DIGITAL DOCUMENT CAMERA
DZ-3600U
User's Manual
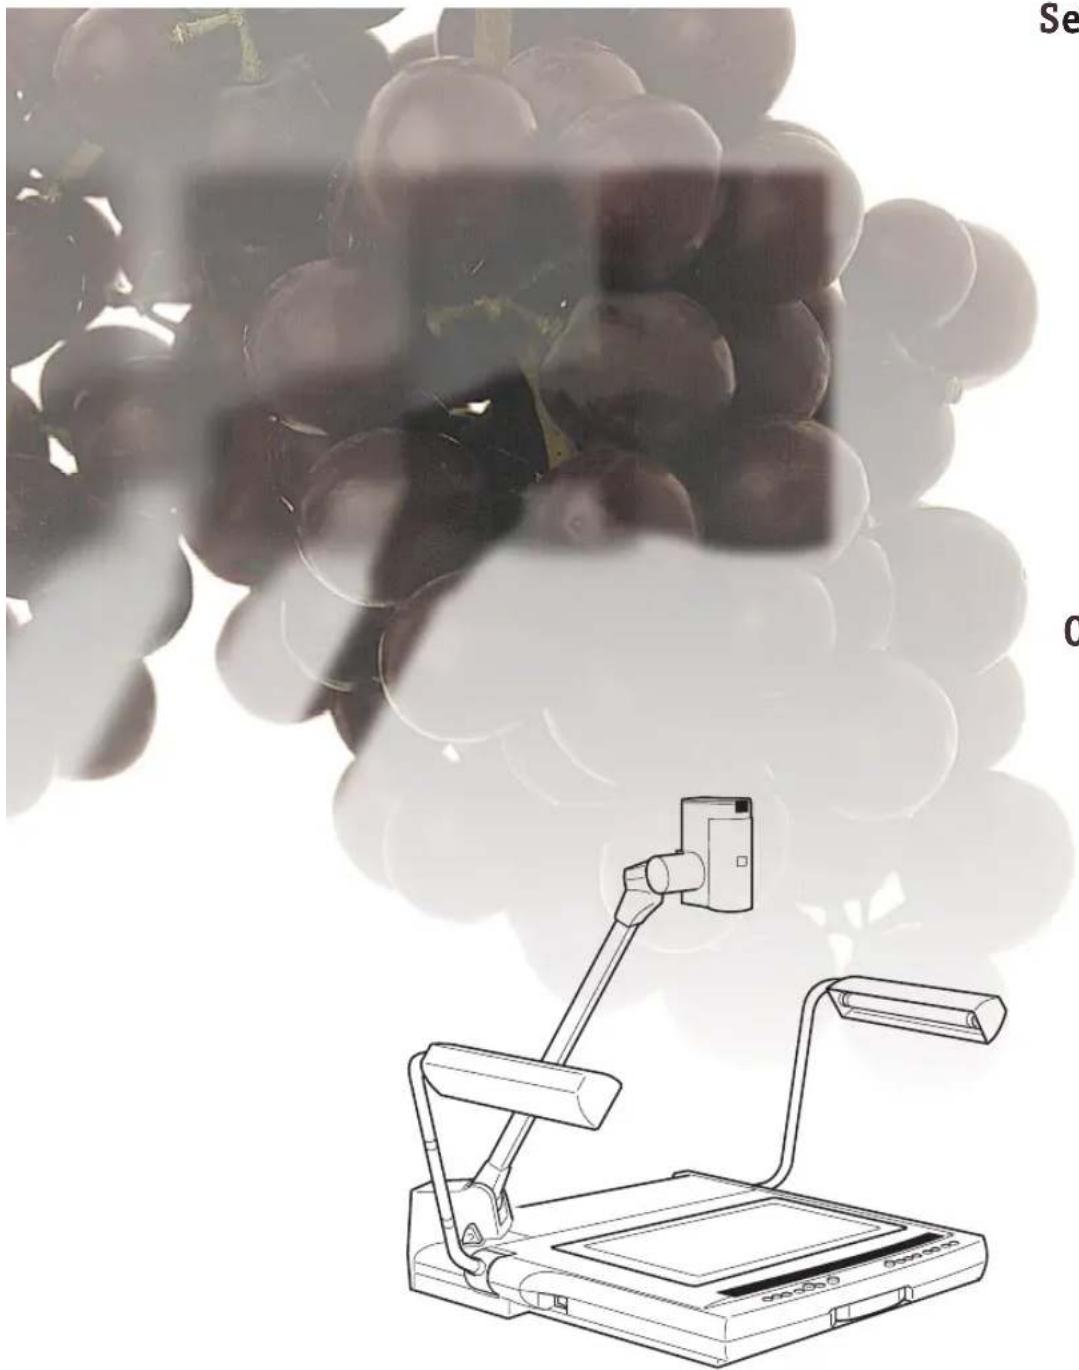
natural_image
Illustration of a laptop with a screen showing a cluster of grapes, no text or symbols present.Setup for Operation with a Computer
Mastering the Basics
An introduction to the Features
Operating without a Computer
Troubleshooting
Appendix
Introduction
Thank you for purchasing a Canon DZ-3600U Digital Document Camera. Please read this Users Guide thoroughly to use this product safely and extend its life. In particular, please read and observe the safety precautions.
Features of the DZ-3600U Digital Document Camera
- High-Resolution
This device employs the Variable Refraction Optical System (VAROS) and a built-in 12 power zoom lens to achieve high-resolution image capturing. Connect it to a computer with a USB (universal serial bus) cable and discover how it handles high-resolution images that could not be accommodated by earlier generations of visualizers.
- Multiple Applications
The DZ-3600U functions in a multitude of capacities, serving as a document camera for presentations when used with a projector, as a scanner for desktop publishing applications or as a videoconferencing camera.
- Versatile
Record anything from flat documents to 3-dimensional objects, OHP transparencies, negative films and others. Just turn the camera head to capture white board images or to pan a conference room.
- Remote Controls
You can conduct a computer-driven presentation without having to touch the computer, if it is linked via a USB cable, since you can control it from the DZ-3600U's remote control or control panel.
- All the Advantages of Traditional Visualizers Plus More
It is also equipped with video out ports like conventional visualizers, making it possible to monitor the video feed from the camera in real-time and to conduct a presentation without a computer.
The instructions for opening the product package, the packing list and the components guide are contained in the appendix at the back of this guide. Please refer to them as required.
Exclusion of Liability
If the DZ-3600U is connected to a recording device, such as a VCR, Canon Inc. accepts no responsibility whatsoever for any financial losses that may be incurred as a result of the loss of recorded information or images, regardless of the cause of the loss.
How to Use the Guides
The following guides are supplied with the DZ-3600U Digital Document Camera. Read the descriptions below to make the most efficient use of them to suit your own purposes.
Users Guide (This Guide)
This guide starts off with an introduction and explanation of the safe use of the equipment, then the first chapter discusses procedures for connecting the power cord and other devices, instructions for installing the software and preparations for using the equipment with a computer. The second chapter explains the basic operating procedures for use with a computer. We encourage first-time users to actually try these procedures as they read.
The third chapter lists all of the operations that can be accomplished with the equipment connected to a computer.
The fourth chapter tells how to use it as a conventional visualizer (video output device) without a computer.
The fifth chapter is devoted to troubleshooting tips. Read this section before contacting the dealer if you are experiencing a problem with the equipment.
The appendix contains instructions for unpacking the equipment, the packing list, a components guide and other useful information to which you may refer as required.
Quick Reference Guide (Pamphlet)
This handy reference can be used like a crib sheet in case you forget or wish to confirm a command during a meeting or presentation. Although it provides comprehensive coverage of how to execute commands using the remote control, control panel and computer, you are recommended to read chapters 2 through 4 of the Users Guide first before relying on it. It also includes a White Balance Adjustment Chart in case the color balance requires resetting.
Copyright Compliance
Please note that use of video or still images recorded by the DZ-3600U, other than for personal use, is subject to copyright laws and is prohibited without the consent of the copyright holder.
- No part of this document may be reproduced or transmitted in any form or by any means, electronic or mechanical, for any purpose, without the express written permission of Canon Inc.
- The equipment and software described in this guide are subject to change without notice.
- Although every effort has been made to ensure the accuracy of this guide, please contact us at the address listed on the back cover to report any oversights, errors or omissions.
-
Notwithstanding the above, please note that Canon Inc. accepts no liability for any results arising from the operation of the equipment or software mentioned herein.
-
Canon and the Canon logo are registered trademarks of Canon Inc.
- Microsoft, PowerPoint and Windows are registered trademarks of Microsoft Corporation in the United States and other countries.
- Intel, Pentium and MMX are registered trademarks of Intel Corporation.
- Other products and names mentioned in this guide may be trademarks or registered trademarks of the respective companies.
⚠️ Safe Use of the Equipment
⚠️ An exclamation point within a triangle is intended to alert the user to the presence of important operating and maintenance (servicing) instructions in the literature accompanying the equipment.
1. ⚠️Important Warnings

TO REDUCE THE RISK OF ELECTRIC SHOCK, DO NOT REMOVE THE COVER (OR BACK) OF THE EQUIPMENT. THERE ARE NO USER-SERVICEABLE PARTS INSIDE. REFER SERVICING TO QUALIFIED SERVICE PERSONNEL.
The serial number of this equipment may be found on the rear of the equipment. No others have the same serial number as yours. You should record the number and other vital information here and retain this guide as a permanent record of your purchase to aid identification in case of theft.
Date of Purchase:
Dealer:
Dealer Address:
Dealer Phone No.:
Model No.: DZ-3600U
Serial No.:
2. Important Operational Instructions

TO REDUCE THE RISK OF ELECTRIC SHOCK, DO NOT EXPOSE THE EQUIPMENT TO RAIN OR MOISTURE.

TO REDUCE THE RISK OF ELECTRIC SHOCK, AND TO REDUCE ANNOYING ELECTROMAGNETIC INTERFERENCE, USE THE RECOMMENDED ACCESSORIES ONLY.
FDA Regulation
This document camera has not been evaluated by the Food and Drug Administration (FDA) for use as a medical device. When incorporated into a system with medical applications, FDA regulations may apply. Therefore, please consult your legal advisor to determine whether FDA regulations apply.
FCC Notice
DZ-3600U Digital Document Camera
This device complies with Part 15 of the FCC Rules. Operation is subject to the following two conditions: (1) this device may not cause harmful interference, and (2) this device must accept any interference received, including interference that may cause undesired operation.
Note:
This device has been tested and found to comply with the limits for a Class B digital device, pursuant to Part 15 of the FCC Rules. These limits are designed to provide reasonable protection against harmful interference in a residential installation. This device generates, uses and can radiate radio frequency energy and, if not installed and used in accordance with the instructions, may cause harmful interference to radio communications.
However, there is no guarantee that interference will not occur in a particular installation. If this device does cause harmful interference to radio or television reception, which can be determined by turning the device off and on, the user is encouraged to try to correct the interference by one or more of the following measures:
- Reorient or relocate the receiving antenna.
- Increase the separation between the device and receiver.
- Connect the device into an outlet on a circuit different from that to which the receiver is connected.
- Consult the dealer or an experienced radio/TV technician for help.
Use of shielded cable is required to comply with Class B limits in Subpart B of Part 15 of the FCC Rules.
Do not make any changes or modifications to the device unless otherwise specified in the manual. If such changes or modifications should be made, you could be required to stop operation of the device.
Canon U.S.A. Inc.
One Canon Plaza, Lake Success, NY 11042, U.S.A.
Tel No. (516) 328-5600
IC NOTICE
This device does not exceed the Class B limits for radio noise emissions from digital apparatus as set out in the Interference-causing device standard entitled 'Digital Apparatus', ICES-003 of Industry Canada.
NOTIFICATION IC
⚠️ Important Safety Instructions
In these safety instructions, the word 'equipment' refers to the Canon DZ-3600U Digital Document Camera and all its accessories.
- Read Instructions - All the safety and operating instructions should be read before the equipment is operated.
- Retain Instructions - The safety and operating instructions should be retained for future reference.
- Heed Warnings - Pay attention to all warnings on the equipment and in the operating instructions.
-
Follow Instructions - All operating and maintenance instructions should be followed.
-
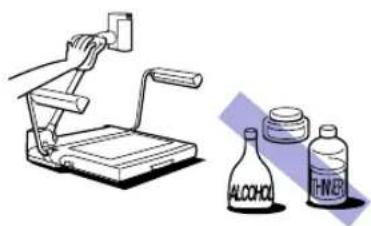
Cleaning - Unplug the equipment from the electrical outlet before cleaning. Wipe the
equipment with a clean soft cloth. If necessary, put a cloth in diluted neutral detergent and wring it well before wiping the equipment with it. Finally, clean the equipment with a clean dry cloth. Do not use benzene, thinners or other volatile liquids or pesticides as they may damage the finish of the equipment. When using chemically treated cleaning cloths, observe those precautions accordingly.
natural_image
Illustration of a hand using a pressure stand next to two labeled bottles (alcohol and alcohol) with no visible text or symbols.-
Accessories - Do not use accessories not recommended in this guide because they may be hazardous. Always use the specified connection cables. Ensure that devices are correctly connected.
-
Water and Moisture: Hazard of Electric Shock - Do not use the equipment near water or in rainy/moist situations. Do not put a heater near this equipment.
-
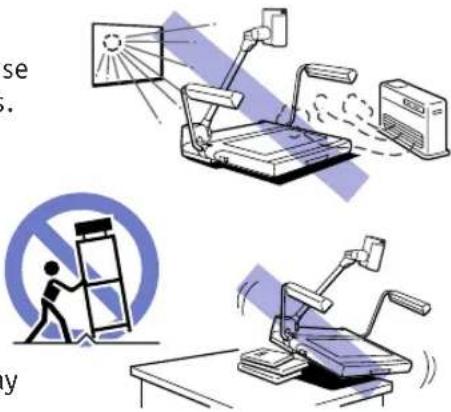
Placement and Transport - Do not place the equipment on an unstable cart, stand, tripod, bracket or table. The equipment may fall, causing serious injury to a child or adult, and serious damage to the equipment. An equipment and cart combination should be moved with care. Quick stops, excessive force and uneven surfaces may cause the equipment and cart to overturn.
-
Power Sources - This equipment should be operated only from the type of power source indicated on the marking label. If you are not sure of the type of power supply in your home, consult your product dealer or local power company.
-
Grounding - This equipment is equipped with a three-pronged grounding plug (the plug has a third grounding pin). The three-pronged grounding plug will fit into a grounding-type power outlet. This is a safety feature. If you are unable to insert the plug into the outlet, contact your electrician to replace your obsolete outlet. Do not defeat the safety purpose of the grounding-type plug.
-
Power Cord Protection - Power cords should be routed so that they are not likely to be walked on or pinched by items placed upon or against them. Pay particular attention to plugs and the point from which the cords exit the equipment.
-
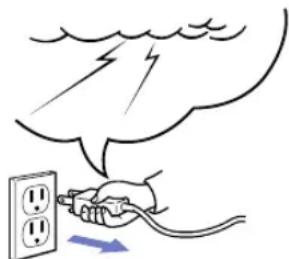
Lightning - For added protection of this equipment during a lightning storm, or when it is left unattended and unused for long periods of time, disconnect it from the electrical outlet. This will prevent damage to the equipment due to lightning and power-line surges.
natural_image
Illustration of a hand using an electrical plug to plug a wall socket, with lightning and smoke above (no text or symbols)-
Overloading - Do not overload electrical outlets and extension cords because this can result in fire or electric shock.
-
Entry of Objects and Liquids - Never push objects of any kind into this equipment through openings as they may touch electric components or short circuit parts, resulting in fire or electric shock. Be careful not to spill liquid of any kind onto the equipment.
-
Servicing - Do not attempt to service this equipment yourself because opening or removing covers may expose you to dangerous electrical currents or other hazards. Refer all servicing to qualified personnel.
natural_image
Illustration of a desktop computer with a scroll and a pair of scissors cutting the screen (no text or symbols)- Damage Requiring Service - Disconnect this equipment from the electrical outlet and all power sources including batteries, and refer servicing to qualified service personnel under the following conditions.
a. When the power cord or plug is damaged. b. If any liquid has been spilled into, or objects have fallen into, the equipment. c. If the equipment has been exposed to rain or water.
d. If the equipment does not operate normally even if you follow the operating instructions. Adjust only those controls that are covered by the operating instructions. Improper adjustment of other controls may result in damage and will often require extensive work by a qualified technician to restore the equipment to its normal operation.
e. If the equipment has been dropped or the casing has been damaged. f. When the equipment exhibits a distinct change in performance. This indicates a need for servicing.
-
Replacement Parts - When replacement parts are required, be sure the service technician has used replacement parts that are specified by Canon or that have the same characteristics as the original parts. Unauthorized substitutions may result in fire, electric shock or other hazards.
-
Safety Check - Upon completion of any service or repairs to the equipment, ask the service technician to perform safety checks to determine that the equipment is in safe operating order.
-
Do not install the equipment in the following locations as this can cause fire or electric shock.
-
Hot locations.
- Locations close to open flame or fire.
- Very humid or dusty locations.
- Locations exposed to direct sunlight.
- Locations exposed to salt spray.
-
Locations close to flammable solvents (alcohol, thinners, etc.).
-
When any of the following occurs, immediately switch off the equipment, unplug it from the main power supply and contact your nearest Canon dealer. Do not continue to use the equipment because this can lead to fire or electric shock.
-
The equipment emits smoke, heat, abnormal noise or unusual odors.
- A metal object falls into the equipment.
-
The equipment is damaged in some way.
-
Please observe the following when using the equipment. Failure to do so can result in fire or electric shock.
-
Do not use flammable sprays near the equipment.
-
Do not subject the equipment to strong impacts.
-
Please observe the following when handling the batteries. Failure to do so may result in the batteries bursting or emitting heat, sparks or corrosive fluid.
-
Do not throw the batteries into a fire, and do not heat, short-circuit or attempt to disassemble them.
- Do not attempt to recharge the batteries.
- Do not use batteries other than those specified for use with the equipment.
- Remove the batteries when they are used up or when the equipment will not be used for an extended period.
- When replacing the batteries, always replace the entire set and do not use different types of batteries together.
- Ensure that the positive (+) and negative (-) terminals are correctly positioned when you load the batteries.
- If any soiling or leakage of the internal battery fluid occurs, thoroughly clean off the soiling or leaked fluid with water.
A La Carte Menu of DZ-3600U Applications
The DZ-3600U can be used in an amazing variety of applications, such as those introduced below.
As a Presentation Tool
Used with the accompanying DZ-3600U Presentation Software, the equipment becomes a highly effective presentation tool that works in conjunction with a computer and projector. Its single remote control places the powerful features of the DZ-3600U, its software and other programs, such as PowerPoint, at your fingertips.
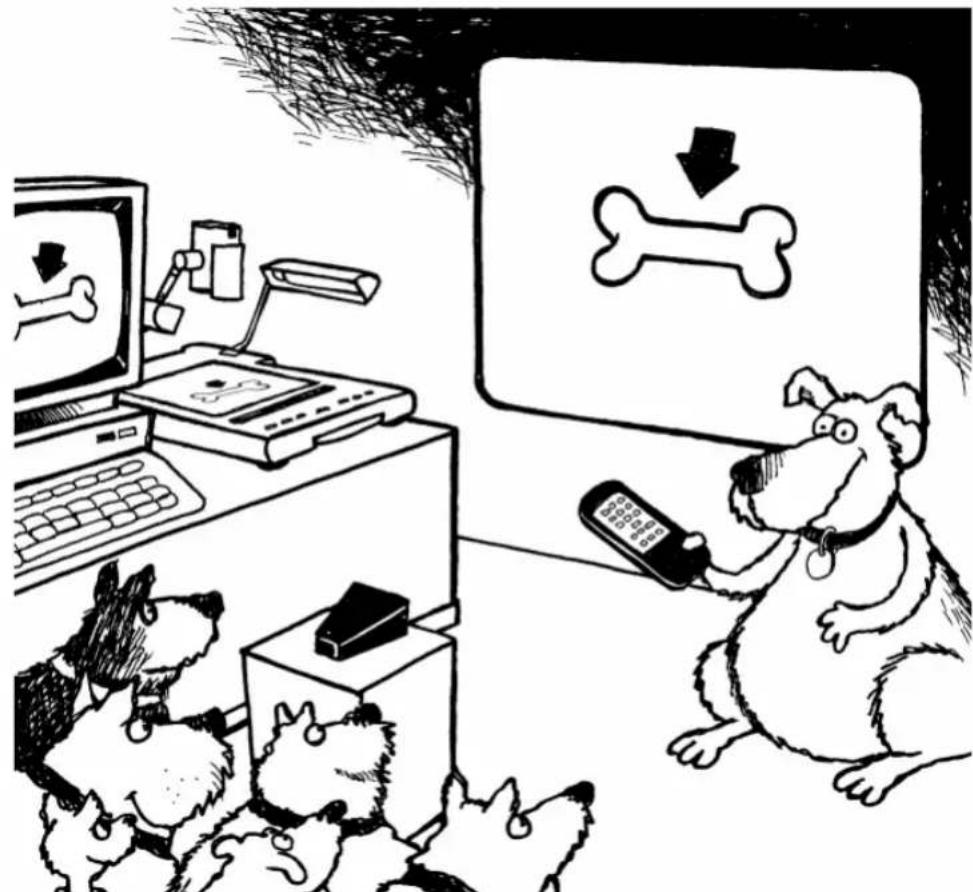
natural_image
Cartoon illustration of a dog watching a computer screen with a bone symbol, while two small dogs sit nearby (no text or symbols present)Control at your fingertips with the ultimate presentation tool.
Presentation Examples
• Conference papers
- OHP transparencies
- Pictures of products and landscapes, slide films, negatives (numerous photographs can be lined up and compared or analyzed)
• Books (opened to any page)
• Full-size products or scale models
• Films, including X-rays
- Specimens
• Conference room white boards
As a Scanner for 3-D Objects
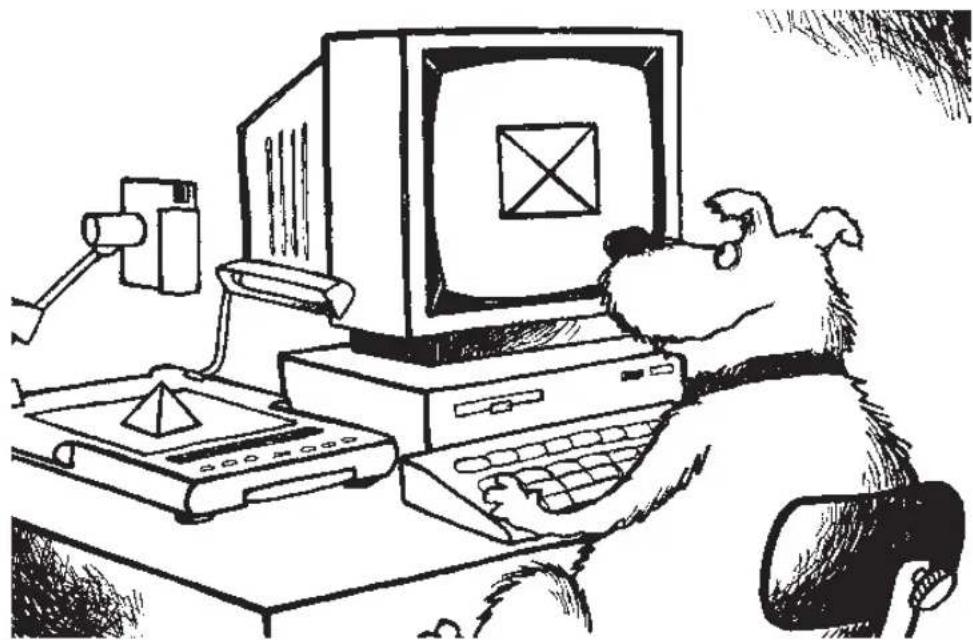
With the supplied DZ-3600U TWAIN Driver, the equipment can be used with standard graphics programs to capture a remarkable assortment of three-dimensional objects and films.
natural_image
Cartoon illustration of a dog using a computer with monitor and keyboard (no text or symbols)Instant 3-D scanning to capture those difficult contours.
As a Conventional Visualizer
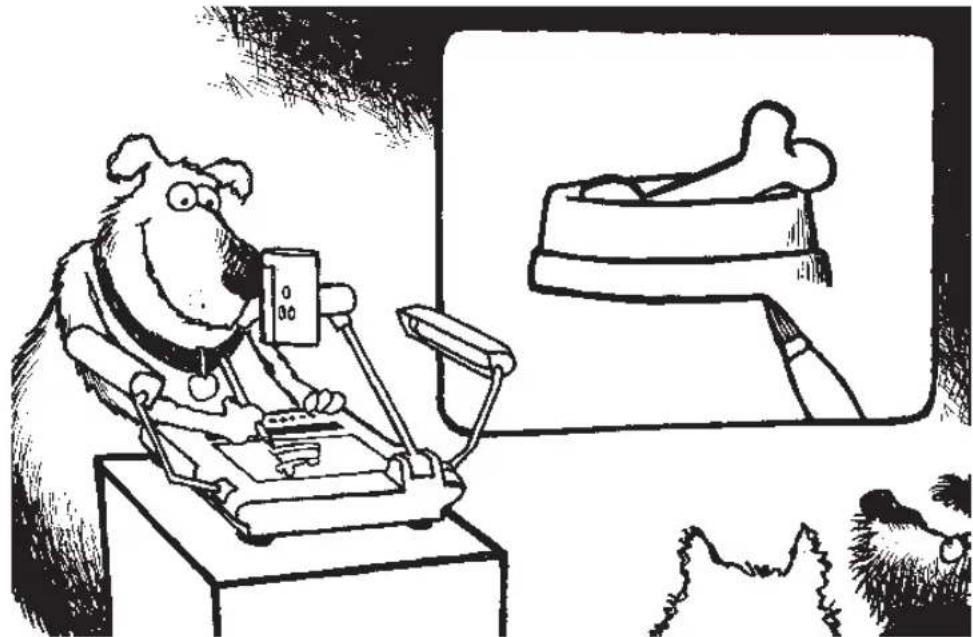
Of course the DZ-3600U fits the bill as a conventional visualizer (video output device) connected directly to a video monitor or a projector.
natural_image
Cartoon illustration of a dog using a computer with a monitor, next to a large bone-shaped object and a mouse (no text or symbols)Get your message across clearly with the superior reproduction of the DZ-3600U.
Table of Contents
⚠️ Safe Use of the Equipment 5
Chapter 1 Setup for Operation with a Computer
Connecting to a Power Source.... 16
Connecting to a Computer 17
Computer System Requirements.... 18
Installing the Software 19
Important Instructions for the Remote Control.... 23
Aim the Remote Control at the Camera Head 24
Checking the Battery Charge Prior to Use 24
Chapter 2 Mastering Basic Operation
Assembly 26
Turning On the Power 28
Starting the Software 29
Placing Objects 30
A Few of the Basics 31
Zooming 32
Capturing Images 33
Rotating Captured Images 34
Closing Software Programs 35
Turning Off the Power 36
Knock-Down 37
Transport Precaution 38
Chapter 3 An Introduction to the Features
About the Bundled Software.... 40
The Two Programs to Install 40
DZ-3600U Presentation Software.... 40
DZ-3600U TWAIN Driver 41
Preview Mode and Still Mode.... 42
Preview Mode 42
Still Mode 43
Toolbar and Status Bar 44
Toolbar 44
Status Bar 44
Display/Hide the Toolbar and Status Bar 45
Capturing Images P S 46
Selecting the Capture Resolution P S 48
Switching to Preview Mode S 50
Selecting the Display Resolution P 51
Saving Images P S 53
Saving Images As Presentation Software Files 54
Saving Just the Displayed Image 55
Saving All Images and the HTML Index 56
Opening Saved Images P.S....58
Forwarding/Reversing the Display to the Next Image P S.. 59
Selecting Images from the List P S.... 61
Adjusting the Display Size of Preview Images P 62
Changing the Display Size of Captured Images S 63
Adjusting the Brightness of Preview Images P 65
Adjusting the Focus of Preview Images P 67
Adjusting the Detail of Preview Images P 69
Adjusting the Color Balance of Preview Images P 70
Adjusting the Orientation of Preview Images P 72
Rotating Captured Images S 74
Capturing an Object in Monochrome Mode P 76
Using the Front Lights and Backlight P 77
Shooting Negatives P 79
Reversing or Inverting Images P 80
Shooting the Surroundings P 81
Using the Finger Pointer S 82
Displaying the Finger Pointer 82
Moving the Finger Pointer.... 83
Interfacing with PowerPoint P S 84
Switching between Application Programs 84
Controlling Slides 85
Scanning Images with TWAIN Driver 86
Selecting the Input Device 86
Using TWAIN Driver 87
P refers to preview mode functions
S refers to still mode functions
Chapter 4 Operating without a Computer
Connecting to a Video Monitor or Projector 90
S Video Cable 90
BNC Video Cable.... 91
Connecting to Other Image Input Devices 92
Connecting to an External Input Device 93
Assembly, Knock-Down and Power On/Off.... 94
Assembly and Knock-Down 94
Turning On the Power 94
Turning Off the Power 94
Button Functions 95
Control Panel 95
Remote Control....96
Camera Head 97
Displaying Images from External Input Devices 98
Chapter 5 Troubleshooting
Troubleshooting tips 100
Error Messages 103
Appendix
Removing the Equipment from the Box 106
Packing List.... 108
Changing the Remote Control Batteries 109
Components Guide 110
Main Unit 110
Rear Panel of the Main Unit 111
Control Panel 112
Remote Control....113
Camera Head 114
Toolbar (Preview Mode) 115
Toolbar (Still Mode) 116
Specifications 117
Glossary 118
Index.... 120
Chapter 1
Setup for Operation with a Computer
Connecting to a Power Source
Connect the DZ-3600U to a power source with the supplied power cord.
This explanation assumes that you have already removed the main unit and accessories from the box and placed them on a stable surface. If you have not yet unpacked them, read and follow the steps described in Removing the Equipment from the Box (P.106), then find a suitable location.

!!! Important !!!
- Do not use a power cord other than the one supplied. Plug it into a 120-volt electrical outlet only. Use with other voltages may result in fire, electric shock or other hazards.
- Ensure that the power switch on the main unit is set to Off before you plug in the power cord.
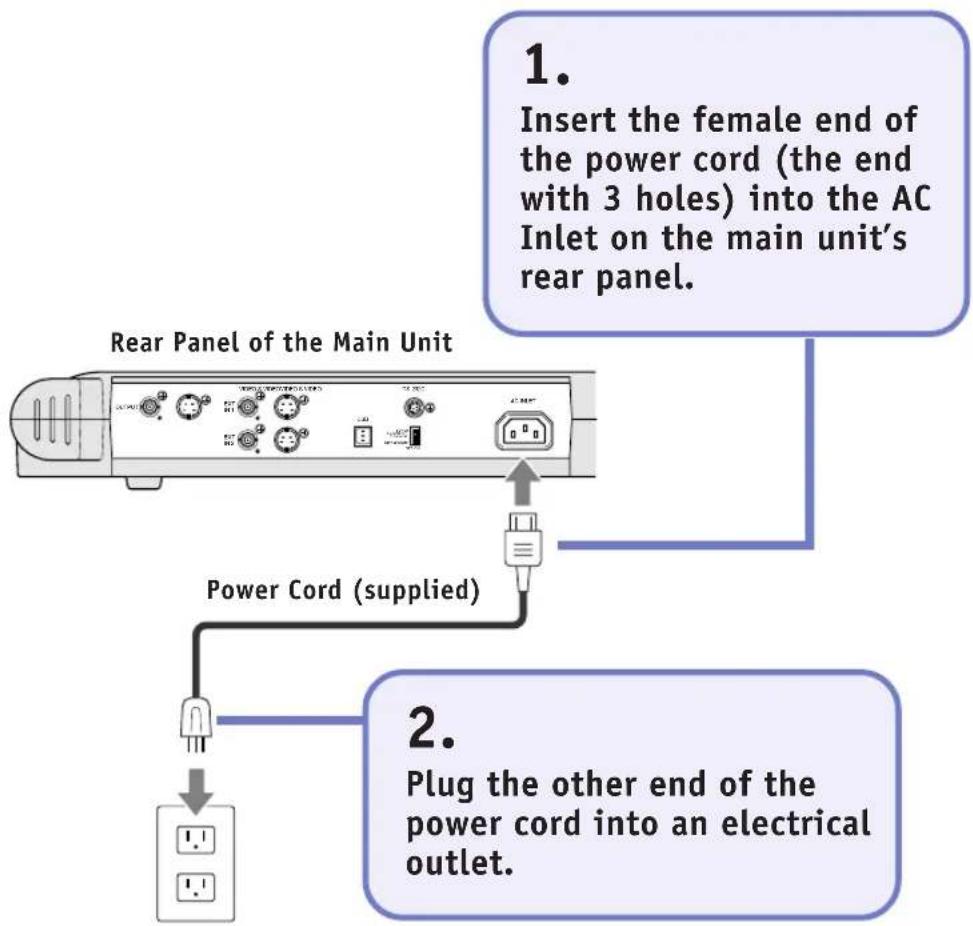
flowchart
graph TD
    A["Main Unit Rear Panel"] --> B["Power Cord (supplied)"]
    B --> C["Plug the other end of the power cord into an electrical outlet."]
    D["Insert the female end of the power cord (the end with 3 holes) into the AC Inlet on the main unit's rear panel."] --> E["1."]
    E --> F["2."]
Connecting to a Computer
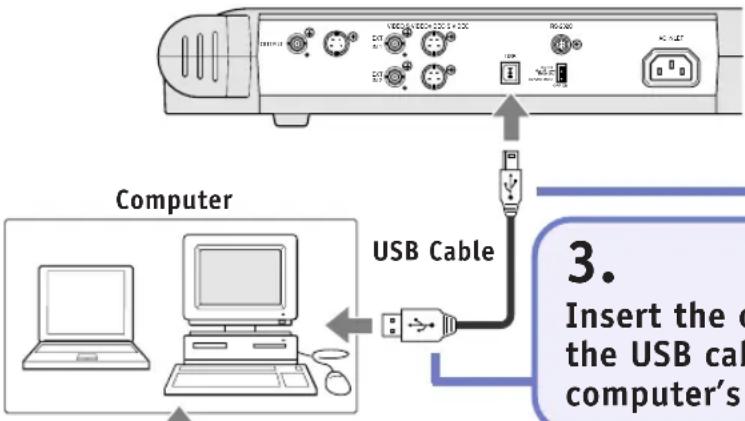
When connected to a computer, the main unit can load captured images onto the computer or be controlled from the computer.
For instructions on how to operate the equipment without a computer, see Chapter 4, Operating without a Computer.
1.
Confirm that the power is off on the main unit and all other devices.
2.
Insert one end of the USB cable into the USB port on the main unit's rear panel.
Rear Panel of the Main Unit
3.
Insert the other end of the USB cable into the computer's USB port.
VGA Cable
To Connect a Projector or Large Screen Monitor
Insert one end of the VGA cable into the computer's video output port, and the other end into the video input port of the projector or large screen monitor.
Projector or Large Screen Monitor
There are many varieties of video output ports on computers and video input ports on projectors and large screen monitors. Ensure that your cables match your equipment.
Computer
Computer System Requirements
The following minimum requirements must be met by your computer for it to successfully run the software for the DZ-3600U.
CPU
166 MHz MMX Pentium or higher (266 MHz Pentium II or higher is recommended) USB interface
Memory
32 MB or more (64 MB or more is recommended)
Free Hard Disk Space
20 MB or more recommended (software requires approximately 5 MB and 50 high-resolution captured images require approximately 15 MB)
Display
800 x 600 (SVGA) or bigger display board or PC monitor capable of displaying any one of the 16-bit, 24-bit or 32-bit modes (1024 x 768 (XGA) or better display is recommended)
Operating System
Windows 95 4.00.950b (OSR 2.1 with USB Supplement) Windows 95 4.00.950c (OSR 2.5 with USB Supplement) Windows 98
Some computers may have the USB interface switched off. Please refer to your computer manual or contact the manufacturer for instructions to switch it on.
Installing the Software
The bundled software must be installed onto the hard drive of your computer for it to work with the DZ-3600U.
The instructions below will show you how to install two programs: DZ-3600U Presentation Software (hereafter referred to as Presentation Software) and DZ-3600U TWAIN Driver (hereafter referred to as TWAIN Driver). As its name suggests, Presentation Software works with your computer to deliver presentations, serving as the key interface between the two. TWAIN Driver is the software that enables the DZ-3600U to capture and load images into TWAIN-compliant application programs, such as the major graphics programs on the market.
!!! Important !!!
- These instructions cover the basic procedures for installing the software. Persons new to PCs should follow these instructions to the letter.
Note
- Experienced computer users who wish to change the target directory or folder for the installation, should comply with the on-screen instructions.
1.
Confirm that the main unit's power is off.
!!! Important !!!
- Make sure that the DZ-3600U's power is off before you install the software. Attempting to install it with the power on will result in an [Unknown device] error message after installation. If you have already started to install the software with the power on, stop the installation, shut down Windows and turn off your computer. Then reinstall with the DZ-3600U's power off.
2.
Turn on the computer's monitor (and any other peripherals) and then the CPU.
- Windows will start.
3.
Place the software CD-ROM into the computer's drive.
- The setup utility will automatically start after a few moments.
- If the setup utility does not automatically start up after a long interval, double-click the [My Computer] icon on the Windows desktop and double-click the CD-ROM icon in the My Computer window. Double-click the [SETUP] icon which appears in the next window. The setup utility will start.
![Canon DZ-3600U Software Setup Welcome to Canon DZ-3600U software setup. Setup will install DZ-3600U Presentation software and drivers. It is strongly recommended that you exit all Windows programs before running this Setup program. Click Cancel to quit Setup and then close any programs you have running. Click Next to continue with the Setup program. WARNING: This program is protected by copyright law and international treaties. Unauthorized reproduction or distribution of this program, or any portion of it, may result in severe civil and criminal penalties, and will be prosecuted to the maximum extent possible under law. [Next] Cancel](/content/2026/06/1146807/images/0858178dea5743bc33304b5e323cd954225f2cef6580c827d062a73ef8f8f337.jpg)
4.
Click the [Next] button.
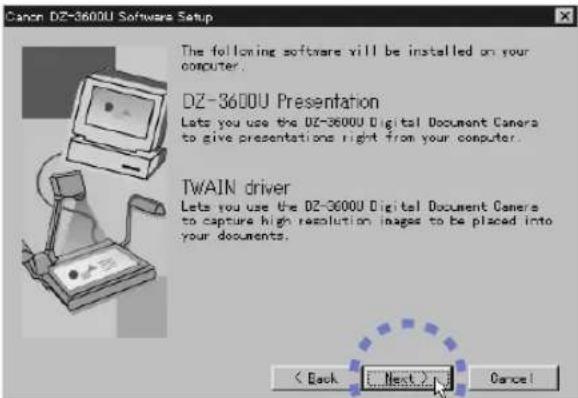
5.
Click the [Next] button.
![Canon DZ-3600U Software Setup Setup will install a TWAIN driver into the Windows/Train_32 directory. Setup will install the DZ-3600U Presentation software to the following directory. Destination Folder C:/Program Files/Canon DZ-3600U Browse... < Back Next > Cancel 6. Click the [Next] button. Canon DZ-3600U Software Setup Setup will add program icons to the Program Folder listed below. You may type a new folder name, or select one from the Existing Folders list. Click Next to continue. Program Folder: Canon DZ-3600U Existing Folders: Adobe Adobe Acrobat AOL BatteryScope BIGLOBE Communication Center Community Place Browser EAST JOY Guidoy-II < Back Next > Cancel 7. Click the [Next] button. Canon DZ-3600U Software Setup The DZ-3600U Presentation software can be started automatically when Windows starts. Launch DZ-3600U Presentation at Windows startup < Back Next > Cancel](/content/2026/06/1146807/images/e261af8d0220496b077d184356c4aa0e7da77bc0f0a84e2f336efef26ee2ff64.jpg)
6.
Click the [Next] button.
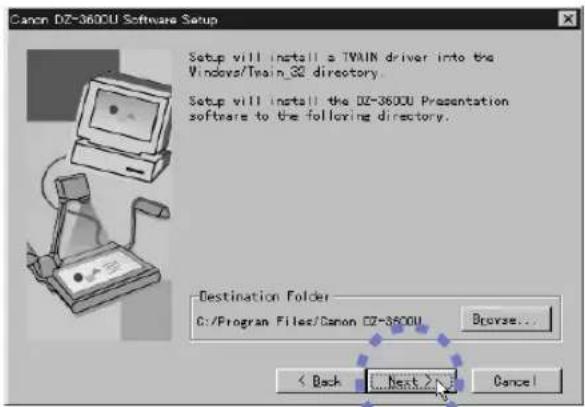
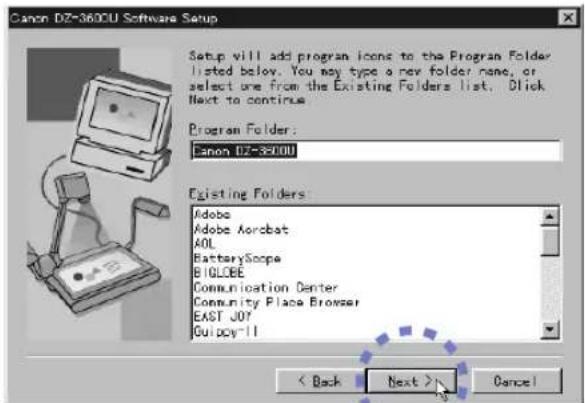
7.
Click the [Next] button.
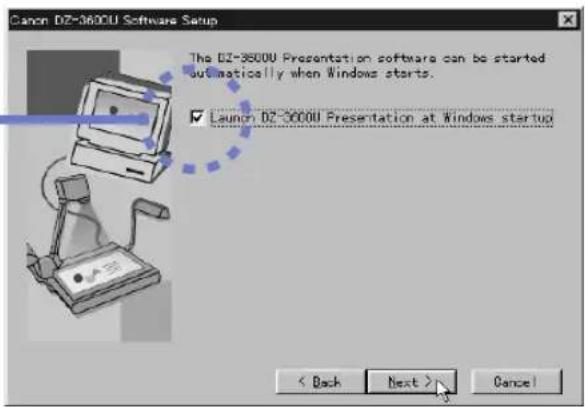
8.
If you wish the software to start automatically, click this check box to place a check mark in it.
By placing a check mark in this box you are setting it so that Presentation Software will automatically start when you turn on the computer and run Windows (a shortcut will be placed in Window's Startup folder). (p. 29)
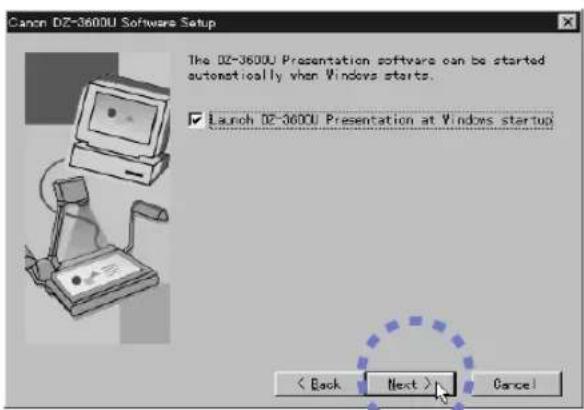
9.
Click the [Next] button.
- The software installation will start. The window below will display when the installation is finished.
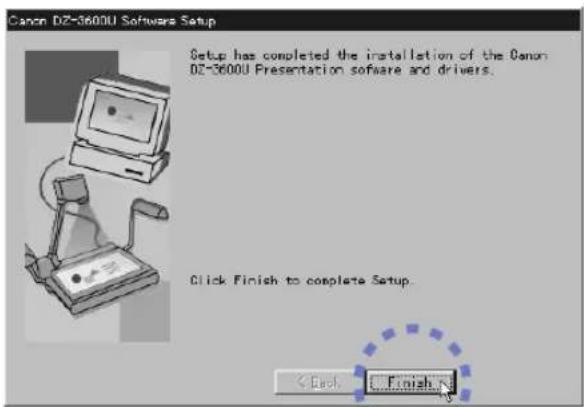
10.
Click the [Finish] button.
• The software installation is complete.
This concludes the software installation process.
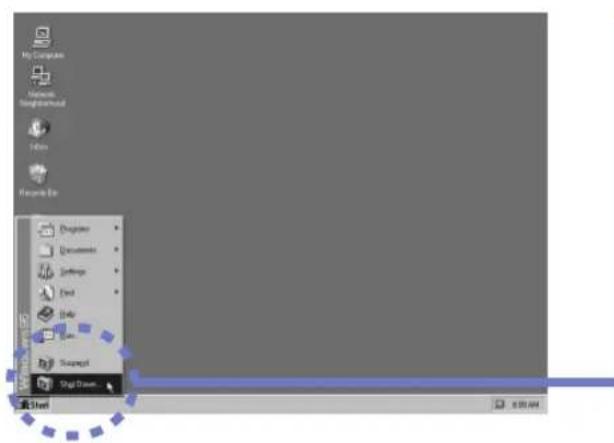
11.
Click the Windows [Start] button on the taskbar, select [Shut Down] from the menu and follow the correct procedures to shut down Windows.
• Alternatively, you may keep Windows running, turn on the DZ-3600U and start up Presentation Software at this point (p. 29).
12.
Turn off the computer, its monitor and any other peripherals.
Important Instructions for the Remote Control
A remote control is supplied with the DZ-3600U. It can be used to control various functions while you are standing at a podium or among the audience.
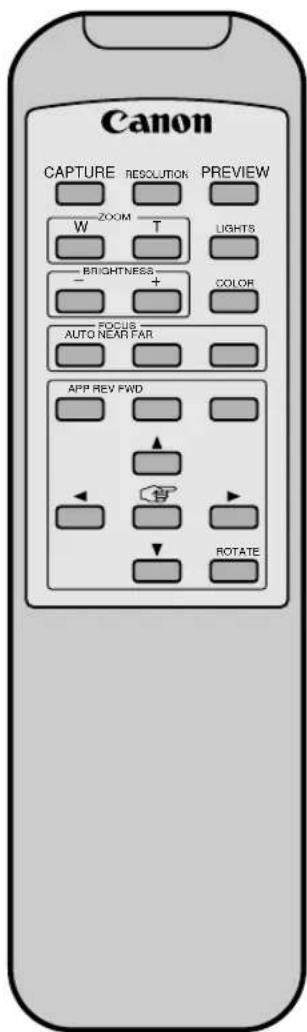
We will have you try various operations using this remote control in the next chapter. If there are no batteries in the remote control, see Changing the Remote Control Batteries (P.109) for instructions.
Note
- There are some differences between the functions that can be accessed through the main unit's control panel and the remote control.
Aim the Remote Control at the Camera Head
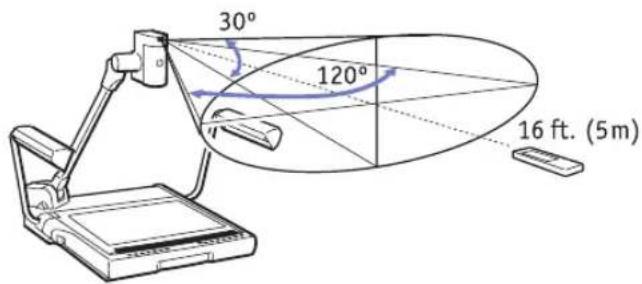
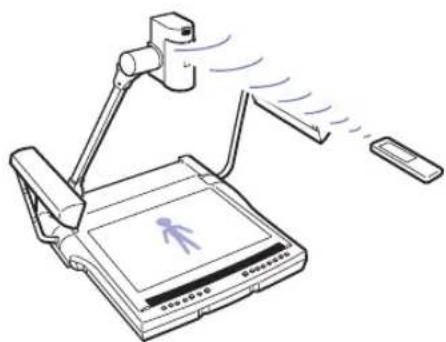
The remote control sensor (the component that receives the infrared signals from the remote control) is located on the camera head. You must aim the remote control at the camera head for it to be effective. Pointing it at the monitor or screen on which images are being displayed will not work.
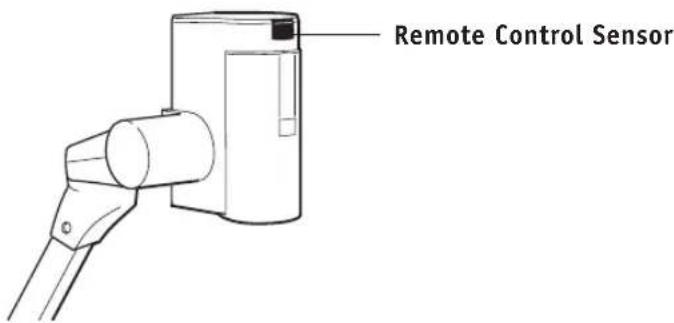
Even if people understand this intellectually, once they get up in front of a real audience, many end up pointing the remote control at the screen and clicking with all their might. We highly recommend that you plan an on-site rehearsal before starting a presentation.
Note
- The effective range of the remote control from the remote control sensor is approximately 16 ft. (5 m) at 120 degrees horizontally and 30 degrees vertically.
Check the Battery Charge Prior to Use
The cause of a remote control not responding at all during a presentation is generally an insufficient battery charge. Remember to always check the battery charge before you need the remote control. Keep an extra set of batteries handy if you are uncertain about the remaining charge. See Changing the Remote Control Batteries (p. 109) for instructions.
Chapter 2
Mastering Basic Operations
Assembly
This chapter explains the most fundamental and important operating procedures step by step. We encourage you to try each step as you read about it.
!!! Important !!!
- This chapter assumes that you have correctly set up the DZ-3600U for use with a computer and installed Presentation Software. If you have not yet done this, follow the instructions in Chapter 1, Setup for Operation with a Computer, before resuming the steps below.
- Do not place the equipment on an unsteady table or object subject to vibration. Movement of the camera head or filmed object and changes in lighting may corrupt the image capture.
- Skip this and the following page if the three arms (two front lights and one camera arm) have already been erected. Start from Turning On the Power (P.28).
1.
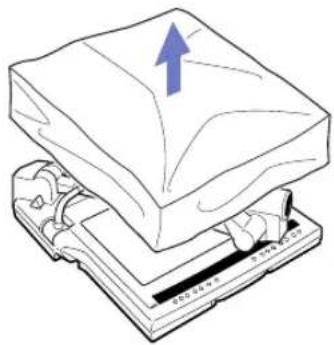
Gently remove the cover from the main unit if it is on.
natural_image
Illustration of a computer monitor with an upward arrow on top (no text or symbols)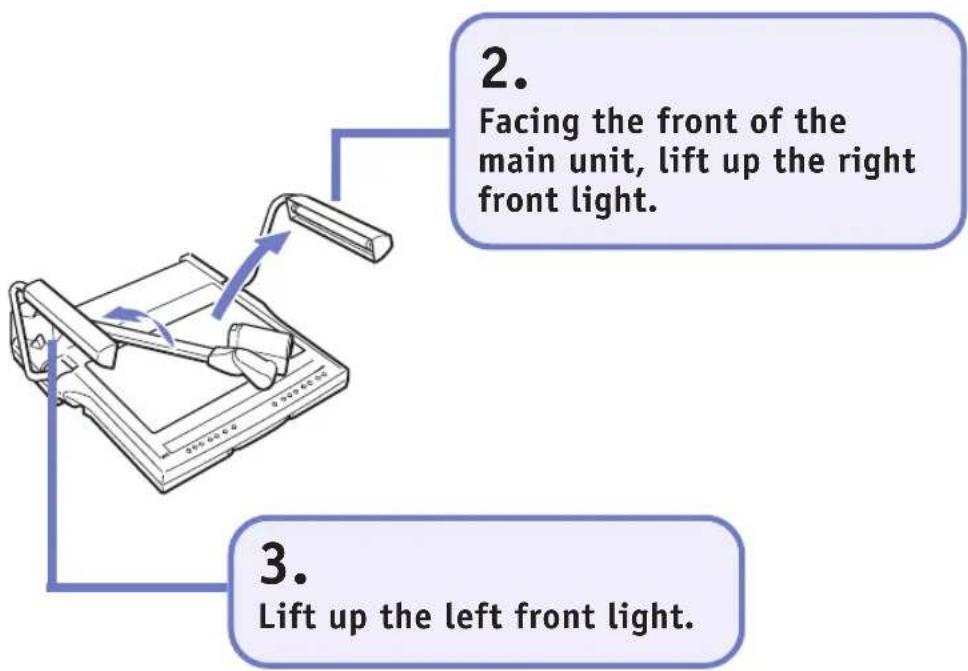
4.
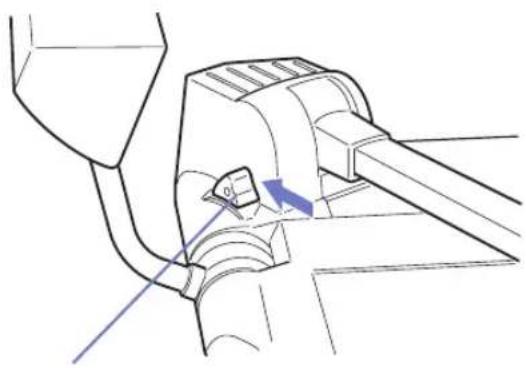
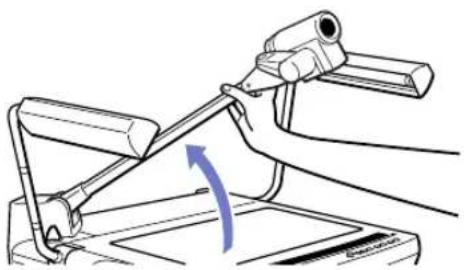
Push the arm lock release lever, which can be found on the main unit's left side at the back.
• The camera arm will now float freely.
natural_image
Technical line drawing of a mechanical assembly with no visible text or symbolsArm Lock Release Lever
natural_image
Line drawing of a mechanical device with a hand operating a lever and rotating around it (no text or symbols)5.
Grasp the camera arm and lift it up until it locks into place with a click.
6.
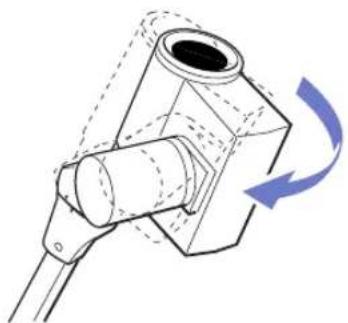
Swivel the camera head horizontally until it clicks into place.
natural_image
Technical line drawing of a mechanical component with a blue curved arrow indicating rotation (no text or symbols)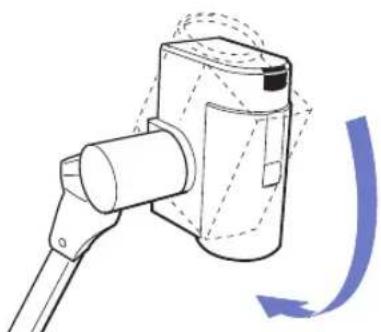
natural_image
Diagram of a mechanical device with a curved arrow indicating rotation or motion (no text or symbols present)7.
Orient the camera head so that the lens points directly onto the object stage.
- Check to make sure that the switch for the closeup lens on the right of the camera head is set to On (p. 97).
Turning On the Power
Turn on the power of each device in the correct sequence.
1.
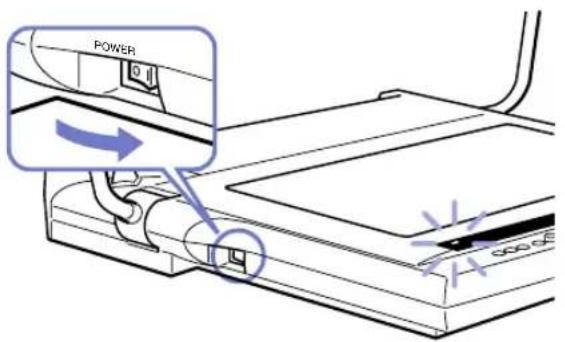
Press the power switch on the main unit to set it to the ( | ) position.
- All the indicators on the control panel will light for about 20 seconds after the power is turned on while the main unit initializes itself. It will indicate the ready state when only the power indicator and a few other indicators remain lit.
2.
Turn on the other devices that you'll be using (computer monitor, computer CPU, projector, etc.).
- Actually, there is no predetermined order in which the main unit, computer and projector has to be turned on.
Starting the Software
If you have set Presentation Software to start automatically (see step 8 at page 21) after Windows has initialized as described in Chapter 1, the following window will display. If this is the case, proceed directly to the next page.
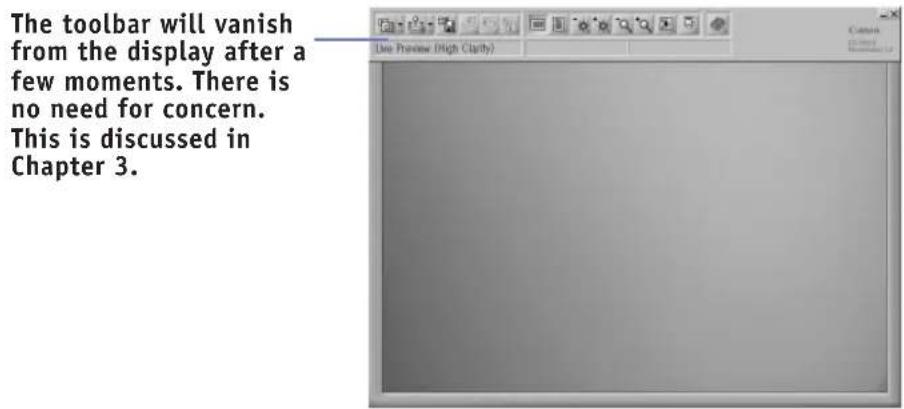
If the above window does not automatically appear and only the Windows desktop displays (a shortcut to the program was not placed in Window's Startup folder), use the following procedures to start the program.
![1. Click the Windows [Start] button on the taskbar and select [Programs], [Canon DZ-3600U] and [Presentation]. • Presentation Software will start and display the window above.](/content/2026/06/1146807/images/32715aada2df40b34d86c8b2ef9c2edefda84be865079104daf6fdcd237e7c4a.jpg)
!!! Important !!!
- Do not detach the USB cable or turn off the main unit while an application program is running.
Note
- If you wish to stop Presentation Software from automatically starting when you run Windows, click the Windows [Start] button and select [Settings] and [Taskbar]. Click the [Start Menu Programs] tab, then click the [Remove] tab. Open the [Startup] folder from the list that displays, select [DZ-3600U Presentation] and click the [Remove] button.
Placing Objects
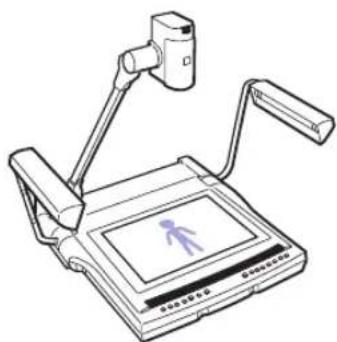
Find a document or other object and place it at the center of the object stage, the white translucent portion.
natural_image
Line drawing of a person using an educational computer (no text or symbols visible)1.
Place the document or object in the center of the object stage, orienting it as shown in the illustration.
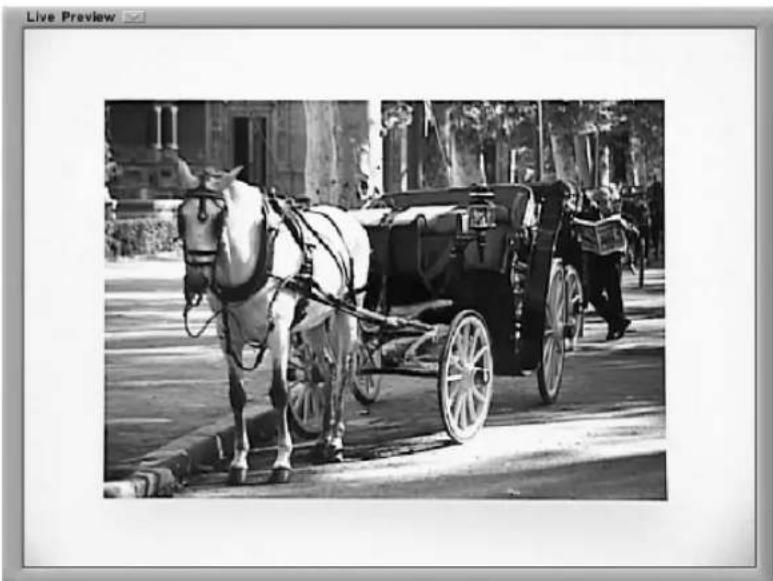
Is the document or object displayed correctly in the large screen monitor, projector screen or your computer monitor? If it does not display, see Chapter 5, Troubleshooting.
natural_image
Black-and-white photo of a horse-drawn carriage on a street, with pedestrians and buildings in the background (no visible text or symbols)Now try putting your hand on the document or object. Notice how the display changes in real time. The movement may appear slightly irregular on the screen. This real-time display is referred to as the 'preview' mode. More details about this are contained in Chapter 3. At this point, it is sufficient to confirm that the real-time display is working.
Note
- Please note that the minor decrease in image quality and irregularity of movement is due to the limitations imposed by the transfer rate of the USB cables. The difference in quality between images captured in still mode and preview mode is so great as to preclude comparison.
A Few of the Basics
We will now introduce you to a few procedures involving the remote control.
!!! Important !!!
- Aim the remote control at the sensor on the camera head to execute commands. For details, see the section entitled Important Instructions for the Remote Control (P.23).
natural_image
Illustration of a person using an LCD display with a handheld device emitting sound waves (no text or symbols)Note
- Each of the functions introduced in this section, such as zooming, can also be controlled from the main unit's control panel or your computer. This explanation in this chapter is written on the premise that you will probably use the remote control in an actual presentation. For instructions for controlling the DZ-3600U from the control panel or a computer, see the respective explanations in Chapter 3.
- In this chapter, we explained how one image is captured and displayed. In fact, more than one image can be captured and saved onto the computer disks. See Chapter 3 for more detail on the wide array of DZ-3600U functions.
Zooming
This topic will explain how to change the size at which an object appears in the display. The size is changed with the zoom function.
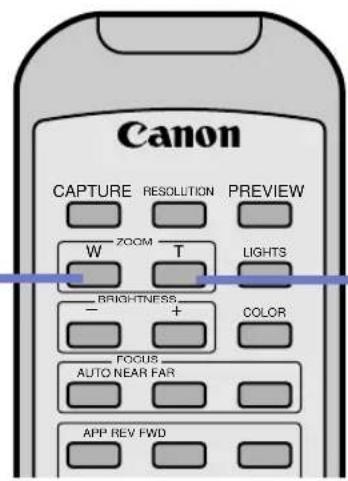
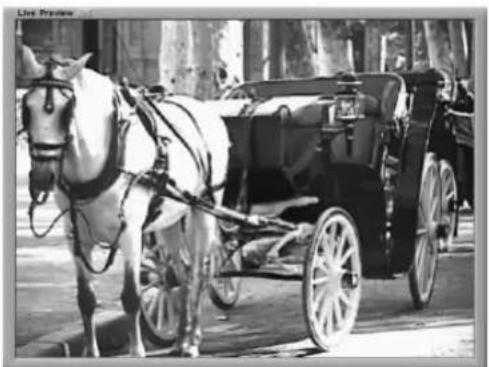
1.
Press the [T] button on the remote control for two or three seconds.
- The display will show a close-up of the document or object.
natural_image
Black-and-white photo of a horse-drawn carriage with two horses, parked outdoors (no visible text or symbols)2.
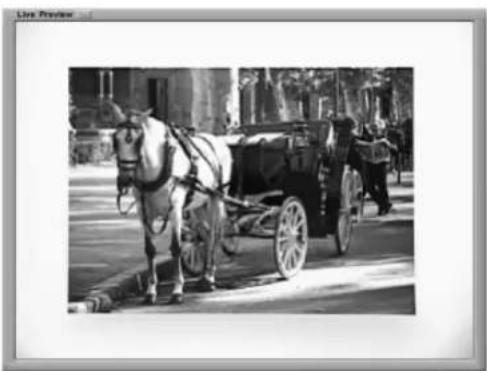
Press the [W] button in the same manner.
- The display will gradually return to its former state.
natural_image
Black-and-white photo of a horse-drawn carriage on a city street, no visible text or symbolsCapturing Images
This topic will show you how to capture the display contents as a still image. The capture function is used to scan and load the document or object.
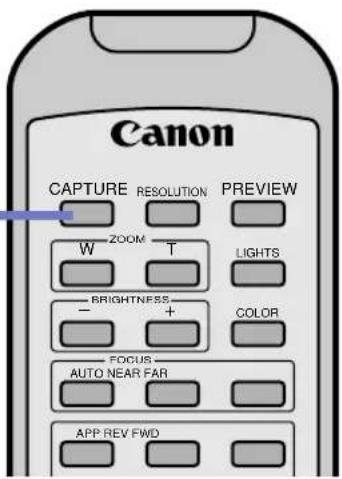
1.
Press the [Capture] button on the remote control.
- The capture will start once you press the capture button, and the captured image will appear in the computer's display after a few moments.
The toolbar will vanish from the display after a few moments. There is no need for concern. This is discussed in Chapter 3.
![CANON DZ3600U - Press the [Capture] button on the remote control. - 2](/content/2026/06/1146807/images/48bf3753f4e5112d8328501ddf7d3917026f7f3cc5aee5e7fad39b63b457db8c.jpg)
natural_image
Black-and-white street scene featuring a horse-drawn carriage and a person in the background (no visible text or symbols)You will note the high resolution of this image compared to the previous real-time images.
Now try placing you hand on the document or object in the same manner as before. Note that nothing will change in the display. That is because the display is not currently showing a real-time image. Instead, it is showing an image that has been loaded into the computer. The DZ-3600U is now in what we call the 'still' mode.
The difference between the preview and still modes is a key concept for operating the DZ-3600U with Presentation Software. Keep this concept in mind as you read further.
Note
- The image quality (fineness or resolution of the image) can be set to one of two settings. Chapter 3 discusses this in greater detail.
Rotating Captured Images
Next, try your hand at changing the orientation of the displayed image with the rotate function.
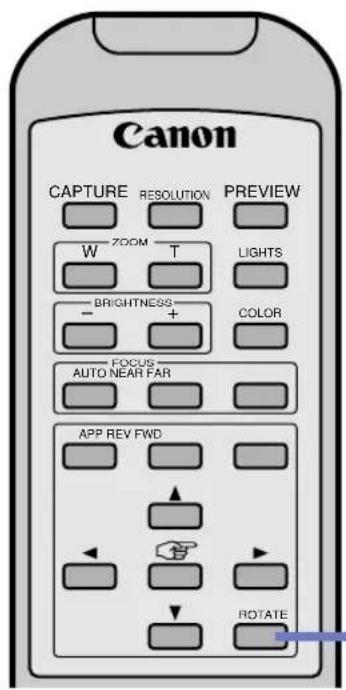
1.
Press the [Rotate] button on the remote control.
- The image will rotate 90 degrees counterclockwise each time the button is clicked.
![CANON DZ3600U - Press the [Rotate] button on the remote control. - 1](/content/2026/06/1146807/images/85ab934a0ab3214517f88d75c8cd40c97845a780f83d3127f5a8cdcf3d047805.jpg)
natural_image
Black-and-white photo of a horse-drawn carriage with riders, parked outdoors (no visible text or symbols)![CANON DZ3600U - Press the [Rotate] button on the remote control. - 2](/content/2026/06/1146807/images/8abbced13643087e13150d0610ccc7c6d2777b20b9989373011106a3f3ea2a23.jpg)
natural_image
Black-and-white photo of industrial machinery components, possibly a motor or conveyor system, with no visible text or symbols.Although there are still numerous other functions to demonstrate, we will draw this session on the basics to a close in order to describe the shut down procedures in the following pages.
Closing Software Programs
The following procedures are for closing the Presentation Software program.
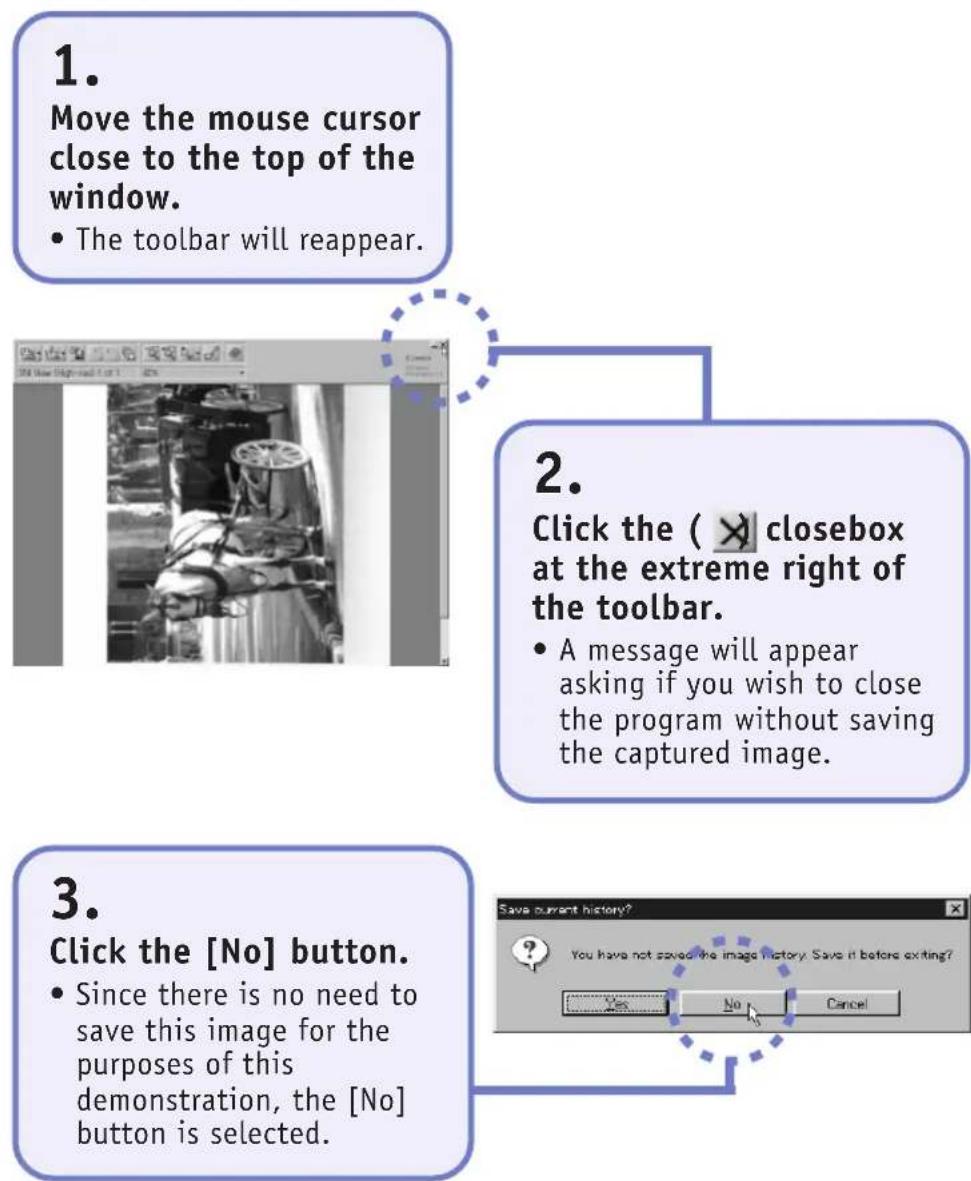
flowchart
graph TD
    A["1. Move the mouse cursor close to the top of the window.<br>• The toolbar will reappear."] --> B["2. Click the (×) closebox at the extreme right of the toolbar.<br>• A message will appear asking if you wish to close the program without saving the captured image."]
    B --> C["3. Click the [No"] button.
• Since there is no need to save this image for the purposes of this demonstration, the["No"] button is selected.]
    C --> D["Save current history?<br>You have not saved the image history. Save it before exiting?"]
    D --> E["Yes"] --> F["No"] --> G["Cancel"]
!!! Important !!!
- If the ( ✗ closebox is clicked before the captured image has been saved to disk, the Save confirmation window will display. Click the [Yes] button in this message to save the image to disk. For further instructions on saving, see Saving Images (P.53).
Turning Off the Power
Turn off the power on the devices in the correct sequence.
!!! Important !!!
- Wait at least five seconds before turning the power switch back on after shutting it off. Turning it on too quickly may result in a malfunction.
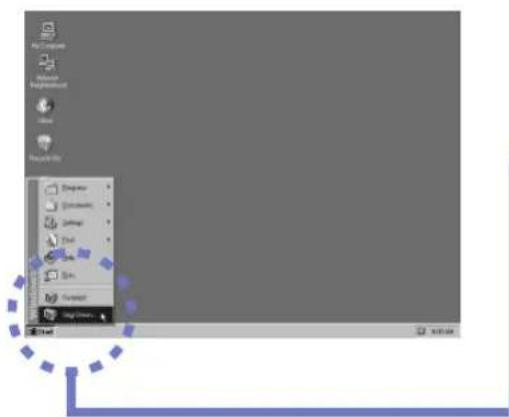
1.
Click the Windows [Start] button on the taskbar and select [Shut Down], following the correct procedures to close Windows.
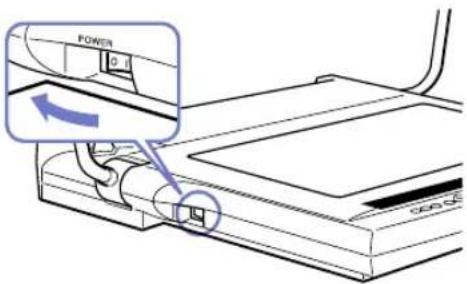
2.
Press the power switch on the DZ-3600U main unit to set it to the (○) position.
- The main unit will power down.
3.
Turn off the other devices, such as the computer and projector.
- Actually, there is no predetermined order in which the main unit, computer and projector has to be turned off.
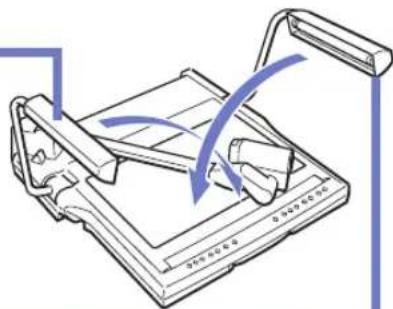
Knock-Down
This topic explains how to fold the arms and prepare the equipment for storage or transport. You may skip this topic if you will not be storing the equipment.
1.
Swivel the camera head until it locks into place with the lens pointing up.
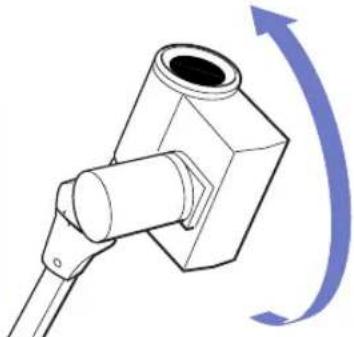
natural_image
Technical line drawing of a mechanical component with a blue curved arrow indicating rotational motion (no text or symbols)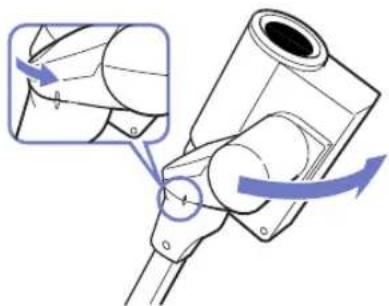
natural_image
Technical diagram of a mechanical component with directional arrows indicating motion or force (no text or symbols present)2.
Turn the camera head in a horizontal plane to align the grooves.
3.
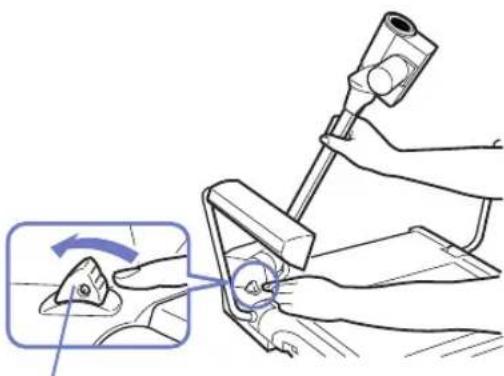
Support the arm with your right hand while you push the arm lock release lever with your left.
• The arm will now move freely.
natural_image
Technical illustration of a mechanical clamp or lever mechanism with a magnified inset showing a pivot point (no text or symbols present)Arm Lock Release Lever

!!! Important !!!
- Always support the camera arm with one hand before you push the arm lock release lever. Failure to support it may result in the camera head crashing down unexpectedly and causing injury or damage.
- Ease the arm down gently when folding it.
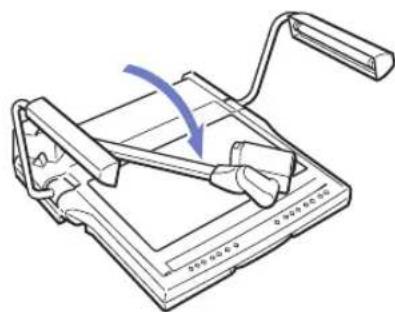
4.
Fold the arm down gently until it clicks into place on the object stage.
5.
Fold down the left front light first.
6.
Fold down the right front light last.
- Face the lights toward each other.
natural_image
Diagram of a mechanical device with a base and clamping mechanism, showing no text or symbols7.
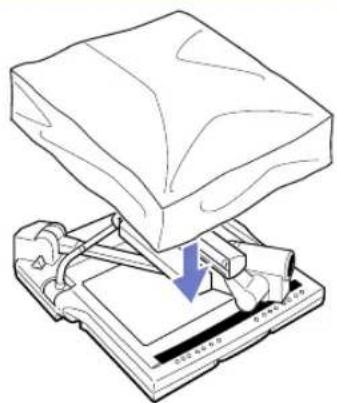
If required, place the cover carefully over the unit when the lamps have cooled sufficiently.
!!! Important !!!


- The fluorescent tubes in the arm lights may become extremely hot after use. Do not touch these tubes directly with any part of your body and wait until they have cooled before placing the cover over the unit.
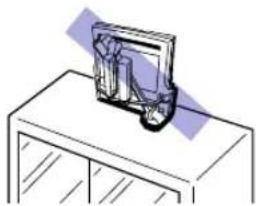
- Store the equipment in a horizontal position. It may fall over and cause injury or damage if stored vertically.
- Before the equipment is picked up or moved, ensure that the power is turned off, all the cords and cables are unplugged and the arms are folded down. Pick it up by the carrying handle.
natural_image
Line drawing of a TV mounted on a cabinet (no text or symbols)Note
• The cover contains a pocket for storing the power cord.
Transport Precaution
Always securely fasten the camera head with tape when transporting the equipment.
Chapter 3
An Introduction to the Features
About the Bundled Software
This topic features the two programs bundled with the DZ-3600U.
The Two Programs to Install
The software installed onto your computer with the setup utility includes DZ-3600U Presentation Software, an application program, and DZ-3600U TWAIN Driver, a driver for capturing images.
DZ-3600U Presentation Software
This application program assists in creating effective full-featured presentations with the DZ-3600U Digital Document Camera. It allows you to adjust the size and brightness of the high-definition still images captured by the camera for display with a projector or other device. Because you can capture any number of images in advance, and even switch between application programs on the fly, your presentations will progress smoothly and naturally. Moreover, most of the functions can be operated with the remote control, which can be easily managed by virtually anyone.
natural_image
Black-and-white photo of a horse-drawn carriage on a street, no visible text or symbolsNote
- Presentation So ftw are also works with Primary Presentation Application (PPA) compliant application programs, such as Microsoft PowerPoint, making it possible to achieve even more dynamic presentations (see psge 84).
- The ( _ ) butt on at the top right of the window can be used to temporarily minimize the presentation So ftw are window on the Window desktop. To restore it, click the DZ-3600U presentation Software icon on the Window taskbar.
DZ-3600U TWAIN Driver
This driver software is for use within standard image processing (graphics) application programs to capture still images from the DZ-3600U. This driver allows you to use the graphics programs with which you are the most familiar to operate the DZ-3600U as a three-dimensional scanner.
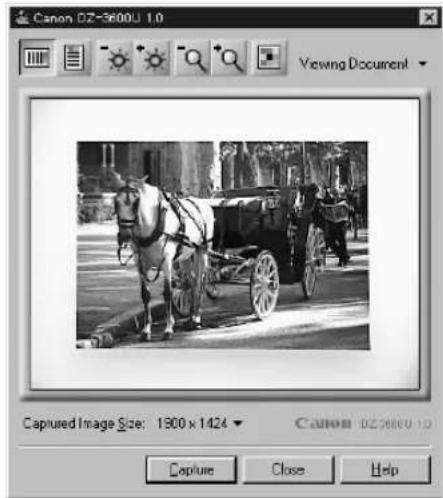
For operating instructions, refer to the section entitled Capturing Images with TWAIN Driver (P.86).
!!! Important !!!
- Application programs must be TWAIN-compliant (TWAIN_32) to be used with the DZ-3600U TWAIN Driver.
Preview Mode and Still Mode
The first priority in using the Presentation Software program is to learn the distinction between the preview mode and the still mode.
Presentation Software features two modes, the preview and still modes, and is always in one mode or the other. The following topic addresses the significance and role of the respective modes.
Note
- Presentation Software starts up in the preview mode.
- The instructions f or swit ching between the two modes are contained in the explanations for various functions (P.50, 60).
Preview Mode
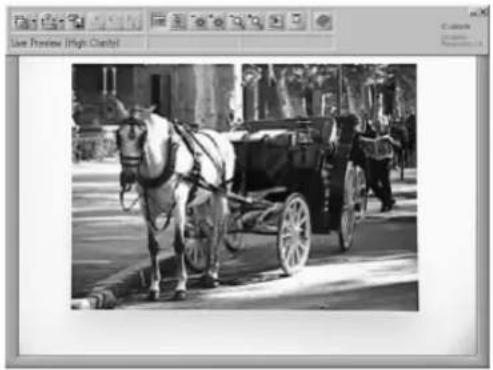
The preview mode is for viewing objects in real time on a computer display (or other device connected to the computer, such as a projector or large screen monitor).
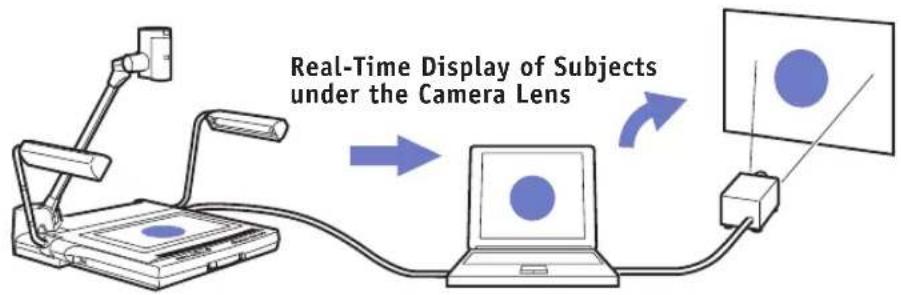
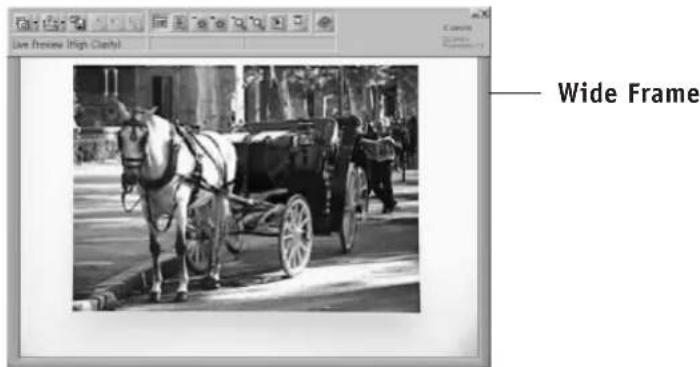
A wide frame appears around the edges of the display when this mode is active. Since the image changes in real-time in preview mode, the preview mode is convenient for aligning objects and adjusting the zoom and brightness before attempting to capture a high-resolution image.
Still Mode
The still mode is for viewing images on a computer display (or other device connected to the computer, such as a projector or large screen monitor) that have been loaded from the DZ-3600U into the computer.
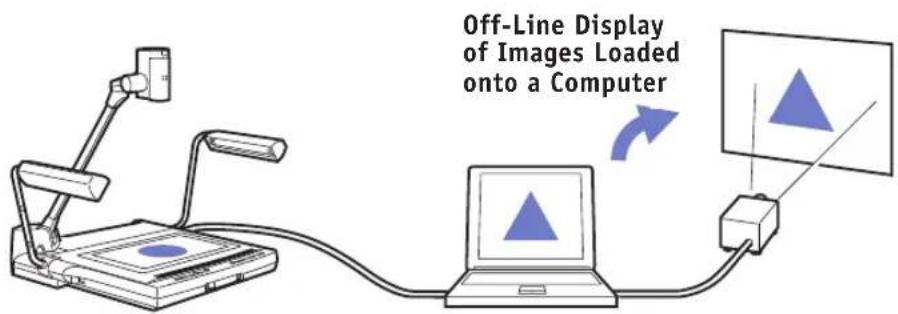
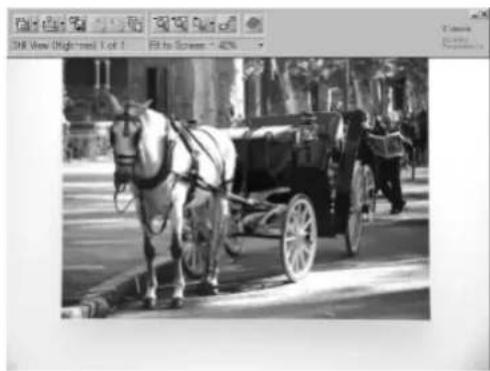
In still mode, you can switch between or change the display size of numerous previously loaded images. You can tell when Presentation Software is in this mode because the wide frame is missing from the edges of the image.
natural_image
Black-and-white street scene featuring a horse-drawn carriage with riders, no visible text or symbolsToolbar and Status Bar
This topic briefly explains the buttons and message area that appear at the top of the Presentation Software window.
Toolbar
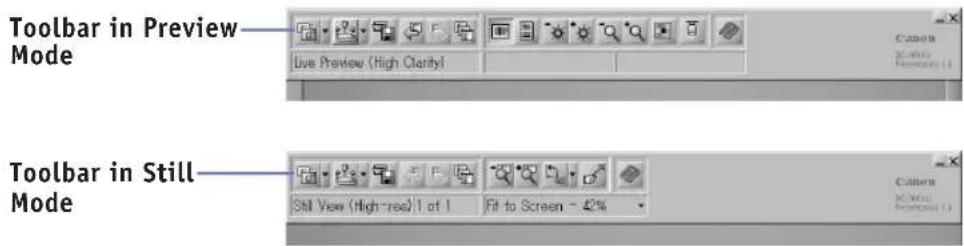
The toolbar is the area at the top of the window that contains the buttons for controlling various Presentation Software functions. The buttons on the toolbar change according to the mode.
!!! Important !!!
- Some buttons, such as the (button, are split into two sections with a left and right portion. Please note that each section represents a different command.
Note
- Positioning the mouse cursor o ver a butt on will cause its name t o display after a few moments.
Status Bar
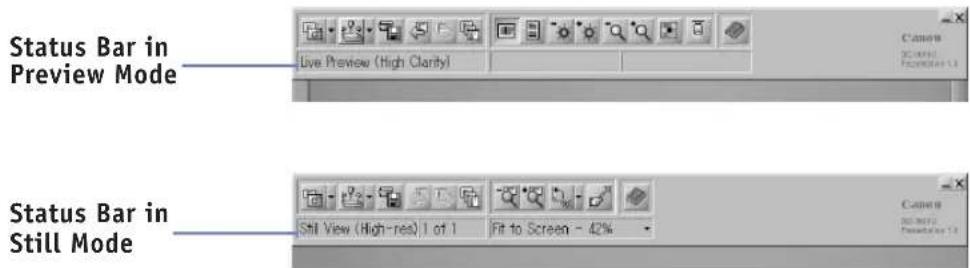
The status bar is the area that appears directly under the toolbar. This bar automatically displays the current mode and various other messages that indicate the DZ-3600U's state. In still mode, the status bar also contains menus, such as the zoom menu for adjusting image display sizes.
Display/Hide the Toolbar and Status Bar
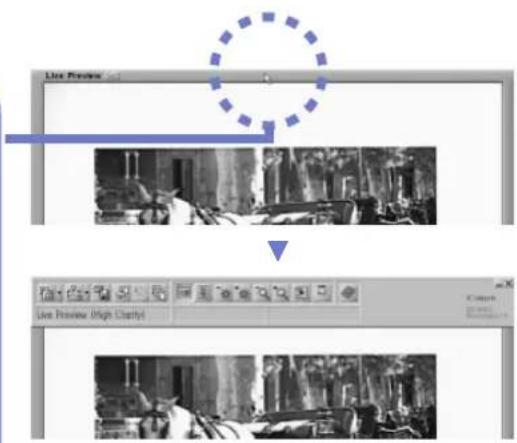
The toolbar and status bar are intended as tools for the presenters and their helpers, and are not meant to be seen by the audience. Presentation Software, therefore, provides the means to easily hide and display them.
Display the Toolbar and Status Bar
Move the mouse cursor to the top of the window
- The toolbar and status bar will display.
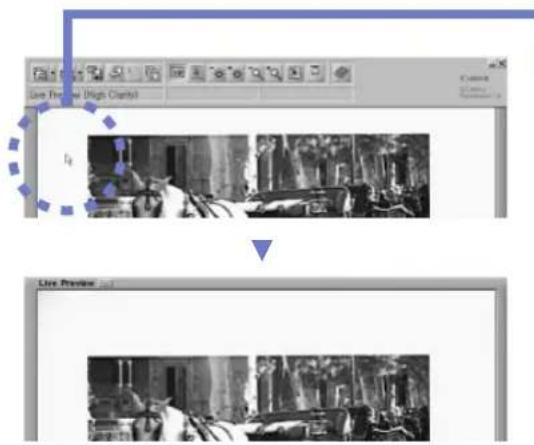
Hide the Toolbar and Status Bar
Method 1: Click any part of the window away from the toolbar or status bar (the image display section).
Method 2: Position the mouse on any part of the window away from the toolbar and status bar for approximately 2 seconds.
- The toolbar and status bar will disappear.
Note
- The examples abov are of the preview mode, but the same procedures can be used in still mode.
- In preview mode, the toolbar and st atus bar can also be displayed by clicking the ( ) butt on that appears at the top of the wide frame.
Capturing Images
The images captured by the DZ-3600U's camera can be loaded onto a computer as still images.
This guide describes individual functions and commands from this point onward. The preview mode and still mode notations in the boxes at the top right of the title page for each topic indicate the mode(s) to which the topic applies.
When this command is executed in preview mode, Presentation Software automatically switches to still mode to display the captured image. Presentation Software remains in still mode when the capture command is executed in still mode, showing the newly captured image in the display.
Note
- You can select the r resolution setting f or the image captur e. For det ails, see Selecting the Captur e Resolution (P .48).
Procedure with the Remote Control
![Capturing Images Press the [Capture] button. • You will capture the subject appearing in the camera lens when the button is pushed.](/content/2026/06/1146807/images/e980bb4d04b56a32c03059986d595e4938bd575134b22c8ad589d1d4640facac.jpg)
Procedure with the Control Panel
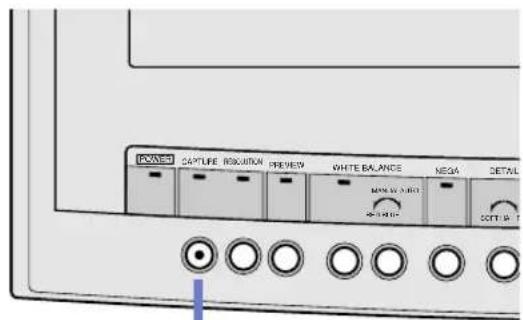
Capturing Images
Press the [Capture] button.
- You will capture the subject appearing in the camera lens when the button is pushed.
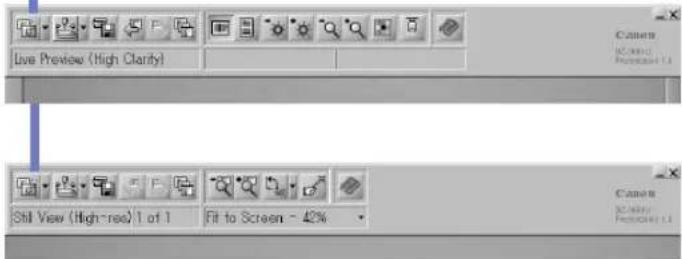
Procedure with the Computer
Preview Mode
Still Mode
Capturing Images
Click the ( ) button.
- You will capture the subject appearing in the camera lens when the button is clicked.
Selecting the Capture Resolution
This topic explains how you can set the resolution at which an image is captured.
At the High Resolution setting, images are 1,900 pixels wide by 1,424 pixels high. At the Low Resolution setting, images are 640 pixels wide by 480 pixels high.
Note
- The resolution is set to High Resolution at startup.
- Although a high-quality image is produced at the High Resolution setting so that fine lines can be distinguished on documents, the tradeoff is the longer time required to capture and display the image. It pays to set the resolution to the optimal value for the specific object type and the purpose for which it is being captured.
- When images are captured at the High Resolution setting, the camera head will emit so ft noises as the lens shifts within it.
Procedure with the Remote Control
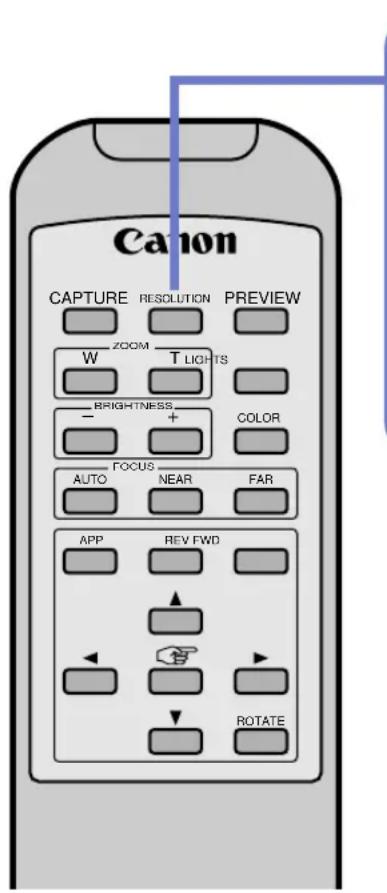
Selecting the Capture Resolution
Press the [Resolution] button.
- Each press of the button will switch between the two resolution settings.
- The resolution setting will display on the Presentation Software status bar.
Procedure with the Control Panel
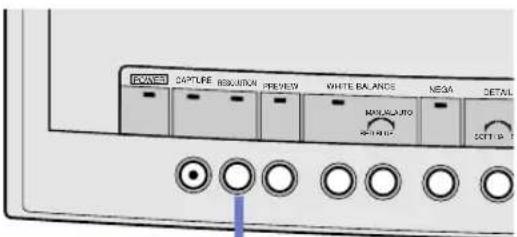
Selecting the Capture Resolution
Press the [Resolution] button.
• Each press of the button will switch between the two resolution settings.
- The resolution setting will display on the Presentation Software status bar.
Procedure with the Computer
Selecting the Capture Resolution
Click the ( ) to the right of the ( button and select High Resolution or Low Resolution from the menu.
- The image will be captured at the selected resolution. Each click of the ( ) button will cause the image before the camera lens to be captured at the selected resolution until the setting is changed.
Preview Mode
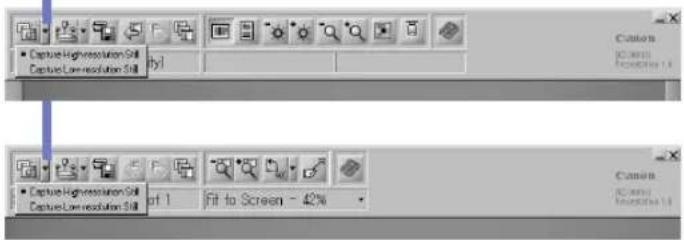
Still Mode
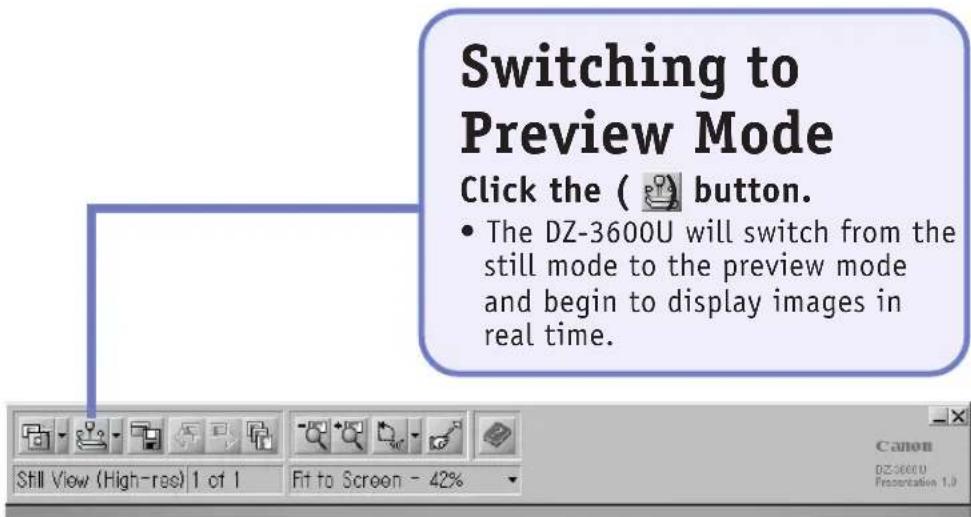
Switching to Preview Mode
This topic addresses how you can switch from still mode to the preview mode.
Procedure with the Remote Control
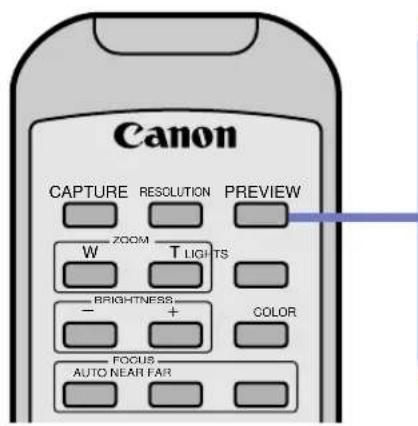
Switching to Preview Mode
In still mode, press the [Preview] button.
- The DZ-3600U will switch from the still mode to the preview mode and begin to display images in real time.
Procedure with the Control Panel
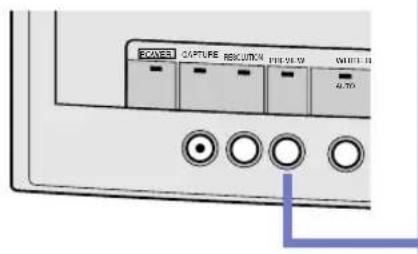
Switching to Preview Mode
In still mode, press the [Preview] button.
- The DZ-3600U will switch from the still mode to the preview mode and begin to display images in real time.
Procedure with a Computer
Selecting the Display Resolution
Preview Mode
In preview mode, you can select between display settings that either feature higher resolution or faster display speed for real-time images.
If [High Clarity] is selected, priority is placed on displaying images at the highest resolution setting, but the speed at which images appear and refresh (the speed at which each frame appears) will be slower. If [High Speed] is selected, priority is placed on displaying images quickly, but the image will be shown at a lower resolution.
Note
- The High Clarity option is selected at startup.
- The display resolution setting has no effect upon the resolution at which images are captured.
- Display rates depend upon the characteristics of the computer system.
- It is easier to align objects on the object stage when the [High Speed] is selected.
Procedure with the Remote Control
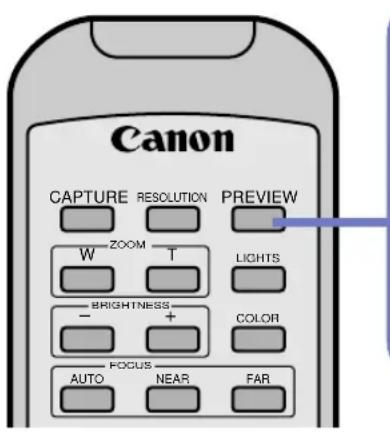
Selecting the Display Resolution
In preview mode, press the [Preview] button.
- The selection will switch between [High Clarity] and [High Speed] each time the button is pressed.
Procedure with the Control Panel
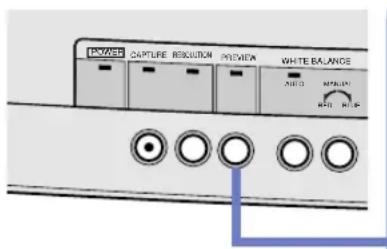
Selecting the Display Resolution
In preview mode, press the [Preview] button.
- The selection will switch between [High Clarity] and [High Speed] each time the button is pressed.
Procedure with a Computer
Selecting the Display Resolution
Click the ( ) button to the right of the ( ) button and select either [High Clarity] or [High Speed] from the menu.
- The display resolution and display rate will change.
- In still mode, click this button to switch into preview mode and select a display resolution.

Saving Images
Captured images can be saved as a file to a computer disk.
Images can be saved to disk in any of the following three ways. Please note that files can only be saved and opened with the computer and not with the remote control or DZ-3600U control panel.
Saving Images as Presentation Software Files
This method allows you to save all of the currently captured images to disk at once. Files saved with this method can be opened again by the Presentation Software program. Use this method if you wish to reuse files for future presentations (for presenting the same images at a different location, for example). The limitation of this method is that the files cannot be opened by other application programs, such as graphics programs.
Note
- The files saved with this method are assigned the ".PIH" file extension.
- The default save location (the folder automatically displayed in the save window) is the [Presentation Histories] folder within the [My Documents] folder.
Saving Just the Displayed Image
This method allows you to save only the current image in the display to disk. You can select between the JPEG (.JPG) and bitmap (.BMP) file formats. This method can only be selected in still mode.
Note
- There are many image file formats currently in use. Presentation Software can save in two of the most popular, the JPEG and bitmap formats. The JPEG format compresses the image data, allowing the image to be saved in an extremely small file. You are recommended to use this format for most purposes.
- The default save location (the folder automatically displayed in the save window) is the [Presentation Images] folder within the [My Documents] folder.
Saving All Images and the HTML Index
This method creates a new folder, saves all the current captured images in it and adds an HTML index for browsing the images. The files are saved in the JPEG (.JPG) format.
Note
- The default save location (the folder automatically displayed in the save window) is the [Presentation Histories] folder within the [My Documents] folder.
Saving Images As Presentation Software Files
Preview Mode
Still Mode
1.
Click the ( 📋 button.
- A menu will display.
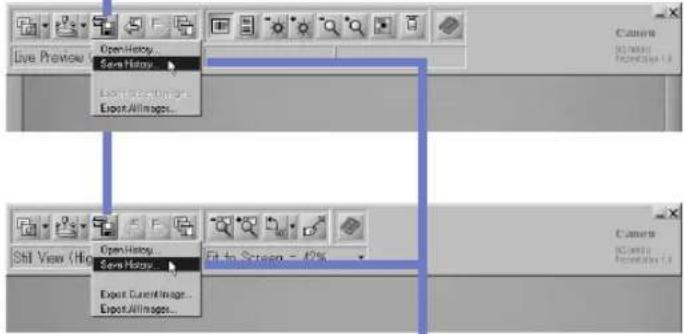
2.
Click [Save History].
- The Save As dialog will display.
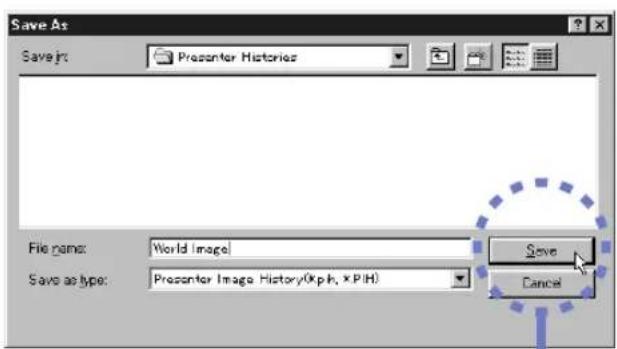
3.
Specify a folder and file name, then click the [Save] button.
- All of the files that have been captured up to this point will save as Presentation Software files.
Saving Just the Displayed Image
1.
Ensure Presentation Software is in still mode and display the image you wish to save.
![2. Click the ( button. • A menu will display. Still View (High Open History... Save History... Fit to Screen - 42% Export Current Image... Export All Images. 3. Click [Export Current Image]. • The Save As dialog will display.](/content/2026/06/1146807/images/f917fd0e148a105c8345a6b2cfd55e886dd83de75c8c6022009cdbb5731f69a2.jpg)
4.
Specify a folder, file name and file format, then click the [Save] button.
- This will save the image as an image file.
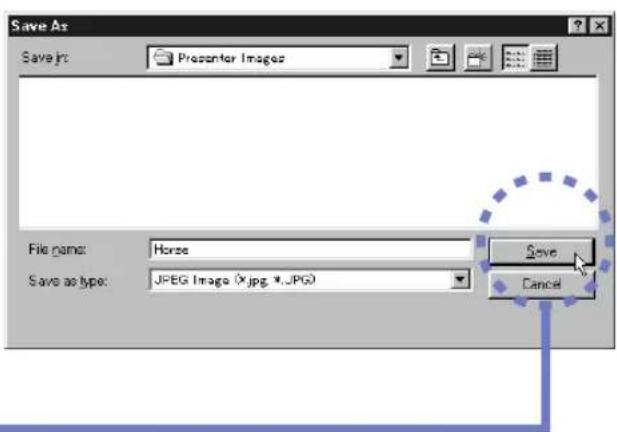
Saving All Images and the HTML Index
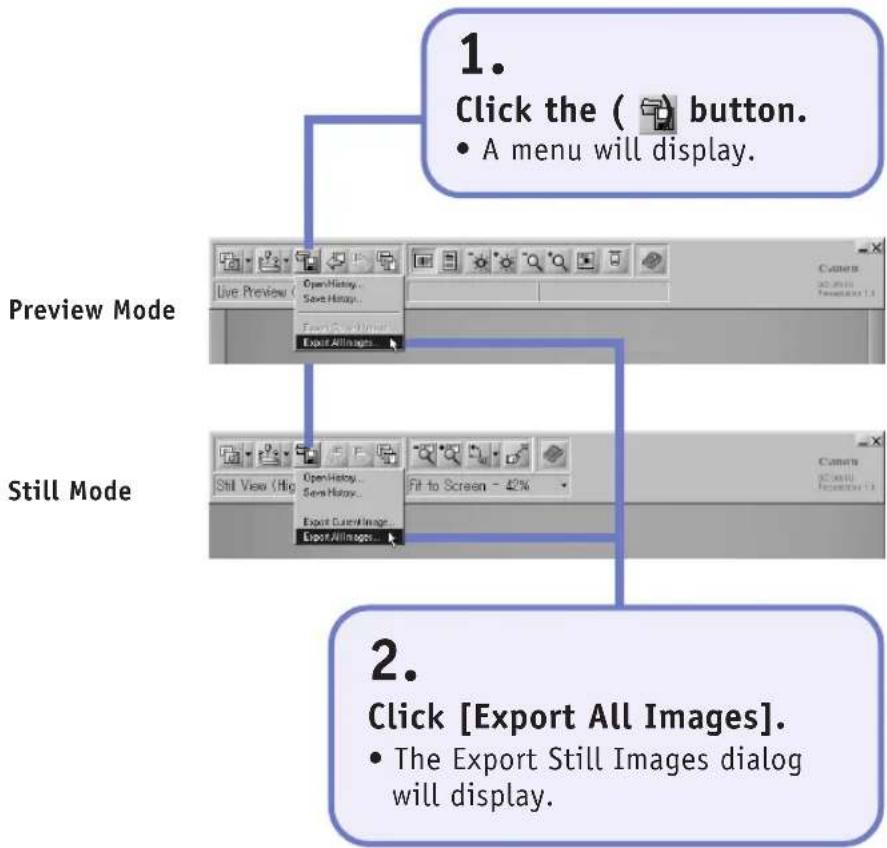
flowchart
graph TD
    A["1. Click the ( button.<br>• A menu will display."] --> B["Preview Mode"]
    B --> C["2. Click [Export All Images"].
• The Export Still Images dialog will display.]
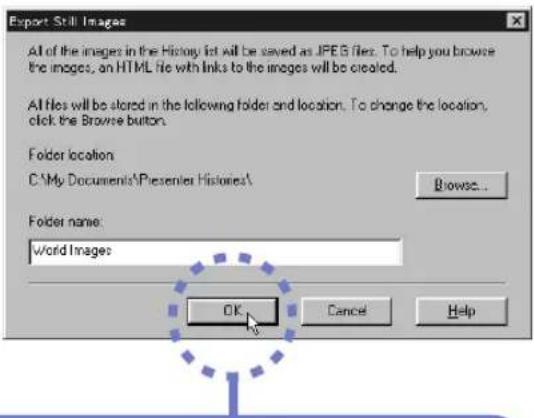
3.
Specify the folder location and folder name, then click the [OK] button.
- To change the suggested folder location, click the [Browse] button to the right.
- A folder with the specified name will be created in the specified location and all the images files will placed in it along with an HTML index file.
Note
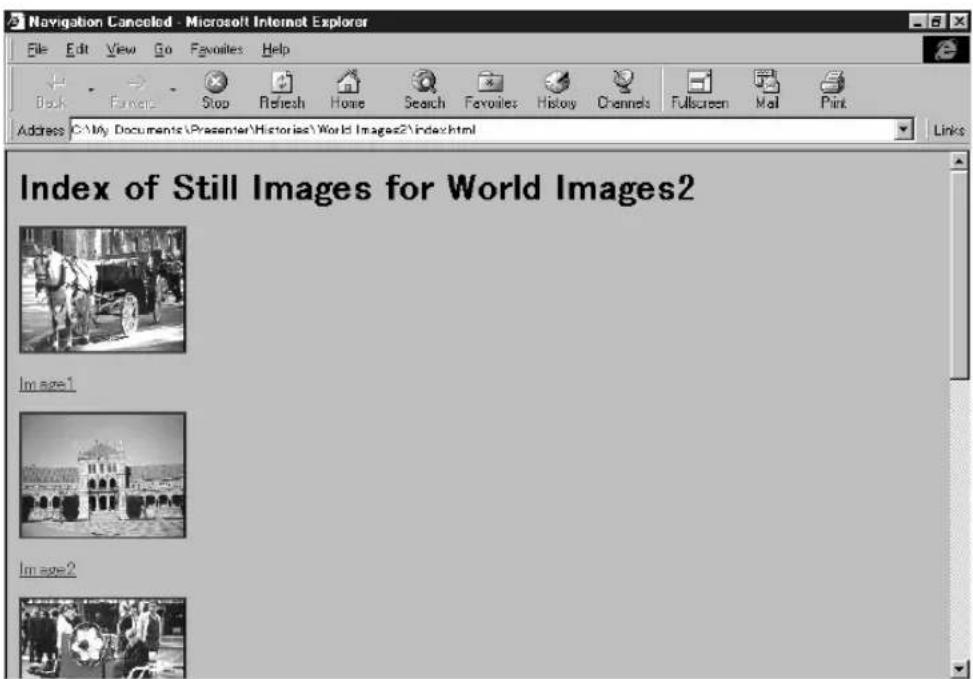
- The following window will display if the HTML index file created by the Saving All Images and the HTML Index method is opened with a browser program for viewing Internet web sites. Click the [Image1], [Image2], etc., icons to open and display each respective image file.
Opening Saved Images
Preview Mode
Still Mode
Presentation Software files saved to disk can be opened and displayed.
!!! Important !!!
- Only files saved in the Presentation Software file format with a ".PIH" file extension can be opened. Image files in standard file formats, such as JPEG or bitmap images, cannot be opened.
- Opening a file causes the unsaved images that have been captured up to that point to be lost. If there are unsaved images when you attempt to open a file, a confirmation message will display. Use this message to save or erase these images.
Preview Mode
Still Mode
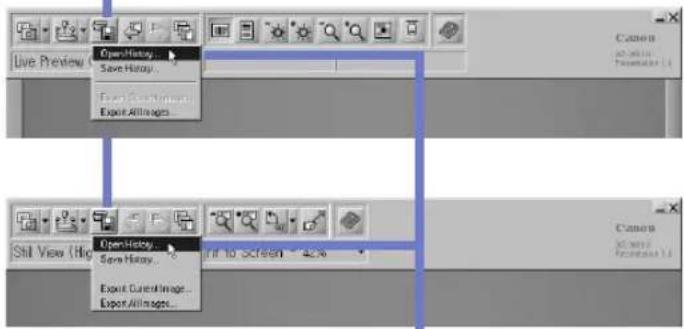
1.
Click the (button.
- A menu will display.
2.
Click [Open History].
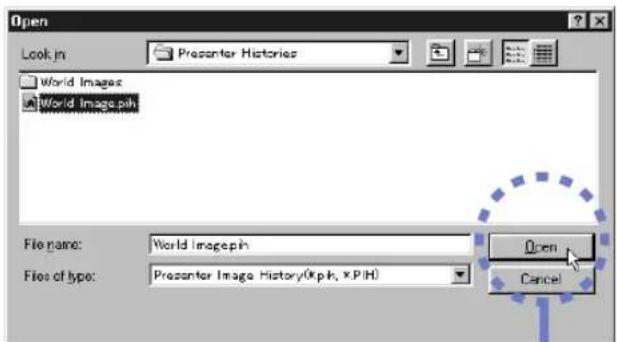
• The Open dialog will display.
3.
Select the file you wish to open and click the [Open] button.
- The previously saved file will open and display in Presentation Software.
Forwarding/Reversing the Display to the Next Image
Preview Mode
Still Mode
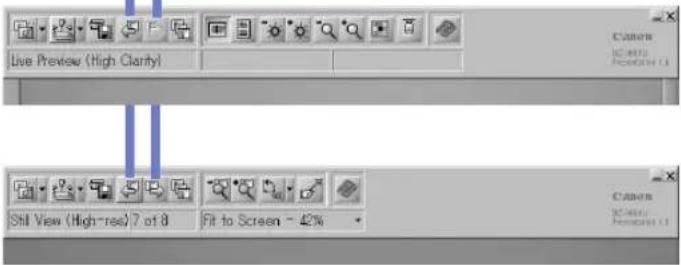
When you are displaying an image in still mode, you can forward or reverse the display to the next image. In preview mode, Presentation Software automatically switches into still mode to perform this procedure.
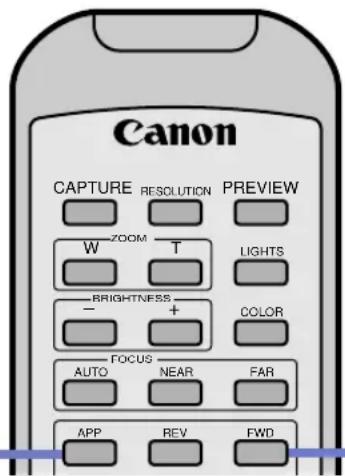
In preview mode, only the [REV] button on the remote control and button on the toolbar are enabled for this command.

Note
- The image number of the currently displayed image is shown in the status bar as XXX of YYY, where the Xs represent the number of the current image and the Ys represent the total number of images captured.
Procedure with the Remote Control
To Reverse the Display to the Previous Image
Press the [REV] button.
- The image immediately prior to the currently displayed image will display.
- In preview mode, Presentation Software will switch into still mode and display the last captured image.
To Forward the Display to the Next Image
Press the [FWD] button.
- The image immediately after the currently displayed image will display.
Procedure with the Control Panel
This command cannot be executed from the control panel.
Procedure with a Computer
To Reverse the Display to the Previous Image
Click the ( ↕) button.
- The image immediately prior to the currently displayed image will display.
- In preview mode, Presentation Software will switch into still mode and display the last captured image.
To Forward the Display to the Next Image
Click the ( 🔒) button.
- The image immediately after the currently displayed image will display.
Preview Mode
Still Mode
Selecting Images from the List
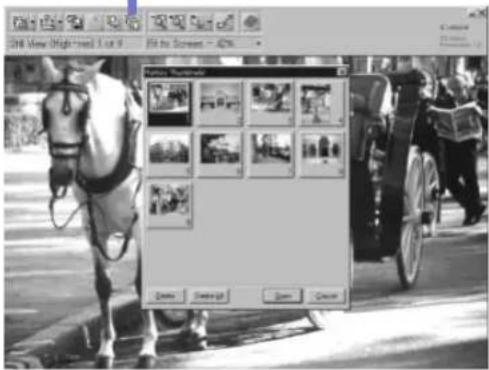
A particular image can be selected from a list of previously captured images and displayed.
If this command is initiated in preview mode, Presentation Software automatically switches to still mode and displays the selected image.
Note
- A scroll bar may appear on the right side of the image list depending upon the number of previously captured images. Use the scroll bar to find the file you wish to select.
- You can delete an image by selecting it from the list and clicking the [Delete] button. All of the captured images can be deleted at once by clicking the [Delete All] button.
Procedure with the Remote Control
This command cannot be executed with the remote control.
Procedure with the Control Panel
This command cannot be executed with the control panel.
Procedure with a Computer
To Select a Previously Captured Image from the List
Click the ( ☐) button, select the image from the list and click the [Open] button.
- Presentation Software will switch to still mode and display the selected image.
- An image can be opened by double-clicking it in the list.
Adjusting the Display Size of Preview Images
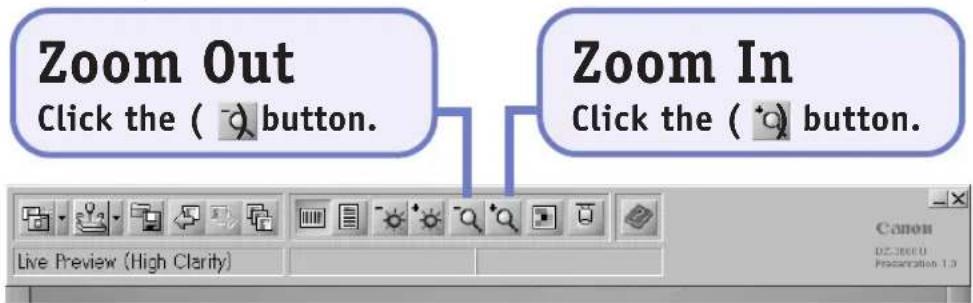
The zoom command can be used to change the image display size. To make zooming easier, set the display resolution to [High Speed].
!!! Important !!!
• Over-zooming the image of a three-dimensional object may exceed the focal adjustment capabilities, resulting in a blurred image.
- The image may be out of focus if it is over-zoomed and the switch for the closeup lens is set to Off. For instructions regarding the closeup lens, see Shooting the Surroundings (P.81).
Procedure with the Remote Control
![Zoom Out Press the [W] button. Zoom In Press the [T] button. Canon CAPTURE RESOLUTION PREVIEW ZOOM T LIGHTS BRIGHTNESS COLOR](/content/2026/06/1146807/images/3039b286d598a4734c6efe740b684c1140d356f1a5a2030a290203bb47fd65cc.jpg)
Procedure with the Control Panel
![Zoom Out Press the [Wide] button. Zoom In Press the [TELE] button.](/content/2026/06/1146807/images/441d835d11d6adc9406845fcf5755683b888ea0cce26ef9cce08859a6c74daf6.jpg)
Procedure with a Computer
Changing the Display Size of Captured Images
Still Mode
The display size of captured images can be changed in still mode.
!!! Important !!!
- The zoom buttons will be shown gray when the maximum level of magnification is about to be exceeded and the command will not execute.
Note
- When the image is zoomed larger than the window, scroll bars appear on the right and bottom of the window. It is also easy to shift the image in the display with the (▲▼◀) cursor buttons on the remote control.
Procedure with the Remote Control
![Zoom Out Press the [W] button. Zoom In Press the [T] button. CAPTURE RESOLUTION PREVIEW ZOOM T LIGHTS BRIGHTNESS COLOR - + FOCUS AUTO NEAR FAR APP REV FWD Fit to Window Press the [-] button. Fit to Width Press the [+] button.](/content/2026/06/1146807/images/7881fd6e35eeb1882ce65c3bba3f0061f6ab8e1a5be91f7e091028829bd9de98.jpg)
Procedure with the Control Panel
This command cannot be executed from the control panel.
Procedure with a Computer
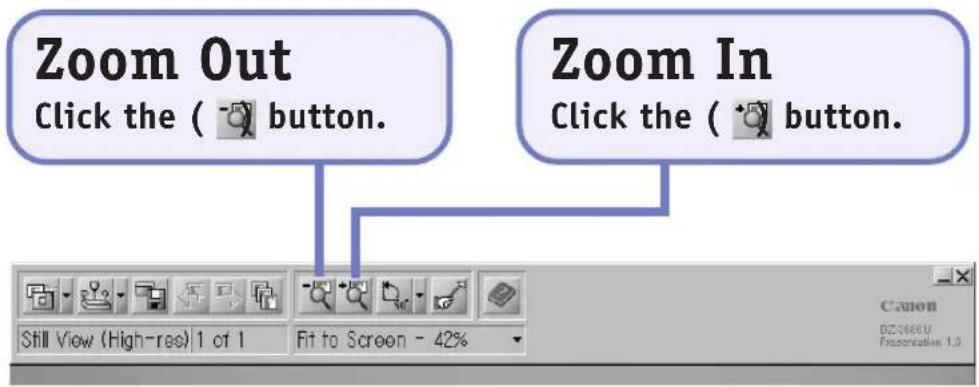
There are two ways to change the zoom setting with the computer.
Method 1
This method uses the Zoom Out/Zoom In buttons.
Method 2
This method uses the pull-down menu on the status bar to select a zoom setting.
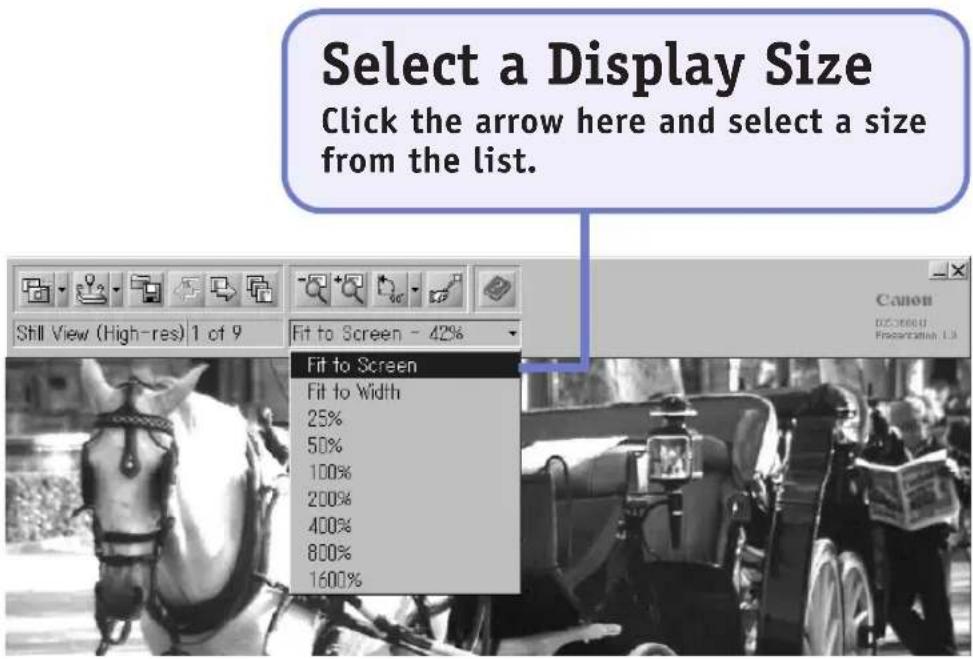
Adjusting the Brightness of Preview Images
The brightness of images in preview mode can be adjusted.
Note
- This function can be used to adjust the image brightness when an extremely dark or bright document or object is displayed, or when the document is relatively small and greater contrast is required to distinguish it from the white of the object stage.
- When the document is extremely dark, the image quality can be improved by placing a piece of black paper behind it.
- The brightness can be adjusted with the control panel even in still mode. However, the change in brightness cannot be verified unless a video monitor is directly connected to the DZ-3600U.
Procedure with the Remote Control
![Darker Press the [-] button. Canon Brighter Press the [+] button. CAPTURE RESOLUTION PREVIEW ZOOM T LIGHTS BRIGHTNESS COLOR - + FOCUS AUTO NEAR FAR APP REV FWD ROTATE](/content/2026/06/1146807/images/5e6602af00f9351ab7a49cb5756dc73f968c1e41ae28f3e82a0eaf96c888311e.jpg)
Procedure with the Control Panel
![Adjusting the Brightness Turn the [Brightness] dial. • Twisting the dial clockwise brightens the image. Twisting it counterclockwise darkens the image.](/content/2026/06/1146807/images/0b406b8bfa3892f5d469c6b15a7e7ce73158708565c47f3277291e89b510e3d1.jpg)
Procedure with a Computer
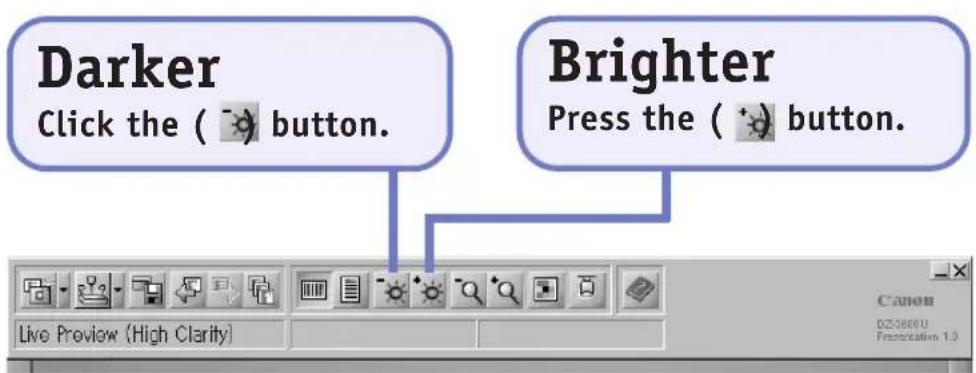
Adjusting the Focus of Preview Images
The focus is normally adjusted with the autofocus function, but it can be adjusted manually with the procedures below.
!!! Important !!!
- Do not forget to reset the DZ-3600U to autofocus (auto indicator on) after you have manually adjusted an image and are displaying the next.
- Pressing the [Auto] button in autofocus mode will turn off the autofocus. There will not be any noticeable change until another document or object is substituted and appears out of focus.
Note
- Use the manual focus when you wish to focus on different parts of a three-dimensional object. Please note that the focal range is approximately 65 mm or greater with the lens zoomed in.
- It may be difficult to focus on some objects - such as glossy items, translucent items, dark cloth and other items with a low reflection profile - with the autofocus. Use the manual focus for these objects.
- The focus can be adjusted manually even in still mode if the control panel is used. However, the change in focus cannot be verified unless a video monitor is directly connected to the DZ-3600U.
Procedure with the Remote Control
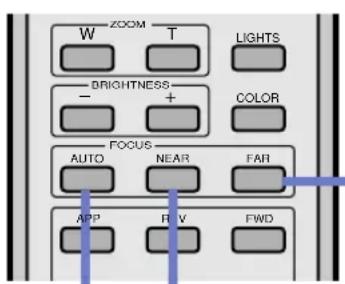
To Adjust the Focus to a More Distant Setting
Press the [Far] button.
- Autofocus will shut off when the button is pressed.
To Adjust the Focus to a Closer Setting
Press the [Near] button.
- Autofocus will shut off when the button is pressed.
To Turn Autofocus On/Off
Press the [Auto] button.
- Autofocus is turned on or off each time the button is pressed.
Procedure with the Control Panel
![To Turn Autofocus On/ Off Press the [Auto] button. • Autofocus is turned on or off each time the button is pressed. • The auto indicator lights when autofocus is on. To Adjust the Focus to a Closer Setting Press the [Near] button. • Autofocus will shut off when the button is pressed. To Adjust the Focus to a More Distant Setting Press the [Far] button. • Autofocus will shut off when the button is pressed.](/content/2026/06/1146807/images/5e4bea83eaf2bbae64d7bb6cd81f20410e898b1d17611e2716903cf2bf3aee0c.jpg)
Procedure with a Computer
This function cannot be controlled from a computer.
Adjusting the Detail of Preview Images
Use the detail function to adjust the sharpness of contour detail in the image.
!!! Important !!!
• Over-emphasizing the image contours may cause it to flicker.
Note
- The image detail can also be adjusted in still mode. However, the change in detail cannot be verified unless a video monitor is directly connected to the DZ-3600U.
Procedure with the Remote Control
This function cannot be controlled with the remote control.
Procedure with the Control Panel
![Adjusting Detail Turn the [Detail] dial. • Twisting the dial clockwise increases the detail. Twisting it counterclockwise softens the detail.](/content/2026/06/1146807/images/72f36a963366bf1a3c62ce8707a81553dd8e91382b7b467173991af7a34b2d01.jpg)
Procedure with a Computer
This function cannot be controlled from the computer.
Adjusting the Color Balance of Preview Images
Preview Mode
The color balance is normally adjusted automatically to the document or object with the auto white balance function. The following procedures may be used to adjust the color balance manually if the color equilibrium is disturbed by a marked change in the ambient lighting.
A large change in the ambient lighting around the DZ-3600U may throw off the color balance and produce a red or blue bias. In this case, you should reset the white balance with the following procedures. They can also be used to intentionally produce a red or blue tint.
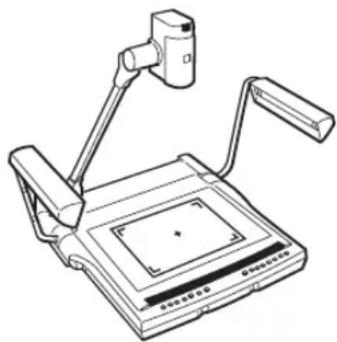
- Place the White Balance Adjustment Chart contained in the Quick Reference Guide onto the object stage as shown in the diagram.
natural_image
Line drawing of a desktop computer with an overhead camera and scroll (no text or symbols)- Zoom the chart until it completely fills the window.
- Press the [Auto] button in the white balance section of the control panel.
The auto indicator will flash until the white balance is reset, then it will turn off.
Replace the White Balance Adjustment Chart with your presentation materials and proceed with your presentation with the equipment in this state. If you wish to intentionally create a red or blue tint, press the [Manual] button after the steps above and use the manual dial to adjust the color.
To reactivate the auto white balance function, press the [Auto] button again.
Note
- The color balance can also be adjusted in still mode. However, the change in color cannot be verified unless a video monitor is directly connected to the DZ-3600U.
Procedure with the Remote Control
This function cannot be controlled with the remote control.
Procedure with the Control Panel
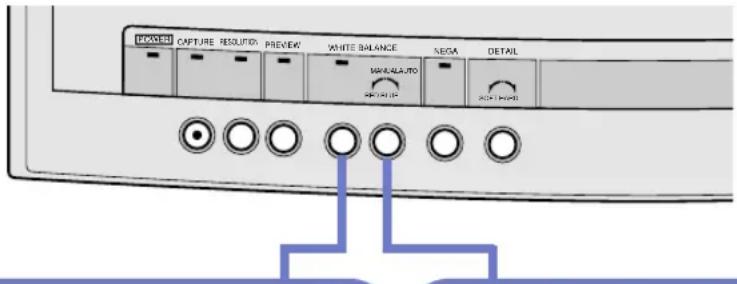
Resetting the White Balance/ Restoring Auto White Balance
Press the [Auto] button.
- If the button is pressed while the auto indicator is shining steadily, the indicator will flash for a few moments, the white balance will reset and the indicator will go off. At this point the auto white balance will be off and the manual dial to the right will be enabled.
- If the button is pressed while the auto indicator is off, auto white balance will be restored.
Adjusting the Color Balance
Adjust the color balance by twisting the [Manual] dial while the auto indicator is off.
- Twisting the dial clockwise strengthens the blue hues, while twisting it counterclockwise strengthens the red hues.
- Pressing the button again while the auto indicator is lit turns off the auto white balance.
Procedure with a Computer
This function cannot be controlled by a computer.
Adjusting the Orientation of Preview Images
Preview Mode
The image in the display can be rotated 90 degrees without physically shifting the object on the object stage.
!!! Important !!!
- The purpose of this command is to change the orientation of the image on a computer display. This function has no direct effect upon the image signal from the DZ-3600U.
- To place a document that will be reoriented with this function, place the top edge on the right of the object stage.
Note
- We will illustrate placement using an A4-sized document, which is longer than it is wide. Assuming that you would normally place this page on the object stage vertically (correct orientation), a portion of the page will protrude beyond the camera's field on the vertical axis. If, instead, you place it on its side (horizontal or landscape orientation) and use the rotate function to shift the image 90 degrees, the entire page will fit into the camera's field.
- The image is captured with the orientation set by this command.
Procedure with the Remote Control
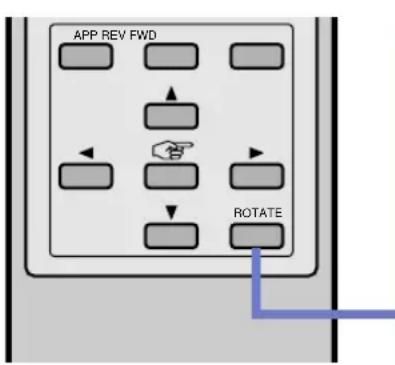
Rotating the Display 90 Degrees
Press the [Rotate] button.
- The image will rotate 90 degrees counterclockwise in the display, appearing to be vertically aligned.
- Pressing the [Rotate] button again restores the image to its original orientation.
Control Panel
This command cannot be executed from the control panel.
Procedure with a Computer
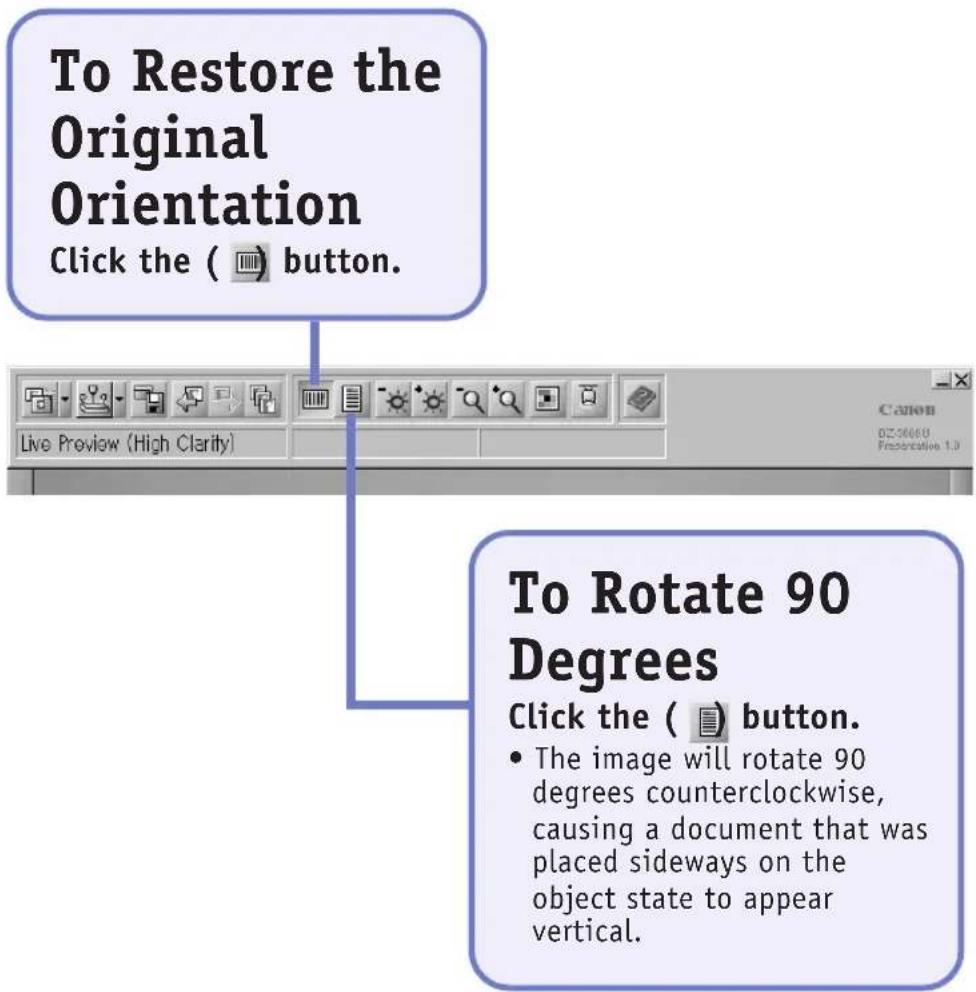
Rotating Captured Images
Still
Mode
This command rotates captured images in 90-degree increments in the display.
Procedure with the Remote Control
![To Rotate an Image Press the [Rotate] button. • The image will rotate 90 degrees counterclockwise each time the button is pressed.](/content/2026/06/1146807/images/2660d4a809033e061d133b9fbcf91b7e9539d488b7a9732ced9460e6347776d9.jpg)
Procedure with the Control Panel
This command cannot be executed with the control panel.
Procedure with a Computer
There are two ways to rotate captured images with a computer.
Method 1
This method rotates the image 90 degrees at a time.
To Rotate the Image 90 Degrees at a Time
Click the ( ) button.
- The image will rotate 90 degrees counterclockwise each time the button is clicked.

Method 2
This method allows you to select from the [Rotate Left 90], [Rotate Right 90] and [Rotate 180] options.
To Select an Angle and Rotate the Image
Click the arrow ( ) button to the right of the ( ) button and select an option from the menu.
- The image will rotate through the specified arc.

Capturing an Object in Monochrome Mode
Objects can be recorded as grayscale (black, shades of gray, and white) or monochrome images with the DZ-3600U.
!!! Important !!!
- If an image is captured after the DZ-3600U has been switched to grayscale or monochrome mode, it will be loaded onto the computer as a monochrome.
Note
- The source object does not have to be monochrome to use this function to good effect. Switching to grayscale mode to view a document on blue paper with black type, for example, masks the blue color but greatly enhances the legibility of the black type.
Procedure with the Remote Control
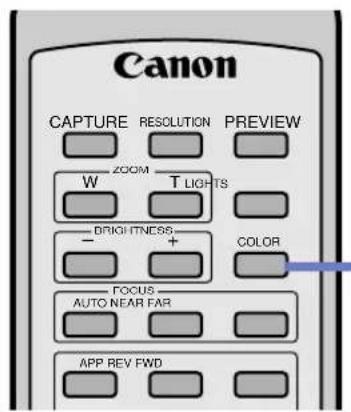
To Switch to Color/Grayscale/Monochrome Mode
Press the [Color] button.
- The mode switches to color, grayscale and monochrome in sequence with each press of the button.
Procedure with the Control Panel
This command cannot be executed with the control panel.
Procedure with a Computer
To Switch to Color/Grayscale/Monochrome Mode
Click the ( ☐) button, and select from the [Color], [Grayscale] and [Monochrome] options on the menu.

Using the Front Lights and Backlight
This command turns the front lights and backlight on and off.
Turn the front lights on when using the DZ-3600U in dark settings. Use the backlight to illuminate films and transparencies, such as OHP transparencies.

!!! Important !!!
- The fluorescent tubes in the front lights become very hot when operated. To avoid burns, please be extremely careful not to touch the tubes directly with your fingers or other body parts.
- The lights take two or three seconds to light up after the power is applied in order to protect their mechanisms. Please do not press the button again because they have not come on right after the button was first pressed.
- Light escaping directly from the backlight will strike the camera lens and adversely affect image quality. To reduce this, zoom in on the film as much as possible to exclude unwanted light.
Note
- To view negative film, turn on the backlight with the procedures described here and then follow the steps described in Shooting Negatives (P.79).
Procedure with the Remote Control
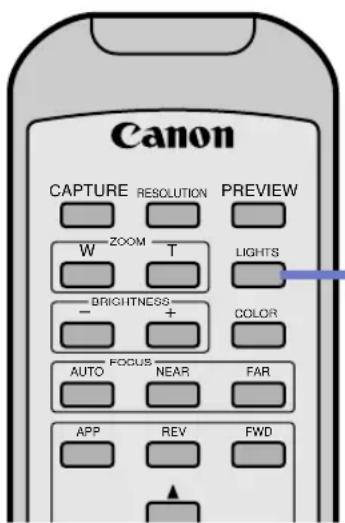
To Turn the Front Lights and Backlight On/Off
Press the [Lights] button.
- The sequence progresses from lights off, to front lights on, and backlight on with each press of the button.
Procedure with the Control Panel
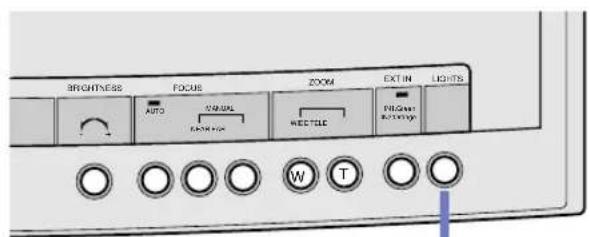
To Turn the Front Lights and Backlight On/Off
Press the [Lights] button.
- The sequence progresses from lights off, to front lights on, and backlight on with each press of the button.
Procedure with a Computer
To Turn the Front Lights and Backlight On/Off
Click the ( ) button and select either the [Front Lights], [Back light] or [Lights Off] option from the menu.

Shooting Negatives
To view negative films, turn on the backlight and switch to negative mode.
Ensure that the backlight is lit (P.77).
Procedure with the Remote Control
This function cannot be controlled with the remote control.
Procedure with the Control Panel
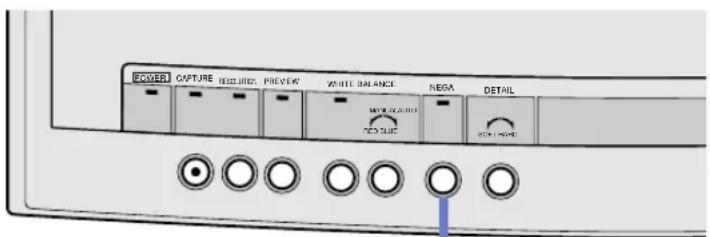
To Switch to Negative Mode
Press the [NEGA] button.
- The mode will switch between the positive and negative mode each time the button is pressed.
- The indicator will light up in negative mode.
Procedures Required for showing Negative Films
- Press the [NEGA] button and then place the negative film strip in the center of the backlit object stage.
- Zoom up on the desired frame until it fills the window.
- Press the white balance [Auto] button on the control panel. The auto indicator will shut off.
- Press the white balance [Auto] button again after you have finished viewing the frame.
The auto indicator will light and the auto white balance function will be reactivated.
Procedure with a Computer
This function cannot be controlled from a computer.
Reversing or Inverting Images
The mirror and flip buttons on the camera head can be used to reverse or invert an image.
Note
- This function is useful for correcting the display of reversed films or upended documents.
- This function can also be used to deliberately reverse or invert the image to change the perspective.
![To Restore the Original Orientation Press the [Reset] button. • Pressing the button resets both the flip and mirror settings to the starting point. Right View of the Camera Head To Flip the Image Press the [Flip] button. • The image will flip or change back with each press of the button. To Reverse the Image Press the [Mirror] button. • The image will reverse or change back with each press of the button.](/content/2026/06/1146807/images/a19a773ee391f02e6320b7a08dee51469cd182b98c0be5db7205d887900db89c.jpg)
Shooting the Surroundings
The camera head can be aimed forward within an arc of 162 degrees and moved freely to shoot an audience, conference participants or the surroundings.
!!! Important !!!
- Do not apply excessive force on the camera or its arm, or rush to move the camera head to hurriedly focus on a subject. This function is intended to be used in a relatively static manner, such as to shoot a meeting or presentation site before the event starts, to shoot artwork on the walls, to shoot presentation materials on panels or to focus on the presenter during a presentation. It is not designed to take fast close-ups of individuals from the audience.
- To shoot objects farther from the lens than the object stage, switch off the closeup lens on the camera head. However, do not forget to turn the closeup lens back on when zooming in on objects on the object stage, which might otherwise appear out of focus.
Note
- The camera head can be swiveled 90 degrees to either side horizontally, 90 degrees downward and 72 degrees upward from the center point.
Point the Lens in the Desired Direction
Turn Off the Closeup Lens.
Move the slider to the [Off] position.
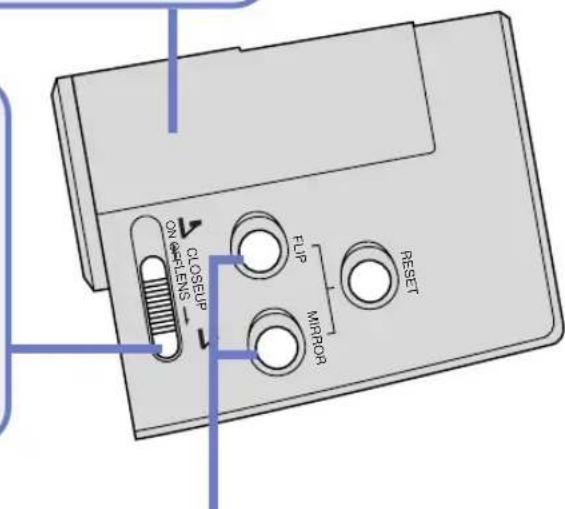
Press the Flip and Mirror Buttons
Press the [Flip] and [Mirror] buttons on the camera head to shoot with the correct orientation.
Using the Finger Pointer
You can display and move a finger pointer within the window to draw attention to specific elements of an image during a presentation.
Displaying the Finger Pointer
The following procedures are used to show and hide the finger pointer.
Procedure with the Remote Control
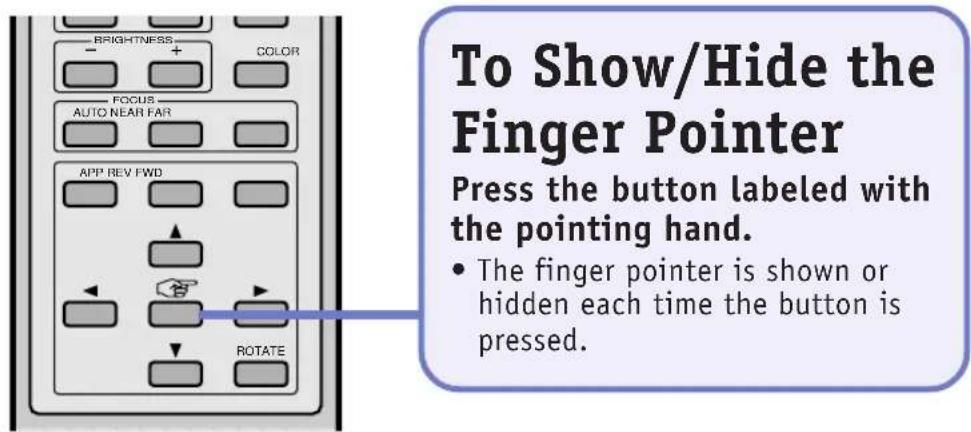
Procedure with the Control Panel
This command cannot be executed with the control panel.
Procedure with a Computer
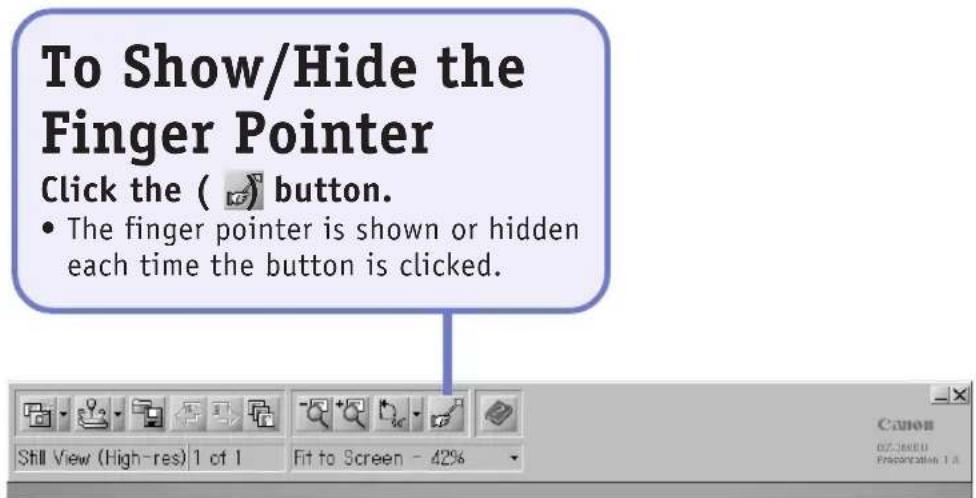
Moving the Finger Pointer
The finger pointer can be moved in all four directions within the display.
Procedure with the Remote Control
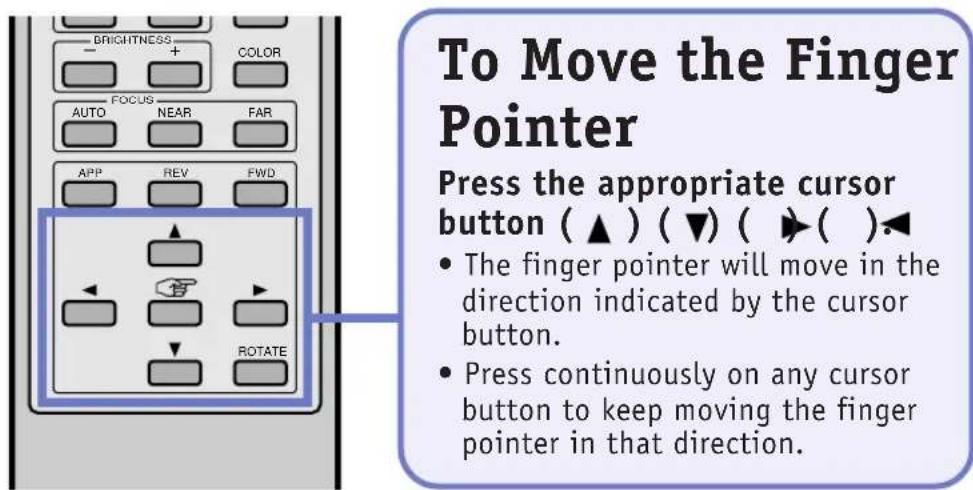
Procedure with the Control Panel
This command cannot be executed with the control panel.
Procedure with a Computer
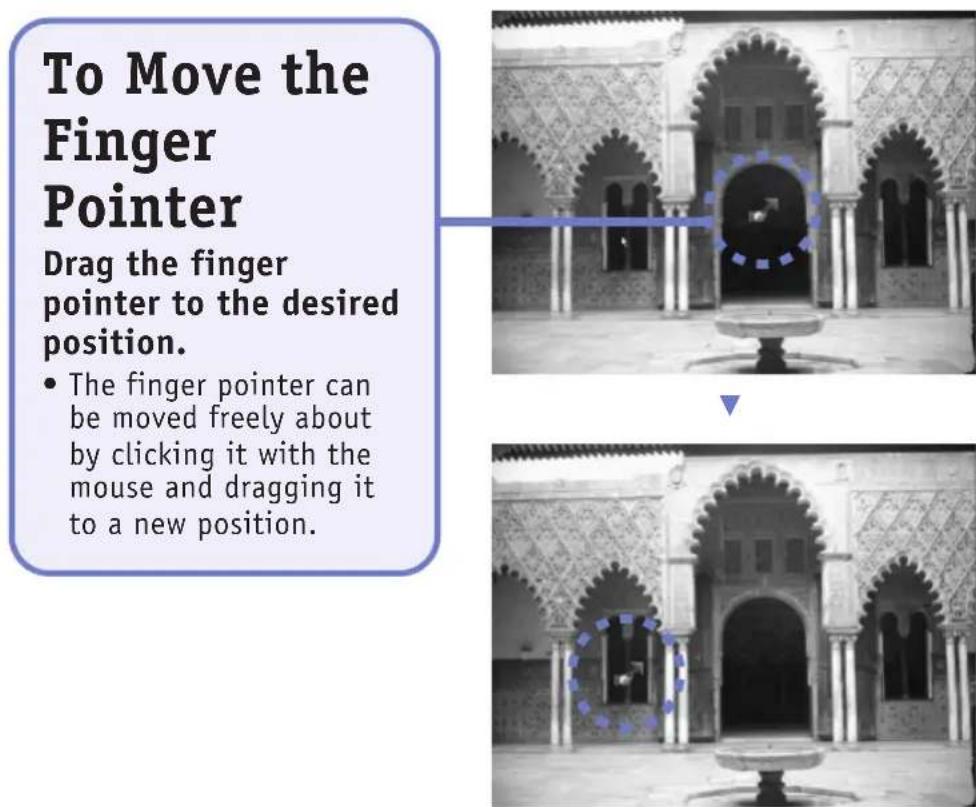
Interfacing with PowerPoint
Microsoft PowerPoint slide shows can also be controlled with the remote control.
Switching between Application Programs
When Presentation Software is running, the remote control can be used to switch between it and the PowerPoint window if that window was the active window immediately prior to Presentation Software.
To Switch between Programs
Press the [APP] button on the remote control.
- The window of the previously active application will display.
- Press the [APP] button again to return to the Presentation Software window.
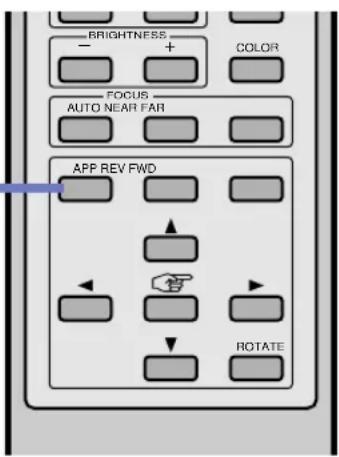
Note
- The following is an example of the procedures for switching to and from a PowerPoint slide show.
- Start DZ-3600U Presentation Software.
- Minimize the Presentation Software window by clicking the (☐) button in the window's upper right.
- Open the PowerPoint presentation file.
- Start the PowerPoint slide show.
- Press the [APP] button on the remote control to switch program windows.
Controlling Slides
You can use the remote control to control the display of slides (pages) in PPA-compliant application programs, such as Microsoft PowerPoint.
Make sure that the desired slide show (in PowerPoint) or file has been selected in the PPA-compliant application.
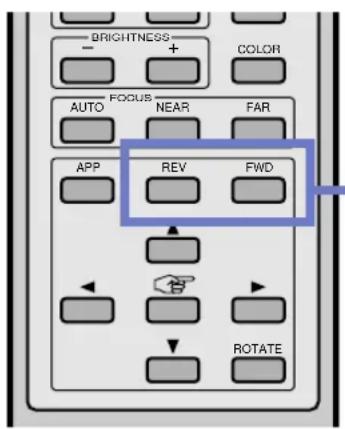
To Advance/Reverse a Slide
Press the [FWD] or [REV] button on the remote control when the desired program is active.
- The [FWD] button will advance the display to the next slide. The [REV] button will advance the display to the preceding slide.
Note
- This function can be used in situations similar to the following example. The presenter presses the [APP] button to switch from Presentation Software to PowerPoint. The presenter explains various slides, moving back and forth in the PowerPoint slide show with the [FWD and [REV] buttons. The presenter then presses the [APP] button to return to Presentation Software and continue the presentation with real-time imaging.
- The [◀] and [▲] cursor buttons can also be used instead of the [REV] button and the [▼] and [▶] buttons instead of the [FWD] button.
Scanning Images with TWAIN Driver
This topic explains how TWAIN Driver can be used to scan and load images from the DZ-3600U into TWAIN-compliant application programs, such as the major graphics programs available on the market.
!!! Important !!!
- The application must be a TWAIN_32 TWAIN-compliant program to operate with TWAIN Driver.
- Presentation Software and TWAIN Driver cannot be run simultaneously on a computer.
Note
- The menu names, operating procedures and windows related to TWAIN Driver may vary considerably between applications. Please refer to each application's guides for specific instructions.
- Please use the control panel to manually adjust the white balance while TWAIN Driver is running (P.70).
Selecting the Input Device
To use TWAIN Driver, the DZ-3600U must first be selected as the input device in the settings of the application. An item such as [TWAIN_32 Device] or [Select Source], should appear in the application's [File] menu or one of its submenus. Click on this item to display a window like the one below (the actual menu, window and button names will vary between applications).
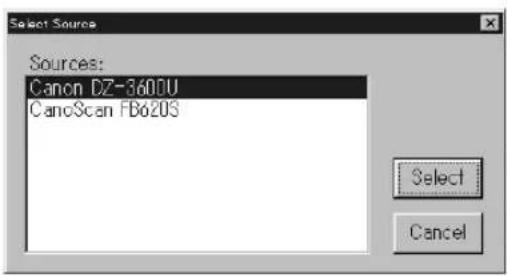
Select the [DZ-3600U] option in this window and click the [Select] button. This completes selection of the DZ-3600U as the input device.
Note
In most applications, the selection of the input device remains effective until another input device is selected.
Using TWAIN Driver
The next step is to start up TWAIN Driver.
An item such as [TWAIN_32], [Acquire], [Import] or [TWAIN Input] should appear in the application's [File] menu or one of its submenus. Click on this item to display a window like the one below.
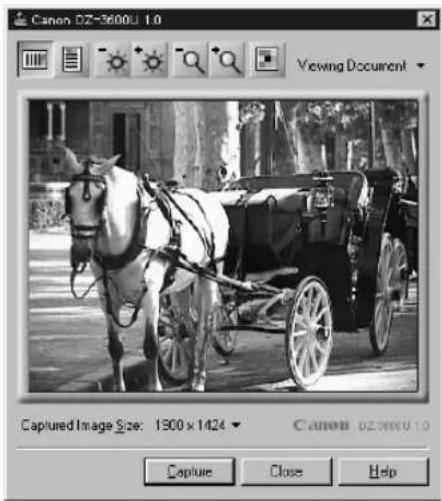
In this window, the following buttons can be used to adjust the settings. Moreover, as with Presentation Software, the remote control and control panel can be used to control the TWAIN Driver.
( ) : To select the image orientation
( - ) ( ) * : To adjust the brightness setting
( - ) ( ) * : To adjust the zoom setting
( ☐ ) : To select the color, grayscale or monochrome data type
Click the ▼ beside the [Viewing Document] item in the window to display the menu below. This setting allows you to select from two options to match the color settings to the type of image being captured.
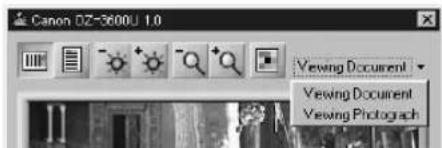
Viewing Documents: Select this option to capture images of objects. The white color in white-paper documents is best captured with this setting.
Viewing Photograph: Select this option to reproduce human skin tones at their best.
Click the ▼ beside the [Captured Image Size] item in the window to display the menu below. This setting allows you to select the size (dimensions expressed in pixels) at which images are captured.
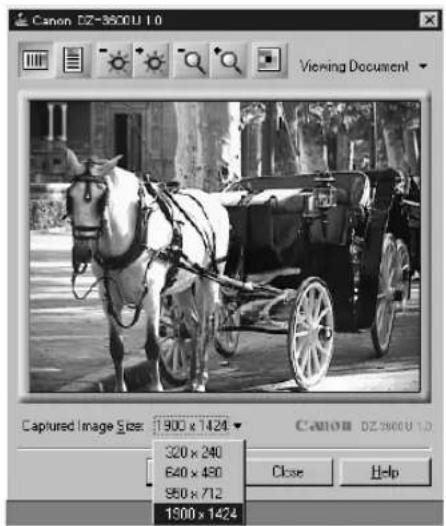
After you have adjusted the settings to your satisfaction, click the [Capture] button. This will cause TWAIN Driver to capture the image and display it in the application's window. When you have finished the capture, click the [Close] button.
Chapter 4
Operating without a Computer
natural_image
Line drawing of a mechanical device with pipes and a conveyor belt, no text or symbols presentConnecting to a Video Monitor or Projector
Use an S video cable or BNC video cable to connect the DZ-3600U to a video monitor or projector.
Note
- The S video and BNC video cables mentioned here are sold separately. Obtain a cable long enough to reach between the devices at the site in which they will be used.
- Standard television sets may be used as video monitors if they are equipped with a video in jack.
S Video Cable
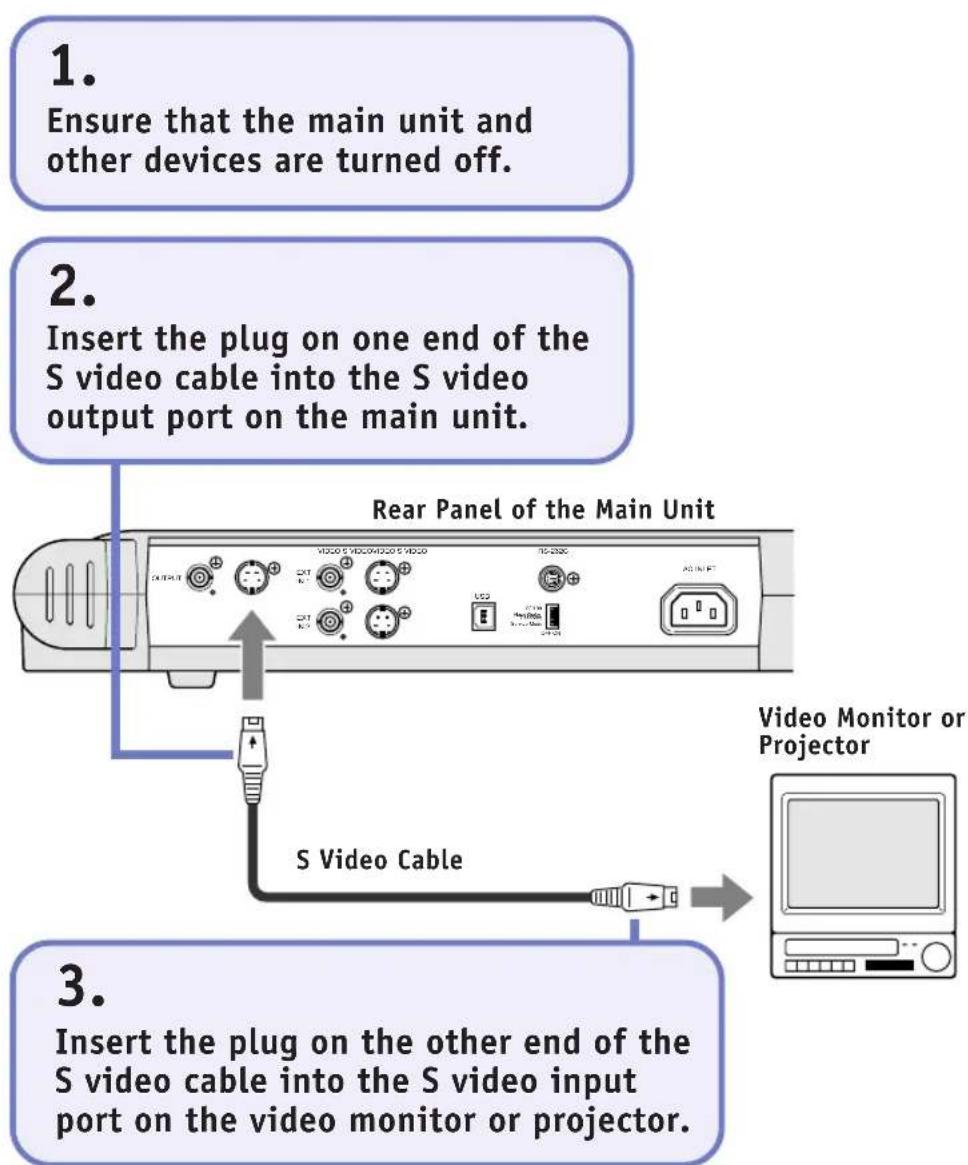
flowchart
graph TD
    A["1. Ensure that the main unit and other devices are turned off."] --> B["2. Insert the plug on one end of the S video cable into the S video output port on the main unit."]
    B --> C["3. Insert the plug on the other end of the S video cable into the S video input port on the video monitor or projector."]
    C --> D["Video Monitor or Projector"]
    D --> E["S Video Cable"]
BNC Video Cable
1.
Ensure that the main unit and other devices are turned off.
2.
Insert the plug on one end of the BNC video cable into the video output port on the main unit.
- Turn the plug in the port to secure it.
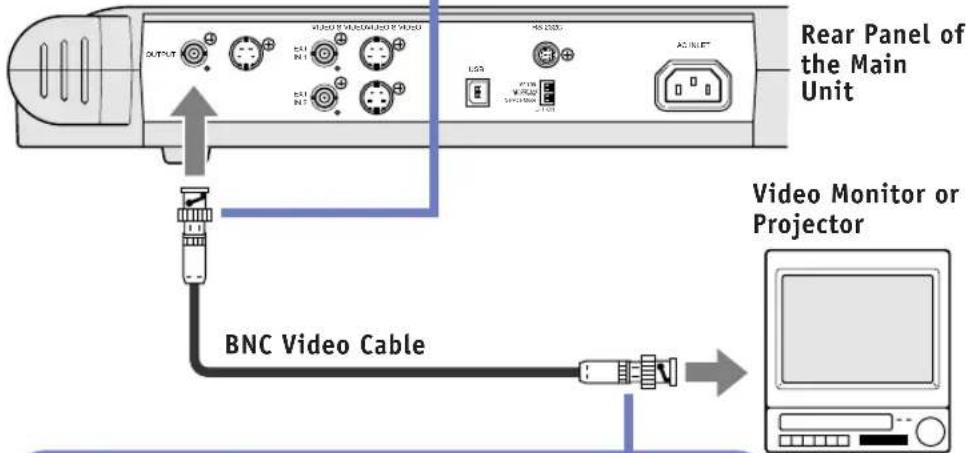
3.
Insert the plug on the other end of the BNC video cable into the video input port on the video monitor or projector, and secure it.
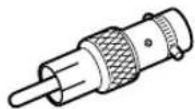
BNC to Pin Adapter
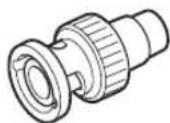
Pin to BNC Adapter
Note
- If the video in port on the video monitor or projector is a pin-type port, you will need to use a BNC to Pin adapter, such as the one pictured to the left, which is readily available on the market.
- Conversely, you may use a pin-type video cable of the kind commonly used on home-use VCRs with a Pin to BNC adapter attached to the DZ-3600U end of the cable. However, this type of cable is generally prone to significant signal loss, which means that the decrease in image quality will increase in proportion to the length of the cable.
- An external VCR may also be connected to either output port if it is free to record DZ-3600U images. The audio portion of the presentation, however, should be recorded with a separate microphone connected directly to the VCR because the audio portion will be transmitted through the S video or video output port.
Connecting to Other Image Input Devices
The DZ-3600U has the ability to connect to other image input devices and throughput the data to a video monitor or projector.
Among its other uses, this function allows you to show the contents of a video tape or the video feed from another camera during a presentation without having to change equipment.
!!! Important !!!
- The video feed from an external input device cannot be output to a computer.
- If the external input device is connected via an S video cable, the output can only be routed through the S video output port. The video output port will not work in this case. Similarly, input through a BNC video cable must be output through the video output port. Accordingly, ensure that the cable you use between the DZ-3600U and the video monitor or projector is the same type as that used between the DZ-3600U and the external input device.
Note
- Up to two external input de vices may be connected at one time. If both devices are connected, the video feed can be freely switched between that of the DZ-3600U, De vice 1 and De vice 2.
- See Displaying Images from External Input De vices (P.98) for an explanation of the operating procedures for these de vices.
- The DZ-3600U is not equipped with audio functions. Accordingly, the audio portion of a video tape play ed on a VCR must be routed through the VCR's audio out ports to a separate amplifier or audio system.
Connecting to an External Input Device
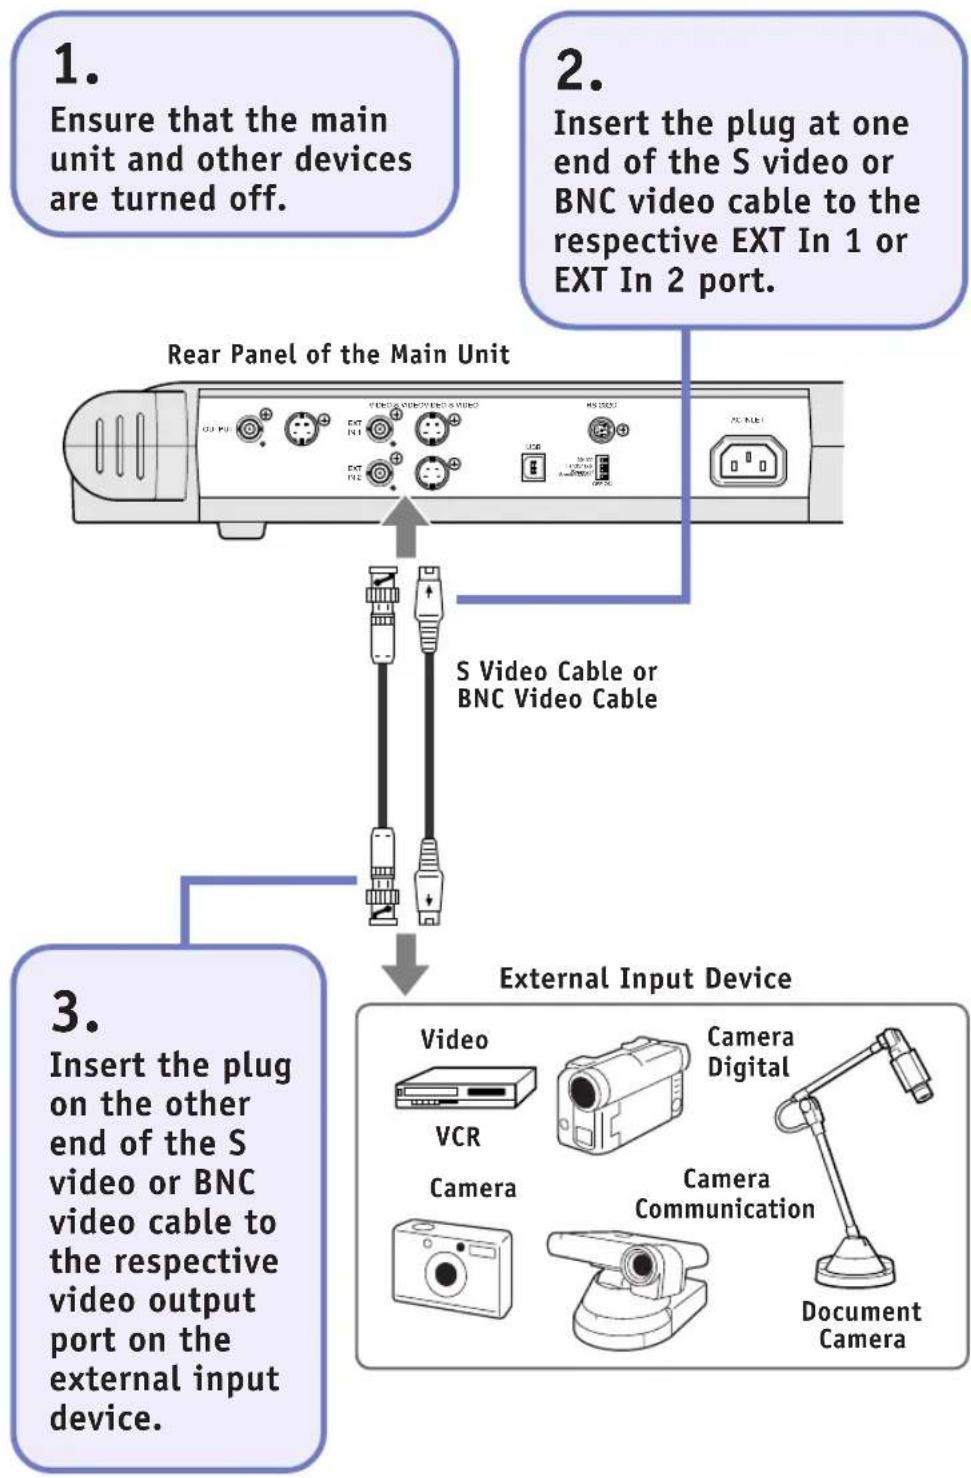
flowchart
graph TD
    A["External Input Device"] --> B["Insert the plug on the other end of the S video or BNC video cable to the respective video output port on the external input device."]
    B --> C["S Video Cable or BNC Video Cable"]
    C --> D["Rear Panel of the Main Unit"]
    D --> E["Ensure that the main unit and other devices are turned off."]
    D --> F["Insert the plug at one end of the S video or BNC video cable to the respective EXT In 1 or EXT In 2 port."]
    A --> G["Document Camera"]
    A --> H["Camera Communication"]
    A --> I["Camera Digital"]
    A --> J["Video"]
    A --> K["VCR"]
    A --> L["Camera"]
Assembly, Knock-Down and Power On/Off
Use the following procedures to assemble, knock-down and turn the power on and off the DZ-3600U.
Assembly and Knock-Down
For assembly instructions, see page 26. For knock-down instructions, see page 37.
Turning On the Power
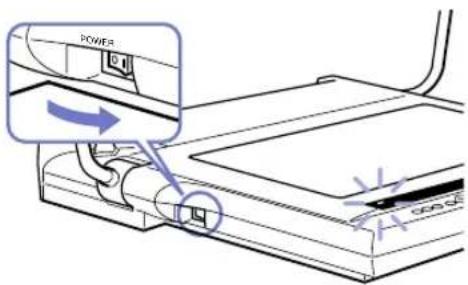
2.
Turn on the power of the other connected devices (video monitor, etc.).
1.
Press the ( | ) side of the power switch, which is located on the left side of the main unit.
- The power in the main unit will come on and the power indicator on the control panel (the front panel on the main unit) will light.
Turning Off the Power
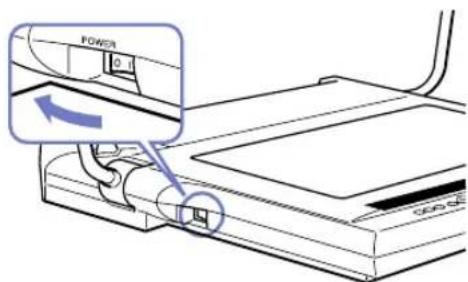
2.
Turn off the power of the other connected devices (video monitor, etc.).
1.
Press the (○) side of the power switch, which is located on the left side of the main unit.
- The main unit will power down.
Button Functions
This topic explains the functions of each button when the DZ-3600U is used as a stand-alone device (no computer).
Control Panel
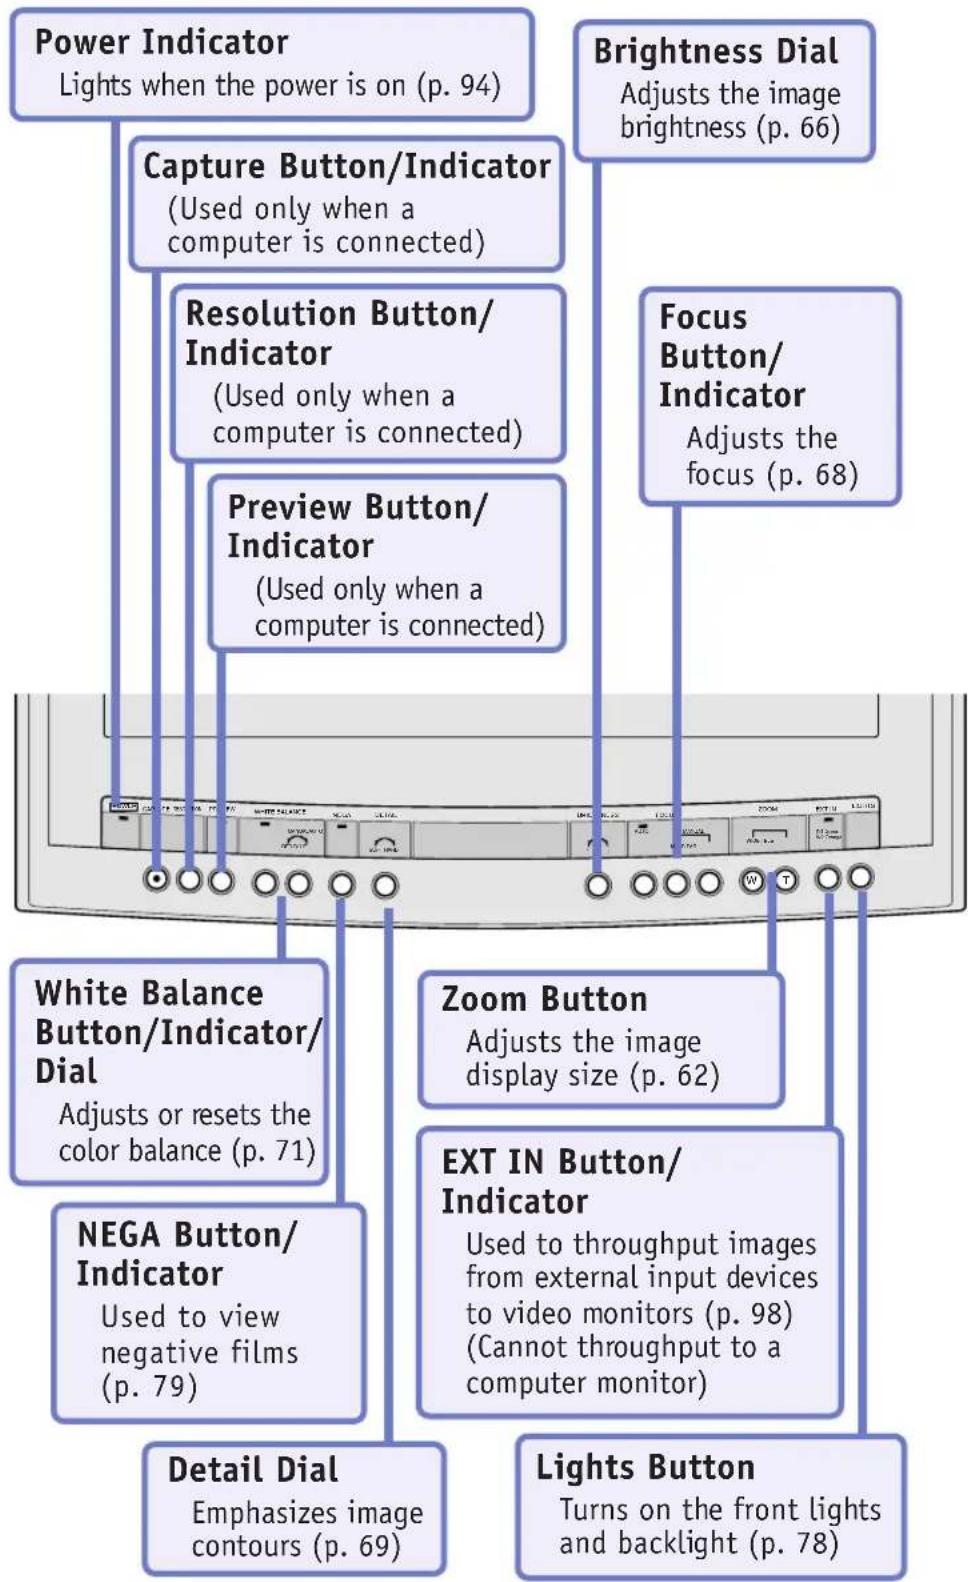
flowchart
graph TD
    A["Power Indicator\nLights when the power is on (p. 94)"] --> B["Capture Button/Indicator\n(Used only when a computer is connected)"]
    B --> C["Resolution Button/Indicator\n(Used only when a computer is connected)"]
    C --> D["Preview Button/Indicator\n(Used only when a computer is connected)"]
    D --> E["White Balance Button/Indicator/Dial\nAdjusts or resets the color balance (p. 71)"]
    E --> F["NEGA Button/Indicator\nUsed to view negative films (p. 79)"]
    F --> G["Detail Dial\nEmphasizes image contours (p. 69)"]
    H["Brightness Dial\nAdjusts the image brightness (p. 66)"] --> I["Focus Button/Indicator\nAdjusts the focus (p. 68)"]
    I --> J["Zoom Button\nAdjusts the image display size (p. 62)"]
    J --> K["EXT IN Button/Indicator\nUsed to throughput images from external input devices to video monitors (p. 98)\n(Cannot throughput to a computer monitor)"]
    K --> L["Lights Button\nTurns on the front lights and backlight (p. 78)"]
Remote Control
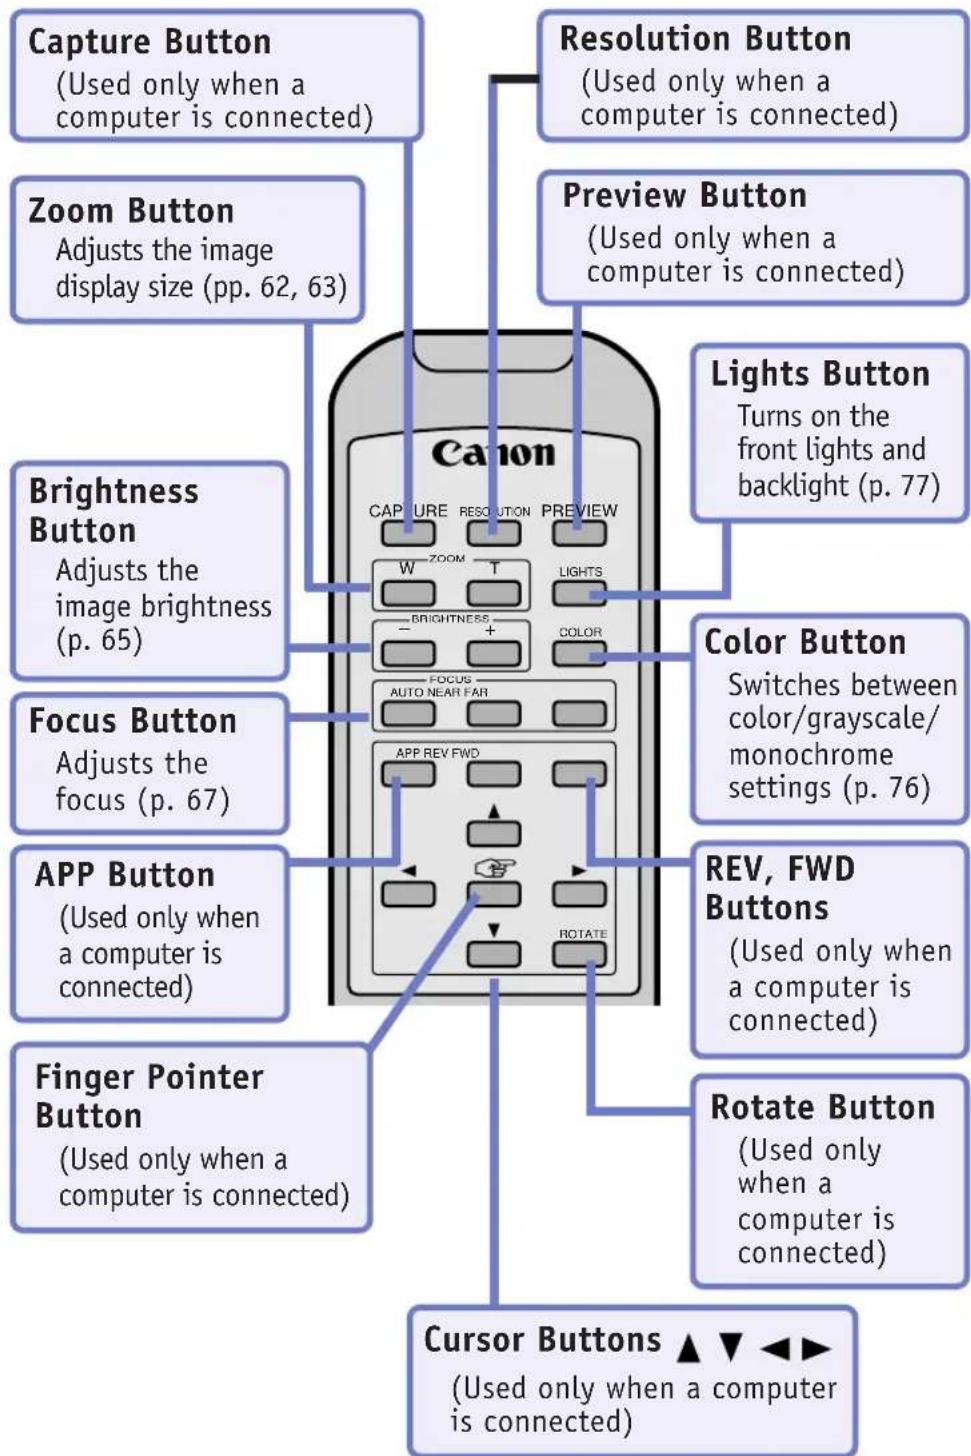
Camera Head
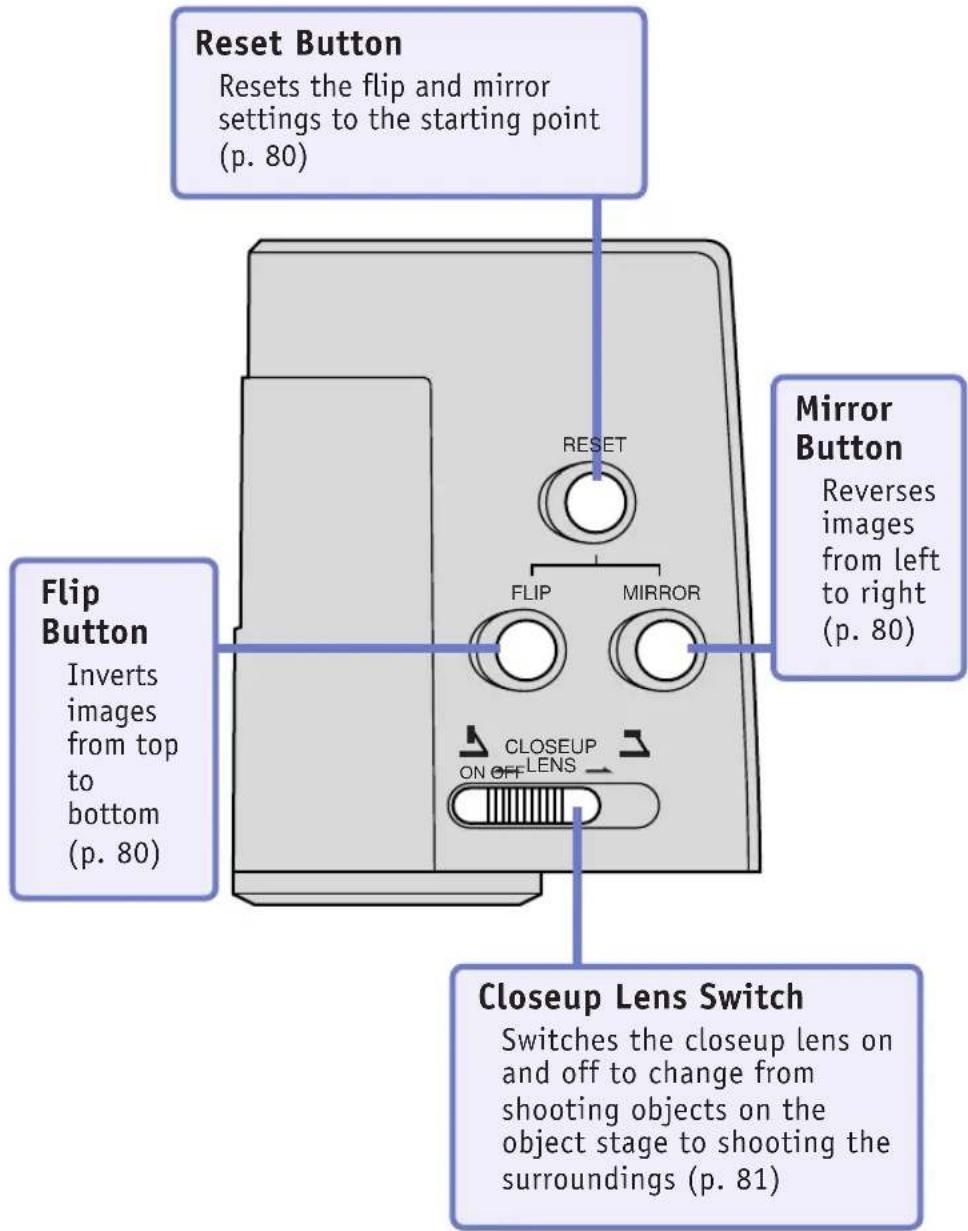
Displaying Images from External Input Devices
The DZ-3600U is equipped with a throughput function to display image data from external input devices, such as VCRs and video cameras.
!!! Important !!!
- The negative, monochrome, flip and mirror functions have no effect on images from external input devices. The image data from these devices is simply passed through the DZ-3600U to the output device.
- Image data from external input devices cannot be throughput to a computer.
Note
- Up to two external input de vices may be connected to the DZ-3600U at once. For connection instructions, see Connecting to Other Image Input De vices (P.92).
- The EXT In indicator turns green when data is input from the device connected to the EXT In 1 port and orange when input from the device connected to the EXT In 2 port.
Procedure with the Remote Control
This function cannot be controlled with the remote control.
Procedure with the Control Panel
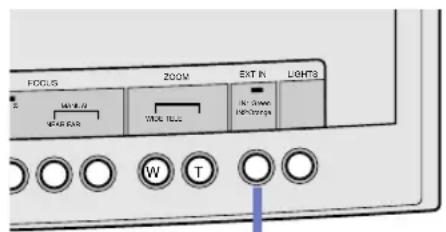
To Receive Images from an External Input Device
Press the [EXT In] button.
- Each time the button is pressed either EXT In 1, EXT In 2 or the DZ-3600U camera will be selected as the image source.
Chapter 5
Troubleshooting
natural_image
Pure diagram of a curved pipe or duct with no text, numbers, or symbolsTroubleshooting Tips
Please confirm the following points before contacting the dealer if you encounter any difficulties operating the equipment or software programs.
Presentation Software Will Not Start
- Is the DZ-3600U's power turned on? (P.28)
- Is the USB cable connected correctly? (P.17)
- Is the software correctly installed? (P.19)
The Computer Monitor Is Blank
- Is the computer connected correctly to its monitor and the projector? (P.17)
- Have the input sources for the computer monitor and projector been correctly selected?
Images Are Not Displaying on the Video Monitor
- Is the DZ-3600U, video monitor and/or projector power turned on? (P.28)
- Are all the devices connected correctly? (P.17)
- Has an external input device (EXT In 1 or EXT In 2) been selected as the current image source? (P.98)
- Have the input sources for the video monitor and projector been correctly selected?
Images Are Not Displaying Smoothly
- Because of the limitations imposed by the transfer rate of the USB cable, the movement of real-time images will be somewhat irregular on the computer display. To view real-time images without the time lag, connect a video monitor or projector directly to one of the output ports on the DZ-3600U. The video output, nevertheless, will still not be entirely smooth in the negative, flip, mirror, monochrome, or grayscale modes, or at the High Clarity display resolution setting in the preview mode. Moreover, the images may momentarily distort when switching between modes. This is not a malfunction.
The Toolbar and Status Bar Have Vanished
- Move the mouse cursor to the top of the window. They will temporarily reappear. (P.45)
The Processing Speed of Other Application Programs Has Slowed
- You have temporarily minimized Presentation Software in preview mode and attempted to use another application program, which has been slowed down. This is due to the fact that Presentation Software is still using memory resources to run its internal programming. To free up memory resources, switch Presentation Software into still mode before using the other application.
Images Are Too Bright or Dark
- Is the brightness correctly set on the monitor or projector?
- Is the object too dark? Turn on the front lights if necessary. (P.77)
- If the image is still too bright or dark, adjust the brightness with the brightness function. (P.65)
The Focus Is Off
- Has the autofocus been shut off? (P.67)
- Has the closeup lens been switched off? Zooming in while the closeup lens is switched off will cause blurring. (P.81)
- Is the object too dark? Turn on the front lights if necessary. (P.77)
- The autofocus may have difficulty focusing on objects that are too glossy, virtually translucent or reflect very little light (such as dark cloth). Use the manual focus on these objects. (P.67)
- It may be difficult to adjust the focus when the lens is zoomed in on three-dimensional objects or thick documents. (P.67)
The Coloration Is Off
- Have the color settings on the monitor or projector been set correctly?
- Has the auto white balance function been turned off? (P.70)
- If the coloration cannot be adjusted satisfactorily with the auto white balance function, reset the white balance. (P.70)
- If the above solution does not work, set the white balance manually. (P.70)
- When you view a negative film, check the white balance [Auto] indication is not lit. (P.79)
Colors Will Not Display
- Has the grayscale or monochrome mode been switched on? (P.76)
The Display Is Flickering
- Switch the electronic shutter DIP switch on the rear panel to the following setting (P.111): For regions with electricity supplied at 60 Hertz: Set the DIP switch to 60
Lines Are Appearing in Captured Images
- Has the camera head or object been moved or has the ambient lighting changed while the image is being captured?
- Lines may appear in images captured at the High Resolution setting. If this occurs, switch the electronic shutter DIP switch on the rear panel to the following setting (P.111):
For regions with electricity supplied at 60 Hertz: Set the DIP switch to 60 - The lines may also disappear if the brightness is adjusted. (P.65)
Images Are Inverted or Reversed
- Has the flip or mirror function been activated? Press the [Reset] button on the camera head. (P.80)
Images from External Input Devices Are Not Displaying
- Is the DZ-3600U or external input device power on? (P.28)
- Is the external input device connected correctly? (P.92)
Lights Are Not Illuminating Immediately After the Lights Button Is Pressed
- To protect the lights, they do not illuminate until two or three seconds after the power has been applied. This is not a malfunction. (P.77)
The Lights Flicker or Are Dim
- The fluorescent tubes in the front lights or backlight have reached the end of their service lives. Replace them if they flicker or are dim. Consult the dealer for replacement tubes.
The Remote Control Will Not Work
- Is there sufficient charge remaining in the batteries? (P.23)
- Is the remote control being aimed at the sensor on the camera head? (P.23)
- Are there any obstacles between the remote control and the sensor?
- Are there other remote controls being used in the vicinity?
- Is the remote control being used over distances longer than 5 meters? (P.23)
TWAIN Driver Won't Capture Images
- Is the DZ-3600U power turned on? (P.28)
- Is the USB cable connected correctly? (P.17)
• Is the software correctly installed? (P.19) - Are you using a TWAIN_32 TWAIN-compliant application program? (P.86)
- Has the DZ-3600U been correctly selected as the TWAIN input device? (P.86)
Error Messages
The following messages may appear on the computer display if an error occurs when the DZ-3600U is connected to the computer. A brief explanation and remedies are provided in the column on the right.
Error Message Cause and Remedy
| A device attached to the system is not functioning. | A problem occurred that was specific to a particular device attached to this computer. The user should consult the documentation for that device. |
| Can't Open Device. Exiting Canon DZ-3600U Presentation. | The Digital Document Camera DZ-3600U is not properly connected to a computer, or the computer has not been properly configured for the DZ-3600U. |
| Connection to the DZ-3600U has been lost. | Please reconnect USB cable to DZ-3600U and start the TWAIN driver again. |
| DZ-3600U Presentation attempted to locate a nonexistent image. | The user specified an image for loading that has been deleted, moved, or corrupted." |
| DZ-3600U Presentation could not allocate needed memory. | The user has run out of virtual memory. Close other applications. |
| Network access is denied. | The user does not have sufficient privileges to create, delete, or write to a file. See your network administrator. |
| Not enough storage is available to process this command. | The system has used all available internal resources. Close other applications or files and try again. |
| Please set your computer's color palette to more than 256 colors and run Canon DZ-3600U Presentation again. | Open the Display Control Panel and click the setting tab, and select a higher color depth. |
| Preview Video not available in this video resolution! | Can not run the TWAIN driver in 16 or 256 colors. Open the Display Control Panel and click the setting tab, and select a higher color depth. |
| The device is not ready. | The user attempted to use a storage device that is not presently ready to use. The user may have removed a removable disk from a drive. |
| The directory or file cannot be created. | Disk full or insufficient network privileges. |
| The disk is full. | Disk is full. Please archive unneeded file to make more disk space. |
| The disk is in use or locked by another process. | Another application is using the disk, and other applications must wait until that application has finished. |
| The file already exists. | The user attempted to save to a directory containing a file of the same name as the one requested to be saved. |
| The folder you specified already exists. Please specify a new folder. | DZ-3600U Presenter will only export all images to folders that it has created. Specify a new folder name that will be created to hold the exported images. |
| The HTML index file could not be created. | Disk full or insufficient network privileges. |
Error Message Cause and Remedy
| The network resource type is not correct. | The user attempted to load from or save to a device on the network that is not a storage device or a device that is able to store additional data. |
| The operation could not be completed because access was denied. | The user does not have sufficient privileges to create, delete, or write to a file. See your network administrator. |
| The operation could not be completed because the disk is full. | Disk is full. Please archive unneeded file to make more disk space. |
| The operation could not be completed because the system is already using all resources. | The user has run out of virtual memory. Close other applications. |
| The specified path could not be created. | Disk full or insufficient network privileges. |
| The specified path is invalid. | The user specified a path that is no longer in existence. It may have been deleted or moved, or if it resided in a network location, the network may no longer be available. |
| The system cannot find the device specified. | The user attempted to save on or load from a removable medium or a network drive that is no longer available. |
| The system cannot find the file specified. | The user specified a file to load that is no longer in the specified location. It may have been deleted or moved, or if it resided in a network location, the network may no longer be available. |
| The system cannot find the path specified. | The user specified a path that is no longer in existence. It may have been deleted or moved, or if it resided in a network location, the network may no longer be available. |
| The system cannot find the specified drive. | The user attempted to save on a removable medium or a network drive that is no longer available. |
| The system cannot open the device or file specified. | The system has exceeded its internal limit of open files. Close other applications or files and try again. |
| The system cannot open the file. | The system has exceeded its internal limit of open files. Close other applications or files and try again. |
| The system cannot read from the specified device. | The storage device did not permit reading. If the device resides on a network, perhaps the network administrator has not granted access privileges to this user for this device. |
| The system cannot write to the specified device. | The storage device did not permit writing. If the device resides on a network, perhaps the network administrator has not granted writing privileges to this user for this device. |
| The wrong diskette is in the drive. | The user attempted to save on or load from one disk, and then switched the disk in the drive before the operation was completed. |
| Unable to activate help! | Can not find the help file. |
Appendix
natural_image
Abstract geometric line drawing with layered lines and gradient blocks (no text or symbols)Removing the Equipment from the Box
This topic explains how to remove the DZ-3600U Digital Document Camera from the packaging in which it is shipped.
!!! Important !!!
• Always use two adults to remove or replace the unit in the packaging.
• Always securely fasten the camera head with tape when transporting the equipment.
- Save the packaging to transport the equipment in the future.
Note
- Although this equipment is primarily used in institutional settings and set up by service personnel or dealers, these instructions are provided in case the users need to move or transport the equipment.
-
Open the lid of the box.
-
Remove the accessories from around the main unit.
-
Lift the main unit out of the box with the packing materials still attached.
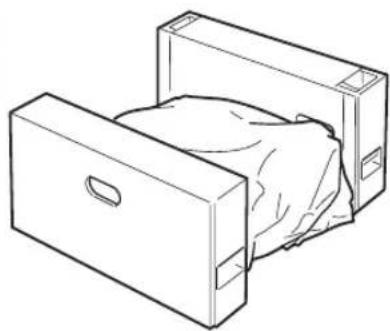
natural_image
Line drawing of a bed inside a rectangular storage box (no text or symbols)-
Support the main unit while the packing materials are removed from each end.
-
Remove the plastic wrap from around the main unit.
6.
Unfold first the left, then the right front light.
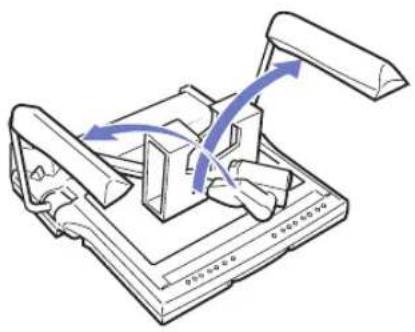
natural_image
Technical line drawing of a mechanical device with directional arrows indicating motion or movement (no text or symbols)7.
Remove the plastic bags from around the front lights.
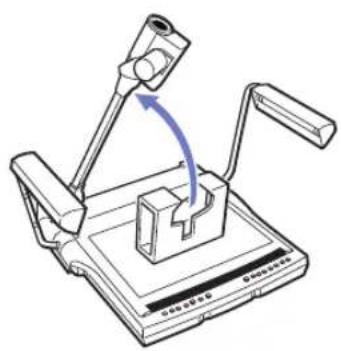
natural_image
Technical line drawing of a mechanical device with a lever and base plate (no text or symbols)8.
Push the lever (arm lock release lever) at the base of the camera arm and unfold the arm.
9.
Remove the packing materials securing the camera arm.
10.
Remove the packing materials taped to the object stage.
11.
Remove all other tape strips from the equipment.
Packing List
The following items should be included in the box.
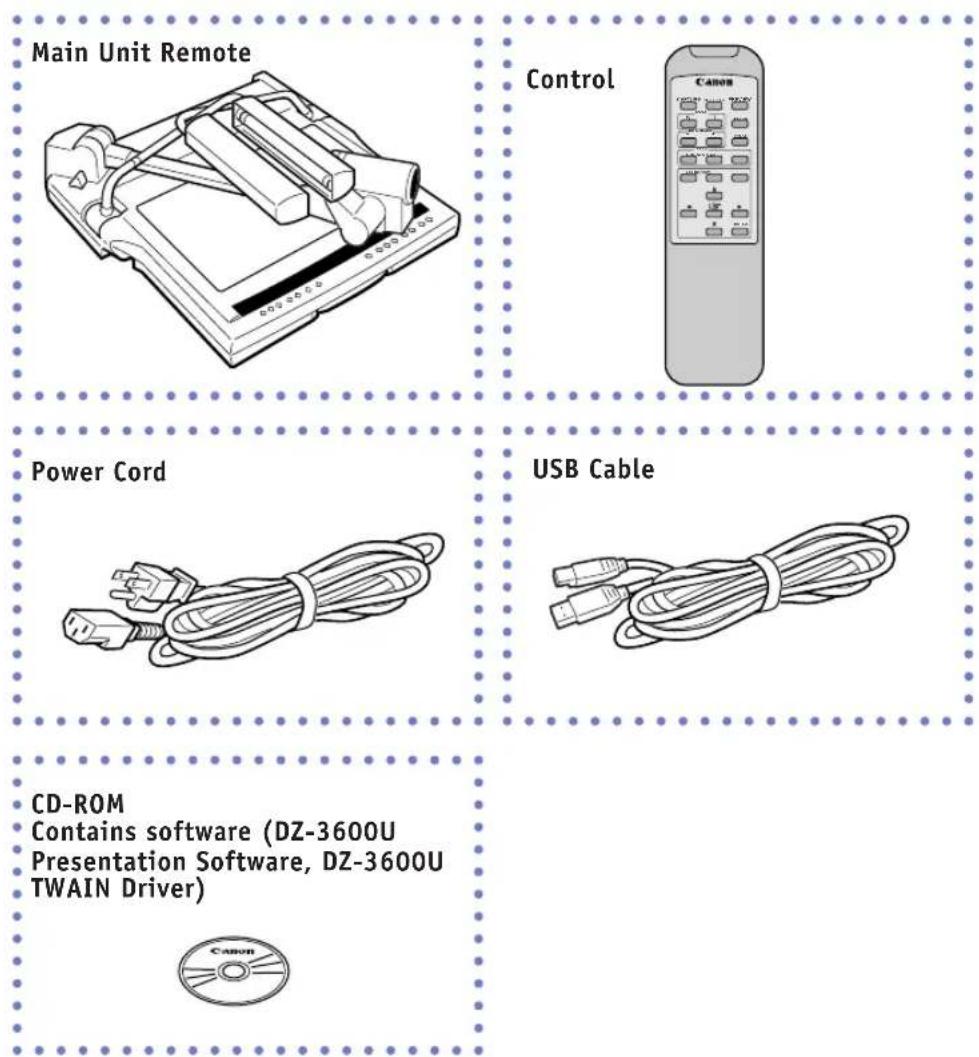
Other Items
Main Unit Cover
Users Guide (this guide)
Quick Reference Guide
Warranty Card
Software License Agreement
!!! Important !!!
- Please consult the dealer from which the equipment was purchased if anything is missing from the package.
Changing the Remote Control Batteries
Follow the procedures below to install or replace the batteries in the remote control.
1.
Open the battery cover by pressing down and sliding the back panel of the remote control that is marked [Open].
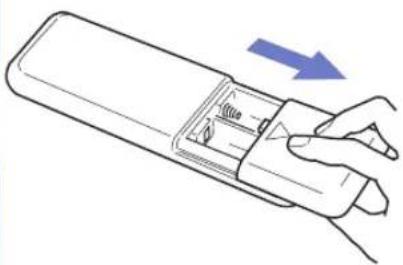
natural_image
Line drawing of a hand holding a device with a blue arrow indicating direction (no text or symbols)2.
If there are spent batteries inside the battery chamber, remove them.
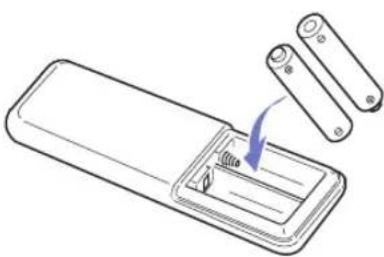
natural_image
Line drawing of a remote control device with two cylindrical batteries inserted (no text or symbols)3.
Insert two AA batteries, orienting the battery terminals ("+" and "-" end) in the direction shown on the diagram in the battery chamber. Do not insert the batteries incorrectly.
- Insert the negative (-) end of the battery into the battery chamber first.
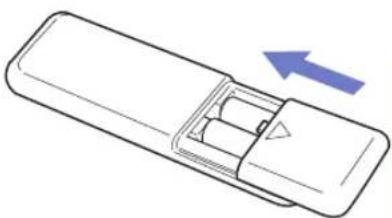
natural_image
Diagram of a remote control panel with an arrow indicating direction (no text or symbols)4.
Slide the battery cover up from the bottom until it closes with a click.
!!! Important !!!
- Do not use rechargeable batteries. (The shape and performance characteristics may not operate the remote control correctly.)
- Do not mix new and spent batteries together.
- Remove the batteries if the unit will not be used for a long period. Remove any battery fluids that leak and replace the leaking cells.
Components Guide
The names and functions of the various components are listed below.
Main Unit
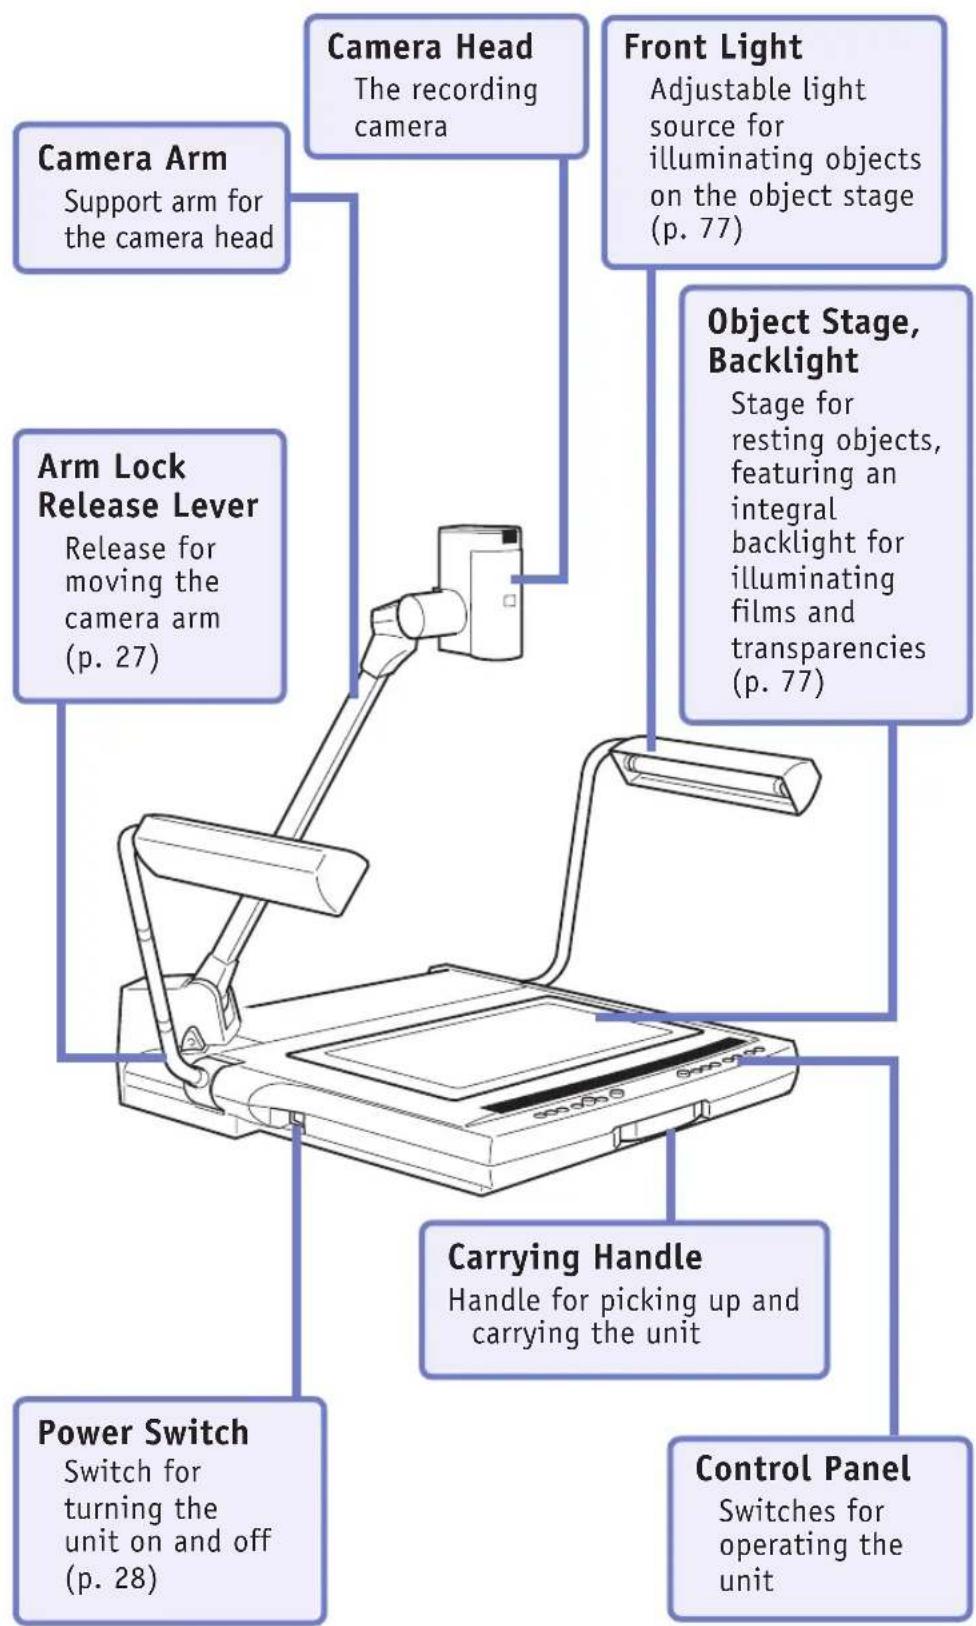
flowchart
graph TD
    A["Camera Arm"] --> B["Support arm for the camera head"]
    C["Arm Lock Release Lever"] --> D["Release for moving the camera arm (p. 27)"]
    E["Camera Head"] --> F["The recording camera"]
    G["Front Light"] --> H["Adjustable light source for illuminating objects on the object stage (p. 77)"]
    I["Object Stage, Backlight"] --> J["Stage for resting objects, featuring an integral backlight for illuminating films and transparencies (p. 77)"]
    K["Carrying Handle"] --> L["Handle for picking up and carrying the unit"]
    M["Power Switch"] --> N["Switch for turning the unit on and off (p. 28)"]
    O["Control Panel"] --> P["Switches for operating the unit"]
Back Panel of the Main Unit
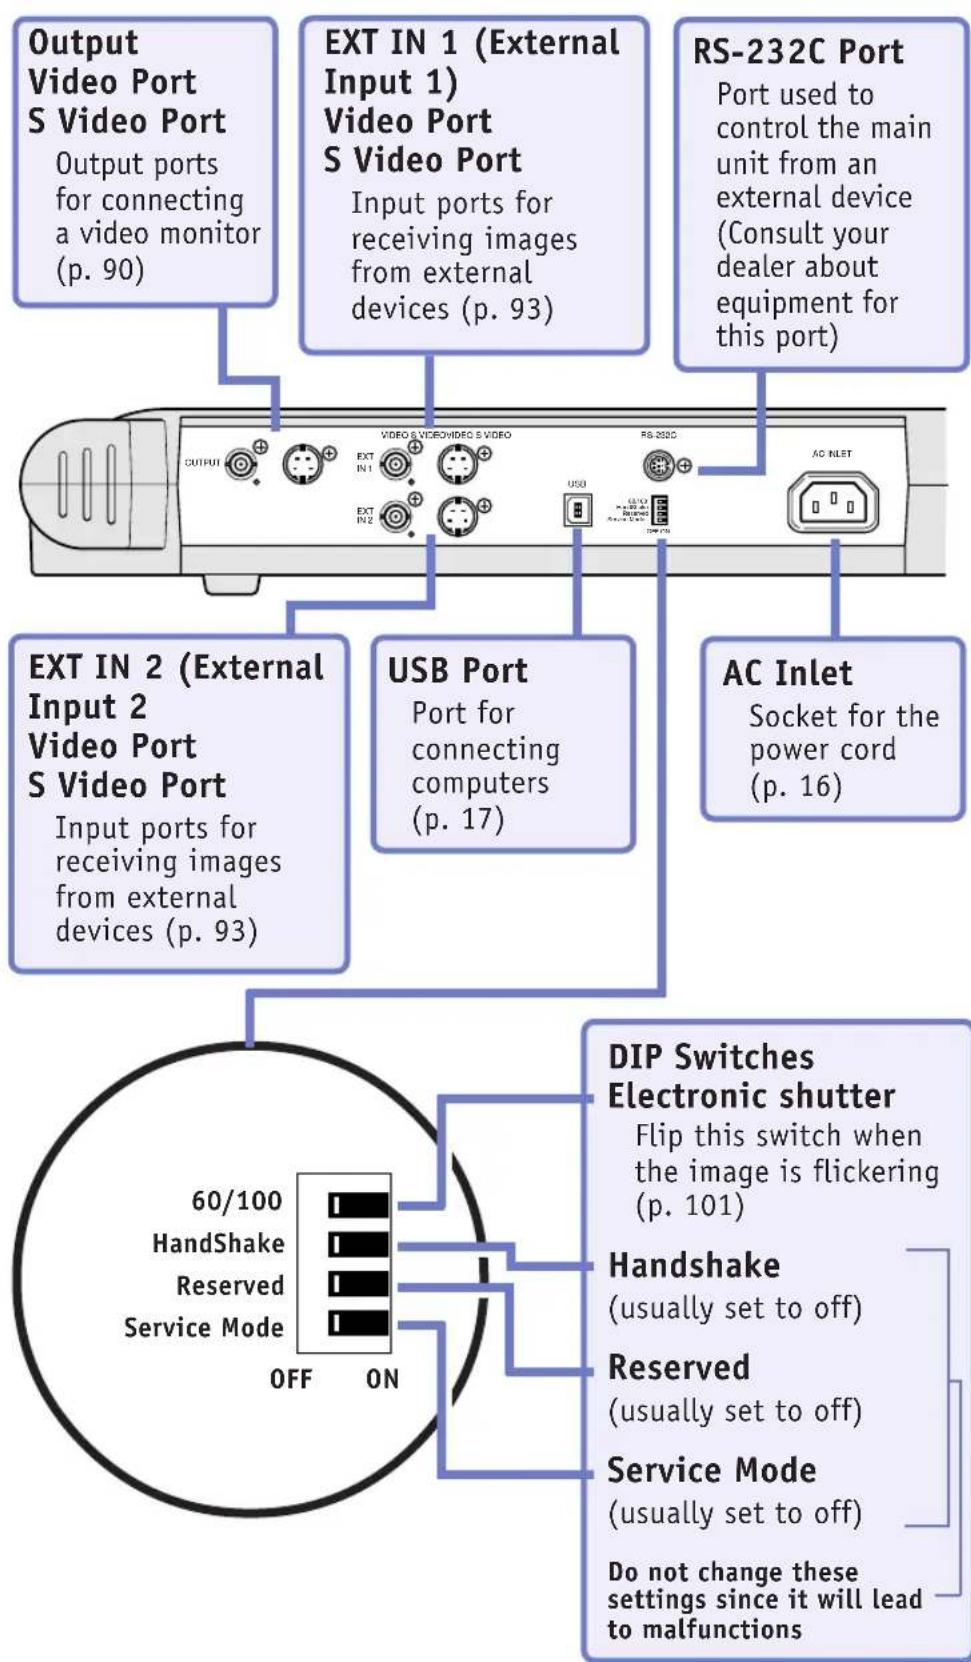
Control Panel
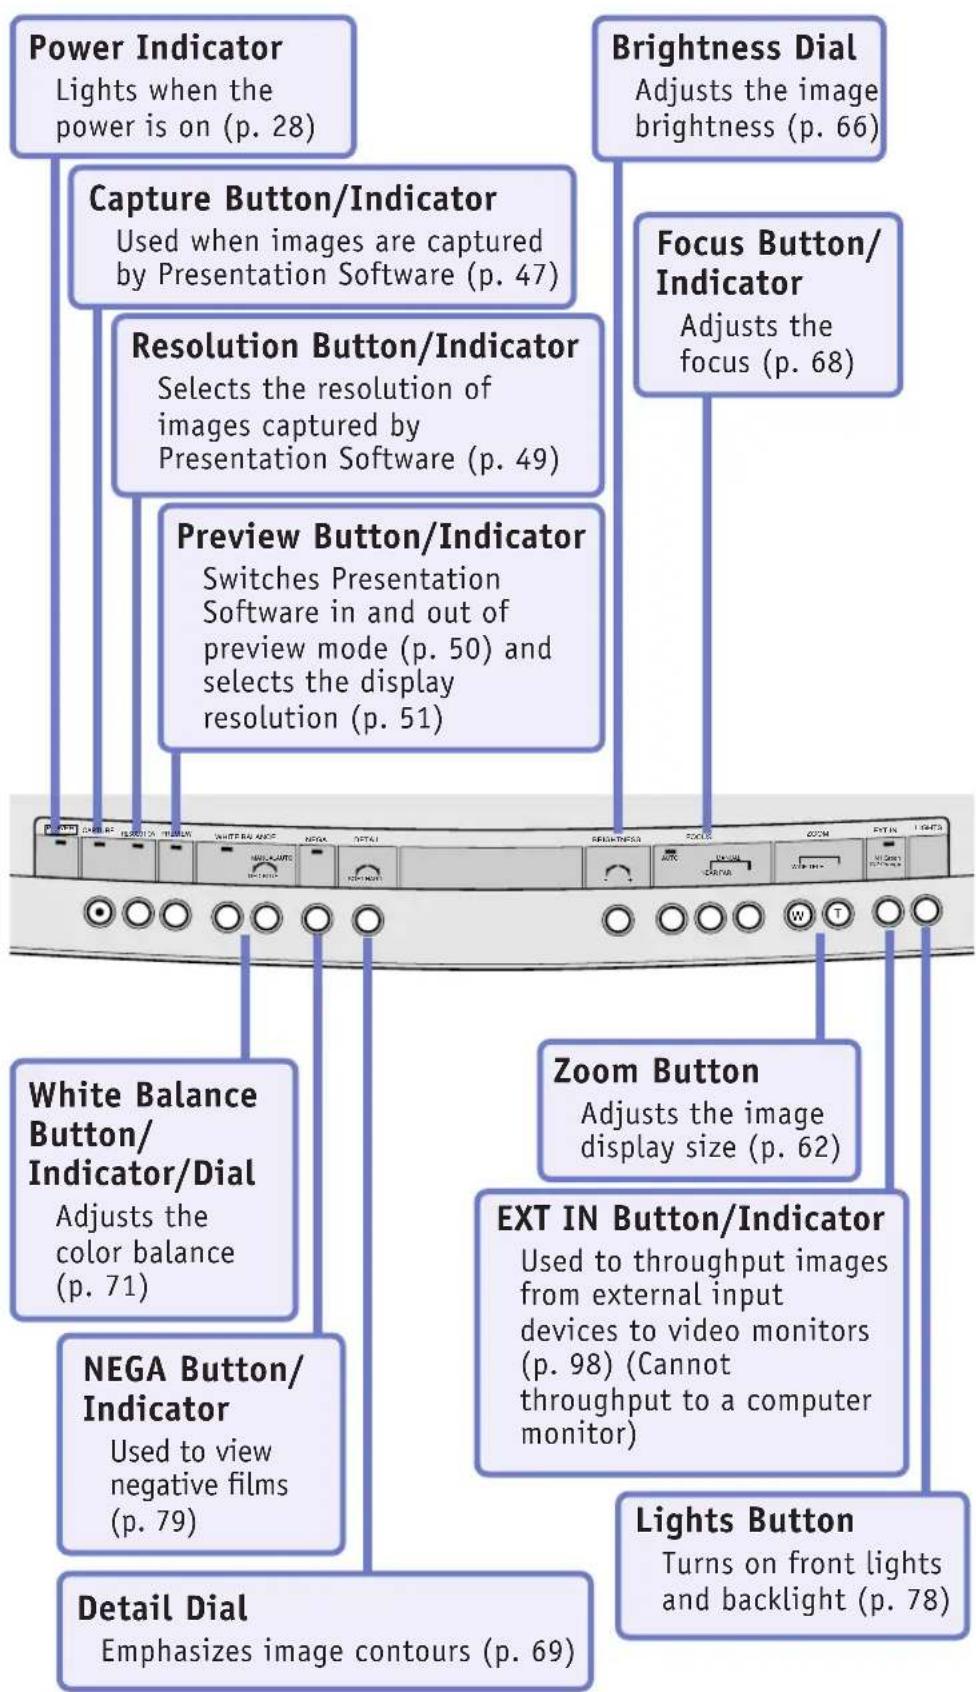
flowchart
graph TD
    A["Power Indicator\nLights when the power is on (p. 28)"] --> B["Capture Button/Indicator\nUsed when images are captured by Presentation Software (p. 47)"]
    B --> C["Resolution Button/Indicator\nSelects the resolution of images captured by Presentation Software (p. 49)"]
    C --> D["Preview Button/Indicator\nSwitches Presentation Software in and out of preview mode (p. 50) and selects the display resolution (p. 51)"]
    D --> E["White Balance Button/Indicator/Dial\nAdjusts the color balance (p. 71)"]
    E --> F["NEGA Button/Indicator\nUsed to view negative films (p. 79)"]
    F --> G["Detail Dial\nEmphasizes image contours (p. 69)"]
    H["Brightness Dial\nAdjusts the image brightness (p. 66)"] --> I["Focus Button/Indicator\nAdjusts the focus (p. 68)"]
    I --> J["Zoom Button\nAdjusts the image display size (p. 62)"]
    J --> K["EXT IN Button/Indicator\nUsed to throughput images from external input devices to video monitors (p. 98) (Cannot throughput to a computer monitor)"]
    K --> L["Lights Button\nTurns on front lights and backlight (p. 78)"]
Remote Control
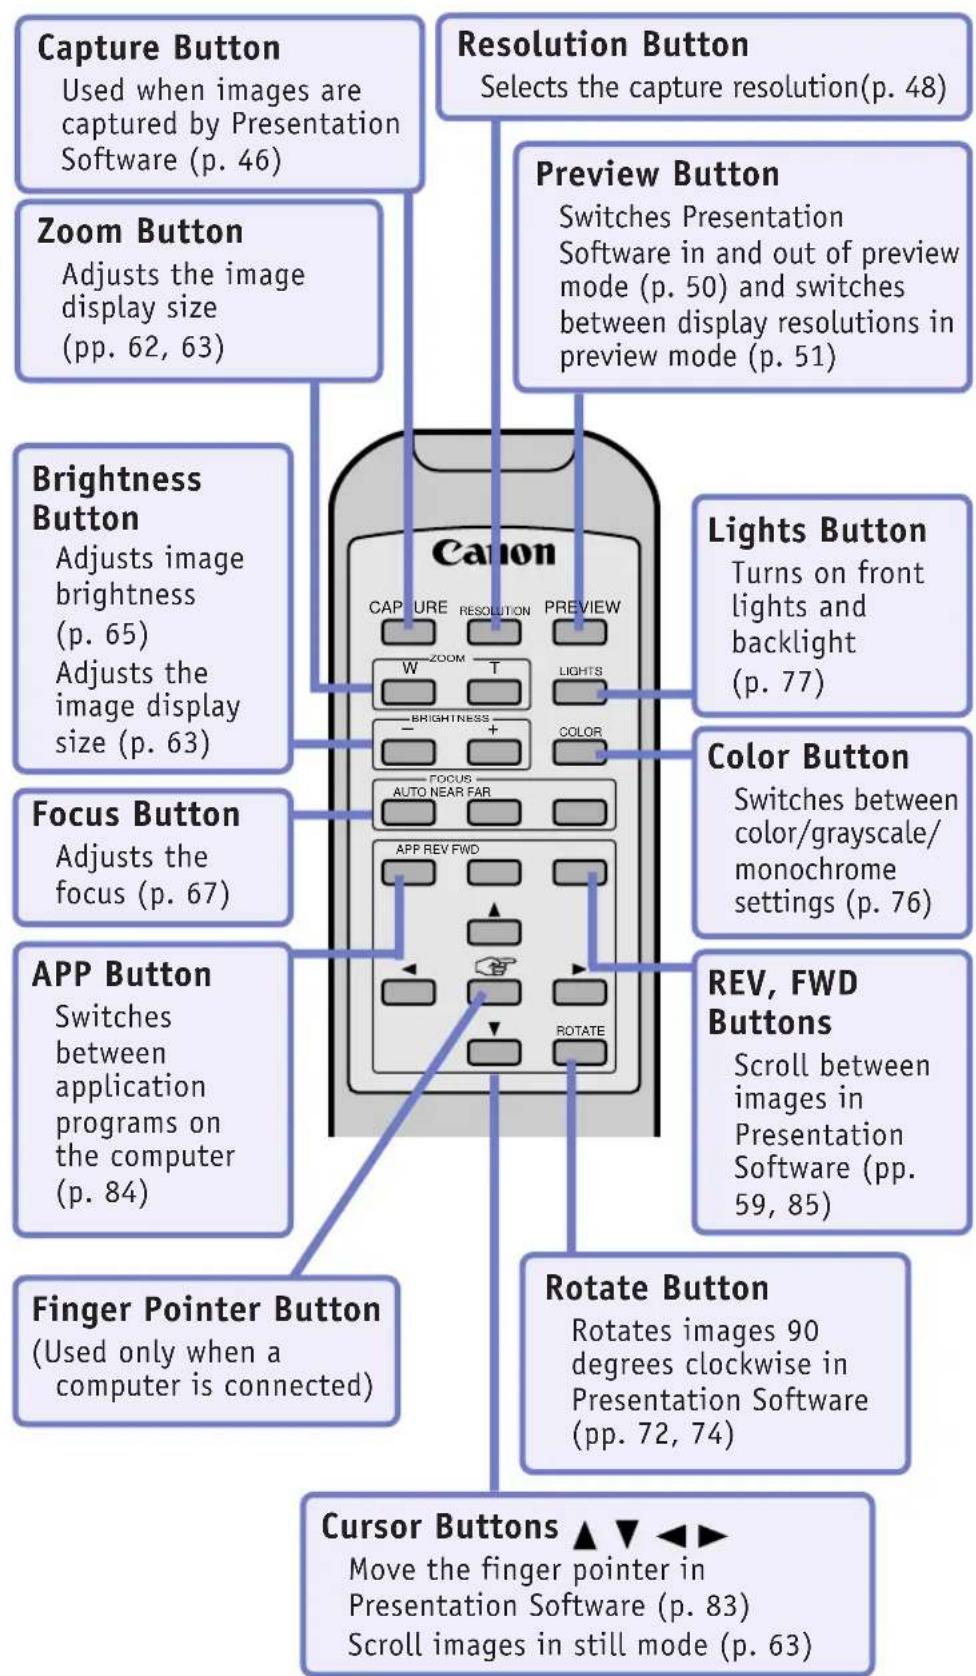
Camera Head
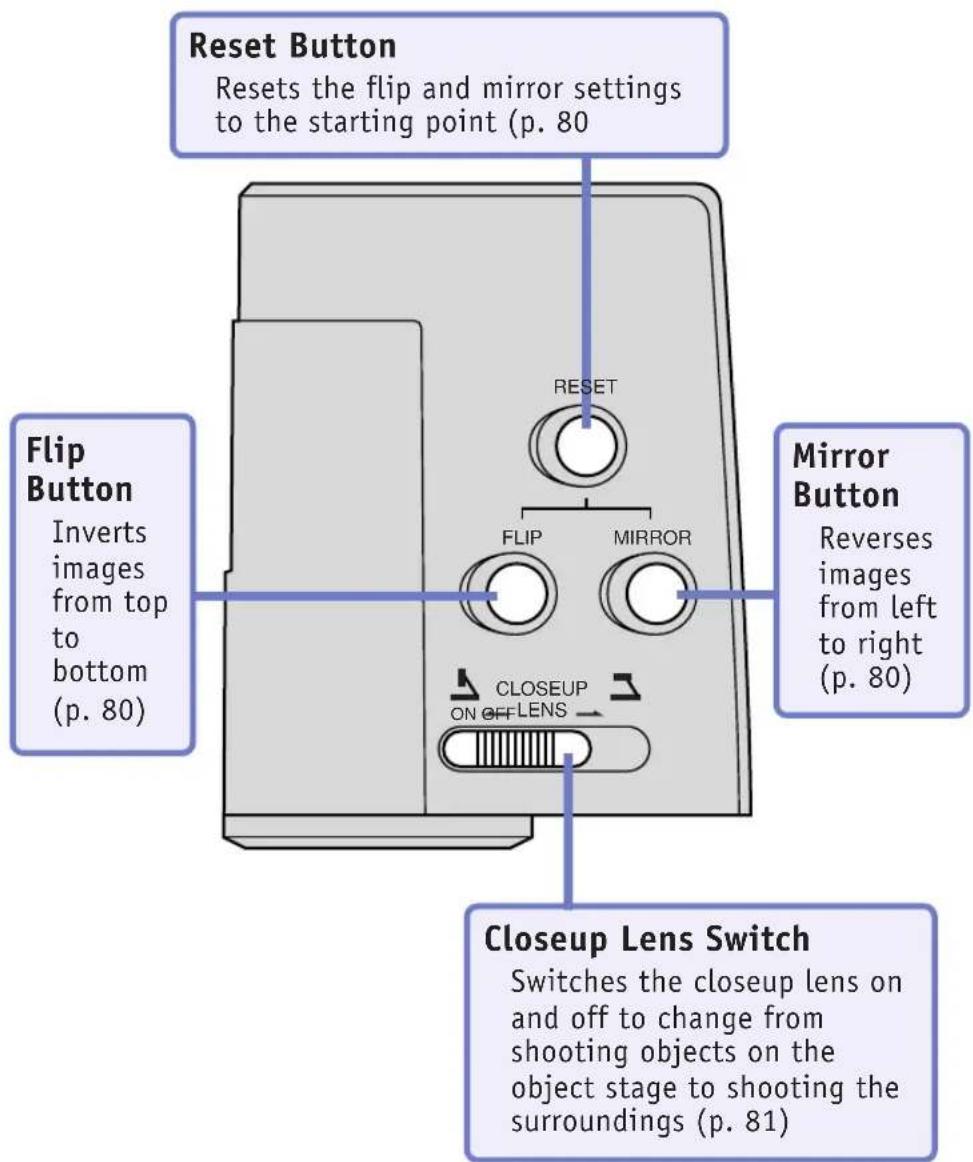
Toolbar (Preview Mode)
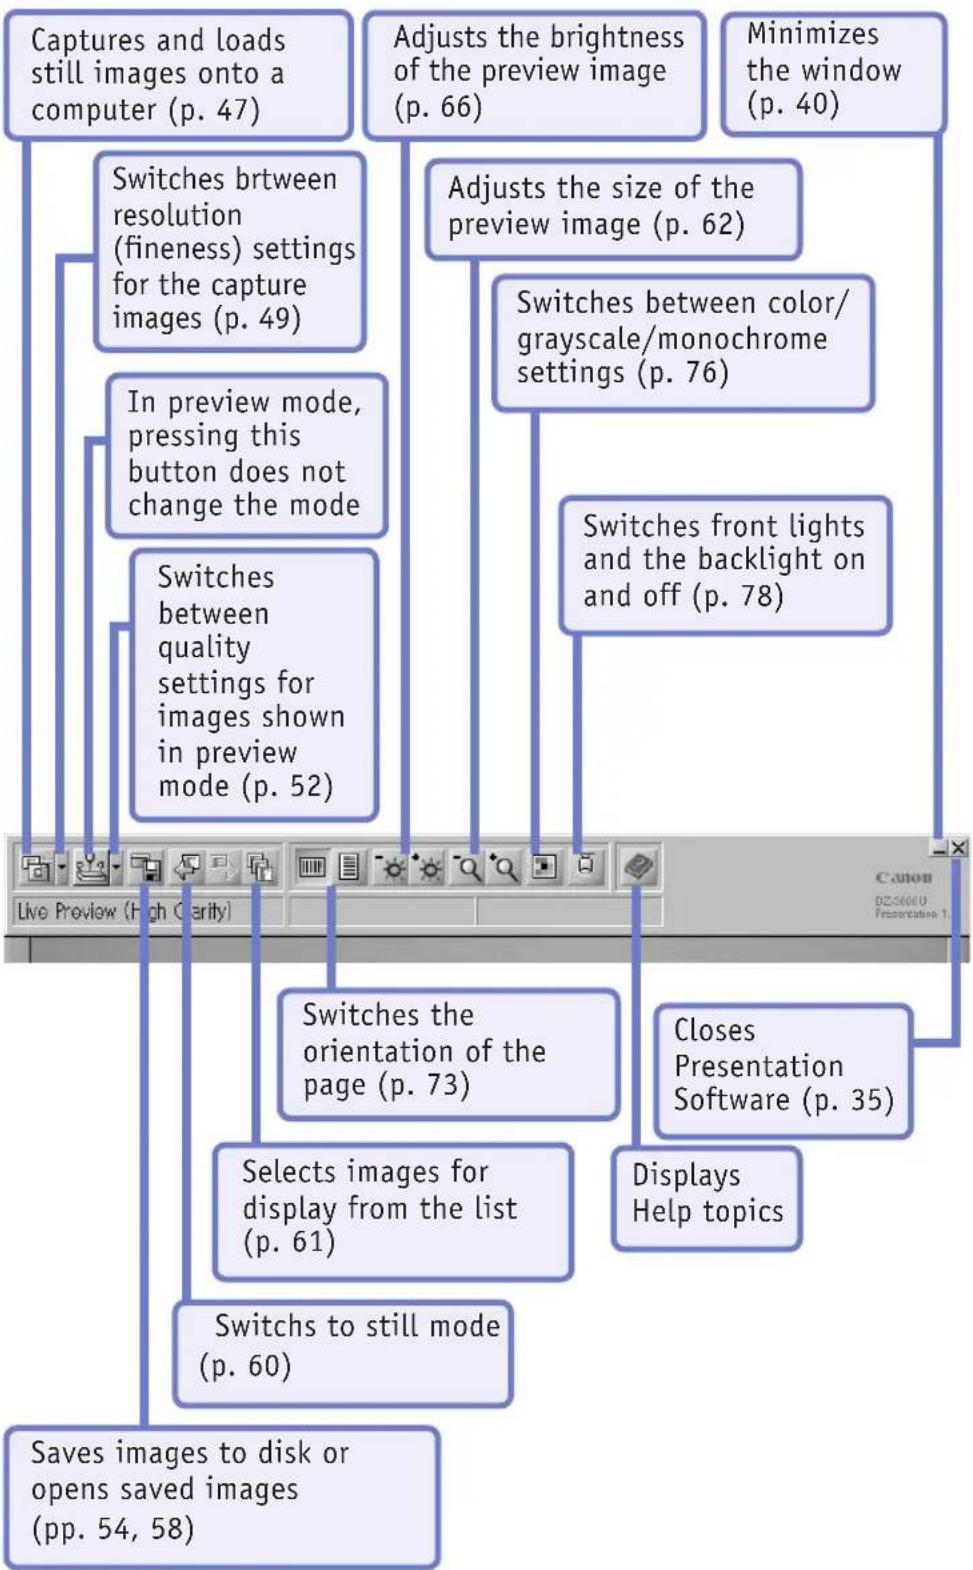
flowchart
graph TD
    A["Captures and loads still images onto a computer (p. 47)"] --> B["Switches brtween resolution (fineness) settings for the capture images (p. 49)"]
    B --> C["In preview mode, pressing this button does not change the mode"]
    C --> D["Switches between quality settings for images shown in preview mode (p. 52)"]
    D --> E["Saves images to disk or opens saved images (pp. 54, 58)"]
    F["Adjusts the brightness of the preview image (p. 66)"] --> G["Adjusts the size of the preview image (p. 62)"]
    G --> H["Switches between color/ grayscale/monochrome settings (p. 76)"]
    H --> I["Switches front lights and the backlight on and off (p. 78)"]
    I --> J["Closes Presentation Software (p. 35)"]
    J --> K["Displays Help topics"]
    K --> L["Selects images for display from the list (p. 61)"]
    L --> M["Switches the orientation of the page (p. 73)"]
Toolbar (Still Mode)
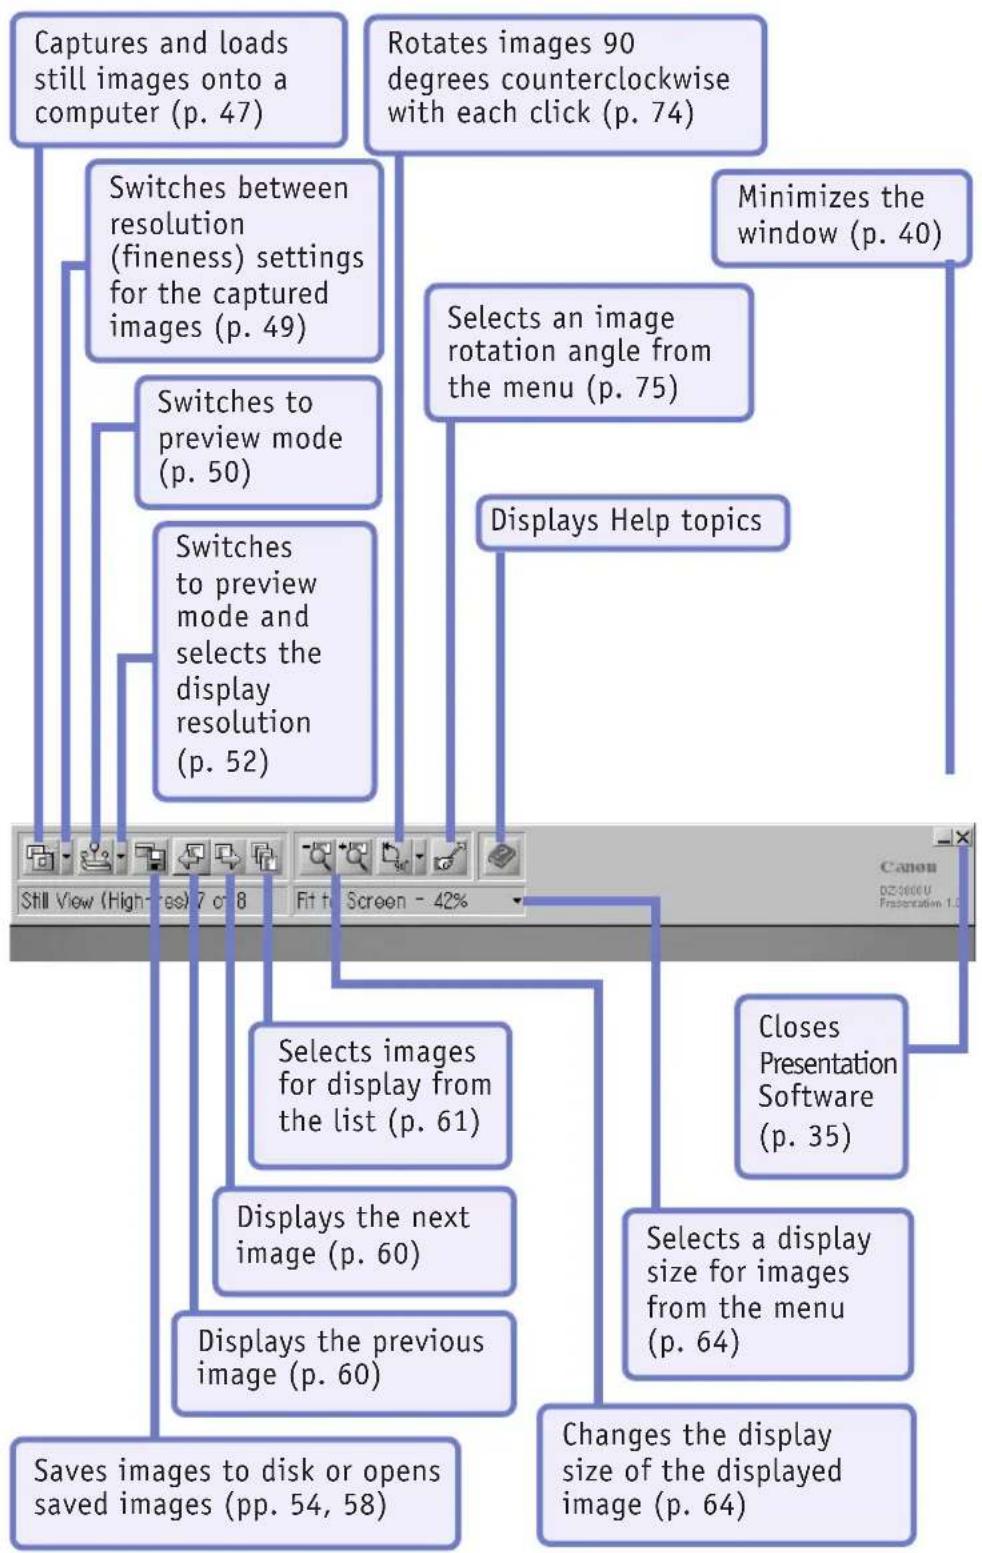
flowchart
graph TD
    A["Captures and loads still images onto a computer (p. 47)"] --> B["Switches between resolution (fineness) settings for the captured images (p. 49)"]
    B --> C["Switches to preview mode (p. 50)"]
    C --> D["Switches to preview mode and selects the display resolution (p. 52)"]
    D --> E["Saves images to disk or opens saved images (pp. 54, 58)"]
    F["Rotates images 90 degrees counterclockwise with each click (p. 74)"] --> G["Selects an image rotation angle from the menu (p. 75)"]
    G --> H["Displays Help topics"]
    I["Minimizes the window (p. 40)"] --> H
    H --> J["Selects images for display from the list (p. 61)"]
    J --> K["Displays the next image (p. 60)"]
    K --> L["Displays the previous image (p. 60)"]
    L --> M["Changes the display size of the displayed image (p. 64)"]
    N["Closes Presentation Software (p. 35)"] --> M
Specifications
Video Signal Conforms to the NTSC color format
Pickup Element 1/3-inch charge-coupled device (CCD)
Total Number of Pixels Approximately 410,000 pixels (effective: 380,000 pixels)
Still Images Size 640 x 480 to 1900 x 1424 pixels
Synchronization Internal
Resolution Video output: horizontal 450 TV lines/vertical 350 TV lines
Still images: horizontal 900 TV lines/vertical 700 TV lines
Signal to Noise Ratio 46 dB (Typical)
Camera Head Rotation Angles Pan: ±90^±5^
Tilt: 0 to 162° ±5°
White Balance Document auto/flesh tone auto/manual
Shooting Lens Composition: 10-elements, 8-groups
Zoom: electric, 12 power
Focal range: f=5.4mm to 64.8mm, F1.8 to 2.8
Iris (exposure): auto/manual
(fine adjustment ±approximately 1 exposure value)
Focus: auto/manual
Electronic Shutter 1/60 and 1/100 sec. (DIP switch selection)
Image Size Range Maximum: approximately 12.6 x 9.3 in. (320 x 235 mm)
Minimum: approximately 1.3 x 1.0 in. (33.5 x 25 mm)
Data Transfer RS-232C: 9600 bps
USB: 12 Mbps
Input Internal camera/external 1/external 2
Illumination Front lights: 6 W fluorescent x 2, high intensity, adjustable
Backlight: 6 W fluorescent x 2, high intensity
Other Functions Negative/positive, color/grayscale/Monochrome, flip, mirror
Input/Output Ports RS-232C: serial interface connector (8-pin DIN) x 1
USB: USB connector (Type B) x1
Video Input: BNC connector (input impedance 75 ohms) × 2
S video Input: S video connector (4-pin mini DIN 75 ohms) x 2
Video Output: BNC connector (output impedance 75 ohms) x 1
S video Output: S video connector (4-pin mini DIN 75 ohms) × 1
Power Supply Requirements AC input: 120 V ±10%, 60 Hz, less than 1.4 A
Power Consumption Maximum: approximately 42 W
Remote Control Operating range: within 16 ft. (5 m)
approximately 30° (up and down) and 120° (right and left)
Exterior Dimensions(w x d x h) Assembled: 28.4 x 20.7 x 22.5 in. (722 x 524.8 x 572.4 mm)
Knocked-Down: 19.1 × 20.7 × 8.1 in. (486 × 524.8 × 205.5 mm)
Weight Approximately 22 lbs (10 kg)
Operating Range Temperature: 41° to 95° F (5° to 35° C)
Humidity: 20% to 85% relative humidity without condensation
Glossary
Color
On a computer, color information is expressed by combining various ratios of the three primary colors: red, green and blue (RGB). The DZ-3600U is capable of expressing each of the primary colors in 256 hues (8 bits), which together create a total of approximately 16.7 million colors (256 x 256 x 256) (24 bits) in which images can be expressed.
Grayscale
A grayscale image is one that is expressed in black, white and 254 shades of gray (a total of 256 tones). A grayscale image looks much like a monochrome photograph.
HTML
Hyper Text Markup Language: a high-level programming language used to create web pages for the Internet. Use Internet browser software to view files created in this format.
Image File
A file that contains image data in a format that can be processed by a computer. At the most fundamental level, an image file is comprised of bitmap information, which is a series of dots (picture elements) assigned color values that are arranged in a grid. There are numerous image file formats, including the bitmap (BMP) and JPEG (JPG) formats, that may or may not use compression and differ in the way the dots are arranged.
NEGA
The DZ-3600U mode that enables negative films to be scanned much like a paper document. This mode produces coloration superior to the method whereby a negative film is scanned as a negative and later inverted with graphics software because it takes the color of the film base into account in calibrating colors. If you look carefully at negative film, you will note that the film itself has an orange tint. The invert function of graphics programs generally are not capable of compensating for the film base color, resulting in a poor color balance.
NTSC
A transmission standard for television signals used in Japan and North America. Different standards are used in Western Europe (PAL) and Eastern Europe (SECAM). Since the output from the DZ-3600U conforms to the NTSC standard, it cannot be viewed on PAL or SECAM televisions and video monitors.
Scanner
The word scanner is commonly used to refer to devices that load the information from paper-based photographs, text and illustrations onto computers. The DZ-3600U not only scans paper-based items, it is also capable of scanning three-dimensional objects as they appear. The process of using a scanner to load information into a computer is called 'scanning.'
TWAIN
An application programming interface (API) standard for image input devices, such as the DZ-3600U, image scanners and digital cameras. Any device will work with any application program, regardless of the manufacturer or model, as long as both comply with the standard.
USB
Universal serial bus: a new interface standard that supports up to 127 peripheral devices, such as keyboards, displays, mice and modems in a daisy chain connection.
VAROS
VARIABLE Refraction Optical System: an imaging technology that achieves a ninefold increase in resolution by optically sampling an object from nine minutely different angles and integrating the data into a single image. Using VAROS, the DZ-3600U is able to achieve a resolution equivalent to a 3.6-million element charge-coupled device (CCD).
White Balance
The human eye is an extremely adaptable device. For example, if exposed to a sheet of white paper outdoors at noon, it will recognize it as 'white paper.' If exposed to the same sheet indoors in a room with the lights off and little ambient light, it will still recognize it as 'white paper.'
Moreover, it can even recognize it under the light of a red sky at twilight. An electronic eye (such as the CCD element used in the DZ-3600U), on the other hand, will probably register the paper as white in the outdoor setting, gray in the darkened room and red under the night sky.
The white balance function is what compensates for this phenomenon. The DZ-3600U is equipped with an auto white balance function so that there is no need to make adjustments in most cases. Nonetheless, it is also equipped with a manual white balance function for when it is required (p. 70).
Index
Symbols
[+] Button 65
[-] Button 65
.PIH Format 53
A
Accessories 108
AC Inlet 16, 111
Aiming the Remote Control 24
APP Button 84
Applications 10
Arm Lock Release Lever 26, 37, 110
Assembly 26
Auto Button 67, 71
Autofocus 67
Automatic Startup 21, 29
Auto White Balance 70
B
Batteries 109
Backlight 77, 110
Bitmap (.BMP) 53
BNC Video Cable 91
Box 106
Brightness 65
Brightness Dial 65
Browser 57
C
Camera Arm 110
Camera Head 27, 110, 114
Capture 46
Capture Button 46
Capture Image Size 88
Capture Resolution 48
Capturing Images 33
Carrying Handle 110
Changing Batteries 109
Closeup Lens 81
Closing Software Programs 35
Color 76,118
Color Balance 70
Color Button 76
Communication Camera 93
Computer System Requirements 18
Connecting to a Computer 17
Connecting to a Power Source 16
Control Panel 110, 112
Cover 26
D
Default Save Location 53
Detail Dial 69
Digital Camera 93
DIP Switch 111
Display Image 55
Displaying Documents 87
Displaying Pictures 87
Display Resolution 51
Display Size 62, 63
Display Speed 51
Document Camera 93
DZ-3600U Presentation Software 40
DZ-3600U TWAIN Driver 41
E
Electronic Shutter 101, 111
Error Message 103
External Input Device 98
EXT IN 111
EXT IN Button 98
F
Far Button 67
Finger Pointer 82
Flip 80
Flip Button 80
Focus 67
Forwarding/Reversing 59
Front Light 77, 110
FWD Button 59,85
G
Glossary 118
Grayscale 76, 118
Grounding 7
H
High Resolution 48
High Speed 51
High Quality 51
History 54
HTML 118
HTML Index 53
I
Image Display Size 62, 63
Image File 118
Image Input Device 92, 98
Image Quality 30, 69
Input Device 86
Installing the Software 19
Interfacing 84
J
JPEG (.JPG) 53
K
Knock-Down 37
L
Large Screen Monitor 17
Lights Button 77
List 61
Low Resolution 48
M
Maintenance 6
Main Unit 110
Manual Dial 71
Memory Requirements 18
Microsoft PowerPoint 84
Mirror Button 80
Monochrome 76
N
Near Button 67
NEGA Button 79, 119
Negative Film 79
Negative Mode 79, 119
NTS 118
0
Object Stage 110
Open 58
Opening Saved Files 58
Orientation 72
0S 18
Output 90, 111
P
Packing List 108
Presentation Software 40
Presentation Software File Format (.PIH) 53
Preview Button 50, 51
Preview Mode 42
Power 28
Power Cord 16
Power Source 16
Power Switch 28, 36, 110
Projector 17, 90
Q
Quick Reference Guide 4
R
Real-Time Display 42
Rear Panel 111
Remote Control 23, 109, 113
Remote Control Batteries 109
Remote Control Sensor 24
Reset Button 80
Resolution 48
Resolution Button 48
REV Button 59, 85
Reversing Images 80
Rotate 72, 74
Rotate Button 72, 74
RS-232C 111
S
Safety 5
Save 53
Save Display Image 55
Save History 54
Saving All Images 56
Saving Images 53
Scanner 119
Selecting Images 61
Sensor 24
Setup 20
Shooting Surroundings 81
Slide 85
Software 40
Software Installation 19
Specifications 117
Starting the Software 29
Status Bar 44
Still Mode 43
Storage 37
System Requirements 18
S Video 90
S Video Cable 90
T
T Button 62, 63
TELE Button 62, 63
Toolbar 44
Toolbar (Preview Mode) 115
Toolbar (Still Mode) 116
Transport Precautions 38
Troubleshooting 100
TWAIN 118
TWAIN Driver 41, 86
U
USB 111, 118
USB Cable 17
USB Port 17
V
Variable Refraction Optical System 119
VAROS 119
VCR 93
VGA Cable 17
Video Camera 93
Video Monitor 90
Visualizer 3
W
W Button 62, 63
White Balance 70, 119
Wide Button 62, 63
Z
Zoom 62, 63
Zooming 32
natural_image
Abstract geometric shape composed of light purple and white stepped blocks (no text or symbols)Art Direction: Yoshisuke Kuramoto, CDS Inc., Tokyo, Japan
Design: Sumio Koike, J-Cat Communications, Vancouver, Canada
Writing: Yoshibito Isogawa, Isogawa Studio, Tokyo, Japan
English Writing: Christian R.P. Cowley, Concise Communications Corp., Vancouver, Canada
Cartoons: Adrian Raeside, Koko Press Inc., Victoria, Canada
Illustration: Torabiko Omura, Moma-room, Tokyo, Japan
Cover Photo: Midori Theodorakakis, J-Cat Communications, Vancouver, Canada
Canon
CANON INC. 30-2, Shimomaruko 3-chome, Ohta-ku, Tokyo 146-8501, Japan
U.S.A. — CANON U.S.A., INC. NEW YORK OFFICE
One Canon Plaza, Lake Success, NY 11042, U.S.A.
Phone: 516-328-5960
15955 Alton Parkway, Irvine, CA 92718-3616, U.S.A.
phone: 714-753-4320
- DIGITAL DOCUMENT CAMERA
- DZ-3600U
- User's Manual
- Introduction
- Features of the DZ-3600U Digital Document Camera
- - High-Resolution
- - Multiple Applications
- - Versatile
- - Remote Controls
- - All the Advantages of Traditional Visualizers Plus More
- Exclusion of Liability
- How to Use the Guides
- Users Guide (This Guide)
- Quick Reference Guide (Pamphlet)
- Copyright Compliance
- ⚠️ Safe Use of the Equipment
- ⚠️Important Warnings
- Important Operational Instructions
- FDA Regulation
- FCC Notice
- DZ-3600U Digital Document Camera
- Note:
- IC NOTICE
- NOTIFICATION IC
- ⚠️ Important Safety Instructions
- A La Carte Menu of DZ-3600U Applications
- As a Presentation Tool
- Presentation Examples
- As a Scanner for 3-D Objects
- As a Conventional Visualizer
- Table of Contents
- Chapter 1 Setup for Operation with a Computer
- Chapter 2 Mastering Basic Operation
- Chapter 3 An Introduction to the Features
- Chapter 4 Operating without a Computer
- Chapter 5 Troubleshooting
- Appendix
- Chapter 1
- Setup for Operation with a Computer
- Connecting to a Power Source
- !!! Important !!!
- Connecting to a Computer
- 1.
- 2.
- 3.
- Computer System Requirements
- CPU
- Memory
- Free Hard Disk Space
- Display
- Operating System
- Installing the Software
- Note
- Place the software CD-ROM into the computer's drive.
- 4.
- 5.
- 6.
- 7.
- 8.
- 9.
- Click the [Next] button.
- 10.
- Click the [Finish] button.
- 11.
- 12.
- Important Instructions for the Remote Control
- Aim the Remote Control at the Camera Head
- Check the Battery Charge Prior to Use
- Chapter 2
- Mastering Basic Operations
- Assembly
- Turning On the Power
- Press the power switch on the main unit to set it to the ( | ) position.
- Turn on the other devices that you'll be using (computer monitor, computer CPU, projector, etc.).
- Starting the Software
- Placing Objects
- A Few of the Basics
- Zooming
- Capturing Images
- Press the [Capture] button on the remote control.
- Rotating Captured Images
- Press the [Rotate] button on the remote control.
- Closing Software Programs
- Turning Off the Power
- Knock-Down
- Transport Precaution
- Chapter 3
- An Introduction to the Features
- About the Bundled Software
- The Two Programs to Install
- DZ-3600U Presentation Software
- DZ-3600U TWAIN Driver
- Preview Mode and Still Mode
- Preview Mode
- Still Mode
- Toolbar and Status Bar
- Toolbar
- Status Bar
- Display/Hide the Toolbar and Status Bar
- Display the Toolbar and Status Bar
- Hide the Toolbar and Status Bar
- Procedure with the Remote Control
- Procedure with the Control Panel
- Press the [Capture] button.
- Procedure with the Computer
- Click the ( ) button.
- Selecting the Capture Resolution
- Press the [Resolution] button.
- Switching to Preview Mode
- Procedure with a Computer
- Selecting the Display Resolution
- Saving Images
- Saving Images as Presentation Software Files
- Saving Just the Displayed Image
- Saving All Images and the HTML Index
- Opening Saved Images
- Forwarding/Reversing the Display to the Next Image
- To Reverse the Display to the Previous Image
- To Forward the Display to the Next Image
- Selecting Images from the List
- To Select a Previously Captured Image from the List
- Adjusting the Display Size of Preview Images
- Changing the Display Size of Captured Images
- Method 1
- Method 2
- Adjusting the Brightness of Preview Images
- Adjusting the Focus of Preview Images
- To Adjust the Focus to a More Distant Setting
- To Adjust the Focus to a Closer Setting
- To Turn Autofocus On/Off
- Adjusting the Detail of Preview Images
- Adjusting the Color Balance of Preview Images
- Resetting the White Balance/ Restoring Auto White Balance
- Press the [Auto] button.
- Adjusting the Color Balance
- Adjusting the Orientation of Preview Images
- Rotating the Display 90 Degrees
- Press the [Rotate] button.
- Control Panel
- To Rotate the Image 90 Degrees at a Time
- To Select an Angle and Rotate the Image
- Capturing an Object in Monochrome Mode
- To Switch to Color/Grayscale/Monochrome Mode
- Using the Front Lights and Backlight
- To Turn the Front Lights and Backlight On/Off
- Shooting Negatives
- To Switch to Negative Mode
- Press the [NEGA] button.
- Procedures Required for showing Negative Films
- Reversing or Inverting Images
- Shooting the Surroundings
- Point the Lens in the Desired Direction
- Turn Off the Closeup Lens.
- Press the Flip and Mirror Buttons
- Using the Finger Pointer
- Displaying the Finger Pointer
- Moving the Finger Pointer
- Interfacing with PowerPoint
- Switching between Application Programs
- To Switch between Programs
- Controlling Slides
- To Advance/Reverse a Slide
- Scanning Images with TWAIN Driver
- Selecting the Input Device
- Using TWAIN Driver
- Chapter 4
- Operating without a Computer
- Connecting to a Video Monitor or Projector
- S Video Cable
- BNC Video Cable
- Connecting to Other Image Input Devices
- Connecting to an External Input Device
- Assembly, Knock-Down and Power On/Off
- Assembly and Knock-Down
- Button Functions
- Remote Control
- Camera Head
- Displaying Images from External Input Devices
- To Receive Images from an External Input Device
- Chapter 5
- Troubleshooting
- Troubleshooting Tips
- Presentation Software Will Not Start
- The Computer Monitor Is Blank
- Images Are Not Displaying on the Video Monitor
- Images Are Not Displaying Smoothly
- The Toolbar and Status Bar Have Vanished
- The Processing Speed of Other Application Programs Has Slowed
- Images Are Too Bright or Dark
- The Focus Is Off
- The Coloration Is Off
- Colors Will Not Display
- The Display Is Flickering
- Lines Are Appearing in Captured Images
- Images Are Inverted or Reversed
- Images from External Input Devices Are Not Displaying
- Lights Are Not Illuminating Immediately After the Lights Button Is Pressed
- The Lights Flicker or Are Dim
- The Remote Control Will Not Work
- TWAIN Driver Won't Capture Images
- Error Messages
- Removing the Equipment from the Box
- Packing List
- Other Items
- Changing the Remote Control Batteries
- Components Guide
- Main Unit
- Back Panel of the Main Unit
- Toolbar (Preview Mode)
- Toolbar (Still Mode)
- Specifications
- Glossary
- Color
- Grayscale
- HTML
- Image File
- NEGA
- NTSC
- Scanner
- TWAIN
- USB
- VAROS
- White Balance
- Index
- Symbols
- A
- B
- C
- D
- E
- F
- G
- H
- I
- J
- K
- L
- M
- N
- 0
- P
- Q
- R
- S
- T
- U
- V
- W
- Z
- Canon
Brand : CANON
Model : DZ3600U
Category : Video projector