
DuraVision FDX1501-A - Screen EIZO - Free user manual and instructions
Find the device manual for free DuraVision FDX1501-A EIZO in PDF.


| Type | LCD monitor |
| Screen Size | 15.0 inches (diagonal) |
| Aspect Ratio | 4:3 |
| Native Resolution | 1024 x 768 pixels |
| Brightness (typical) | 300 cd/m² |
| Contrast Ratio (typical) | 1500:1 |
| Viewing Angles (H/V) | 170°/170° |
| Input Interface | DVI-D, VGA |
| Dimensions (W x H x D) | 339 x 346 x 196 mm |
| Weight (approx.) | 5.5 kg |
| Power Consumption (max) | 25 W |
| Power Supply | AC 100-240 V, 50/60 Hz |
| Preset Modes | User, DICOM, CAL, Custom |
| Special Features | DICOM Part 14 simulated calibration, brightness stabilization |
| OSD Languages | English, German, French, Spanish, Italian, Chinese, Japanese |
| VESA Mount | 100 x 100 mm |
| Cleaning Instructions | Wipe gently with a soft, dry cloth. Do not use solvents. |
| Safety Precautions | Do not block ventilation slots; use only with EIZO power cord. |
| Spare Parts / Service | Contact EIZO authorized service partner for parts and repair. |
| Intended Use | Medical imaging (PACS, endoscopy) and general office |
Frequently Asked Questions - DuraVision FDX1501-A EIZO
User questions about DuraVision FDX1501-A EIZO
0 question about this device. Answer the ones you know or ask your own.
Ask a new question about this device
Download the instructions for your Screen in PDF format for free! Find your manual DuraVision FDX1501-A - EIZO and take your electronic device back in hand. On this page are published all the documents necessary for the use of your device. DuraVision FDX1501-A by EIZO.
USER MANUAL DuraVision FDX1501-A EIZO
Touch Panel Color LCD Monitor
Important
Please read this User's Manual, and the Setup Manual (separate volume) carefully to familiarize yourself with safe and effective usage.
- Please refer to the Setup Manual for basic information ranging from installation of the monitor to using the monitor.
- The latest User's Manual is available for download from our web site: http://www.eizoglobal.com
This product has been adjusted specifically for use in the region to which it was originally shipped. If operated outside this region, the product may not perform as stated in the specifications.
No part of this manual may be reproduced, stored in a retrieval system, or transmitted, in any form or by any means, electronic, mechanical, or otherwise, without the prior written permission of EIZO Corporation. EIZO Corporation is under no obligation to hold any submitted material or information confidential unless prior arrangements are made pursuant to EIZO Corporation's receipt of said information. Although every effort has been made to ensure that this manual provides up-to-date information, please note that EIZO monitor specifications are subject to change without notice.
CONTENTS
CONTENTS....3
Chapter 1 Introduction......4
1-1. Features 4
1-2. EIZO LCD Utility Disk.... 5
Disk contents and software overview .... 5
use touch panel driver 5
1-3. Basic Operations and Functions ...... 6
Basic operation of the Setting menu 6
Functions....7
Chapter 2 Adjusting Screens ....8
2-1. Setting the Resolution 8
Display resolution 8
Setting resolution 8
2-2. Adjusting Color 9
select the display mode (Color Mode) ..... 9
perform advanced adjustments 9
Adjustable settings in each mode 10
adjust brightness 10
adjust color temperature ....11
adjust gamma 11
adjust the color saturation 12
adjust hue....12
adjust gain 13
2-3. Screen Adjustment....14
Digital Signal Input 14
Analog Signal Input 14
Chapter 3 Setting Monitor 18
3-1. Adjusting Volume......18
3-2. Enabling / Disabling DDC/CI communication ....18
3-3. Locking Operation Buttons .....18
3-4. Showing and hiding the EIZO logo .....19
3-5. Setting Language....19
3-6. Resetting the Monitor to the Default Settings....19
reset the color adjustments 19
reset all adjustments to the default settings....20
Chapter 4 Power Saving Functions ...... 21
4-1. Setting Power Saving 21
4-2. Setting Power Indicator.... 22
4-3. Enabling / Disabling Auto Power-OFF..... 22
Chapter 5 Troubleshooting....23
5-1. No picture 23
5-2. Imaging problems (for both digital and analog).... 24
5-3. Imaging problems (for analog only) ..... 24
5-4. Other problems 25
5-5. Touch panel problems (for FDX1501T-A only)....25
Chapter 6 Reference 26
6-1. Connecting Multiple PCs 26
- switch among input signals 26
- set input signal selection 27
6-2. Displaying Monitor Information 27
6-3. Preset Timing 28
Chapter 7 Glossary 29
Appendix 31
Trademark 31
License / Copyright 31
LIMITED WARRANTY 32
Recycling Information ....41
Chapter 1 Introduction
Thank you very much for choosing an EIZO color LCD monitor.
1-1. Features
- 15" LCD
• Supports a resolution of 1024 × 768
• LED backlight LCD panel
The LED backlight provides better power efficiency and reduced power consumption compared to existing fluorescent backlight LCD panels. No mercury, a hazardous substance, is used.
• High-intensity panel
Maintains visibility under high-illumination conditions - A design without ventilation holes in the main unit makes dust penetration difficult.
- Stereo speakers
• Supports a wide range of operating temperatures and operating humidity - Operating temperature : 0°C to 50°C (32°F to 122°F)
- Operating humidity: 20% to 90% R.H. (wet bulb temperature ≤ 39 °C (102 °F), no condensation)
• A 3-year long-term warranty for 24-hour continuous use
• Power saving function
Suppressing the power consumption reduces the carbon dioxide emissions. This product is equipped with power saving function. - Eco Timer
This function allows you to set the monitor to turn off automatically after a specified time has passed in the power saving mode.
See "4-3. Enabling / Disabling Auto Power-OFF" (page 22). - Displays HDCP (High-bandwidth Digital Protection) protected contents
(for FDX1501T-A only)
- Touch Panel provided
- Detection method: Analog resistive technology
- Communication: USB, RS-232C (* Cannot be used at the same time.)
1-2. EIZO LCD Utility Disk
An “EIZO LCD Utility Disk” (CD-ROM) is supplied with this product. The following table shows the disk contents and the overview of the software programs.
Disk contents and software overview
The disk includes adjustment software, touch panel software, and user's manuals. Refer to Readme.txt file on the disk for software startup procedures or file access procedures.
| Item Overview Windows Macintosh | |||
| Screen adjustment pattern files Used when adjusting the image of analog signal input manually. | |||
| Touch panel driver*1 | Driver software required for operating the touch panel monitor on Windows. | - | |
| User's Manual of this monitor (PDF file) | |||
| User's Manual for Touch Panel Driver (PDF file)*1 | - | ||
| Readme.txt file | |||
*1 Used only for the FDX1501T-A.
T● use touch panel driver
For information on how to install or use the touch panel driver, see the Touch Panel Driver User's Manual (on the CD-ROM).
1-3. Basic Operations and Functions
Basic operation of the Setting menu
1. Displaying the Setting menu
- Press ⓄThe Setting menu appears.

2. Adjusting / Setting
- Choose a menu to adjust / set with ▼ and then press . The Sub menu appears.
![Color (User1) Return Brightness [ 100 ] Temperature [ Off ] Gamma [ 2.2 ] Advanced Settings Color Reset](/content/2026/05/964567/images/d7d7b2df2d32eddec6ecff978302e4679f285fd208276628a74066af631881b8.jpg)
- Choose an item to adjust / set with Ⓨ, and then press . The adjustment / setting menu appears.
- Adjust / set the selected item with ▼, and then press .
3. Exiting
- Choose "Return" from the Sub menu and press ●The Setting menu appears.
- Choose "Exit" from the Main menu and press Ⓞ. The Setting menu quits.
Note
- The Setting menu can also be exited by pressing twice quickly.
Fonctions
The following table shows the Setting menu and setting items of each menu.
| Main menu Setting Reference | |||
| Color*1 | Brightness “2-2. Adjusting Color” (page 9) | ||
| Temperature | |||
| Gamma | |||
| Advanced Settings Saturation | |||
| Color Reset “To reset the color adjustments” (page 19) | |||
| Screen Smoothing | 2-3. Screen Adjustment” (page 14) | ||
| Analog Adjustment*2 | Auto Screen Adjust | ||
| Auto Range Adjust | |||
| Clock | |||
| Phase | |||
| Hor.Position | |||
| Ver.Position | |||
| PowerManager Power Save “4-1. Setting Power Saving” (page 21) | |||
| Monitor Settings | Input Signal | “To set input signal selection” (page 27) | |
| Power Indicator “4-2. Setting Power Indicator” (page 22) | |||
| Language “3-5. Setting Language” (page 19) | |||
| DDC/CI | “3-2. Enabling / Disabling DDC/CI communication” (page 18) | ||
| Logo | “3-4. Showing and hiding the EIZO logo” (page 19) | ||
| Reset | “To reset all adjustments to the default settings” (page 20) | ||
| Information | “6-2. Displaying Monitor Information” (page 27) | ||
*1 The adjustment / settings available on the "Color" menu depend on the selected Color mode (see "Adjustable settings in each mode" (page 10)).
*2 These functions can be adjusted with analog input.
Chapter 2 Adjusting Screens
2-1. Setting the Resolution
Display resolution
For details on compatible resolutions, refer to "Compatible Resolutions" in the Setup Manual.
Sotting resolution
When you connect the monitor to the PC and find that the resolution is improper, or when you want to change the resolution, follow the procedure below.
Windows 10
- Right-click the mouse anywhere on the desktop except for icons.
- From the displayed menu, click "Display Settings".
- On the "Customize your display" dialog box, click "Advanced display settings".
- Select a monitor, then choose a resolution from the "Resolution" pull-down menu.
- Click the "Apply" button.
- When a confirmation dialog box is displayed, click "Keep changes".
Windows 8.1 / Windows 7
- For Windows 8.1, click the "Desktop" tile on the Start Screen to display the desktop.
- Right-click the mouse anywhere on the desktop except for icons.
- From the displayed menu, click "Screen resolution".
- On the "Screen Resolution" dialog box, select the monitor.
- Click "Resolution" to select the desired resolution.
- Click the "OK" button.
- When a confirmation dialog box is displayed, click "Keep changes".
Windows Vista
- Right-click the mouse anywhere on the desktop except for icons.
- From the displayed menu, click "Personalize".
- On the "Personalization" window, click "Display Settings".
- On the "Display Settings" dialog box, select the "Monitor" tab and select desired resolution in the "Resolution" field.
- Click the "OK" button.
- When a confirmation dialog box is displayed, click "Yes".
Windows XP
- Right-click the mouse anywhere on the desktop except for icons.
- From the displayed menu, click "Properties".
- When the "Display Properties" dialog box is displayed, click the "Settings" tab and select desired resolution for "Screen resolution" under "Display".
- Click the "OK" button to close the dialog box.
Mac OS X
- Select "System Preferences" from the Apple menu.
- When the "System Preferences" dialog box is displayed, click "Displays" for "Hardware".
- On the displayed dialog box, select the "Display" tab and select desired resolution in the "Resolutions" field.
- Your selection will be reflected immediately. When you are satisfied with the selected resolution, close the window.
2-2. Adjusting Color
To select the display mode (Color Mode)
This function allows easy selection of a desired mode according to monitor application.
Display Modes
| Mode Purpose | |
| User1 Select this to | define a desired set of parameter settings. |
| User2 | |
| sRGB Suitable for color matching with sRGB compatible peripherals. | |
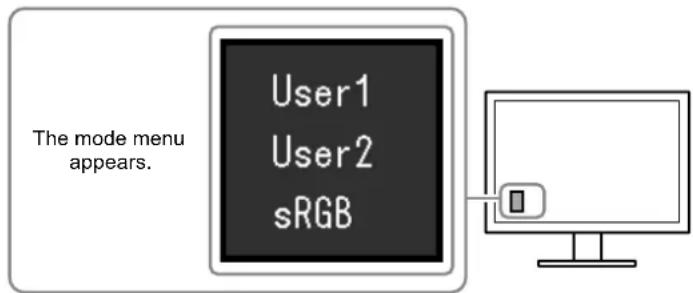
Procedure
- Press Ⓜ.
The mode menu appears at the bottom left of the screen. - The mode among the list is highlighted in turn each time is pressed.
You can switch the mode with ☑ or ☑ while the mode menu is displayed.

Note
- The Setting menu and the Mode menu cannot be displayed at the same time.
TO perform advanced adjustments
The "Color" menu of the Setting menu allows you to set and save the independent color adjustment for each mode.
Attention
- It takes about 30 minutes for the performance of electrical parts to stabilize. Please wait 30 minutes or more after the monitor power has been turned on, and then adjust the monitor.
- Perform the range adjustment first when adjusting color for analog signals (see "To adjust color gradation automatically" (page 17)).
- The same image may be seen in different colors on multiple monitors due to their monitor-specific characteristics. Make fine color adjustment visually when matching colors on multiple monitors.
Adjustable settings in each mode
The adjustable settings depend on the mode. (Non-adjustable or non-settable function cannot be selected.)
√: Adjustable -: Not adjustable
| Function | Color Mode | |||
| User1 User2 | sRGB | |||
| Brightness | ||||
| Temperature - | ||||
| Gamma - | ||||
| Advanced Settings Saturation - | ||||
| Hue - | ||||
| Gain - | ||||
| Color Reset | ||||
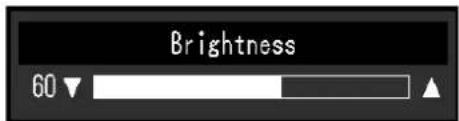
T● adjust brightness
The screen brightness is adjusted by changing the brightness of the backlight (light source from the LCD back panel).
Adjustable range
0 to 100
Procedure
- Press ▲.
The brightness adjustment screen appears. - Use ▼ or ▲ for adjustment.
- Press Ⓞ to exit.
Attention
- A range of setting values on the adjustment screen are displayed in magenta. The contrast (video signal level) is changed to adjust the brightness in this range.
Note
- Alternatively, you can use "Brightness" under "Color" in the Adjustment menu to adjust it.
To adjust color temperature
Color temperature can be adjusted.
The color temperature is normally used to express the hue of "White" and / or "Black" by a numerical value. The value is expressed in degrees "K" (Kelvin).
The screen becomes reddish at a low color temperature, and bluish at a high color temperature, like the flame temperature. A gain preset value is set for each color temperature setting value.
Adjustable range
Off, 4000 K-10000 K (specified by every 500 K unit, including 9300 K)
Procedure
- Choose "Color" in the Setting menu, and press Ⓞ.
- Choose "Temperature" in the "Color" menu, and press Ⓞ.
The "Temperature" menu appears.
- Use ▼ or for adjustment.
- Press Ⓞ to exit.
Note
- The value shown in "K" is available only as reference.
- “Gain” allows you to perform more advanced adjustment (see “To adjust gain” (page 13)).
- If you set to "Off", the image is displayed in the preset color of the monitor (Gain: 100 for each RGB).
- When gain is changed, the color temperature is changed to "Off".
To adjust gamma
Gamma can be adjusted. The brightness of the monitor varies depending on the input signal, however, the variation rate is not proportional to the input signal. To keep the balance between the input signal and the brightness of the monitor is called as “Gamma correction”.
Adjustable range
1.8, 2.0, 2.2
Procedure
- Choose "Color" in the Setting menu, and press Ⓞ.
- Choose "Gamma" in the "Color" menu, and press Ⓞ.
The "Gamma" menu appears.
- Use or for adjustment.
- Press Ⓞ to exit.
T● adjust the color saturation
This function allows you to adjust color saturation.
Adjustable range
-50 to 50
Procedure
- Choose "Color" in the Setting menu, and press Ⓞ.
- Choose "Advanced Settings" in the "Color" menu, and press Ⓞ.
- Choose "Saturation" in the "Advanced Settings" menu, and press ⚙. The "Saturation" menu appears.
- Use or for adjustment.
- Press Ⓞ to exit.
Attention
- Using this function may make some color gradations unavailable for display.
- The minimum value (-50) changes the screen to monochrome.
Note
To adjust hue
This function allows you to adjust hue.
Adjustable range
-50 to 50
Procedure
- Choose "Color" in the Setting menu, and press Ⓞ.
- Choose "Advanced Settings" in the "Color" menu, and press ●.
- Choose "Hue" in the "Advanced Settings" menu, and press . The "Hue" menu appears.
- Use or for adjustment.
- Press to exit.
Attention
- Using this function may make some color gradations unavailable for display.
To adjust gain
The brightness of each color component red, green, and blue is called “Gain”. You can change the hue of “white” by adjusting gain.
Adjustable range
0 to 100
Procedure
- Choose "Color" in the Setting menu, and press Ⓞ.
- Choose "Advanced Settings" in the "Color" menu, and press Ⓞ.
-
Choose "Gain" in the "Advanced Settings" menu, and press . The "Gain" menu appears.
-
Adjust gain with or for each of red, green, and blue.
-
Press to exit.
Attention
- Using this function may make some color gradations unavailable for display.
Note
- The value of gain changes with that of color temperature.
- When gain is changed, the color temperature is changed to "Off".
2-3. Screen Adjustment
Digital Signal Input
When digital signals are input, images are displayed correctly based on the preset data of the monitor, but if characters and / or lines appear blurred, go to "To modify blurred characters / lines" (page 17).
When performing more advanced adjustment, see “2-2. Adjusting Color” (page 9) and subsequent pages.
Analog Signal Input
Attention
- It takes about 30 minutes for the performance of electrical parts to stabilize. Please wait 30 minutes or more after the monitor power has been turned on, and then adjust the monitor.
- The Self Adjust (automatic screen adjustment) function does not work for the images under the resolution of 800 × 600 (SVGA).
- The self adjustment (or automatic screen adjustment) function works correctly when an image is fully displayed over the Windows or Macintosh display area. They do not work properly in the cases below:
- When an image is displayed only on a part of the screen (command prompt window, for example)
- When a black background (wallpaper, etc.) is in use
Also, these functions cannot work properly in some graphic boards.
The monitor screen adjustment is used to suppress flickering of the screen or adjust screen position and screen size correctly according to the PC to be used.
Note
- The Self Adjust function works when all of the following conditions are satisfied:
- When a signal is input into the monitor for the first time or when a resolution or vertical / horizontal scan frequency not used before is set
If the screen is not displayed correctly even after performing the Self Adjust operation, adjust the screen according to the procedures on the following pages to use the monitor comfortably.
Setting Procedures
1. Perform the auto adjustment.
To adjust flickering, screen position, and screen size automatically
Procedure
- Choose "Screen" in the Setting menu, and press Ⓞ.
- Choose "Analog Adjustment" in the "Screen" menu, and press Ⓞ.
- Choose "Auto Screen Adjust" in the "Analog Adjustment" menu, and press Ⓞ.
- Select "Yes" with ▼ or ▲ and press .●
Flickering, screen position, and screen size are corrected by the auto-adjustment function.
If the screen is not displayed correctly even after performing the auto adjustment, perform adjustments according to the following procedure. If the screen is displayed correctly, go to "5. Adjusting color gradation." (page 17).
2. Prepare to use analog screen adjustment patterns.
Load the "EIZO LCD Utility Disk" to your PC, and then open the "Screen adjustment pattern files".
Note
- For details and instructions on opening the "Screen adjustment pattern files", refer to the Readme.txt file.
3. Perform the auto adjustment again with the analog screen adjustment pattern displayed.
To adjust flickering, screen position, and screen size automatically
Procedure
- Display Pattern 1 in full screen on the monitor using the "Screen adjustment pattern files".
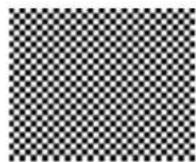
- Choose "Screen" in the Setting menu, and press Ⓞ
- Choose "Analog Adjustment" in the "Screen" menu, and press Ⓞ.
- Choose "Auto Screen Adjust" in the "Analog Adjustment" menu, and press Ⓞ.
- Select "Yes" with ▼ or ▲ and press .●
Flickering, screen position, and screen size are corrected by the auto-adjustment function.
If the screen is not displayed correctly even after performing the auto adjustment, perform adjustments according to the following procedure. If the screen is displayed correctly, go to "5. Adjusting color gradation." (page 17).
4. Choose "Screen" from the Setting menu to perform advanced adjustments.
Adjust the clock, phase and position, in this order.
To eliminate vertical bars
Procedure
- Choose "Analog Adjustment" in the "Screen" menu, and press Ⓞ.
- Choose "Clock" in the "Analog Adjustment" menu, and press Ⓞ.
The "Clock" menu appears.
- Adjust the clock with ☑ or ☒ eliminate vertical bars.
Press ☑ or slowly so as not to miss the adjustment point.
- Press ⓣ to exit.
When blurring, flickering or bars appear on the screen after adjustment, proceed to "To remove flickering or blurring".
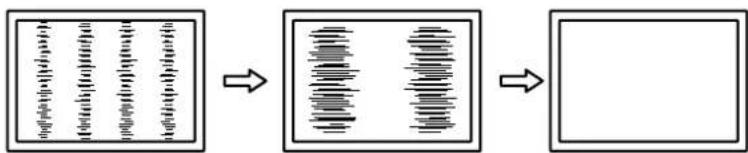
flowchart
graph LR
    A["Initial Box with labels 'Antepläte', 'Antepläte', 'Antepläte', 'Antepläte'"] --> B["Intermediate Box with two vertical lines and horizontal bars"]
    B --> C["Final Box"]
To remove flickering or blurring
Procedure
- Choose "Analog Adjustment" in the "Screen" menu, and press Ⓞ.
- Choose "Phase" in the "Analog Adjustment" menu, and press ♏.
The "Phase" menu appears.
- Adjust the phase with 📋 or ⓣ minimize flickering or blurring.
- Press Ⓞ to exit.
When vertical bars appear on the screen after adjustment, go back to "To eliminate vertical bars".
(Clock → Phase → Position)

flowchart
graph LR
    A["Rectangular File"] --> B["Empty Box"]
Attention
- Flickering or blurring may not be eliminated depending on your PC or graphics board.
To correct the screen position
Note
- Since the number of pixels and the pixel positions are fixed on the LCD monitor, only one position is provided to display images correctly. The position adjustment is made to shift an image to the correct position.
Procedure
- Choose "Analog Adjustment" in the "Screen" menu, and press Ⓞ.
-
Choose "Hor.Position" or "Ver.Position" from the "Analog Adjustment" menu, and press Ⓞ. The "Hor. Position" or "Ver. Position" menu appears.
-
Adjust the position with ☑ or . ▲
- Press Ⓞ to exit.
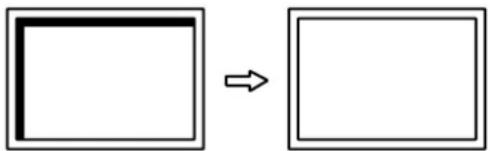
flowchart
graph LR
    A[" "] --> B[" "]
- Close Pattern 1.
5. Adjusting color gradation.
To adjust color gradation automatically
Every color gradation (0 to 255) can be displayed by adjusting the signal output level.
Procedure
- Display Pattern 2 in full screen on the monitor using the "Screen adjustment pattern files".

- Choose "Screen" in the Setting menu, and press Ⓞ
- Choose "Analog Adjustment" in the "Screen" menu, and press Ⓞ.
- Choose "Auto Range Adjust" in the "Analog Adjustment" menu, and press Ⓞ.
- Select "Yes" with ▼ or ⚠ and press .● The output range is set automatically.
- Close Pattern 2.
6. Modify blurred characters or lines.
To modify blurred characters / lines
When an image is displayed with a resolution other than recommended, the characters or lines of the displayed image may blur.
Attention
- Smoothing setting may not be required depending on the display resolution. (You cannot choose the smoothing icon.)
Adjustable range
1 to 5
Procedure
- Choose "Screen" in the Setting menu, and press Ⓞ.
- Choose "Smoothing" in the "Screen" menu, and press . The "Smoothing" menu appears.
- Use ☑ or for adjustment.
- Press Ⓞ to exit.
Chapter 3 Setting Monitor
3-1. Adjusting Volume
This function allows you to adjust the volume.
Attention
- The volume cannot be adjusted for a chassis mount type or panel mount type monitor.
Adjustable range
0 to 30
Procedure
- Press 🔊.
The sound volume menu appears. - Use ☑ or for adjustment.
- Press Ⓞ to exit the adjustment.
3-2. Enabling / Disabling DDC/CI communication
This function allows you to enable / disable the DDC/CI communication (see “Chapter 7 Glossary” (page 29)).
Procedure
- Choose "Monitor Settings" in the Setting menu, and press Ⓞ.
- Choose "DDC/CI" in the "Monitor Settings" menu, and press Ⓑ. The "DDC/CI" menu appears.
- Select "On" or "Off" with ⏻ or . ⬆
- Press Ⓞ to exit.
3-3. Locking Operation Buttons
This function allows you to lock the settings to prevent them being changed.
Procedure
- Press ⏻ to turn off the monitor.
- Hold down Ⓢ while pressing Ⓞ to turn on the monitor.
You can toggle between Lock and Unlock by performing steps 1 and 2.
Note
- The following operations are available even if the buttons are locked:
- Turning on or off the monitor with the Power button
3-4. Showing and hiding the EIZO logo
When the monitor is turned on, the EIZO logo appears on the screen. You can choose to show or hide the display of the EIZO logo.
Procedure
- Choose "Monitor Settings" in the Setting menu, and press Ⓞ.
- Choose "Menu Settings" in the "Monitor Settings" menu, and press Ⓞ.
- Choose "Logo" in the "Menu Settings" menu, and press Ⓞ.
The "Logo" menu appears. - Select "On" or "Off" with 📋r . ▲
- Press Ⓞ to exit.
3-5. Setting Language
This function allows you to select a language for the Setting menu or messages.
Selectable languages
English, German, French, Spanish, Italian, Swedish, Japanese, Simplified Chinese, Traditional Chinese
Procedure
- Choose "Monitor Settings" in the Setting menu, and press Ⓞ.
- Choose "Language" in the "Monitor Settings" menu, and press ●.
The "Language" menu appears. - Choose a language with 📋 or . ▲
- Press Ⓞ to exit.
3-6. Resetting the Monitor to the Default Settings
The setting values are reset to the default settings.
Attention
• After resetting, you cannot undo the operation.
Note
- Regarding the default setting, see "Main default settings" in the Setup Manual.
T● reset the color adjustments
This function only resets the color adjustments for the currently selected mode to the default settings.
Procedure
- Choose "Color" in the Setting menu, and press Ⓞ.
- Choose "Color Reset" in the "Color" menu, and press Ⓞ.
- Select "Yes" with ▼ or ◆
- Press ⊙.
The color adjustments revert to the default settings.
T● reset all adjustments to the default settings
This function resets all adjustments to the default settings.
Procedure
- Choose "Monitor Settings" in the Setting menu, and press Ⓞ.
- Choose "Reset" in the "Monitor Settings" menu, and press Ⓞ.
- Select "Yes" with ▼ or ◆
- Press ☑.
All adjustments revert to the default settings.
Chapter 4 Power Saving Functions
4-1. Setting Power Saving
This function allows you to set the monitor into the power saving mode according to the PC status. When the monitor has shifted to the power saving mode, the images on the screen are not displayed.
Attention
- Unplugging the power cord completely shuts off power supply to the monitor.
- Power consumption varies even when the stereo mini jack cable is connected.
Note
- The monitor changes to the power saving mode about 15 seconds after the signal input ceases to be detected.
Procedure
- Choose "PowerManager" in the Setting menu, and press Ⓞ.
- Choose "Power Save" in the "PowerManager" menu, and press Ⓞ.
The "Power Save" menu appears. - Select "On" or "Off" with 📋r .
- Press Ⓞ to exit.
Power Saving System
Analog Signal Input
This monitor complies with the VESA DPM standard.
| PC Monitor Power Indicator | |||
| On Operating Blue | |||
| Power saving mode | STAND-BY SUSPENDED OFF | Power saving mode Orange | |
| Power Off | Power saving mode Orange | ||
Digital Signal Input
This monitor complies with the DVI DMPM standard.
| PC Monitor Power Indicator | ||
| On Operating Blue | ||
| Power saving mode | Power saving mode | Orange |
| Power Off | Power saving mode | Orange |
Exiting the power saving mode
If the monitor receives input, it automatically exits the power saving mode and returns to the normal display mode.
4-2. Setting Power Indicator
This function allows you to set the power indicator (blue) ON / OFF in the monitor ON condition.
Procedure
- Choose "Monitor Settings" in the Setting menu, and press Ⓞ.
- Choose "Power Indicator" in the "Monitor Settings" menu, and press Ⓑ. The "Power Indicator" menu appears.
- Select "On" or "Off" with 📋 or .
- Press ⊙ to exit.
4-3. Enabling / Disabling Auto Power-OFF
This function allows you to switch the setting to turn off the monitor automatically after a specified time has passed in the power saving mode.
Adjustable range
Off, 0, 1, 2, 3, 5, 10, 15, 20, 25, 30, 45 min, 1, 2, 3, 4, 5 h
Procedure
- Choose "PowerManager" in the Setting menu, and press Ⓞ.
- Choose "Eco Timer" in the "PowerManager", and press Ⓞ.
- Select "Off" or time to turn off the monitor with ▼ or ▲
- Press Ⓞ to exit.
Chapter 5 Troubleshooting
If a problem still remains after applying the suggested remedies, contact your local EIZO representative.
5-1. No picture
| Problem Possible cause and remedy | |
| 1. No picture• Power indicator does not light.• Power indicator is lighting blue.• Power indicator is lighting orange. | Check whether the power cord is connected properly.Press Ⓤ.Increase “Brightness” and / or “Gain” in the Setting menu (see “To perform advanced adjustments” (page 9)).Switch the input signal with Ⓢ.Move the mouse or press any key on the keyboard.Check whether the PC is turned on.Depending on the PC and graphics board, the input signal is not detected and the monitor does not recover from the power saving mode. If the screen is not displayed even after moving the mouse or pressing any key on the keyboard, turn the monitor off and on using its power button. When the screen is displayed, execute the following procedure. The problem may be improved.Press Ⓤ to turn off the monitor.Hold down Ⓜ while pressing Ⓣ to turn on the monitor.“x” is displayed on the menu title of “Information” of the Setting menu (see “6-2. Displaying Monitor Information” (page 27)).3. Reboot the PC.To return to the previous setting, perform steps 1 to 3 again.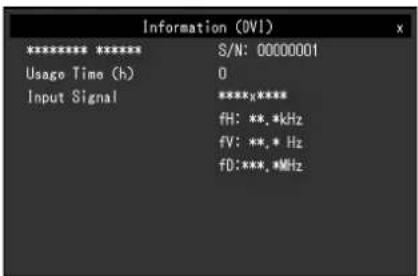 |
| 2. The message below appears. | This message appears when the signal is not input correctly even when the monitor functions properly. |
• The message shows that the input signal is out of the specified frequency range.Example: | Check whether the PC is configured to meet the resolution and vertical scan frequency requirements of the monitor (see “Compatible Resolutions” in the Setup Manual).Reboot the PC.Select an appropriate setting using the graphics board’s utility. Refer to the User’s Manual of the graphics board for details. |
5-2. Imaging problems (for both digital and analog)
| Problem Possible cause and remedy | |
| 1. The screen is too bright or too dark. | Adjust “Brightness” in the Setting menu. (The LCD monitor backlight has a limited life span. When the screen becomes dark or begins to flicker, contact your local EIZO representative.) |
| 2. Characters are blurred. | Check whether the PC is configured to meet the resolution and vertical scan frequency requirements of the monitor (see “Compatible Resolutions” in the Setup Manual).When an image is displayed with a resolution other than recommended, the characters or lines of the displayed image may blur. Use “Smoothing” in the Setting menu to adjust it (see “To modify blurred characters / lines” (page 17)). |
| 3. Afterimages appear. | Afterimages are particular to LCD monitors. Avoid displaying the same image for a long time.Use the screen saver or power save function to avoid displaying the same image for extended periods of time. |
| 4. Green / red / blue / white dots or defective dots remain on the screen. | This is due to LCD panel characteristics and is not a failure. |
| 5. Interference patterns or pressure marks remain on the screen. | Leave the monitor with a white or black screen. The symptom may disappear. |
| 6. Noise appears on the screen. | When entering the HDCP signals, the normal images may not be displayed immediately. |
5-3. Imaging problems (for analog only)
| Problem Possible cause and remedy | |
1. Display position is incorrect. | ·Use “Position” in the Setting menu to correct the image position (see “To correct the screen position” (page 16)).·If the problem persists, use the graphics board's utility if available to change the display position. |
2. Vertical bars appear on the screen or a part of the image is flickering. 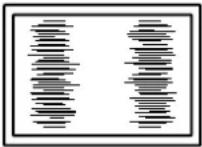 | ·Use “Clock” in the Setting menu to adjust it (see “To eliminate vertical bars” (page 15)). |
3. Whole screen is flickering or blurring.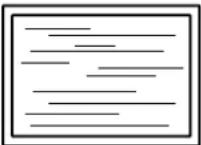 | ·Use “Phase” in the Setting menu to adjust it (see “To remove flickering or blurring” (page 16)). |
5-4. Other problems
| Problem Possible cause and remedy | |
| 1. The Setting menu does not appear. | · Check whether the operation lock function is active (see “3-3. Locking Operation Buttons” (page 18)). |
| 2. The “Smoothing” on the Setting menu “Screen” cannot be selected. | · You cannot choose “smoothing” when the screen is displayed in the following resolutions or settings.- The resolution is 1024 × 768 |
| 3. The auto adjustment function does not work. | · This function does not work during digital signal input.· This function is intended for use on the Macintosh and on AT-compatible PC running Windows. It does not work properly when an image is displayed only on a part of the screen (command prompt window, for example) or when a black background (wallpaper, etc.) is in use.· This function does not work correctly with some graphics boards. |
| 4. No audio output. | · Check whether the stereo mini jack cable is connected properly.· Check whether volume is set to 0.· Check the PC and audio playback software to see whether they are configured correctly. |
5-5. Touch panel problems (for FDX1501T-A only)
Attention
- For information on how to install or use the touch panel driver, see the Touch Panel Driver User's Manual (on the CD-ROM).
| Problem Possible cause and remedy | |
| 1. Cursor position is not correct. / Cursor jumps. | Turn off and on the monitor. If the symptom is not improved, perform the calibration on the monitor.Touch with one finger only.Connect the monitor to the PC with the cable indicated in the Setup Manual or User's Manual of the monitor. Using a conversion adapter, the touch panel may not operate properly. |
| 2. Touch operation is not effective. | Check whether “Use EEPROM” in the “Device” menu is not checked in the “Properties” settings of the touch panel driver. If the check is already applied, perform the calibration.Other login user may have changed the setting. Set the touch panel driver again.Restart “DMC Touch Panel Configuration”, or reboot the PC. |
| 3. Some deflection may appear on the surface of touch panel portion. | Due to the touch panel structural characteristics, the deflection may occur on the touch panel surface in high temperature / high humidity operating environment.This is not a trouble. |
| 4. Not touch-sound. | The touch-sound may not be output from the external line out of the PC depending on the hardware configuration.Under Windows 10 / Windows 8.1 / Windows 7, touch-sound is only output through the audio output terminal of the PC. To hear touch-sound, connect speakers. |
Chapter 6 Reference
6-1. Connecting Multiple PCs
The product has multiple connections to PCs and allows you to switch to one of the connections for display.
Connection examples

flowchart
graph TD
    A["Computer"] --> B["DVI-D connector"]
    A --> C["D-Sub connector"]
    B --> D["Signal cable (option FD-C39)"]
    C --> E["Signal cable (supplied MD-C87)"]
    D --> F["DVI connector"]
    E --> G["D-Sub mini 15-pin connector"]
TO switch among input signals
The input signal switches each time is pressed.
When the signal is switched, the active input port name appears at the top right corner of the screen.

T● set input signal selection
| Setting Function | |
| Auto The monitor re | cognizes the connector through which PC signals are input.When a PC is turned off or enters the power saving mode, the monitor automatically displays another signal. |
| Manual | The monitor detects only the PC's signals currently displaying automatically. Select the input signal for display using the 5 operation button. |
Procedure
- Choose "Monitor Settings" from the Adjustment menu, and press Ⓞ.
- Choose "Input Signal" from "Monitor Settings", and press ♏.
- Select "Auto" or "Manual" with ▼ or ◆
- Press Ⓞ to exit.
Note
- If you select "Auto", the monitor enters the power saving mode after all the PCs have entered the power saving mode or have been switched off.
6-2. Displaying Monitor Information
This function allows you to display the model name, serial number, usage time, resolution, and input signal.
Procedure
- Choose "Information" in the Setting menu, and press Ⓞ.
The "Information" menu appears.
Attention
- When you turn on the monitor for the first time, the usage time may be more than 0 due to a factory inspection.
6-3. Preset Timing
The following table shows factory preset analog signal timing.
Attention
- Display position may be deviated depending on the PC connected, which may require screen adjustment using Setting menu.
- If a signal other than those listed in the table is input, adjust the screen using the Setting menu. However, screen display may still be incorrect even after the adjustment.
- When interlace signals are used, the screen cannot be displayed correctly even after screen adjustment using the Setting menu.
| Resolution | Frequency | ||
| Dot Clock: MHz Hor | horizontal: kHz Vertical: Hz | ||
| 640 × 400 21 | 05 24.83 56.42 | ||
| 640 × 400 25 | 18 31.48 70.10 | ||
| 640 × 480 | 25.18 | 31.47 | 59.94 |
| 640 × 480 | 31.50 | 37.86 | 72.81 |
| 640 × 480 | 31.50 | 37.50 | 75.00 |
| 720 × 400 | 28.32 | 31.47 | 70.09 |
| 800 × 600 | 36.00 | 35.16 | 56.25 |
| 800 × 600 | 40.00 | 37.88 | 60.32 |
| 800 × 600 | 50.00 | 48.08 | 72.19 |
| 800 × 600 | 49.50 | 46.88 | 75.00 |
| 1024 × 768 | 65.00 | 48.36 | 60.00 |
| 1024 × 768 | 75.00 | 56.48 | 70.07 |
| 1024 × 768 | 78.75 | 60.02 | 75.03 |
Chapter 7 Glossary
Clock
The analog signal input monitor needs to reproduce a clock of the same frequency as the dot clock of the graphics system in use, when the analog signal is converted to a digital signal for image display. This is called clock adjustment. If the clock pulse is not set correctly, some vertical bars appear on the screen.
DDC/CI (Display Data Channel/Command Interface)
VESA provides the standardization for the interactive communication of the setting information, etc. between a PC and the monitor.
DVI (Digital Visual Interface)
DVI is a digital interface standard. DVI allows direct transmission of the PC's digital data without loss.
This adopts the TMDS transmission system and DVI connectors. There are two types of DVI connectors. One is a DVI-D connector for digital signal input only. The other is a DVI-I connector for both digital and analog signal inputs.
DVI DMPM (DVI Digital Monitor Power Management)
DVI DMPM is a digital interface power saving function. The “Monitor ON (operating mode)” and “Active Off (power saving mode)” are indispensable for DVI DMPM as the monitor’s power mode.
Gain
This is used to adjust each color parameter for red, green and blue. An LCD monitor displays the color by the light passing through the panel color filter. Red, green and blue are the three primary colors. All the colors on the screen are displayed by combining these three colors. The color tone can be changed by adjusting the light intensity (volume) passing through each color's filter.
Gamma
Generally, the monitor brightness varies nonlinearly with the input signal level, which is called "Gamma Characteristic". A small gamma value produces a low-contrast image, while a large gamma value produces a highcontrast image.
HDCP (High-bandwidth Digital Content Protection)
Digital signal coding system developed to copy-protect the digital contents, such as video, music, etc.
This helps to transmit the digital contents safely by coding the digital contents sent via the DVI or HDMI connector on the output side and decoding them on the input side.
Any digital contents cannot be reproduced if both of the equipments on the output and input sides are not applicable to HDCP system.
Phase
Phase means the sampling timing to convert the analog input signal to a digital signal. Phase adjustment is made to adjust the timing. It is recommended that phase adjustment be made after the clock is adjusted correctly.
Range Adjustment
Range adjustment controls the signal output levels to display every color gradation. It is recommended that range adjustment be made before color adjustment.
Resolution
The LCD panel consists of numerous pixels of specified size, which are illuminated to form images. This monitor consists of horizontal 1024 pixels and 768 vertical pixels. At a resolution of 1024 × 768 , all pixels are illuminated as a full screen (1:1).
sRGB (Standard RGB)
International standard for color reproduction and color space among peripheral devices (such as monitors, printers, digital cameras, scanners). As a form of simple color matching for the Internet, colors can be displayed using tones close to those of the transmission and reception devices.
Temperature
Color temperature is a method to measure the white color tone, generally indicated in degrees Kelvin. The screen becomes reddish at a low temperature, and bluish at a high temperature, like the flame temperature.
5000 K: Slightly reddish white
6500 K: White referred to as daylight-balanced color
9300 K: Slightly bluish white
TMDS (Transition Minimized Differential Signaling)
A signal transmission system for digital interface.
VESA DPM (Video Electronics Standards Association - Display Power Management)
VESA specifications achieve increased energy efficiency for computer monitors. This involves standardization of signals sent from the computer (graphics board).
DPM defines the status of signals transmitted between the computer and monitor.
Appendix
Trademark
The terms HDMI and HDMI High-Definition Multimedia Interface, and the HDMI Logo are trademarks or registered trademarks of HDMI Licensing, LLC in the United States and other countries.
VESA is a registered trademark of Video Electronics Standards Association.
Acrobat, Adobe, Adobe AIR, and Photoshop are registered trademarks of Adobe Systems Incorporated in the United States and other countries.
AMD Athlon and AMD Opteron are trademarks of Advanced Micro Devices, Inc.
Apple, ColorSync, eMac, iBook, iMac, iPad, Mac, MacBook, Macintosh, Mac OS, PowerBook, and QuickTime are registered trademarks of Apple Inc.
ColorMunki, Eye-One, and X-Rite are registered trademarks or trademarks of X-Rite Incorporated in the United States and/or other countries.
ColorVision and ColorVision Spyder2 are registered trademarks of DataColor Holding AG in the United States.
Spyder3 and Spyder4 are trademarks of DataColor Holding AG.
ENERGY STAR is a registered trademark of the United States Environmental Protection Agency in the United States and other countries.
GRACoL and IDEAlliance are registered trademarks of International Digital Enterprise Alliance.
NEC is a registered trademark of NEC Corporation.
PC-9801 and PC-9821 are trademarks of NEC Corporation.
NextWindow is a trademark of NextWindow Ltd.
Intel, Intel Core, Pentium and Thunderbolt are registered trademarks of Intel Corporation in the United States and other countries.
PowerPC is a registered trademark of International Business Machines Corporation.
PlayStation is a registered trademark of Sony Computer Entertainment Inc.
PSP and PS3 are trademarks of Sony Computer Entertainment Inc.
RealPlayer is a registered trademark of RealNetworks, Inc.
TouchWare is a trademark of 3M Touch Systems, Inc.
Windows, Windows Media, Windows Vista, SQL Server, Xbox 360, and Internet Explorer are registered trademarks of Microsoft Corporation in the United States and other countries.
YouTube is a registered trademark of Google Inc.
Firefox is a registered trademark of the Mozilla Foundation.
Kensington and MicroSaver are trademarks of ACCO Brands Corporation.
EIZO, the EIZO Logo, ColorEdge, DuraVision, FlexScan, FORIS, RadiCS, RadiForce, RadiNET, Raptor, and ScreenManager are registered trademarks of EIZO Corporation in Japan and other countries.
ColorNavigator, EcoView NET, EIZO EasyPIX, EIZO ScreenSlicer, i • Sound, Screen Administrator, UniColor Pro, and Re/Vue are trademarks of EIZO Corporation.
All other company and product names are trademarks or registered trademarks of their respective owners.
License / Copyright
A round gothic bold bit map font designed by Ricoh is used for the characters displayed on this product.
LIMITED WARRANTY
EIZO Corporation (hereinafter referred to as “ EIZO”) and distributors authorized by EIZO (hereinafter referred to as the “Distributors”) warrant, subject to and in accordance with the terms of this limited warranty (hereinafter referred to as the “Warranty”), to the original purchaser (hereinafter referred to as the “Original Purchaser”) who purchased the product specified in this document (hereinafter referred to as the “Product”) from EIZO or Distributors, that EIZO and Distributors shall, at their sole discretion, either repair or replace the Product at no charge if the Original Purchaser becomes aware within the Warranty Period (defined below) that the Product malfunctions or is damaged in the course of normal use of the Product in accordance with the description in the instruction manual attached to the Product (hereinafter referred to as the “User’s Manual”).
The period of this Warranty is three (3) years from the date of purchase of the Product (hereinafter referred to as the "Warranty Period"). EIZO and Distributors shall bear no liability or obligation with regard to the Product in relation to the Original Purchaser or any third parties other than as provided under this Warranty.
EIZO and Distributors will cease to hold or store any parts (excluding design parts) of the Product upon expiration of seven (7) years after the production of such parts is discontinued. In repairing the monitor, EIZO and Distributors will use renewal parts which comply with our QC standards. If the unit cannot be repaired due to its condition or the stockout of a relevant part, EIZO and Distributors may offer the replacement by a product with equivalent performance instead of repairing it.
The Warranty is valid only in the countries or territories where the Distributors are located. The Warranty does not restrict any legal rights of the Original Purchaser.
Notwithstanding any other provision of this Warranty, EIZO and Distributors shall have no obligation under this Warranty whatsoever in any of the cases as set forth below:
(a) Any defect of the Product caused by freight damage, modification, alteration, abuse, misuse, accident, incorrect installation, disaster, faulty maintenance and/or improper repair by third party other than EIZO and Distributors;
(b) Any incompatibility of the Product due to possible technical innovations and/or regulations;
(c) Any deterioration of the sensor;
(d) Any deterioration of display performance caused by the deterioration of expendable parts such as the LCD panel and/or backlight, etc. (e.g. changes in brightness, changes in brightness uniformity, changes in color, changes in color uniformity, defects in pixels including burnt pixels, etc.);
(e) Any defect of the Product caused by placement in a location where it may be affected by strong vibration or shocks;
(f) Any defect of the Product caused by external equipment;
(g) Any defect of the Product on which the original serial number has been altered or removed;
(h) Any defect of the Product caused by liquid leaking from battery;
(i) Any normal deterioration of the product, particularly that of consumables, accessories, and/or attachments (e.g. buttons, rotating parts, cables, User's Manual, etc.); and
(j) Any deformation, discoloration, warp, and/or rust of the exterior of the product including that of the surface of the LCD panel.
To obtain service under the Warranty, the Original Purchaser must deliver the Product, freight prepaid, in its original package or other adequate package affording an equal degree of protection, assuming the risk of damage and/or loss in transit, to the local Distributor. The Original Purchaser must present proof of purchase of the Product and the date of such purchase when requesting services under the Warranty.
The Warranty Period for any replaced and/or repaired product under this Warranty shall expire at the end of the original Warranty Period.
EIZO OR DISTRIBUTORS ARE NOT RESPONSIBLE FOR ANY DAMAGE TO, OR LOSS OF, DATA OR OTHER INFORMATION STORED IN ANY MEDIA OR ANY PART OF ANY PRODUCT RETURNED TO EIZO OR DISTRIBUTORS FOR REPAIR.
EIZO AND DISTRIBUTORS MAKE NO FURTHER WARRANTIES, EXPRESSED OR IMPLIED, WITH RESPECT TO THE PRODUCT AND ITS QUALITY, PERFORMANCE, MERCHANTABILITY OR FITNESS FOR ANY PARTICULAR USE. IN NO EVENT SHALL EIZO OR DISTRIBUTORS BE LIABLE FOR ANY INCIDENTAL, INDIRECT, SPECIAL, CONSEQUENTIAL OR OTHER DAMAGE WHATSOEVER (INCLUDING, WITHOUT LIMITATION, DAMAGES FOR LOSS OF PROFIT, BUSINESS INTERRUPTION, LOSS OF BUSINESS INFORMATION, OR ANY OTHER PECUNIARY LOSS) ARISING OUT OF THE USE OR INABILITY TO USE THE PRODUCT OR IN ANY CONNECTION WITH THE PRODUCT, WHETHER BASED ON CONTRACT, TORT, NEGLIGENCE, STRICT LIABILITY OR OTHERWISE, EVEN IF EIZO OR DISTRIBUTORS HAVE BEEN ADVISED OF THE POSSIBILITY OF SUCH DAMAGES. THIS EXCLUSION ALSO INCLUDES ANY LIABILITY WHICH MAY ARISE OUT OF THIRD PARTY CLAIMS AGAINST THE ORIGINAL PURCHASER. THE ESSENCE OF THIS PROVISION IS TO LIMIT THE POTENTIAL LIABILITY OF EIZO AND DISTRIBUTORS ARISING OUT OF THIS LIMITED WARRANTY AND/OR SALES.
BEGRENZTE GARANTIE
This product, when disposed of, is supposed to be collected and recycled according to your country's legislation to reduce environmental burden. When you dispose of this product, please contact a distributor or an affiliate in your country.
The contact addressees are listed on the EIZO website below.
http://www.eizoglobal.com
For recycling information for customers in Switzerland, please refer to the following website.
http://www.swico.ch

- Important
- CONTENTS
- CONTENTS....3
- Chapter 1 Introduction......4
- Chapter 2 Adjusting Screens ....8
- Chapter 3 Setting Monitor 18
- Chapter 4 Power Saving Functions ...... 21
- Chapter 5 Troubleshooting....23
- Chapter 6 Reference 26
- Chapter 7 Glossary 29
- Appendix 31
- Chapter 1 Introduction
- 1-1. Features
- 1-2. EIZO LCD Utility Disk
- Disk contents and software overview
- T● use touch panel driver
- 1-3. Basic Operations and Functions
- Basic operation of the Setting menu
- Displaying the Setting menu
- Adjusting / Setting
- Exiting
- Fonctions
- Chapter 2 Adjusting Screens
- 2-1. Setting the Resolution
- Display resolution
- Sotting resolution
- Windows 10
- Windows 8.1 / Windows 7
- Windows Vista
- Windows XP
- Mac OS X
- 2-2. Adjusting Color
- To select the display mode (Color Mode)
- Procedure
- Note
- TO perform advanced adjustments
- Attention
- Adjustable settings in each mode
- T● adjust brightness
- Adjustable range
- To adjust color temperature
- To adjust gamma
- T● adjust the color saturation
- To adjust hue
- To adjust gain
- 2-3. Screen Adjustment
- Digital Signal Input
- Analog Signal Input
- Setting Procedures
- Perform the auto adjustment.
- To adjust flickering, screen position, and screen size automatically
- Prepare to use analog screen adjustment patterns.
- Perform the auto adjustment again with the analog screen adjustment pattern displayed.
- Choose "Screen" from the Setting menu to perform advanced adjustments.
- To eliminate vertical bars
- To remove flickering or blurring
- To correct the screen position
- Adjusting color gradation.
- To adjust color gradation automatically
- Modify blurred characters or lines.
- To modify blurred characters / lines
- Chapter 3 Setting Monitor
- 3-1. Adjusting Volume
- 3-2. Enabling / Disabling DDC/CI communication
- 3-3. Locking Operation Buttons
- 3-4. Showing and hiding the EIZO logo
- 3-5. Setting Language
- Selectable languages
- 3-6. Resetting the Monitor to the Default Settings
- T● reset the color adjustments
- T● reset all adjustments to the default settings
- Chapter 4 Power Saving Functions
- 4-1. Setting Power Saving
- Power Saving System
- Exiting the power saving mode
- 4-2. Setting Power Indicator
- 4-3. Enabling / Disabling Auto Power-OFF
- Chapter 5 Troubleshooting
- 5-1. No picture
- 5-2. Imaging problems (for both digital and analog)
- 5-3. Imaging problems (for analog only)
- 5-4. Other problems
- 5-5. Touch panel problems (for FDX1501T-A only)
- Chapter 6 Reference
- 6-1. Connecting Multiple PCs
- TO switch among input signals
- T● set input signal selection
- 6-2. Displaying Monitor Information
- 6-3. Preset Timing
- Chapter 7 Glossary
- Clock
- DDC/CI (Display Data Channel/Command Interface)
- DVI (Digital Visual Interface)
- DVI DMPM (DVI Digital Monitor Power Management)
- Gain
- Gamma
- HDCP (High-bandwidth Digital Content Protection)
- Phase
- Range Adjustment
- Resolution
- sRGB (Standard RGB)
- Temperature
- TMDS (Transition Minimized Differential Signaling)
- VESA DPM (Video Electronics Standards Association - Display Power Management)
- Appendix
- Trademark
- License / Copyright
- LIMITED WARRANTY
- BEGRENZTE GARANTIE
Brand : EIZO
Model : DuraVision FDX1501-A
Category : Screen