
330009 - Steam cleaner MORPHY RICHARDS - Free user manual and instructions
Find the device manual for free 330009 MORPHY RICHARDS in PDF.


| Product Type | Steam Cleaner |
| Brand | Morphy Richards |
| Model | 330009 |
| Dimensions (approx.) | 30 x 25 x 20 cm |
| Weight | 2.0 kg |
| Power Supply | 220-240 V, 50-60 Hz |
| Power Consumption | 1500 W |
| Water Tank Capacity | 1.0 L |
| Heat-up Time | approx. 3 minutes |
| Steam Pressure | 3.5 bar |
| Continuous Steam Time | up to 30 minutes |
| Main Functions | Removes dirt, grease, and grime; disinfects and sanitizes surfaces; suitable for floors, windows, tiles, and upholstery |
| Cleaning & Maintenance | Descale regularly with a mixture of water and vinegar; empty water tank after each use; rinse and dry accessories |
| Safety Features | Overheat protection; auto shut-off when tank is empty; safety lock on steam trigger |
| Accessories Included | Measuring cup, funnel, floor cloth, window squeegee, detail brush, small brush, large brush, extension tubes |
| Repairability | Replacement parts available (e.g., brushes, cloths, seals); consult authorized service center for repairs |
| Warranty | 2 years |
| Country of Origin | China |
Frequently Asked Questions - 330009 MORPHY RICHARDS
User questions about 330009 MORPHY RICHARDS
0 question about this device. Answer the ones you know or ask your own.
Ask a new question about this device
Download the instructions for your Steam cleaner in PDF format for free! Find your manual 330009 - MORPHY RICHARDS and take your electronic device back in hand. On this page are published all the documents necessary for the use of your device. 330009 by MORPHY RICHARDS.
USER MANUAL 330009 MORPHY RICHARDS
smart ideas for your home

POWER
STEAMPRO
Multi-function Steam Generator
Please read and keep these instructions for future use

natural_image
Line drawing of a morphy richards steam iron with visible branding and exhaust pipe (no text or symbols on the device itself)
IMPORTANT: To prevent limescale problems which would not be covered by the guarantee, we recommend the use of a mix of 50% tap water and 50% distilled or demineralised water (available from most large supermarkets).
For competitions, product hints and tips and more join us at

www.morphyrichards.co.uk/blog

www.facebook.com/morphyrichardsuk
@loveyourmorphy
www.morphyrichards.com
* Register online for your 2 year guarantee. See back of this instruction book for details. (UK and Ireland customers only)
Important safety instructions
The use of any electrical appliance requires the following common sense safety rules. Please read these instructions carefully before using the product.
- WARNING: Disconnect from the mains supply before carrying out any routine maintenance.
- This appliance can be used by persons with reduced physical, sensory or mental capabilities, or lack of experience and knowledge, if they have been given supervision or instruction concerning the use of the appliance in a safe way and understand the hazards involved.
• Children shall not play with the appliance. - Keep the appliance out of reach of children when it is energized or cooling down.
- The steam generator must not be left unattended while it is connected to the supply mains.
- The steam generator must be used and rested on a stable surface.
- When placing the iron on the steam generator base or on its heel, ensure that the surface on which the heel or base is placed is stable.
- The steam generator is not to be used if it has been dropped, if there are visible signs of damage or it is leaking.
- The filling aperture may be opened during use, due to the design of the system.
Personal safety
- CAUTION - HOT: Burns can occur from touching hot parts, hot water or steam, or the iron rest plate.
-
WARNING: Never direct steam at electrical components or fittings. If in doubt about the suitability of steam for cleaning an appliance, contact the appliance manufacturer for advice prior to cleaning.
-
WARNING: Never touch the plug or cable with wet hands.
- WARNING: Nozzles and tools will be hot after use. Allow to cool before attempting to remove.
- WARNING: Do not discharge the steam towards people or animals. Danger of scalding.
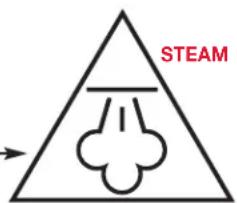
• To protect against fire, electric shock and personal injury, do not immerse cord, plug or steam generator in water or other liquid.
- The plug should be removed from the wall socket after use, before cleaning, filling or changing the accessories, or carrying out user maintenance.
Location
- Do not use or keep this product outside.
- Do not store the appliance near hot surfaces eg. ovens or heating appliances.
Mains cable
- WARNING: A damaged or severed mains cable fitted with a plug should never be connected to the mains supply. It must be destroyed, as a damaged cable becomes hazardous if connected to a power socket.
- Do not let the mains lead come into contact with the hot soleplate of the iron.
- Do not allow the mains lead to become strained.
Product safety
- Do not operate with a damaged steam/supply cord or grommet, it must be replaced by the manufacturer, its service agent or similarly qualified person in order to avoid a hazard.
- WARNING: Always test on an inconspicuous area first. Never use on materials that can not resist high temperature, such as dralon, natural fur etc.
- Never modify the appliance in any way.
Other safety considerations
-
Do not use any chemical detergents, perfumes, alcohol or descaler etc in water.
• Repairs to electrical appliances are only to be undertaken by trained personnel.
• Unprofessional repairs can be dangerous for users. -
Use only genuine Morphy Richards spare parts and accessories.
- The appliance must not be left unattended while connected to the supply mains.
- This appliance is intended for domestic use only. Misuse or use for commercial or any other purpose will render the guarantee invalid.
Electrical requirements
- Check that the voltage on the rating plate of your appliance corresponds with your house electricity supply which must be A.C. (Alternating Current).
- If the socket outlets in your home are not suitable for the plug supplied with this appliance, the plug should be removed by trained authorised personnel and the appropriate one fitted.
- WARNING: This appliance must be earthed.
- Should the fuse in the mains plug require changing, a 13 amp BS1362 fuse must be fitted.
Contents
Health and safety 2 & 3
Electrical requirements 3
Dual functionality .... 4
Steam ironing overview / Features 4
Temperature guide 5
Safe working for ironing 6
Before use 6
Using the steam generator for steam ironing 6 & 7
Filling 8
Features 8
Steam cleaning mode (certain models only) 9
Steam cleaning accessories overview (certain models only) 9
Steam cleaning floors (certain models only) 10 & 11
Using the accessories for steam cleaning (certain models only) 12
Attachments for use with the accessory adaptor (certain models only) ...... 13
Utility nozzle for use on the jet nozzle (certain models only) 13
After use 14
Maintenance 14
Emptying and storing 15
Contact us 15
Guarantee 16
Dual functionality

natural_image
Technical line drawings of a steam iron device, showing front and side views (no text or symbols)Steam ironing Steam cleaning
(certain models only)
Dependant on the model, this product can be easily used for two separate functions:
1 Steam generator iron for use with an ironing board for ironing clothes, linen etc.
2 On certain models, a range of attachments can be added to enable the product to be used as a steam cleaner for cleaning floors, carpets, work surfaces, glass and vertical or hard to reach surfaces (see 'Steam cleaning mode' section, page 9).
Steam ironing mode overview
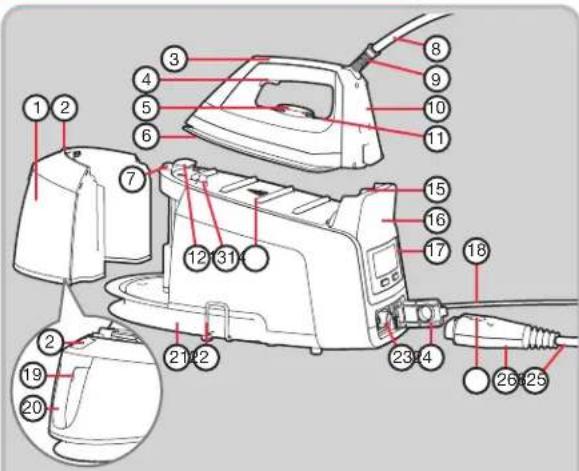
Features
(1) Water tank
(2) Water tank filler cap
(3) Iron handle
(4) Iron steam trigger
(5) Temperature dial
(6) Soleplate
(7) Iron release button
(8) Iron steam supply cord
(9) Iron cable grommet
(10) Iron heel
(11) Temperature indicator light
(12) Locking hook
(13) Locking column
(14) Iron rest plate
(15) Iron rear docking hook
(16) Steam generator main body
(17) Control panel
(18) Power cord
(19) Water tank release button
(20) Water tank handle
(21) Cord storage groove
(22) Cord clamp
(23) Steam cord connection inlet
(24) Spring-loaded steam connection inlet cover
(25) Iron steam cord connector release buttons
(26) Iron steam cord connector
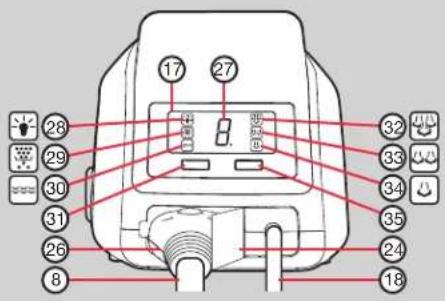
(27) Steam pressure indicator
(28) Power indicator
(29) Descaling indicator
(30) Low water indicator
(31) On/Off power button
(32) High steam indicator
(33) Medium steam indicator
(34) Low steam indicator
(35) Steam level selector
Temperature guide
Heat setting markings on the temperature dial of all Morphy Richards irons match those of the International Textile Care Labelling Code
Symbol

(120°C Max) Cool (160°C Max) Warm (210°C Max) Hot MAX setting


Control dial positions
Do not iron

Steam level setting (see step 6 of 'Using the Steam Generator for steam ironing', page 7)
No steam (see 'Dry ironing', page 8)
Low Medium / High High

Fabric Nylon, Acetates,
synthetic fabrics
Wool, Polyester mixtures
Cotton, Linen Rayon, Rayon mixtures
Ironing Iron on wrong side,
if moisture required, use damp cloth (not Acetate)
Fabrics requiring this setting usually require steam pressing.
Steaming

Without steam

Safe working for ironing
Locate your steam generator horizontally on the iron rest plate of your ironing board (if large enough) or on a heat resistant stand at the same height as your ironing board or below it. Always ensure the steam generator is on a firm surface when ironing.
WARNING: Do not use the product on a surface which could be damaged by heat or steam such as a worktop or a polished wood surface.
If in doubt, contact Morphy Richards.
Before use
Remove any protective cover from the soleplate (6) and the base unit, if any.
Unwind and straighten the power cord (18) and steam supply cord (8).
Textiles and clothes should carry ironing instructions. If not, follow the temperature guide on the previous page, but test the temperature by ironing the hem of the garment or similar discreet area first.
It is advised to begin with ‘cool’ fabrics and work up to higher settings. An iron heats up quicker than it cools down so you’ll save time and electricity.
If you turn the temperature dial down from a hot setting to a cooler setting, wait until the iron temperature has stabilised before you continue ironing.
NOTE: Hold the steam generator main body (16) with both hands when handling and moving the unit, as the water tank (1) is detachable.
Using the steam generator for steam ironing

natural_image
Diagram showing a device connected to a cable with red arrows indicating direction (no text or symbols)If steam ironing, ensure the iron steam supply cord (8) is attached into the steam cord connection inlet (23) on the back of the steam generator main body (16).
The steam cord connection inlet can be found by opening the spring-loaded steam connection inlet cover (24).
Open the spring-loaded steam connection inlet cover and push the steam cord connector (26) (with the two screw heads in the casing facing upwards) firmly into the steam cord connection inlet until it clicks into place.

natural_image
Diagram of a vehicle's rear bumper with red arrow indicating vertical motion (no text or symbols)
natural_image
Illustration of a toaster with a red arrow indicating the blade (no text or symbols present)Unlock the iron from its storage position on top of the steam generator main body (16) by pressing and holding the iron release button (7) - this unlocks the iron, enabling you to rotate the tip of the soleplate (6) (in an anti-clockwise direction) out from under the locking hook (12). Lift the iron heel (10) away from the rear docking hook (15).
WARNING: Never press down on the locking column (13) itself to unlock it, incase the iron is already on and the soleplate is hot.
During use, the iron may be rested on the iron rest plate (14) with the soleplate tip on top of the locking hook and the heel slotted on to the rear docking hook.
Using the Steam Generator for steam ironing (continued)

natural_image
Diagram showing a red arrow pointing to a container and a machine, with no visible text or symbols.Remove the detachable water tank (1) by squeezing the water tank release button (19). Lift the filler cap (2), and fill with water to the max fill line. Replace the water tank.

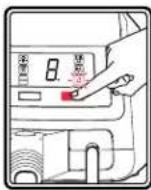
Plug the appliance into a mains outlet and press the On/Off power button (31) to activate the unit. A buzzer will be heard, the power indicator (28) will illuminate and the low steam indicator (34) will flash.

Turn the temperature dial (5) to suit the garment (see 'Temperature guide', page 5). The temperature indicator light (11) illuminates until the temperature is reached. Begin ironing when the temperature indicator light goes out. If you turn the temperature dial down, wait until the temperature indicator light illuminates and then goes off again.
The temperature indicator will cycle on and off during ironing as it maintains its temperature.

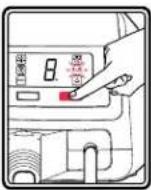
Press the steam level selector button (35) to select the desired steam level. The relevant steam level indicator (32/33/34) will stop flashing and illuminate constantly when the steam level is reached.
For a strong, continuous flow of steam during ironing, press and hold the iron steam trigger (4) to deliver steam through the soleplate (6).
NOTE: During use, the number displayed on the steam pressure indicator (27) will change. This will not interfere with how you use the product or how it performs.
WARNING: The steam supply cord (8) will get hot during use.

When you have finished ironing, turn off the appliance by pressing and holding the On/Off power button (31) for two seconds. A buzzer will be heard and both the power indicator (28) and steam level indicator (32/33/34) will be extinguished.
Disconnect the plug from the mains outlet.
Filling
IN HARD WATER AREAS, WE RECOMMEND A MIX OF 50% TAP WATER AND 50% DISTILLED OR DEMINERALISED WATER.
Never use battery topping up fluid or water containing any substances like starch, sugar, fragrant additives or defrosted water from a refrigerator.
Re-filling during use
If the water level is too low, the low water level indicator (30) will illuminate, a buzzer will sound, and the unit will not produce steam. If this happens, disconnect the water tank (1) by squeezing the water tank release button (19). Lift the filler cap (2) and refill with water to the max fill line. Replace the water tank.

Features
Dry ironing
To use your steam generator as a dry iron only, follow steps 1, 2, 4 and 5 of 'Using the Steam Generator for steam ironing' on pages 6 and 7. You do not need to put water in the water tank or select a steam level. Press the iron steam trigger (4) at least once every 10 minutes, or the product will automatically turn off.
Auto shut-off (certain models only)
If the steam trigger (4) is unused for 10 minutes, the product will automatically turn off, both for safety and to save energy.
To restart, press the On/Off power button (31) (see step 2 of 'Using the Steam Generator for steam ironing' on page 6) and wait for the temperature to rise again.
Steam function
During steaming, small amounts of water may be ejected from the soleplate (6). This is normal and can be avoided by using the steam for short amounts of time and only when the iron is at the correct temperature (the temperature indicator light (11) on the iron goes out when ready).
Sudden jolts of the boiler unit can also cause water droplets on the soleplate; therefore, do not move the base unit during ironing. We recommend for first time ironing that you iron over an old towel.
NOTE: The product may occasionally produce a pumping sound during steam ironing. This is normal and is caused by water being pumped through the steam generator.
Vertical steam
Vertical steam is useful for removing creases from hanging clothes, curtains, wall hangings, etc. Hold the iron between 1cm and 2cm away from the item and press the iron steam trigger (4).
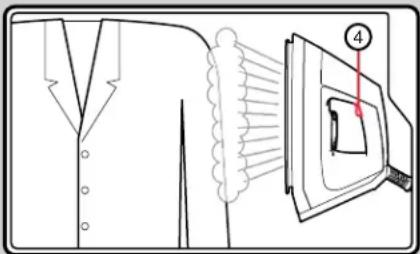
WARNING: Do not use the vertical steam feature on clothes that are being worn.
Steam cleaning mode (certain models only)
IMPORTANT: Please remember that the steam cleaner operates by emitting steam at an increased temperature of over 100^ C. Always test on an inconspicuous area first. Never use it on objects or surfaces which cannot resist this temperature, or on surfaces with coatings or polishes, or on delicate materials such as dralon, plastic, natural fur or antique items etc.
If in doubt, check carefully on a part of the material where minor marks will not matter.
Steam cleaning accessories overview (certain models only)
The accessories shown below are only available with certain models only.
Therefore, any information relating to their use (particularly pages 10, 11, 12 and 13) are relevant for certain models only.
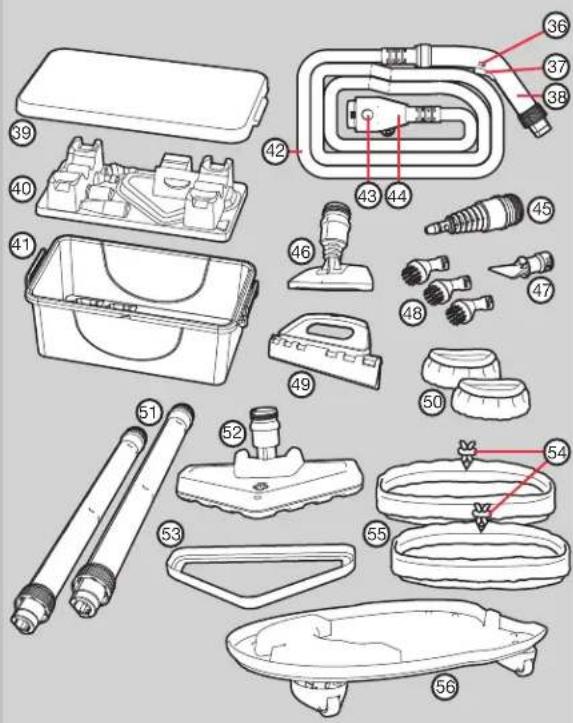
(36) Jet nozzle child lock
(37) Jet nozzle steam trigger
(38) Jet nozzle
(39) Accessory storage box lid
(40) Accessory storage rack
(41) Accessory storage box
(42) Jet nozzle steam supply cord
(43) Steam cord connector release button (jet nozzle)
(44) Steam cord connector (jet nozzle)
(45) Accessory adaptor (base attachment for circular brush attachments (48) and spatula attachment (47), see page 13)
(46) Utility nozzle (base attachment for elasticated utility cloths (50) and squeegee attachment (49), see page 13)
(47) Spatula attachment (to remove stubborn deposits, see page 13)
(48) Circular brush attachments (for tiles, wheel trims, mirrors etc, see page 13)
(49) Squeegee attachment (for tiled or glass areas such as windows or mirrors etc, see page 13)
(50) Elasticated utility cloths (for tiled or glass surfaces, upholstery and bedding etc, see page 13)
(51) Extension tubes
(52) Floorhead attachment (for carpets or hard floors, see pages 10 and 11)
(53) Carpet glider (for carpets, see page 11)
(54) Micro-fibre floor cloth tightening toggle
(55) Micro-fibre floor cloth (for carpets or hard floors, see page 11)
(56) Wheeled floor base (for carpets or hard floors, see page 11)
Steam cleaning floors (certain models only)
IMPORTANT: Before use, hardfloors should be thoroughly swept and carpets should be thoroughly dry vacuumed. However, we recommend that the steam cleaner is not used on: - bare wooden floors or any surfaces where wood is exposed (as it will absorb moisture and may distort). - damaged hardfloors or hardfloors with gaps present (as it will absorb moisture and may distort).
Also, do not steam in one place for an extended period, because the continual heat may cause damage to carpets and laminate flooring.
Please disconnect and allow the unit to cool before changing cloths and attachments.
Remove the iron (providing it has been allowed to cool following any previous usage) from its locked storage position on top of the steam generator main body (16) (as described in step 2 of 'Using the steam generator for steam ironing').
Next, unplug the appliance from the mains supply outlet.
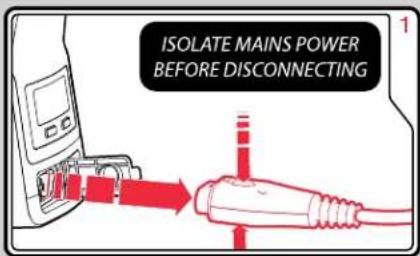
Remove the iron steam supply cord (8) from the steam cord connection inlet (23) by squeezing the steam cord connector release buttons (25) on the top and bottom of the steam cord connector (26) and pull the ironing steam supply cord out of the unit. Set the iron aside in a safe place on its heel.

natural_image
Diagram showing a device connected to two cables with red connectors, no text or symbols presentEnsure the jet nozzle child lock (36) is in the locked position.
Then, attach the jet nozzle steam supply cord (42) into the steam cord connection inlet (23) on the back of the steam generator main body (16).
The steam cord connection inlet can be found by opening the spring-loaded steam connection inlet cover (24).
Open the spring-loaded steam connection inlet cover and push the steam cord connector (with the two screw heads in the casing facing upwards) firmly into the steam cord connection inlet until it clicks into place.

Attach both extension tubes (51) together by pushing the screw-threaded top end of one tube onto the 'D' shaped bottom end of the other tube. The upper tube has a screw-lock which must be tightened as indicated on the tubes to secure them together.
Attach the tube assembly to the jet nozzle (38) using the same method as described above.

natural_image
Diagram showing a mechanical component with a red downward arrow indicating motion or force, no text or symbols present.Attach the floorhead attachment (52) to the base of the tube assembly by pushing the screw-threaded neck of the floorhead onto the 'D' shaped bottom end of the lower tube. The tube has a screw-lock which must be tightened as indicated on the neck of the floorhead attachment to secure them together.
Steam cleaning floors (certain models only) (continued)

natural_image
Diagram of a mechanical device with red arrows indicating force or movement, showing a component above a bowl (no text or symbols)Attach the micro-fibre floor cloth (55) to the floorhead attachment (52), securing it in place by tightening the toggle (54).

natural_image
Diagram showing a mechanical component with red arrows indicating downward motion or force, no text or symbols present.If cleaning carpet, rest the floorhead attachment (52) with the micro-fibre floor cloth (55) attached into the carpet glider (53) to make it easier to move the floorhead attachment across the carpet.
NOTE: The carpet glider is designed to make it easier to move the floorhead across the carpet and is intentionally a loose fit on the floorhead.
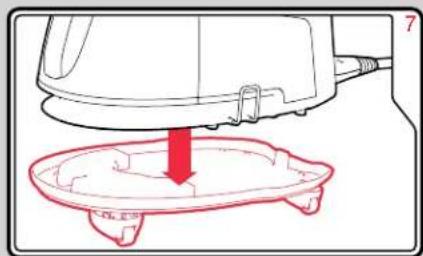
To allow easy manoeuvring around the floor, rest the steam generator main body (16) into the wheeled floor base (56).
NOTE: The wheeled floor base is designed to make it easier to move the steam generator across the floor when using the floorhead attachment and is intentionally a loose fit on the steam generator.
natural_image
Diagram of a curved mechanical component with red arrows indicating motion or force direction (no text or symbols)Fill the water tank (1). Reconnect the appliance to the mains supply outlet. Turn the product on and select the steam level as described in steps 3, 4 and 6 of 'Using the steam generator for steam ironing', page 7.
Ensure the jet nozzle child lock (36) is in the unlocked position, this will allow you to use the jet nozzle steam trigger (37) to produce steam as required.
When you have finished steaming, turn off the appliance as described in step 7 of 'Using the steam generator for steam ironing', page 7.
Using the accessories for steam cleaning (certain models only)

natural_image
Diagram of a welding torch with a red arrow indicating direction (no text or symbols present)This function is ideal for cleaning vertical surfaces and hard to reach places.
Attach the jet nozzle (38) to the steam generator main body (16) as described in steps 1 and 2 of 'Steam cleaning floors', page 10.
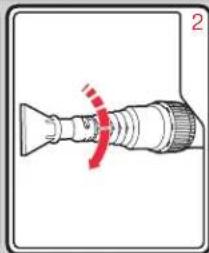
In order to use the circular brush attachments (48) or the spatula attachment (47), the accessory adaptor (45) must firstly be attached onto the jet nozzle (38). This can be done by completing the following:
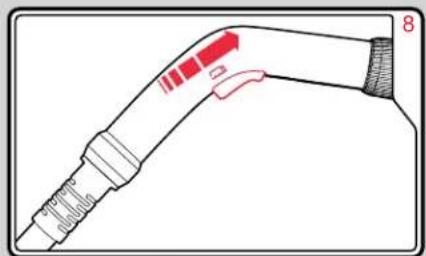
Push the screw-threaded wide opening of the accessory adaptor onto the 'D' shaped end of the jet nozzle. The jet nozzle has a screw-lock which must be tightened as indicated on the accessory adaptor to secure them together.

natural_image
Diagram of a mechanical component with a red curved arrow indicating motion or force (no text or symbols)Push the accessory (the circular brush attachments (48) or the spatula attachment (47)) onto the end of the accessory adaptor (45) by aligning the large circular protrusion on the accessory adaptor with the corresponding large key-way inside the hole of the accessory, and the smaller circular protrusion on the accessory adaptor with the corresponding smaller key-way inside the hole of the accessory. Then, twist the accessory until it locks into place.
If wishing to use the utility nozzle (46), this may be attached to the jet nozzle using the same method as attaching the accessory adaptor.

natural_image
Diagram of a welding torch with red directional arrows indicating motion or force (no text or symbols)If additional reach is required, one or both of the extension tubes (51) may be used between the jet nozzle (38) and the accessory adaptor (45) or the utility nozzle (46).
Attach the extension tube(s) into the end of the jet nozzle as described in step 3 of 'Steam cleaning floors', page 10.
Push the screw-threaded wide opening of the accessory adaptor or utility nozzle onto the 'D' shaped end of the tube. The tube has a screw-lock which must be tightened as indicated on the accessory adaptor or utility nozzle to secure them together.
NOTE: steam cleaning mode has been designed for one-handed use.
WARNING: Switch OFF and unplug before changing accessories. After use, accessories will be very hot, allow to cool before handling.
WARNING: Never direct steam towards people, animals or delicate surfaces. When using in the steam cleaning mode, only ever hold the product by the jet nozzle handle.
Never block any nozzle, eg. by holding against a surface being cleaned.
Attachments for use with the accessory adaptor (certain models only)
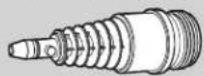
Accessory adaptor (45)
- Adaptor for other accessories.
- Clean crevices.
• Hard to reach places.
Spatula attachment (47)
- Remove stubborn deposits.
- De -ice the freezer.

Circular brush attachments (48)
- Remove stains on tiles.
- Clean wheel trims.
• Clean ovens and hobs. - Clean grout.

Utility nozzle for use on the jet nozzle (certain models only)

Utility nozzle (46)
Required for using the squeegee and upholstery functions.
Push the screw-threaded wide opening of the utility nozzle onto the 'D' shaped end of the jet nozzle (38) or extension tube(s) (51). The jet nozzle or extension tube(s) have a screw-lock which must be tightened as indicated on the utility nozzle to secure them together.

Elasticated utility cloth (50)
Use this cloth for covering the utility nozzle (46)
to clean or freshen up:
- Glass surfaces
• Upholstery
Bedding
Squeegee attachment (49)
Use this attachment for cleaning:
- Tiles - Shower Doors - Windows - Mirrors
WARNING: Do not use on very cold glass, as the sudden temperature change may crack the glass.
natural_image
Diagram of a mechanical device with a screw and lever, showing red arrows indicating force or movement (no text or symbols)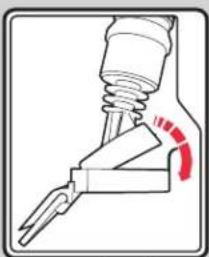
natural_image
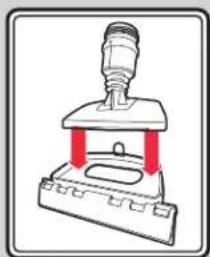
Diagram of a mechanical clamp or spring assembly with a red curved arrow indicating motion (no text or symbols)Attach the squeegee attachment to the utility nozzle (46) by inserting the lip at the front of the utility nozzle under the small hooks at the front of the recess in the squeegee attachment. Then secure the back of the utility nozzle into the locking clip on the squeegee attachment.

natural_image
Diagram of a mechanical clamp or tool with red arrows indicating force direction (no text or symbols)
natural_image
Diagram of a mechanical device with red arrows indicating force or movement (no text or symbols)Remove the squeegee attachment after use by holding the locking clip away. The utility nozzle can now be lifted out of the squeegee attachment.
After use
Follow the two maintenance steps below after every use.
- Switch the cleaner off and unplug from the socket. If the appliance was used as a steam cleaner, place immediately on a suitable surface (eg. tiled floor) where the residual heat/moisture in the floor nozzle/cloth will not affect the surface. Wait until the cleaner has cooled down completely.
- Remove the detachable water tank (1) by squeezing the water tank release button (19). Lift the filler cap (2), and empty the water tank.
Maintenance
Cleaning the boiler
When the boiler requires descaling, the descaling indicator (29) will illuminate. When this happens, the boiler must be manually rinsed out with clean water until all the scale is removed. The indicator light will go out only after the scale has been removed.
WARNING: Never remove the boiler screw (58) when the steam generator is hot.
1 Unplug the appliance from the mains outlet and leave to cool for two hours.
2 Remove the detachable water tank (1).
3 Remove the iron by disconnecting the iron steam supply cord (8) from the steam cord connection inlet (23) (see step 1 of 'Steam cleaning floors (certain models only)', page 10).
4 Hold the steam generator main body (16) firmly with both hands and shake well.
5 Turn the steam generator main body upside-down and pull back the boiler cap (59). Unscrew the boiler screw(58) with the boiler key (57), which is attached to the underside of the steam generator main body. If the screw is a bit too tight to undo, try using a large screwdriver or a socket and wrench set for more leverage.


natural_image
Technical line drawing of a mechanical component with no visible text or symbols6 Hold the steam generator main body over the sink, turn it the correct way up to empty all water and loose scale from the boiler into the sink.
7 Using clean water, refill and empty the boiler repeatedly until all scale has been rinsed out.
8 Replace the boiler screw, ensuring it is tightened fully. Replace the boiler cap, boiler key, water tank and iron to the base unit.
WARNING: Ensure the boiler is empty before replacing the boiler screw.
9 The descaling indicator will extinguish the next time you use the product. Please wait for up to one minute whilst it pumps water and registers that the boiler has been cleaned.
To clean a coated soleplate (6)
Do not use scouring powder or solution as this could cause damage to the coating.
If any man-made fibres fuse to the soleplate, set the iron at the MAX position and pass it over a clean piece of cotton to draw the deposit off the surface.
To clean the exterior
Allow the unit to cool and wipe over with a damp cloth and mild detergent, then wipe dry. Abrasive cleaners should not be used.
Cleaning the cloths (certain models only)
The micro-fibre floor cloth (55) and the elasticated utility cloths (50) can be machine washed (40°C max). For heavy soiling, soak the cloths in warm water and detergent or a mild stain remover.
IMPORTANT: Do not use bleach or fabric softener.
Allow cloths to completely dry before storing.
Replacement cloths can be purchased by calling our UK helpline directly on: 0844 873 0726 or logging onto www.morphyrichards.com.
Maintaining the attachments (certain models only)
Dirt and blockages should be regularly removed from the attachments to help prolong their usage.
Emptying and storing
Allow the appliance to cool.
Remove the detachable water tank (1) by squeezing the water tank release button (19). Lift the filler cap (2), and empty the water tank. Once the water tank is empty, re-attach it to the steam generator main body (16).
If the steam generator is not going to be used for a long time, also empty the boiler as instructed, (see 'Cleaning the boiler', page 14).
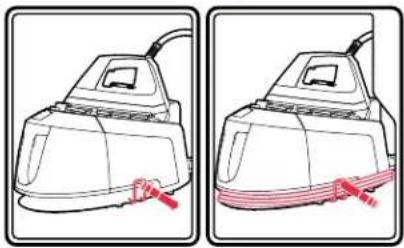
To store, pull the cord clamp (22) outwards. Wrap the power cord (18) and iron steam supply cord (8) around the base unit in the cord storage groove (21). Secure the cord in place with the cord clamp. Avoid kinking of cables, particularly at the exit from the steam generator main body (16).
natural_image
Illustration of a pair of iron iron holders with red straps, shown from different angles (no text or symbols)IMPORTANT: Do not pull too tightly on the iron cable grommet (9), or the iron steam supply cord (8) where it joins the iron steam cord connector (26), when wrapping the power cord (18) around the steam generator main body (16). Damage to cables caused by wrapping too tightly will not be covered by the guarantee.
Storing the steam iron
Lock the iron into the storage position on top of the steam generator main body by pushing the soleplate down on the locking column (13) whilst pushing the iron heel (10) onto the rear docking hook (15). The iron should now be at a slight diagonal on the iron rest plate. Pivot the tip of the soleplate (6) under the locking hook (12) and off the locking column. The spring-loaded locking column will now spring up, securing the iron in place.

natural_image
Two-step illustration of a steam iron pressing into a device, showing the process with red arrows indicating the step (no text or symbols present)Attach the iron steam supply cord (8) into the steam cord connection inlet (23) on the back of the steam generator main body (16), as described in step 1 of 'Using the steam generator for steam ironing', page 6.
Storing the accessories (certain models only)
Store all accessories in the accessory storage rack (40) and place into the accessory storage box (41) and fit the lid (39) securely to the box.
Contact us
Helpline
If you are having a problem with your appliance, please call our Helpline, as we are more likely to be able to help than the store you purchased the item from.
Please have the product name, model number and serial number to hand when you call to help us deal with your enquiry quicker.
UK Helpline: 0844 871 0960
IRE Helpline: 1800 409 119
Spares: 0844 873 0726
Talk To Us
If you have any questions or comments, or want some great tips to help you get the most out of your products, join us online:
Blog: www.morphyrichards.co.uk/blog
Facebook: www.facebook.com/morphyrichardsuk
Twitter: @loveyourmorphy
Website: www.morphyrichards.com
RN330009MUK Rev2 12/13
Registering your 2 year guarantee
Your standard 1 year guarantee is extended for an additional 12 months when you register the product within 28 days of purchase with Morphy Richards. If you do not register the product with Morphy Richards within 28 days, your product is guaranteed for 1 year. To validate your 2 year guarantee, register with us online at www.morphyrichards.co.uk
Or call our customer registration line
UK 0844 871 0962
IRE 1800 409 119
N.B. Each qualifying product needs to be registered with Morphy Richards individually.
Please note that the 2 year guarantee is only available in the UK and Ireland. Please refer to the 1 year guarantee for more information.
Your 1 year guarantee
To qualify for the 1 year guarantee, the appliance must have been used according to the instructions supplied.
It is important to retain the retailer's receipt as proof of purchase. Staple your receipt to this back cover for future reference.
Please quote the following information if the product develops a fault. These numbers can be found on the base of the product.
Model no. Serial no.
All Morphy Richards products are individually tested before leaving the factory. In the unlikely event of any appliance proving to be faulty within 28 days of purchase, it should be returned to the place of purchase for it to be replaced. If the fault develops after 28 days and within 12 months (2 years if registered) of original purchase, you should contact the Helpline number quoting Model number and Serial number on the product, or write to Morphy Richards at the address shown.
You may be asked to return a copy of proof of purchase. Subject to the exclusions set out below (see Exclusions), the faulty appliance will then be repaired or replaced and dispatched usually within 7 working days of receipt.
If you suspect a fault, follow the simple checks detailed below before retrying the appliance or calling the helpline.
- Check the steam outlet is not blocked.
- Check the plug is firmly in the socket.
- Check the socket is working by trying another appliance.
- Check the fuse in the plug.
If, for any reason, this item is replaced during the 1 year guarantee period, the guarantee on the new item will be calculated from original purchase date. Therefore it is vital to retain your original till receipt or invoice to indicate the date of initial purchase.
This appliance is intended for domestic use only. Misuse or use for commercial or any other purpose will render the guarantee invalid.
Exclusions
Morphy Richards shall not be liable to replace or repair the goods under the terms of the guarantee where:
1 The fault has been caused or is attributable to accidental use, misuse, negligent use or used contrary to the manufacturer's recommendations or where the fault has been caused by power surges or damage caused in transit.
2 The fault is caused by limescale build-up.
3 The cables are damaged due to wrapping too tightly or excessive kinking.
4 The appliance has been used on a voltage supply other than that stamped on the products.
5 Repairs have been attempted by persons other than our service staff (or authorised dealer).
6 The appliance has been used for hire purposes or non domestic use.
7 The appliance is second hand.
8 Morphy Richards reserves the right not to carry out any type of servicing under the guarantee at its discretion.
9 The guarantee excludes consumables such as cloths and brushes.
- This guarantee does not confer any rights other than those expressly set out above and does not cover any claims for consequential loss or damage. This guarantee is offered as an additional benefit and does not affect your statutory rights as a consumer. Morphy Richards products are intended for household use only. See usage limitations within the location safety instructions.
Disclaimer
Morphy Richards has a policy of continuous improvement in product quality and design. The company, therefore reserves the right to change the specification of its models at any time.

For electrical products sold within the European Community. At the end of the electrical products useful life, it should not be disposed of with household waste. Please recycle where facilities exist. Check with your Local Authority or retailer for recycling advice in your country.
IF YOU ARE HAVING A PROBLEM
WITH ONE OF OUR PRODUCTS,
CALL OUR HELPLINE:
UK: 0844 871 0960
EIRE: 1800 409 119
SPARES: 0844 873 0726
morphy richards
The After Sales Division
Morphy Richards Ltd
Mexborough,
South Yorkshire,
England, S64 8AJ
www.morphyrichards.com



- POWER
- STEAMPRO
- Multi-function Steam Generator
- www.morphyrichards.com
- Important safety instructions
- Personal safety
- Location
- Mains cable
- Product safety
- Other safety considerations
- Electrical requirements
- Contents
- Features
- Temperature guide
- Safe working for ironing
- Before use
- Using the steam generator for steam ironing
- Using the Steam Generator for steam ironing (continued)
- Filling
- Re-filling during use
- Dry ironing
- Auto shut-off (certain models only)
- Steam function
- Vertical steam
- Steam cleaning mode (certain models only)
- Steam cleaning accessories overview (certain models only)
- Steam cleaning floors (certain models only)
- Steam cleaning floors (certain models only) (continued)
- Using the accessories for steam cleaning (certain models only)
- Attachments for use with the accessory adaptor (certain models only)
- Accessory adaptor (45)
- Spatula attachment (47)
- Circular brush attachments (48)
- Utility nozzle for use on the jet nozzle (certain models only)
- Utility nozzle (46)
- Elasticated utility cloth (50)
- Squeegee attachment (49)
- After use
- Maintenance
- Cleaning the boiler
- WARNING: Never remove the boiler screw (58) when the steam generator is hot.
- WARNING: Ensure the boiler is empty before replacing the boiler screw.
- To clean a coated soleplate (6)
- To clean the exterior
- Cleaning the cloths (certain models only)
- IMPORTANT: Do not use bleach or fabric softener.
- Maintaining the attachments (certain models only)
- Emptying and storing
- Storing the steam iron
- Storing the accessories (certain models only)
- Contact us
- Helpline
- Talk To Us
- Registering your 2 year guarantee
- Your 1 year guarantee
- Exclusions
- Disclaimer
- morphy richards
Brand : MORPHY RICHARDS
Model : 330009
Category : Steam cleaner