CR01 - Alarm Clock Sealey - Free user manual and instructions
Find the device manual for free CR01 Sealey in PDF.


| Brand | Sealey |
| Model | CR01 |
| Product Type | Alarm Clock Radio |
| Dimensions (approx.) | 100 x 100 x 50 mm |
| Weight (approx.) | 0.3 kg |
| Power Supply | AC 230V ~ 50Hz or 2 x AAA batteries (backup) |
| Display Type | Digital LED display with adjustable brightness |
| Radio Bands | AM/FM |
| Alarm Functions | Wake to radio or buzzer; snooze (9 min); sleep timer |
| Volume Control | Rotary dial for radio volume; separate alarm volume |
| Additional Features | 12/24 hour format; date display; programmable radio presets |
| Maintenance | Clean with soft, dry cloth; avoid liquids and abrasive cleaners |
| Safety Warnings | Do not expose to water or moisture; unplug during storms; keep ventilation slots clear |
| Spare Parts / Repairability | No user-serviceable parts; refer to qualified service personnel for repairs |
Frequently Asked Questions - CR01 Sealey
User questions about CR01 Sealey
0 question about this device. Answer the ones you know or ask your own.
Ask a new question about this device
Download the instructions for your Alarm Clock in PDF format for free! Find your manual CR01 - Sealey and take your electronic device back in hand. On this page are published all the documents necessary for the use of your device. CR01 by Sealey.
USER MANUAL CR01 Sealey
AM/FM ALARM Clock Radio
AC 230-240V\~ 50Hz, 6W
AM: 530-1600kHz
FM: 88 -108MHz
1. SAFETY
1.1. GENERAL
- The ventilation should not be impeded by covering the ventilation openings with items, such as newspapers, table cloths, curtains, etc.
No naked flame sources, such as lighted candles, should be placed on the apparatus.
- It shall not be exposed to dripping or splashing and no objects filled with liquids, such as vases, shall be placed on the apparatus.
Do not place the product in closed bookcases or racks without proper ventilation.
- Where the mains plug or an appliance coupler is used as the disconnect device, the disconnect device shall remain readily operable.
1.2. ELECTRICAL SAFETY
WARNING! It is the user's responsibility to read, understand and comply with the following electrical instructions:
You must ensure the risk of electric shock is minimised by the installation of appropriate safety devices.
An RCCB (Residual Current Circuit Breaker) should be incorporated in the main distribution board. We also recommend that an RCD (Residual Current Device) is used with all electrical products, particularly portable equipment which is plugged into an electrical supply not protected by an RCCB.
You must also read and understand the following instructions concerning electrical safety.
1.2.1. The Electricity At Work Act 1989 requires all portable electrical appliances, if used on business premises, to be tested by a qualified electrician, using a Portable Appliance Tester (PAT), at least once a year.
1.2.2. The Health & Safety at Work Act 1974 makes owners of electrical appliances responsible for the safe condition of the appliance and the safety of the appliance operator. If in any doubt about electrical safety, contact a qualified electrician.
1.2.3. You must ensure that you:
√ Inspect the plug, cable and connector for wear and damage to ensure items are safe before connecting to the mains power supply.
If worn or damaged DO NOT use.
√ Important: Check that the voltage marked on the radio is the same as the power supply to be used.
x DO NOT pull the plug from the mains socket by the lead.
x DO NOT get the radio wet, or use in wet, damp conditions (for indoor use only).
1.2.4. Ensure that the insulation on all cables and on the appliance is safe before connecting it to the power supply. See 1.2.1. and 1.2.2. and use a Portable Appliance Tester.
1.2.5. Ensure that cables are always protected against short circuit and overload.
1.2.6. DO NOT use worn or damaged cables, plugs or connectors. Immediately have any faulty item repaired or replaced by a qualified electrician.
When a BS1363/A UK 3 pin plug is damaged, cut the cable just above the plug and dispose of the plug safely.
Fit a new plug according to the following instructions (UK only).
a) Connect the GREEN/YELLOW earth wire to the earth terminal 'E'.
b) Connect the BROWN live wire to the live terminal 'L'.
c) Connect the BLUE neutral wire to the neutral terminal 'N'.
d) After wiring, check that there are no bare wires, that all wires have been correctly connected, that the cable outer insulation extends beyond the cable restraint and that the restraint is tight.
Double insulated products, which are always marked with this symbol are fitted with live (brown) and neutral (blue) wires only. To rewire, connect the wires as indicated right.
DO NOT connect either wire to the earth terminal.


The lightning flash with arrowhead symbol, within an equilateral triangle, is intended to alert the user to the presence of un-insulated "dangerous voltage" within The product's enclosure that may be of sufficient magnitude to constitute a risk of electric shock.

The exclamation point within an equilateral triangle is intended to alert the user to presence of important operating and maintenance (servicing) instructions in the literature accompanying the appliance.
CAUTION
RISK OF ELECTRIC SHOCK DO NOT OPEN
Warning: to reduce the risk of electric shock, DO NOT remove cover(orback). Nouserserviceable parts inside, refer servicing to qualified service personnel.
PARTS2.
Top View

Underside
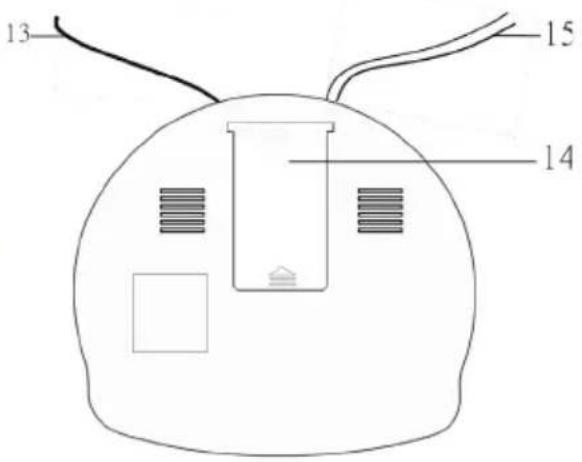
Time button1.
Function switch 2.
PM indicator 3.
Auto Indicator 4.
Minute button 5.
Snooze button 6.
Hour button7.
Sleep set button 8.
Alarm button9.
Tuning control knob 10.
Band switch11.
Volume control knob12.
FM antenna 13.
Battery compartment 14.
Power Cable15.
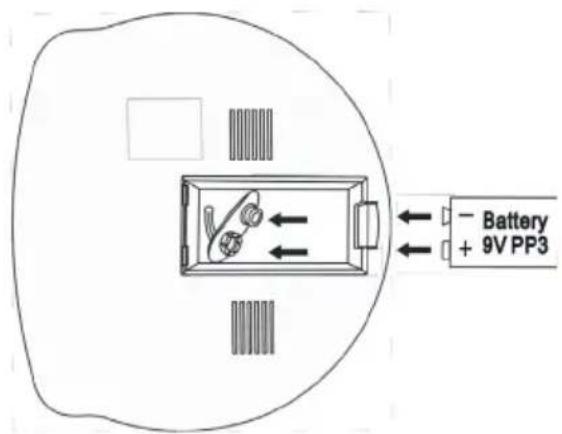
3. FITTING THE BACK UP BATTERY
It is advisable to fit a battery (not supplied) in the battery compartment to prevent the loss of the display time and settings during a power failure.
To install the battery
3.1 Slide off the battery compartment cover from the underside of the unit.
3.2 Insert 1 x 9V heavy-duty alkaline battery. Insert the positive (+) round terminal of the battery into the negative connector. Fit the round connector into the negative (-) terminal of the battery. Take care to observe the correct polarity (+/-).
3.3 Refit the battery compartment cover.
3.4 DO NOT expose the batteries or the installed batteries to excessive heat (e.g. fire, sunshine or position close to radiators etc.).
Note! Dispose of used batteries responsibly at local authority household waste recycling facility.
• DO NOT dispose of batteries in a fire as the batteries may explode.
• Only use 9V batteries in this appliance.
- Be sure to insert correctly taking care to observe the correct polarity (+ and -).
• Use only batteries of the same or equivalent type as recommended.
• DO NOT recharge non-rechargeable batteries.
• Never try to dismantle batteries.
• DO NOT short-circuit the supply terminals.
• Always remove exhausted or dead batteries from the product, do not dispose of in fire.
- Remove batteries from the product before extended storage.
4. SETTING THE TIME
4.1 Move the function switch to OFF and plug the mains power cable into the household socket. '12:00' will flash in the display.
4.2 Press and hold the TIME button and at the same time press the HOUR button until the correct hour is displayed. If setting the time in the afternoon and evening, cycle through the hours until the correct hour is displayed and the pm indicator is illuminated.
4.3 After setting the hour, press the MIN button until the correct minute is displayed.
4.4 Once the time has been set, release the TIME button.
5. USING THE RADIO
5.1 Plug the mains power cable into the household socket and switch on.
5.2 Slide the FUNCTION switch to the 'ON' position.
5.3 Select the waveband by sliding the BAND switch to the desired waveband (AM or FM).
5.4 Turn the TUNING knob to select the station of choice. The radio frequency scale will show the wavelength selected.
5.5 Adjust the volume to the desired level by rotating the VOLUME control knob.
5.6 To turn off the radio, slide the FUNCTION switch to 'OFF'.
Note! The built in AM and the external FM antennas are directional. If tuning into an FM station extend or move the antenna for a better reception. If tuning into an AM station rotate the whole unit after tuning to obtain the best reception.
6. SETTING AND USING THE ALARM
6.1 Press and hold the ALARM button and at the same time press the HOUR button repeatedly until the correct alarm hour is displayed.
After setting the hour, press the MIN button repeatedly until the correct alarm minute is displayed.6.2
Once the time has been set, release the ALARM button. 6.3
6.4 To activate the alarm, slide the FUNCTION switch to the position marked 'BUZZ' to wake up to a buzzer or 'AUTO' to wake up to the radio.
Once the alarm has been activated, the AUTO indicator will illuminate in the display.6.5
When the time on the clock is the same as the alarm time that has been set, the alarm will sound.6.6
6.7 The alarm will continue to sound and stop automatically after 1 hour 59 minutes. To silence the alarm, press the ALARM button. The alarm indicator will remain illuminated and the alarm will sound again the same time the following day unless the FUNCTION switch is moved to 'OFF'.
6.8 To activate the snooze function, press the SNOOZE button when the alarm sounds. The alarm will silence and the alarm will sound again after approximately nine minutes.
6.9 To turn off the alarm permanently, slide the FUNCTION switch to the 'OFF' position.
Note! The snooze button can be used repeatedly in the 1 hour 59 minute interval after the set alarm time.
7. SETTING AND USING THE SLEEP FUNCTION
This function will switch off the unit automatically after a preset time interval up to 59 minutes.
7.1 Move the FUNCTION switch to 'OFF', 'BUZZ' or 'AUTO' position.
7.2 Press and hold the SLEEP button, the radio will start to play and '0:59' will be shown in the display. Release the button and the display will show the clock and the radio will switch off after 59 minutes.
7.3 To set a shorter time interval, press and hold the SLEEP button and at the same time press the MIN button until the desired switch off time interval is displayed.
7.4 The unit will switch off after the time interval selected has lapsed.
7.5 To turn off the sleep function, press the SNOOZE button and the radio will stop immediately.
Note! If the function switch is moved to 'BUZZ' or 'AUTO' the alarm is also activated. Before setting the sleep interval, ensure the alarm is set to the desired wake up time.
8. CARE AND MAINTENANCE
- Wipe external surfaces with a soft cloth. If the cabinet is very dirty, unplug from the mains supply and use a damp cloth soaked in a weak solution of washing up liquid and water. Allow to dry thoroughly before reusing.
• Should it become necessary to replace the fuse in the plug, please replace with a 3A fuse that conforms with BS 1362.
9. TECHNICAL SPECIFICATION
| Rated voltage | 230 - 240V~ 50Hz |
| Power consumption | 6W |
| Radio | AM 530-1600kHz |
| FM 88-108MHz |
| Operating conditions | Temperature: 5°C to 35°C |
| Humidity 5% to 90% | |
| Operating position | Horizontal |
Rating Information: At the bottom of the unit.
10. TROUBLESHOOTING GUIDE
| Observation Potential cause / solution | |
| The unit does not work. | Does the socket that is being used have power?Is the unit switched on at the plug? |
| No sound. Is the volume control set at minimum? | |
| Radio reception weak. | Extend or adjust the position of FM antenna to help improve FM reception.Adjust the position of the radio to help improve AM reception. |
| Alarm function does not work. | Has the alarm been activated by moving the FUNCTION switch to ‘AUTO’ or ‘BUZZ’?Has the alarm been set for the correct 12-hour interval (e.g. alarm set for ‘pm’ instead of ‘am’)?Has the clock been set for the correct 12-hour interval?Ensure the PM INDICATOR is illuminated when setting the clock for time intervals between midday and midnight. |
| Sleep function does not work. | Has the sleep function been activated by pressing the SLEEP button and moving the FUNCTION switch to the ‘OFF’, ‘BUZZ’ or ‘AUTO’ position? |
Environmental Protection.

The European Directive 2002/96/EC on Waste Electrical and Electronic Equipment (WEEE), requires that old electrical appliances must not be disposed of in the normal unsorted municipal waste stream. Old must be collected separately in order to optimise the recovery and recycling of the materials they and reduce the impact on human health and the environment.
The crossed out "wheeled bin" symbol on the product reminds you of your obligation, that when you dispose of the appliance it must be separately collected.
Consumers should contact their local authority or retailer for information concerning the correct disposal of their old appliance.
Visit www.recycle-more.co.uk, click on "bank locator" and enter your postcode to find your nearest recycling
site.


When the product is no longer required, it must be disposed of in an environmentally protective way.
Battery Removal
To remove the battery refer to Section 3 'Fitting the back up battery' and reverse the procedure for fitting the Dispose of used batteries responsibly at local authority household waste recycling facility.
Declaration of Conformity We, the sole importer into the UK, declare that the product listed here is in conformity with the following standards and directives. The construction file for this product is held by the Manufacturer and
CLOCK RADIO ALARM Model: CR01
2006/95/EC Low Voltage Directive
2004/10/EC EMC Directive
93/68/EEC CE Marking Directive
2002/95/EC RoHS Directive
2002/96/EC WEEE Directive
The construction file for this product is held by the Manufacturer and may be inspected, by a national authority, upon request to Jack Sealey Ltd.

Signed by Mark Sweetman

24th June 2009
For Jack Sealey Ltd. Sole importer into the UK of Sealey Power Products.
NOTE: It is our policy to continually improve products and as such we reserve the right to alter data, specifications and component parts without prior notice.
IMPORTANT: No liability is accepted for incorrect use of product.
WARRANTY: Guarantee is 12 months from purchase date, proof of which will be required for any claim.
INFORMATION: For a copy of our latest catalogue and promotions call us on 01284 757525 and leave your full name and address, including postcode.


Sole UK Distributor Sealey Group, Bury St. Edmunds, Suffolk.

www.sealey.co.uk sales@sealey.co.uk
- AM/FM ALARM CLOCK RADIO
- SAFETY
- GENERAL
- ELECTRICAL SAFETY
- CAUTION
- RISK OF ELECTRIC SHOCK DO NOT OPEN
- PARTS2
- FITTING THE BACK UP BATTERY
- TO INSTALL THE BATTERY
- SETTING THE TIME
- USING THE RADIO
- SETTING AND USING THE ALARM
- SETTING AND USING THE SLEEP FUNCTION
- CARE AND MAINTENANCE
- TECHNICAL SPECIFICATION
- TROUBLESHOOTING GUIDE
- ENVIRONMENTAL PROTECTION
- BATTERY REMOVAL
- CLOCK RADIO ALARM MODEL: CR01
Brand : Sealey
Model : CR01
Category : Alarm Clock