Turbostream - Shower head Aqualisa - Free user manual and instructions
Find the device manual for free Turbostream Aqualisa in PDF.


| Product Type | Shower Head |
| Brand | Aqualisa |
| Model | Turbostream |
| Material | Chrome-plated ABS plastic |
| Diameter | 4.5 inches (114 mm) |
| Weight | 0.5 lbs (0.23 kg) |
| Connection Type | Standard 1/2 inch BSP thread |
| Flow Rate | 2.0 GPM (7.6 L/min) at 60 psi |
| Operating Pressure | 15 - 100 psi (1 - 7 bar) |
| Spray Patterns | Adjustable: rain, massage, jet, mist |
| Number of Nozzles | 60 self-cleaning silicone jets |
| Functions | Turbo boost, water-saving mode, anti-leak seal |
| Installation | Tool-free hand-tighten connector |
| Cleaning | Rub nozzles to remove limescale; wipe with damp cloth |
| Warranty | 2 years limited |
| Included Accessories | Shower head unit, Teflon tape, manual |
| Compliance | WRAS approved, WaterSense certified |
| Repairability | Replaceable O-rings and seals available |
| Intended Use | Residential indoor use only |
Frequently Asked Questions - Turbostream Aqualisa
User questions about Turbostream Aqualisa
0 question about this device. Answer the ones you know or ask your own.
Ask a new question about this device
Download the instructions for your Shower head in PDF format for free! Find your manual Turbostream - Aqualisa and take your electronic device back in hand. On this page are published all the documents necessary for the use of your device. Turbostream by Aqualisa.
USER MANUAL Turbostream Aqualisa
VarisprayandTurbostream
Fixed and adjustable height heads

natural_image
Close-up of a modern chrome showerhead with handle and socket (no text or symbols visible)Components

natural_image
Product catalog illustration of a showerhead with various fixtures and accessories (no text or labels visible)Adjustable height shower head
natural_image
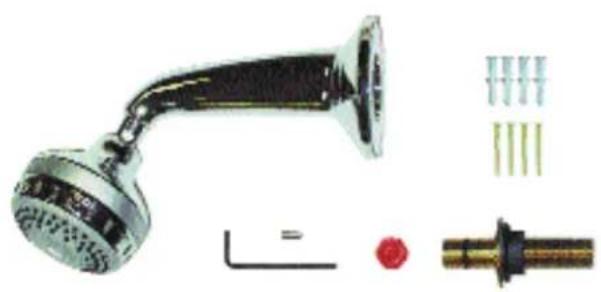
Product photo of a showerhead with various fittings and a red bolt, shown alongside (no text or symbols visible)Fixed concealed shower head

natural_image
Product assembly diagram showing a showerhead, pipe, and various small components (no text or labels)Fixed exposed shower head
Importantinformation
Introduction
The Aqualisa range of shower heads has been designed for use with the Aqualisa Thermo and Digital shower valves.
The installation of this shower head with anything other than an Aqualisa shower valve may result in poor shower performance.
If you have any questions at any stage during installation please contact the Aqualisa customer helpline on 01959 560010.
Safety information
This product must be installed by a competent person in accordance with all relevant current Water Supply Regulations.
Flushing
Some modern fluxes can be extremely corrosive and, if left in contact, will attack the working parts of this unit. All soldering must be completed and the pipe work thoroughly flushed out in accordance with current Water Supply Regulations prior to connection of the product.
Connections
The Aqualisa shower head range is suitable for use with 15mm British Standard copper tube. Tube should be cut using a rotary type cutter and lubricated using a silicone-based lubricant or petroleum jelly (Vaseline or similar) prior to insertion of the fitting. Supply lines must be flushed clear of any debris before installation.
Stored water capacities
The minimum capacity of the cold storage cistern should not be less than 225 litres (50 gallons). The capacity of the hot cylinder must be capable of meeting the anticipated demand.
Siting
For optimum performance, with gravity fed systems, the distance between the bottom of the storage cistern and the shower head should not be less than 1m (when using an adjustable height shower kit). If using a fixed head, the highest point of the pipe work must be below the underside of the cistern.
Step-by-stepinstructions
15mm-22mm wall outlet conversion guide
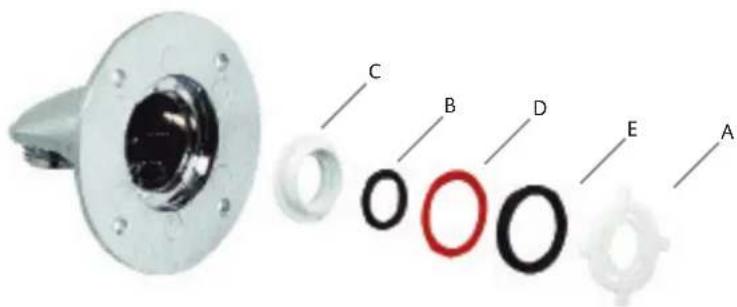
1
Remove the support ring (A) by turning it anti-clockwise to unlock the bayonet fitting.
2
Remove the central 'O' ring (B) before removing the 'O' ring housing (C), the support washer (D) and the outer 'O' ring (E).
3
Re-fit the support washer (D) and the outer 'O' ring (E) so that they sit against the ledge inside the outlet body.
4
Push out the centre section of the support ring (A) to enable it to take 22mm pipe.

natural_image
Close-up of a white circular mechanical component with a central hole and four protrusions, labeled '15mm' at the bottom (no other text or symbols)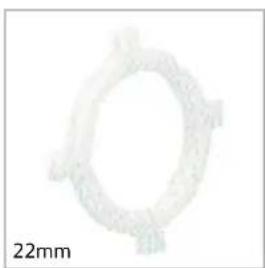
natural_image
Circular object with textured surface, labeled '22mm' at bottom left (no other text or symbols)5
Re-fit the support ring (A), rotating it clockwise until it locks in position.
Adjustable height head installation
!
In addition to the guide below it is essential that the written instructions overleaf are read and understood and that you have all the necessary components (shown overleaf) before commencing installation. Failure to install the product in accordance with these instructions may adversely affect the warranty terms and conditions. Do not undertake any part of this installation unless you are competent to do so. Prior to starting ensure that you are familiar with the necessary plumbing regulations required to install the product correctly and safely.
The adjustable height heads are supplied with universal fixings.
The adjustable height heads are suitable to be fitted with either concealed or exposed shower valves. A wall outlet assembly is supplied for installation with a concealed valve. If fitting with an exposed valve please proceed to instruction 7.
1
Prepare pipe work from the shower valve to the required position for the hose outlet using a 15mm copper pipe. Slide the 15mm gripper ring down the projecting pipe up to the wall face.

!
NB. The wall outlet is supplied for use with 15mm pipe work. However, if required, the outlet assembly can be adapted to accept 22mm pipe work. Please follow the conversion guide overleaf.
2
Trim the projecting pipe to a length of 15-22mm using a rotary type cutter. If a hacksaw is used, the pipe end must be carefully de-burred and chamfered.
3
Clean and lubricate the pipe using a suitable (silicone based) lubricant.
4
Remove the wall outlet cover plate and carefully slide the wall outlet onto the projecting pipe. Turn to the required position and mark the screw holes on the wall face.
5
Remove the wall outlet and drill and prepare suitable wall fixings. Ensure the projecting pipe is clean and lubricate again if necessary. Refit the wall outlet and secure it to the wall using the screws provided.

6
Refit the wall outlet coverplate.

natural_image
Hand holding a metallic object with a detached circular component (no text or symbols visible)7
Drill and plug two holes 642mm-655mm vertically apart using a spirit level to facilitate if necessary. Fit the rail end clip into position and loosely fit the lower bracket into position.

8
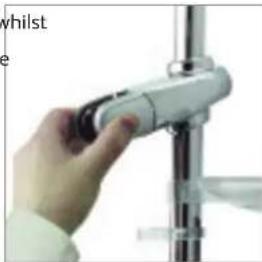
Pass the rail through the handset holder whilst keeping the slider levers depressed with the handset holder pointing in a downward direction.
natural_image
Close-up of a hand holding a white cylindrical device against a metallic vertical pole (no visible text or symbols)9
If the soapdish is required slide onto the rail under the handset holder.
10
Current water supply regulations state the handset should not be allowed to pass a point 25mm above the spill over level of the bath or shower tray. If this cannot be achieved, the hose restraint must be fitted. This is fitted to the rail under the soapdish.
11
Fit the rail into the rail end bodies taking care to engage the location slot onto the lugs.
12
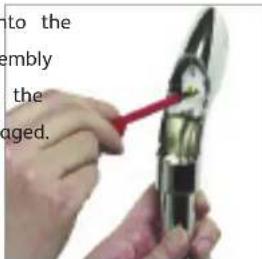
Fit the rail end clip fitting into position into the top rail end body and secure the rail assembly to wall using the screws provided ensuring the rail and rail end bodies remain firmly engaged.
13
Place the rail end covers into position and push firmly into place.

natural_image
Close-up of a hand holding a tool tip, no visible text or symbols14
Ensuring the hose washers are in position, connect the conical end of the hose to the handset after passing it through the hose restraint (if required). Attach the other end of the hose to the valve or wall outlet.

natural_image
Hand holding a handheld microphone with sound waves, no visible text or symbolsFixed head concealed
!
In addition to the guide below it is essential that the written instructions overleaf are read and understood and that you have all the necessary components (shown overleaf) before commencing installation. Failure to install the product in accordance with these instructions may adversely affect the warranty terms and conditions. Do not undertake any part of this installation unless you are competent to do so. Prior to starting ensure that you are familiar with the necessary plumbing regulations required to install the product correctly and safely.
The concealed fixed head is supplied with universal fixings.
The maximum panel thickness for installation of the fixed head is 35mm, which includes a maximum tile thickness of 15mm.
1
Run a 15mm outlet pipe from the shower valve to the preferred position for the fixed head arm. The pipe must terminate with a suitable 12 " BSP female fitting, to accept the spigot at the correct depth as detailed in instruction 2 below.
!
If the spigot cannot be secured to the wall then the pipe must be secured using a clip or another form of fixing.
2
Secure the spigot into the 12 " female fitting allowing it to project to a length of 31-46mm measured from the finished surface using the washer and back nut as required. A 12mm hexagonal key can be inserted into the front of the spigot to facilitate tightening.

natural_image
Close-up of a hand holding a small mechanical component, possibly a knob or dial (no visible text or symbols)!
If the spigot is to be secured before tiling then the depth of the tiles must be taken into consideration.
The 12 " BSP tail can be trimmed to length if required.
3
Insert the red 38 " BSP plug into the front of the spigot and tighten. Turn on the shower valve to pressurise the system and thoroughly check the outlet assembly for any leaks.

4
Turn off the valve and leave the plug in place to prevent ingress of debris during the making good process. No parts of the shower system should be cemented into the wall.
5
Carefully slide the cover plate down the fixed head arm to give clear access to the fixing plate.
6
Carefully remove the plug from the fixing spigot remembering that the system contains water that may be under pressure.
7
Ensuring that the spigot 'O' ring is clean and slightly lubricated (using a silicone based lubricant or petroleum jelly), slide the fixed head arm over the mounting spigot until it meets the wall surface.

natural_image
Close-up of a metallic mechanical component with a yellow connector, no visible text or symbols8
Set the arm into position and mark the f points. Remove the arm and drill and prep the wall fixings. Refit the arm and secure the wall using the screws provided.

9
Tighten the M5 locking screw located on the underside of the fixing plate using the hexagonal key provided and slide the cover plate into position against the wall face.

natural_image
Close-up of a hand using a screwdriver to adjust a showerhead (no text or symbols visible)10
Unscrew and remove the spray cassette and run the shower for a few seconds to clear any internal debris, which may be present. Refit the spray cassette.
Fixed head exposed
!
In addition to the guide below it is essential that the written instructions overleaf are read and understood and that you have all the necessary components (shown overleaf) before commencing installation. Failure to install the product in accordance with these instructions may adversely affect the warranty terms and conditions. Do not undertake any part of this installation unless you are competent to do so. Prior to starting ensure that you are familiar with the necessary plumbing regulations required to install the product correctly and safely.
This system is usually fitted with an exposed Aquavalve 700 Thermo shower valve and is supplied complete with the necessary fittings for installation with this valve. However this fixed head kit can also be fitted with an Aquarian Thermo shower valve, but an Aquarian manifold kit will need to be purchased separately which will include the necessary fittings for use with the Aquarian Thermo. Please refer to the Aquarian manifold installation instructions for full fitting instructions.
The exposed fixed head system utilises a 19mm diameter tube and is supplied complete with an adaptor for use with an exposed Aquavalve 700 Thermo. As assembled, the mixing valve has a 12 " BSP outlet situated on the underside. In order to accommodate the exposed fixed head kit it will be necessary to carry out the following procedures taking care to avoid any damage to the plated surfaces.
1
Unscrew the Aquavalve 700 Thermo 12 " BS outlet connector from the bottom of the body using either a 12mm hexagonal key standard radiator key.

2
Using a large flat bladed screwdriver remove the body plug from the top of the valve taking care not to damage the plated surfaces and refit in the underside of the valve.

3
With the sealing 'O' ring in position, locate the 34 " adaptor into the top outlet and carefully secure using either a 12mm hexagonal key or standard radiator key.
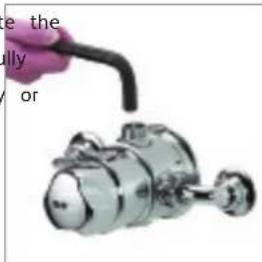
The riser tube and shower head assembly may now be fitted as follows:
1
Screw the formed shower arm to the riser tube. The riser tube can be shortened if required by trimming the plain end using a rotary type cutter.


2
Carefully slide the fixing bracket up the riser tube until the joint is hidden.

natural_image
Close-up of a hand holding a metal tool or connector (no visible text or symbols)3
Locate the riser tube into the 34 " outlet and place in the required position against the wall face.
4
Mark the required fixings holes and remove the riser tube assembly from the valve. Prepare and fit the fixings ensuring no debris enters the shower valve.
5
Carefully slide the plated 34 " nut and 'O' onto the riser tube and locate the assemb into the 34 " valve outlet.

natural_image
Hand using a mechanical tool to lift a metallic valve (no text or symbols visible)6
Fix the wall stay and spacer to the wall the screws provided.

natural_image
Close-up of a hand using a tool to lift a metal rod (no text or symbols visible)7
Carefully tighten the 34 " nut using either 31mm A/F spanner or a tool with smooth jaws just sufficiently to compress the 'O' ring and achieve a watertight seal.
8
Carefully screw the shower head to the shower head arm taking care not to damage the plated surfaces. Carefully tighten the shower head with a suitable spanner or a tool with smooth jaws just sufficiently to lock the head in position.

natural_image
Close-up of a hand holding a stainless steel showerhead (no visible text or symbols)9
Remove the spray cassette and run the shower for a few seconds to flush out any debris that may be present and check for leaks. Refit the spray cassette.
Afterinstallation...
Run through the Aqualisa shower head operation with the purchaser and hand them this guide. Complete and post the Aqualisa shower head guarantee card or register online at www.aqualisa.co.uk.

natural_image
Close-up of a hand holding a showerhead with a circular handle (no text or symbols visible)Adjustable head user guide
- To select the desired spray pattern rotate the shower spray cassette clockwise or anti-clockwise.

natural_image
Hand holding a showerhead with a metallic handle, no visible text or symbols- To select the preferred height for the shower head, depress the handset holder levers fully to enable the slider to be moved up or down the rail.

natural_image
Hand holding a silver showerhead with a black handle (no text or symbols visible)- Angular adjustment is made by carefully but firmly pulling forwards or pushing back the shower head against the knuckle ratchet in the holder.

natural_image
Close-up of a hand holding a metallic showerhead with a curved handle (no text or symbols visible)Fixed head concealed and exposed user guide
- To select the desired spray pattern rotate the shower spray cassette clockwise or anti-clockwise.

natural_image
Close-up of a hand holding a stainless steel showerhead (no text or symbols visible)- The angle of the fixed shower heads can be adjusted. The shower head is mounted on a multi-directional ball joint to allow for angular adjustment in any direction by carefully holding the shower spray cassette and moving the head to the desired angle.
.Cleaning
Your Aqualisa shower head system should be cleaned using only a soft cloth and washing up liquid.
DO NOT USE ABRASIVE CLEANERS
To reduce the requirement for chemical descaling in hard water areas, the shower heads incorporate rub clean teats. Any scale build up that may occur in any of the holes can be broken down by gently rubbing the flexible tips of the jets during use. Should chemical descaling of the head become necessary, unscrew and remove the shower head cassette and fully immerse in a mild proprietary descalent.
It is imperative that descaling is carried out strictly in accordance with the manufacturers instructions. Substances that are not suitable for plastics and electroplated surfaces must not be used.
Userguide
Shower operation
Turn the on/off knob fully anti-clockwise into the open position to turn the shower on.
N.B. The on/off knob MUST NOT be used as a method of flow control.
Rotate the temperature control lever to select a comfortable showering temperature using the temperature markings as a guide.
Turn the on/off knob fully clockwise into the closed position after use.
Tap operation
The Aquamixa Thermo is fitted with conventional 'non rising spindle' type taps. Turn taps anti-clockwise to fill the bath and turn clockwise to close.
THE BATH FILL THROUGH THE TAPS IS NOT THERMOSTATIC.
After installation
Run through the Aquamixa Thermo operation with the end user and hand them this guide. Complete and post the Aquamixa Thermo guarantee card or register online at www.aqualisa.co.uk.
Cleaning
Your Aquamixa Thermo unit should be cleaned using only a soft cloth and washing up liquid.
DO NOT USE ABRASIVE CLEANERS.

natural_image
Abstract logo design with blue and red curved segments on gray background (no text or symbols)AQUALISA
Aqualisa Products Limited
The Flyer's Way
Westerham Kent TN16 1DE
Sales enquiries: 01959 560010
Republic of Ireland 01-864-3363
Customer helpline: 01959 560010
Republic of Ireland 01-844-3212
Brochure Hotline: 0800 652 3669
Website: www.aqualisa.co.uk
Email: enquiries@aqualisa.co.uk

- VarisprayandTurbostream
- Components
- Importantinformation
- Introduction
- Safety information
- Flushing
- Connections
- Stored water capacities
- Siting
- Step-by-stepinstructions
- 15mm-22mm wall outlet conversion guide
- Adjustable height head installation
- !
- 1
- 2
- 3
- 4
- 5
- Fixed head concealed
- Fixed head exposed
- Afterinstallation...
- Adjustable head user guide
- Fixed head concealed and exposed user guide
- .Cleaning
- DO NOT USE ABRASIVE CLEANERS
- Userguide
- Shower operation
- Tap operation
- After installation
- Cleaning
- AQUALISA
Brand : Aqualisa
Model : Turbostream
Category : Shower head