CR-113iPH - Alarm Clock Technika - Free user manual and instructions
Find the device manual for free CR-113iPH Technika in PDF.


| Product Type | Alarm Clock Radio |
| Brand | Technika |
| Model | CR-113iPH |
| Color | Black |
| Dimensions (W x H x D) | 200 x 100 x 120 mm |
| Weight | 0.5 kg |
| Power Source | AC adapter (included) or 3x AAA batteries (backup) |
| Radio Bands | AM / FM |
| Alarm Functions | Wake to radio or buzzer, dual alarm, snooze, sleep timer |
| Display Type | LED clock with dimmer |
| Snooze Duration | 9 minutes (default) |
| Sleep Timer | Up to 90 minutes |
| Dual Alarm | Yes, independent alarm settings |
| iPod/iPhone Dock Connector | 30-pin compatible with iPhone/iPod classic, nano, touch (up to iOS 6.1.6) |
| Charging Function | Charges connected iPod/iPhone when using AC power |
| Speaker Type | Mono speaker, 2W |
| Volume Control | Rotary knob or buttons |
| Menu Language | English (display) |
| Maintenance Instructions | Wipe with a soft, dry cloth. Do not use liquid cleaners. |
| Safety Warnings | Keep away from water and moisture. Use only included AC adapter. |
| Included Components | Main unit, AC adapter, user manual |
| Manual Availability | Free PDF download from notice-facile.com |
Frequently Asked Questions - CR-113iPH Technika
User questions about CR-113iPH Technika
0 question about this device. Answer the ones you know or ask your own.
Ask a new question about this device
Download the instructions for your Alarm Clock in PDF format for free! Find your manual CR-113iPH - Technika and take your electronic device back in hand. On this page are published all the documents necessary for the use of your device. CR-113iPH by Technika.
USER MANUAL CR-113iPH Technika
natural_image
Circular diagram with concentric rings and a central square, no text or symbols presentCR-113iPH
Owner's Handbook
Clock radio with dock for iPhone

Works with
iPhone

Made for
iPod
IMPORTANT SAFETY INFORMATION

CAUTION!
RISK OF ELECTRIC SHOCK DO NOT OPEN

TO REDUCE THE RISK OF ELECTRIC SHOCK DO NOT REMOVE COVER (OR BACK)

This symbol indicates that there are important operating and maintenance instructions in the literature accompanying this unit.

This symbol indicates that dangerous voltage constituting a risk of electric shock is present within this unit.
Read these instructions.
Keep these instructions.
Heed all warnings.
Follow all instructions.
Do not use this apparatus near water.
Clean only with a slightly damp cloth.
Do not block any ventilation openings.
Install in accordance with the manufacturer's instructions.
Do not install or operate near any heat sources such as radiators, stoves, or other apparatus that produce heat.
Unplug this apparatus during lightning storms or when unused for long periods of time.
Refer all servicing to qualified service personnel. Servicing is required when the apparatus has been damaged in any way, such as the power-supply cord or plug is damaged, liquid has been spilled or objects have fallen into the apparatus, the apparatus has been exposed to rain or moisture, does not operate normally, or has been dropped.
Warning: To reduce the risk of fire or electrical shock, do not expose this product to rain or moisture. The product must not be exposed to dripping and splashing and no object filled with liquids such as a vase of flowers should be placed on the product. No naked flame sources such as candles should be placed on the product.
Caution: Changes or modifications not expressly approved by the manufacturer could void the user's authority to operate this device.
Caution: Usage of controls or adjustments or performance of procedures other than those specified herein may result in hazardous exposure.
IMPORTANT
This equipment generates, uses and can radiate radio frequency energy and, if not installed and used in accordance with the instructions, may cause harmful interference to radio communication. However, this is no guarantee that interference will not occur in a particular installation. If this equipment does cause harmful interference to radio or television reception, which can be determined by turning the equipment off and on, the user is encouraged to try to correct the interference by one of the following measures:
- Reorient or relocate the receiving antenna.
- Increase the separation between the equipment and receiver.
- Connect the equipment into an outlet on a circuit different from that to which the receiver is connected.
- Consult the dealer or an experienced radio/TV technician for help.
ELECTRICAL INFORMATION
Use this appliance only with the supplied AC Adaptor. Using non-approved power supplies will void the warranty.
Mains Supply: The mains operating voltage of the AC Adaptor is marked on a rating plate on the AC Adaptor.
The means of disconnecting this appliance from the mains supply is the AC adaptor. This should be unobstructed and readily operable at all times.
INDEX
INDEX
Important safety information ....1
Introduction 2
Unpacking 2
Controls & Connections 3
Fitting batteries 4
Display features 5
Backup battery 6
Getting started 7
Power control 7
Setting the time and date 7
Selecting a source 8
Adjusting the volume 8
Listening to FM radio 8
Radio presets 8
iPod dock and adaptors 9
Docking an iPod 10
Playing an iPod 10
Playing other audio sources ....11
Using the alarms 12
Advanced operation....13
Sleep function 16
Care & Maintenance....16
Troubleshooting 16
Specifications 16
Warranty 16
The CR-113iPH is a full-function clock radio with dual alarms and a retractable docking bay for an iPod or iPhone. Special features of the CR-113iPH enable it to share information with a docked iPod touch or iPhone (requires installation of a free Technika application on the iPhone).
PRELIMINARIES INTRODUCTIO
UNPACKING
Carefully unpack the unit. If it is damaged, please return it to your nearest Tesco store for replacement. Remember to take your purchase receipt with you.
Retain the User Handbook. If you pass the unit on to a third party make sure you pass on the handbook.
We suggest you retain the packaging. If you dispose of it, do so having regard to any recycling regulations in your area.
CONTENTS
The carton should contain:
The CR-113iPH clock radio•
AC adaptor•
Operating Manual•
If any items are missing or damaged, contact your nearest TESCO store for a replacement. Have your receipt ready when you call. Retain the packaging. If you dispose of it, do so having regard to any recycling regulations in your area.
LOCATION
Place the unit on dry stable surface away from heat and damp and where it is unlikely to fall or be knocked over.
If you plan to dock an iPod or iPhone to the unit, ensure that there is enough clearance for the retractable dock to open from the left side of the unit.
CONTROLS & CONNECTIONS
FRONT VIEW

① Display
② Preset button
③ Display/Memory button
④ Play/Pause/Enter button
⑤ Next/Set + button
⑥ Previous/Set - button
⑦ Alarm button
⑧ Time button
⑨ Sleep button
⑩ Retractable iPod dock
CONTROLS & CONNECTIONS
TOP VIEW BACK VIEW
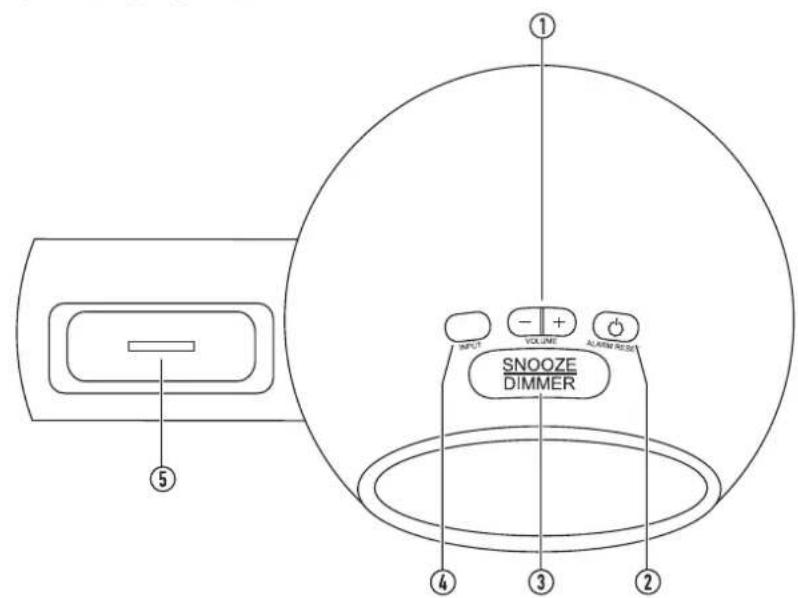
① Volume down (-) and up (+) buttons
② Standby/On/Alarm reset button
③ Snooze/Display dimmer button
④ Input function selector button
⑤ Retractable iPod dock

① 12/24 hour selector button
② Audio In jack
③ FM aerial wire
④ DC In jack
DISPLAY
DISPLAY LAYOUT

① Time display
② FM stereo indicator
③ MHz indicator for FM
④ Date/Alarm minutes time display
⑤ Sleep indicator
⑥ Temperature display*
⑦ Month/Alarm hours display
⑧ Weather display*
⑨ AM/PM indicator for alarm
⑩ AUX (Audio In) mode indicator
⑪ FM mode indicator
⑫ iPod/iPhone mode indicator
⑬ Alarm 2 indicator
⑭ Alarm 1 indicator
⑮ AM/PM Indicator for clock (12 hour mode)
*Features require a docked iPhone or iPod touch with Technika application installed.
DISPLAY DIMMER
The display brightness can be set to one of 3 levels.
- Press the SNOOZE/DIMMER button repeatedly to set the display brightness to one of the options of high, medium or off.
BACKUP BATTERY
A backup battery may be fitted to your clock radio. With the backup battery fitted, your clock radio will retain your time and alarm settings in the event of a power cut.
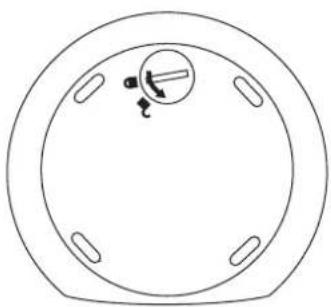
The backup battery compartment is located on the underside of the unit.
To fit a backup battery:
Referring to the drawing, use a coin or flat-bladed 1. screwdriver to turn the battery cover anti-clockwise to the 'unlocked' symbol.
natural_image
Simple line drawing of a circular mechanical component with a central knob and four side slots (no text or symbols)Lift out the battery cover.2.
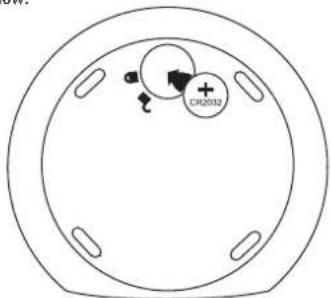
Fit a CR2032 battery, observing polarity as shown 3. below.
natural_image
Circular diagram with four corner slots and a central plus symbol, no text or labels presentReplace the battery cover with the slot aligned to the 4. unlock symbol.
Turn the cover to align the slot with the lock symbol to 5. lock it in place.
Battery disposal:
Dispose of used batteries with regard to the recycling regulations in your area. Do NOT short circuit batteries or throw them into water, the general rubbish or in a fire.
Weak batteries can leak and damage the unit. Replace them in good time!
GETTING STARTED
FM AERIAL
Before using your clock radio for FM reception, unwrap and fully extend the aerial wire. You may need to adjust the position of the aerial wire for maximum signal strength.
CONNECTING AC MAINS POWER
Before connecting the power, check that the mains voltage on the rating plate of the AC adaptor is the same as the voltage in your area.
Plug the DC cord from the AC adaptor into the DC jack on the back of the unit.
Plug the AC adaptor into the wall socket and switch the - mains power on.
The unit is now ready for use.
NOTE:- The AC adaptor may become warm during operation
- this is normal.
POWER CONTROL
STANDBY CONTROL
To turn the radio on:
- Press the ⏻/ALARM RESET button on the top panel. The unit will switch on and the iPod, FM or AUX function indicator will light to show the selected audio source.
To set the radio to Standby:
- Press the ⏻/ALARM RESET button on the top panel. The unit will set to Standby. All function indicators will switch off.
TIME AND DATE DISPLAYS
SETTING THE TIME AND DATE
When first switched on, the clock and date displays on your radio will not be set.
Choosing 12 or 24 hour clock time display:
- At any time you can press the 12/24 hr. button on the back panel to switch the clock display between 12 or 24 hour time display.
The clock and alarm displays will toggle between 12 hour (with AM and PM indicator) and 24 hour modes.
NOTE: changing between 12 and 24 hour display will not affect the clock or alarm settings.
To set the clock time:
• Press the TIME button briefly.
The hours digit will flash.
- Press the ▶▶/SET+ or ◀◀/SET- button to set the correct hour.
- Press the ▶II/ENTER button to confirm this setting.
The minutes digits will flash.
- Press the ▶▶/SET+ or ◀◀/SET- button to set the correct minutes.
- Press the ▶II/ENTER button to confirm this setting.
The clock is now set.
To set the date:
• Press and hold the TIME button.
The year digits will flash.
- Press the ▶▶/SET+ or ◀◀/SET- button to set the correct year.
- Press the ▶II/ENTER button to confirm this setting.
The month (left) digits will flash.
- Press the ▶▶/SET+ or ◀◀/SET- button to set the correct month.
- Press the ▶II/ENTER button to confirm this setting. The date (right) digits will flash.
- Press the ▶▶/SET+ or ◀◀/SET- button to set the correct date.
- Press the ▶II/ENTER button to confirm this setting. The date is now set.
SETTING THE TIME AND DATE USING THE TECHNIKA iPhone APPLICATION
The time, date and alarm settings for your clock radio can also be set via a Technika application for iPhone or iPod touch.
Once this application has been installed, you can set time, date and alarm settings into the application. When you next dock your iPhone to the clock radio, these settings will synchronise.
For more details of installing and using the Technika application, refer to the 'Advanced Operation' section on page 13.
SELECTING A SOURCE
SOUND SOURCES
You can choose to listen to the following sources -
• FM radio
- iPod (when docked)
- Aux source (when connected via the rear panel AUDIO IN jack).
Selecting a source:
- Press the INPUT button on the top panel repeatedly to scroll through the available sources.
The symbol for the selected source will light on the display.
ADJUSTING THE VOLUME
To increase the volume:
- Press the VOLUME + button on the top of the unit.
To decrease the volume:
- Press the VOLUME - button on the top of the unit.
When the volume is adjusted, the display will change to show the current volume level setting on a scale of 00 (minimum) to 30 (maximum).
LISTENING TO FM RADIO STAT
To listen to FM radio:
- Press the INPUT button repeatedly to select FM mode. The 'FM' mode indicator will light, the radio will play and the display will show the tuned frequency.
After a few seconds, the display will revert to show the time unless you change any FM settings, for example, re-tuning.
To auto-tune to FM stations
- Press and hold the ▶/SET+ or ◀/SET- button to auto-tune up or down the band.
The radio will search in the direction indicated and the tuning frequency will be displayed whilst searching.
When a usable station is detected the radio will stop tuning and play the station.
To manually tune to FM stations
- Press the ▶▶/SET+ or ◀◀/SET- button briefly to tune the band manually in 50kHz steps.
STEREO/MONO RECEPTION
When receiving a strong, good quality, FM stereo signal your radio will switch automatically to stereo reception.
The FM stereo symbol will be displayed.
When receiving weaker or FM mono signals, your radio will switch to mono reception.
The FM stereo symbol will not be displayed.
PRESETS
Radio presets
Your radio can store up to 20 of your favourite stations as presets for quick recall.
To store a station as a preset
Tune to the station you want to store as a preset.
• Press and hold the DISPLAY/MEMORY button.
The Preset Store display will appear (P- followed by a flashing number).
- Press the ▶▶/SET+ or ◀◀/SET- button if you want to choose a different preset number to store the station.
- To store the preset, press the DISPLAY/MEMORY button.
NOTE: If a preset is not stored within 5 seconds, the radio will revert to normal operation.
To recall any preset 1-20
- Press the PRESET button repeatedly to step through the preset stations stored.
When you stop browsing through the presets, the display will change briefly to show the station frequency before returning to display the time.
RETRACTABLE DOCK
This model features a retractable iPod/iPhone dock that is built-in to the left side of the unit.
To open the retractable dock:
Press the surface of the retractable dock.

natural_image
Line drawing of a hand touching a round digital clock with a hand pointing at it (no text or symbols present)The dock will unlock and pop open.
Pull the dock out fully before docking your iPod.

natural_image
Line drawing of a hand holding a digital timer next to a circular device with a digital clock (no text or symbols visible)To close the retractable dock::
Remove your iPod (if it is docked).
Press the retractable dock gently home.
The catch will click and the retractable dock will lock into • place.
iPod ADAPTORS
Before docking your iPod you must first check if your iPod has a docking connector. Early iPod models do not have one and cannot be docked to your unit. The docking connector is located on the base of the iPod as shown below.

Before docking your iPod, you must first fit the correct iPod adaptor to the docking bay. Each iPod adaptor matches the shape of a particular iPod and is necessary to ensure that your iPod is securely held when docked.

Fitting the iPod adaptor
When your iPod was new it may have been supplied with a standard dock adaptor in the packaging. If so, fit the adaptor by pressing it gently into the Docking Bay as shown above. NOTE: Do not dock an iPod without fitting the correct adaptor, you may damage the iPod and your unit.
If you don't have a dock adaptor
If your iPod was not supplied with a standard dock adaptor, or if you have lost the adaptor, you can buy one from Apple on-line. To determine the exact model of your iPod, refer to this web-link - http://support.apple.com/kb/HT1353. You can then browse the iPod accessories page on the Apple website to find an adaptor for your iPod model that can be purchased on-line.
DOCKING AN iPod
To dock your iPhone or iPod:
Open the retractable dock as described on the previous page.
Check that the correct iPod adaptor is fitted to the docking bay.
- Locate the iPod on the Docking Connector and press it gently home.
To remove your iPod from the dock:
Grip the iPod at the sides.
Lift the iPod gently from the dock.
Close the retractable dock.
CHARGING AN iPod
When an iPod is docked, the iPod will begin to charge automatically and will continue to charge when the unit is set to Standby.
PLAYING MUSIC FROM ANiPod
To play a docked iPod:
- Press the INPUT button repeatedly to select iPod function mode.
The iPod indicator will show on the display.
Navigate to the music you want to play using the controls • on the iPod.
Once an iPhone is docked and playing, you can operate some of the functions from the front panel controls.
Playback functions:
- Press the ▶II/ENTER button to toggle between Play and Pause mode at any time.
- Press the ▶▶/SET+ or ◀◀/SET- button to select the next or previous track on your iPod.
iPhone/iPod touch
To play a docked iPhone/iPod touch:
- Unlock the iPhone if necessary.
For first time use the message 'Application Not Installed' will be displayed on the iPhone screen.
The Technika application is necessary to enable advanced features of the unit.
For more details of the advanced features enabled with the application installed, refer to the Advanced Operation'section on page 13.

- If you want to download the application from iTunes, touch 'Yes' and follow the prompts on the iPhone screen.
- If you want to download the application later, touch 'No' on the iPhone screen.
Playing music:
- Select iPod operation from the iPhone menu.
• Navigate to your choice of music.
Once an iPhone is docked and playing, you can operate some of the functions from the front panel controls.
Playback functions:
- Press the ▶II/ENTER button to toggle between Play and Pause mode at any time.
- Press the ▶▶/SET+ or ◀◀/SET- button to select the next or previous track on your iPod.
CONNECTING AUDIO SOURCES TO THE AUDIO IN JACK
The AUDIO IN jack may be used to connect sound sources with a Line or Headphone analogue output to play through your unit. These may include -
iPod models that cannot be docked to the unit-
iPod Shuffle•
MP3 players•
CD walkman players•
Tape walkman players•
Personal computers or laptops
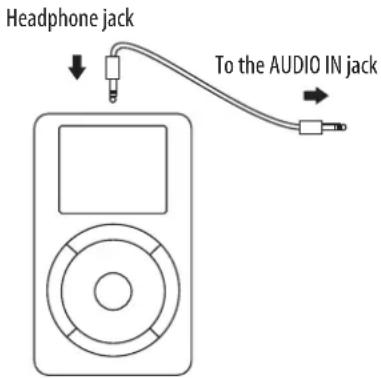
Connecting to the AUDIO IN jack
Connect a stereo 3.5mm jack cable (not supplied) • between the headphone or LINE/AUX jack of the personal audio player and the AUDIO IN jack on the back panel.
Playing the AUDIO source
- Press the INPUT button repeatedly to select AUX mode.
The AUX symbol will be displayed.
Set your personal audio player/computer to PLAY.
- Set the listening volume to the level you want with the volume controls on the radio or remote control.
If there is no sound or if the volume level is not loud enough, you may need to increase the volume setting on your personal audio player/computer.
NOTE:- The volume control of the iPod must be turned up when playing through the AUDIO IN jack.
NOTE:- An iPod connected to the AUDIO IN jack cannot be operated from the controls of your clock radio.
USING THE ALARMS
Your clock radio has two alarms (Alarm 1 and Alarm 2). You can set either or both alarms to wake you at your preferred time and choose to wake up to the sound of radio, music from an iPod or a buzzer.
Setting the Alarm 1 alarm time:
• Press and hold the ALARM button.
The Alarm 1 indicator will light and the hours digit will flash.
- Press the ▶▶/SET+ or ◀◀/SET- button to set the correct alarm hour.
Press the 2. ▶II/ENTER button to confirm this setting.
The minutes digits will flash.
- Press the ▶▶/SET+ or ◀◀/SET- button to set the correct alarm minutes.
Press the 4. ▶II/ENTER button to confirm this setting.
The current alarm wake-up mode will flash.
- Press the ▶▶/SET+ or ◀◀/SET- button to select the wake-up mode you want from the options of - FM, iPod or Buzzer.
Press the 6. ▶II/ENTER button to confirm this setting.
Alarm 1 time is now set.
Setting the Alarm 2 alarm time:
• Press and hold the ALARM button.
The Alarm 1 indicator will light and the hours digit will flash.
• Press the ALARM button briefly.
The Alarm 2 indicator will light and the hours digit will flash.
Follow steps 1 - 6 above to set the Alarm 2 hour, minute • and Alarm mode.
Checking the alarm time:
- Press the DISPLAY/MEMORY button repeatedly to change the display in the sequence -
Alarm 1 time check.
The Alarm 1 indicator will light and the Alarm 1 time setting will be displayed.
Alarm 2 time check.
The Alarm 2 indicator will light and the Alarm 2 time setting will be displayed.
- Return to time/date display.
NOTE: The time check displays will cancel after 5 seconds.
Setting the alarm to wake you:
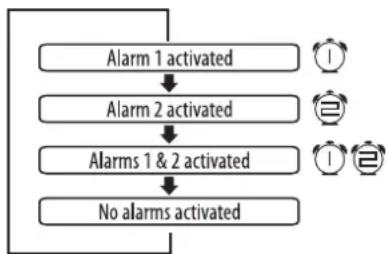
- Press the ALARM button repeatedly to set Alarm 1, Alarm 2 or both alarms to wake you as required or to.
- Press the MEM/ALARM button repeatedly to scroll through the wake-up options on the display -
flowchart
graph TD
    A["Alarm 1 activated"] --> B["Alarm 2 activated"]
    B --> C["Alarms 1 & 2 activated"]
    C --> D["No alarms activated"]
The indicators shown next to each option will light on the display to confirm the mode that is set.
IMPORTANT NOTES:
- Remember to set the unit to Standby before going to bed. If you have chosen FM radio as wake-up mode, remember - to tune to a station.
- If you have chosen iPod as wake-up mode, remember to dock your iPod and set the volume to a level that will wake you before going to bed. If you forget to dock your iPod and the alarm is set, the unit will automatically wake you with a buzzer.
WHEN THE ALARM WAKES YOU
The alarm will sound at your preset time and the Alarm Mode display will flash. The volume will gradually increase in level. You can then choose to set snooze, which will temporarily reset the alarm for a further 10 minutes, or to switch it off.
To set snooze:
- To set snooze, press the SNOOZE/DIMMER button when the alarm sounds.
The alarm will stop sounding and the alarm indicator will flash. After 10 minutes, the alarm will sound again.
To switch off the alarm:
- To switch off the alarm, press the ALARM RESET button.
The unit will set to Standby.
ALARM REPEAT
The alarm(s) will sound at the same time each day when set.
ADVANCED OPERATION
The advanced features are enabled when an iPhone or iPod touch with Technika application running is docked to the unit (iPhone in this section also applies to iPod touch).
Advanced features -
Weather and temperature display
Automatic clock setting via the iPhone application
Alarm setting via the iPhone application•
Radio operation via the iPhone application
Installing the application:
The Technika application must be installed on the iPhone to enable the advanced features.
- Press the INPUT button repeatedly to select iPod function mode.
Dock the iPhone.
Unlock the iPhone if necessary.
If the application has not been installed, the message 'Application Not Installed' will be displayed on the iPhone
screen.

- Touch 'Yes' and follow the prompts on the iPhone screen to download the application from iTunes and install it.
USING THE APPLICATION
Running the application:
NOTE: The iPhone does not have to be docked to run the application.
• Find the 'Technika' application icon on your iPhone.
• Touch the application to start it.
NOTE: Advanced features will only be available when the iPhone is docked with the application running.
Setting the Clock, Date and your home location for Weather:
- Dock your iPhone with the application running.
When you dock your iPhone for the first time you will see the message - 'Would you like to use your current location'. - Touch 'OK' to retireve your current location.
Once this has been set, the time, date, weather and temperature displays of your clock radio will synchronise with the latest information available from the iPhone.
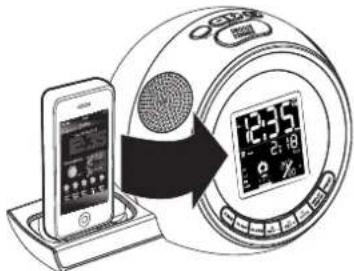
TIP: Remember that the Technika application will run on your iPhone when it is not docked to display time, date and weather information.
Choosing an application function:
- Touch one of the icons located at the bottom of the screen to select the function you want.
Application help

Application help:
If you need help with using the application, touch the help icon at the top of the screen.
There are several help screens available, scroll to reveal them.
Touch the ⬤ icon to exit the help screens.
ADVANCED OPERATION
CLOCK FUNCTION:
If the application is running on an iPhone that is docked, the time, date and weather settings of your clock radio will be automatically updated.
With the clock function selected, you can also choose to set either or both of the alarms.
Setting the alarms via the application:
Touch the Clock icon to open the clock screen.

Alarm setting icon1.
Time and date displays2.
Alarm time displays3.
Location and weather summary4.
Setting the alarms via the application:
NOTE: When an iPhone is docked and the Technika application is running, alarm settings made in the application will override alarm settings made on your clock radio.
To set alarm times and wake-up music:
From the clock display screen, touch the alarm setting icon to open the alarm setting screen.
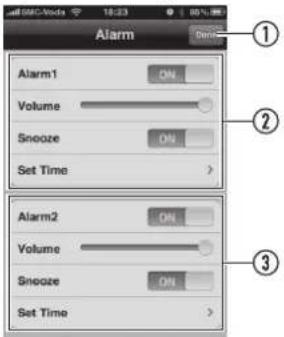
Done icon, touch to exit alarm setting1.
Alarm 1 setting area2.
Alarm 2 setting area3.
- From this screen you can switch each alarm on or off, set the wake-up volume and choose to activate snooze mode.
- Touch the set time banner to open a sub-screen that enables you to set the alarm time and day(s) and to select wake-up music from your iPhone.
When the time is set, press the 'DONE' icon to return to the main alarm setting screen.
- When you have finished changing all alarm settings, press the 'DONE' icon to return to the clock screen.
NOTE: When the iPhone is docked and the alarms are set through the application, the wake-up mode will always be the music you selected from the iPhone.
WEATHER FUNCTION:
- Touch the Weather icon to launch the weather application.
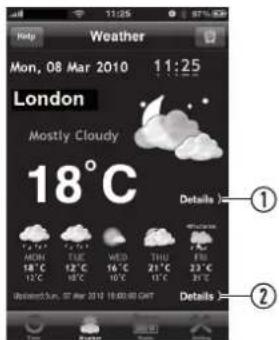
- More detail of the current weather
- Weather forecast
From the weather screen you can choose sub-screens that display detailed information of the current weather condition or a weather forecast.
From the detail sub-screens, touch the '< Back' icon to return to the main weather display screen.
ADVANCED OPERATION
RADIO FUNCTION:
Select the Radio function from the application menu at the bottom of the screen.
The radio screen will be displayed.
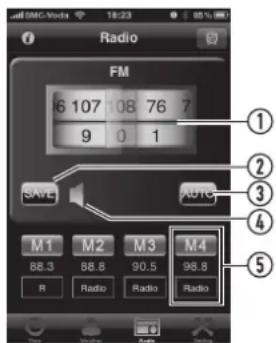
Scroll here to tune the radio (108.0 MHz 1. shown in this example)
Touch here to store a station preset2. Touch here to scan for a station3.
Scroll here to change the radio volume4.
Touch to select a radio preset5.
You can now operate many functions of your clock radio from the iPhone screen, tuning for stations and storing presets. In addition, you can assign the presets names for easier selection.
Auto tuning/preset storing:
Touch the AUTO icon to scan for stations and store any • stations found in the application preset locations.
NOTE: The presets stored by the application are separate and additional to those stored from the control panel.
Manual tuning:
Scroll the frequency wheel to manually tune a station. The upper half of the wheel sets tuning in 1MHz steps, the lower half in 0.1MHz steps.
For example, to tune 105.5MHz, set the upper wheel to 105, the lower wheel to 5.
Both the iPhone display and the clock radio display will tune.
Storing a station as a preset:
NOTE: If you know the station frequencies of your favourite stations, you can enter the frequencies into the application and store them as presets before docking your iPhone.
Tune to the station you want to store.
Touch the SAVE icon.
Choose a preset number to store this station (touch the • M1, M2.... etc icon).
The station will be stored.
NOTE: You can scroll the preset bar to reveal more preset numbers (up to 20) if required.
Naming preset stations:
You can name preset stations stored on your iPhone.
Touch the text box below the preset number you want to rename.
The text entry keypad will appear.
Enter the preset name.
APPLICATION SETTINGS:
From the Application setting screen you can choose the following settings -
Flash colon: Set to 'ON' for a flashing colon on the clock display.
Brightness: Set the display brightness for the application (useful to make the display dimmer when docked at night).
24 Hour Mode: Set the clock mode to your preference of 24 hour or 12 hour display.
Temperature unit: Choose to set the temperature display units to your preference of Centigrade or Fahrenheit.
Auto-Lock: When set to 'ON' with the application running the iPhone will lock automatically after 1 minute of inactivity. When set to 'OFF' the iPhone will not lock while the application is running.
NOTE: When Auto-Lock is set to 'OFF' the iPhone display will stay permanently lit when the application is running.
Sure Alarm: If Sure Alarm is enabled, the alarms will still operate if Auto-Lock has locked the iPhone.
NOTE: Setting Sure Alarm 'On' is recommended if you plan to use the alarm functions in the Technika application.
SLEEP FUNCTION
SLEEP TIMER
You can set the Sleep timer to play music for a set period while you are falling asleep.
To set the sleep timer:
Play your choice of music.
- Press the SNOOZE/SLEEP button repeatedly to cycle through the sleep time options from 10 minutes to 90 minutes in 10 minute intervals. Pressing once more beyond the 90 minute setting will cancel Sleep mode.
When Sleep mode is set the Sleep indicator will be displayed and the music will continue to play for the time you selected. The unit will then set to Standby.

Checking the sleep time remaining:
- If you want to check the sleep time remaining during the sleep period, press the SLEEP button.
Cancelling sleep mode:
• To cancel Sleep mode, set the unit to Standby.
CARE AND MAINTENANCE W
CARE AND CLEANING
All care and cleaning operations should be carried out with the unit unplugged from the mains power.
The surface of the unit can be cleaned with a barely damp cloth and then dried carefully. Never use abrasives, abrasive cloths or chemical solvents.
TROUBLESHOOTING
Poor quality radio reception
The aerial signal may not be adequate. Try repositioning the aerial wire (FM) or loop aerial (AM).
Alarm not sounding
Check that you have set the correct alarm time, and set the alarm to wake you (wake-up mode symbol(s) will be displayed). Check also that the unit is set to Standby before you go to bed.
If you have docked an iPhone with the application running, check that the application settings are correctly made in the application.
No sound/low volume from AUDIO IN source:
Check that the volume control is turned up on the AUX source.
No display:
The display dimmer may have been set to low (no backlight). Press the SNOOZE/DIMMER button to restore the backlight.
ANTY & SPECIFICATIONS
SPECIFICATIONS
Supply Voltage: 5V +1.2A
AC Adaptor input: 100-240V \~, 50/60Hz, 0.2A
AC Adaptor output: .... 5V 1.2A
Frequency range: 76-108MHz
Net Weight: ....kg


UK: Waste electrical products/batteries should not be disposed of with household waste. Separate disposal facilities exist, for your nearest facilities see www.recycle-more.co.uk or in-store for details.
ROI: Produced after 13th August 2005. Waste electrical products/batteries should not be disposed of with household waste. Please recycle where facilities exist. Check with your Local Authority or retailer for recycling advice.
WARRANTY
Your Tesco appliance is covered by a warranty for 12 months from the date of purchase. If a fault develops during this period, please contact the TESCO electrical help line on 0845 456 6767. Please have your original purchase receipt with you when you call. This warranty in no way affects your consumer rights.
Technika
Tesco Stores Ltd,
Delaware Road, Cheshunt, Herts, EN8 9SL

Technika Helpline: 0845 456 6767 (Calls cost up to 4p per minute from a BT landline, other providers may vary)
CR113IPH V0
- Owner's Handbook
- IMPORTANT SAFETY INFORMATION
- CAUTION!
- TO REDUCE THE RISK OF ELECTRIC SHOCK DO NOT REMOVE COVER (OR BACK)
- IMPORTANT
- ELECTRICAL INFORMATION
- INDEX
- PRELIMINARIES INTRODUCTIO
- UNPACKING
- CONTENTS
- LOCATION
- CONTROLS & CONNECTIONS
- DISPLAY
- DISPLAY DIMMER
- BACKUP BATTERY
- To fit a backup battery:
- Battery disposal:
- GETTING STARTED
- FM AERIAL
- CONNECTING AC MAINS POWER
- POWER CONTROL
- STANDBY CONTROL
- To turn the radio on:
- To set the radio to Standby:
- TIME AND DATE DISPLAYS
- SETTING THE TIME AND DATE
- Choosing 12 or 24 hour clock time display:
- To set the clock time:
- To set the date:
- SETTING THE TIME AND DATE USING THE TECHNIKA iPhone APPLICATION
- SELECTING A SOURCE
- SOUND SOURCES
- Selecting a source:
- ADJUSTING THE VOLUME
- To increase the volume:
- To decrease the volume:
- LISTENING TO FM RADIO STAT
- To listen to FM radio:
- To auto-tune to FM stations
- To manually tune to FM stations
- STEREO/MONO RECEPTION
- PRESETS
- Radio presets
- To store a station as a preset
- To recall any preset 1-20
- RETRACTABLE DOCK
- To open the retractable dock:
- To close the retractable dock::
- iPod ADAPTORS
- Fitting the iPod adaptor
- If you don't have a dock adaptor
- DOCKING AN iPod
- To dock your iPhone or iPod:
- To remove your iPod from the dock:
- CHARGING AN iPod
- PLAYING MUSIC FROM ANiPod
- To play a docked iPod:
- Playback functions:
- iPhone/iPod touch
- To play a docked iPhone/iPod touch:
- Playing music:
- CONNECTING AUDIO SOURCES TO THE AUDIO IN JACK
- Connecting to the AUDIO IN jack
- Playing the AUDIO source
- USING THE ALARMS
- Setting the Alarm 1 alarm time:
- Setting the Alarm 2 alarm time:
- Checking the alarm time:
- Setting the alarm to wake you:
- IMPORTANT NOTES:
- WHEN THE ALARM WAKES YOU
- To set snooze:
- To switch off the alarm:
- ALARM REPEAT
- ADVANCED OPERATION
- Installing the application:
- USING THE APPLICATION
- Running the application:
- Setting the Clock, Date and your home location for Weather:
- Choosing an application function:
- Application help:
- CLOCK FUNCTION:
- Setting the alarms via the application:
- To set alarm times and wake-up music:
- WEATHER FUNCTION:
- RADIO FUNCTION:
- Auto tuning/preset storing:
- Manual tuning:
- Storing a station as a preset:
- Naming preset stations:
- APPLICATION SETTINGS:
- SLEEP FUNCTION
- SLEEP TIMER
- To set the sleep timer:
- Checking the sleep time remaining:
- Cancelling sleep mode:
- CARE AND MAINTENANCE W
- CARE AND CLEANING
- TROUBLESHOOTING
- Poor quality radio reception
- Alarm not sounding
- No sound/low volume from AUDIO IN source:
- No display:
- ANTY & SPECIFICATIONS
- SPECIFICATIONS
- WARRANTY
- Technika
Brand : Technika
Model : CR-113iPH
Category : Alarm Clock