
1411R - Television MATSUI - Free user manual and instructions
Find the device manual for free 1411R MATSUI in PDF.


| Product Type | Television |
| Brand | Matsui |
| Model | 1411R |
| Display Technology | CRT |
| Screen Size | 14 inches (diagonal) |
| Dimensions (with stand) | Approx. 360 x 380 x 400 mm (W x H x D) |
| Weight | Approx. 12 kg |
| Power Supply | AC 220-240V, 50Hz |
| Power Consumption | 65 W (typical) |
| Remote Control | Included (infrared) |
| Input Connectors | SCART, RF (antenna) |
| Output Connectors | Headphone jack (3.5 mm) |
| Audio System | Mono speaker, 2 W |
| Channel Coverage | VHF/UHF (analog) |
| Preset Channels | Up to 99 |
| On-Screen Display | Yes (OSD) |
| Sleep Timer | Yes (adjustable) |
| Child Lock | Yes |
| Cleaning Instructions | Wipe with soft dry cloth; do not use liquid cleaners |
| Spare Parts Availability | Remote control, power cord, stand; contact manufacturer |
| Manual Language | English (PDF download) |
Frequently Asked Questions - 1411R MATSUI
User questions about 1411R MATSUI
0 question about this device. Answer the ones you know or ask your own.
Ask a new question about this device
Download the instructions for your Television in PDF format for free! Find your manual 1411R - MATSUI and take your electronic device back in hand. On this page are published all the documents necessary for the use of your device. 1411R by MATSUI.
USER MANUAL 1411R MATSUI
REMOTE CONTROL COLOUR TELEVISION
14" (V 34cm)
MATSUI 1411 R SERIES
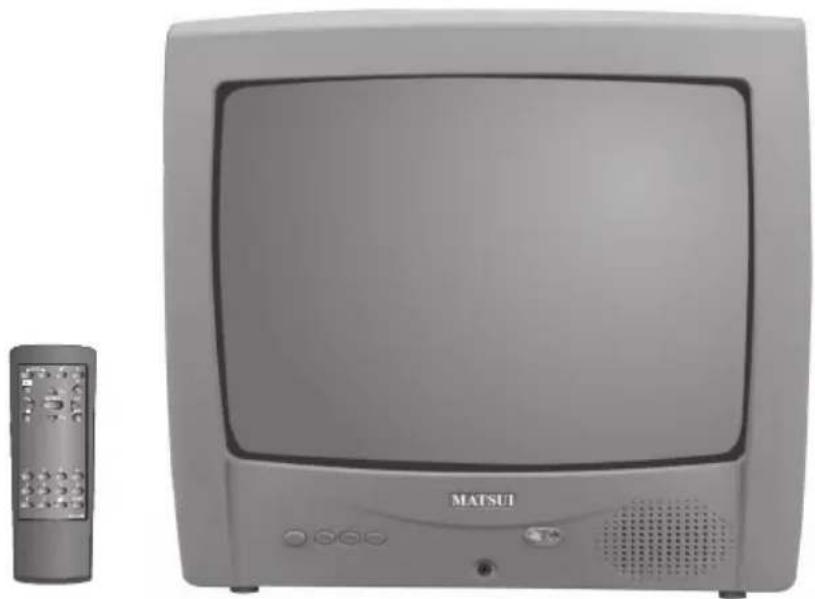
natural_image
Exterior view of a gray MATSUI CRT television set with a remote control unit (no visible text or symbols on the device body)Before operating the unit, please read this manual thoroughly.
Contents
Introduction 2
Nominal Specifications 2
Safety Precautions 3
Mains Supply.... 3
Installation 4
Aerial Connection 4
Peripheral Connections 4
Remote Control. 4
Switching On the TV 5
Stand-By.... 5
Tuning the TV Stations. 5
TV Operation. 6
On-Screen Display 6
Selecting TV Stations 6
Volume Control 6
Mute 6
Sleep Timer 6
Volume and Picture Settings 6
Troubleshooting.... 7
Reception 7
Introduction
Before Using Your Television
Read this instruction Book. It contains detailed information on the operation and care of your new television. When you have read the instructions, keep them carefully for future reference.
Keep the purchase receipt with this book for future reference.
Features
- Can memorize 99 programs.
- UHF-band tuner. (depending on model).
- Automatic program search.
- Automatic program memory.
- On-screen menu for easy operation.
- Teletext (depending on model).
- Automatic on/off functions.
- Sleep function up to 90 minutes.
- Headphone connection (3.5-mm jack with speaker disconnector).
- SCART socket.
- Infrared remote control.
- Child lock.
Specifications
Power supply:
220 / 240V 50Hz.
AC Power consumption:
- 14" / 17": 35 W.
- Audio Output Power: 1 W.
- Weight: (Without accessories).
$$ 1 4 ^ {\prime \prime} = 9. 5 \mathrm{Kg}. $$
- Dimensions (WxHxD):
$$ 1 4 ^ {\prime \prime} = 3 5 4 \times 3 2 0 \times 3 7 0 \mathrm{mm}. $$
Accessories:
- Remote control.
- Antenna.
- Batteries: 2 x RC6.
Weight and Dimensions are approximate.
Because we continually strive to improve our products we may change specifications and designs prior notice.
Safety Precautions
Read the safety and Operating Instructions carefully. Keep them safe and retain them for future reference.
- Damage: Never use your TV if it is damaged in any way. Always place your TV on a flat level surface avoiding anywhere which may be subject to strong vibration
- Weather: It is advisable to unplug the aerial during an electrical storm.
- Moisture: Do not allow your TV to be exposed to rain, moisture, dust. If any liquid is spilt into your TV it can cause serious damage. If you spill any liquid into your TV switch it off at the mains immediately. Contact your store.
- Interference: Do not place your TV on or near appliances which may cause electromagnetic interference (TV or Hi-Fi speakers). If you do, it may adversely affect the working of the unit, and cause a distorted picture or sound.
- Temperature: Avoid extremes of temperature, either hot or cold, place your TV well away from heat sources such as radiators or gas / electric fires.
- Ventillation: The TV must be well ventilated. Do not cover your TV or position in a small confined spaces. It is recommended that you leave a 10 cm gap all around your TV.
- Batteries: Batteries are easily swallowed by young children. Do not allow young children to play with the remote control unit.
- Covers: Do not remove any fixed covers as this may expose dangerous voltages.
- Standby: Do not leave your TV in standby for long periods of time e.g. overnight or while on holiday.
Mains Supply
This unit is designed to operate from an AC 240V 50Hz household mains supply.
This unit is supplied with an approved 13 amp (BS 1363) fuse mains plug.
When replacing the fuse, always use a 5 amp (BS 1362) approved type.
Never use this plug if the fuse cover is missing.
To obtain a replacement fuse, cover contact your store.
If the mains sockets in your home differ or are not suitable for the type of plug supplied, then the plug should be cut from the mains lead and a suitable type fitted. Please refer to the wiring instructions on this page.
Warning!
If the mains plug is cut from the mains lead of this appliance, the plug must be destroyed. A mains plug with bare wires is hazardous if engaged in a mains output line socket.
You must use a 13 amp plug (BS 1363) and fit a 5 amp fuse (BS 1362). If any other type of plug is used, a 5 amp fuse must be fitted, either in the plug adaptor or at the distribution board.

natural_image
3D rendering of a mechanical component with a lever and base (no text or symbols visible)Note: When you replace the fuse, open the fuse cover with a screwdriver.
Wiring Instructions
The wires in the mains lead are coloured in accordance with the following code:
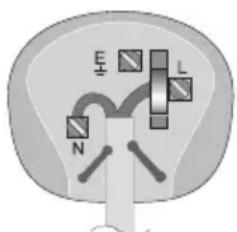
As the colours of the wires in the mains lead of the appliance may not correspond with the coloured markings identifying the terminals in your plug, proceed as follows:
- The wire which is coloured Blue must be connected to the terminal which is marked with the letter N or coloured black.
- The wire which is coloured Brown must be connected to the terminal which is marked with the letter L or coloured red.
- No connection is to be made to the Earth terminal

Installation
Follow these step-by-step instructions:
• Always place the TV on a solid base leaving at least 5 cm around each side for ventilation.
- Ensure that the mains voltage is correct and that the plug on the TV mains lead is in the mains supply socket properly.
- Please refer to the Safety Precautions on Page 1.

Aerial Connection
Insert the main aerial into the 75 ohm socket 7 at the back of the TV.
Loop aerial: Supplied only for 14" sets.
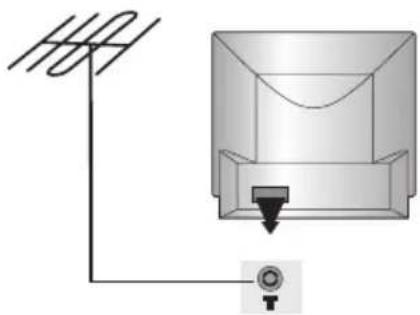
natural_image
Diagram of a mechanical or electrical component with an antenna and a control knob (no text or symbols)Reception quality of any, or all channels, will depend on whether you are using the loop or an outside / loft aerial installation.
Satisfactory reception using the loop aerial will depend on a number of factors such as location of your home in relation to the transmitter and the distance from it.
If you cannot obtain satisfactory reception using the loop aerial, assuming you have tuned in the correct channels for your area, you should contact a local professional aerial contractor, who can advise you on reception conditions.
Please note if your TV has Teletext, and you are using the loop aerial, you may appear to be able to receive satisfactory TV pictures but text information could be erratic.
Peripheral Connections
Aerial connection
You can connect your Video Recorder or other equipment via the aerial connection on the back of the TV.
- Unplug the aerial plug from your TV and insert it into the aerial input 7Γ of your equipment.
- Connect another aerial plug to the output of your equipment, connect the other side to the aerial input 7Γ of your TV.
- Switch on your equipment.
- Check in the handbook of the particular equipment to see what the test signal looks like.
- Now, refer to the section Storing TV channels to search for and store this signal on a programme number. After that, you can receive signals from your equipment on this programme number.
- Tune the video in on program 99.

Remote Control
The remote control handset is powered by RC6 Batteries or equivalent.
Lift the battery cover off the handset (see diagram) and insert the batteries, taking care to observe the correct polarity as marked inside the battery compartment.

natural_image
Diagram showing two views of a remote control casing with battery plates and a downward arrow indicating a component (no text or symbols present)Remote Control
The life of the batteries is approximately one year but this may vary depending on atmospheric conditions and amount of use. Even if they are not used, batteries lose power and they should be changed at least once a year regardless of use.
Note: Weak batteries can leak and severely damage the handset. Always remove the batteries when they become weak and if the response from the handset becomes erratic or if the handset is not used for a period of time.
Note: For the best effect, the handset should be pointed directly at the TV.
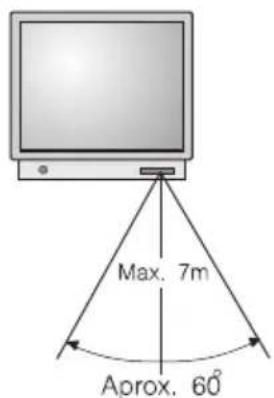
Switching on the TV
- Press the on button marked ☑ on the front of the set. The TV set will switch on or go into stand-by mode.
- If the TV is in stand-by mode, the red stand-by indicator light will come on.
- Press ▲ P+ or ▼-, or a channel number button on the remote control to switch on the TV.

natural_image
Illustration of a hand pointing at a computer monitor (no text or symbols visible)Stand-By
By pressing ☐ on the remote control you can switch the TV to Stand-by. The red stand-by light on the front of TV will light.
Press ▲ P+ or ▼- or a channel number button on the remote control to switch on the TV again.
Tuning the TV stations
Your new television has the capacity to store up to 99 pre-set stations.
It may be useful to write down the channel numbers you have assigned to each TV station.
For example: 1=BBC1, 2=BBC2, 3=ITV, 4=CH4, etc.
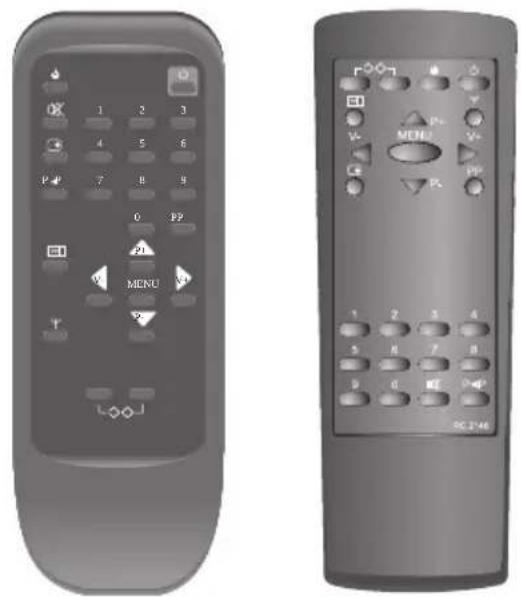
natural_image
Two remote control devices shown from different angles (no text or symbols visible)Please follow these steps:
- Press together. Channel Number will flash on-screen.
- Press ▶▶, the tuning bar will be displayed on screen and the Auto-Tuning sequence will start.
- If you want to continue searching for a specific TV station, press ▶ again until the set tunes into your required station.
- Press ▲ P+ or ▼- or the required channel number (0 to 99). The selected program number is displayed on the screen.
- Press ➞ together to store the selection.
- Repeat these steps to store any other TV stations you require.
TV Operation TV Operation
Please follow these steps:
On-Screen Display
The On-Screen Display information allows you to see the channel number on which the TV station is stored and the timer status.
- Press + for on-screen display information.
- Press + to switch off on-screen display.

Selecting TV stations
- Press ▲ P+ or ▼ P- or the required channel number on the remote control handset or + (up) or - (down) on the TV set.
- If you require a two digit channel on the remote (10 to 99) you must press the second digit within 4 seconds.

- The Scart/AV Socket at the rear can be used to connect other equipment to the set. This input is selected by pressing "0".
• P◀P: Change to previous channel.

Note: that Channel "0" is the AV channel and therefore cannot be tuned in the same way as Channels 1-99.
Picture Controls
- Press MENU to select Brightness, Contrast, Colour or Sharpness.
- Use the ◀ V- or ▶+ buttons to adjust to your preference.
- If you want to leave the menu at any time continue to press the MENU button until the display disappears. The menu will also automatically disappear after 15 seconds.
Volume Control

- To adjust the volume. Press ◀ V- or ▶ V+ buttons on the remote control.
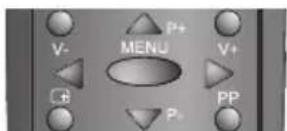
Mute
- Press once to turn off the sound.
- Press ✗ again to restore the sound.

Sleep Timer
With this feature you can select a time period after which the TV switches automatically to Stand-By mode.
- Press ↓ until the required time period is displayed on the screen. This time period can be set in steps of 15 minutes starting from 90 minutes downwards.
The countdown starts immediately after the time period is selected. You can see the remaining time by pressing
- During the final minute of the selected time period, the seconds remaining begin to count down on the screen, informing you that the TV is going to switch off. At the end of this time period the TV switches to Stand-by mode. - If you want to stop the "Sleep Timer", press ⏻ until the selected time period displayed on the screen is "00".
Volume and Picture Settings
The Volume and Picture Levels on your TV are set by

the factory to give an ideal picture and sound quality. If you want to change the initial factory levels to your selected levels, after adjusting the controls, press the ➡️ buttons twice to store them. You must press and hold these two buttons together.
The first press will bring up the channel number which will flash.
The second press will bring up the channel no. again as confirmation.

To restore: Automatically when switching on the TV, or when P P button is pressed.
Note: To adjust picture or volume you can use also P/ △ (menu), and + / - buttons on the TV set.
Troubleshooting
If you have difficulty in setting up your new television you can call the Helpline (see cover). If they are unable to resolve your problem over the phone, just call the Dealer, or Mail order company where you bought this product, telling them the model number and what seems to be wrong.
In the event of problems recurring, check the following before seeking service.
| Symptoms | Check these items and try these adjustments |
| No picture, no sound. | Be sure power cord is plugged in.Be sure TV is switched “ON”.Try another channel (station trouble).Check aerial connections (back of TV).Check aerial for broken wire in lead.Check outside aerial. |
| Sound OK, poor picture.Picture blurred. Check aerial connections (back of TV).Lines or streaks in picture.Poor reception on some channels. | Try another channel (station trouble).Check aerial for broken wire in lead.Check outside aerial.Check for local interference. |
| Picture OK, poor sound. | Try another channel (station trouble).Check for local interference. |
| Picture rolls vertically. | Try another channel (station trouble).Check for local interference. |
| No colour.Poor colour. Check aerial connections (back of TV). | Try another channel (station trouble).Check aerial for broken wire in lead. |
| Remote Control does not work. | Check your batteries.Refer to the instruction book for operation range. |
Reception
Ignition
Black spots and horizontal streaks may appear, the picture may flutter or drift. This is usually caused by interference from car ignition systems, neon lamps, electric drills and other electrical appliances.
Ghosting
Ghosting is caused by the TV signal following two paths. One is the direct path and the other is reflected from tall buildings, hills or similar obstruction.
Changing the direction and/or position of the aerial may improve reception.
Snow
If your TV is located on the fringe area of a TV station, where the signal is weak, your picture may be affected by the appearance of small dots (Snow). It may be necessary to install a stronger aerial to improve the picture.
Radio Frequency Interference
This kind of interference produces moving ripples or diagonal streaks and in some cases loss of contrast in the picture.
- REMOTE CONTROL COLOUR TELEVISION
- Contents
- Introduction
- Before Using Your Television
- Features
- Specifications
- Safety Precautions
- Mains Supply
- Warning!
- Wiring Instructions
- Installation
- Aerial Connection
- Peripheral Connections
- Remote Control
- Switching on the TV
- Stand-By
- Tuning the TV stations
- TV Operation TV Operation
- On-Screen Display
- Selecting TV stations
- Picture Controls
- Volume Control
- Mute
- Sleep Timer
- Volume and Picture Settings
- Troubleshooting
- Reception
- Ignition
- Ghosting
- Snow
- Radio Frequency Interference
Brand : MATSUI
Model : 1411R
Category : Television