
M51SPB - Lawn mower COBRA - Free user manual and instructions
Find the device manual for free M51SPB COBRA in PDF.


| Product Type | Lawn Mower |
| Brand | Cobra |
| Model | M51SPB |
| Engine Type | 4-Stroke Petrol |
| Cutting Width | 51 cm (20 inches) |
| Grass Bag Capacity | 60 liters |
| Cutting Height Adjustment | 6 positions, 25-75 mm |
| Drive System | Self-Propelled (Rear Wheel) |
| Weight (approx.) | 28 kg |
| Dimensions (LxWxH) | 140 x 50 x 100 cm |
| Fuel Tank Capacity | 0.8 liters |
| Oil Capacity | 0.5 liters |
| Safety Features | Operator Presence Control (Safety Brake) |
| Mulching Capability | Yes (mulch plug included) |
| Side Discharge | Available with optional side chute |
| Handle Type | Folding for compact storage |
| Maintenance | Regular blade sharpening, engine oil change, air filter cleaning |
| Spare Parts Availability | Blades, belts, spark plugs, air filters available |
| Warranty | 2 years (check local terms) |
Frequently Asked Questions - M51SPB COBRA
User questions about M51SPB COBRA
0 question about this device. Answer the ones you know or ask your own.
Ask a new question about this device
Download the instructions for your Lawn mower in PDF format for free! Find your manual M51SPB - COBRA and take your electronic device back in hand. On this page are published all the documents necessary for the use of your device. M51SPB by COBRA.
USER MANUAL M51SPB COBRA
Henton and Chattell Ltd., London Road, Nottingham NG2 3HW UK
www.cobragarden.co.uk
CONTENTS
SECTION 1 SYMBOLS MARKED ON THE PRODUCT.... 3
SECTION 2 GENERAL SAFETY RULES.... 3
SECTION 3 PARTS DESCRIPTION.... 6
SECTION 4 TECHNICAL DATA....6
SECTION 5 ASSEMBLY....7
SECTION 6 "3 IN 1" 8
SECTION 7 OPERATION INSTRUCTIONS ...... 9
SECTION 8 MAINTENANCE INSTRUCTIONS.... 12
SECTION 9 LUBRICATION.... 12
SECTION 10 CLEANING.... 12
SECTION 11 STORAGE INSTRUCTIONS (OFF SEASON).... 14
SECTION 12 TROUBLESHOOTING.... 16
SECTION 13 WARRANTY.... 17
SECTION 14 ENVIRONMENT.... 17
SECTION 15 EC-DECLARATION OF CONFORMITY.... 18

WARNING:
For your own safety please read this manual before attempting to operate your new unit. Failure to follow instructions can result in serious personal injury. Spend a few moments to familiarise yourself with your mower before each use.
1. SYMBOLS MARKED ON THE PRODUCT
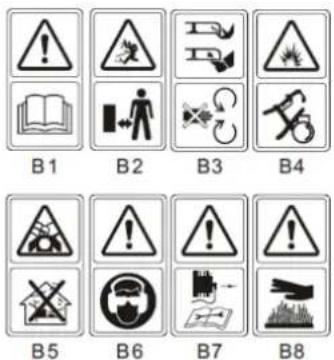
Fig. A
B.1 Read Operator's Manual.
B.2 Keep bystanders away.
B.3 Pay attention to the operator's hands and feet to avoid injury.
B.4 Fuel is flammable, keep fire away. Do not add fuel with running machine.
B.5 Toxic fumes; don't operate indoors, including your garage or shed.
B.6 When mowing, please wear protective glasses and ear plugs to defend the operator himself.
B.7 When repairing, please remove the spark plug, before undertaking repair work according to the operational manual.
B.8 Caution: Engine hot.

Figure B: Safety Label Found On the Lawn Mower: KEEP HANDS AND FEET AWAY.
2. GENERAL SAFETY RULES

WARNING When using petrol tools, basic safety precautions, including the following, should always be followed to
reduce the risk of serious personal injury and/or damage to the unit. Read all these instruction before operating this product and retain these instructions for future reference.

WARNING: This machine produces an electromagnetic field during operation. This field may under some circumstances
interfere with active or passive medical implants. To reduce the risk of serious or fatal injury, we recommend persons with medical implants to consult their physician and the medical implant manufacturer before operating this machine.
Training
- Before using the lawnmower read the instructions carefully. Familiarise yourself with the controls and pay particular attention in learning how to stop the machine in an emergency.
-
Never allow children or people unfamiliar with these instructions to use the lawn mower. Local regulations can restrict the age of the operator.
-
Never mow while people, especially children or pets are nearby.
- Never use the mower if the operator is taking medicine or substances that could affect or impair his ability to react or concentrate.
- Keep in mind that the operator or user is responsible for accidents or hazards occurring to other people or their property.
Before you start
- While mowing, always wear substantial footwear and long trousers. Do not operate the equipment when barefoot or wearing open toed sandals.
- Thoroughly inspect the area where the equipment is to be used and remove all objects which can damage or be thrown by the machine.
- WARNING - Petrol is highly flammable.
- Store fuel in containers specifically designed for this purpose.
- Refuel outdoors only and do not smoke while refuelling; add fuel before starting the engine.
- Never remove the cap of the fuel tank or add petrol while the engine is running or when the engine is hot.
-
If petrol is spilled, do not attempt to start the engine, but move the machine away from the area of spillage and avoid creating any source of ignition until petrol vapours have dissipated.
-
Replace all fuel tank and container caps securely.
- Replace faulty silencers.
- Before using, always visually inspect to see that the blade, blade bolts and cutter assembly are not worn or damaged. Replace worn or damaged blades and bolts in sets to preserve balance.
Operation and Caution
- Do not operate the engine in a confined space where dangerous carbon monoxide fumes can collect, refuel outdoors only.
- Mow only in daylight or in good artificial light.
- Avoid operating the equipment in wet grass, where feasible.
- Always be sure of your footing on slopes.
- Walk, never run, always be in control of the lawnmower and never allow yourself to be pulled along.
- For wheeled rotary machines, mow across the face of slopes, never up and down.
- Exercise extreme caution when changing direction on slopes.
- Do not mow excessively steep slopes of more than 20^
- Use extreme caution when reversing or pulling the lawn mower towards you.
- Stop the blade if the lawn mower has to be tilted for transportation when crossing surfaces other than grass, and when transporting the lawn mower to and from the area to be mowed
- Never operate the lawn mower with defective guards, or without safety devices, for example deflectors and/or grass catchers, in place.
- Do not change the engine governor settings or over speed the engine.
- Before starting the engine, disengage all blades and drive clutches.
- Keep your feet well away from the blade when starting the engine and in accordance with the instructions.
- Do not tilt the lawn mower when starting the engine and always start on a flat surface free from long grass.
- Do not start the engine when standing in front of the discharge chute.
- Never put hands or feet near or under rotating parts. Keep clear of the discharge opening at all times.
- Always ensure the engine is fully switched off before picking up/carrying the Lawnmower.
- Stop the engine and disconnect the spark plug wire, make sure that all moving parts have come to a complete stop and, where a key is fitted remove the key, make sure engine has had time to cool:
- Before unclogging chute and clearing blockages.
- Before checking, cleaning or working on the lawn mower.
- After striking a foreign object. Inspect the lawnmower for damage and make repairs before restarting.
- If the lawn mower starts to vibrate abnormally (check immediately).
- Stop the engine and disconnect the spark plug wire, make sure that all moving parts have come to a complete stop and,
where a key is fitted remove the key, make sure engine is completely cooled.
- Whenever you leave the lawn mower.
-
Before refuelling.
-
Reduce the throttle setting during engine shut down and, if the engine is provided with a shut-off valve, turn the fuel valve off at the conclusion of mowing.
Maintenance and Storage
- Keep all nuts, bolts and screws tight to be sure the equipment is in safe working condition.
- Never store the equipment with petrol in the tank inside a building where fuel vapours can reach an open flame or spark or where the temperature is high.
- Before storage allow the engine to cool.
- To reduce the fire hazard, keep the engine, silencer, battery compartment and petrol storage area free of grass, leaves, or excessive grease.
- Check the grass catcher and deflector frequently for wear or deterioration.
- Replace worn or damaged parts for safety. Genuine parts should always be used as parts of inferior quality can damage the equipment and compromise safety.
- If the fuel tank has to be drained, this should be done outdoors. Always ensure engine is completely cooled before starting this task.
- If the blade needs to be removed, wear strong gloves to prevent injury to hands and fingers. Check the blades balance after sharpening.
- When transporting the machine make sure you close the fuel cut off. Be careful to ensure weight is evenly distributed. Wear strong gloves.
- When tilting the machine never tilt towards the air filter as this may become damaged with fuel.
- Never crank the engine when the spark plug is removed.
- Frequently check the fuel lines and fittings for damage and cracks, replace if necessary
- Never start the engine with the air filter cover removed.
- Carefully clean the mower and grass bag after use to remove debris as this can damage and corrode.
Fertilisers and top dressings are particularly corrosive.
- In time your chassis may peel because of the abrasive action of the debris making contact. This can be remedied by touching up paintwork where necessary to prevent corrosion.

Warning: Do not touch rotating blade.

Warning: Refuel in a well ventilated area with the engine stopped.
- PARTS DESCRIPTION
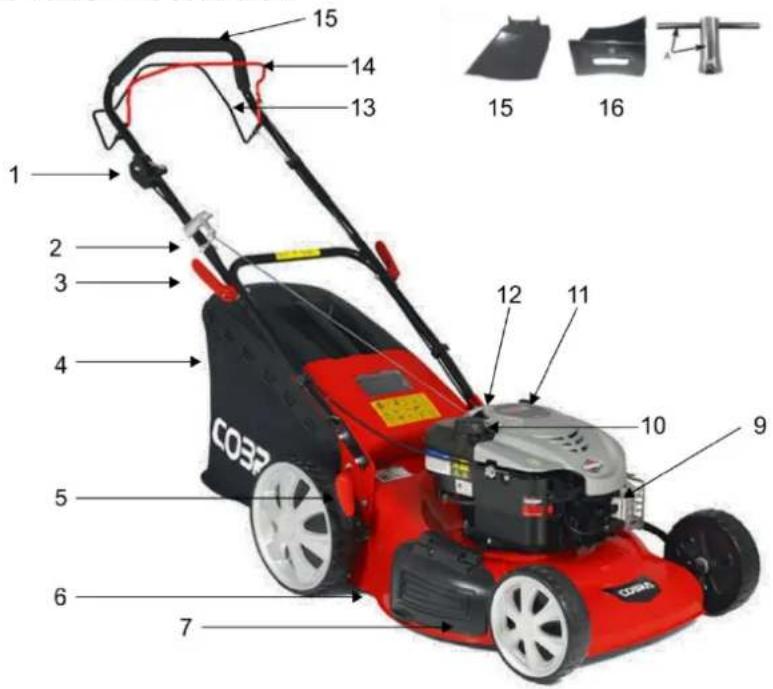
Fig. 1A
- Throttle choke Lever
2.Rope guide - Locking Lever
- Grass catcher
- Height adjusting lever
- Deck
- Sideward flap
- Front cover
- Spark Plug
- Fuel cap
- Oil Cap
- Starter handle
- Self-drive control handle
- Brake control handle
- Under handle
-
Side discharge channel
-
Mulching wedge
Including A: Spark plug wrench
- TECHNICAL DATA
| Model | M51SPB |
| Engine type | Briggs 650E |
| Self Propelled | Yes |
| Engine Displacement | 190 cm^3 |
| Blade Width | 510 mm |
| Speed at max. Power | 2700/min |
| Fuel Tank Capacity | 1.0L |
| Grass catcher capacity | 60 L |
| Net Weight | 35.3 kg |
| Height adjustment : | 25-75mm, 10 adjustment |
| M51SPB | |
| Guaranteed Sound pressure level at the operator's position (According to EN 836 Annex H& EN ISO 4871) | 85.4dB(A)(K=3dB(A) |
| Measured sound power level Guaranteed Sound Power level (According to 2000/14/EC) | 94.4 dB(A) K=1.83dB(A) 98 dB(A) |
| Vibration (According to EN 836 Annex G) | 3.958m/s ^2 K=1.5 m/s ^2 |
5. ASSEMBLY
5.1 FOLDING HANDLE
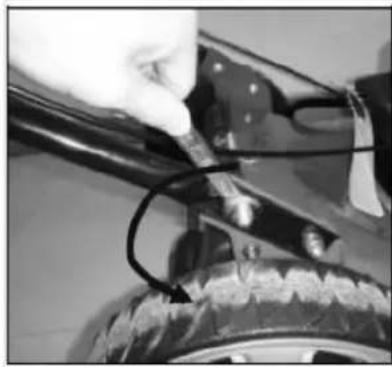
- Fix the lower handlebars into the unit body with a suitable spanner. (Fig. 2A)
- Lift the two locking levers to release the upper handlebars for folding. (Fig. 2B)
- Push the locking lever closed to lock the handlebars in the operating position. (Fig. 2B)
- Adjust the tension by turning the lock nut with a suitable spanner. (Fig. 2C)
natural_image
Close-up of a hand applying adhesive to a tire, no visible text or symbolsFig. 2A
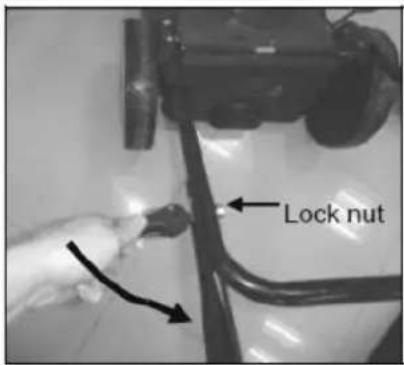
Fig. 2B
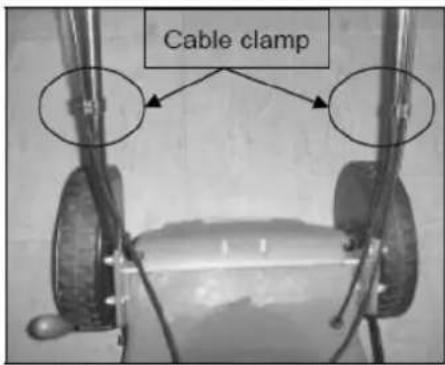
Fig. 2C
5.2 MOUNTING AND DISMOUNTING THE GRASS CATCHER
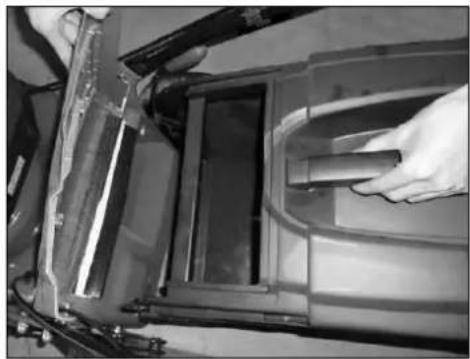
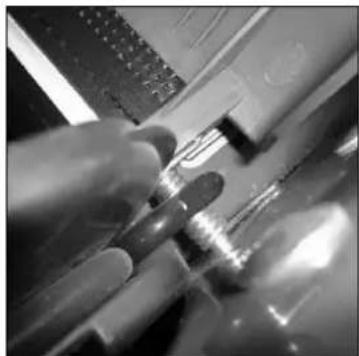
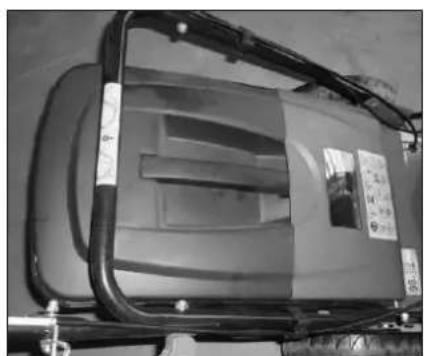
- To fit: Raise the rear cover and hitch the grass catcher on rear of the mower.
- To remove: grasp and lift the rear cover, to remove the grass catcher.
natural_image
Close-up of hands installing or adjusting a mechanical component with a cylindrical part (no visible text or symbols)Fig. 3A
natural_image
Close-up of a hand using a tool to interact with a mechanical component (no visible text or symbols)Fig. 3B
natural_image
Exterior view of a modern office building (no signage)Fig. 3C
5.3 STARTER HANDLE
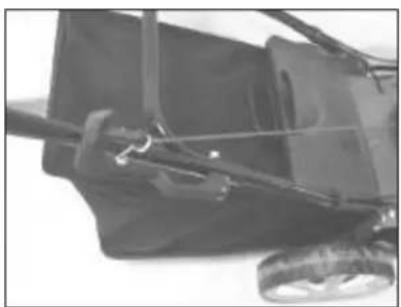
Engage the Brake Control Handle and then move the starter handle from the engine to the rope guide.
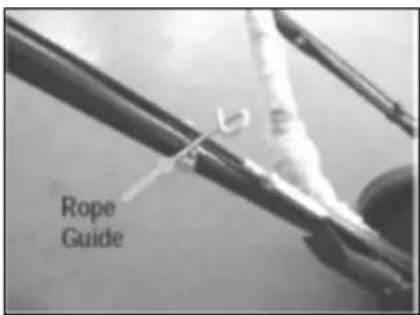
Fig. 4A
natural_image
Close-up of a black utility vehicle with visible wheels and suspension components (no text or symbols)Fig. 4B
5.4 HEIGHT OF CUT
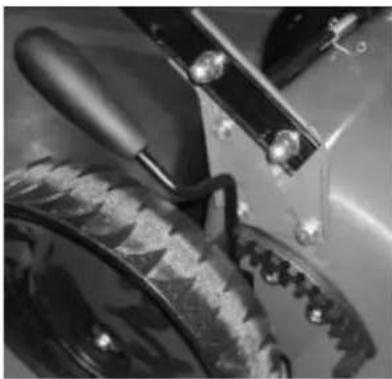
Apply outward pressure to disengage the lever from the rack. Move the lever forward or back to adjust the height of cut. (Fig. 5 and see clause 7.9)
natural_image
Close-up of a mechanical component with visible gears and a tool, no text or symbols presentFig. 5
6. "3 IN 1"
The lawn mower has 3 in 1 features:
- Rear grass collection.
- Grass mulching.
- Side-discharge.
What is mulching?
When mulching, the grass is cut in one working stage, then finely chopped and returned to the grass strip as natural fertiliser.
Recommendations for mulch-mowing:
- Cut your lawn regularly. Cut-back by a maximum of 2cm from grass of 6cm height.
- Ensure the blade is sharp for best results - Do not mulch wet grass.
- Set maximum engine speed.
- Only move at a walking pace.
- Regularly clean mulching wedge, housing inner side and mowing blade.
Starting Operation
ONE: Retrofitting for mulching mower

WARNING: Only with a stopped engine and when the blades have completely stopped.
- Raise the rear cover and remove the grass catcher
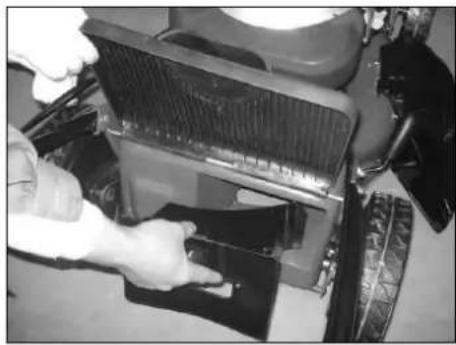
- Push the mulching wedge into the deck. Lock the mulching wedge with the button into the opening on the deck. (Fig.6A/Fig 6B)
- Lower the rear cover again.
natural_image
Person installing or adjusting a black panel on a vehicle chassis (no visible text or symbols)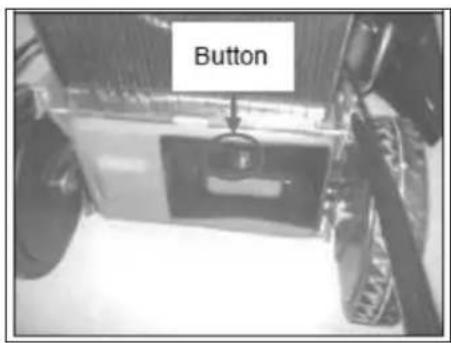
Fig. 6A
Fig. 6B
TWO: Resetting for side-discharge mowing

WARNING: Only when the engine is completely stopped and the blades have stopped rotating.
- Lift the rear cover and remove the grass catcher.
- Mount the Mulching wedge.
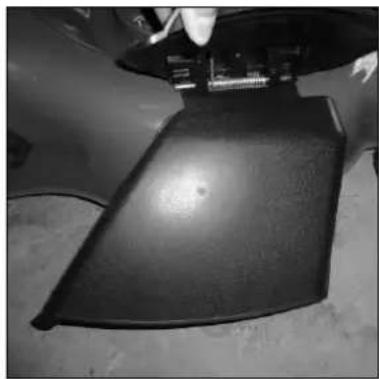
- Lift the flap for side discharge. (Fig. 7A)
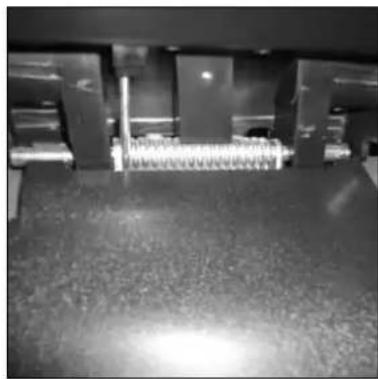
- Mount the side discharge channel for side discharge on the support pin of the sideward flap. (Fig. 7B)
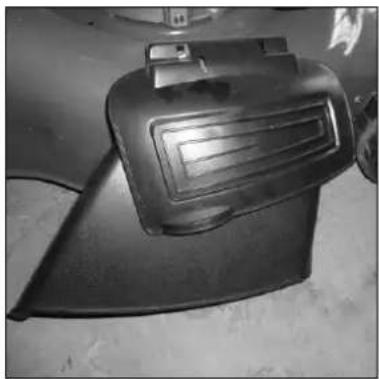
- Lower the sideward flap- the flap lies on the side discharge channel. (Fig. 7C)
natural_image
Close-up of a black plastic component with a handle, partially held by fingers (no visible text or symbols)Fig.7A
natural_image
Interior view of a factory or industrial facility with machinery and reflective flooring (no visible text or symbols)Fig.7B
natural_image
Close-up of a black plastic mechanical component with a rectangular opening (no visible text or symbols)Fig.7C

WARNING: Only when the engine is completely stopped and the blades have stopped rotating
THREE: Mowing with the grass catcher
For mowing with the grass catcher, remove the mulching wedge and discharge channel for side discharge and mount the grass catcher.
- Removing the mulching wedge:
-Lift rear cover and remove the mulching wedge. - Removing the side discharge channel for side discharge:
-Lift sideward flap and remove the side discharge channel.
-The sideward flap automatically closes the discharge opening on the housing by mean of spring force.
-Regularly clean the sideward flap and discharge opening forms of grass rest and stuck dirt. - Mount the grass catcher:
-To fit: Raise the rear cover and hitch the grass catcher on rear of mower.
-To remove: Grasp and lift the rear cover, remove grass catcher.

WARNING: Only when the engine is completely stopped and the blades have stopped rotating
7. OPERATING INSTRUCTIONS

WARNING! Petrol is highly flammable.
Petrol is highly flammable.
Store fuel in containers specifically designed for this purpose.
Refuel outdoors only, before starting the engine and do not smoke while refueling or handling fuel.
Never remove the cap of the fuel tank or add petrol while the engine is running or when the engine is hot.
If petrol is spilled, do not attempt to start the engine but move the machine away from the area of spillage and avoid creating any source of ignition until petrol vapors have dissipated.
Replace all fuel tanks and container caps securely.
Before tipping the lawn mower to maintain the blade or drain oil, remove fuel from tank.
WARNING: never fill fuel tank indoors, with the engine running or until the engine has been allowed to cool for at least 15 minutes after running.
7.2 TO START THE ENGINE AND ENGAGE THE BLADE
- The unit is equipped with a rubber boot over the end of the spark plug, make certain the metal loop on the end of the spark plug wire (inside the rubber boot) is fastened securely over the metal tip on the spark plug.
- When starting from cold, press the primer bulb 3-5 times before starting the engine.
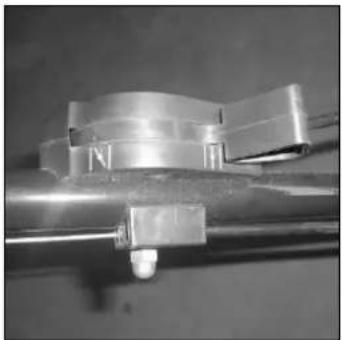
- When starting the engine from cold, turn throttle choke lever to “” position. When starting a warm engine, turn throttle lever to a mid-position.
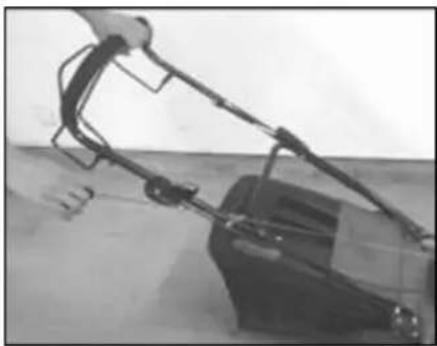
- Standing behind the unit, grasp the brake control handle and hold it against the upper handle as shown in Fig. 8B
- Grasp the starter handle as shown Fig.8B and pull up rapidly. Return it slowly to the rope guide bolt after engine starts. Releasing the brake control handle stops the engine and blade.
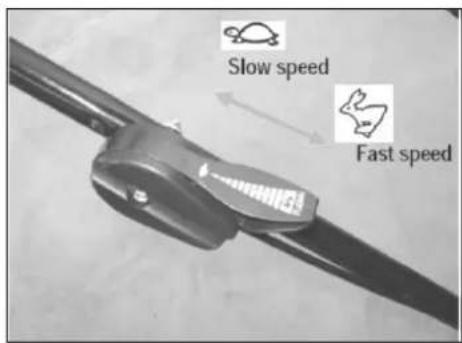
Fig. 8A
natural_image
Close-up of a robotic arm gripping a small mechanical component (no visible text or symbols)Fig. 8B
natural_image
Close-up of a metallic mechanical component with a cylindrical shaft and flange (no visible text or symbols)Fig. 8C
Note: During operation, tightly hold the brake handle with both hands.
Note: During operation, when the brake handle is released, the engine will stop and thus stop the lawnmower from operating.
7.4 TO STOP ENGINE

The blade continues to rotate for a few seconds after the engine is shut off.
- Release the brake control handle to stop the engine and blade. (Fig.9)
- Disconnect and ground the spark plug wire as instructed in the separate engine manual to prevent accidental starting while equipment is unattended.
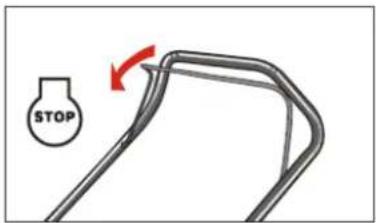
Fig. 9
7.5 CONNECTION FOR AUTO DRIVE - SELF PROPELLED OPTION
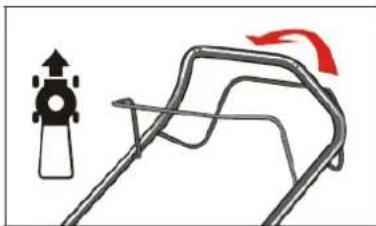
Grip the Self-drive control handle, the lawnmower will move forward automatically with a speed of about 3.6km/h (Fig.10), release the self-drive handle, the lawnmower will stop moving.
natural_image
Diagram showing a motor handle mechanism with directional arrows indicating motion (no text or symbols)Fig. 10
7.6 FOR THE BEST RESULTS WHEN MOWING
First clear the lawn of debris: Be sure that the grass is clear of stones, sticks, wire or other objects, which could be accidentally thrown out by the mower in any direction and cause serious injury to the operator and others as well as damage to property and surrounding objects.
Avoid cutting wet grass: For effective mowing do not cut wet grass, because it tends to stick to the underside of the deck preventing proper mowing of the grass.
General Recommendations: Cut no more than 1/3 the length of the grass.
Ground speed will need to be adjusted to aid the even distribution of clippings onto the lawn.
For especially heavy cutting in thick grass it may be necessary to use one of the slowest speeds in order to get a clean well mowed cut. When mowing long grass you may have to cut the lawn in two passes, lowering the blade another 1/3 of the length for the second cut and perhaps cutting in a different pattern than was used the first time. Overlapping the cut a little on each pass will also help to clean up any stray clippings left on the lawn.
The mower should always be operated at full throttle to get the best cut and allow it to do the most effective job of mowing.
Clean underside of deck: Be certain to clean the underside of the cutting deck after each use to avoid a build-up of grass, which could prevent proper mulching.

WARNING: If the mower blade strikes a foreign object, stop the engine immediately. Remove the wire from the spark
plug, thoroughly inspect the mower for any damage and repair the damage before restarting and operating the mower. Extensive vibration of the mower during operation is an indication of serious damage. The unit should be promptly inspected and repaired.
7.7 GRASS CATCHER

Only when the engine is completely stopped and the blades have stopped rotating
There is a transparent window on the rear cover which you can see the grass condition in the grass catcher. (Fig. 11A)
If the grass catcher is full, you will need to empty and clean the grass catcher, make sure it is clean and ensure its meshwork is ventilated.
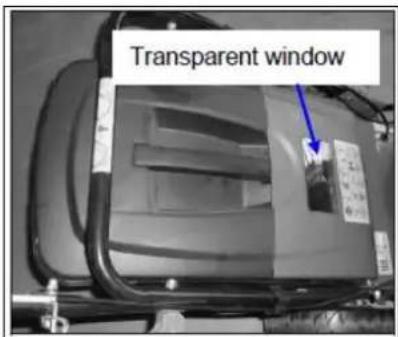
Fig. 11A
7.8 DECK
The underside of the mower deck should be cleaned after each use to prevent a buildup of grass clippings, leaves, dirt or other matter. If this debris is allowed to accumulate, it will invite rust and corrosion, and may prevent proper mulching. The deck may be cleaned by tilting the mower and scraping clean with a suitable tool (make certain the spark plug wire is disconnected).
7.9 HEIGHT ADJUSTMENT INSTRUCTIONS

CAUTION: Do not at any time make any adjustment to the lawnmower without first stopping the engine and
disconnecting the spark plug wire.

CAUTION: Before changing the mowing height, stop the mower and disconnect spark plug cable.
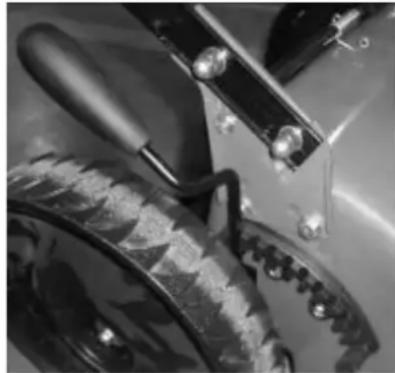
Your mower is equipped with a central height adjustment lever offering 10 height positions.
The height (the blade to the ground) can be adjusted from 25 mm to 75 mm (10 height positions).
-
Stop the mower and disconnect the spark plug cable before changing the mower cutting height.
-
The central height adjustment lever offers you 10 different height positions.
To change the height of cut, squeeze the adjuster lever toward the wheel, moving it up or down to the selected height.
natural_image
Close-up of a mechanical component with visible gears and a tool (no text or symbols)Fig. 12
8. MAINTENANCE INSTRUCTIONS
SPARK PLUG
Use only the original replacement spark plug. For best results, replace the spark plug every 100 hours of use.
9. LUBRICATION INSTRUCTIONS

CAUTION: DISCONNECT SPARK PLUG BEFORE SERVICING.
. 1. WHEELS-Lubricate the ball bearings in each wheel at least once a season with a light oil.
- ENGINE-Follow engine manual for lubrication instructions
10. CLEANING

CAUTION: Do not hose the engine. Water can damage the engine or contaminate the fuel system.
-
Wipe the deck with dry cloth.
-
Hose under the deck by tilting the mower so that the spark plug is up.
CAUTION: Do not allow dirt or dust to clog the air filter foam element.
The engine air cleaner element must be serviced (cleaned) after 25 hours normal mowing. The foam element must be serviced regularly if the mower is used in dry dusty conditions.
To CLEAN AIR FILTER
CAUTION: Do not allow dirt or dust to clog the air filter foam element. The engine air cleaner element must be serviced (cleaned) after 25 hours normal mowing. The foam element must be serviced regularly if the mower is used in dry dusty conditions.
To CLEAN AIR FILTER
1.1 Remove the locking knob.(For Briggs engine; Fig.13A)
2. Remove the filter cover.
3. Wash filter element in soap water. DO NOT USE PETROL!
4. Air dry the filter element.
5. Place a few drops of SAE30 oil on the foam filter and squeeze tightly to remove any excess oil.
6. Reinstall filter.

NOTE: Replace filter if frayed, torn, damaged or unable to be cleaned.
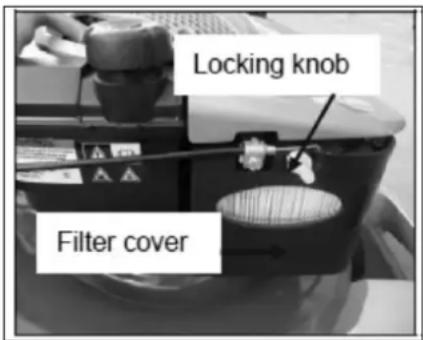
Fig. 13A
10.2 CUTTING BLADE

CAUTION: Be sure to disconnect and ground the spark plug wire before working on the cutting blade to prevent
accidental engine starting. Protect hands by using heavy gloves or a rag to grasp the cutting blades.
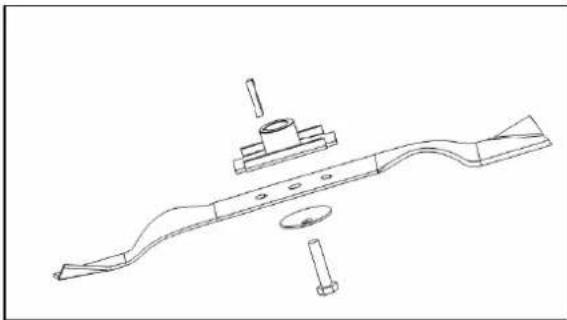
Tip mower as specified in separate engine manual. Remove the hex bolt and washer, which holds the blade and blade adapter to the engine crankshaft. Remove the blade and adapter from the crankshaft.

WARNING: Periodically inspect the blade adapter for cracks, especially if you strike a foreign object. Replace when
necessary. For best results your blade should be sharp. Slightly worn blades may be re-sharpened with care. After removing the blade, it may be ground or filed, so that the cutting edge is as close to the original bevel as possible. It is extremely important that each cutting edge receives an equal amount of grinding to prevent an unbalanced blade. Improper blade balance will result in excessive vibration causing damage to the engine and mower. Be sure to carefully balance the blade after sharpening. The blade can be tested for balance by balancing it on a round shaft screwdriver. Remove metal from the heavy side, until it balances evenly.
Before reassembling the blade and the blade adapter to the unit, lubricate the engine crankshaft and the inner surface of the blade adapter with light oil. Install the blade adapter on the crankshaft. Refer Fig.15. Place the blade with the part number facing away from the adapter. Align the washer over the blade and insert the hex bolt. Tighten the hex bolt to the torque listed below:
natural_image
Technical line drawing of a mechanical assembly with no visible text or symbolsFig. 14
10.3 BLADE MOUNTING TORQUE
Center Bolt 40Nm.min, 50Nm.max. To ensure safe operation of your unit. All nuts and bolts must be checked periodically for correct tightness. After prolonged use, especially in sandy soil conditions, the blade will become worn and lose some of the original shape. Cutting efficiently will be reduced and the blade should be replaced. Replace with an approved factory replacement blade only. Possible damage resulting from blade unbalance is not the responsibility of the manufacturer.
When you change the blade, use the original type marked on the blade:
When you change the blade, use the original type marked on the blade (Cobra Part 263001330) (to order the blade, please contact your local dealer)

WARNING: Do not touch the blade whilst still rotating.
10.4 ENGINE
Refer to the separate engine manual for engine maintenance instructions.
Maintain engine oil as instructed in the separate engine manual packed with your unit.
Read and follow the engine instructions carefully.
Service the air filter as per the separate engine manual. Clean every few hours under extremely dusty conditions. Poor engine performance and flooding usually indicates that the air filter requires attention. To service the air filter, refer to the separate engine manual packed with your mower. The spark plug should be cleaned and the gap reset annually. Spark plug replacement is recommended at the start of each mowing season. Check the engine manual for the correct plug type and gap specifications. Clean the engine regularly with a cloth or brush. Keep the cooling system (blower housing area) clean to permit proper air circulation, which is essential to engine performance. Be certain to remove all grass, dirt and combustible debris from the muffler area.
11. STORAGE INSTRUCTIONS (OFF SEASON)
The following steps should be taken to prepare the lawn mower for storage at the end of the mowing season.
- Drain the fuel from the engine by running the engine until it stops.
a) Start the engine and let it run until it has used up all remaining petrol and stalls.
b) Remove the spark plug. Use an oilcan to fill approx. 20 ml oil into the combustion chamber. Operate the starter to evenly distribute the oil in the combustion chamber. Replace the spark plug. - Clean and grease the lawnmower carefully as described above under "Lubrication".
- Slightly grease the cutter to avoid corrosion.
- Store the lawnmower in a dry, clean and frost-protected place.

CAUTION! The engine must have completely cooled down before storing the lawnmower.

NOTE: - When storing any type of power equipment in an unventilated or material storage shed,
-Care should be taken to rust-proof the equipment. Using a light oil or silicone, coat the equipment, especially cables and all moving parts.
- Be careful not to bend or kink cables.
- If the starter rope becomes disconnected from rope guide on the handle, disconnect and ground the spark plug wire. Depress the blade control handle and pull the starter rope out from the engine slowly. Slip the starter rope into the rope guide bolt on the handle.
Transport
Turn the engine off. Ensure not to bend or damage the cutter when pushing the lawnmower over obstacles.
- TROUBLESHOOTING
| PROBLEM | PROBABLE CAUSE | CORRECTIVE ACTION |
| Engine does not start. | Throttle chock not in the correct position for the prevailing conditions. | Move throttle choke to correct position |
| Fuel tank is empty. | Fill tank with fuel: refer to ENGINE OWNERS MANUAL. | |
| Air cleaner element is dirty. | Clean air cleaner element: refer to ENGINE OWNERS MANUAL | |
| Spark plug loose. | Tighten spark plug to 25-30Nm. | |
| Spark plug wire loose or disconnected from plug. | Install spark plug wire on spark plug. | |
| Spark plug gap is incorrect. | Set gap between electrodes at 0.7 to 0.8mm | |
| Spark plug is defective | Install new, correctly gapped plug: refer to ENGINE OWNERS MANUAL | |
| Carburetor is flooded with fuel | Remove air cleaner element and pull starter rope continuously until carburetor clears itself and install air cleaner element. | |
| Faulty ignition module | Contact the service agent. | |
| Engine difficult to start or loses power. | Dirt, water, or stale fuel tank. | Drain fuel and clean tank. Fill tank with clean, fresh fuel |
| Vent hole in fuel tank cap is plugged. | Clean or replace fuel tank cap. | |
| Air cleaner element is dirty. | Clean air cleaner element. | |
| Engine operates erratically. | Spark plug is defective. | Install new, correctly gapped plug: refer to ENGINE OWNERS MANUAL |
| Spark plug gap is incorrect. | Set gap between electrodes at 0.7 to 0.8mm | |
| Air cleaner element is dirty. | Clean air cleaner element: refer to ENGINE OWNERS MANUAL | |
| Engine idles poorly. | Air cleaner element is dirty. | Clean air cleaner element: refer to ENGINE OWNERS MANUAL |
| Air slots in engine shroud are blocked. | Remove debris from slots. | |
| Cooling fins and air passages under engine blower housing are blocked. | Remove debris from cooling fins and air passages. | |
| Engine skips at high speed. | Gap between electrodes of spark plug is too close. | Set gap between electrodes at 0.7 to 0.8mm |
| Engine overheats | Cooling air flow is restricted. | Remove any debris from slots in shroud, blower housing, air passages |
| Incorrect spark plug. | For Briggs engine: Install RJ19LMC spark plug | |
| Mower vibrates abnormally | Cutting assembly is loose. | Tighten blade |
| Cutting assembly is unbalanced | Balance blade. |
13. WARRANTY
This product is warranted in accordance with legal regulations for a 24 month period effective from the date of purchase by the first user.
This product will not be covered if used in a commercial application.
This warranty covers all material or production failures, it does not include: defects from normal wear and tear, parts such as, bearings, brushes, cables, air cleaning elements, brake pad, clutch disc, tyre, wheel, recoil starter rope, belts, cutter blades, plugs, lubricant oils and grease or accessories. Damage or defects resulting from abuse, accidents or alterations, natural fading of painted or plated surfaces, sheet peeling and other natural deterioration.
Any damage that occurs from the use of non-genuine Cobra parts will not be covered.
We reserve the right to reject any claim where the purchase cannot be verified or when it is clear that the product was not maintained properly. (Clean ventilation slots, carbon brushes and serviced regularly)
Expenses incidental to the warranty claim that are not covered;
-Compensation for loss of time, commercial loss or rental costs of substitute product.
-Costs incurred for transportation to and from the dealership.
Any damage that occurs from the following will not be covered; exposure of the product to smoke and soot, chemical agents, bird droppings or other animal waste, seawater, sea breeze, salt or other environmental phenomena.
Any damage resulting from operating methods other than those indicated in the owner's manual will not be covered.
Your purchase receipt must be kept as proof for date of purchase. Your un-dismantled mower must be returned to your dealer in an acceptably clean state, accompanied by your proof of purchase.
Please Register Your Mower
If your dealer did not collect registration information from you, please take a few minutes and register your purchase with Cobra.
You can register by completing and mailing the registration card that should be in the box or by going online to: www.cobragarden.co.uk and clicking on Product Registration.
Before using the lawn mower, all mower operators must read this manual
13. ENVIRONMENT
Should your machine need replacement after extended use, do not put it in the domestic waste but dispose of it in an environmentally safe way.
- EC Declaration of Conformity
| EC Declaration of Conformity | |
| We herewith declare, | Cobra Garden MachineryHenton & Chattell Ltd, London Road, Nottingham NG2 3HW United Kingdom |
| that the following machine complies with the appropriate basic safety and health requirements of the EC Directive based on its design and type, as brought into circulation by us. | |
| In case of alteration of the machine, not agreed upon by us, this declaration will lose its validity | |
| Machine Description: | Lawn Mower |
| Machine Type: | M51SPB (1560AQ) |
| Displacement: | 190 cm^3 |
| Max. Cutting length: | 510 mm |
| Measured sound power level | 94.4 dB(A) |
| Guaranteed sound power level: | 98 dB(A)Notified Body for EC Directive 2000/14/EC:0036TüV SüD Industrie Service GmbHWestendstrasse 199. 80686 München. Deutschland |
| Applicable EC Directives: | EC Machinery Directive: 2006/42/ECEC Directive of Electromagnetic Compatibility (2004/108/EC)EC Directive of noise emission (2000/14/EC) |
| Applicable Harmonized Standards: | EN 836EN ISO 14982 |
| Authorized Signature/Date/Place: |  Peter J. Chaloner 02-12-2013 Peter J. Chaloner 02-12-2013 |
| Title of Signatory: | Managing Director |
| name and address of the person authorised to compile the technical file | Cobra Garden MachineryHenton & Chattell Ltd, London Road, Nottingham NG2 3HW United Kingdom |
- CONTENTS
- WARNING:
- SYMBOLS MARKED ON THE PRODUCT
- GENERAL SAFETY RULES
- Training
- Before you start
- Operation and Caution
- Maintenance and Storage
- Fertilisers and top dressings are particularly corrosive.
- ASSEMBLY
- FOLDING HANDLE
- MOUNTING AND DISMOUNTING THE GRASS CATCHER
- STARTER HANDLE
- HEIGHT OF CUT
- "3 IN 1"
- Starting Operation
- ONE: Retrofitting for mulching mower
- WARNING: Only with a stopped engine and when the blades have completely stopped.
- TWO: Resetting for side-discharge mowing
- THREE: Mowing with the grass catcher
- OPERATING INSTRUCTIONS
- TO START THE ENGINE AND ENGAGE THE BLADE
- TO STOP ENGINE
- CONNECTION FOR AUTO DRIVE - SELF PROPELLED OPTION
- FOR THE BEST RESULTS WHEN MOWING
- GRASS CATCHER
- DECK
- HEIGHT ADJUSTMENT INSTRUCTIONS
- MAINTENANCE INSTRUCTIONS
- SPARK PLUG
- LUBRICATION INSTRUCTIONS
- CLEANING
- To CLEAN AIR FILTER
- CUTTING BLADE
- BLADE MOUNTING TORQUE
- ENGINE
- Read and follow the engine instructions carefully.
- STORAGE INSTRUCTIONS (OFF SEASON)
- Transport
- WARRANTY
- Please Register Your Mower
- ENVIRONMENT
Brand : COBRA
Model : M51SPB
Category : Lawn mower