WM105VB - Washing machine White Knight - Free user manual and instructions
Find the device manual for free WM105VB White Knight in PDF.


| Product Type | Freestanding washing machine |
| Brand | White Knight |
| Model | WM105VB |
| Dimensions (H x W x D) | 85 cm x 60 cm x 55 cm |
| Weight | 65 kg |
| Power Supply | 220-240 V, 50 Hz, 10 A |
| Drum Capacity | 7 kg |
| Maximum Spin Speed | 1000 rpm |
| Number of Programs | 15 |
| Programs | Cotton, Synthetics, Delicates, Quick Wash, Wool, Hand Wash, Rinse & Spin, Drain & Spin, Pre-Wash, Intensive, Eco, Night Wash, Sport, Mix, Drum Clean |
| Temperature Settings | Cold, 30°C, 40°C, 60°C, 90°C |
| Energy Efficiency Class | A |
| Water Consumption per Cycle | ~ 50 L |
| Noise Level (Wash/Spin) | 58 dB / 76 dB |
| Features | Delay start, Child lock, Overfill protection, Foam control, Unbalance detection, Auto shut-off, Bleach compartment, Softener compartment, Liquid detergent tray, Clear lid, Stainless steel drum |
| Maintenance | Clean filter, Clean drum, Clean detergent drawer, Clean door seal, Descaling every 3 months |
| Safety | Child safety lock, Anti-flood protection, Overheat protection, Door lock during cycle |
| Spare Parts | Belt, Pump, Motor, Door seal, Filter, Hoses, PCB, Drum bearings, User manual |
| Repairability Index | 8.0/10 |
Frequently Asked Questions - WM105VB White Knight
User questions about WM105VB White Knight
0 question about this device. Answer the ones you know or ask your own.
Ask a new question about this device
Download the instructions for your Washing machine in PDF format for free! Find your manual WM105VB - White Knight and take your electronic device back in hand. On this page are published all the documents necessary for the use of your device. WM105VB by White Knight.
USER MANUAL WM105VB White Knight
Please read this instruction manual carefully before you use this product
CONTENTS
SECTION 1: BEFORE USE
- Safety warnings
- Recommendations
SECTION 2: INSTALLATION
• Removal of transportation screws
- Foot adjustment
• Electrical connection
• Water supply connection
- Drain connection
SECTION 3: TECHNICAL SPECIFICATIONS
SECTION 4: CONTROL PANEL
- Start/Pause button
• Function indicator lights
• Function buttons - Program knob
- Washing programs
SECTION 5: WASHING YOUR LAUNDRY
- Before washing
- Running the machine
SECTION 6: MAINTENANCE AND CLEANING
SECTION 1: BEFORE USE
SAFETY WARNINGS
- Do not use a multiple socket or extension cable.
- Do not connect a plug with a damaged cord into a socket.
- If the cord is damaged it should be replaced by the manufacturer or appointed service agent in order to avoid a hazard.
- Never remove the plug from the socket by pulling the cord section. Remove the plug only by gripping the plug itself.
- Do not plug the machine to the power supply with wet hands.
- Never touch the machine with wet hands or feet.
- Never open the detergent drawer while the machine is running.
- Never force open the door of the machine whilst the machine is running.
- The machine can reach high temperatures while running, so do not touch the drain hose and water during the draining cycle.
- In the event of any failure, first unplug the appliance and close off the water tap. Do not attempt to repair. Please contact your authorised service agent.
- Keep the packing materials from your machine away from children to avoid any hazards.
- Do not let children play with the washing machine.
- Keep pets away from your machine.
- Your machine should only be used by adults and in accordance with the information written in this manual.
- Your machine is designed for use in a domestic environment. The warranty will be invalid if you use it for commercial purposes.
- The appliance should not be put on a carpet which can block the air ventilation on the bottom side.
-
The appliance is not intended for use by people (including children) with reduced
-
If you plan not to use your machine for a long time, unplug it, shut off the water supply and leave the door open in order to keep the inside of the machine dry and to prevent unpleasant odours in the drum.
- As a result of our quality control procedures, a certain amount of water may remain in your machine from testing. This is not harmful for your machine and is perfectly normal.
SECTION 2: INSTALLATION
Please pay attention to the following issues before using your washing machine for the first time.
REMOVAL OF TRANSPORTATION SCREWS
- The 4 transportation screws, which are located at the back of the machine, must be removed before running the machine.
- Loosen the screws by turning them anti-clockwise with a suitable spanner. (DIAGRAM-1)
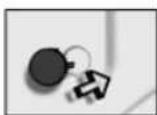
• Pull out the screws, rubber washers and plastic spacers. (DIAGRAM-2) - The holes where the transport screws have been removed should be covered with the plastic transport caps found in the accessories bag. (DIAGRAM-3)
- The transportation screws that have been removed from the machine must be reused in any future transporting of the machine.
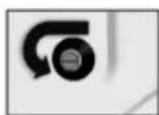
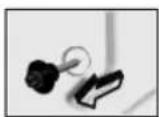
DIAGRAM-2
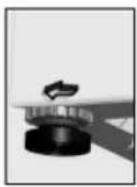
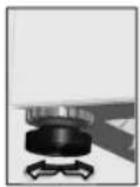
• You can level your machine by adjusting its feet.
- First, loosen the plastic adjustment nut away from the cabinet base.
- Change the level by adjusting the feet upwards or downwards.
- When the machine is level and stable, tighten the plastic adjustment nut again by rotating it upwards against the base of the cabinet.
- Never put cartons, wooden blocks or similar materials under the machine to balance irregularities of the floor.
ELECTRICAL CONNECTION
- Your washing machine requires a 50Hz supply of 220-240V.
- A special earthed plug has been attached to the supply cord of your washing machine. This plug must be fitted to an earthed socket. The fuse value fitted to this plug must be 13A. If you have any doubts about your electrical supply, consult a qualified electrician.
- Insert the machine's plug into an earthed socket which you can easily reach.
⚠ WARNING: This appliance must be earthed.
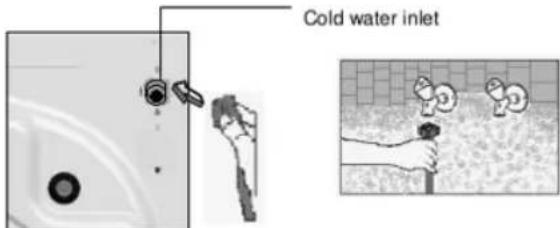
WATER SUPPLY CONNECTION
DRAIN CONNECTION
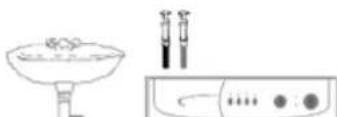
- The drain hose should be mounted at a minimum height of 60 cm and a maximum height of 100 cm from the floor.
- The end of the drain hose can be connected directly to a drainage stand-pipe or alternatively to a special connection point designed for that purpose on the waste outlet of a sink unit
- Do not extend the drain hose or your guarantee will be invalidated.
Note: The outlet hose of this appliance must only be connected to a "dirty water" drain. Water must not be discharged into a "fresh water" drain.
natural_image
Simple line drawings of a food preparation setup with a bowl, test tubes, and control panel (no text or symbols)SECTION 3: TECHNICAL SPECIFICATIONS
| WM105VWM105VBWM105VS | |
| Maximum dry laundry capacity (kg) 5 | |
| Recommended loading (kg) 4,5 | |
| Height (cm) 85 | |
| Width (cm) 59,6 | |
| Depth (cm) 51 | |
| Maximum spin cycle ( rpm ) 1000 |
SECTION 4: CONTROL PANEL
WM105V-WM105VS-WM105VB
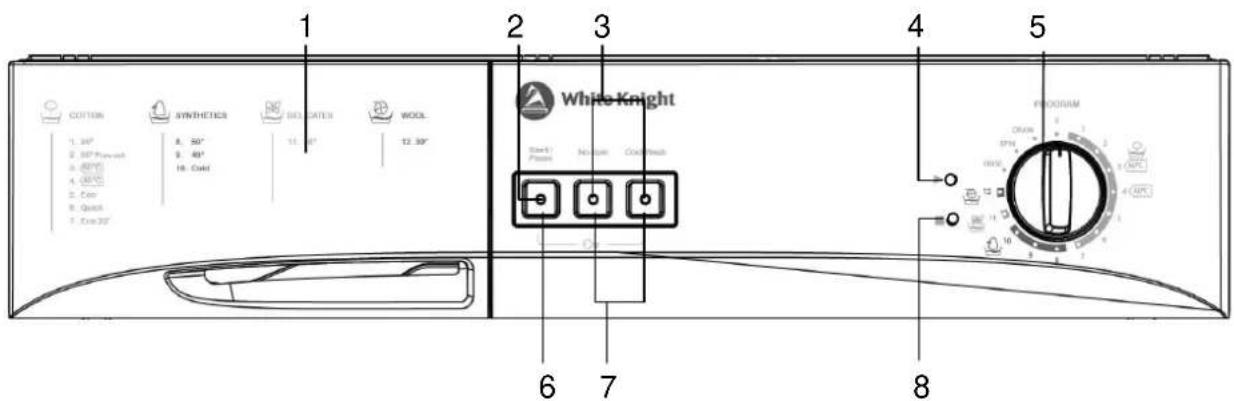
1 - Detergent drawer 5 - Program knob
2 - Start/pause light 6 - Start/pause button
3 - Function indicator lights 7 - Function buttons
4 - Program ready light 8 - Program end light
Our product has an electronic card and soft-touch buttons. To activate the functions touch the buttons gently.
START/PAUSE BUTTON
Used to start a selected program or pause during running.
Note: The program knob must be brought to the O(off) position before selecting the program or changing an existing program.
FUNCTION INDICATOR LIGHTS
When the start/pause button or any function button is pressed, the corresponding light turns on. The light turns off when the function button or start/pause button is re-pressed, or when the process or selected function is completed.
The function indicator lights are also used in the failure detection system mentioned in section 9.
FUNCTION BUTTONS
No spin
This program is recommended to be used for your sensitive clothes on which no spinning should be done. By pressing this function button, you can cancel the spinning process which is included in the program.
Cold wash
When this button is pressed, your clothes are washed with cold water. With this function, you can wash your slightly dirty clothes using less energy and water.
Note: If a ‘cold’ wash program is selected with the program dial then the cold wash light will come on.
Note: Depending on which program has been selected, it may be possible to select the function buttons after the machine has started. If the light comes on when the function button is pressed then the function will be activated. If the light does not come on then the additional function will not be activated.
PROGRAM KNOB
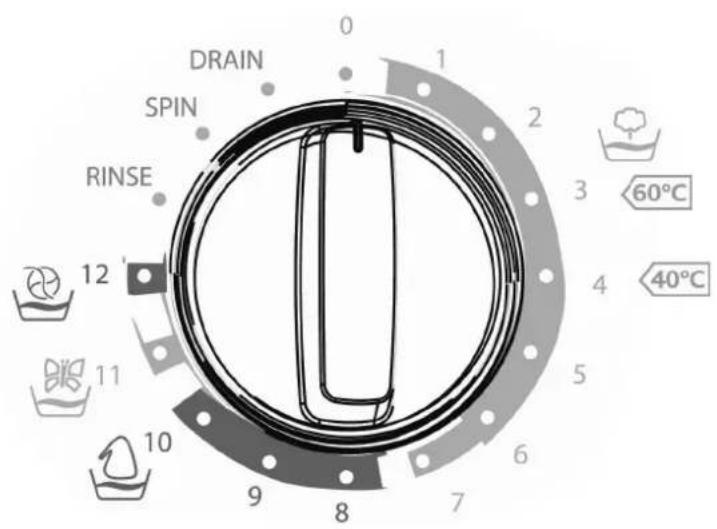
With the program knob, you can select the program with which you desire to wash your clothes. You can adjust the program selection process by turning the program knob in both directions. Ensure that the mark on the program knob is aligned with the program you want to select. When you bring the program knob to the O(off) position, while your machine is running, your program will remain incomplete.
| 1 - Cotton 90°C |
| 2 - Cotton 60°C with prewash |
| 3 - Cotton 60°C 60°C |
| 4 - Cotton 40°C 40°C |
| 5 - Eco wash |
| 6 - Quick wash |
| 7 - Eco 20° |
| 8 - Synthetic 60°C |
| 9 - Synthetic 40°C |
| 10 - Synthetic cold |
| 11 - Delicate 30°C |
| 12 - Wool 30°C |
| 13 - Rinse |
| 14 - Spin |
| 15 - Drain |
| 0 - OFF |
| PROGRAM | DETERGENT COMPARTMENT | MAX DRY LOAD CAPACITY (kg) | PROGRAM TIME (MINS) | ENERGY CONSUMPTION (kWh) | WATER CONSUMPTION (litres) | TYPE OF LAUNDRY EXPLANATIONS |
| 1- COTTON 90° 2 5 155 | 1,96 75 | Dirty, boil, cotton and linen textile | ||||
| 2 - COTTON 60° (PREWASH) | 1+2 5 140 | 0,89 74 | Very dirty, cotton, coloured and linen textile | |||
| 3 - COTTON 60°60°C | 2 5 190 | 0,85 43 | Dirty, cotton, coloured and linen textile | |||
| 4 - COTTON 40°40°C | 2 5 180 | 0,82 45 | Dirty, cotton, coloured and linen textile | |||
| 5 - ECO WASH 2 5 80 0,39 43 | Dirty, cotton, coloured and linen textile | |||||
| 6 - QUICK WASH 2 2,5 30 | 0,16 40 | Slightly dirty, cotton, coloured and linen textile | ||||
| 7 - ECO 20° 2 2,5 102 0,14 30 | Less dirty, cotton and linen textiles. (Underwear, bedsheet, tablecloth, (towel max. 2 kg) bedcloth, etc.) | |||||
| 8 - SYNTHETIC 60° | 2 3 84 | 0,95 45 | Dirty, synthetic or synthetic mixture textile | |||
| 9 - SYNTHETIC 40° | 2 3 65 | 0,53 45 | Slightly dirty, synthetic or synthetic mixture textile | |||
| 10 - SYNTHETIC COLD | 2 3 72 | 0,12 45 | Slightly dirty, synthetic or synthetic mixture sensitive laundry. Washed without heating the tap water. | |||
| 11 - DELICATE 30° 2 | 2 70 | 0,34 56 | Slightly dirty, cotton, coloured, synthetic or synthetic mixture sensitive laundry | |||
| 12 - WOOL 30° | 2 2 73 | 0,29 52 | Dirty, hand and machine wash wool laundry | |||
| 13 - RINSE 28 0,04 | 41 | When you need an additional rinse to be done to your clothes after the washing process, you can use this program for all kinds of clothes. | ||||
| 14 - SPIN 10 0,02 - | When you need an additional spin to be done to your clothes after the washing process, you can use this program for all kinds of clothes. | |||||
| 15 - DRAIN 2 0,01 - | This program is used to drain the dirty water inside after the washing process of your machine. If you want the water inside your machine to be drained before the program ends, you can use this program. | |||||
TABLE - 1
Note: You can use fabric softeners in all programs (except spin and drain programs) as required. Please use the quantity of softener as recommended by the softener producer. Put the softener in the ☑ (softener) compartment of the detergent drawer.
The Cotton 60° 60°C and Cotton 40° 40°C are the standard washing programs to which the information on the energy label and product fiche relates. These programs are suitable to clean normally soiled cotton laundry. They are the most efficient programs in terms of combined energy and water consumption.
If the machine is left powered up it will consume 0.68W. When the program dial is in the O (off) position the machine will consume 0.08W, until the power is switched off.
Based on test results of standard 60 °C cotton programme at full load and partial load, and standard 40 °C cotton programme at partial load, remaining moisture content is (%) 62.
The actual water temperature achieved may differ from the declared program temperature.
It is recommended to use liquid detergent for low temperature washing programs.
SECTION 5: WASHING YOUR LAUNDRY
- Plug in the machine. Switch on the power.
- Connect the hoses to the water supply and to the drain. Open the water tap.
First wash cycle
It is recommended that the first wash cycle should be made without any laundry to ensure that the drum is clean and any water left from the factory testing is removed. Pour half a measuring cup of normal all purpose detergent into compartment 2 and select cotton program at 90^ .
BEFORE WASHING
Sorting your laundry
- Sort your clothes according to their types (cotton, synthetic, sensitive, woollen, etc.), washing temperatures and level of dirtiness.
• Never wash your white and coloured clothes together. - Since your new coloured clothes may shed dye on the first wash, wash them separately.
- Be careful that no metal pieces are found on or in the pockets of your clothes, remove if there are any.
- Zip and button your clothes.
- Remove the plastic or metal hooks from curtains and remove laces or place them inside a washing bag and tie.
• Pull textiles like trousers, knitted fabric, t-shirts and sweat shirts inside out. - Wash your small clothes, like socks and handkerchiefs, in a washing bag.


Putting detergent into the machine
The quantity of the detergent that you will put in your machine depends on the following criteria:
- Your detergent consumption will change according to the dirtiness of your clothes. For your slightly dirty clothes, do not pre-wash and put a small amount of detergent in compartment 2 of the detergent drawer.
- For excessively dirty clothes, select a program with pre-washing. Put 14 portion of the detergent you will use in compartment 1 in the detergent drawer and the remaining portion in compartment 2.
- Only use detergents developed specifically for automatic washing machines. The quantities that will be used for your clothes are written on the detergent packaging.
- As the hardness of your water increases, the amount of the detergent to be consumed will also increase.
- As the amount of your clothes increases, the amount of the detergent to be consumed will also increase.
- Put softener in the softener compartment in your detergent drawer. Do not exceed the MAX level. Otherwise, the softener will diffuse in the washing water via the siphon.
- Concentrated softeners should be diluted with some water before putting in the drawer. This is because the softener with a high density can obstruct the siphon and prevent the correct flow of the softener.
- You can use fluid detergents in all programs without pre-washing. For this, mount the fluid detergent level plate in the second compartment of the detergent drawer and arrange the amount of fluid detergent according to the levels on this plate.
RUNNING THE MACHINE
Program selection and features
Changing the program
If you have selected a program and you do not want it to continue:
- Press the start/pause button.
- Turn the program knob to the O(off) position.
- Turn the program knob to the program you require. (You can select the program that you desire from Table-1).
• The program ready light will come on.
- By pressing the start/pause button, run the program which you have selected.
Cancellation of the program
If you desire to end a running program early:
- Press the start/pause button.
• Turn the program knob to O(off) status.
- Turn the program knob to the "Drain" or "Spin" programs.
• The program ready light will come on.
- Run the program you have selected by pressing the start/pause button.
Program ending
- Your machine will automatically stop when the program you have selected ends.
• The program end light will be on.
• Turn the program knob to the O(off) position.
- The door will be unlocked approximately two minutes after the program ends. You can open the door by pulling the handle of the door towards yourself and take out your clothes.
- After you unload your clothes leave the door open to dry the interior of your machine.
• Unplug your machine.
- Close the water tap.
▲WARNING
SECTION 6: MAINTENANCE AND CLEANING
• Unplug your machine.
- Close the water tap.
WATER INLET FILTERS
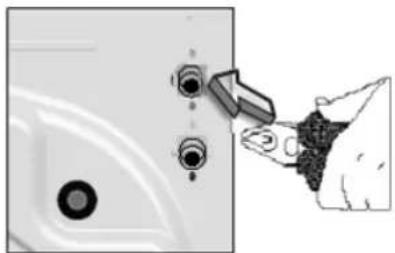
On the tap part of your machine's water inlet hose and at the end of the water inlet valve, there are filters to prevent entrance of dirt and foreign materials in the water to the machine. If the machine is unable to receive sufficient water, although your water tap is opened, these filters should be cleaned.
- Remove the water inlet hose.
- Remove the filter found on the water inlet valve by using a pair of pliers and wash thoroughly with a brush.
- Clean the filter of the water inlet hose, located on the tap side, by removing manually together with the seal.
- After you clean the filters, you can fit them the same way as you have removed them.
natural_image
Diagram showing a hand holding a tool near a sink with circular components, next to a close-up of a textured surface (no text or symbols)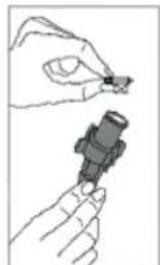
natural_image
Illustration of a hand holding a small object, possibly a connector or tool, with no visible text or symbols.
WARNING!
Danger of being scalded!
Since the water inside the pump maybe hot, wait for it to cool.
DETERGENT DRAWER
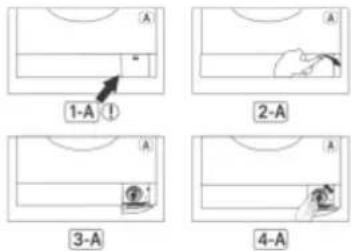
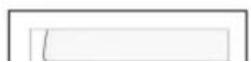
Detergents may form sediment in your detergent drawer or in the housing of the detergent drawer over time. To clean the sediment, pull out the detergent drawer from time to time.
To pull out the detergent drawer:
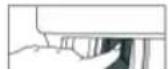
• Pull the detergent drawer to the end.(DIAGRAM-1)
- Press the blue siphon plug in the drawer and continue to pull the drawer until it is removed. (DIAGRAM-2)
- Wash with an old toothbrush and plenty of water.
- Ensure that any leftover detergent does not drop into your machine.
- After drying the detergent drawer return it into the housing in the same way that you pulled it out.
THE CABINET
Clean the exterior surface of the cabinet of your machine with lukewarm water and a cleaning substance that will not damage the cabinet. After rinsing with clean water, wipe it with a soft and dry cloth.
WARNING!
If the machine is installed in a location where the ambient temperature can fall below 0^ C, ensure the following procedure is used when it is not in use:
- Plug in the machine.
- Close the water tap and remove the water inlet hose from the tap.
- Place the ends of the water drain and water inlet hose in a cup on the ground.
- Turn the program knob to "Drain" program.
• The program ready light will come on. - Run the program by pressing the start/pause button.
- Unplug your machine when the program is over (program end light is on). When you complete this process, the remaining water inside the machine will be drained and thus formation of ice in the machine will be prevented. When you operate your machine again, be sure that the ambient temperature is above 0^ .
THE DRUM
Do not leave metal parts like needles, staples or coins inside your machine. These pieces cause rust stains in the drum. To eliminate these stains, use a suitable cleaning substance and follow the recommendations of the cleaning substance producer. For cleaning rust stains, never use scouring pads or similar rough objects.
LIMESCALE REMOVAL
If you use the correct amount of detergent, there will be no need for limescale removal. However, if you wish to remove limescale, use the limescale protectors available in the market and pay attention to their warnings.
SECTION 7: PRACTICAL INFORMATION

Alcoholic beverages: The stain point should first be washed with cold water, than wiped with glycerine and water and then be rinsed with water mixed with vinegar.

Shoe Polish: The stain should be slightly scratched without ruining the cloth, rubbed with detergent and rinsed. In case it is not eliminated, it should be rubbed with 1 unit of pure alcohol (96 degrees) mixed in 2 units of water and then washed with lukewarm water.

Tea and coffee: Stretch the stained area of your cloth on the top of a container and pour water as hot as the type of your cloth can endure on it. If the type of your cloth is suitable, wash it with lye.

Chocolate and cocoa: By leaving your clothes in cold water and rubbing with soap or detergent, wash it in the highest temperature that the type of your cloth can endure. If there is still a stain of oil left, wipe with oxygenated water (in proportion of 3%).

Tomato paste: After scraping the dried pieces without ruining the cloth, leave in cold water for about 30 minutes and wash by rubbing with detergent.

Meat broth-egg: Eliminate the dried stain residues and wipe with a sponge or soft cloth wetted in cold water. Rub with detergent and wash with diluted lye.

Grease and oil stains: First wipe the residues. Rub the stain with detergent and then wash with lukewarm soapy water.
Mustard: First apply glycerine to the stained area. Rub with detergent and then wash. If the stain still does not disappear, wipe with alcohol (On synthetic and coloured cloth, a mixture of 1 unit alcohol, 2 units water should be used)

Blood stain: Lay your clothes in cold water for 30 minutes. If the stain still does not disappear, lay in mixture of water and ammonia (3 table-spoons of ammonia in 4 litres of water) for 30 minutes.

Cream, ice-cream and milk: Lay your clothes in cold water and rub the stained area with detergent. If the stain has still not disappeared, apply lye on the fabric of your clothes in proper proportion. (Do not use lye on coloured clothes).

Mould: Mould stains should be cleaned as soon as possible. The stain should be washed with detergent and if it does not disappear, it should be wiped with oxygenated water (in proportion of 3%).

Ink: Hold the stained area under cold water and wait until the inky water completely runs off. Then rub with water diluted with lemon juice and detergent, wash after waiting for 5 minutes.

Fruit: Stretch the stained area of your clothes on the top of a container and pour cold water on it. Do not pour hot water on the stain. Wipe with cold water and apply glycerine. Wait for 1-2 hours and rinse after wiping with a few drops of white vinegar.

Grass stain: Rub the stained part with detergent. If the type of fabric is suitable for use of lye, wash it with lye. Rub your woollen clothes with alcohol. (For coloured ones, a mixture of 1 unit pure alcohol and 2 units of water).

Oil Paint: The stain should be eliminated before it dries by applying thinners on it. Then it should be rubbed with detergent and washed.

Burnt stain: If your cloth is suitable for use of lye, you can add lye into your washing water. For woolen fabric, a cloth dampened in oxygenated water should be covered on the stain and it should be ironed with a dry cloth on it. It should be washed after rinsing well.
SECTION 8: AVOIDING MINOR FAULTS
All repairs carried out on the machine should be done by authorised service agents only.
| FAILURE PROBABLE CAUSE | METHODS OF ELIMINATION | |
| Your machine does not operate. | It is unplugged. | Insert the plug into the socket. |
| The fuse is blown. Change the fuse. | ||
| The electric power is off. Check the electric power. | ||
| Start/pause button has not been pressed. | Press the start/pause button. | |
| The program knob is in the O(off) position. | Turn the program knob to the required program. | |
| The door is not shut properly. | Shut the door properly. You should hear the click. | |
| Your machine does not receive water. | Water tap is closed. Open water tap. | |
| The water inlet hose may be bent. | Check the water inlet hose. | |
| The water inlet hose is obstructed. | Clean the filters of water inlet hose. (*) | |
| The valve inlet filter is obstructed. | Clean the valve inlet filter. (*) | |
| The door is not shut properly. | Shut the door properly. You should hear the click. | |
| Your machine is not draining water. | The drain hose is obstructed or bent. | Check the drain hose. |
| The pump filter is obstructed. | Clean the pump filter. (*) | |
| The clothes are not placed inside the machine in a well-balanced manner. | Spread the clothes inside the machine in an orderly and well-balanced manner. | |
| Your machine is vibrating. | The feet of your machine are not adjusted. | Adjust the feet. (**) |
| Transportation screws are not removed. | Remove transportation screws. (**) | |
(*) See the section concerning the maintenance and cleaning of your machine.
(**) See the section concerning installation of your machine.
| FAILURE PROBABLE CAUSE | METHODS OF ELIMINATION | |
| Your machine is vibrating. | There is a small amount of clothes in the drum. | It does not prevent operation of the machine. |
| Excessive amount of clothes are filled in the machine or the clothes are not placed in a well-balanced manner. | Do not exceed the recommended quantity of clothes and spread your clothes in the machine in a well-balanced manner. | |
| Your machine touches a rigid object. | Prevent your machine from touching other objects. | |
| Excessive foam in the detergent drawer. | Too much detergent has been used. | Press the start/pause button. In order to stop the foam, dilute one table-spoon of softener in half litre of water and pour it into the detergent drawer. Press the start/pause button after 5-10 minutes. Arrange the amount of the detergent properly in the next washing process. |
| Wrong detergent has been used. | Use only detergents produced for full automatic washing machines. | |
| The washing result is bad. | Your laundry is too dirty for the program you have selected. | Select a suitable program. (see Table-1) |
| The amount of detergent used is not sufficient. | Use more detergent, according to the detergent producer. | |
| The washing result is not good. | Clothes exceeding the maximum capacity have been filled in your machine. | Put the clothes in your machine in a manner not to exceed its maximum capacity. |
| Your water may be hard. | Use the amount of detergent according to the declaration of the detergent producer. | |
| Distribution of the clothes in your machine is not well-balanced. | Spread the clothes inside the machine in an orderly and well-balanced manner . | |
| The water is drained from the machine as soon as it is filled. | The end of the water drain hose is in a position too low according to the machine. | Place the water drain hose in an appropriate height.(**) |
| No water is seen in the drum during washing. | No failure. The water is at the lower part of the drum. | - |
| There are residues of detergent on the clothes. | The pieces of some detergents which do not dissolve in water may stick to your clothes as white stains. | By setting your machine to the “Rinse” program, make an additional rinse or eliminate the stains after drying, with the help of a brush. |
| There are grey stains on the clothes. | These stains may be caused by oil, cream or ointment. | In the next washing operation, use the maximum detergent amount declared by the detergent producer. |
(**) See the section concerning installation of your machine.
| FAILURE PROBABLE CAUSE | METHODS OF ELIMINATION | |
| The spinning process is not done or starts with delay. | No failure. The unbalanced load control works in that way. | The unbalanced load control system will try to distribute your clothes in an homogenous manner. After your clothes are distributed, passage to the spinning process will be realised. In the next washing process, place your clothes into the machine in a well-balanced manner. |
SECTION 9: AUTOMATIC FAILURE DETECTION SYSTEM
Your machine is equipped with systems which will both take the necessary precautions and warn you in case of any failure by controlling itself constantly during the washing processes.
| FAILURE CODE | FAILURE INDICATOR | PROBABLE FAILURE | THE PROCESS TO BE DONE |
| Err 01 | The start/pause light blinks. | The door is not shut properly. | Shut the door properly so that you hear the click. If the problem persists, turn off the machine, unplug and contact the authorised service agent immediately. |
| Err 02 | The program ready light blinks. | The water level in your machine is below the heater. The pressure of your water supply may be low. | Turn the tap fully on. Water may be cut, check it. If the problem is still continuing, your machine will automatically stop after a while. Unplug your machine, turn off the tap and contact the authorised service agent. |
| Err 03 | The start/pause light and program ready light blinks. | The pump has failed or the pump filter is obstructed. | Clean the pump filter. If the problem persists, contact the authorised service agent. (*) |
| Err 04 | The program end light blinks. | There is an excessive amount of water in your machine. | Your machine will automatically drain the water. After your machine has completed the draining process, shut down your machine and unplug. Close the tap and contact the authorised service agent. |
(*) See the section regarding the maintenance and cleaning of your machine.
| FAILURE CODE | FAILURE INDICATOR | PROBABLE FAILURE | THE PROCESS TO BE DONE |
| Err 05 | The start/pause light and program end light blink. | The heater of your machine or the heat sensor has failed. | Shut down your machine and unplug. Turn off your tap and contact the authorised service agent. |
| Err 06 | The program ready light and program end light blink. | The motor has failed. | Shut down your machine and unplug. Turn off your tap and contact the authorised service agent. |
| Err 07 | The program start/pause light, ready light and program end light stays on permanently. | Configuration error. | Shut down your machine and unplug. Turn off your tap and contact the authorised service agent. |
| Err 08 | The start/pause light, program ready light and program end light blink. | Fault error | Shut down your machine and unplug. Turn off your tap and contact the authorised service agent. |
| Err 09 | The program ready light and program end light stays on permanently. | The network voltage is too high or too low. | If the network voltage is lower than 150V or higher than 260V, your machine will automatically stop. When the network voltage has recovered, your machine will continue its operation. |
SECTION 10: INTERNATIONAL WASHING SYMBOLS
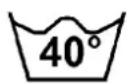 | 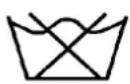 | 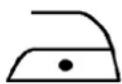 | 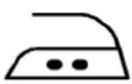 |
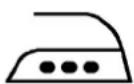
| Washing temperature. | Do not wash (hand wash) | Lukewarm iron. | Medium hot iron. |
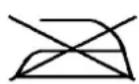
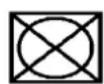
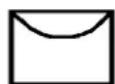
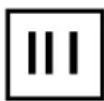

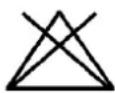
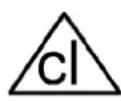
Drip dry. Dry flat. Do not bleach. Handy to bleach.
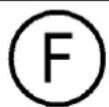
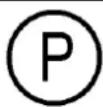
All of these are dry cleaning symbols. The letters are to instruct the cleaner what type of solvent to be used. Garments bearing these symbols should not be washed in your machine unless the label says otherwise.
Crosslee plc, Halifax, HX3 8DE, UK
- CONTENTS
- SECTION 1: BEFORE USE
- SECTION 2: INSTALLATION
- SECTION 3: TECHNICAL SPECIFICATIONS
- SECTION 4: CONTROL PANEL
- SECTION 5: WASHING YOUR LAUNDRY
- SECTION 6: MAINTENANCE AND CLEANING
- SAFETY WARNINGS
- REMOVAL OF TRANSPORTATION SCREWS
- ELECTRICAL CONNECTION
- DRAIN CONNECTION
- START/PAUSE BUTTON
- FUNCTION INDICATOR LIGHTS
- FUNCTION BUTTONS
- No spin
- Cold wash
- PROGRAM KNOB
- First wash cycle
- BEFORE WASHING
- Sorting your laundry
- Putting detergent into the machine
- RUNNING THE MACHINE
- Changing the program
- Cancellation of the program
- Program ending
- WATER INLET FILTERS
- WARNING!
- DETERGENT DRAWER
- THE CABINET
- THE DRUM
- LIMESCALE REMOVAL
- SECTION 7: PRACTICAL INFORMATION
- SECTION 8: AVOIDING MINOR FAULTS
- SECTION 9: AUTOMATIC FAILURE DETECTION SYSTEM
- SECTION 10: INTERNATIONAL WASHING SYMBOLS
Brand : White Knight
Model : WM105VB
Category : Washing machine