C72AW - Washing machine White Knight - Free user manual and instructions
Find the device manual for free C72AW White Knight in PDF.


| Product Type | Condenser Tumble Dryer |
| Brand | White Knight |
| Model | C72AW |
| Dimensions (H x W x D) | 85 cm x 59.5 cm x 58 cm |
| Maximum Dry Load (Cotton) | 7 kg |
| Maximum Dry Load (Delicates) | 7 kg |
| Energy Efficiency Class | C |
| Condensing Efficiency Class | D |
| Annual Energy Consumption | 561 kWh |
| Energy Consumption Full Load | 4.71 kWh |
| Energy Consumption Half Load | 2.60 kWh |
| Sound Power Level | 72 dBA |
| Heat Settings | Selectable via HEAT SWITCH |
| Timer Range | Selectable via TIMER dial |
| Safety Features | Safety cut-out, hot surface warning, automatic cool down |
| Maintenance | Clean lint filter after each use; clean condenser monthly |
| Drain Options | Internal drain pump for connection to household waste pipe |
| Stacking Kit Optional | Yes, use only kit 0312-004-01000 |
| Door Reversibility | Yes, reversible (instructions on back page) |
| Power Consumption Off Mode | 0 W |
| Power Consumption Left On Mode | 0 W |
| Standard Programme Duration Full Load | 125 minutes |
| Standard Programme Duration Half Load | 75 minutes |
Frequently Asked Questions - C72AW White Knight
User questions about C72AW White Knight
0 question about this device. Answer the ones you know or ask your own.
Ask a new question about this device
Download the instructions for your Washing machine in PDF format for free! Find your manual C72AW - White Knight and take your electronic device back in hand. On this page are published all the documents necessary for the use of your device. C72AW by White Knight.
USER MANUAL C72AW White Knight
INSTRUCTIONS FOR USE CONDENSER TUMBLE DRYER

White Knight
IMPORTANT: PLEASE READ THESE
INSTRUCTIONS THOROUGHLY BEFORE USING
THIS APPLIANCE. KEEP THEM IN A SAFE PLACE FOR FUTURE REFERENCE.
IMPORTANT USER INFORMATION
—This tumble dryer is intended for NORMAL DOMESTIC USE ONLY.
—Please note it is not recommended that the dryer is placed directly next to ovens or cookers as the performance of the dryer may be affected.
—A carpet must not obstruct the ventilation openings in the base of the dryer.
- Do not stack the tumble dryer on top of other appliances without the correct stacking kit.
—Any electrical work required to install the appliance should be carried out by a qualified person.
—It is important to clean the lint filter after each drying cycle and the condenser every month or the restrictions to airflow will extend drying times and could cause the safety cut-out to trip.
—Under no circumstances should anything other than the recommended articles be placed in the tumble dryer.
—The tumble dryer should be serviced by an appointed service organisation and only genuine parts used.
—It is dangerous to alter or modify the product in any way other than fitting authorized accessories.
- We recommend that the appliance is unplugged each time after use. It should always be disconnected from the electricity supply or long periods (i.e.weekends, if it is to be left unattended for long periods such as holidays etc.)
—The rear of the dryer gets quite hot during use. Position the dryer so that the back is not accessible while in operation, but ensure that the sides have a space available to allow airflow.
—The special mains cable and plug assembly must only be replaced with a genuine part from the manufacturer or our appointed service agent.
It is important to clean fluff from the window of the dryer and around the door seal after each drying cycle. Failure to do so could result in water leaking.
- This appliance can be used by children aged from 8 years and above and persons with reduced physical, sensory or mental capabilities or lack of experience and knowledge if they have been given supervision or instruction concerning use of the appliance in a safe way and understand the hazards involved. Children shall not play with the appliance. Cleaning and user maintenance shall not be made by children without supervision. Children of less than 3 years should be kept away unless continuously supervised.
Fabric softeners, or similar products, should be used as specified by the fabric softener instructions.
WARNING: Never stop a tumble dryer before the end of a drying cycle unless all items are quickly removed and spread out so that heat is dissipated.
Remove all objects from pockets such as lighters and matches.
DO NOT use a two-way adaptor, or extension lead. The dryer must be connected to its own socket.
DO NOT block the air inlets at the front, base, rear and side of your dryer.
DO NOT allow fluff to accumulate around the tumble dryer. Risk of fire
DO NOT exceed the recommended maximum load.
DO NOT dry unwashed items in the tumble dryer
DO NOT place articles in the dryer if anything other than a water solution has been used in the cleaning process.
DO NOT attempt to dry dripping wet articles.
DO NOT use the tumble dryer if you suspect that it is damaged in any way. Under no circumstances should you attempt to repair the appliance yourself. Repairs carried out by inexperienced persons may cause serious injury. Consult your local appointed service engineer and insist on genuine spare parts.
INSTALLATION
Position the tumble dryer so that the plug remains accessible after installation. Do not block the vent at the front or base of the dryer, as this will impair the working of the machine. This appliance must not be installed behind a lockable door, a sliding door or a door with hinges on the opposite side to that of the tumble dryer.
DRAINAGE OPTIONS
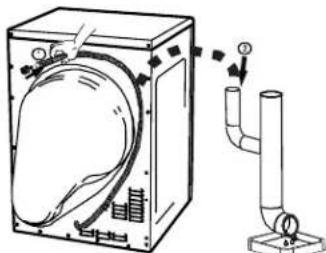
Your new tumble dryer is fitted with an internal drain pump, which enables you to drain condensed water to your household waste pipe. To connect the dryer to your household waste pipe, follow the simple instructions below:-
1/ Pull the drain hose from the valve at the top of the unit.
2/ Fit the drain hose into your household waste pipe, ensuring a gap between the end of the hose and any water in the waste pipe.
natural_image
Technical line drawing of a washing machine with a pipe fitting and a side view showing internal components (no text or labels)If the drain hose is not long enough to reach your waste pipe, a drain extension kit can obtained from your retailer (part number 4213 089 8778).
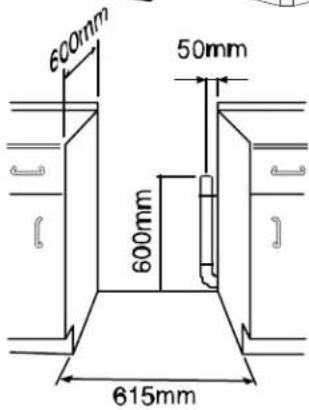
The illustration shows the minimum space required by the dryer and the position of the waste-pipe within this space and behind the dryer. If a trap is fitted it must not obstruct the air inlet at the back of the dryer. The waste pipe can be positioned on either side of the dryer.
If the waste pipe is used by the dryer and a washing machine then its diameter must be large enough to contain both hoses - 1.5" bore (38mm) minimum.
FINAL INSTALLATION
natural_image
Three-panel illustration showing solar panel installation on a surface, with no visible text or symbols.Push the filter into its operating position as shown in the diagram. If you wish to change the side on which your door opens, see the instructions on the back page. Remove any dust by wiping the drum and door with a damp cloth. Any initial smell of burning will be caused by dust on the heater and will quickly disappear.
THE CONTROLS – (control panel styles may vary)
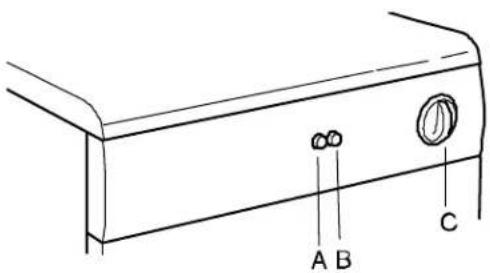
A. HEAT SWITCH Select the required heat setting based on the recommendations on the control panel. B. START BUTTON Press Start button after closing the door and selecting the required drying time. C. THE TIMER Select the required drying time based on the recommendations on the control panel.
PREPARATION
Check care labels inside the garments.
CARE LABELS YOU MAY FIND ON YOUR FABRICS
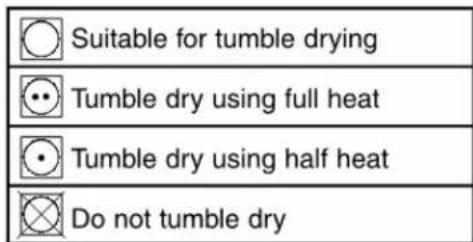
Do not tumble dry woollen or wool mixture articles unless the article is labelled as being suitable. This should avoid shrinkage.
Place delicate articles e.g.tights, scarves, inside a pillowcase.
To avoid the need to iron easycare polyester/cotton items it is .better to only dry small loads (i.e. half fill drum) It is better to dry small and large articles together.
Fabric softeners, or similar products, should be used as specified by the fabric softener instructions. Do not overload the dryer or dry large bulky items such as duvets or sleeping bags as it is important that the airflow through the dryer is not obstructed.
The final part of a tumble dryer cycle occurs without heat (cool down cycle) to ensure that the items are left at a temperature that ensures that the items will not be damaged.
Items that have been soiled with substances such as cooking oil, acetone, alcohol, petrol, kerosene, spot removers, turpentine, waxes and wax removers should be washed in hot water with an extra amount of detergent before being dried in the tumble dryer.
Items such as foam rubber (latex foam), shower caps, waterproof textiles, rubber backed articles and clothes or pillows fitted with foam rubber pads should not be dried in the tumble dryer.
OPERATION
Open the door.
Load clothes loosely into the drum.
Load sheets first, starting with one corner.
Close the door.
Dry your hands.
Check that the timer is in the '0' position.
Plug in the machine.
Select correct heat position, (see programme chart on control panel for recommendations).
Set the timer to the required time setting (see programme chart on control panel for recommendations).
For energy labeling purposes (EN61121:2005) for a cotton dry load, use the maximum load weight for cotton and set the timer to the recommended drying time for cotton dry as specified on the control panel.
The standard cotton programme is suitable to dry normal wet cotton laundry. It is the most efficient programme in terms of energy consumption for drying wet cotton laundry.
Your appliance is a reversing, small door opening. A full load will typically take 125 minutes and will use approximately 4.71kWh of electricity. A half load will typically take 75 minutes and will use approximately 2.60kWh of electricity.
The power consumption of the off-mode and the left-on mode is zero.
Press the start button.
The drum will begin rotating. Reversing drum models will stop periodically to rotate in the reverse direction for a short time.
Should the clothes become dry before the cycle has finished, or if an excessive programme time has been selected, the drum will continue to rotate while the thermostat will automatically regulate the heater to reduce the risk of over drying.
If the door is opened during a cycle the dryer will stop. To restart, close the door and press the start button. When drying large items such as sheets, we suggest you periodically stop the dryer to redistribute the load, and restart it immediately afterwards.
There is an automatic 12 minute cool down period at the end of every cycle, during which the heater is switched off. This helps to minimize creasing, and must always be used fully to avoid the risk of fire.
NEVER SWITCH THE DRYER OFF AND LEAVE A HOT LOAD IN THE DRUM. RISK OF FIRE.
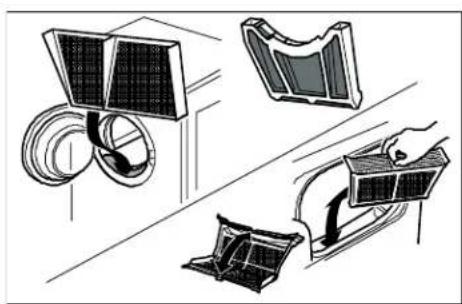
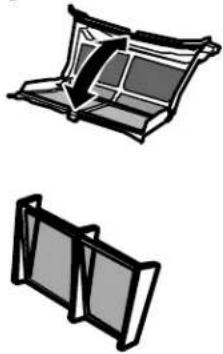
ALWAYS CLEAN THE FILTER AFTER EACH USE. Failure to do so could cause the safety cut-out to operate.
natural_image
Two 3D architectural cutaway diagrams of a building facade, showing front and side views (no text or symbols)- Pull the filter upwards and away from the appliance.
- Remove any threads or fluff by hand or with a soft brush.
- Slide the filter back.
- Wash the filter occasionally in detergent solution using a soft brush to remove small particles.
- If your filter becomes damaged, replace it to ensure no damage is caused to the dryer.
THE CONDENSER
The condenser and ducting should be cleaned monthly or more frequently if the dryer is in constant use. See “CLEANING THE CONDENSER” below.
NOTE: The condenser will discolour through use.
REMOVING THE CONDENSER
-Firmly pull the condenser out.
RE-INSTALLING THE CONDENSER
—Carefully push the condenser back into the machine, until it is pushed fully home and a “click” is heard.
IMPORTANT:
- Ensure all lint and fluff is removed from around the grille seal before closing or water may leak.
- The dryer may leak if the condenser is not correctly re-installed
CLEANING THE CONDENSER
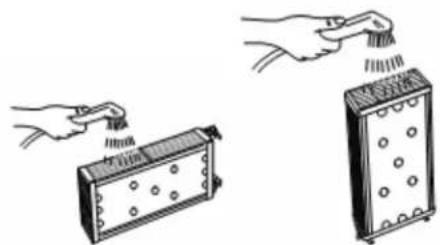
CAUTION: For maximum efficiency, the plates are made from very thin aluminum and are easily damaged. Do not try to poke anything between the plates or use a hard object or tool for cleaning. At all times, handle the condenser carefully and avoid crushing the plates.
-Remove the condenser (see above).
-Flush the fluff from between the plates under running water and carefully shake off excess water.
natural_image
Illustration showing two hand positions: one holding a tool, the other handling a tray with circular holes (no text or symbols)Whilst the condenser is removed, clean as much fluff as possible from inside the ducting by reaching a hand into the machine. In particular, keep the passage from the fan clear (on the right hand side of the condenser duct).
After cleaning, re-install the condenser (see above).
OPTIONAL EXTRAS
Stacking Kit.
This enables the dryer to be stacked on top of another similar flat topped appliance. Only stack kit 0312-004-01000 should be used. Any other stack kit may affect performance.
The above item can be purchased as an accessory for your tumble dryer from your supplier.
TECHNICAL DATA
OVERALL DIMENSIONS:
Height: 85 cm
Width: 59.5 cm
Depth: 58 cm
MAXIMUM DRY WEIGHT LOADS:
Cotton 7kg
(For minimum creasing 2kg)
Delicates 7kg
For electrical ratings see plate on back of dryer.
For Model No. see serial plate inside door (needed when requesting service).
"Room temperature range 5°C to 30°C. (Drying performance decreases as room temperature falls).
Your washing machine should have a spin speed of not less than 1000rpm for maximum efficiency."
CUSTOMER ADVICE – BEFORE CALLING FOR ASSISTANCE
If the clothes are not dry after normal drying time:
-Check that you used the correct heat setting.
-Check that you have not set the timer within a cool down period.
- Check that the lint filter has been cleaned. A blocked filter will restrict the airflow.
- Check that your dryer is heating - below the door to the left side, should feel warm to the touch after the first 10-15 minutes of its programme.
Failure to heat may indicate the safety cut-out has operated. To reset, simply press the red button at the rear of the machine. If it has operated then a sharp “click” will be heard.
This cut-out only operates if the airflow is severely restricted so make sure the filter is clean, the air inlets and outlets at the side and back are not blocked, and that all other restrictions are removed before re-starting.
If the cut-out continues to operate after checking the above points, you should contact your service agent.
Check that the machine has the correct weight load in the drum before starting the appliance.
If your machine does not work check the following before calling a service engineer:-
- Check that there is a supply of electricity.
- Check that the door has been properly closed and the machine is switched on.
- Check the fuse in the moulded plug.
A call out charge will be applied for a service visit, if the call could have been avoided by following these instructions.
ESSENTIAL CONTACT INFORMATION FOR “IN GUARANTEE” AND “OUT OF GUARANTEE” REPAIRS.
If problems continue after checking the above points you should contact our service agent. Please ensure that you have your serial number and model number to hand when you make the call. To locate the serial number on your dryer, open the door and look for a white label inside the door opening. This will indicate the appliance model number along with the serial number.
APPROVED SERVICE AGENTS:
White Knight (Whirlpool) 0800 988 1323 (calls are free from landlines however calls from mobiles may be charged at your network provider's rates)
O R
White Knight (0800 Repair): 0344 8797422 (Calls charged at basic rate).
Northern Ireland Only: (Service Network 2000) 028 90365222 (Daytime calls cost up to 14p plus 8p per minute from BT lines Monday-Friday. Mobile and other providers' charges may vary).
THIS APPLIANCE MUST BE EARTHED
natural_image
Symbol of a trash bin with crossed lines and a blank rectangular base (no text or labels)This appliance is marked according to the European Directive 2012/19/EU on Waste Electrical and Electronic Equipment (WEEE).
This guideline is the frame of a European wide validity of return and Recycling on Waste Electrical and Electronic Equipment.
This label, positioned on the rear of your dryer, indicates the surface is hot when in operation - avoid touching.
CAUTION
HOT SURFACE
| COND SDO Rev | |
| Suppliers name or trade mark WHITE KNIGHT | |
| Model identifier 767, 762, 727, 76A, 72A, 769, 76C - TYPE | |
| Rated capacity at full load 7kg | |
| Appliance type Condenser | |
| Energy efficiency class C | |
| Energy consumption of the appliance* 561kWh | |
| The figures above is based on 160 drying cycles of the standard cotton programme at full and partial load and the consumption of the low-power modes. Actual energy consumption per cycle will depend on how the appliance is used. | |
| Automatic/non-automatic | Non-automatic |
| EU Ecolabel N/A | |
| E_dry 4.71kWh | |
| E_dry% 2.60kWh | |
| Eg_dry N/A | |
| Eg_dry% N/A | |
| Eg_dry,a N/A | |
| Eg_dry%a N/A | |
| Off mode power ( P_o ) | 0W |
| Left on mode power ( P_l ) | 0W |
| Duration of left-on mode N/A | |
| The standard cotton programme used at full and partial load is the standard drying programme to which the information in the label and the fiche relates. This programme is suitable for drying normal wet cotton laundry. It is the most efficient programme in terms of energy consumption for cotton. | |
| T_t 96mins | |
| T_dry | 125mins |
| T_dry% | 75mins |
| Condensing efficiency class | D |
| C_t | 61% |
| C_dry | 63% |
| C_dry% | 60% |
| Sound power level | 72dBA |
| Built in/not built in | This appliance is not intended to be built in. |
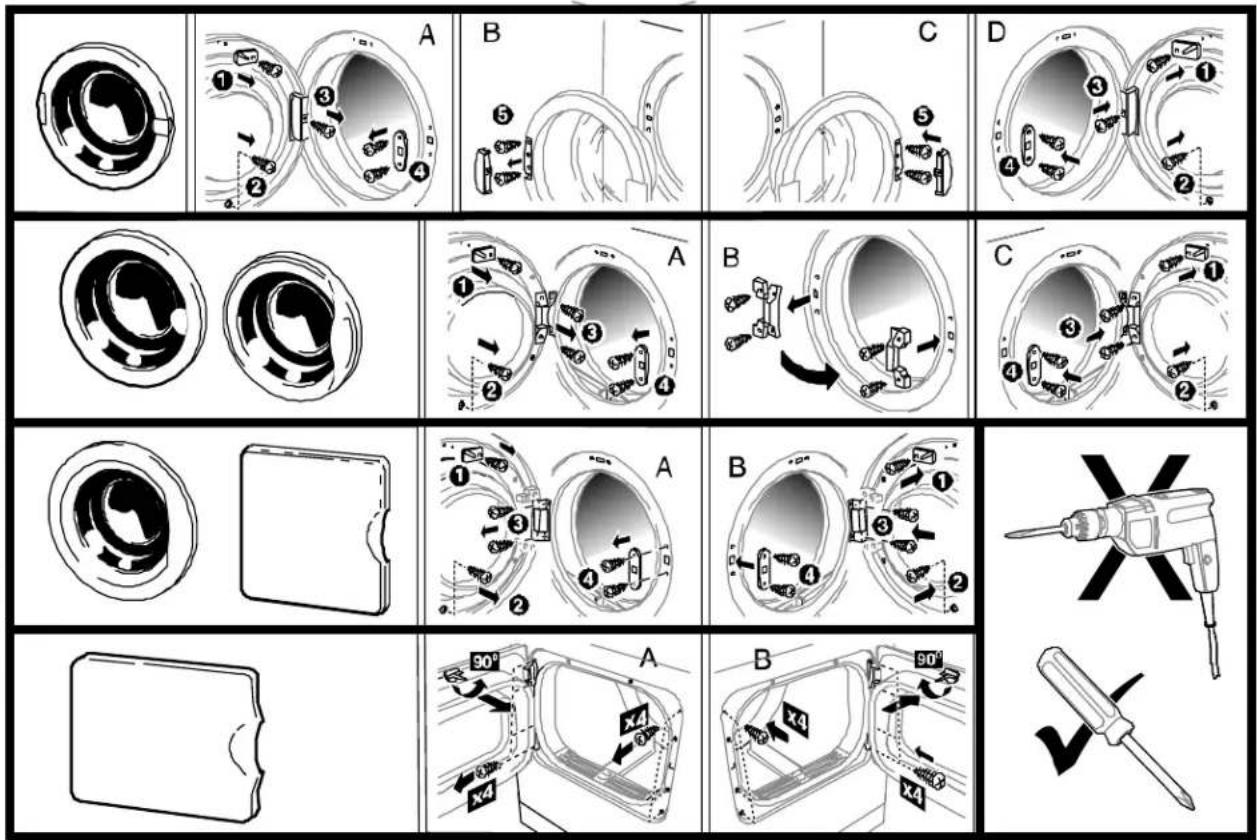
REVERSING THE DOOR OPENING
SELECT DOOR TYPE
- INSTRUCTIONS FOR USE CONDENSER TUMBLE DRYER
- White Knight
- IMPORTANT: PLEASE READ THESE
- INSTRUCTIONS THOROUGHLY BEFORE USING
- IMPORTANT USER INFORMATION
- INSTALLATION
- DRAINAGE OPTIONS
- FINAL INSTALLATION
- THE CONTROLS – (control panel styles may vary)
- PREPARATION
- CARE LABELS YOU MAY FIND ON YOUR FABRICS
- OPERATION
- THE CONDENSER
- REMOVING THE CONDENSER
- RE-INSTALLING THE CONDENSER
- IMPORTANT:
- CLEANING THE CONDENSER
- OPTIONAL EXTRAS
- TECHNICAL DATA
- OVERALL DIMENSIONS:
- MAXIMUM DRY WEIGHT LOADS:
- CUSTOMER ADVICE – BEFORE CALLING FOR ASSISTANCE
- A call out charge will be applied for a service visit, if the call could have been avoided by following these instructions.
- ESSENTIAL CONTACT INFORMATION FOR “IN GUARANTEE” AND “OUT OF GUARANTEE” REPAIRS.
- APPROVED SERVICE AGENTS:
- THIS APPLIANCE MUST BE EARTHED
- REVERSING THE DOOR OPENING
Brand : White Knight
Model : C72AW
Category : Washing machine