
LCD-B2004 - Television FUNAI - Free user manual and instructions
Find the device manual for free LCD-B2004 FUNAI in PDF.


| Product Type | LCD Television |
| Brand | Funai |
| Model | LCD-B2004 |
| Screen Size | 20 inches (diagonal) |
| Resolution | 1366 x 768 (HD) |
| Aspect Ratio | 16:9 |
| Brightness | 250 cd/m² |
| Contrast Ratio | 1000:1 |
| Response Time | 8 ms |
| Viewing Angle | 178° horizontal / 178° vertical |
| Connectivity | 1x HDMI, 1x Composite (AV), 1x VGA (PC), 1x USB |
| Audio Output | 2 x 5W speakers |
| Power Consumption | 45 W (typical), <1 W standby |
| Power Supply | AC 100-240V, 50/60Hz |
| Dimensions (with stand) | 480 x 340 x 180 mm |
| Dimensions (without stand) | 480 x 300 x 60 mm |
| Weight | 4.2 kg |
| Wall Mount VESA | 100 x 100 mm |
| Remote Control | Included |
| Additional Features | Built-in digital tuner (ATSC), parental control, sleep timer, closed captioning |
Frequently Asked Questions - LCD-B2004 FUNAI
User questions about LCD-B2004 FUNAI
0 question about this device. Answer the ones you know or ask your own.
Ask a new question about this device
Download the instructions for your Television in PDF format for free! Find your manual LCD-B2004 - FUNAI and take your electronic device back in hand. On this page are published all the documents necessary for the use of your device. LCD-B2004 by FUNAI.
USER MANUAL LCD-B2004 FUNAI
- Auto Power Off Function- If there is no signal input from the antenna terminal and no user operation for 15 minutes, the TV will turn itself off automatically.
- S-VIDEO Input- allows you to get better picture detail and clarity for the playback of S-VHS VCR tapes, Video Discs, Satellite System, Video Game or Video Cameras.
Supplied Accessories
- Remote control
• Two R6 (AA) batteries - Owner's Manual
DECLARATION OF CONFORMITY
This product complies with the requirement of the directives
EMC-Directive: 89 / 336 / EEC
Low Voltage Directive: 737/25/EEC
CE Marking: 93/68/EEC
We declare that the following products:
LCD COLOUR TV, Model: LCD-A1504, LCD-A2004, LCD-B1504, LCD-B2004, LCD-C1504 and LCD-C2004 Trade Name: Funai
is in compliance with following Regulations.
Help Phone Number in UK (only for LCD-B1504/LCD-B2004): 0870 240 5807
Printed in China
Model/Serial Number
To aid reporting in case of loss or theft, please record the TV's model and serial numbers in the space provided. The numbers are located at the rear of the TV.
Model number:
Serial number:
A Note About Recycling
This product's packaging materials are recyclable and can be reused. Please dispose of any materials in accordance with your local recycling regulations.
This product consists of materials which can be recycled and reused if disassembled by a specialised company. Batteries should never be thrown away or incinerated but disposed of in accordance with your local regulations concerning chemical wastes.
Contact your council for details.
EN55013:2001+A1:2003
EN55020: 2002 + A1: 2003
EN61000-3-2: 2000, EN61000-3-3: 1995 + A1: 2001
EN60065:1998
EN60825-1: 1994 + A1: 1996 + A2: 2001


L4100EA/L4200EA/L4101BB/L4201BB**
EN
2005.8.05
PRECAUTIONS
WARNING:
TO REDUCE THE RISK OF FIRE OR ELECTRIC SHOCK, DO NOT EXPOSE THIS APPLIANCE TO RAIN OR MOISTURE.
CAUTION:
TO REDUCE THE RISK OF ELECTRIC SHOCK, DO NOT REMOVE COVER (OR BACK). NO USER SERVICEABLE PARTS INSIDE. REFER SERVICING TO QUALIFIED SERVICE PERSONNEL.
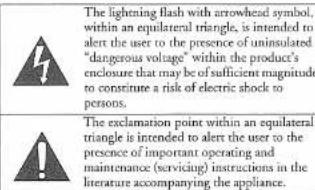
The lightening flash with arrowhead symbol, within an equilateral triangle, is intended to alert the user to the presence of uninsulated "dangerous voltage" within the product's enclosure that may be of sufficient magnitude to constitute a risk of electric shock to persons.
The exclamation point within an equilateral triangle is intended to alert the user to the presence of important operating and maintenance (servicing) instructions in the literature accompanying the appliance.
POWER SUPPLY
The main power supply is engaged when the main plug is plugged in a 220-240V, 50Hz AC outlet. To operate the unit, press STANDBY-ON to turn on the unit.
WARNING: LIVE PARTS INSIDE.
DO NOT REMOVE ANY SCREWS.
CAUTION
1) Do not attempt to open the cabinet. There are no parts you can service inside. Refer all servicing to qualified service personnel.
2) Slots and openings in the cabinet and the sides or bottom are provided for ventilation. To ensure reliable operation and to protect the unit from overheating, these openings must not be blocked or covered.
Avoid installation in enclosed spaces such as bookcases unless proper ventilation is provided.
3) Keep the unit away from radiators and other heat sources.
4) Do not push objects of any kind into the unit through the cabinet slots or openings as they could touch electrically live parts or short circuit parts resulting in a fire or electric shock.
5) Never spill liquid on this unit. If liquid is spilled and penetrates into the unit, consult qualified service personnel.
6) Use this unit in a horizontal (flat) subsoil only.
7) Do not place any combustible objects on the device (candles, etc.).
8) The LCD panel used in this product is made of glass. Therefore, it can break when the product is dropped or applied with impact. Be careful not to be injured by broken glass pieces in case the LCD panel breaks. The LCD panel is a very high technology product with 921,600 thin film transistors, giving you fine picture details. Occasionally, a few non-active pixels may appear on the screen as a fixed point of blue, green or red. Please note that this does not affect the performance of your product.
Connection to Power (Only for U.K.)
Before Switching on make sure that the voltage of your electricity supply is the same as that indicated on the rating plate.
Mains Cord
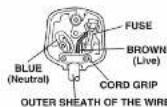
This appliance may be fitted with a non-rewireable plug. If it is necessary to change the fuse in a non-rewireable plug the fuse cover must be refitted. If the fuse cover is lost or damaged, the plug must not be used until a replacement available from the appliance manufacturer is obtained. It is important that the colour of the replacement fuse cover corresponds with the rating marking on the base of the plug. If the plug has to be changed because it is not suitable for your socket, or becomes damaged, it should be cut off and an appropriate plug fitted following the wiring instructions below. The plug removed must be disposed of safely as insertion into a 13A socket is likely to cause an electrical hazard. For your own safety read the following instructions carefully before attempting to connect this unit to mains. The wires in this mains lead are coloured in accordance with the following code:
BLUE-NEUTRAL, BROWN-LIVE
Important
As the colours of the wires in the mains lead of this appliance may not correspond with the coloured markings identifying the terminals in your plug, proceed as follows: The wire which is coloured blue must be connected to the terminal which is marked with the letter N or coloured black. The wire which is coloured brown must be connected to the terminal which is marked with the letter L or coloured red. No connection is to be made to the earth terminal of the plug. If a 13 Amp (BS 1363) Plug is used, a 5 Amp Fuse must be fitted, or if any other type of Plug is used a 5 Amp Fuse must be fitted, either in the Plug or Adaptor, or on the Distribution Board.
Mains Supply: 220 - 240 V \~ 50 Hz - AC only
Do not make any connection to the larger pin marked with the letter "E" or by the symbol ± or coloured green or green and yellow.
OPERATING CONTROLS AND FUNCTIONS
This manual describes the LCD-A1504, LCD-A2004, LCD-B1504, LCD-B2004, LCD-C1504 and LCD-C2004.
These models are different in size and shape, but operate identically. The LCD-A2004/LCD-B2004/LCD-C2004 is illustrated in this manual.
FRONT PANEL
LCD-A1504/LCD-B1504/LCD-C1504
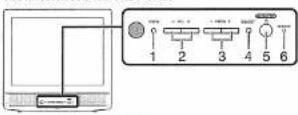
LCD-A2004/LCD-B2004/LCD-C2004
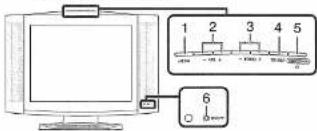
1. MENU
Press to display the menu on the TV screen.
-
VOL +/- (front panel) / VOL Δ/▽ (remote control) Press to control the volume level. Press to determine the setting mode from the menu on the TV screen (only VOL + or VOL Δ). Press to select or adjust from a particular menu (for example: Language Selection, Channel Presetting, or Picture Adjustment).
-
PROG. +/- (front panel) / PROG. ▲/▼ (remote control) Press to select memorised channel. Press to select the setting mode from the menu on the TV screen. Press to select item you want to adjust in the picture control mode.
PAGE ▲/▼ (remote control) Press to go to the next page or the previous page of Teletext.
- SELECT (front panel) / INPUT SELECT (remote control)
Press to select TV or video input (AV1 or AV2) mode.
-
STANDBY-ON Press to turn the TV ON or OFF (standby)
-
STANDBY-ON indicator
Lichts up when power is on.
- 0-9 number buttons
Press two digits to directly access the desired channel. Remember to press "0" before a single digit channel.
Press to mute the sound portion of the TV programme (Volume level display turns LIGHT RED from LIGHT BLUE). Press this button again or press VOL +/- on the front panel or VOL △/▽ on the remote control to restore sound.
Installing The Batteries
1) Remove the battery compartment cover on the remote unit by sliding it while slightly twisting.
2) Insert "R6" penlight batteries into battery compartment in the direction as indicated by the polarity (+/-) markings. Batteries installed with incorrect polarity may damage the remote unit.
3) Replace the cover.
REMOTE CONTROL
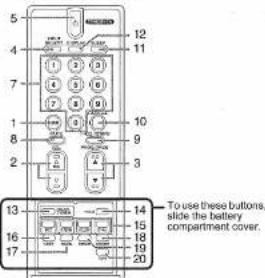
9. PROG. RETURN
Press to go back to the previously viewed channel. For example, pressing this button once will change channel display from P03 (present channel) to P10 (previously viewed channel) and pressing it a second time will return from P10 to P03.
10. SOUND SEL
Press to change sound modes.
11. SLEEP
Press to set the Sleep Timer.
- DISPLAY Press to display the channel number or input source on the screen. If you press it again, the display will disappear.
13. COLOR SYSTEM
Press to select the input signal from the tuner or external devices.
14. HOLD
Press to hold the current page of Teletext.
- RED/GREEN/YELLOW/CYAN Press to directly select the page numbers of Teletext shown at the bottom of the TV screen.
16. INDEX
Press to go back to the start page of Teletext.
17. REVEAL
Press to call up the hidden information of Teletext.
18. SUB CODE
Press to select subpages of Teletext.
19. EXPAND
Press to enlarge fonts of Teletext.
TEXT Press to switch Teletext on or off, or transparent mode.
4) Push the cover on it's top side until it clicks in order to fit the cover completely to the compartment.

REAR PANEL
LCD-A2004 / LCD-B2004 / LCD-C2004
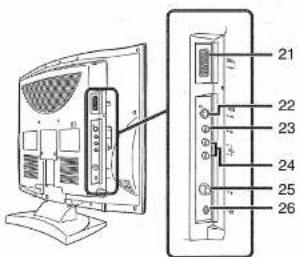
21. RGB scart jack
AV1: Connect to the scart jack of a DVD player or set top box.
Table Stand
Photo Stand
(LCD-A1504/LCD-B1504/LCD-C1504)
Adjust the length of the stand in 5 levels to change the angle of TV.

PREPARATION FOR USE
Connections
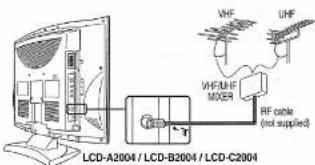
SET UP FOR USE
- Unless stated, all operations described are based on remote control use. Some operations can be carried out using the buttons on the front panel.
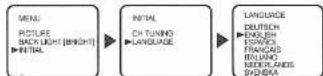
Language Selection
If you want to change the language of the on-screen menu, follow the procedure below.
1) Connect the power cord to a standard AC outlet.
Note: If some digits appear in the corner of the screen, press STANDBY-ON without unplugging the power cord.
2) Press STANDBY-ON to turn on the TV.
3) Press MENU so that the menu display appears on the TV screen.
22. S-VIDEO input jack
AV2: Connect to the S-VIDEO output jack of a video camera or VCR using the S-VIDEO cable (not supplied).
Note: The S-VIDEO jack is given priority over the VIDEO jack.
23. VIDEO input jack
AV2: Connect to the video output jack of a video
camera, VCR or video
AV2: Connect to the left/right audio output jacks of a video camera, VCR or video game.
Note: The AUDIO L (input) jack is for mono input. The sound is heard from both speakers. Use this jack for monaural audio equipment to be hooked up.
25. Aerial input jack
Connect to an antenna, cable system or satellite system.
26. 📞 Headphone jack
Connect headphone (not supplied) for personal listening. Note: Do not connect earphones that have an L-shaped plug. The plug may interfere with the cabinet.
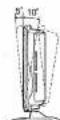
Tilt Stand
(LCD-A2004/LCD-B2004/LCD-C2004)
Adjust the stand to change the angle of TV (-5^-10^) .
1) Insert the RF cable plug into the Aerial input jack at the back of this unit.
2) Plug this unit into an AC outlet.
3) The STANDBY-ON indicator on the front panel lights on, then press STANDBY-ON on the front panel or the remote control to turn the unit on.
- PROG. (+/- or ▲/▼) can also be used to turn the unit on.
4) Press PROG ▲/▼ to point to "INITIAL", then press VOL △.
5) Press PROG ▲/▼ to point to "LANGUAGE", then press VOL △.
6) Press PROG ▲/▼ repeatedly to select your desired language, then press VOL △. • The selected language will be indicated by yellow
7) Press MENU to exit
- Supplied Accessories
- DECLARATION OF CONFORMITY
- Help Phone Number in UK (only for LCD-B1504/LCD-B2004): 0870 240 5807
- Model/Serial Number
- A Note About Recycling
- PRECAUTIONS
- WARNING:
- CAUTION:
- POWER SUPPLY
- WARNING: LIVE PARTS INSIDE.
- DO NOT REMOVE ANY SCREWS.
- CAUTION
- Connection to Power (Only for U.K.)
- Mains Cord
- Important
- OPERATING CONTROLS AND FUNCTIONS
- FRONT PANEL
- MENU
- Installing The Batteries
- PROG. RETURN
- SOUND SEL
- SLEEP
- COLOR SYSTEM
- HOLD
- INDEX
- REVEAL
- SUB CODE
- EXPAND
- REAR PANEL
- RGB scart jack
- Table Stand
- Photo Stand
- PREPARATION FOR USE
- SET UP FOR USE
- Language Selection
- S-VIDEO input jack
- VIDEO input jack
- Aerial input jack
- 📞 Headphone jack
- Tilt Stand
Brand : FUNAI
Model : LCD-B2004
Category : Television