
ACP-5040 - Car radio DAEWOO - Free user manual and instructions
Find the device manual for free ACP-5040 DAEWOO in PDF.


| Product Type | Car Stereo |
| Brand | Daewoo |
| Model | ACP-5040 |
| Form Factor | 1-DIN Standard |
| Dimensions (W x H x D) | Approx. 180 x 50 x 160 mm |
| Weight | Approx. 1.2 kg |
| Power Supply | 12V DC (Negative Ground) |
| Max Power Output | 4 x 40W |
| Radio Bands | AM / FM Stereo |
| Audio Playback | CD, CD-R/RW, MP3 Compatible |
| Additional Inputs | Auxiliary Input (3.5 mm) |
| Display | LCD with White Backlight |
| EQ Presets | Built-in Equalizer (Rock, Pop, Classic, Flat) |
| Remote Control | Included (Wired or Wireless depending on version) |
| Detachable Faceplate | Yes, for theft prevention |
| Fuse Rating | 10A (ATC/ATO type) |
| Cleaning Instructions | Wipe with soft dry cloth; avoid solvents |
| Repair and Spare Parts | Contact authorized service center; faceplate & fuse available |
| Safety Warnings | Disconnect battery negative terminal before installation; avoid short circuits |
Frequently Asked Questions - ACP-5040 DAEWOO
User questions about ACP-5040 DAEWOO
0 question about this device. Answer the ones you know or ask your own.
Ask a new question about this device
Download the instructions for your Car radio in PDF format for free! Find your manual ACP-5040 - DAEWOO and take your electronic device back in hand. On this page are published all the documents necessary for the use of your device. ACP-5040 by DAEWOO.
USER MANUAL ACP-5040 DAEWOO
CD Player/Receiver with 4-Channel High Power Output Flip Down & Full Detachable Face Panel
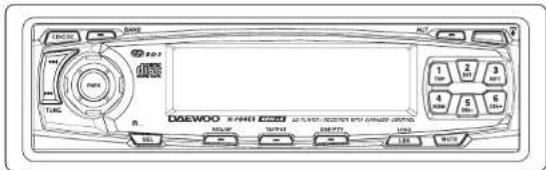
■4-Channel high Power(40W 4Ch)
Electronic Tuning
Electronic Volume/Bass/Treble/Balance/Fader
■42Memory Capability (18FM + 12MW + 12LW)
Tel. Mute & Loudness controls
■ Flip down & Full Detachable Face for Anti-Theft
■ Panel Carrying Case Included
DAEWOO
INSTRUCTION MANUAL
WIRING CONNECTIONS
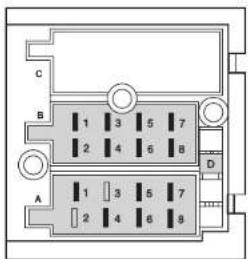
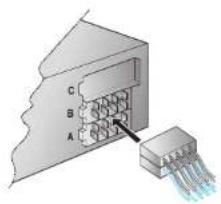
The pins in the ISO connector have the following functions (connector seen from the rear)
A. ELECTRIC CONNECTIONS
- TEL.MUTE : BROWN
- Back-up+12V: YELLOW
- +12V (electric antenna) : BLUE
- Dimmer : PINK
- +12V supply(from ignition lock) : RED
- Earth : BLACK
B. LOUD SPEAKER
- +Right Rear : VIOLET
-
- Right Rear : VIOLET/BLACK
- +Right Front : GRAY
-
- Right Front : GRAY/BLACK
- +Left Front : WHITE
-
- Left Front ; WHITE/BLACK
7.+Left Rear:GREEN
- Left Front ; WHITE/BLACK
-
- Left Rear : GREEN/BLACK
LINE OUT(RCA CORD)

Connect to input pins of additional AMP or device.
NOTE! The red cable must be connected via the car's ignition lock to prevent unwanted discharge of the battery if it is not used for longer periods of time.
HOW TO INSTALL & REMOVE THE APPARATUS
NOTE!
- Use only the supplied mounting hardware for safe and secure installation.
- Please consult your nearest dealer if you get any problems with installation.
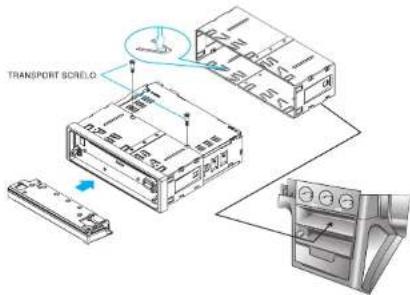
HOLDER
- Remove transport screw (You cannot insert a CD until the screw is removed.)
-
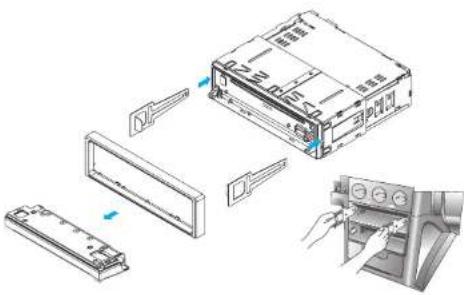
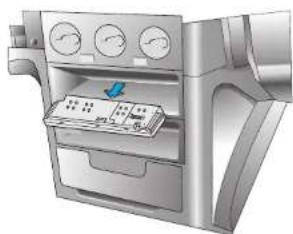
Insert the holder into the car radio slot. Fasten the holder by pulling and bending the tabs which are located around the holder as illustrated.
-
Press the release knob to open up the front panel and detach it by pulling it towards you.
- Insert the enclosed handles into the slits of the unit, as illustrated, while pressing the handle lightly, then pull the unit out of the holder.
FRONT PANEL
natural_image
Illustration of a car air conditioner unit with control panel and dials (no text or symbols visible)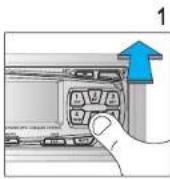
Detaching the front panel
- Press the release knob to open up the panel.
- Holding the middle upper side of the panel, pull it straight out towards the arrow direction.(See the figure)
- The red lamp blinks to tell you that the front panel has been detached.(It could be stolen)
- Keep the front panel in the supplied protection case.
Keep in mind:
- If it works malfunction, take the panel off and put it back again.
- Do not touch the contact pins on the rear of the front panel, this can cause contact errors. If the contacts are not clean, clean contacts with a cotton swab dipped in alcohol.
- Do not expose the front panel to direct heat or cold.
- Be careful not to splash juice or other soft drinks into the car audio.
- Do not apply too much force. Otherwise, the panel may be damaged.
- Never take the front panel apart.
Attaching the front panel
- Holding the panel at its top and bottom edges.
- Attach left side of the panel lightly first, then push the right side of the panel into the unit.
- Do not press the panel hard against the unit. It can be attached by pressing it lightly. And beware not to drop it.
FUNCTION DESCRIPTION, CONTROLS
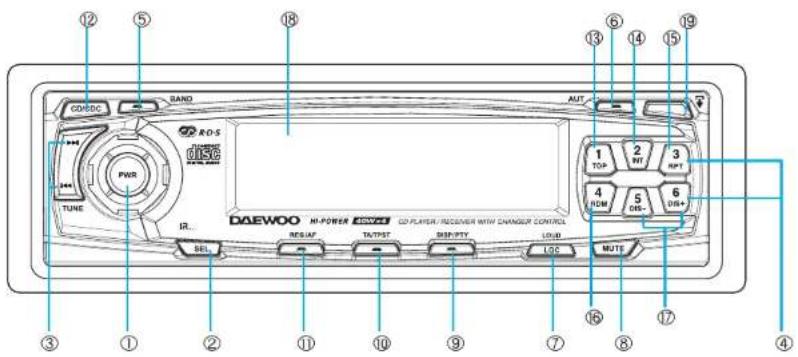
- POWER ON / OFF
- AUDIO SELECTOR
- TUNING & TRACK UP / DOWN
- PRESET BUTTON(1-6)
- BAND CONTROL
- AUT (AUTO TRAVEL PRESET)
- LOCAL STATION & LOUDNESS CONTROL
- MUTE
-
DISPLAY / PTY
-
TA / TPST STANDBY
- REGIONAL / AF
- CD / CDC BUTTON (CDC : Option)
- TOP
- INTRO SCAN
- REPEAT
- RANDOM
- DISC UP(+) / DOWN(-)
- LCD
- RELEASE BUTTON
To switch the audio system off, press power button lightly. Simultaneously, the system memorizes all information about its current setting, and restores the information when you turn the system on by pressing the power on/off button again. You can also turn the system on by pressing BAND button instead of power button.
- SOUND CONTROL (POWER, 1)
Rotate outer power button clockwise/counterclockwise to increase/decrease the VOLUME, BASS, TREBLE, BALANCE, FADER, depending on what you select using the audio selector.
2. AUDIO SELECTOR (SEL, ②)
Pressing the audio select button, you can adjust BASS, TREBLE, BALANCE, FADER and VOLUME.
Select the item you want to adjust by pressing the audio selector repeatedly. Adjust the selected item within 5 seconds. (After 5 seconds the function will again serve as the volume control.)
Telephone mute :
- When you are receiving the phone, the message of TEL MUTE is coming on the display panel and the sound should be muted automatically.
- ISO A parts, NO 1 support this function, with which the phone should be connected during the installation.
3. TUNING UP/DOWN CONTROL (▶▶, Ⓤ)
During the radio mode
Press the tuning up/down arrows (▶◀◀) for less than 0.7 seconds to choose the radio station which you want to listen to step by step. Press the buttons for more than 0.7 seconds to go to the higher or lower station automatically. The sound will be muted during seeking automatically.
In case of CD mode:
This button is to track up/down
In case of clock mode:
This button is to hour/minute up
4. PRESET STATION (Button 1-6, ⓐ)
Any station may be preset into these buttons by simply pressing and holding the buttons down for 2 seconds. Up to 18 FM(6 in FM1, 6 in FM2 and 6 in Aut FM) and 24AM(6 in MW1 or MW, 6 in MW2 or LW, 6 in AUT MW, 6 in AUT LW) can be assigned to the preset station buttons.
5. BAND CONTROL (BAND, ⑤)
Step cyclically through the tuning bands in the order :
(2 BAND) FM-1 → FM-2 MW-1 MW-2 FM-4 → (3 BAND) FM-1 → FM-2 MW LW FM-1 →
In user option programming mode, this key is used to toggle the currently displayed option.
Press more than 1.5 seconds.
ENGLISH GERMAN ITALIAN FRENOH
RADIO & DISPLAY CONTROL
6. AUTO TRAVEL PRESET (AUT, ④)
Press the AUT button within 1.5 seconds, you can change the radio mode to the AUT function that operates all over the radio band. The display will show you the message AUT. To return, press the BAND button lightly.
Press the AUT button for more than 1.5 seconds it starts to search for the 6 strongest FM or AM stations of the region where you are driving to be stored. To return to the stations you manually set, press the BAND button lightly.
When pressed LOC/LOUD button shortly, it displays the message LOC. This is used to change the tuning stop level during search. The LOCAL mode is established when the button is pressed to its ON position. At this position, stations with weak transmissions signals are skipped. This function makes it possible to scan quickly all those stations with stable reception. Press the button again to its OFF position to scan stations with weak signals.
LOUDNESS CONTROL (LOUD, ⑦)
Press more than 1.5 sec. this button to select loudness or normal sound. The message LOUD appears on the display while you enjoy the BASS and TREBLE boost. To cancel, press this button again.
8. MUTE (B)
Press this button to mute the sound temporarily. All indicator digit flashing on the display. To cancel the mode press again.
9. DISPLAY CONTROL (DISP, ⑨)
When pressed belower than 1.5 seconds.
■ present clock is displayed.
■ another key is not pressed during 5 seconds, it is changed
priority display states.
(1) In RDS Broadcasting reception

(2) In Radio Mode(Not RDS)

(3) In CD Mode(in RDS Broadcasting reception)

■ During clock displayed
After DISP key is pressed longer than 1.5 seconds User can adjust clock (T-UP:hour, T-DN:Minutes)
When pressed longer than 1.5 seconds.
The display will show the programme service name of the current station or-when not available-the band and frequency.
The display key serves to show available information:
■ Programme Type name
■ Band and frequency
■ Programme Service name
Each time this key is pressed, the display changes to the next item in the list. If an item is not available, it is skipped.
RADIO
USING THE RDS FUNCTIONS
What is RDS?
The RDS(Radio Data System) is a digital information system developed by the EBU(European Broadcasting Union). Pick-a-backed on normal FM broadcasts, RDS offers a variety of information services and automatic retuning functions for RDS-compatible car stereos.
In 1988 RDS became available in the United Kingdom, France, West Germany, Ireland and Sweden. Test transmissions are being conducted in many other European countries. It is expected that RDS will be available in most western European countries in the near future.
NOTE! The RDS function of this unit uses the RDS data transmitted along with FM broadcasts. It does not work in the MW(AM). The RDS function may not work properly in the areas where test transmissions are being conducted.
Important!
As a result of PS function the station display changes over to frequency display during the manual or automatic search for a station.
Program service (display of station name)
The radio indicates the name of the RDS-station on the display, if you receive a station with RDS-signals.
RDS digital data includes various data :
PI ... Program Identification
Recognizes the country code and the program of the channel.
PS ... program Service Name
The name of the channel is shown in the display.
AF ... List of alternative frequencies
A list of alternative frequencies with the same program contents to tune automatically to the stronger station which broadcasts the program using PI and AF.
TP ... Traffic program
Recognizes channels with traffic information.
TA ... Traffic announcement
Detects traffic information broadcast via the channel.
PTY 31 ... Alarm code
Detects alarm announcement via the channel(catastrophe alarm)
REG ... Regional change
Change to regional stations.
EON ... Enhanced other networks
Make the traffic announcement for stations without traffic decoder possible.
10. Traffic broadcast recognition (TA, ⑪)
If the button TA/TPST is pressed for less than 1.5 seconds, RDS-stations transmitting traffic information can be heard. TA is displayed when this function is engaged. When the set is CD mode, the radio automatically tunes to a strong FM station transmitting traffic information in the back ground. If the CD player is on, when a traffic announcement is transmitted, the CD is interrupted and the announcement is received at normal volume.
Even if the volume is completely turned down, the traffic announcement will be heard at normal volume. Once the announcement ended, the previous volume is resumed. The CD starts playing again.
- Traffic information breaks through only when both TP and TA are displayed at the same time.
- If only TP is displayed, no traffic information is transmitted by the current transmitter.
- To give priority to search for stations transmitting traffic information, press the TA button for more than 1.5 seconds. TPST ON will be displayed.
- To continue listening to a weak station not transmitting traffic information, press TA button for more than 1.5 seconds, TPST OFF will be displayed.
- To disregard a traffic information message, press the TA button for less than 1.5 seconds. And then TA indicator will be disappeared.
Traffic information recognition (TPST, 10)
If the RDS-station tuned on, the unit recognizes RDS-frequencies with traffic information(TPST). TPST will be indicated on the display in reception of one of these frequencies.
NOTE: During traffic announcement CD playing stops. You can hear traffic announcement at normal volume also in low volume status, if the TA-function is activated
PI seek
PI-automatic seek starts automatically, if you recall a preset button when its reception is weak. PI-seek ends automatically if a station with the same PI and a better reception is found. During seek the unit is searching for a station with the same program identification(PI) and a better reception. It is useful in some areas where some stations send no AF-list.
If the radio doesn't find a station with the same PI-code, it returns to the station you heard before.
RADIO
USING THE RDS FUNCTIONS
11. Change-over to regional program (REG, ①)
At certain times some national radio stations broadcast regional program. It is possible to pre-tune these station by pressing button REG/AF shortly. The display shows REG. Automatically after 5 seconds or by pressing any button the display shows the frequency indication or the name of the chosen program. If you want to continue to receive the particular regional program, you are tuned in to keep the function on.
If the frequency changes, the radio will only react to those stations with this regional program. You can switch off the function again by pressing button REG/AF shortly.
You can change to regional function again by pressing REG/AF buttons shortly. The function is confirmed by the word REG on the display.
If you have memorized manually any station the mode of the REG-function(turned on/off)is also memorized.
Example: A chain of radio transmitters is transmitting a music program nationally and a different program(a commentary)regionally at the same time. If the REG-function is not on, it may be that the radio switches from the preset regional spoken program to the nationally transmitted music program if the frequency is changed(AF-function) because of poor reception. If the REG-function is on however, the radio will automatically search for only those stations which are transmitting the same regional program originally selected. It is impossible for the radio to switch to another national station.
AF(network following) reception (AF, ①)
This unit returns to the stronger alternative transmitter in the list of alternative frequencies(AF). The display indicates AF as confirmation on the display. Thus a motorist can keep listening to the same program.
Example: If there are the following network broadcasting stations, The reception frequency automatically changes from 98.5MHz to 107.5MHz or 96.0MHz to 102.5MHz, but a motorist can keep listening to the same program while driving from point A to point B.
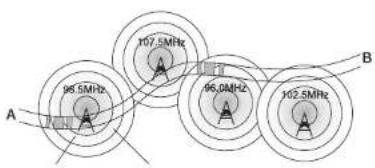
The AF-function is only possible with FM. To select AF-function switch to FM and press the button AF/REG for about 1.5 seconds. After the radio has tuned into an RDS transmitter it will automatically find the best transmitter in the particular chain of transmitters as soon as reception starts to get worse, using the PI and AF code systems, as long as you are still driving within the areas of the particular areas.
The display shows the indication AF on the display.
■ Sometimes it may seem that the radio has gone off for a short while. There is no fault-the radio is merely checking the quality or other signals on the AF-list. If muting disturbs turn off the AF-function.
- When the radio switches over to an alternative frequency, it will go quiet for a moment because it first has to check out the accuracy of the PI data for the new frequency.
- If you leave a reception area and there is no alternative AF frequency, the PS data stay in the memory and are deleted only when you start searching for a station.
- If you have memorized manually any station, the mode of the AF-function (turned on/off) also memorized.
What is EON?
EON(Enhanced Other Network) is a new RDS service provided by certain station networks.
Even if you are tuned in to an RDS station which does not give traffic news, e.g. a classical music program, you can still get the traffic news by pressing TA/TPST-button, which tunes your radio in to the traffic news. If another RDS transmitter now starts to broadcast traffic news, yours radio automatically switches to this station for the traffic news. When the traffic news is finished, it switches back to the station you were on before.
NOTE : Thanks to this new RDS-function, the alternative frequency list of the selected chain of stations is automatically updated and this ensures that there is always an instant automatic search of the best RDS stations in all programs to the particular chain of stations.
Program type recognition (PTY, ⑨)
Radios equipped with PTY are able to display the various program features of an individual station. By selecting the PTY function you can get stations with the feature you want, i.e. stations which broadcast mainly news bulletins, sports, pop music or rock music, for example.
The radio will then only seek those with the features you have preselected.
RADIO
USING THE RDS FUNCTIONS
Selecting the PTY function
Depress the button for approx. 2 seconds to tune on the PTY-function. If the station just receives a PTY-program the indication of the program name lights in the display window. If there is no station of program type available at that time, the display shows NO PTY.
Selection of a program via the seek-function; selecting a station of the correct program type
By selecting the PTY function you are able to find the type of program you want by repeatedly touching one of the no. 1 keys in the appropriate direction. The chosen program type must be confirmed by depressing and holding these button 1 (tuning up/down). Automatically seek starts for a station with the sort of music or commentary you want. If there is no station of that program type available at that time, the radio then switches automatically to the last station you selected.
M1:NEWS
M2: EDUCATE
M3: SPORTS
M4:VARIED
M5:POP M
M6:CLASSIC
| Program types | Display P | Program types Display | |
| Speech | SPEECH | Science | SCIENCE |
| News | NEWS | Varied | VARIED |
| Current affairs | AFFAIRS | Popular Music | POP M |
| Information | INFO | Rock Music | ROCK M |
| Sports | SPORT | Middle of the Road Music | MOR M |
| Education | EDUCATE | Light Classical | LIGHT M |
| Drama | DRAMA | Classical | CLASSICS |
| Culture | CULTURE | Other Music Type | OTHER |
| Order : | ||||||
| NEWS | AFFAIRS | INFO | SPORTS | EDUCATE | DRAMA | CULTURE |
| ▲ | ▼ | |||||
| SPEECH | SCIENCE | |||||
| ▲ | ▼ | |||||
| OTHER M | VARIED | |||||
| ▲ | ▼ | |||||
| CLASSIC | LIGHT M | MORM | ROCK M | POP M | ||
COMPACT DISC PLAYER
Listening to a CD
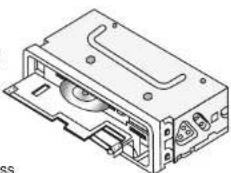
- Open the front panel by pressing the RELEASE (open, ⏻) button.
■ Insert a compact disc. - Close the front panel.
■ Play will start automatically.
■ If a DISC is already inserted, press the CD/CDC(⑫) button.
natural_image
Isometric technical drawing of a mechanical device housing with internal components (no text or symbols)12. PLAY / PAUSE(CD / CDC, ①)
■ Using the CDP only without CDC.
To stop the radio and start disc play, press this button for less than 1.5 seconds. Press the button once during disc play to pause. To release from pause mode, press this button again.
CDC Operation Ref.: CD-Changer mode selector (13p)
■ To go to the beginning of desired track
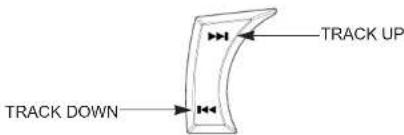
Track up & Down.
During play, press either the track up (▶▶) or the track down (◀◀) button for less than one second.
When you wish to locate a particular program, press the track/tune button in desired direction.
Reverse & Fast Forward
During play, press either the track up (▶) or the track down(◀◀) for more than one second. If the track down button is pressed, the disc is set to the rewind mode. To cancel the mode, release it. If the up button is pressed, the disc is set to the fast forward mode. Release to cancel the mode.
COMPACT DISC PLAYER Using the CD-Changer
13. TOP Function (TOP, ①)
At anytime you want to listen to the title song of disc, press this button softly. Then the CD will be played from the NO.1 track.
14. Intro Scan (INT, ⑩)
Press the INT button to know what songs are on the disc. It starts to play the first 10 seconds of the tracks which are from the next song to the last one, while INTRO appears on the display.
Press the INT button once more to listen to the song you want to hear while this function is operates. Then INTRO disappears.
15. Repeat Function (RPT, ⑯)
If you want to listen to a song repeatedly, press the RPT button, then RPT appears on the display. Press the button once again, the function returns to normal play mode.
16. Random Function (RDM, ⑥)
If you want to enjoy the songs in a random order, press RDM button. Then RDM appears on the display.
Press the button once again, the function returns to normal play mode.
Disc ejection ( ▲
Press the 🔊 button to remove your disc from the unit after Flip down (open) the Front Panel.
CD Reset Button
In the event of the unit not functioning correctly in CDP mode, gently press this button for more than 2 seconds. The disc will be ejected and the unit will return to the initial memorized status.
CD-CHANGER mode selector
■ PLAY / PAUSE (CD / CDC, ②)
To stop the radio or CDP and start CD-changer disc play, press
CD/CDC button for more than 1.5 seconds.
To pause the CD-Changer, press this button again for less than 1.5 seconds.
To change the CDP mode, press this button again for more than 1.5 seconds.
and the Radio mode, press BAND button.
17. DISC SELECTOR (DISC-, DISC+, ⑰)
You can change the discs pressing the DISC - or DISC +
In case of inserting 10 discs changer.
• Optional item : Using the Changer AKD-100 Series Only.
(It is possible to auto change #1 to #10 discs.)
If the fuse has blown, replace with a fresh unit having the same amperage. If the new fuse blows as soon as it is inserted, there may be something wrong the unit. In cases like this, contact your dealer.
- When opening the fuse holder, always make sure that the ignition is switched off.
FM car antenna
When tuning in FM stations while the vehicle is moving, the vehicle will pass through changing signal conditions ranging from strong signals near broadcast stations to extremely weak signals. If any FM antenna is not used, the sensitivity may be reduced and the noise may increase as the signal conditions keep changing. For FM reception with a good sound quality and minimal noise, it is recommended that you attach a special FM car antenna.
Cleaning discs
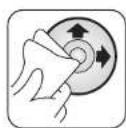
Before playing, clean the disc with an optional cleaning cloth.
Wipe the disc in the direction of the arrow.
- Do not use solvents such as benzine, thinner, commercially available cleaners or antistatic spray intended for analog discs.
Note:
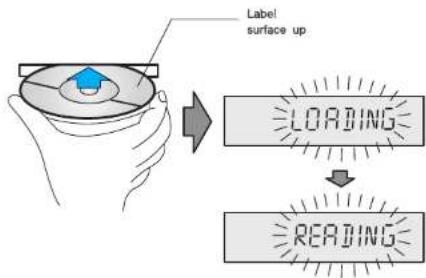
- Do not insert a disc with the label surface down. Doing so may damage the unit.
- Do not try to insert another disc when one has been already inserted.
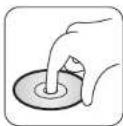
- Handle the disc by its edge, and to keep the disc clean, do not touch the surface.
- Do not stick paper or tape on disc.
- Do not expose the disc to direct sunlight or
heat sources such as hot air ducts, or leave it in a car parked in direct sunlight where temperatures may be excessive.
SPECIFICATION
GENERAL
Power requirement DC 12.0V / Rated : 14.4V
(Usable:10.8\~15.6V)Negative ground
Maximum output power 160 watts total
Rated output power 40 watts per channel into 4 ohms
(1KHz, 1% total harmonic distortion)
Current consumption 10A Maximum
Dimensions (W H D)
Escutcheon 188
×58 15 mm
Body 178
×50 160 mm
Weight (Net) 1.8 kg
BASS/TREBLE Controls
±10dB at 100Hz/10kHz
CD PLAYER SECTION
System Compact disc digital audio
Frequency 10-20,000 Hz
±3 dB
Total harmonic distortion less than 0.15% at 2 Watts
Signal to noise ratio
70dB (A network)
Wow and flutter Below measurable limit
Laser Diode Properties Material: GaAlAs
Wave length: 760-800 mm
Emission Duration: Continuous
Laser out-put Power: Less than 44.6W
TUNER SECTION
FM MW
LW
Tuning range
87.5 to 108 MHz
522 to 1620 KHz 144 to 288 KHz
Usable sensitivity
25 dB/μV 40dB/ V μ
Mono IHF
6 dB/μV
(75 ohms)
50 dB quieting sensitivity
50 dB
Stereo
30 dB/μV
Signal to Noise ratio
Stereo / mono
55 dB/60 dB
Channel step
50 KHz
9 KHz
- CD Player/Receiver with 4-Channel High Power Output Flip Down & Full Detachable Face Panel
- WIRING CONNECTIONS
- ELECTRIC CONNECTIONS
- LOUD SPEAKER
- LINE OUT(RCA CORD)
- HOW TO INSTALL & REMOVE THE APPARATUS
- NOTE!
- HOLDER
- FRONT PANEL
- Detaching the front panel
- Attaching the front panel
- - SOUND CONTROL (POWER, 1)
- AUDIO SELECTOR (SEL, ②)
- Telephone mute :
- TUNING UP/DOWN CONTROL (▶▶, Ⓤ)
- During the radio mode
- In case of CD mode:
- PRESET STATION (Button 1-6, ⓐ)
- BAND CONTROL (BAND, ⑤)
- RADIO & DISPLAY CONTROL
- AUTO TRAVEL PRESET (AUT, ④)
- LOUDNESS CONTROL (LOUD, ⑦)
- MUTE (B)
- DISPLAY CONTROL (DISP, ⑨)
- ■ During clock displayed
- RADIO
- USING THE RDS FUNCTIONS
- What is RDS?
- Important!
- Program service (display of station name)
- RDS digital data includes various data :
- Traffic broadcast recognition (TA, ⑪)
- Traffic information recognition (TPST, 10)
- PI seek
- Change-over to regional program (REG, ①)
- AF(network following) reception (AF, ①)
- What is EON?
- Program type recognition (PTY, ⑨)
- Selecting the PTY function
- Selection of a program via the seek-function; selecting a station of the correct program type
- COMPACT DISC PLAYER
- Listening to a CD
- PLAY / PAUSE(CD / CDC, ①)
- ■ To go to the beginning of desired track
- Reverse & Fast Forward
- COMPACT DISC PLAYER Using the CD-Changer
- TOP Function (TOP, ①)
- Intro Scan (INT, ⑩)
- Repeat Function (RPT, ⑯)
- Random Function (RDM, ⑥)
- Disc ejection ( ▲
- CD Reset Button
- CD-CHANGER mode selector
- ■ PLAY / PAUSE (CD / CDC, ②)
- DISC SELECTOR (DISC-, DISC+, ⑰)
- FM car antenna
- Cleaning discs
- Note:
- SPECIFICATION
- GENERAL
- CD PLAYER SECTION
- TUNER SECTION
- FM MW
- LW
Brand : DAEWOO
Model : ACP-5040
Category : Car radio