
DVD-LS85 - CD Player PANASONIC - Free user manual and instructions
Find the device manual for free DVD-LS85 PANASONIC in PDF.
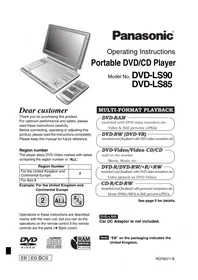


| Product Type | Portable CD Player |
| Brand | Panasonic |
| Model | DVD-LS85 |
| Dimensions | 130 x 140 x 25 mm |
| Weight | 0.3 kg |
| Power Supply | 2 AA batteries or AC adapter (DC 4.5V) |
| Playable Discs | CD, CD-R, CD-RW |
| Anti-Shock Protection | Yes (approx. 40 seconds) |
| Headphone Output | 3.5mm stereo jack |
| Output Power | 10 mW per channel |
| Playback Modes | Normal, Random, Repeat, Program |
| Battery Life (approx.) | 30 hours with alkaline AA |
| Maintenance | Clean lens with dry cotton swab; wipe exterior with soft cloth |
| Safety | Do not open casing; avoid moisture and extreme temperatures |
| Spare Parts & Repairability | Contact Panasonic authorized service centers |
Frequently Asked Questions - DVD-LS85 PANASONIC
User questions about DVD-LS85 PANASONIC
0 question about this device. Answer the ones you know or ask your own.
Ask a new question about this device
Download the instructions for your CD Player in PDF format for free! Find your manual DVD-LS85 - PANASONIC and take your electronic device back in hand. On this page are published all the documents necessary for the use of your device. DVD-LS85 by PANASONIC.
USER MANUAL DVD-LS85 PANASONIC
Dear customer
Thank you for purchasing this product.
For optimum performance and safety, please read these instructions carefully.
Before connecting, operating or adjusting this product, please read the instructions completely.
Please keep this manual for future reference.
Region number
The player plays DVD-Video marked with labels containing the region number or "ALL".
| Region Number | |
| For the United Kingdom and Continental Europe | 2 |
| For Asia 3 |
Example: For the United Kingdom and Continental Europe



Operations in these instructions are described mainly with the main unit, but you can do the operations on the remote control if the remote controls are the same (see back cover).


Panasonic®
Operating Instructions
Portable DVD/CD Player
Model No. DVD-LS90 DVD-LS85
MULTI-FORMAT PLAYBACK
DVD-RAM
recorded with DVD video recorders etc.
Video & Still pictures (JPEG)
DVD-RW (DVD-VR)
recorded and finalized with DVD video recorders etc.
DVD-Video/Video CD/CD
sold on the market
Movie, Music etc.
DVD-R/DVD-RW/+R/+RW
recorded and finalized with DVD video recorders etc.
Video (played as DVD-Video)
CD-R/CD-RW
recorded and finalized with personal computers etc.
Music (WMA/MP3) & Still pictures (JPEG)
See page 5 for details.
DVD-LS85
Car DC adaptor is not included.
Note
“EB” on the packaging indicates the United Kingdom.
Caution for AC Mains Lead
(For United Kingdom)
("EB" area code model only)
For your safety, please read the following text carefully. This appliance is supplied with a moulded three pin mains plug for your safety and convenience. A 5-ampere fuse is fitted in this plug.
Should the fuse need to be replaced, please ensure that the replacement fuse has a rating of 5-ampere and that it is approved by ASTA or BSI to BS1362.
Check for the ASTA mark or the BSI mark on the body of the fuse.
If the plug contains a removable fuse cover, you must ensure that it is refitted when the fuse is replaced. If you lose the fuse cover, the plug must not be used until a replacement cover is obtained. A replacement fuse cover can be purchased from your local dealer.
CAUTION!
IF THE FITTED MOULDED PLUG IS UNSUITABLE FOR THE SOCKET OUTLET IN YOUR HOME, THEN THE FUSE SHOULD BE REMOVED AND THE PLUG CUT OFF AND DISPOSED OF SAFELY. THERE IS A DANGER OF SEVERE ELECTRICAL SHOCK IF THE CUT OFF PLUG IS INSERTED INTO ANY 13-AMPERE SOCKET.
If a new plug is to be fitted, please observe the wiring code as stated below. If in any doubt, please consult a qualified electrician.
IMPORTANT
The wires in this mains lead are coloured in accordance with the following code: Blue: Neutral, Brown: Live. As these colours may not correspond with the coloured markings identifying the terminals in your plug, proceed as follows: The wire which is coloured Blue must be connected to the terminal which is marked with the letter N or coloured Black or Blue. The wire which is coloured Brown must be connected to the terminal which is marked with the letter L or coloured Brown or Red.
WARNING: DO NOT CONNECT EITHER WIRE TO THE EARTH TERMINAL WHICH IS MARKED WITH THE LETTER E, BY THE EARTH SYMBOL ⊥ OR COLOURED GREEN OR GREEN/YELLOW.
THIS PLUG IS NOT WATERPROOF—KEEP DRY.
Before use
Remove the connector cover.
How to replace the fuse
The location of the fuse differs according to the type of AC mains plug (figures A and B). Confirm the AC mains plug fitted and follow the instructions below. Illustrations may differ from actual AC mains plug.
- Open the fuse cover with a screwdriver.
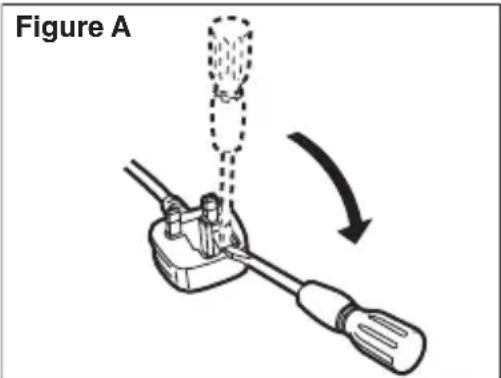

- Replace the fuse and close or attach the fuse cover.


WARNING: TO REDUCE THE RISK OF FIRE, ELECTRIC SHOCK OR PRODUCT DAMAGE, DO NOT EXPOSE THIS APPARATUS TO RAIN, MOISTURE, DRIPPING OR SPLASHING AND THAT NO OBJECTS FILLED WITH LIQUIDS, SUCH AS VASES, SHALL BE PLACED ON THE APPARATUS.
WARNING:
The driver must not operate this unit while the vehicle is moving.
Do not operate this unit where it can be viewed by the driver.
Driver operation or viewing of this unit while the vehicle is moving will cause distraction which may result in serious accident and personal injury or property damage.
CAUTION!
- DO NOT INSTALL OR PLACE THIS UNIT IN A BOOKCASE, BUILT-IN CABINET OR IN ANOTHER CONFINED SPACE. ENSURE THE UNIT IS WELL VENTILATED. TO PREVENT RISK OF ELECTRIC SHOCK OR FIRE HAZARD DUE TO OVERHEATING, ENSURE THAT CURTAINS AND ANY OTHER MATERIALS DO NOT OBSTRUCT THE VENTILATION VENTS.
- DO NOT OBSTRUCT THE UNIT'S VENTILATION OPENINGS WITH NEWSPAPERS, TABLECLOTHS, CURTAINS, AND SIMILAR ITEMS.
- DO NOT PLACE SOURCES OF NAKED FLAMES, SUCH AS LIGHTED CANDLES, ON THE UNIT. • DISPOSE OF BATTERIES IN AN ENVIRONMENTALLY FRIENDLY MANNER.
CAUTION!
THIS PRODUCT UTILIZES A LASER. USE OF CONTROLS OR ADJUSTMENTS OR PERFORMANCE OF PROCEDURES OTHER THAN THOSE SPECIFIED HEREIN MAY RESULT IN HAZARDOUS RADIATION EXPOSURE. DO NOT OPEN COVERS AND DO NOT REPAIR YOURSELF. REFER SERVICING TO QUALIFIED PERSONNEL.
CAUTION!
DANGER OF EXPLOSION IF BATTERY IS INCORRECTLY REPLACED.
REPLACE ONLY WITH THE SAME OR EQUIVALENT TYPE RECOMMENDED BY THE MANUFACTURER. DISCARD USED BATTERIES ACCORDING TO THE MANUFACTURER'S INSTRUCTIONS.
AC adaptor
This AC adaptor operates on AC between 100 V and 240 V. But
- Obtain a suitable plug adaptor if the plug does not fit the AC mains socket.
The socket outlet shall be installed near the equipment and easily accessible or the mains plug or an appliance coupler shall remain readily operable.
This product may receive radio interference caused by mobile telephones during use. If such interference is apparent, please increase separation between the product and the mobile telephone.
Marking sign is located on bottom of the unit.
Table of contents
Caution for AC Mains Lead ..... 2
Precautions 4
Accessories 5
Discs that can be played ..... 5
Preparations
① Attaching the battery..... 6 ② Recharging the battery ..... 6 ③ The remote control ..... 7 ④ Adjusting the LCD angle....7
Play....8
Useful functions ..... 10
Enjoying higher quality audio and video 12
Program/Random play ..... 13
Playing data discs 14
Playing HighMAT™ discs ..... 15
Playing programs/playlist on RAM/DVD-RW (DVD-VR) discs 15
Playing CD 15
Using On-Screen Menus.....16
Changing the player settings....18
Using this unit with other equipment ..... 20
When Using in a car 21
Frequently asked questions....22
Tips for making WMA/MP3 and JPEG discs (For CD-R/CD-RW) ..... 22
Specifications 23
Troubleshooting guide ..... 24
Maintenance 27
Main feature index. . . . .Back cover
Do not rest the unit on your lap for a long time while using it. The unit can become hot and cause burns.
To prevent damage
Avoid the following:
- Spraying flammable insecticides near the unit.
- Pressing the LCD.
- Touching the lens and other parts of the laser pickup.
Do not use the unit in the following places:
- Sandy places such as beaches.
- On top of cushions, sofas, or hot equipment such as amplifiers.
Do not leave in an unventilated automobile or exposed to direct sunlight and high temperatures.
Precautions
Read these operating instructions carefully before using the unit. Follow the safety instructions on the unit and the applicable safety instructions listed below. Keep these operating instructions handy for future reference.
1) Read these instructions. 2) Keep these instructions. 3) Heed all warnings. 4) Follow all instructions. 5) Do not use this apparatus near water. 6) Clean only with dry cloth. 7) Do not block any ventilation openings. Install in accordance with the manufacturer's instructions. 8) Do not install near any heat sources such as radiators, heat registers, stoves, or other apparatus (including amplifiers) that produce heat. 9) Protect the AC mains lead from being walked on or pinched particularly at plugs, convenience receptacles, and the point where they exit from the apparatus. 10) Only use attachments/accessories specified by the manufacturer.
11) Use only with the cart, stand, tripod, bracket, or table specified by the manufacturer, or sold with the apparatus. When a cart is used, use caution when moving the cart/apparatus combination to avoid injury from tip-over.

12) Unplug this apparatus during lightning storms or when unused for long periods of time.
13) Refer all servicing to qualified service personnel. Servicing is required when the apparatus has been damaged in any way, such as AC mains lead or plug is damaged, liquid has been spilled or objects have fallen into the apparatus, the apparatus has been exposed to rain or moisture, does not operate normally, or has been dropped.
For the United Kingdom and Republic of Ireland
Sales and Support Information
Customer Care Centre
● For customers within the UK: 08705 357357 - For customers within the Republic of Ireland: 01 289 8333 - Visit our website for product information - E-mail: customer.care@panasonic.co.uk
Direct Sales at Panasonic UK
- Order accessory and consumable items for your product with ease and confidence by phoning our Customer Care Centre Monday - Thursday 9:00am – 5:30pm, Friday 9:30am – 5:30pm (Excluding public holidays).
- Or go online through our Internet Accessory ordering application at www.panasonic.co.uk.
- Most major credit and debit cards accepted.
- All enquiries, transactions, and distribution facilities are provided directly by Panasonic UK Ltd.
- It couldn't be simpler!
- Also available through our Internet is direct shopping for a wide range of finished products; take a browse on our website for further details.
Batteries
1. Battery pack (Lithium ion battery pack)
- Use this unit to recharge the battery pack.
- Do not use the battery pack with equipment other than the specified player.
- Do not use the player outside if it is snowing or raining. (The battery pack is not waterproof.)
- Do not get dirt, sand, liquids, or other foreign matter on the terminals.
- Do not touch the plug terminals (+ and -) with metal objects.
- Do not disassemble, remodel, heat, or throw into fire.
- Do not store the battery pack in temperatures over 60 °C.
2. Button-type battery (Lithium battery)
- Insert with poles aligned.
- Do not touch the terminals (+ and -) with metal objects.
- Do not disassemble, remodel, heat or throw into fire.
- Keep out of reach of children. If any electrolyte should come into contact with your hands or clothes, wash it off thoroughly with water. If any electrolyte should come into contact with your eyes, never rub the eyes. Rinse eyes thoroughly with water, and then consult a doctor.
3. Disposing of the batteries
Check and follow your local regulations before disposal.
For the United Kingdom and Continental Europe
THIS UNIT IS INTENDED FOR USE IN MODERATE CLIMATES.
For Asia
THIS UNIT IS INTENDED FOR USE IN TROPICAL CLIMATES.
Precautions for Listening with the Headphones or Earphones
- Do not play your headphones or earphones at a high volume. Hearing experts advise against continuous extended play.
- If you experience a ringing in your ears, reduce volume or discontinue use.
- Do not use while operating a motorized vehicle. It may create a traffic hazard and is illegal in many areas.
- You should use extreme caution or temporarily discontinue use in potentially hazardous situations.
- Even if your headphones or earphones are the open-air type designed to let you hear outside sounds, don't turn up the volume so high that you can't hear what's around you.
Accessories
Use numbers indicated in parentheses when asking for replacement parts.
(Product numbers correct as of March 2005. These may be subject to change.)
□ 1 Remote control (N2QAHC000021)
☐ 1 Button-type battery for remote control (for replacement, see page 7.)
□ 1 Audio/video cable (K2KA6CB00003)
□ 1 AC adaptor (RFEA213W)
□ 1 AC mains lead
For the United Kingdom (RJA0053-3X)
For others (K2CQ2CA00006)
☐ 1 Car DC Adaptor DVD-LS90 only (RFEC201M)
□ 1 Rechargeable battery pack
DVD-LS90 (CGR-H702)
DVD-LS85 (CGR-H701)
For replacement: Available from Panasonic dealers
DVD-LS90 DVD-LS85 (CGR-H703)
DVD-LS90 only (CGR-H702)
DVD-LS85 only (CGR-H701)
- The included AC mains lead and AC adaptor are for use with this unit only. Do not use them with other equipment.
Discs that can be played
Operations in these instructions are described mainly with reference to specific formats. Icons such as RAM show the formats.
 RAMRAM4.7 RAMRAM4.7 | DVD-RAM RAM JPEGRAM Recorded with devices using Version 1.1 of the Video Recording Format (a unified video recording standard), such as DVD video recorders, DVD video cameras, personal computers, etc.JPEG Recorded with Panasonic DVD-Video recorders using DCF (Design rule for Camera File system) Standard Version 1.0. To play JPEG files, select “Play as Data Disc” (→ page 17, Other Menu). |
  VIDEO VIDEO | DVD-Video DVD-V— |
  RR4.7 RW RR4.7 RW | DVD-R (DVD-Video)/DVD-RW (DVD-Video) DVD-VDiscs recorded and finalized * on DVD video recorders or DVD video cameras |
| DVD-RW (DVD-VR) DVD-RW (VR)Discs recorded and finalized * on DVD video recorders or DVD video cameras using Version 1.1 of the Video Recording Format (a unified video recording standard). | |
| — | +R (Video)/+RW (Video) DVD-VDiscs recorded and finalized * on DVD video recorders or DVD video cameras |
  [DIGITAL VIDEO] [SUPER VIDEO] [DIGITAL VIDEO] [SUPER VIDEO] | Video CD VCDIncluding SVCD (Conforming to IEC62107) |
  DIGITAL AUDIO DIGITAL AUDIO TEXT DIGITAL AUDIO DIGITAL AUDIO TEXT | CD CD WMA MP3 JPEG VCDThis unit can play CD-R/RW recorded with the above formats. Close the sessions or finalize * the disc after recording.WMA MP3 JPEG This unit also plays HighMAT discs. |
* A process that allows play on compatible equipment. - It may not be possible to play the above discs in all cases due to the type of disc or condition of the recording.
■ Discs that cannot be played
DVD-Audio, DVD-ROM, Version 1.0 of DVD-RW, CD-ROM, CDV, CD-G, SACD, DivX Video Discs and Photo CD, DVD-RAM that cannot be removed from their cartridges, 2.6-GB and 5.2-GB DVD-RAM, and "Chaoji VCD" available on the market including CVD, DVCD and SVCD that do not conform to IEC62107.
Preparations
FOR THE UNITED KINGDOM ONLY READ THE CAUTION FOR THE AC MAINS LEAD ON PAGE 2 BEFORE CONNECTION.
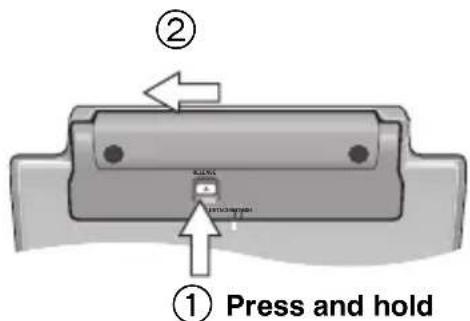
① Attaching the battery (When the unit is off)
The illustrations show how to attach the CGR-H702. Attach CGR-H701 in the same way.
Bottom side of this unit
Detaching
- Turn the unit off before detaching the battery pack. ● The illustrations show how to detach the CGR-H702. Detach CGR-H701 in the same way.
When not using for long periods of time
- Remove the battery pack (→ left). (Even when the unit is turned off, there is a small amount of voltage running through the unit, and this may result in a malfunction.)
- Recharge the battery for re-use.
② Recharging the battery (When the unit is off)
![graph LR A["DC IN"] --> B["AC adaptor (included)"] B --> C["AC mains lead (included)"] C --> D["To household mains socket"]](/content/2026/05/962129/images/592bd960d1a5b865e1365c6e6e12050db9608df39f12ca54e60564fa20aedb8e.jpg)

- You can also use this unit without charging while connecting the AC adaptor and the AC mains lead.
To conserve power
This unit consumes 0.5 W of power even when turned off. When the unit is not going to be used for a long time, disconnect the AC mains lead from the household mains socket.
The unit is in the standby condition (the [⏻] indicator lights) when the AC mains lead is connected. The primary circuit is always "live" as long as the AC adaptor is connected to an electrical outlet.


[⏻] goes out → lights [CHG] lights → goes out
Recharging time:
DVD-LS90: Approx. 8 hours
DVD-LS85: Approx. 4 hours
When finished, disconnect the AC adaptor and the AC mains lead.
Checking the remaining battery charge
When the unit is on (→ page 8) and powered by the battery pack, press [DISPLAY] to check on the LCD (displays for a few seconds).
![graph LR A["(screen)"] --> B["Charging System"] B --> C["Battery"] C --> D["Recharge"] D --> E["Recharge (Appears automatically when there is only a few minutes of charge remaining.)"]](/content/2026/05/962129/images/9e4745ede5690e157ded069187d4678eadc616c3367684a5e25c3633d4875726.jpg)
Approximate play times (hours)
| Battery pack | Play (at room temperature using headphones) | |||
| LCD brightness level | LCD Off | |||
| -50 (factory preset) | +5 | |||
| CGR-H701 (DVD-LS85) | 3 2 1.5 4 | |||
| CGR-H702 (DVD-LS90) | 6 4 3 8 | |||
| CGR-H703 (optional) 10 8 6 16 | ||||
- The times indicated above may differ depending on use.
- To change the LCD brightness (→ page 11, Adjusting the picture quality on the LCD).
③ The remote control
Insert the button-type battery (included)
Range of use
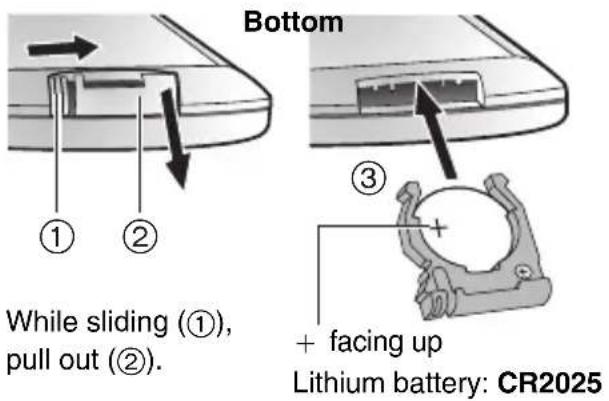
- Keep out of the reach of small children.
- Accidental swallowing of batteries can result in stomach and intestinal damage.

④ Adjusting the LCD angle
![graph LR A["Open the LCD"] --> B["Standard"] B --> C["Free"] C --> D["Slide"] D --> E["Compact"] style A fill:#f9f,stroke:#333 style B fill:#ccf,stroke:#333 style C fill:#cfc,stroke:#333 style D fill:#fcc,stroke:#333 style E fill:#cff,stroke:#333](/content/2026/05/962129/images/dc251a0e4966f0b15f77967f2d8551a26abbdd7ebc99e39e22028c0036e6df31.jpg)
When moving the unit: Close the LCD. Don't hold by the LCD.
Play
1 Open the lid.
OPEN Headphone terminals [💡]
3.5 mm Stereo
2 Insert a disc and close the lid.

Load double-sided discs so the label for the side you want to play is facing up.
RAM Remove discs from their cartridges before use.
3 Press and hold.

The unit turns on and play begins.
4 Adjust the volume.

- While stopped, the unit automatically turns off once 15 minutes (after approximately 5 minutes when using the battery pack) have elapsed.
- Discs continue to rotate while menus are displayed. Press [■, -OFF] when you finish to preserve the unit's motor.
- Total title number may not be displayed properly on +R/+RW.
- If you are experiencing problems, refer to troubleshooting guide (→ page 24).
Main unit operations
 | Turn unit on/play | Press and hold and the power comes on and play begins. |
 | Pause Press [ | ▶, ON] to restart play. |
 | Stop | The position is memorized when “▷” flashes on the screen.Press [▶, ON] to resume.DVD-VWhile the message is displayed, press [▶, ON] and the previous chapters are reviewed.Opening the lid, or pressing [■, -OFF] while “▷” is flashing cancels the memorized position where play stopped. |
| Turn unit off Press | and hold until “OFF” is displayed. | |
 | Skip | Press [◀◀,▶▶].RAM DVD-RW (VR) Can also skip to the markers. |
| Search Press and hold [◀◀,▶▶] (up to 5 steps). | ||
| Slow play | Press and hold [◀◀,▶▶] (up to 5 steps) while paused.Press [▶, ON] to return to normal play.VCD [▶▶] only | |
TOP MENU | Top menu DVD-V | |
| Playing programs | RAM DVD-RW (VR) (→ page 15) | |
MENU | Menu DVD-V | |
| Playing playlists | RAM DVD-RW (VR) (→ page 15) | |
| Navigation menu | WMA MP3 JPEG (→ page 14) | |
RETURN | Return | Returns to the previous screen.VCD (with playback control) Returns to the menu. |
 | Menu operation | Press [▲▼◀▶] to select an item and press [ENTER] to confirm. |
| Frame-by-frame | While paused, press [◀▶].VCD [▶] only | |
| Group skip | WMA MP3 JPEGPress [▲▼]. | |
Remote control operations
 | Skip Press [◀◀ | ,▶▶]. |
 | Search Press [◀◀ | ,▶▶](up to 5 steps). |
| Slow play Press [◀◀ | ,▶▶](up to 5 steps) while paused. Press [▶](PLAY) to return to normal play. VCD [▶▶] only | |
__ __ __ __ __ | Enter number | RAM DVD-RW (VR) DVD-V VCD CD e.g. To select 12: [≥10] → [1] → [2] VCD with playback control While stopped, press the numbered buttons. WMA MP3 JPEG e.g. To select 123: [1] → [2] → [3] → [ENTER] |
- You cannot turn on the unit with the remote control if the unit is powered by the battery pack.
Useful functions
Repeat play (Only when the elapsed play time can be displayed. For JPEG, you can use even if there is no elapsed time display.)
Press several times to select the content to repeat.

- To exit the screen: Press [RETURN].
To repeat a specified section (A-B Repeat)
Except JPEG and RAM DVD-RW (VR) (still picture part)
1
DISPLAY

Press once.
2
① Press [▲▼] to select Other Settings. ② Press [ ] to go to the next menu and [▲▼] to select "Play Menu". ③ Press [ ] to go to the next menu and [▲▼] to select "A-B Repeat". ④ Press [ENTER] at the starting and ending points.
- Press [ENTER] again to cancel.
- To exit the screen: Press [RETURN].

Changing play speed RAM DVD-RW (VR) DVD-V
1
DISPLAY

Press once.

① Press [▲▼] to select Other Settings. ② Press [ ] to go to the next menu and [▲▼] to select "Play Speed". ③ Press [ENTER] and ▲▼] to select "Normal" or "×0.6" to "×1.4" (in 0.1 units). ④ Press [ENTER].
- Press [▶] (PLAY) to return to normal play.
- After you change the speed
- Advanced Surround (→ below) and Multi Re-master (→ page 12) do not work.
- Digital output switches to PCM-2ch.
- 96 kHz sampling frequency is converted to 48 kHz.
- This may not work depending on the disc's recording.
- To exit the screen : Press [RETURN].
Enjoying virtual surround (Advanced Surround)
RAM DVD-RW (VR) DVD-V VCD (2 or more channels)
A.SURROUND
Press to select "SP 1 Natural" or "SP 2 Enhanced".
A surround sound effect can be made using 2 speakers (on other equipment).
- When using headphones, press to select "HP 1 Natural" or "HP 2 Enhanced".
- When using discs recorded with surround sound, sound seems to come from speakers on either side of you.
- Optimum seating position is 3 to 4 times the distance between the front left and right speakers or the width of the television if using the television's speakers.
- Do not use in combination with surround effects on other equipment.
- To exit the screen: Press [RETURN].
MONITOR MODE
Press to select the monitor mode.
NORMAL: Normal
FULL: Stretched horizontally
ZOOM: Stretched vertically and horizontally
OFF: No picture
- If you are not using the LCD on this unit, select "OFF" to conserve power. (The [⏻] indicator flashes)
- The LCD turns off automatically if you close it.
Adjusting the picture quality on the LCD
1

2

Press [▲▼] to select the item, and [◀▶] to change the setting.
- To exit the screen: Press [PICTURE MODE].
Changing soundtracks DVD-V (with multiple soundtracks) RAM DVD-RW (VR) VCD

Press to select the soundtrack.

RAM DVD-RW (VR) VCD
You can use this button to select
“L”, “R” or “L R”.
DVD-V (Karaoke discs)
Press [◀▶] to select
"On" or "Off" for vocals.
Read the disc's instructions for details.
- To exit the screen: Press [RETURN].
Signal type/data
LPCM/□ Digital/DTS/MPEG: Signal type kHz (Sampling frequency)/bit/ch (Number of channels) Example: 3/2 .1ch

Changing subtitles
DVD-V (with subtitles) VCD (SVCD only)
RAM DVD-RW (VR)
(On/Off only with discs that contain subtitle on/off information)
SUBTITLE

(Remote control)

DVD-V VCD
Press to select the subtitle language.
- On +R/+RW, a subtitle number may be shown for subtitles that are not displayed.
To clear/display the subtitles
Press [◀▶] to select "On" or "Off".
RAM DVD-RW (VR)
Press to select "On" or "Off".
- Subtitle on/off information cannot be recorded using Panasonic DVD Recorders.
- To exit the screen : Press [RETURN].
Angle select DVD-V (with multiple angles) / Still picture rotation JPEG

(Remote control)
Press to select the angle or rotate the still picture.
- To exit the screen: Press [RETURN].
e.g. DVD-V

Enjoying higher quality audio and video
Multi Re-master
RAM DVD-RW (VR) DVD-V (Discs recorded with 48 kHz only) VCD CD
This feature gives you a more natural sound by adding the higher frequency signals not recorded on the disc.
WMA MP3 (Disc recording is other than 8 kHz, 16 kHz or 32 kHz)
This feature reproduces the frequencies lost during recording to give you a sound closer to the original.
1
DISPLAY

Press once.
2


① Press [▲▼] to select Other Settings. ② Press [▶] to go to the next menu and [▲▼] to select "Audio Menu". ③ Press [▶] to go to the next menu and [▲▼] to select "Multi Re-master". ④ Press [ENTER] and [▲▼] to select "1", "2" or "3". ⑤ Press [ENTER].
- To exit the screen: Press [RETURN].
| Setting | DVD-V CD (LPCM)Type of music | Other discsEffect level |
| 1 High tempo | (e.g., pop and rock) Light | |
| 2 Various tempos | (e.g., jazz) Medium | |
| 3 Low tempo | (e.g., classical) Strong | |
| Off Off Off |
- Multi Re-master may not work when connecting with a digital optical cable (→ page 20).
Picture Mode
1
DISPLAY

2

Menu
Picture Mode Normal
Press once.
① Press [▲▼] to select Other Settings. ② Press [▶] to go to the next menu and [▲▼] to select "Picture Menu". ③ Press [ ] to go to the next menu and select "Picture Mode". ④ Press [ENTER] and [▲▼] to select "Normal", "Cinema1" or "Cinema2". ⑤ Press [ENTER].
Cinema1: Mellows images and enhances detail in dark scenes.
Cinema2: Sharpens images and enhances detail in dark scenes.
- To exit the screen: Press [RETURN].
Program/Random play
Remote control only
DVD-V, VCD, CD, WMA, MP3, JPEG

While stopped, press to change.
Program play → Random play ↑ Off (Normal play) ←
Disable HighMAT disc play to use random and program play. Select "Play as Data Disc" in Other Menu. (→ page 17).
Program play (up to 32 items)
e.g., DVD-V
1
Press to select an item (→ page 9).
Repeat this step to program other items.
2
Selecting all the items (on the disc or in the title or group)
Press [ENTER] and [▲▼] to select "ALL", then press [ENTER] again to register.
Changing the program
Press [▲▼] to select an item.
To change an item, repeat step 1.
- To clear an item, press [CANCEL] (or select "Clear" and press [ENTER]).
Clearing the whole program
Select "Clear all" and press [ENTER]. The whole program is also cleared when the unit is turned off or the disc lid is opened.
Random play
e.g., DVD-V
1 DVD-V WMA MP3 JPEG only

Press to select a group or a title (→ page 9).
2
To exit the program or random mode
Press [PLAYMODE] several times while stopped.
Playing data discs
WMA MP3 JPEG
You can play JPEG files on DVD-RAM or play HighMAT discs without using the HighMAT function (→ page 17, "Play as Data Disc" in Other Menu).
Playing items in order (Playback Menu) (except JPEG files on DVD-RAM)

While the menu is displayed
Press [▲▼] to select "All", "Audio", or "Picture" and press [ENTER].
- To display/exit the screen: Press [TOP MENU].
Playing from the selected item (Navigation Menu)
1
Press.
2

Press [▲▼◄►] to select the group and press [ENTER].
- To play content in the group in order: Press [ENTER].
- To start play from the selected content:
Press [▲▼] to select and press [ENTER].
Group and content number currently playing
- To listen to WMA/MP3 contents while showing a JPEG image on the screen
Select a JPEG file first, and then select WMA/MP3 contents. (The opposite order is not effective.)
●To exit the screen: Press [MENU].
■ Using the submenu
While the navigation menu (→ see above) is displayed.
Submenu![1 Press [DISPLAY]. 2 Press [▲▼] to select the submenu (→ see right) and press [ENTER].](/content/2026/05/962129/images/eafe3d6b04e87b26eff141e9348c5f3443c10555e6874459e52cc9dbacecd6b7.jpg)
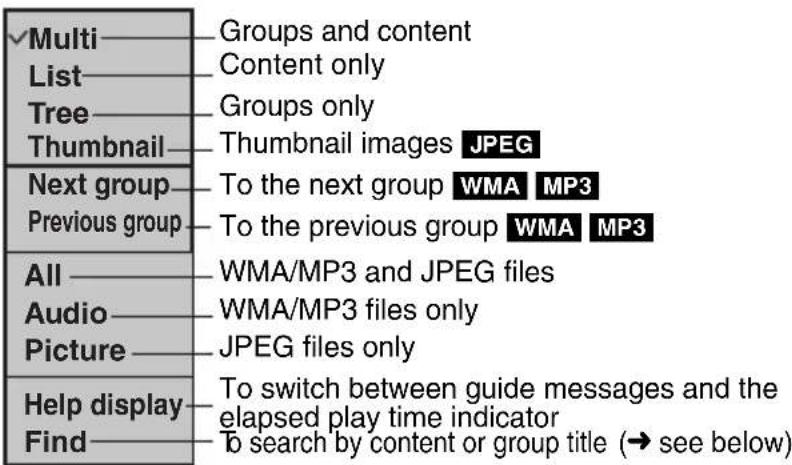
■ Searching by a content or group title
Press [◀▶] to highlight a group title to search a group, or a content title to search its content.
1 Select "Find". (→ see above)
2 Press [▲▼] to select a character and press [ENTER].
- Repeat to enter another character. ●Lower case is also searched.
- Press and hold [|◀◀,▶▶] to skip between A, E, I, O and U. -Press [◀] to erase a character.
- Erase the asterisk (*) to search for titles starting with that character.
3 Press [▶] to select "Find" and press [ENTER]. The search result screen appears. 4 Press [▲▼] to select the content or group and press [ENTER].

Playing HighMAT™ discs
WMA MP3 JPEG

While the menu is displayed
Press [▲▼◀▶] to select items and press [ENTER].


Menu:
Takes you to the next menu which shows playlists or another menu.
Playlist:
Play starts.
- To return to the menu screen, press [TOP MENU] then press [RETURN] several times.
- To change the menu background, press [DISPLAY]. The background changes to the one recorded on the disc.
- To display/exit the screen, press [TOP MENU].
Selecting from the list
- During play, press [MENU].
- Press [◀] then [▲ ▼] to switch among "Playlist", "Group" and "Content" lists.
- Press [▶] then [▲ ▼] to select an item and press [ENTER].
- To exit the screen: Press [MENU].

Playing programs/playlist on RAM/DVD-RW (DVD-VR) discs
- Titles appear only if they have been entered.
- You cannot edit playlists and titles.
1 To play programs: TOP MENU
To play playlists: MENU
2
Press [▲▼] to select the program or playlist and press [ENTER].


- Only when the disc contains a playlist.
- You can also use the numbered buttons on the remote control (→ page 9).
- Press [▶] to show the contents of the program (Only when playing the program).
- To exit the screen : Press [TOP MENU] or [MENU].
Playing CD CD
Titles appear with CD text playback.
1
2
Press [▲▼] to select the tracks and press [ENTER].
- To exit the screen: Press [MENU].
Press [DISPLAY] to switch between guide messages and the elapsed play time indicator.
Using On-Screen Menus
1
DISPLAY

Press once.
2
① Press [▲▼] to select the menu. ② Press [ ] to go to the next menu and [▲▼] to set.
Repeat step ② if necessary.
- Press [◀] to go to the previous menu.
- Items shown differ depending on the type of software.
- There are items which you can select using the numbered buttons and [ENTER] on the remote control.
- If the setting does not change, press [ENTER].
- To finish, press [RETURN].
Main menus
| Program, Group, Title Chapter, Track, Playlist Content | To start from a specific item |
| Time | To skip incrementally or decrementally* (Time Slip for play only)1. Press [ENTER] twice to show Time Slip indicator.2. Press [▲▼] to select the time and press [ENTER].●Press and hold [▲▼] to alter faster.To start from a specific time* (Time Search)To change remaining/elapsed time display |
| Audio | (→ page 11, Changing soundtracks) |
| To display the current bitrate or sampling frequency | |
| Thumbnail | To show thumbnail images |
| Subtitle | (→ page 11, Changing subtitles) |
| Marker (VR) | To recall a marker recorded on DVD-Video recorders |
| Angle | (→ page 11, Angle select) |
| Rotate Picture | (→ page 11, Still picture rotation) |
| Slideshow | To turn on/off slideshowTo change the slideshow timing (0 to 30 sec) |
| Other Settings | (→ See below) |
* Except + R/+ RW
Other Settings
| Play Speed | (→ page 10, Changing play speed) |
Play Menu (Only when the elapsed play time can be displayed,
JPEG: The Repeat and Marker functions can be used.)
| Repeat | (→ page 10, Repeat play) |
| A-B Repeat | (→ page 10, A-B Repeat) |
| MarkerExcept RAM DVD-RW (VR) | To mark up to 5 positions to play again[ENTER] (The unit is now ready to accept markers.)To mark a position: [ENTER] (at the desired point)To mark another position: [◀▶] to select “*”→ [ENTER]To recall a marker: [◀▶] → [ENTER]To erase a marker: [◀▶]→ [CANCEL] (Remote control)● This feature doesn’t work during program and random play.● Markers you add clear when you open the disc lid or switch the unit to standby. |
Picture Menu
| Picture Mode | (→ page 12, Picture Mode) |
Audio Menu
| Advanced Surround | (→ page 10,Enjoying virtual surround) |
| Dialogue Enhancer | To make the dialogue in movies easier to hearDVD-V(Dolby Digital, DTS, 3-channel or over, with the dialogue recorded in the center channel)On ←→ Off |
| Multi Re-master | (→ page 12, Multi Re-master) |
Display Menu
| Information | On Off (JPEG: Off, Date, Details) |
| Subtitle Position | 0 to -60 (in of 2 units) |
| Subtitle Brightness | Auto, 0 to -7 |
| Just Fit Zoom | RAM DVD-RW (VR) DVD-V VCDTo expand the letterbox picture to fit the screen.Press [▲▼] to select the preset aspect ratio or “Auto”. |
| Manual Zoom | RAM DVD-RW (VR) DVD-V VCDPress [▲▼] for fine adjustments. (Press and hold to alter faster.)-from ×1.00 to ×1.60 (in 0.01 units)-from ×1.60 to ×2.00 (in 0.02 units) |
| Bitrate Display | RAM DVD-RW (VR) DVD-V VCD On Off |
| GUI See-through | On Off |
Other Menu
| Setup | (→ page 18, Changing the player settings) |
| Play as DVD-VRPlay as HighMATorPlay as Data Disc | ● While stopped, select “Play as Data Disc” to play JPEG files on DVD-RAM or to play a HighMAT disc without using the HighMAT function. |
Checking the play status (Elapsed play time indicator)
Press [DISPLAY] twice.![Condition-play, pause or slow/search Current position Play mode --- : Normal Play PGM: Program Play RND: Random Play PBC: Playback control play VCD Current playback item 1:23:54 Elapsed time/remaining time Press [▲ ▼] to change. (WMA/MP3/SVCD can only display elapsed time.)](/content/2026/05/962129/images/67952f9da6e5eb71ea3e39abc24949d53f3c45dafcede93d6e55d42415a91f72.jpg)
- To exit the screen: Press [RETURN].
Changing the player settings
Remote control only
- Referring to pages 18 to 19, change as required.
- Underlined items are the factory presets.
The settings remain intact even if you switch the unit to standby.
1
SETUP
2

Press [▲ ▼ ◀▶] to select the menu, item, content and press [ENTER].

- To return to the previous screen, press [RETURN].
- To finish the SETUP menu, press [SETUP].
- While stopped, the menu is also displayed when [MENU] on the main unit is pressed; however, when a DVD-RAM or HighMAT CD is being used a playlist menu appears.
"Disc" tab
| Audio | ●English ●Original ※1●Other*****※3 | Language Options●French ●German●Italian ●Spanish●Portuguese ●Swedish ●DutchFor Asia●French ●Spanish |
| Subtitle | ●Automatic※2 ●English●Other*****※3 | |
| Menus | ●English ●Other*****※3 | |
| RatingsSet a ratings level to limit DVD-Video play.●Follow the on-screen instructions. | Setting ratings (When level 8 is selected)●8 No Limit●1 to 7: Prohibits play corresponding to ratings recorded on the disc.●0 Lock All: To prevent play of discs without ratings levels.When setting a ratings level, a password screen is shown.Follow the on-screen instructions.Do not forget your password.A message screen will be shown if a DVD-Video exceeding the ratings level is inserted in the unit. Follow the on-screen instructions. | |
*1 The original language designed on the disc is selected. *2 If the language selected for "Audio" is not available, subtitles appear in that language (If available on the disc). *3 Input a code number referring to the table on page 19.
"Video" tab
| TV AspectChoose the setting to suit your television and preference. | 4:3 Pan&Scan: Regular aspect television (4:3)The sides of the widescreen picture are cut off so it fills the screen (unless prohibited by the disc).4:3 Letterbox: Regular aspect television (4:3)  Widescreen picture is shown in the letterbox style.16:9: Widescreen televisionUse the television's screen modes to change the way the picture is shown. Widescreen picture is shown in the letterbox style.16:9: Widescreen televisionUse the television's screen modes to change the way the picture is shown. |
| Still ModeSpecify the type of picture shown when paused. | AutomaticField: The picture is not blurred, but picture quality is lower.Frame: Overall quality is high, but the picture may appear blurred. |
| NTSC Disc OutputChoose PAL 60 or NTSC output when playing NTSC discs. | PAL 60: When connected to a PAL televisionNTSC:When connected to an NTSC television |
"Audio" tab
| PCM Digital Output※1 | Check the digital input limitations of the equipment you connect and select the maximum sampling frequency of PCM digital output.Off: When not connected using a digital optical cableUp to 48 kHz: When connected to equipment compatible with 44.1 or 48 kHzUp to 96 kHz: When connected to equipment compatible with 88.2 or 96 kHzUp to 192 kHz: When connected to equipment compatible with 176.4 or 192 kHz●Signals from copy-protected discs are converted to 48 or 44.1 kHz.●Some equipment cannot handle sampling frequencies of 88.2 kHz, even if it can handle 96 kHz. Read your equipment's operating instructions for details. | |
| Dolby Digital※1 | BitstreamPCM | Select “Bitstream” when the equipment can decode the bitstream (digital form of multi-channel data). Otherwise, select “PCM”. (If the bitstream is output to the equipment without a decoder, high levels of noise can be output and may damage your speakers and hearing.) |
| DTS Digital Surround※1 | PCMBitstream | |
| MPEG※1※2 | PCMBitstream | |
| Dynamic Range Compression | ● Off● On: Adjusts for clarity even when the volume is low through compressing the range of the lowest sound level and the highest sound level. Convenient for late night viewing. (Only works with Dolby Digital). | |
| Audio during SearchChoose whether to have sound during search | ● On ● Off | |
*1 Only when connected using a digital optical cable ( → page 20) *2 For Asia MPEG is not available.
"Display" tab
| Menu Language | ●English ●Français ●Deutsch ●Italiano ●Español●Português ●Svenska ●NederlandsFor Asia●English ●Français ●Español |
| On-Screen Messages | ●On ●Off |
"Others" tab
| HighMAT Selects the play method for HighMAT discs | ● Enable: Plays as HighMAT● Disable: Plays as WMA/MP3/JPEG |
| Re-initialize Setting This returns all values in the Setup menus to the default settings. | ● Yes: The password screen is shown if “Ratings” (→ page 18) is set. Please enter the same password and press [ENTER]. When “Initialized” appears on the screen, wait for about 10 seconds. Press [ENTER] and turn the unit off and on again.● No |
Language code list
| Abkhazian: 6566 | Chinese: 9072 | Hindi: 7273 | Malagasy: 7771 | Samoan: 8377 | Tibetan: 6679 |
| Afar: 6565 | Corsican: 6779 | Hungarian: 7285 | Malay: 7783 | Sanskrit: 8365 | Tigrinya: 8473 |
| Afrikaans: 6570 | Croatian: 7282 | Icelandic: 7383 | Malayalam: 7776 | Scots Gaelic: | Tonga: 8479 |
| Albanian: 8381 | Czech: 6783 | Indonesian: 7378 | Maltese: 7784 | 7168 | Turkish: 8482 |
| Ameharic: 6577 | Danish: 6865 | Interlingua: 7365 | Maori: 7773 | Serbian: 8382 | Turkmen: 8475 |
| Arabic: 6582 | Dutch: 7876 | Irish: 7165 | Marathi: 7782 | Serbo-Croatian: | Twi: 8487 |
| Armenian: 7289 | English: 6978 | Italian: 7384 | Moldavian: 7779 | 8372 | Ukrainian: 8575 |
| Assamese: 6583 | Esperanto: 6979 | Japanese: 7465 | Mongolian: 7778 | Shona: 8378 | Urdu: 8582 |
| Aymara: 6589 | Estonian: 6984 | Javanese: 7487 | Nauru: 7865 | Sindhi: 8368 | Uzbek: 8590 |
| Azerbaijani: 6590 | Faroese: 7079 | Kannada: 7578 | Nepali: 7869 | Singhalese: 8373 | Vietnamese: |
| Bashkir: 6665 | Fiji: 7074 | Kashmiri: 7583 | Norwegian: 7879 | Slovak: 8375 | 8673 |
| Basque: 6985 | Finnish: 7073 | Kazakh: 7575 | Oriya: 7982 | Slovenian: 8376 | Volapük: 8679 |
| Bengali; Bangla: 6678 | French: 7082 | Kirghiz: 7589 | Pashto, Pushto: 8083 | Somali: 8379 | Welsh: 6789 |
| Frisian: 7089 | Korean: 7579 | Spanish: 6983 | Wolof: 8779 | ||
| Bhutani: 6890 | Galician: 7176 | Kurdish: 7585 | Persian: 7065 | Sundanese:8385 | Xhosa: 8872 |
| Bihari: 6672 | Georgian: 7565 | Laotian: 7679 | Polish: 8076 | Swahili: 8387 | Yiddish: 7473 |
| Breton: 6682 | German: 6869 | Latin: 7665 | Portuguese:8084 | Swedish: 8386 | Yoruba: 8979 |
| Bulgarian: 6671 | Greek: 6976 | Latvian, Lettish: 7686 | Punjabi: 8065 | Tagalog: 8476 | Zulu: 9085 |
| Burmese: 7789 | Greenlandic:7576 | Quechua: 8185 | Tajik: 8471 | ||
| Byelorussian: 6669 | Guarani: 7178 | Lingala: 7678 | Rhaeto-Romance: 8277 | Tamil: 8465 | |
| Gujarati: 7185 | Lithuanian: 7684 | Tatar: 8484 | |||
| Cambodian:7577 | Hausa: 7265 | Macedonian: 7775 | Romanian: 8279 | Telugu: 8469 | |
| Catalan: 6765 | Hebrew: 7387 | Russian: 8285 | Thai: 8472 |
Using this unit with other equipment
Turn off all equipment before connecting and read the appropriate operating instructions.
Enjoying with 5.1ch audio
![graph LR A["Left side of this unit"] --> B["Digital optical cable (not included)<br>• Do not bend sharply.<br>• Align and insert."] B --> C["Amplifier with a built-in decoder or a decoder-amplifier combination"] C --> D["OPTICAL IN"] D --> E["Connect the 6 speakers to the amplifier's 5.1ch audio out…](/content/2026/05/962129/images/91001b6818dbd1bf5e19aa76656e285f090fbeac4fc8606be8e7f2fbc06ad358.jpg)
- Change "PCM Digital Output", "Dolby Digital", "DTS Digital Surround" and "MPEG *" (→ page 19). ※ For Asia MPEG is not available.
Enjoying stereo audio

Television connections
Connect the video output from this unit directly to the television.

- The unit's speakers do not have magnetic shielding. Do not place the unit near televisions, personal computers or other devices easily influenced by magnetism. Do not keep this unit and magnetized cards (bank cards, commuter passes, etc.) close together. - If you raise the volume on the television while playing this unit, the volume may abruptly become very loud when you switch to a television broadcast. Return the volume to its normal level before changing.
For the United Kingdom and Continental Europe
Use the RCAJ adaptor (not included) if your TV has a 21-pin SCART terminal.
RCAJ adaptor (not included)
![graph LR A["To the television's 21-pin SCART terminal"] --> B["Red"] A --> C["White"] A --> D["yellow"] B --> E["Black"] C --> F["Yellow"] D --> G["Yellow"] E --> H["To [AUDIO/OPT OUT"]] F --> I["To [VIDEO"]] G --> J["Audio/Video cable (included)"]](/content/2026/05/962129/images/fe98345e2a3417562ef23e25b8fa87f1c75011c84279af0239f886868576c8b1.jpg)
When using in a car
The driver must not operate this unit while the vehicle is moving.
Do not operate this unit where it can be viewed by the driver.
Driver operation or viewing of this unit while the vehicle is moving will cause distraction which may result in serious accident and personal injury or property damage.
DVD-LS85
Car DC Adaptor is not included. (Included rechargeable battery pack can be used.)
DVD-LS90
Use included Car DC Adaptor. (→ see below)
■ Connections
Before connection, consult your car owner's manual or your dealer.
- Connect to the cigarette lighter socket of a vehicle that has a 12 V battery. It is not compatible with a vehicle that has a 24 V battery.
- This is a special negative grounded Car DC Adaptor. Using this Car DC Adaptor with a plus grounded car can cause malfunction and lead to fire.

Left side of this unit
Place the unit on a stable surface.
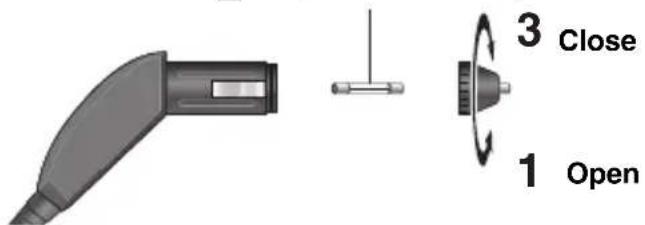
■ Replacing the fuse
Replace only with the specified 125 V/250 V, 2.5 A fuse. Use of any other type can cause fire.
2 Replace the fuse. (125 V/250 V, 2.5 A type)
■ Cautions
• To avoid draining your car battery - Disconnect the Car DC Adaptor from the cigarette lighter after use. The Car DC Adaptor continues to consume some power even if it is not being used, and if a battery pack is attached to this unit, it will start recharging which uses more power. -Do not use the Car DC Adaptor for long periods when the engine is not running. -The Car DC Adaptor cannot be used to recharge the battery pack. Use the AC adaptor included with this unit. - When starting an engine, pull Car DC Adaptor out of the cigarette lighter socket. Mishandling of the Car DC Adaptor can cause malfunction. - No responsibility will be taken for damage that occurs due to faulty installation. - Leave some slack in the cord.
DVD-LS90
DVD-LS85
(Left side of this unit)
You can enjoy audio through your car audio system by connecting a car stereo cassette adaptor (not included: RP-CC20) to the headphone jack on the left side of this unit.
Frequently asked questions
Reference pages are shown in parentheses.
| What kind of equipment is necessary to enjoy 5.1ch audio? | Connect to an AV amplifier with a built-in decoder that has 5.1ch audio output terminals. (20) |
| Can I play a DVD-Video bought in another country? | You can only play DVD-Video if their region number is the same or includes the same region number as the unit or if the DVD-Video is marked “ALL”. Confirm the region number for the unit on the bottom panel. Check the disc jacket. (Cover) |
| Can I use on an airplane or in a hospital? | Electromagnetic waves that are emitted from this unit may affect equipment on an airplane or in a hospital.Please obey the rules and/or instructions indicated by the hospital or airline. |
| Can I use in a car? | DVD-LS90 Use included Car DC Adaptor. (21) DVD-LS85 Car DC Adaptor is not included.(Included rechargeable battery pack can be used.) Damage may occur if you do not use the specified Car DC Adaptor. |
| Can I connect with a computer? | You can enjoy use of the computer as a television monitor when connecting with the AV input terminal on a computer. However, you cannot operate this unit as peripheral equipment. |
Tips for making WMA/MP3 and JPEG discs (For CD-R/CD-RW)
- Discs must conform to ISO9660 level 1 or 2 (except for extended formats).
- This unit is compatible with multi-session but if there are a lot of sessions it takes more time for play to start. Keep the number of sessions to a minimum to avoid this.
- If groups were created away from the root like "002 group" in the illustration below, the eighth one and onwards are displayed on the same vertical line in the menu screen.
- There may be differences in the display order on the menu screen and computer screen. ●This unit cannot play files recorded using packet write.
Naming folders and files
(Files are treated as content and folders are treated as groups on this unit.)
At the time of recording, prefix folder and file names. This should be with numbers that have an equal number of digits, and should be done in the order you want to play them (this may not work at times).
Files must have the extension:
".WMA" or ".wma"
".MP3" or ".mp3"
".JPG", ".jpg", ".JPEG" or ".jpeg"
WMA
- You cannot play WMA files that are copy protected.
- This unit is not compatible with Multiple Bit Rate (MBR: a file that contains the same content encoded at several different bit rates).
MP3
- This unit is not compatible with ID3 tags.
- Compatible sampling rate: 8, 11.02, 12, 16, 22.05, 24, 32, 44.1, and 48 kHz
JPEG
- JPEG files taken on a digital camera that conform to the DCF Standard Version 1.0 are displayed.
- Pictures taken using digital camera functions not supported by DCF like automatic picture rotation may not be displayed.
- Files that have been altered, edited, or saved with computer picture editing software may not be displayed.
- This unit cannot display moving pictures, MOTION JPEG, or other such formats, still pictures other than JPEG (e.g., TIFF), or play pictures with attached audio.
e.g., MP3![graph TD A["root"] --> B["001 group"] A --> C["002 group"] A --> D["003 group"] B --> E["001 track.mp3"] B --> F["002 track.mp3"] B --> G["003 track.mp3"] B --> H["004 track.mp3"] C --> I["001 track.mp3"] C --> J["002 track.mp3"] C --> K["003 track.mp3"]](/content/2026/05/962129/images/e909d954a2046ee7ac77a7cf790ef47ac4b037465c61f66b88b9612f6aca1b78.jpg)
Specifications
Operating temperature range:
+5 to +35 °C
Operating humidity range:
5 to 85% RH (no condensation)
Discs played (8 cm or 12 cm):
(1) DVD (DVD-Video) (2) DVD-RAM (DVD-VR, JPEG※4, 5) (3) DVD-R (DVD-Video) (4) DVD-RW (DVD-Video, DVD-VR) (5) +R/RW (Video) (6) CD, CD-R/RW [CD-DA, Video-CD, SVCD*1, MP3*2, 5, WMA*3, 5, JPEG*4, 5, HighMAT Level 2 (Audio and Image)]
Signal system: PAL/PAL60 (NTSC) selectable
LCD screen: 9" α-Si, TFT wide-screen LCD
Composite-video output:
Output level: 1 Vp-p (75 Ω)
Output terminal: Mini-jack
Number of terminals: 1 system
Audio output:
Output level: 1.5 Vrms (1 kHz, 0 dB, 10 kΩ)
Output terminal: Stereo mini-jack
Number of terminals: 1 system
Audio performance:
(1) Frequency response:
●DVD (linear audio):
4 Hz to 22 kHz (48 kHz sampling)
4 Hz to 44 kHz (96 kHz sampling)
• CD audio: 4 Hz to 20 kHz
(2) S/N ratio:
- CD audio: 115 dB
(3) Dynamic range:
• DVD (linear audio): 98 dB
● CD audio: 97 dB
(4) Total harmonic distortion:
- CD audio: 0.008 %
Digital audio output:
Optical digital output: Mini optical terminal
Number of terminals: 1 system
(also used for audio output)
Pickup:
Wave length: 662 nm/785 nm (DVD/CD)
Laser power: CLASS 3B/CLASS 3B (DVD/CD)
Power supply: DC 12 V (DC IN terminal)/
DC 7.2 V (Exclusive battery terminal)
Power consumption (using included AC adaptor):
13 W (Unit only: 10 W)
Power consumption in Standby mode
(using included AC adaptor):
approx. 0.5 W
Power consumption in Recharge mode
(using included AC adaptor):
13 W
AC adaptor:
Power source: AC 100 to 240 V, 50/60 Hz
Power consumption: 28 W
DC output: 12 V, 1.5 A
Car DC Adaptor (DVD-LS90 included):
DC input: 12 V, 20 W
DC output: 12 V, 1.5 A
Battery pack (lithium ion)
CGR-H702 (DVD-LS90 included):
Voltage: 7.2 V
Capacity: 4700 mAh
CGR-H701 (included with DVD-LS85):
Voltage: 7.2 V
Capacity: 2150 mAh
Dimensions (W × D × H)
(excluding protrusions and battery):
DVD-LS90: 235.4 mm × 178.6 mm × 39.0* mm
*29.9 mm at lowest point
(D=185 mm including battery)
(H=51.5 mm including battery)
*29.9 mm at lowest point
(D=179.3 mm including battery)
(H=46.7 mm including battery)
Mass (including battery):
DVD-LS90: 1097 g
DVD-LS85: 999 g
Note
Specifications are subject to change without notice. Mass and dimensions are approximate.
*1 Conforming to IEC62107 *2 Compatible compression rate: between 32 kbps and 320 kbps *3 Compatible compression rate: between 48 kbps and 320 kbps *4 Exif Ver 2.1 JPEG Baseline files Picture resolution: between 320×240 and 6144×4096 pixels (Sub sampling is 4:2:2 or 4:2:0) *5 The total combined maximum number of recognizable audio and picture contents and groups: 4000 audio and picture contents and 400 groups.
Troubleshooting guide
Before requesting service, make the following checks. If you are in doubt about some of the check points, or if the remedies indicated in the chart do not solve the problem, consult your dealer for instructions. (Reference pages are shown in parentheses.)
The following do not indicate malfunction.
● Sound from the AC adaptor during recharging. ● The battery pack warming up when recharging or during use. - The surface and area around the unit becoming warm when used for long periods.
Power
| No power. | Check connections to the AC adaptor or battery pack.(6)You cannot turn on the unit with the remote control if the unit is powered by the battery pack.The unit has protection circuitry that is activated if it becomes too hot or too cold. The unit will not work if this occurs. Use the unit between 5 °C and 35 °C . |
| Unit turns off automatically. | The unit turns off after it has been stopped for about 15 minutes (5 minutes when the unit is powered by the battery pack) to conserve power. Turn the unit on again. |
| Cannot charge or the [CHG] indicator fails to light. | The battery pack can only be recharged when the unit is off.The charging time increases when the temperature is too hot or too cold, and charging may not be possible under some circumstances.Check connections to the AC adaptor or battery pack.(6) |
| Play time dramatically reduced after recharging. | The battery pack has reached the end of its service life (It can be recharged about 300 times). |
No operation
| No response when any buttons pressed. | This unit cannot play discs other than the ones listed in these operating instructions.(5)The unit may not be operating properly due to lightning, static electricity or some other external factor. Turn the unit off and then back to ON. Alternatively, turn the unit off, disconnect the power source (AC or battery pack), and then reconnect it.Condensation has formed: Wait 1 to 2 hours for it to evaporate. |
| No response when remote control buttons pressed. | Check that the battery is installed correctly.(7)The battery is depleted: Replace it with new one.(7)Point the remote control at the remote control sensor and operate.(7) |
| You have forgotten your ratings password.Reset all the settings to Factory Preset. | While stopped, press and hold [◀◀] and [■■] on the unit and then also press and hold [▶, ON] on the unit until “Initialized” disappears from the screen. Turn the unit off and on again. All settings will return to the default values. |
| No picture or sound. | Check that the disc has something recorded on it. |
Specific operation impossible or incorrect
| It takes time before play starts. MP3 | ● Play may take time to begin when an MP3 track has still picture data. Even after the track starts, the correct play time will not be displayed; however, this is normal. |
| The program and random play functions do not work. DVD-V | ● These functions do not work with some DVD-Videos. |
| Menu doesn’t appear. VCD with playback control | ● Press [■] twice and then press [▶] (PLAY). |
| Subtitle position is wrong. | ● Adjust the position. (“Subtitle Position” in Display Menu) (17) |
| No subtitles. | ● Display the subtitles. (11) |
| In A-B repeat, point B is automatically set. | ● The end of an item becomes point B when it is reached. |
| Play doesn’t start. WMA | ● This unit may not play WMA that contains still picture data. |
Picture incorrect
| No picture on the LCD. | Select a monitor mode other than “OFF” (no picture). (11, Selecting how to show 4:3 aspect pictures on the LCD) |
| The LCD is dark. | Adjust the brightness. (11, Adjusting the picture quality on the LCD) |
| LCD pixels turn black or radiate different colors. | The LCD is constructed with precision technology so 99.99 % of the pixels are active, but of the remaining of 0.01 %, there are pixels that may be black or emit light constantly. This phenomenon is not a malfunction. |
| Picture doesn’t appear on the television (or the size of the picture seems wrong). | Check connections. (20)Check that the television is on.Check that the input mode on the television is correct.Check the settings in “Video—TV Aspect”. (18)Turn off the zooming feature on your television if you are using Zoom. (17)Ensure that the unit is connected directly to the television, and is not connected through a video cassette recorder. (20) |
| Menu not displayed correctly. | Restore the zoom ratio to ×1.00. (17)Set “Subtitle Position” in Display Menu to “0”. (17) |
| Auto zoom function does not work well. | Use the other preset aspect ratios or manual adjustment. (17)Zoom function may not work well, especially in dark scenes and may not work depending on the type of disc. |
Troubleshooting guide
Sound incorrect
| Sound distorted. | Select “Off” in “Advanced Surround”. (10)Move unit away from mobile phones.Noise may occur when playing WMA files. |
| Piercing noise comes from the speakers. | If you have connected a digital amplifier which does not include decoder, be sure to select “PCM” in “Dolby Digital”, “DTS Digital Surround” or “MPEG **” in “Audio” tab. (19) |
| Effects do not work. | None of the audio effects work when the unit is connected through the digital optical cable and is outputting bitstream signals. (20)Some audio effects do not work or have less effect with some discs.Advanced Surround and Multi Re-master do not work if you have changed the play speed. |
| No sound from the unit’s speaker. | The speaker is off if the LCD is closed or headphones are connected.Turn up the volume. (8) |
| No sound from other speakers. | Check all connections and settings. (20) |
| No sound when you change the play speed. | There may be a pause in sound. |
* For Asia MPEG is not available.
Recording
Cannot record to digital recording equipment. (Incorrect sound recorded.)
- You cannot record WMA/MP3.
- You cannot record DVDs that have protection preventing digital recording.
- You cannot record DVDs if the recording equipment cannot handle signals with a sampling frequency of 48 kHz.
- Make the following settings:
- Advanced Surround: Off (10)
- PCM Digital Output: Up to 48 kHz (19) – Dolby Digital/DTS Digital Surround/MPEG*: P C M (19)
* For Asia MPEG is not available.
Displays
| “∅”No On-Screen display.“Check the disc.” | ● The operation is prohibited by the unit or disc.● Select “On” for “On-Screen Messages” in “Display” tab. (19)● Clean the disc. (27) |
| “ [IMAGE] ERROR | ●A problem has occurred with the battery pack. Consult your dealer. |
| “ [IMAGE] ERROR | ●The battery pack has been recharging for 12 hours but has failed to recharge for some reason. Recharge again. |
| “ [IMAGE] ERROR | ●You are recharging in a location that is too hot or too cold. Recharge at normal temperature (+5 to +35 °C). |
| “H □□”□□ stands for a number. | ● Trouble has occurred. The number appearing after “H” depends on the problem. Turn the unit off and on again. Alternatively, turn the unit off, disconnect the power source (AC or battery pack), reconnect the power and turn the unit on again.If the service numbers fail to clear, note the service numbers and consult your dealer. |
| “Cannot display group xx, content xx” | ● You are trying to play incompatible groups or content. (22) |
[⏻] and [CHG] indicators
The [⏻] indicator flashes rapidly.
The [⏻] indicator flashes slowly.
The [CHG] indicator flashes rapidly.
The [CHG] indicator flashes slowly.
- The unit has malfunctioned. Consult your dealer.
- The unit is on and the LCD is closed or the monitor mode is set to "OFF" (no picture). Turn the unit off when you have finished.
- There is a problem with the battery pack. Turn the unit on and check the message on the LCD. (26)
- Battery pack charge is low. The unit will turn off automatically after a few minutes.
Maintenance
To clean this unit, wipe with a soft, dry cloth.
- Use eyeglass cleaner to remove stubborn dirt from the LCD.
- Never use alcohol, paint thinner or benzine to clean this unit.
Maintenance of the lens
- Remove dust carefully with an air blower for camera lenses (optional).
- Recommended product: Lens cleaner kit (SZZP1038C) (Available from Panasonic dealers.)
- You cannot use a CD type lens cleaner.
- Be careful not to touch the lens with your fingers.
To clean discs
Wipe with a damp cloth and then wipe dry.

Disc handling precautions
- Do not attach labels or stickers to discs (This may cause disc warping, rendering it unusable).
- Do not write on the label side with a ball-point pen or other writing instrument.
- Do not use record cleaning sprays, benzine, thinner, static electricity prevention liquids or any other solvent.
- Do not use scratch-proof protectors or covers.
- Do not use the following discs:
- Discs with exposed adhesive from removed stickers or labels (rented discs etc). – Discs that are badly warped or cracked.
- Irregularly shaped discs, such as heart shapes.
Manufactured under license from Dolby Laboratories. "Dolby" and the double-D symbol are trademarks of Dolby Laboratories.
“DTS” and “DTS 2.0 + Digital Out” are trademarks of Digital Theater Systems, Inc.
This product incorporates copyright protection technology that is protected by method claims of certain U.S. patents and other intellectual property rights owned by Macrovision Corporation and other rights owners. Use of this copyright protection technology must be authorized by Macrovision Corporation, and is intended for home and other limited viewing uses only unless otherwise authorized by Macrovision Corporation. Reverse engineering or disassembly is prohibited.
MPEG Layer-3 audio decoding technology licensed from Fraunhofer IIS and Thomson multimedia.
HighMAT™ and the HighMAT logo are either trademarks or registered trademarks of Microsoft Corporation in the United States and/or other countries.

Windows Media, and the Windows logo are trademarks, or registered trademarks of Microsoft Corporation in the United States and/or other countries.
WMA is a compression format developed by Microsoft Corporation. It achieves the same sound quality as MP3 with a file size that is smaller than that of MP3.

Main feature index
To select the content to repeat (→ page 10)
To enjoy virtual surround (→ page 10)
To adjust the picture quality (→ page 11)
To select how to show 4:3 aspect pictures
(→ page 11)
Shows a disc top menu (→ page 9)
Shows a program list (→ page 15)
Shows On-Screen Menus (→ page 16)
Shows a disc menu (→ pages 9, 14)
Shows a playlist (→ page 15)
Adjusts the volume (→ page 8)


| CAUTION - VISIBLE AND INVISIBLE LASER RADIATION WHEN OPEN AND INTERLOCKS DEFEATED.AVOID EXPOSURE TO BEAM. |
| VARNING -SYNLIG OCH OSYNLIG LASERSTRÅLNING NÅR DENNA DEL ÅR ÖPPNAD OCHSPÄRREN ÅR URKOPPLAD. BETRAKTA EJ STRÅLEN. |
| ADVARSEL-SYNLIG OG USYNLIG LASERSTRÅLING VED ÅBNING, NÅR SIKKERHEDSAFBRYDEREER UDE AF FUNKTION. UNDGÅ UDSÆTTEELSE FOR STRÅLING. |
| ADVARSEL-SYNLIG OG USYNLIG LASERSTRÅLING NÅR DEKSEL ÅPNES OG SIKKERHEDSLÅSBRYTES. UNNGÅ EKSPONERING FOR STRÅLEN. |
| VARO! -AVATTAESSA JA SUOJALUKITUS OHITETTAESSA OLET ALTTIINA NÄKYVÄÄ JANÄKYMÄTÖN LASERSÄTEILYLLE. ÄLÄ KATSO SÄTEESEEN. |
| VORSICHT-SICHTBARE UND UNSICHTBARE LASERSTRAHLUNG, WENN ABDECKUNG GEÖFFNETUND SICHERHEITSVERRIEGELUNG ÜBERBRÜCKT. NICHT DEM STRAHL AUSSETZEN. |
| ATTENTION-RAYONNEMENT LASER VISIBLE ET INVISIBLE DANGEREUX EN CAS D'OUVERTURE ETLORSQUE LA SÉCURITÉ EST NEUTRALISÉE. EXPOSITION DANGEREUSE AU FAISCEAU. |
| 注意 -打开时及联锁消除时可见及不可见激光辐射.避免激光束照射. |
(Bottom of product)

(Bottom of product)

- DEAR CUSTOMER
- REGION NUMBER
- PANASONIC®
- OPERATING INSTRUCTIONS
- PORTABLE DVD/CD PLAYER
- MULTI-FORMAT PLAYBACK
- DVD-RAM
- DVD-RW (DVD-VR)
- DVD-VIDEO/VIDEO CD/CD
- DVD-R/DVD-RW/+R/+RW
- CD-R/CD-RW
- DVD-LS
- NOTE
- CAUTION FOR AC MAINS LEAD
- (FOR UNITED KINGDOM)
- CAUTION
- IMPORTANT
- WARNING
- AC ADAPTOR
- TABLE OF CONTENTS
- PREPARATIONS
- TO PREVENT DAMAGE
- PRECAUTIONS
- FOR THE UNITED KINGDOM AND REPUBLIC OF IRELAND
- SALES AND SUPPORT INFORMATION
- CUSTOMER CARE CENTRE
- DIRECT SALES AT PANASONIC UK
- BATTERIES
- BATTERY PACK (LITHIUM ION BATTERY PACK)
- BUTTON-TYPE BATTERY (LITHIUM BATTERY)
- DISPOSING OF THE BATTERIES
- FOR THE UNITED KINGDOM AND CONTINENTAL EUROPE
- FOR ASIA
- PRECAUTIONS FOR LISTENING WITH THE HEADPHONES OR EARPHONES
- ACCESSORIES
- DISCS THAT CAN BE PLAYED
- DISCS THAT CANNOT BE PLAYED
- ① ATTACHING THE BATTERY (WHEN THE UNIT IS OFF)
- DETACHING
- WHEN NOT USING FOR LONG PERIODS OF TIME
- ② RECHARGING THE BATTERY (WHEN THE UNIT IS OFF)
- TO CONSERVE POWER
- RECHARGING TIME
- DVD-LS85: APPROX. 4 HOURS
- CHECKING THE REMAINING BATTERY CHARGE
- ③ THE REMOTE CONTROL
- INSERT THE BUTTON-TYPE BATTERY (INCLUDED)
- RANGE OF USE
- ④ ADJUSTING THE LCD ANGLE
- PLAY
- OPEN THE LID
- INSERT A DISC AND CLOSE THE LID
- PRESS AND HOLD
- ADJUST THE VOLUME
- MAIN UNIT OPERATIONS
- USEFUL FUNCTIONS
- TO REPEAT A SPECIFIED SECTION (A-B REPEAT)
- CHANGING PLAY SPEED RAM DVD-RW (VR) DVD-V
- ENJOYING VIRTUAL SURROUND (ADVANCED SURROUND)
- PRESS TO SELECT "SP 1 NATURAL" OR "SP 2 ENHANCED
- PRESS TO SELECT THE MONITOR MODE
- ADJUSTING THE PICTURE QUALITY ON THE LCD
- PRESS [▲▼] TO SELECT THE ITEM, AND [◀▶] TO CHANGE THE SETTING
- CHANGING SOUNDTRACKS DVD-V (WITH MULTIPLE SOUNDTRACKS) RAM DVD-RW (VR) VCD
- PRESS TO SELECT THE SOUNDTRACK
- RAM DVD-RW (VR) VCD
- SIGNAL TYPE/DATA
- CHANGING SUBTITLES
- DVD-V VCD
- PRESS TO SELECT THE SUBTITLE LANGUAGE
- RAM DVD-RW (VR)
- PRESS TO SELECT "ON" OR "OFF
- ANGLE SELECT DVD-V (WITH MULTIPLE ANGLES) / STILL PICTURE ROTATION JPEG
- ENJOYING HIGHER QUALITY AUDIO AND VIDEO
- MULTI RE-MASTER
- PICTURE MODE
- PROGRAM/RANDOM PLAY
- PROGRAM PLAY (UP TO 32 ITEMS)
- CHANGING THE PROGRAM
- CLEARING THE WHOLE PROGRAM
- RANDOM PLAY
- PLAYING DATA DISCS
- PLAYING FROM THE SELECTED ITEM (NAVIGATION MENU)
- PLAYING HIGHMAT™ DISCS
- SELECTING FROM THE LIST
- PLAYING PROGRAMS/PLAYLIST ON RAM/DVD-RW (DVD-VR) DISCS
- PLAYING CD CD
- USING ON-SCREEN MENUS
- CHECKING THE PLAY STATUS (ELAPSED PLAY TIME INDICATOR)
- CHANGING THE PLAYER SETTINGS
- USING THIS UNIT WITH OTHER EQUIPMENT
- ENJOYING WITH 5.1CH AUDIO
- ENJOYING STEREO AUDIO
- TELEVISION CONNECTIONS
- WHEN USING IN A CAR
- CONNECTIONS
- REPLACING THE FUSE
- CAUTIONS
- FREQUENTLY ASKED QUESTIONS
- TIPS FOR MAKING WMA/MP3 AND JPEG DISCS (FOR CD-R/CD-RW)
- NAMING FOLDERS AND FILES
- WMA
- MP
- JPEG
- SPECIFICATIONS
- TROUBLESHOOTING GUIDE
- THE FOLLOWING DO NOT INDICATE MALFUNCTION
- SPECIFIC OPERATION IMPOSSIBLE OR INCORRECT
- PICTURE INCORRECT
- RECORDING
- [⏻] AND [CHG] INDICATORS
- MAINTENANCE
- MAIN FEATURE INDEX
Brand : PANASONIC
Model : DVD-LS85
Category : CD Player