
Venue 7139 - Tablet DELL - Free user manual and instructions
Find the device manual for free Venue 7139 DELL in PDF.


| Product Type | Tablet |
| Brand | Dell |
| Model | Venue 7139 |
| Dimensions (Height) | 279.74 mm (11.01 inches) |
| Dimensions (Width) | 176.76 mm (6.96 inches) |
| Weight | 889 g (1.96 lb) |
| Display | 10.8-inch TFT-LCD, Full HD (1920 x 1080), 400 nits |
| Processor | Intel Haswell ULX Y-series |
| Memory | 4 GB / 8 GB LPDDR3 |
| Storage | NGFF SSD 128 GB / 256 GB |
| Battery | 2-cell lithium ion, 36 WHr, rechargeable |
| Power Adapter | 23.4 W, 19.5 V DC, 100-240 V AC input |
| Cameras | Front: 2 MP; Rear: 8 MP |
| Connectivity | Wi-Fi, Bluetooth, optional LTE/HSPA+, NFC |
| Ports | USB 3.0, 3.5 mm audio, microSD, microSIM, docking |
| Operating System | Windows 8.1 |
| Care & Cleaning | Use soft cloth dampened with water; do not use liquid cleaners |
| Safety | Read manual; avoid electrostatic discharge; use only Dell adapters |
| Spare Parts & Repairability | Battery replaceable; stylus and keyboard dock optional; authorized service recommended |
| General Information | Released 2013; supports optional stylus and docks |
Frequently Asked Questions - Venue 7139 DELL
User questions about Venue 7139 DELL
0 question about this device. Answer the ones you know or ask your own.
Ask a new question about this device
Download the instructions for your Tablet in PDF format for free! Find your manual Venue 7139 - DELL and take your electronic device back in hand. On this page are published all the documents necessary for the use of your device. Venue 7139 by DELL.
USER MANUAL Venue 7139 DELL
Dell Venue Pro 11 -7130/7139
User's Guide
Notes, Cautions, and Warnings

NOTE: A NOTE indicates important information that helps you make better use of your computer.

CAUTION: A CAUTION indicates either potential damage to hardware or loss of data and tells you how to avoid the problem.

WARNING: A WARNING indicates a potential for property damage, personal injury, or death.
© 2013 Dell Inc. All Rights Reserved.
Trademarks used in this text: Dell™, the DELL logo, Venue™, and Wi-Fi Catcher™ are trademarks of Dell Inc. Intel®, Xeon®, Core™, and Atom™, are registered trademarks or trademarks of Intel Corporation in the U.S. and other countries. Microsoft®, Windows®, MS-DOS®, Windows Vista®, the Windows Vista start button, and Office Outlook® are either trademarks or registered trademarks of Microsoft Corporation in the United States and/or other countries. Wi-Fi® is a registered trademark of Wireless Ethernet Compatibility Alliance, Inc.
2013 -10
Rev. A00
Contents
1 Working on Your Tablet....5
Before Working Inside Your Tablet....5
Turning off Your Tablet....6
2 Setting Up Your Tablet....9
Charging the Tablet....9
Turning On Your Tablet....10
Turning off the Screen....11
Using power buttonUsing Charms....11
3 Using Your Tablet....13
Screen Orientation....13
How to lock / unlock the screen orientation....13
Adjusting the screen brightness....13
Gestures....14
Right-Click....15
The Windows Start Screen....15
How to access the Start screen....16
Get to know Windows 8.1....16
Swipe Right....16
Swipe Left....17
Swipe Up/Down....17
Split Screen....17
Using Headphones....17
Removing the Micro-SD card....18
Removing the Battery....18
Installing the Battery....19
Installing the micro-SIM Card....19
4 Managing your tablet settings....21
Wi-Fi setting....21
Turning On/Off Wi-FiConnecting to a network....21
Mobile broadband setting....22
Turning On/Off mobile broadbandConnecting to a mobile broadband networkDisconnecting from mobile broadband networkMobile broadband optionsService Provider hardware informationEnabling PIN lock....22
Refreshing / Recovering / Re-setting your tablet....24
Refresh your PC without affecting your filesRemove everything and re-install WindowsAdvanced startup....25
5 Synchronizing your tablet....27
Using Microsoft account....27 Copying music, photos, and videos....27
6 Optional Stylus Features....29
Getting Your Stylus Ready for Use....29 Using the Optional Stylus with Your Tablet....30
7 Desktop Dock Features....31
Connecting the Power Adapter....32
8 Thin Travel Keyboard Dock Features.... 33
Docking Your Tablet to the Thin Travel Keyboard Dock ....33
9 Mobile Keyboard Dock Features....35
Docking Your Tablet to the Keyboard Dock .... 35 Undocking Your Tablet from the Keyboard Dock.... 36 Charging the dock.... 36 Battery behavior.... 37
10 Cleaning Your Tablet....39
11 Troubleshooting....41
Battery problem....41 System problem....42 Touchscreen problem....43 Network problem....43
12 System Setup.... 45
System Setup (BIOS) Options....45 Updating the BIOS....54
13 Specifications....57
14 Contacting Dell....61
1
Working on Your Tablet
Before Working Inside Your Tablet
Use the following safety guidelines to help protect your tablet from potential damage and to help to ensure your personal safety. Unless otherwise noted, each procedure included in this document assumes that the following condition exists:
- You have read the safety information that shipped with your tablet.
WARNING: Before working inside your tablet, read the safety information that shipped with your tablet. For additional safety best practices information, see the Regulatory Compliance Homepage at www.dell.com/regulatory_compliance
CAUTION: Many repairs may only be done by a certified service technician. You should only perform troubleshooting and simple repairs as authorized in your product documentation, or as directed by the online or telephone service and support team. Damage due to servicing that is not authorized by Dell is not covered by your warranty. Read and follow the safety instructions that came with the product.
CAUTION: To avoid electrostatic discharge, ground yourself by using a wrist grounding strap or by periodically touching an unpainted metal surface, such as a connector on the back of the tablet.
CAUTION: Handle components and cards with care. Do not touch the components or contacts on a card. Hold a card by its edges or by its metal mounting bracket.
CAUTION: When you disconnect a cable, pull on its connector or on its pull-tab, not on the cable itself. Some cables have connectors with locking tabs; if you are disconnecting this type of cable, press in on the locking tabs before you disconnect the cable. As you pull connectors apart, keep them evenly aligned to avoid bending any connector pins. Also, before you connect a cable, ensure that both connectors are correctly oriented and aligned.
NOTE: The color of your tablet and certain components may appear differently than shown in this document.
To avoid damaging your tablet, perform the following steps before you begin working inside the tablet.
- Ensure that your work surface is flat and clean to prevent the tablet cover from being scratched.
- Turn off your tablet (see Turning Off Your Tablet).
- If the tablet is connected to a docking device (docked) such as the optional docking station or keyboard dock, un-dock it.
- Disconnect the power adapter from the tablet.
- Turn the tablet upside-down on a flat work surface.
NOTE: To avoid damaging the system board, you must remove the main battery before you service the tablet.
-
Remove the main battery.
-
Press and hold the power button for a few seconds to remove the flea power from the system board.
△ CAUTION: To guard against electrical shock, always unplug your tablet from the electrical outlet.
CAUTION: Before touching anything inside your tablet, ground yourself by touching an unpainted metal surface, such as the metal at the back of the tablet. While you work, periodically touch an unpainted metal surface to dissipate static electricity, which could harm internal components.
- Remove the storage SD card from the tablet.
Turning off Your Tablet
Turning off your tablet completely shuts down your tablet. You can turn off your tablet by two ways:
- Using power button
- Using charms menu
- To turn off your tablet using power button:
a) Press and hold the Power button until you see "Slide to shut down your PC" on the screen.
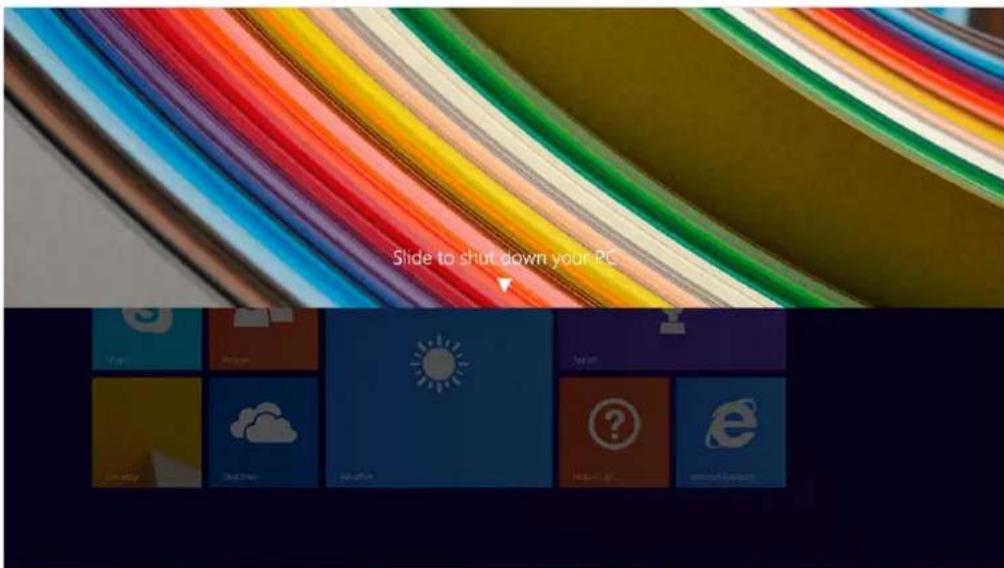
b) Slide to shut down your tablet.
NOTE: You can also turn off your tablet without sliding down the screen. Press and hold the Power button for >10 seconds to turn off your tablet. You can perform this force shutdown, if your tablet is not responding / behaving unexpectedly or touch is not working.
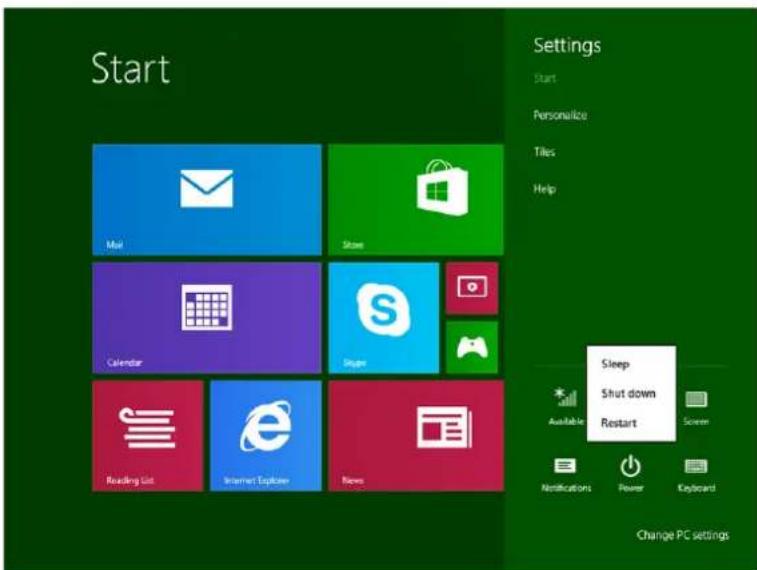
- To turn off your tablet using the charms menu:
a) Swipe from the right edge of the display to access the Charms menu.
b) Touch Settings → Power → Shut down to turn off the tablet.
Setting Up Your Tablet
Charging the Tablet
CAUTION: Charge the battery in an ambient temperature of 0 °C to 40 °C.
CAUTION: Use only the power adapter and power cable that came with your tablet. Using unauthorized power adapters or power cables may cause severe damage to your tablet.
NOTE: The battery is not fully charged when you unpack your tablet.
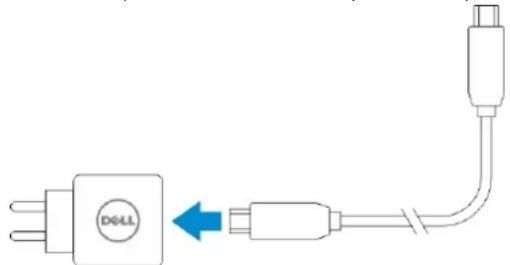
- Connect the power cable into the power adapter.
natural_image
Pure electrical circuit lines without any symbols- Connect the power adapter to an electrical outlet and charge the tablet until the battery is fully charged.
NOTE: The tablet battery requires about 4 hours to fully charge.
NOTE: You can also trickle charge the tablet via micro-USB connection. The battery takes up to 24 hours to fully charge depending on the power output of the USB port. The trickle charging also works with other non-Dell adapters.
You can check the tablet battery charge status from:
- Battery-charge light located on the front of the tablet:
LED Behavior Description
Solid white color on Battery is charging.
Off Battery is not charging. Either no AC adapter is
Amber color on Momentarily
connected or battery is fully charged.
- The LED will be solid amber for 2 seconds and then change to solid white. This is an indication that the system cannot power on with the current state of charge, but the battery is being charged.
- Battery is charging
- The tablet will not power on.

NOTE: You can check the exact battery charge level by booting to the operating system.
- Battery icons displayed on the screen:
Battery icon Description
| Battery is fully charged and AC adapter is connected. | |
| Battery is charging with AC adapter. | |
| Your tablet is running on battery power and the battery is discharging. | |
| Your tablet is plugged in, and either no battery is detected or the battery is not working correctly. | |
| Battery is at low level. | |
| Battery is at critical level. |
Turning On Your Tablet

NOTE: Use this tablet in an ambient temperature between 0 °C and 40 °C.
- Press and hold the Power button for 2 seconds to turn on your tablet.
- If the lock screen image displays, swipe your finger from the bottom of the display to switch to the login screen, and then enter password to log in to Windows.
The tablet is ready for use after the Windows Start screen displays.
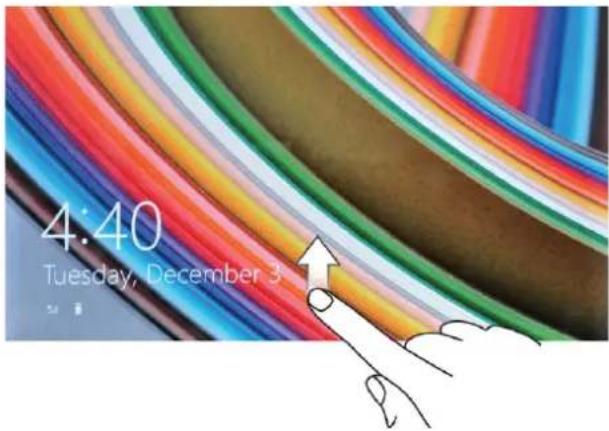

NOTE: If the login screen is not enabled in Windows 8.1, you will be taken directly from the lock screen to the start screen.

NOTE: The lock screen is only displayed when returning from a sleep state.
Turning off the Screen
Using power button
Press the Power button to turn off the screen.
Using Charms
- Swipe from the right edge of the display to access the Charms bar.
- Touch Settings → Power → Sleep to turn off the screen.
NOTE: If your tablet is in a sleep state, press the Power button 📍 or Windows button once to turn on the screen.
Using Your Tablet
Screen Orientation
For optimal viewing experience, the screen orientation changes automatically to portrait or landscape format depending on how you hold the tablet.

NOTE: Some applications may not support automatic screen rotation to portrait or landscape format.
How to lock / unlock the screen orientation
-
Swipe from the right edge of the display to access the Charms bar.
-
Touch Settings


- Touch toggle to lock the screen orientation, or touch toggle to unlock the screen orientation.
Adjusting the screen brightness
You can also adjust the screen brightness here by using the slider under the toggle menu.
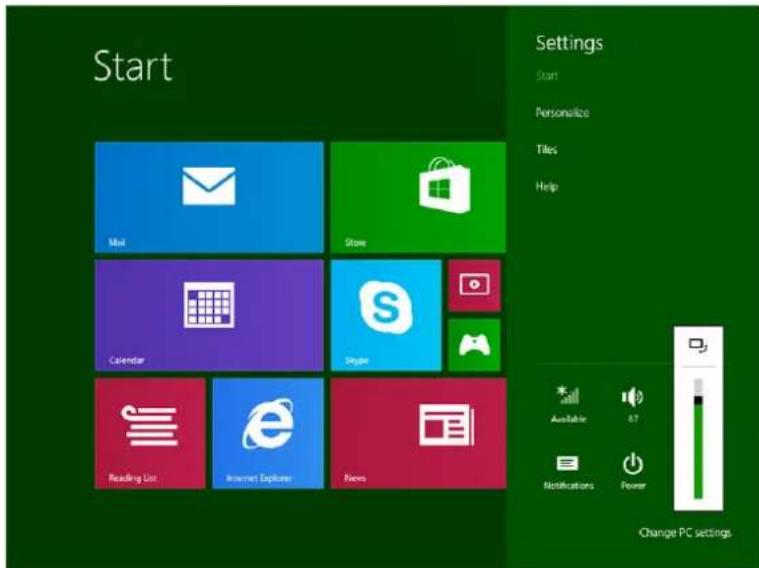
You can also adjust your screen automatically. To adjust the screen brightness automatically:
- Swipe from the right edge of the display to access the Charms bar.
- Touch Settings ⚙ → PC settings → PC and devices → Power and sleep.
- Under Brightness, slide left or right to turn on / turn off the automatic brightness option.

NOTE: You can turn on / turn off the slider to have the screen automatically adjust the brightness, based on the ambient light.
Gestures
Your tablet has a multi-touch display. You can touch the screen to operate the tablet.
Gesture Actions Functions
Touch
Tap gently on the display with your fingertip.
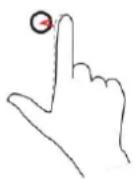
- Select items on the screen, including options, entries, images, and icons
- Start applications
- Touch buttons on the screen
- Input text using the on-screen keyboard
Touch and Hold
Touch and hold your finger on the display

- Display detailed information about an item
- Open the context menu of an item to perform further actions
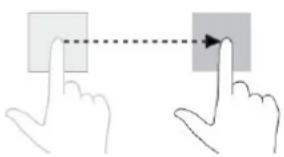
Drag and Drop
- Touch and hold your finger on an item on the screen
- Keeping your finger in contact with the display, move your fingertip to the desired location
- Take your finger off the display to drop the item in the desired location
natural_image
Illustration of two hands pointing at a square button with a dashed arrow indicating alignment (no text or symbols)Move item such as images and icons on the screen
- Scroll through the Start screen, web pages, lists, entries, photos, contacts, and so on
- Close an application. (Swipe the application to the bottom of the display)
Swipe or Slide
Move your finger in a vertical or horizontal direction on the display
Gesture Actions Functions
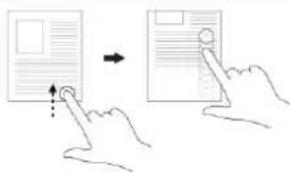
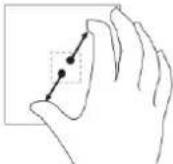
Zoom in
Touch the display with two fingers and then move the fingers apart
Enlarge the view of an image or web page
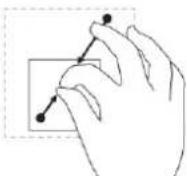
Zoom out
Touch the display with two fingers and then move the fingers closer
Reduce the view of an image or web page
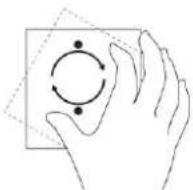
Rotate
Touch the display with two or more fingers and then move the fingers in a clockwise or counterclockwise arc
Rotate an object by 90 degrees
Right-Click
To perform a right-click in your tablet, Touch and Hold your finger for 2 seconds on any section of the screen or an icon and then release your finger.
The options menu appears on the screen.
The Windows Start Screen
The Windows Start screen displays a list of default and custom Live Tiles, which act as a shortcut to Control Panel, Windows Explorer, Weather application, RSS, Windows Store, Internet Explorer, and other installed applications.
Live Tiles on your Start screen change and update in real time so you can get real-time updates about news or sports, check what your friends are up to, and get the latest weather forecast.
The tile-based user interface gives you direct access to your most recently used applications, Emails, photos, music, videos, contacts, Facebook & Twitter updates, and frequently viewed websites. You can pin your favorite or frequently used applications as Live Tiles to customize the Start screen.
You also can personalize the Start screen by setting your favorite picture as a wallpaper.

NOTE: Live Tiles can be added or removed by using Pin or Unpin options.
How to access the Start screen
Follow either method to access the Start screen:
- Press the Windows button.
- Swipe from the right edge of the display to access the Charms bar, and then touch the Start icon

Get to know Windows 8.1
You can touch the Help+Tips tile on the Start screen to get help and tips on using Windows 8.1.
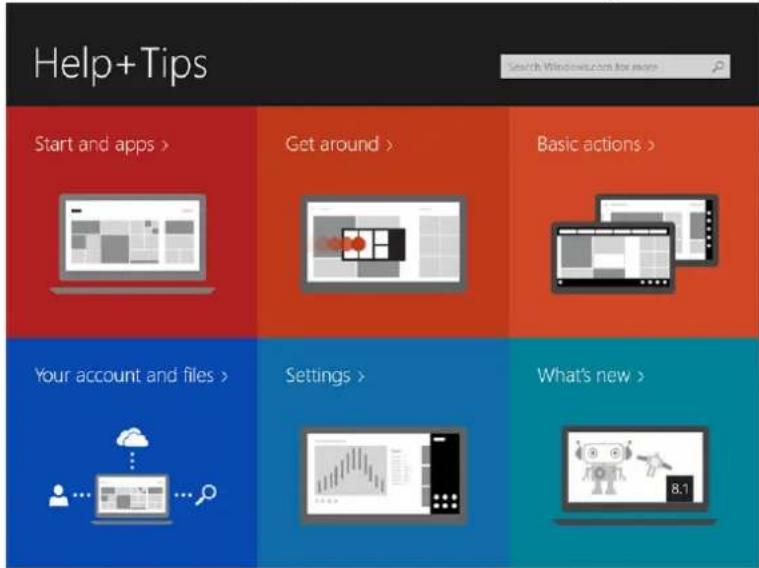
Swipe Right
Swiping-in from the right edge of the display reveals the Charms bar. Charms provide access to the system commands, such as Start, Search, Share, Devices, and Settings options.
If your tablet is running on an application or performing actions, pressing the Start icon 📁 takes you back to the Start screen. If you are at the Start screen, pressing the Start icon 📁 takes you to the most recently used application or most recently viewed screen.

NOTE: The functionality of the Start icon is same as Windows button
Swipe Left
- Swiping slowly from the left edge to the right edge of the display reveals thumbnails of the open applications and cycles the thumbnails of the open applications.
- Swiping-in and out on the left edge of the display brings up a list of the most recently used applications.
Swipe Up/Down
- Swiping-in from the bottom or top edge of the display reveals the All apps icon 📊. Touch All apps to show an alphabetical list of all applications installed on your tablet.
- Swiping-in from the top to the bottom of an application docks or closes the application.
For more information on using Windows Start screen, visit windows.microsoft.com/en-us/windows-8/start-screen-tutorial.
You can also enable the camera (front), when the screen is in lock mode. To enable the camera when the screen is in lock mode:
-
Swipe from the right edge of the display to access the Charms bar.
-
Click Settings → Change PC Settings → PC and Devices
-
Scroll down and navigate to Camera.
-
Swipe to turn on, to use the camera during the lock screen mode.
To make sure you can use the camera during the lock screen mode:
-
Press Power button to turn off the screen.
-
Press Power button again to enable the lock screen mode.
-
Swipe down to enable the camera.
Split Screen
The split screen option enables you to open two applications on the same screen, which helps you in multitasking. To split the screen:
- Open any two applications that you want to perform the split screen.
- Swipe from the left to open the second application and hold your finger until the screen splits.
- Release your finger to drop the second application.
NOTE: Windows 8.1 enables you to split the screen in variable width.
Using Headphones
You can use headphones to listen to music and sounds, record audio, or make calls.

WARNING: Listening to loud music for extended period of time can lead to hearing loss.
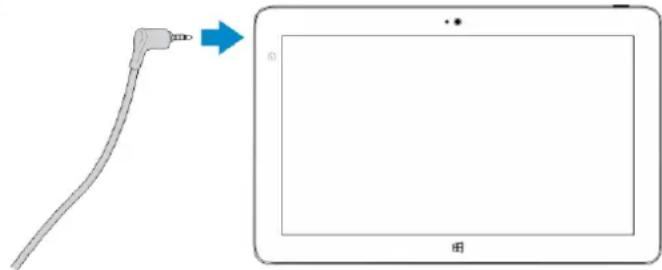
- Connect the headphones to the audio port (3.5 mm) on the tablet.
- Insert the earphones in your ears and adjust the volume level to a comfortable level.

NOTE: When you connect a headphone or an external audio device to the audio connector, the integrated speakers on your tablet are muted automatically.

CAUTION: To prevent damage to the headphones when disconnecting it from the tablet, pull the connector and not the cable.

NOTE: It is recommended that you turn down the volume level before plugging the headphone, and then adjust to a comfortable level. Sudden exposure to loud sounds can cause hearing damage.
Removing the Micro-SD card

CAUTION: Removing the Micro-SD card when transferring data may cause data loss or result in application errors. Make sure your tablet has finished all save operations to the Micro-SD card.
- Enter the Desktop mode. Touch Safely Remove Hardware in the notification area at the bottom-right corner of the screen.

NOTE: If you don't see Safely Remove Hardware icons in the notification area.

touch Show Hidden Icons to display all
- Touch Eject SD Memory Card. A message appears confirming that the Micro-SD card can be safely removed. If a warning message appears stating the Micro-SD card cannot be removed, ensure all data transfers involving the Micro-SD card are complete.
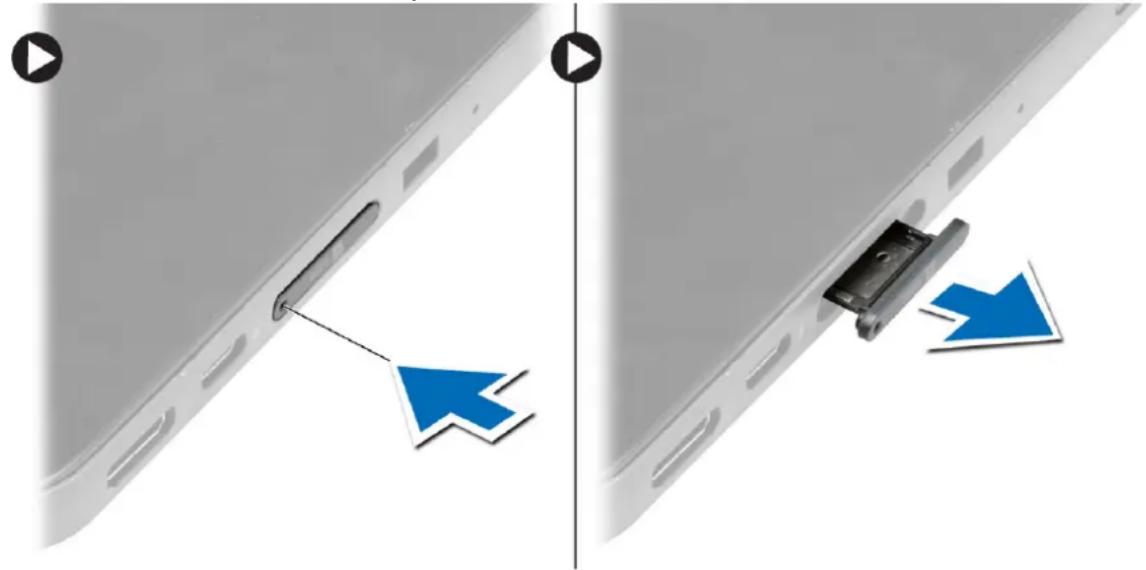
- Insert the tip of a small bent paperclip into the small hole on the micro-SD slot cover.
- Push the tip all the way into the hole until the micro-SD tray ejects. Pull the micro-SD card tray out.
- Remove the micro-SD card from the tray.
natural_image
Diagram showing a device being inserted into a tablet, with blue arrows indicating the process (no text or symbols present)Removing the Battery
- Follow the procedures in Before Working Inside Your Tablet.
-
Remove the base cover.
-
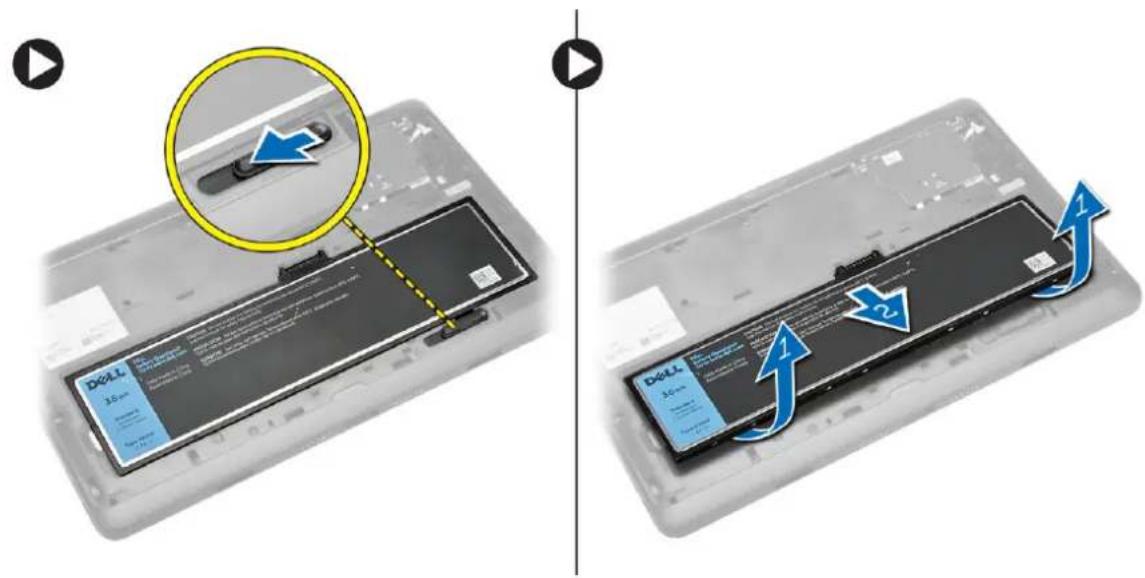
Perform the following steps:
a) Slide the release latch in the direction indicated to unlock the battery.
b) Push the battery forward to release it from its connector on the system board.
c) Lift and remove the battery from the tablet.
a) Slide the release latch in the direction indicated to unlock the battery.
b) Push the battery forward to release it from its connector on the system board.
c) Lift and remove the battery from the tablet.
Installing the Battery
- Slide the battery into its slot until it clicks into place.
- Install the base cover.
Installing the micro-SIM Card

CAUTION: Removing the Micro-SIM card when the tablet is on may cause data loss or damage the card. Make sure your tablet is turned off or the network connections are disabled.
- Turn off your tablet. For more information on turning off your tablet, see Turning off Your Tablet.
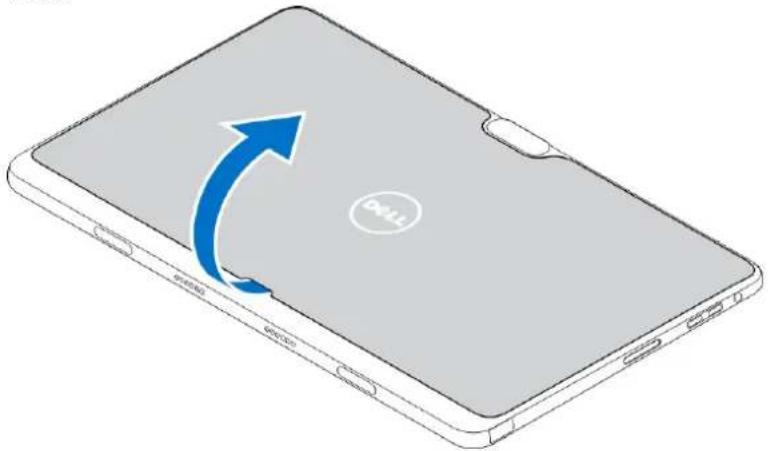
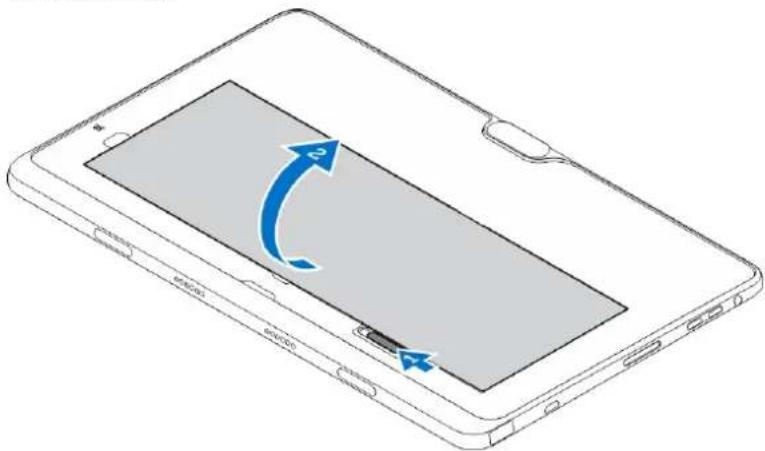
- Pry the base cover in the direction indicated and lift it at an upward angle to remove it from the tablet.
natural_image
Illustration of a smartphone showing the D4.5 logo and blue arrow indicating rotation (no text or symbols on the device itself)- Slide the release latch in the direction indicated to unlock the battery. Lift and remove the battery from the tablet.
natural_image
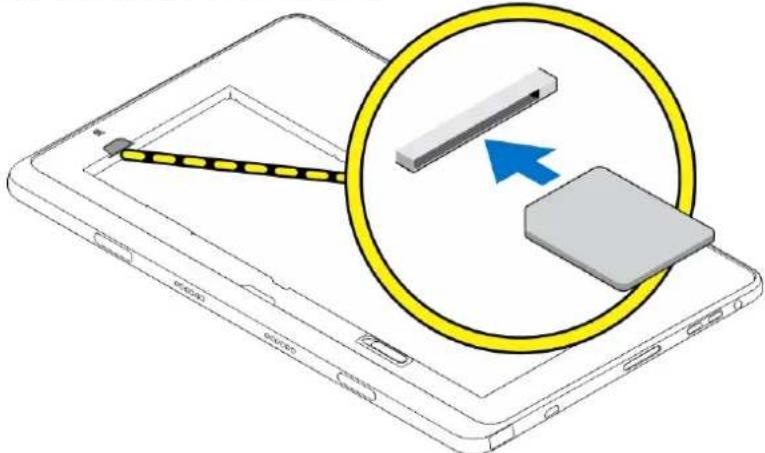
Line drawing of a tablet device showing a screen with an arrow indicating rotation (no text or symbols present)- Insert the micro-SIM card into its slot.
natural_image
Illustration of a smartphone with a cable being inserted into a circular device, showing internal components and a blue arrow (no text or symbols)Managing your tablet settings
Wi-Fi setting
Turning On/Off Wi-Fi
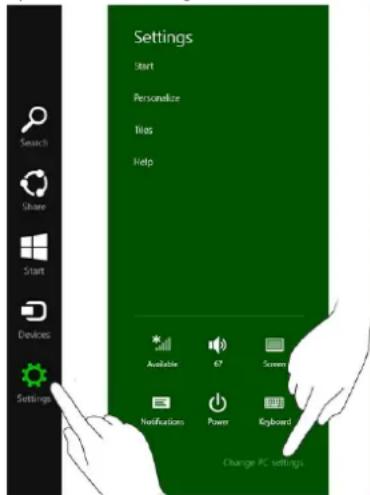
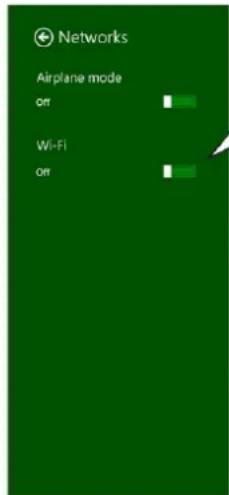
- Swipe from the right edge of the display to access the Charms bar.
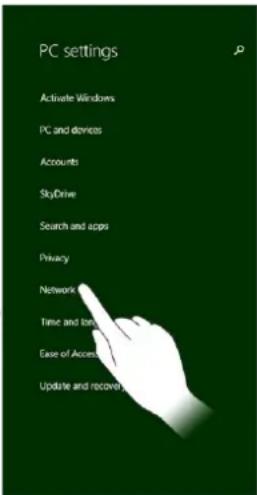
- Touch Settings → Change PC settings → Networks → Airplane mode.
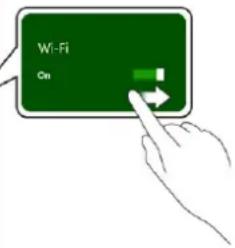
- Swipe Wi-Fi icon right or left to turn Wi-Fi on or off.
Connecting to a network
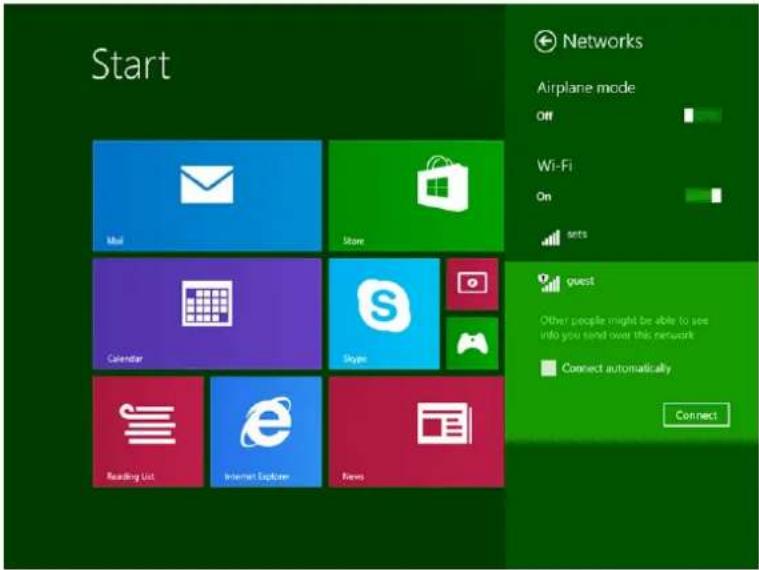
- Swipe from the right edge of the display to access the Charms bar.
- Touch Settings → Available → Select an available network → Connect
Mobile broadband setting
Turning On/Off mobile broadband
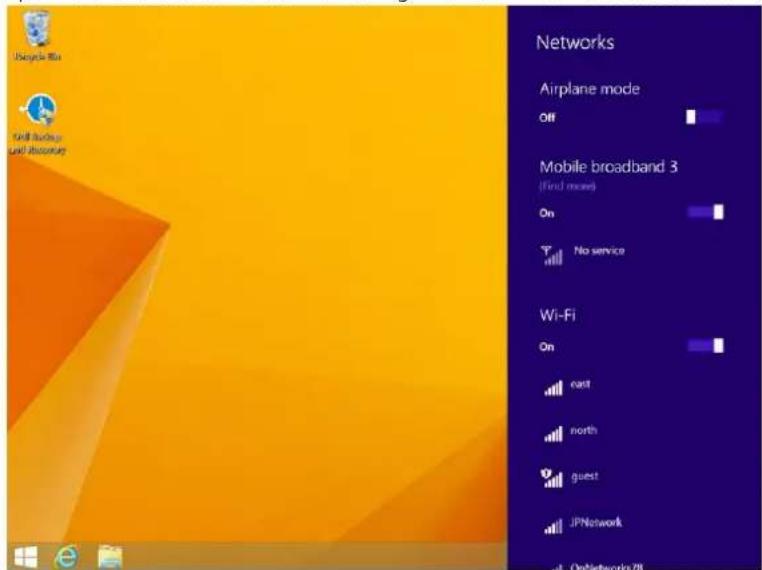
- Swipe from the right edge of the display to access the Charms bar.
- Touch Settings → Change PC settings → Networks → Airplane mode.
- Swipe Mobile broadband icon left or right to turn mobile broadband on or off.
Connecting to a mobile broadband network
- Ensure an active SIM card is inserted into the tablet.
-
Swipe from the right edge of the display to access the Charms bar.
-
Touch Setting → Network → Connections → Your Service Provider → Connect.
-
The estimated data usage will be shown once the mobile broadband network is enabled.
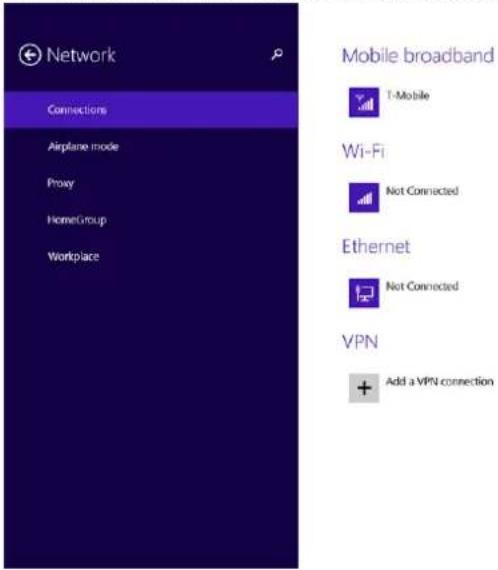
NOTE: You can choose the option Connect automatically to connect the mobile broadband automatically.
NOTE: Your tablet will automatically prioritize Wi-Fi networks over mobile broadband networks, when both are available. If your tablet is connected to the mobile broadband and any of saved Wi-Fi connections comes within range, it will disconnect from the mobile network and connect to the Wi-Fi automatically. For more information on turning on Wi-Fi network, see Wi-Fi setting.
Disconnecting from mobile broadband network
-
Swipe from the right edge of the display to access the Charms bar.
-
Touch Setting → Network → Your Service Provider → Disconnect.
NOTE: Once your tablet has disconnected from mobile broadband, the option Connect automatically will be disabled as well.
Mobile broadband options
- Swipe from the right edge of the display to access the Charms bar.
- Touch Settings → Networks
-
Touch and hold Your Service Provider or right-click if docked.
-
Touch Show estimated data usage/Hide estimated data usage to show or hide your data usage.
- Touch Set as metered connection/Non metered connection to set a particular connection as a metered/non-metered connection.
- Touch View connection properties to view your connected mobile broadband properties.
NOTE: If the option Set as metered connection is enabled, Windows Update will not download updates automatically unless it is a high priority, critical security update.
Service Provider hardware information
- Swipe from the right edge of the display to access the Charms bar.
- Touch Settings → Change PC settings → Network.
- Touch Your Service Provider to view the hardware information including the subscriber information and International Mobile Equipment Identity (IMEI) number.

Share this connection

Properties
Manufacturer: Sierra Wireless, incorporated Model: Dell Wireless 5570e HSPA+ (42Mb)
Firmware: SW19X15C_01.12
Network type: GSM
Data class: GPS, EDGE, UMTS, HSORA, HSUPA
IME: 355606050034714
Mobile number
(5) 810260532506780
SIM ICCID: 8901260533425067608
Copy
Security
Use a PIN to help protect your SIM
Use a PIN
Enabling PIN lock
-
Swipe from the right edge of the display to access the Charms bar.
-
Touch Settings → Network

- Touch and hold Your Service Provider or right-clicked if docked.
- Touch View connection properties→Security→Use a PIN.
- Enter your SIM PIN Code.
NOTE: Your Service Provider refers to the network service providers available in your location.
CAUTION: If you enter the incorrect PIN code, your mobile broadband connection will not be established. If you unsuccessfully enter the code three times, your SIM card will be locked. To unlock the SIM card, contact your service provider to get a Personal Unblocking Key (PUK) to unlock the SIM card.
NOTE: Before you contact your carrier, have your IMEI number ready.
Refreshing / Recovering / Re-setting your tablet
You can refresh / recover / restore your tablet to original factory settings.
- Swipe from the right edge of the display to access the Charms bar.
-
Touch Settings → Change PC Settings → Update and recovery → Recovery.
-
Refresh your PC without affecting your files
- Remove everything and reinstall Windows
-
Advanced startup
-
Select any recovery option to complete the task.
Refresh your PC without affecting your files
This option enables you to refresh your tablet without losing your photos, music, videos, and other personal files. If you want to perform this action:
- Click Get started. The Refresh your PC window opens.
- Click Next.
- Click Refresh.
Click Cancel to cancel this action.
Remove everything and re-install Windows
This option enables you to recycle or start over your tablet completely, and you can reset to its default / factory settings. If you want to perform this action:
- Click Get Started. The Rest your PC window opens.
- Click Next.
After you click Next, you will now have to select any of the two below options to finish the task:
- Just remove my files — If you select this option, Windows removes all your files including your photos, music, videos, and other personal files.
- Fully clean the drive — If you select this option, Windows resets your tablet.

CAUTION: Resetting your tablet erases all data from your tablet, including your account configuration, music, pictures, files, and so on. Ensure that you back up all the required data before you proceed.
Click Cancel to cancel this action.
Advanced startup
This option enables you to start up from a device or compact disc (such as DVD or USB drive) and change your tablet's firmware settings, change Windows startup settings, or restore Windows from the system image. If you want to perform this action, click Restart Now.

NOTE: Third-party applications will be removed.
Synchronizing your tablet
Using Microsoft account
If your computer has Microsoft Windows 8.1 installed, you can synchronize user settings of your tablet with your computer using a Microsoft account. When you sign in with your Microsoft account on your tablet, you can automatically synchronize your settings, including internet browser history, application settings, and personal files etc., with other Windows 8.1 PCs and Windows 8.1 tablets.

NOTE: You need a wireless connection for both your computer and tablet.
- Go to Charms bar, then click Settings → PC Settings → Accounts → Switch to a Microsoft account to switch your computer local account to your Microsoft account.
- A new option will be added to PC Settings called Sync your settings.
- Click Settings → PC Settings → More PC Settings → Sync your settings to show all kind of toggles for synchronizing your data and settings.
Copying music, photos, and videos
- Connect a USB key or a Micro-SD card to the computer and copy the required files.
- After the copy is complete, use the Safely Remove Hardware wizard to remove your tablet from the computer.
- You can also use the Skydrive feature of Win 8.1 to copy music, photos, and videos.
Optional Stylus Features
This section provides information about the features available on the Stylus.
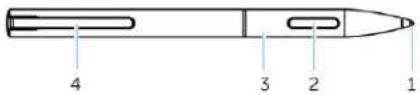
Feature Functionality
1 Pen lead Provides touch functionality.
2 Pen button Used to perform a left-click and right-click.
3 Middle barrel Provides access to the battery compartment.
4 Pen clip / Pen rear cap Used to secure the stylus in your pocket.
NOTE: The Stylus is optional and is sold separately.
NOTE: This Stylus only works with the Dell Venue 11 pro-5130 and Dell Venue 11 pro-7130/7139 tablets. It is not designed to work the earlier family of Dell tablets. Also, the stylus purchased for use with any other Dell tablets is not supported by the Dell Venue 11 pro-5130 and Dell Venue 11 pro-7130/7139 tablets.
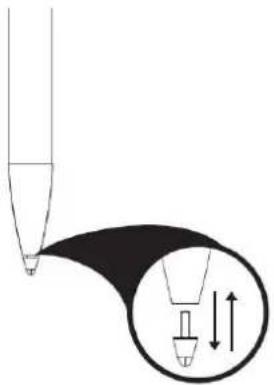
You can replace the Stylus pen lead, as shown in the below image.
natural_image
Diagram showing a pen tip interacting with a magnified view of a droplet inside a circle (no text or symbols)Getting Your Stylus Ready for Use
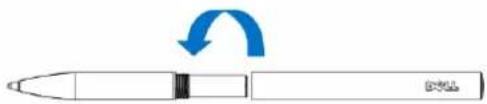
- Twist the middle barrel in a counter clockwise direction.
natural_image
Simple line drawing of a pen with an arrow indicating rotation (no text or symbols)- Insert a AAAA battery with the positive side facing the tip of the pen.


NOTE: Follow your local and regional statutes and regulations on disposal of battery waste.
- Re-assemble the barrel securely.
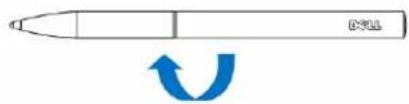
Using the Optional Stylus with Your Tablet
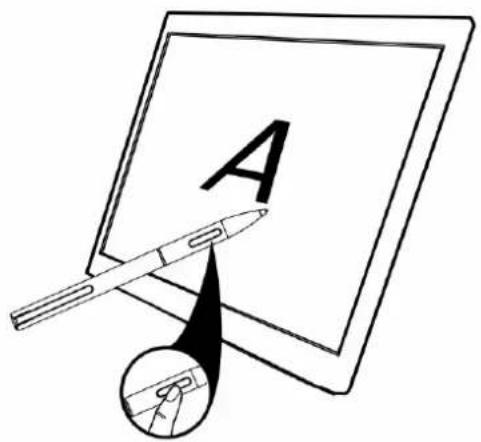
The Stylus is ergonomically designed to work with your tablet for long time periods. The user can seamlessly switch between pen and finger entry without any manual mode switching. The stylus supports features such as palm rejection, hovering, and pressure sensing, which allow for industry leading accuracy and ease of use with no calibration necessary. The two buttons are software configurable for using features such as erasing, highlighting, or performing mouse clicks. You can use the tip of the stylus to draw shapes, select text, turn a page and write or sign the documents on your tablet.
You can also press the button on the side of the stylus to perform the left-click and right-click functions on your tablet.
7
Desktop Dock Features
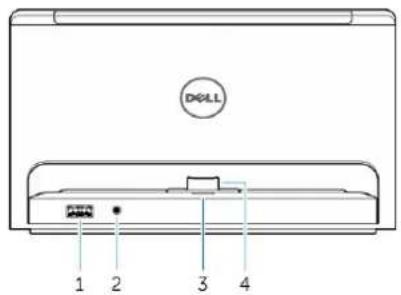
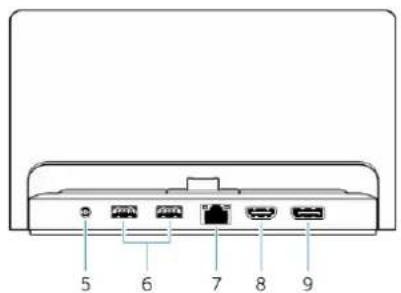
This section provides information about the features available on the Desktop dock.
Feature Functionality
1 USB 3.0 connector Connect USB devices, such as flash memory.
2 Audio connector Connect headphones or external speakers.
3 Power status light Indicates the power status.
4 Docking connector Connect the docking connector on the tablet.
5 Power connector Connect the AC adapter.
6 USB 3.0 connectors Connect USB devices, such as flash memory.
7 Network connector Connect an Ethernet cable for internet access.
8 HDMI connector Connect HDMI-capable devices such as projectors, TV's, and monitors.
9 DisplayPort connector Connect DisplayPort-capable devices such as projectors, TV's, and monitors.
NOTE: The desktop dock will only support USB 2.0 when docked with Venue Pro 11-5130.
NOTE: The Desktop dock is sold separately and is not shipped with the tablet.

NOTE: In Venue Pro 11-5130, you can use the HDMI connector or DisplayPort connector to mirror the same external display. You can use unique content display through the HDMI connector or DisplayPort connector only in Venue Pro 11 - 7130/7139.
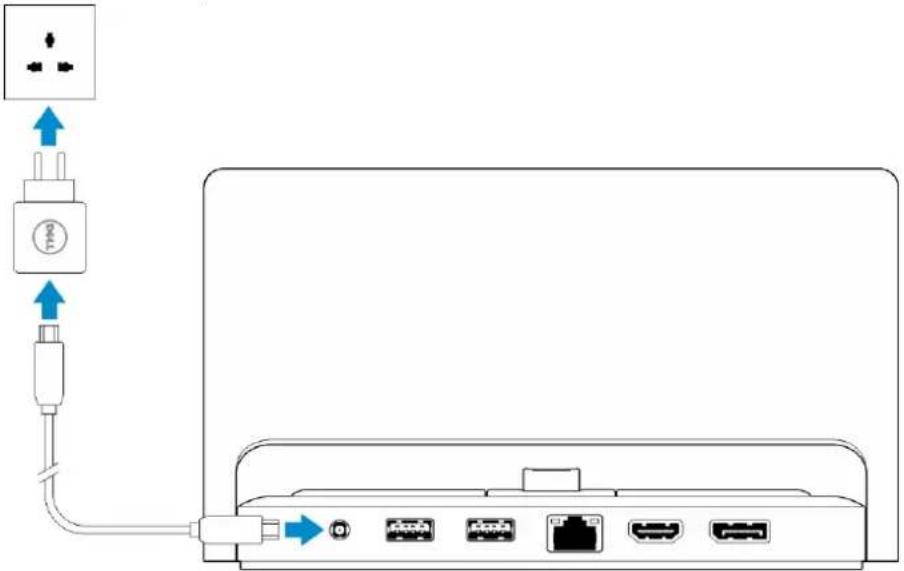
Connecting the Power Adapter
- Connect one end of the power adapter to a wall socket and the other end to the power connector port on the desktop dock.
Thin Travel Keyboard Dock Features
This section provides information about the features available on the Thin keyboard dock.
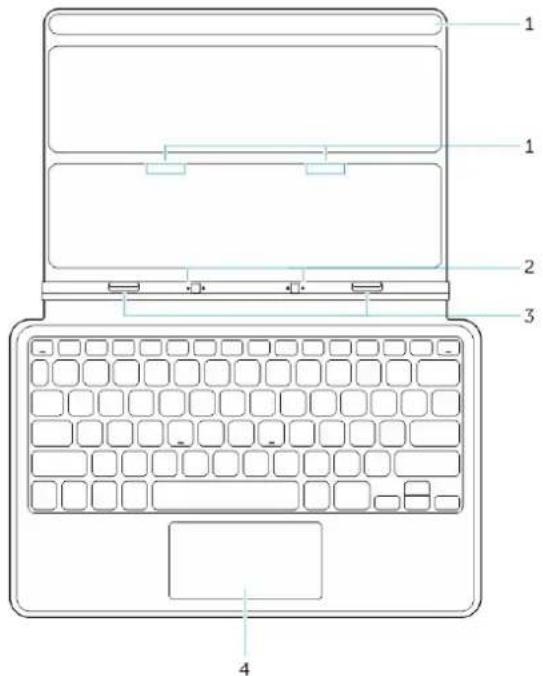
Table 1.
Feature Functionality
1 Magnets Magnets to enable docking.
2 Docking pins Allows the tablet to make electrical contact with the dock.
3 Docking Connect the docking connector on the tablet.
Connectors
4 Touch pad Allows you to move the mouse pointer on the screen and provides the function of a mouse.

NOTE: The Thin travel keyboard dock is sold separately and is not shipped with the tablet.
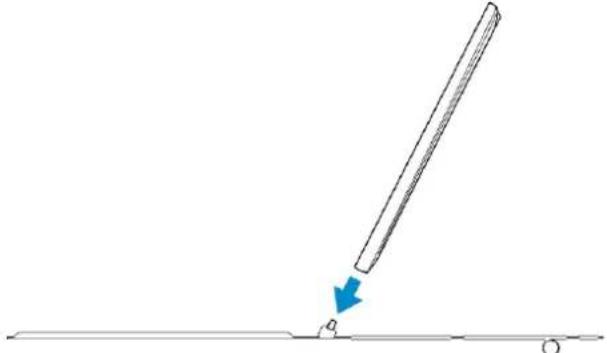
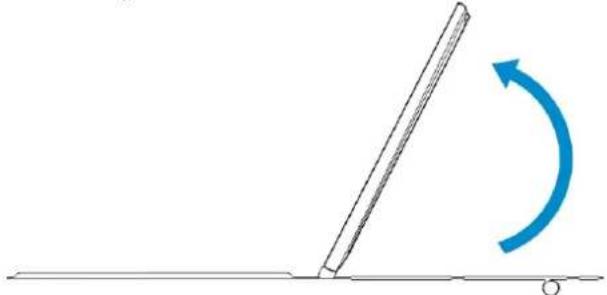
Docking Your Tablet to the Thin Travel Keyboard Dock
-
Align the two docking connectors on the tablet to those on the dock.
-
Slide the tablet downward until the tablet clicks into place..
natural_image
Simple line drawing of a tool with a blue arrow indicating motion, no text or symbols present- Attach the keyboard cover and slide it down to attach the dock to the tablet.
natural_image
Simple line drawing of a pencil leaning against a horizontal line with an arrow indicating rotation (no text or symbols)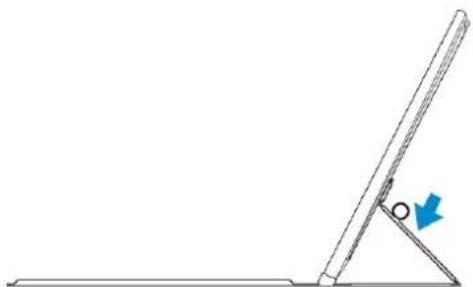
natural_image
Simple line drawing of a table tennis paddle leaning against an inclined stand, with a blue arrow indicating the angle (no text or symbols)NOTE: When the connection is made, you need to manually turn the on-screen keyboard off if it is displayed on the screen.
Mobile Keyboard Dock Features
This section provides information about the features available on the keyboard dock.
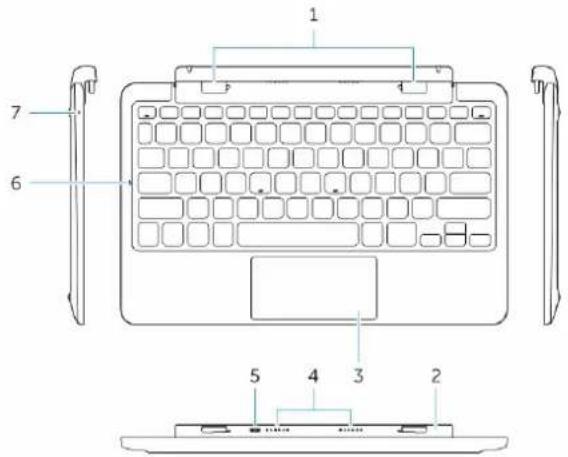
Feature Functionality
1 Docking connectors Connect the docking guide slots on the tablet.
2 Rotatable hinge Allows the tablet to rotate around the hinges.
3 Touch pad Allows you to move the mouse pointer on the screen and provides the function of a mouse.
4 Dock Pins Allows the tablet to make electrical contact with the dock.
5 micro USB power connector Connect a micro USB charger to charge the dock
6 Caps Lock LED Indicates if the Caps Lock key on the keyboard is turned on.
7 Battery charge LED Indicates if the battery is charging when connected to AC power.

NOTE: The keyboard dock is sold separately and is not shipped with the tablet.
Docking Your Tablet to the Keyboard Dock
- Dock the tablet.
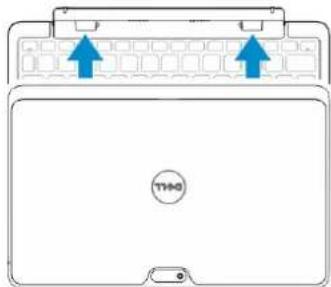
natural_image
Front view of a laptop with two blue arrows pointing to the top panel (no text or symbols visible)- Open the tablet and press the power button.
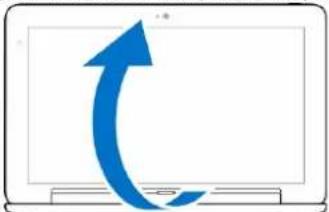

NOTE: When the connection is made, you need to manually turn the on-screen keyboard off if it is displayed on the screen.
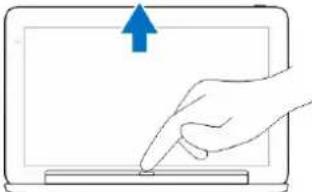
Undocking Your Tablet from the Keyboard Dock
- Push and hold the button on the Mobile Keyboard dock.
natural_image
Line drawing of a hand pressing a button on a laptop screen (no text or symbols)- Lift the tablet from the Mobile Keyboard dock.
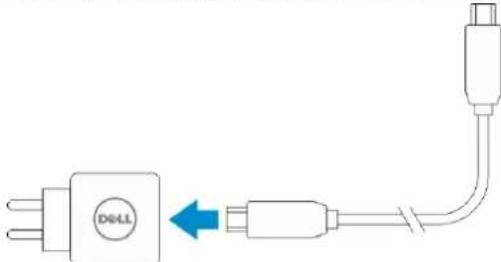
Charging the dock

CAUTION: Use only the supplied power adapter and power cable to charge your tablet and dock. Using unauthorized power adapters or power cables may cause severe damage to your tablet and dock.
- Connect the power adapter to the microUSB charging port on your keyboard dock.
natural_image
Pure electrical circuit lines without any symbols- The keyboard dock charges through the tablet if AC power is attached to the tablet.

NOTE: Power can't be directly attached to travel keyboard when the tablet is docked.

NOTE: The dock battery requires about four hours to fully charge.
For more information on the tablet battery charging time, see Charging the tablet.
You can check the keyboard dock battery status from:
- Battery-charge light located on the left side of the keyboard dock:
LED behavior Description
Solid white color on Battery is charging with AC power when AC
adapter is connected directly to the dock.
Off Battery is not charging, either no AC adapter is
connected or battery is fully charged or the AC power is connected directly to the tablet.
For more information on checking the tablet battery status, see tablet battery charge status.
Battery behavior
When AC power is connected, the tablet gets charged first followed by the dock. During discharge or when AC power is not connected, the dock battery gets used first followed by the tablet.
Cleaning Your Tablet
CAUTION: Before you clean your tablet, disconnect all cables. Clean your tablet with a soft cloth dampened with water. Do not use liquid or aerosol cleaners, which may contain flammable substances.
- Turn off your tablet. For more information on turning off your tablet, see Turning Off Your Tablet.
- Disconnect any attached devices, headphones, speakers, and keyboard dock from the tablet and from their electrical outlets.
- Remove any installed Micro-SD and Micro-SIM card. For more information on removing the Micro-SD card and Micro-SIM card, see Remove the Micro-SD card and Remove the Micro-Sim card.
- Moisten a soft, lint-free cloth with either water or a display cleaner, and wipe the surface of the tablet until it is clean. Do not allow water from the cloth to seep down to the tablet ports and surrounding Windows button.
NOTE: To avoid damaging the tablet or display, follow the instructions that are included with the product.
NOTE: Do not clean the keyboard with a moist cloth.
Troubleshooting
Battery problem
Problems Possible causes Possible solutions
Battery does not charge
- Unplug the Dell AC power adapter from the wall and verify that the outlet is functioning.
- Check all cable connections and plug back into the wall, then back into the tablet.
- Check the AC adapter LED light to ensure if the AC adapter is working.
- Check all connectors to ensure proper connectivity.
If the AC adapter works and the battery does not charge, try to:
- Remove and re-insert the battery to ensure the battery fits to its connectors properly.
- Replace with another battery, if available.

NOTE: The tablet battery requires about 4 hours to fully charge.
The tablet's temperature is below 0 °C or higher than 40 °C.
The battery or power adapter is damaged.
Charge the battery in an ambient temperature between 0 °C to 40 °C.
Contact a Dell authorized reseller to replace the battery or power adapter.
Battery drains quickly even when the tablet is in Standby mode
If the tablet is not in the range of a network it can connect to, the tablet continues to send out signals to locate a base station and drains the battery.
- Temporarily turn off the tablet.
- Move the tablet in range of a network it can connect to, or temporarily
turn off the wireless
connection on your tablet.
- Use your tablet in airplane mode.
System problem
Problems Possible causes Possible solutions
Tablet does not turn on The battery is completely discharged.
-
Charge the tablet for at least 4 hours.
-
Press and hold the Power button for 4 seconds.
Tablet does not turn off Press and hold the Power button
for 11 seconds to perform a hard shut down.
Tablet locks up
- Press and hold the power button for 11 seconds to perform a hard shut down.
Tablet is not responding or behaving unexpectedly
- Remove the power supply and unplug / plug the battery.
- Driver failure
- Operating system failure
- Virus/Malware
-
Shut down and restart your tablet.
-
Refresh the tablet.
-
Contact Dell's support service. Go to dell.com/support or dell.com/contactdell.
Software or feature is not working as expected
Restart your tablet. Software updates may have been downloaded in the background.
Swipe from the right edge of the display to access the Charms bar and touch Settings→Power→Restart to restart the tablet.
Docking station not working as expected
Un-dock / Re-dock your tablet. If the issue still continues, power cycle your tablet on the dock.
Touchscreen problem
Problems Possible causes Possible solutions
Touchscreen responds slowly or improperly
Protective cover prevents the tablet from recognizing your inputs.
- Shutdown and restart your tablet.
• Gently wipe the display with a clean dry cloth. - Remove any protective covers from the touchscreen.
- If the operating system is re-installed, make sure all the drivers are installed.
Network problem
Problems Possible causes Possible solutions
No wireless connection
- Check if the wireless radio is on. See Wi-Fi setting.
- Try to get closer to the wireless access point.
- Reset the wireless router if using a private network; open the browser to view the landing page if using a public network.
No mobile broadband connection
- The mobile broadband has been capped.
-
No signal from the service provider.
-
Check if the mobile broadband is turned on. See Turning On/Off mobile broadband
- Move your tablet to a different location for better signal reception.
Contact your service provider to change your broadband plan.
System Setup
System Setup enables you to manage your computer hardware and specify BIOS-level options. From the System Setup, you can:
- Change the NVRAM settings after you add or remove hardware
• View the system hardware configuration - Enable or disable integrated devices
- Set performance and power management thresholds
- Manage your computer security
To access the system setup options (BIOS):
-
Connect your tablet to the keyboard dock or connect a USB enabled keyboard to your tablet.
-
Press the Power ⏻ button to turn on your tablet or restart your tablet, if you have already turned on your tablet.
-
Press F2 after the Dell logo appears.
NOTE: You might have to press F2 repeatedly until the Windows redirects to the system setup options.
To access the setup options (BIOS) without an external keyboard :
-
Press the Power ⏻ button to turn on your tablet or restart your tablet, if you have already turned on your tablet.
-
Press and hold the Volume Up button when the Dell logo appears on the screen.
-
When the F12 Boot Selection menu appears, press the Volume Up button to change the boot selection to the BIOS Setup option.
NOTE: The Volume Up button cycles through the menu options (Boot Options, BIOS Setup, Diagnostics, and so on. You can select the desired option by pressing the Volume Up button.)
- Press the Volume Down button to select the option.
System Setup (BIOS) Options
Table 2. System Information
| Option Function |
| BIOS Version Displays the BIOS revision. |
| Service Tag Displays the service tag of your tablet. |
| Asset Tag Displays the asset tag of your tablet. |
| Ownership Tag Displays the ownership information. |
| Manufacture Date Displays the date of manufacture. |
Option Function
| Ownership Date Displays the ownership | |
| date. | |
| Express Service Code Displays the Express | Service code of the tablet. |
| Memory Installed Displays the memory installed on the tablet. | |
| Memory Available Displays the memory available on the tablet. | |
| Memory Speed Displays the memory speed. | |
| Memory Channel Mode Displays the memory | capacities on the tablet. |
| Memory Technology Displays new type of | device file in Linux for interacting with flash memory. |
| Processor Type Displays the processor | type available on the tablet. |
| Core Count Displays the core count | of the tablet. |
| Processor ID Displays the processor | ID of the tablet. |
| Current Clock Speed Displays the current | clock speed of the tablet. |
| Minimum Clock Speed Displays the minimum | clock speed of the tablet. |
| Maximum Clock Speed Displays the maximum | clock speed of the tablet. |
| Processor L2 Cache Displays the L2 cache of | the tablet. |
| Processor L3 Cache Displays the L3 cache of | the tablet. |
| HT Capable Displays the tablet is | Hyper-Thread capable. |
| 64-bit Technology Displays the tablet | functions with 64-bit technology (Intel EM64T). |
Option Function
| Video Controller Displays the video | controller used in the tablet. |
| Video BIOS Version Displays the BIOS | version number of the tablet. |
| Video Memory Displays the video | memory of the tablet. |
| Panel Type Displays the panel type | used in the tablet. |
| Native Resolution Displays the resolution | of the tablet. |
| Audio Controller Displays the audio | controller used in the tablet. |
| Wi-Fi Device Displays the Wi-Fi device | in the tablet. |
| Cellular Device Displays the cellular | device in the tablet. |
| Bluetooth Device Displays the Bluetooth | device in the tablet. |
Table 3. Battery Information
| Option Function |
| AC Adapter Displays the AC Adapter information. |
| Battery Status Displays the current battery status. |
| Battery Charge State Displays if the battery is charging/discharging. |
| Battery Health Displays the battery health. |
Table 4. Boot Sequence
| Option Function | |
| Boot Sequence Displays the order that the BIOS searches devices when trying to find an operating system to boot. The options are:Windows Boot ManagerUEFI | |
| Boot List Option | Allows you to change the boot list option.LegacyUEFI |
Option Function
| You can also perform other options. The options are:Add Boot Option — This option allows you to add a boot optionDelete Boot Option — This option allows you to delete an existing boot optionView — This option allows you to view a boot option |
Table 5. Advanced Boot Options
| Option Function | |
| Enable Legacy Option ROMs During the UEFI boot mode, the Enable Legacy | |
| Option ROMs option will allow legacy option | |
| ROMs to load. This option is not allowed if Secure Boot is enabled. | |
Table 6. Date/Time
| Option Function |
| System Date Displays the system date. |
| System Time Displays the system time. |
Table 7. System Configuration
| Option Function | |
| USB Configuration Allows you to configure the integrated USB controller. The options: | |
| Enable Boot SupportEnable USB3.0 ControllerEnable External USB PortBy default, all the options are enabled. | |
| USB PowerShare Allows you to configure | the USB PowerSharefeature behavior.Default: Not enabled |
| Audio This field allows you to | enable or disable theintegrated audioconnector.Enable Audio.Default: Enabled |
| Miscellaneous Devices Allows you to enable or disable various on-board devices. | |
Option Function
- Enable Microphone. Default: Enabled
- Enable Camera. Default: Enabled
- Enable Media Card. Default: Enabled
- Disable Media Card
Table 8. Video
Option Function
| LCD Brightness Displays the panel brightness when the ambient light sensor is off. |
| • Brightness on Battery |
| • Brightness on AC |
Table 9. Security
Option Description
| Admin Password This field lets you set, change, or delete the administrator (admin) |
| password (also known as the setup password). The admin password enables several security features. |
| The drive does not have a password set by default. |
| To add a new password: |
| • Enter the old password |
| • Enter the new password |
| • Confirm the new password |
| Click OK after entering the password details. |
System Password Allows you to set, change, or delete the tablet password (previously called the primary password).
The drive does not have a password set by default.
To add a new password:
- Enter the old password
- Enter the new password
- Confirm the new password
Click OK after entering the password details.
Strong Password
Enable strong password - This option is disabled by default.
Password Configuration This field controls the minimum and maximum number of characters allowed for the admin and system passwords. Changes to these fields are not active until they are committed via the apply button or saving changes before exiting setup.
- Admin Password Min
- Admin Password Max
- System Password Min
Option Description
- System Password Max
Password Bypass This option lets you bypass the system (Boot) Password and the internal HDD password prompts during a system restart.
- Disabled
- Reboot Bypass (Default Enabled)
Password Change Allows you to determine whether changes to the system and hard disk passwords are permitted when an administrator password is set.
- Allow Non-Admin Password Changes (Default)
Non-Admin Setup Changes
This option lets you determine whether changes to the setup options are permitted when an administrator password is set.
- Allow Wireless Switch Changes (Default)
TPM Security This option lets you control whether the Trusted Platform Module (TPM) in the system is enabled and visible to the operating system. TPM Security (Default)
- TPM ACPI Support
- Deactivate
- Activate

NOTE: Activation, deactivation, and clear options are not affected if you load the setup program's default values. Changes to this option take effect immediately.
PTT Security Allows you to enable or disable PTT Support.
- PTT Security (Default)
- Revoke Trust (Default)
Computrace (R) This field lets you activate / de-activate or disable the BIOS module interface of the optional Computrace Service from Absolute Software.
- Deactivate (Default)
- Disable
- Activate
CPU XD Support This option enables or disables the Execute Disable mode of the Processor.
- Enable CPU XD Support (Default Enable)
Admin Setup Lockout Allows you to enable or disable the option to enter setup when an admin password is set.
- Enable Admin Setup Lockout (Default)
Table 10. Secure Boot
| Option Function | |
| Secure Boot Allows you to enable or disable the secure boot feature. Default: Disabled | |
| Expert Key Management Allows you to manipulate the security key databases only if the system is in Custom Mode. The Enable Custom Mode option is disabled by default. The options are:PKKEKdbdbxIf you enable theCustom Mode, the relevant options for PK, KEK, db, and dbxappear. The options are:Save to File- Saves the key to a user-selected fileReplace from File- Replaces the current key with a key from a user-selected fileAppend from File- Adds a key to the current database from a user-selected fileDelete- Deletes the selected keyReset All Keys- Resets to default settingDelete All Keys- Deletes all the keysNOTE: If you disable the Custom Mode, all the changes made will be erased and the keys will restore to default settings. |
Table 11. Performance
| Option Description |
| Multi Core Support Specifies whether the processor will have one or all cores enabled. The performance of some applications will improve with the additional cores. |
| All (Default)12 |
| Intel SpeedStep Allows you to enable or disable the Intel SpeedStep mode of the processor. |
| Enable Intel(R) SpeedStep (Default) |
| C States Control Allows you to enable or disable the additional processor sleep states. |
| C states (Default) |
| Intel TurboBoost Allows you to enable or disable Intel TurboBoost mode of the processor. |
Option Description
| · Enable Intel TurboBoost (Default) — Allows the Intel TurboBoost driver to increase the performance of the CPU or graphics processor. | |
| HyperThread control | Allows you to enable or disable the HyperThreading in the processor. Default: Enabled |
| Rapid Start Technology | This option may improve the battery life by automatically putting the tablet into a low power state during the sleep state, for a user-specified amount of time. The options are: · Intel Rapid Start Feature · Transition to Rapid Start when using timer By default, all the options are enabled. |
Table 12. Power Management
| Option Description | |
| AC Behavior Allows the tablet to power-on automatically, when AC adapter is plugged. The option is disabled. | |
| Wake on AC | |
| Auto On Time Allows you to set the time at which the system must turn on automatically. The options are: | |
| Disabled (Default)Every DayWeekdaysSelect Days | |
| Peak Shift This option allows to use minimize AC consumption during peak power time of day. | |
| MondayTuesdayWednesdayThursdayFridaySaturdaySunday | |
| Advanced Battery Charge Configuration | This option places batteries in the system advanced battery charging mode to maximize battery health. |
| MondayTuesdayWednesdayThursdayFridaySaturday | |
Option Description
| • Sunday | |
| Primary Battery Charge Configuration | • Adaptive• Standard• ExpressCharge• Primary AC Use• Custom |
| NOTE: Some of the battery settings may not be available for all battery types. To enable this option, you should disable the Advanced Battery Charge Configuration Mode. | |
| Intel Smart Connect Technology | This option, if enabled, will periodically sense the nearby wireless connections, while the tablet is asleep. Default: Disabled |
Table 13. POST Behavior
| Option Description | |
| Adapter Warnings Allows you to activate the adapter warning messages when certain power adapters are used. The option is enabled by default. | |
| • Enable Adapter Warnings | |
| Fastboot This option can speed up the boot process by bypassing some compatibility steps. | |
| • Minimal• Thorough• Auto (Default Enable) | |
| NOTE: Enabling the Fastboot will prevent F2 BIOS access through USB or Thin / Travel keyboard. You can still access the BIOS Setup, by pressing theVolume Upbutton after the Dell logo screen appears. | |
Table 14. Virtualization Support
| Option Description |
| Virtualization This option specifies whether a Virtual Machine Monitor (VMM) can utilize the additional hardware capabilities provided by Intel Virtualization technology. |
| • Enable Intel Virtualization Technology (Default) |
| VT for Direct I/O This option specifies whether a Virtual Machine Monitor (VMM) can utilize the additional hardware capabilities provided by Intel Virtualization Technology for Direct I/O. |
| • Enable VT for Direct I/O (Default) |
Option Description
Trusted Execution This option specifies whether a Measured Virtual Machine Monitor (MVMM) can utilize the additional hardware capabilities provided by Intel Trusted Execution Technology. Default: disabled
Table 15. Wireless
| Option Description |
| Wireless Device Enable Allows you to enable or disable the wireless devicesWWAN (Default Enable)WLAN / WiGig |
Table 16. Maintenance
| Option Description |
| Service Tag Displays the service tag of your tablet. |
| Asset Tag Allows you to create a system asset tag if an asset tag is not already set.This option is not set by default. |
Table 17. System Logs
| Option Description |
| BIOS events Displays the system event log and allows you to clear the log. |
| • Clear Log |
| Power events Displays the power event log and allows you to clear the log. |
| • Clear Log |
Updating the BIOS
It is recommended to update your BIOS (system setup), on replacing the system board or if an update is available. For tablet, ensure that the battery is fully charged and connected to a power outlet
- Re-start the tablet.
- Go to dell.com/support.
- Enter the Service Tag or Express Service Code and click Submit.
NOTE: To locate the Service Tag, click Where is my Service Tag?
NOTE: If you cannot find your Service Tag, click Detect My Product. Proceed with the instructions on screen.
- If you are unable to locate or find the Service Tag, you can select your product from the products list under the General Support.
- Choose the Product Type from the list.
- Select your product model and the Product Support page of your product appears.
- Click Get Drivers and click View All Drivers.
The Drivers and Downloads page opens.
- On the Drivers and Downloads screen, under the Operating System drop-down list, select BIOS.
- Identify the latest BIOS file and click Download File.
You can also analyze which drivers need an update. To do this for your product, click Analyze System for Updates and follow the instructions on the screen.
- Select your preferred download method in the Please select your download method below window; click Download File.
The File Download window appears.
- Click Save to save the file on your tablet.
- Click Run to install the updated BIOS settings on your tablet. Follow the instructions on the screen.
Specifications

NOTE: Offerings may vary by region. The following specifications are only those required by law to ship with your computer. For comprehensive specification of your computer go to Specifications' section in your Owner's Manual available on the support site at dell.com/support. For more information about the configuration of your computer, go to Help and Support in your Windows operating system and select the option to view information about your computer.
System Information
Chipset Intel Lynx Point
DRAM bus width 128 bit (64-bits x 2 channels)
Flash EPROM 128 Mbit Quad-SPI
Processor
Type Intel Haswell ULX Y-series CPU
External bus frequency SOC no external bus connected chipset
Memory
Memory capacity 4 GB/8 GB
Memory type LPDDR3/DDR3L
Memory speed 1600 MHz
Minimum memory 4 GB
Maximum memory 8 GB
Audio
Type Side firing
Stereo conversion 24-bit
Speakers AAC 25 x 9 x 3 mm, 1 W, speaker
Video
Video type integrated
Data bus integrated
Video controller iGPU GT2 graphics
Communications
Network adapter WLAN, LTE, HSPA+
Wireless BT, NFC
Ports and Connectors
Audio one 3.5 mm jack
USB one USB 3.0 connector
Memory card reader one microSD card reader
Docking port one Dell 40-pin dock connector
Subscriber Identity Module (SIM) port one micro SIM slot
Smart card one smart card reader
Display
Type TFT-LCD with eDP interface, Full-HD (1920 x 1080)
Size 10.8 inches high definition (HD)
Dimensions:
Height 250.20 mm (9.85 inches)
Width 149.25 mm (5.90 inches)
Diagonal 274.32 mm (10.08 inches)
Active area (X/Y) 239.04 mm / 134.46 mm
Maximum resolution 1920 pixels x 1080 pixels
Maximum brightness 400 nits
Refresh rate 60 Hz
Minimum viewing angles:
Horizontal 80/80
Vertical 80/80
Pixel pitch 0.1245 mm × 0.1245 mm
Front camera
Type OV 2722 (2 MP)
Resolution 1920 pixels x 1080 pixels
Rear camera
Type IMX 175 (8 MP)
Resolution 3264 pixels x 2448 pixels
Storage
Storage NGFF SSD 128 GB / 256 GB
Battery
Type 2-cell lithium ion (36 WHr)
Dimensions
Length 240.85 mm (9.48 inches)
Height 7.17 mm (0.28 inch)
Width 70.60 mm (2.78 inches)
Weight 240.00 g (0.53 lb)
Voltage 7.4 VDC (nominal) and 8.7 VDC (maximum)
Temperature range
Operating 0 °C to 50 °C (32°F to 158°F)
Non-Operating -20 °C to 65 °C (4 °F to 149 °F)
Coin-cell battery 3 V CR2025 lithium ion
AC Adapter
Type
Input voltage 100 VAC to 240 VAC
Input current (maximum) 0.60 A
Input frequency 50 Hz to 60 Hz
Output power 23.4 W
Output current (30 W) 1.2 A / 2.0 A
Rated output voltage 19.5 Vdc
Temperature range:
Operating 0 °C to 40 °C (32 °F to 104 °F)
Non-operating -40 °C to 70 °C (-40 °F to 158 °F)
Physical
| Height | 279.74 mm (11.01 inches) |
| Width | 176.76 mm (0.50 inches) |
| Weight (minimum) | 889 grams (1.96 lb) |
Environmental
Temperature:
Operating 0 °C to 40 °C
Environmental
Storage -40 °C to 65 °C
Relative humidity (maximum):
Operating Operating 10% to 90% (noncondensing)
Storage Storage 5% to 95% (noncondensing)
Altitude (maximum):
Operating
-16 m to 3048 m (-50 to 10,000 ft)
Non-operating -15.2 m to 10,668 m (-50 ft to 35,000 ft)
Airborne contaminant level G1 as defined by ISA-71.04–1985
Contacting Dell
NOTE: If you do not have an active Internet connection, you can find contact information on your purchase invoice, packing slip, bill, or Dell product catalog.
Dell provides several online and telephone-based support and service options. Availability varies by country and product, and some services may not be available in your area. To contact Dell for sales, technical support, or customer service issues:
- Visit dell.com/support
- Select your support category.
- Verify your country or region in the Choose a Country/Region drop-down menu at the top of page.
- Select the appropriate service or support link based on your need.
- Dell Venue Pro 11 -7130/7139
- User's Guide
- Notes, Cautions, and Warnings
- © 2013 Dell Inc. All Rights Reserved.
- Contents
- Working on Your Tablet....5
- Setting Up Your Tablet....9
- Using Your Tablet....13
- Managing your tablet settings....21
- Synchronizing your tablet....27
- Optional Stylus Features....29
- Desktop Dock Features....31
- Thin Travel Keyboard Dock Features.... 33
- Mobile Keyboard Dock Features....35
- Cleaning Your Tablet....39
- Troubleshooting....41
- System Setup.... 45
- Specifications....57
- Contacting Dell....61
- 1
- Working on Your Tablet
- Before Working Inside Your Tablet
- Turning off Your Tablet
- Setting Up Your Tablet
- Charging the Tablet
- LED Behavior Description
- Turning On Your Tablet
- Turning off the Screen
- Using power button
- Using Charms
- Using Your Tablet
- Screen Orientation
- How to lock / unlock the screen orientation
- Adjusting the screen brightness
- Gestures
- Gesture Actions Functions
- Touch
- Touch and Hold
- Drag and Drop
- Swipe or Slide
- Zoom in
- Zoom out
- Rotate
- Right-Click
- The Windows Start Screen
- How to access the Start screen
- Get to know Windows 8.1
- Swipe Right
- Swipe Left
- Swipe Up/Down
- Split Screen
- Using Headphones
- Removing the Micro-SD card
- Removing the Battery
- Installing the Battery
- Installing the micro-SIM Card
- Managing your tablet settings
- Wi-Fi setting
- Turning On/Off Wi-Fi
- Connecting to a network
- Mobile broadband setting
- Turning On/Off mobile broadband
- Connecting to a mobile broadband network
- Disconnecting from mobile broadband network
- Mobile broadband options
- Service Provider hardware information
- Enabling PIN lock
- Refreshing / Recovering / Re-setting your tablet
- Refresh your PC without affecting your files
- Remove everything and re-install Windows
- Advanced startup
- Synchronizing your tablet
- Using Microsoft account
- Copying music, photos, and videos
- Optional Stylus Features
- Feature Functionality
- Getting Your Stylus Ready for Use
- Using the Optional Stylus with Your Tablet
- 7
- Desktop Dock Features
- Connecting the Power Adapter
- Thin Travel Keyboard Dock Features
- Table 1.
- Docking Your Tablet to the Thin Travel Keyboard Dock
- Mobile Keyboard Dock Features
- Docking Your Tablet to the Keyboard Dock
- Undocking Your Tablet from the Keyboard Dock
- Charging the dock
- Battery behavior
- Cleaning Your Tablet
- Troubleshooting
- Battery problem
- Problems Possible causes Possible solutions
- System problem
- Touchscreen problem
- Network problem
- System Setup
- System Setup (BIOS) Options
- Option Function
- Strong Password
- Option Description
- Non-Admin Setup Changes
- Updating the BIOS
- Specifications
- System Information
- Processor
- Memory
- Audio
- Video
- Communications
- Ports and Connectors
- Display
- Front camera
- Rear camera
- Storage
- Battery
- AC Adapter
- Environmental
- Contacting Dell
Brand : DELL
Model : Venue 7139
Category : Tablet