
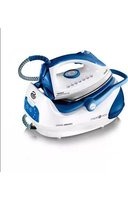
SI9030N - Iron SWAN - Free user manual and instructions
Find the device manual for free SI9030N SWAN in PDF.


| Product Type | Steam Iron |
| Brand | Swan |
| Model | SI9030N |
| Power Consumption | 2400 W |
| Water Tank Capacity | 300 ml |
| Soleplate Material | Ceramic |
| Steam Output (Continuous) | 40 g/min |
| Steam Burst | 150 g/min |
| Spray Function | Yes |
| Self-Clean Function | Yes |
| Anti-Drip System | Yes |
| Auto Shut-Off | Yes (after 8 minutes of inactivity) |
| Vertical Steaming | Yes |
| Variable Temperature Control | Yes (dial selector) |
| Cord Length | 2.5 m |
| Weight | 1.3 kg |
| Dimensions (L x W x H) | 28 x 12 x 15 cm |
| Cable Type | Swivel cord |
| Water Fill Opening | Wide mouth for easy filling |
| Indicator Lights | Power and ready light |
| Maintenance | Descaling recommended using vinegar solution |
| Storage | Heel rest for upright storage |
| Warranty | 2 years |
Frequently Asked Questions - SI9030N SWAN
User questions about SI9030N SWAN
0 question about this device. Answer the ones you know or ask your own.
Ask a new question about this device
Download the instructions for your Iron in PDF format for free! Find your manual SI9030N - SWAN and take your electronic device back in hand. On this page are published all the documents necessary for the use of your device. SI9030N by SWAN.
USER MANUAL SI9030N SWAN
Instruction Manual
- Make sure to read all the safety precautions below and look at the illustrations before you start using the appliance.
- Use the appliance for its intended use only.
- The appliance is intended for household use only.
- In order to protect against the risk of electric shock, do not immerse iron, power base into water or any other liquids
- Connect the appliance only to an alternating current of the voltage specified on the rating plate and only to an earthed socket. To avoid a circuit overload, do not operate another high wattage appliance in the same circuit.
- Never yank cord to disconnect from outlet; instead, grasp plug and pull to disconnect.
- During use, do not lift the appliance by power cord/supply hose.
- Always disconnect the plug of the appliance from electrical outlet when filling with water or emptying and when not in use.
- Do not operate the appliance with a damaged cord or if the appliance has been dropped or damaged, it must be taken to a qualified serviceman or manufacturer or its service agent for examination and repair. Incorrect re-assembly can cause a risk of electric shock when the iron is used.
- Keep the iron and its cord out of reach of children less than 8 years of age when it is energized or cooling down.
- During use, always place the power base on a stable, level and horizontal surface or ironing board, and then place the iron on the power base.
- Place the iron on the power base. Do not allow power cord or supply hose to touch hot surface.
- Burns can occur from touching hot metal parts, hot water or steam. Use caution when using the appliance. If the iron is placed onto the iron rest plate during in use, the iron rest plate may become a hot surface. Do not touch the iron rest plate and the soleplate until they have cooled down completely.
- Never use the iron facing towards people because the steam can cause burns.
- Never twist the supply hose during use.
- The iron must not left unattended while it is connected to the supply mains.
- The appliance must be used or stored in a level and horizontal surface.
- When placing the iron on its stand, ensure that the surface on which the stand is placed is stable.
- The iron is not to be used if it has been dropped, if there are visible signs of damage or if it is leaking.
- If the supply cord is damaged, it must be replaced by the manufacturer, its service agent or similarly qualified persons in order to avoid a hazard.
- This appliance can be used by children aged from 8 years and above and persons with reduced physical, sensory or mental capabilities or lack of experience and knowledge if they have been given supervision or instruction concerning use of the appliance in a safe way and understand the hazards involved.
-
Children shall not play with the appliance. Cleaning and user maintenance shall not be made by children without supervision.
-
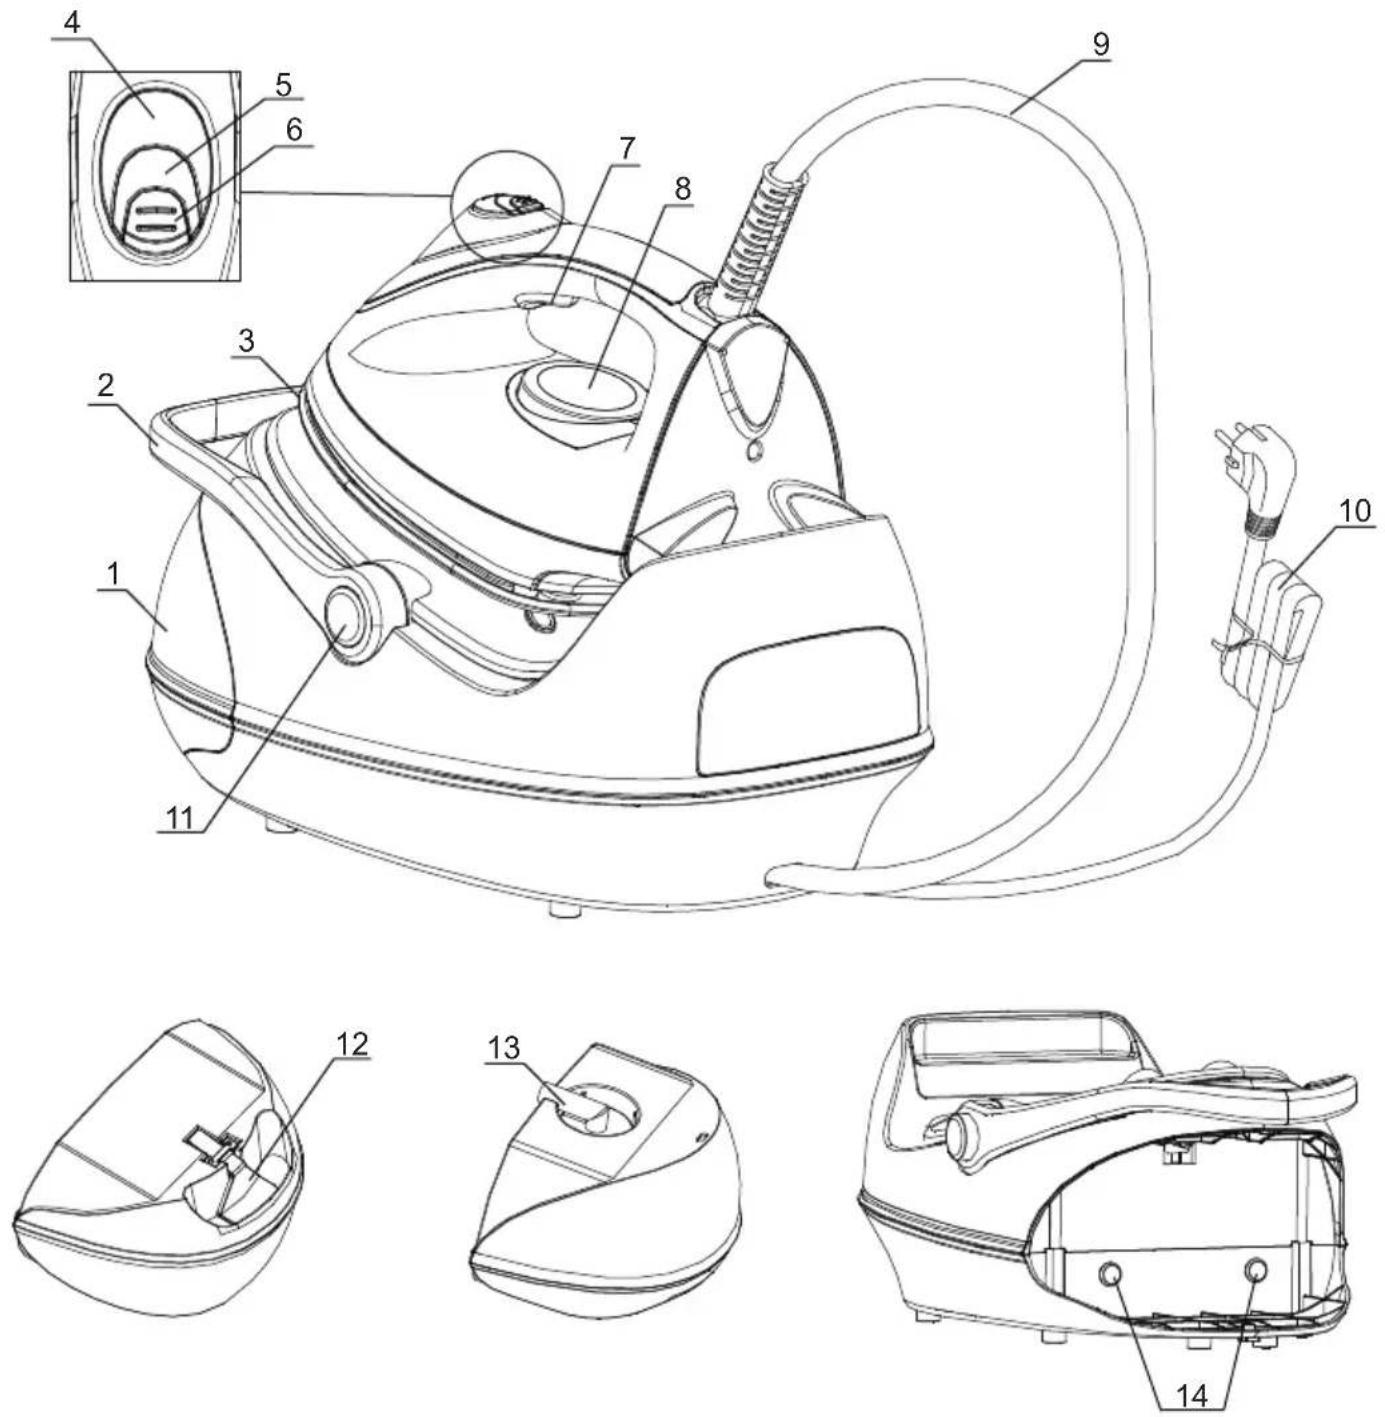
Water tank;
- Handle
- Soleplate;
- Heating indicator light
- Steam button
- Steam button lock
-
Steam button
-
Temperature control dial
- Power cord/Supply hose
- Power cord
- Handle button
- Water tank release
-
Filter
-
Water tank decoration indicator light
| Temperature Setting | SYNTHETIC | WOOL SILK | COTTON | LINEN Max |
| Fabric | Synthetics, Silk, Nylon, Arcrylic, Acetate | Wool, Polyester | Rayon cotton, Linen | Rayon cotton, Linen |
| Ironing Instruction | Dry Iron on the opposite side of the fabric | Use a press cloth and Steam Iron on the opposite side of the fabric | Iron while fabric is still damp | Steam Ironing |
| Steam Selection |  |  |  |  |

Temperature control dial
- Follow up the ironing instructions on the garment label. If there is not any instruction label, but you know what the fabric is, please refer to the fabric setting chart described in this instruction manual.
- The fabric setting chart is only valid for plain fabrics and not for materials to which finishes, glosses etc, have been applied. Textile to which some kind of finish has been applied (gloss, crinkle, relief etc.) is best ironed at lower temperature.
- First sort laundry according to ironing temperature setting guide: wool with wool, cotton with cotton, etc.
- The iron heats up more quickly than it cools down. Therefore, start ironing articles that need to be ironed at the lowest temperature, such as those made of synthetic fibres.
- If the fabric consists of various kinds of fibres, always select the temperature required by the most delicate fibres, i.e. the lowest temperature. If, for example, an article consists of 60% polyester and 40% cotton, according to the fabric setting chart it should be ironed for polyester and without steam.
- If you do not know what kind of fabric the article is made of, iron a piece of the material which is not visible when you wear to find out the appropriate temperature for your articles.
- Pure woolen fabrics (100% wool) should be ironed with the iron setting to steam ironing position. It is advisable to set the temperature control button to "Max" position and use a dry pressing cloth.
- When steam ironing woolen fabrics, shiny patches may occur. You may prevent this by turning the article inside out and ironing the reverse side.
- After using steam iron for cotton fabrics, do not iron articles required by lower temperature (such as nylon etc.) immediately. It is advisable to adjust the temperature button to the lower setting, waiting for about 2-8 minutes till the power indicator light turns off, and then you can start ironing.
IMPORTANT HINTS:
Do not fill water tank with vinegar, perfume, starch, chemically descaled water or descaling agents.
Prepare the appliance for use:
- Check if the rating indicated in the rating plate corresponds to the mains voltage in your home.
- Press handle button to lay handle down. Fig.1
- Remove the protective foil or sticker or card from the soleplate.
-
Fully unwind and straighten the power cord and the supply hose.
-
Place the appliance on a stable, level and horizontal surface such as an ironing board.
-
Place the iron onto the iron rest plate horizontally at the base unit.

Fig.1
Fill water tank
- Press the water tank lock upwards and slide the detachable water tank outwards from the base.
Fig.2
- Take the filter upwards out from the water fill hole.
Fig.3
- Fill the water tank up to or below the "MAX" fill line with clean tap water. Fig.4
- Replace filter back into water filling hole.
-
Replace the water tank into the base unit again. It will be locked in place with the base unit until a "click" sound is heard.(Water tank indicator light will light up to indicate that water tank and filter have been installed in place if power ON) Fig.5
-
Always pour out the remaining water after use.
Note: When the water level reaches a low level or empty, pump sound will change to indicate refilling is needed. Stop using the appliance immediately and refill water tank as the above methods.


Fig.3 Fig.4
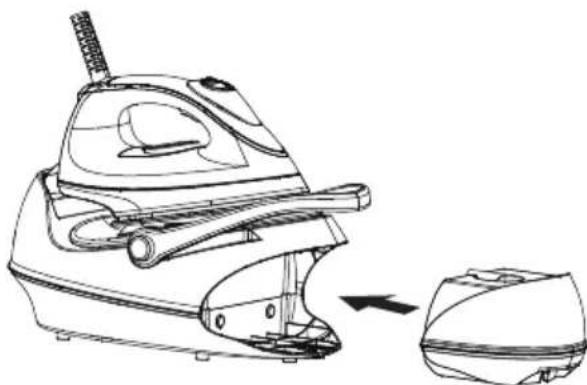
Fig.5
Water tank indicator light
- After power On, water tank indicator light will light up for easy viewing of water level.
- Water tank indicator light will not light up when water tank or filter are not properly installed. No steam will be produced even if steam button is pressed.
Steam ironing
- Fill water tank with clean water refer to above filling instruction. For better performance, please immerse filter in water for several minutes before installing it into the water tank.
- Connect the appliance into a suitable socket outlet. Water tank decoration indicator light lights up to indicate that the unit has been connected to the power supply.
- Set temp setting knob to steam ironing position according to fabric setting chart mentioned above. Heating indicator light illuminates to indicate the unit is being heated up. When the heating indicator light turns off, the desired temperature has been reached. It is ready for steam ironing. During use, heating indicator light cycles from on to off, and then off to on. It does not indicate a defects or hazard, it is just temperature maintenance.(For every first time use, please pre-heat for 3 minutes)
- Before every first time use, it is advised to clean iron unit as following methods: Take the iron up from the base unit, press steam button underneath the handle to allow steam ON for 20 seconds, and then OFF for 30 seconds, this cycle should be repeated for 2 times. When temperature indicator light stops blinking, it is ready for use.
- After use, put iron unit back onto the base unit again, turn temperature control dial to "MIN", and then unplug the appliance from main socket.
- Slide out the water tank and pour out the remaining water.
Note:
For every first time use, it is normal that's a slight vibration sound may be heard from electrical pump inside the base unit for a few seconds when steam ironing has started. It is because there is air inside the filter, it will stop once the air inside the filter has been pumped out.
Dry ironing
- Connect the appliance to a suitable socket outlet. Water tank indicator illuminates to indicate that the unit has been connected to the power supply
- Set temp setting knob to desired position according to above ironing temperature setting guide or fabric setting chart. Heating indicator light on iron unit will turn on to indicate that the steam chamber being heated up. When heating indicator light turns off, it indicates that desired temperature has been reached. It is ready for dry ironing. During use, it is normal that heating indicator light will cycle from on to off, and then off to on. This shows that steam chamber automatically keeps temperature constant.(For every first time use, it should be pre-heated for about 3 minutes)
- After use, put iron unit back onto the base unit again, turn temperature control dial to "MIN",
- Unplug the appliance from main socket.
Note: When changing your Temp setting from higher setting to lower, it is proposed that not to start ironing immediately since it may cause burns to your fabrics. Please wait until heating indicator light turns on, then turn off.
Vertical steam ironing
Follow the steam ironing process, and then hold the iron in vertical position between 5cm and 15cm away from the hanged fabrics. (Fig.6) Press the steam button, and then will create vertical steam. This feature is especially used for removing creases from hanging clothes and curtains. Never do this while garment is being worn!
Notes on vertical steaming:
- Never block the steam hose.
- Do not use the appliance continuously for more than 2 minutes. Otherwise, water may leak from sole plate
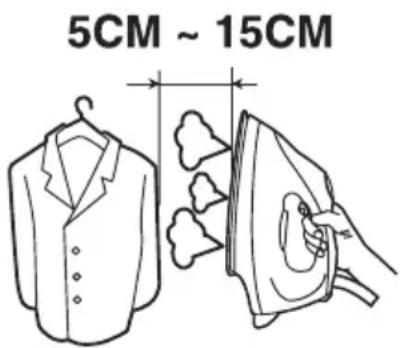
Fig.6
Auto-locking function for steam button
Press down steam button lock and then push it backwards, steam button will automatically lock. Steam will be produced continually.
If you want to stop steam, please push steam button lock forward.
Notice: Always turn steam lock off when resting iron on its base or if you leave the iron unattended
Pump overheat protection function
The pump has an in-built overheat protection circuit. When water in water tank has been used up the pump will be hot. If temperature of pump exceeds its Max limit, overheat protection will automatically activate to protect pump being damaged. At this point the, pump indicator light will turn off, please turn power switch on base unit off and then check if water tank has sufficient water or water tank has been properly installed. If not, please refill water tank and re-install water tank into base unit. Wait 30 minutes for the pump to cool and work again
Use of the handle
Handle attached to the base unit used for carrying the appliance. Press two handle buttons at same time to lay down the handle (Fig.7). After use, allow the appliance completely cool down, put the iron onto power base. Lift handle up (Fig.8). There will be a “click” sound to indicate the handle has been locked in place and you can carry the appliance by the handle.

Fig.7 Fig.8

Filter Replacement
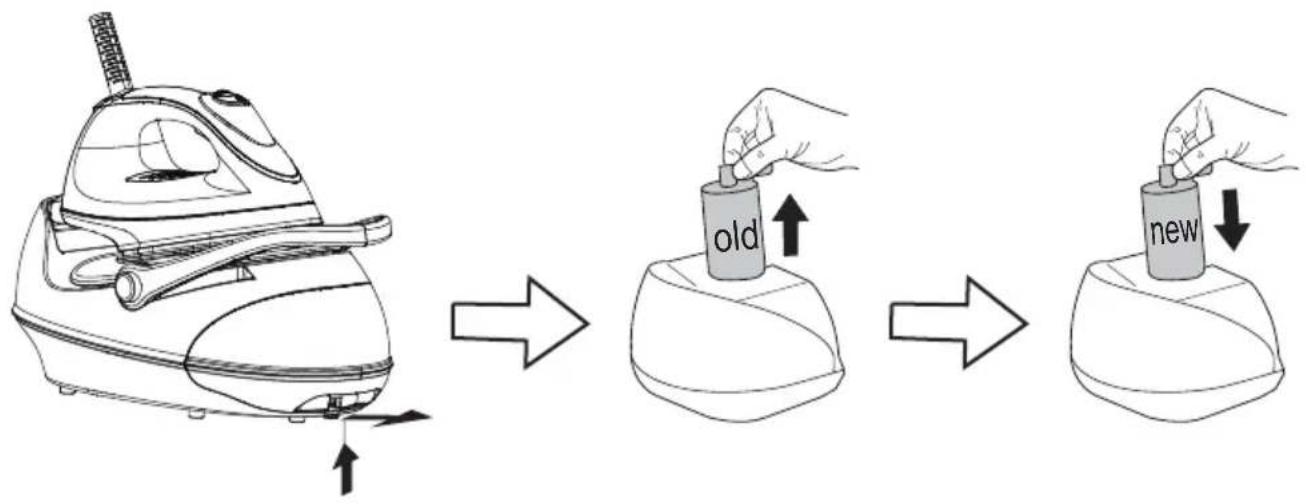
Slide water tank out from the base unit, take the filter upward out from water tank, and then replace with a new one. (For better performance, immerse the new filter in water for a few minutes before replacing)
Anti-calc system
-
The filter is designed to reduce the build-up of limescale which occurs during steam ironing, this will prolong the working life of your iron. However, please note that the filter will not completely stop the natural process of limescale build-up.
-
The filter will need to be changed every 2 months on average. The filter can still be used even if a new one is not available at that time. However, limescale may build up in the steam chamber, This happens depending on your local water hardness. It is advised that the filter is replaced as soon as possible. Alternatively, use bottled/distilled water.
Emptying and storing
-
Disconnect the appliance from the power supply and allow the appliance to cool down for 60 minutes at least.
-
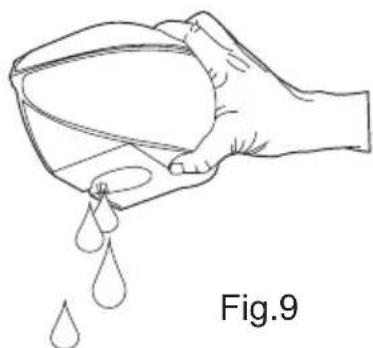
After use, slide out the water tank and pour out all the remaining water. (Fig.9)
-
The iron should be placed on the iron rest plate, and then stored.
Cleaning and Maintenance:
-
Unplug the appliance from the main supply and let the iron completely cool down.
-
Clean the iron with a damp cloth.
-
Wipe off scale and any other deposits on the soleplate with a damp cloth or non-abrasive(liquid) cleaner. (Fig.10)
-
Never immerse any part of the appliance in water.
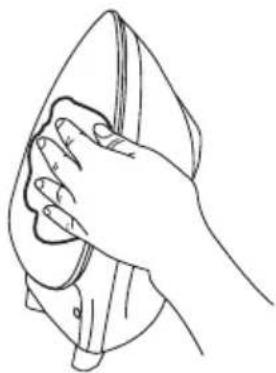
Fig.10
Trouble shooting
| Problems | Possible causes | Solution |
| Iron won't heat | Incorrect connection to the main socket | Re-plug the unit to main socket. |
| Temperature control dail is set at“MIN” position. | Set to the required position. | |
| Unknown malfunction. | Take it to qualified service man or manufacturer for repair. | |
| Water tank indicator OFF and no steam | Filter is incorrectly fitted | Install the filter |
| Water tank has not been installed properly | Install water tank till a click sound produced. | |
| Droplets of water escape from the soleplate | Temperature setting knob is set at low temperature position. | Set temperature setting knob to suitable position refer to Fabric setting chart. |
| The set temperature has not been reached or is too low. | Allow sufficient time for iron to preheat or set higher temperature. |


- IMPORTANT HINTS
- PREPARE THE APPLIANCE FOR USE
- FILL WATER TANK
- WATER TANK INDICATOR LIGHT
- STEAM IRONING
- NOTE
- DRY IRONING
- VERTICAL STEAM IRONING
- NOTES ON VERTICAL STEAMING
- AUTO-LOCKING FUNCTION FOR STEAM BUTTON
- PUMP OVERHEAT PROTECTION FUNCTION
- USE OF THE HANDLE
- FILTER REPLACEMENT
- ANTI-CALC SYSTEM
- EMPTYING AND STORING
- CLEANING AND MAINTENANCE
Brand : SWAN
Model : SI9030N
Category : Iron