SM S15 CAW - Vacuum Cleaner Hotpoint Ariston - Free user manual and instructions
Find the device manual for free SM S15 CAW Hotpoint Ariston in PDF.


| Product Type | Cylinder Vacuum Cleaner |
| Brand | Hotpoint Ariston |
| Model | SM S15 CAW |
| Dimensions (LxWxH) | 40 x 25 x 30 cm |
| Weight | 5.2 kg |
| Power Consumption | 1200 W |
| Dust Bag Capacity | 3 L |
| Bag Type | Paper bag |
| Filtration System | HEPA filter |
| Cord Length | 6 m |
| Noise Level | 78 dB(A) |
| Suction Power Control | Variable power slider on handle |
| Attachments Included | Crevice tool, upholstery brush, floor nozzle, dusting brush |
| Wheels | 2 large rear wheels, 1 front swivel |
| Automatic Cord Rewind | Yes |
| Parking System | Vertical parking and horizontal storage |
| Filter Maintenance | Clean HEPA filter every 3 months; replace annually |
| Spare Parts Availability | Dust bags, filters, and accessories available online |
| Energy Class | A |
| Manufacturer Warranty | 2 years |
Frequently Asked Questions - SM S15 CAW Hotpoint Ariston
User questions about SM S15 CAW Hotpoint Ariston
0 question about this device. Answer the ones you know or ask your own.
Ask a new question about this device
Download the instructions for your Vacuum Cleaner in PDF format for free! Find your manual SM S15 CAW - Hotpoint Ariston and take your electronic device back in hand. On this page are published all the documents necessary for the use of your device. SM S15 CAW by Hotpoint Ariston.
USER MANUAL SM S15 CAW Hotpoint Ariston
natural_image
Illustration of a HotPoint AeroR displayed on a base (no text or symbols on the device body)EN Operating instructions
natural_image
Diagram of a square mechanical component with concentric rings and mounting holes, labeled with number 15 (no text or symbols beyond label)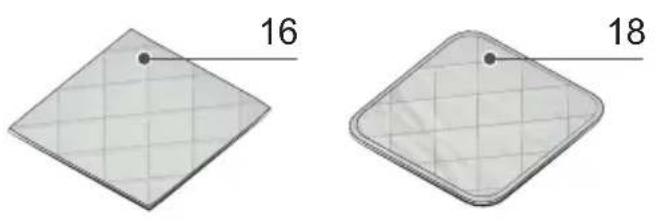
natural_image
Two diamond-shaped grid-patterned objects with labeled measurements (16 and 18), no text or symbols present.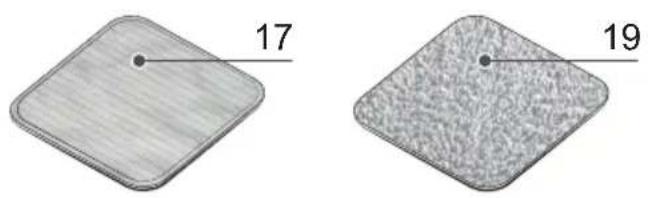
A
natural_image
Diagram of a mechanical device with a downward arrow indicating force or direction (no text or symbols present)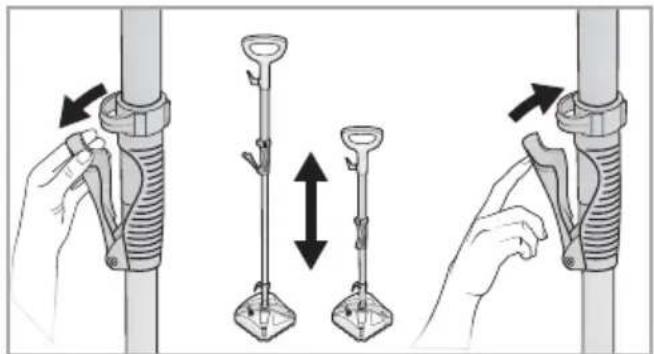
natural_image
Illustration of three hands adjusting a vertical tool with two different sizes, showing mechanical assembly (no text or symbols)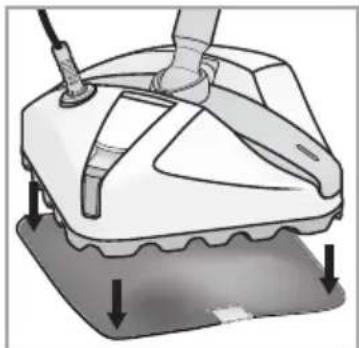
natural_image
Illustration of a hand using a tool to press down a small mechanical component (no text or symbols visible)B
natural_image
Illustration of a hand using a tool to adjust or install a mechanical component (no text or symbols visible)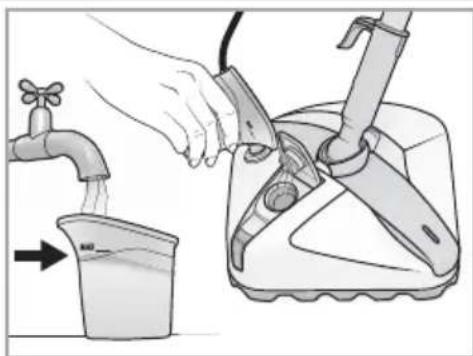
natural_image
Illustration of a hand pouring liquid into a water tap while using a manual pump (no text or symbols)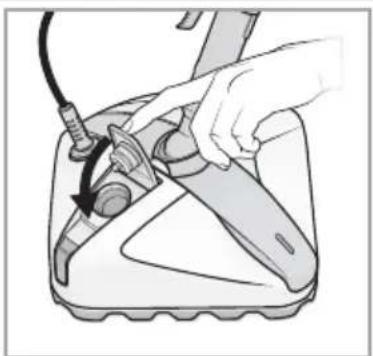
natural_image
Illustration of a hand using a tool to adjust or install a mechanical component (no text or symbols visible)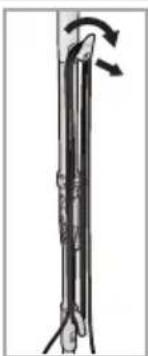
natural_image
Diagram of a vertical pipe or tube with directional arrows indicating flow or movement (no text or symbols)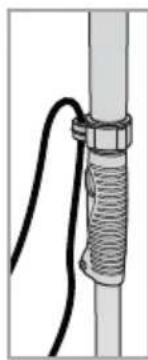
natural_image
Simple line drawing of a coiled cable or wire attached to a vertical pipe (no text or symbols)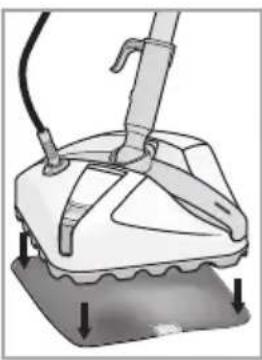
natural_image
Diagram of a mechanical device with a lever and base, showing no text or symbols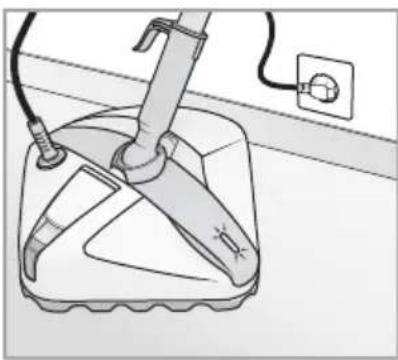
natural_image
Illustration of a mechanical device with a tool and cable, no visible text or symbols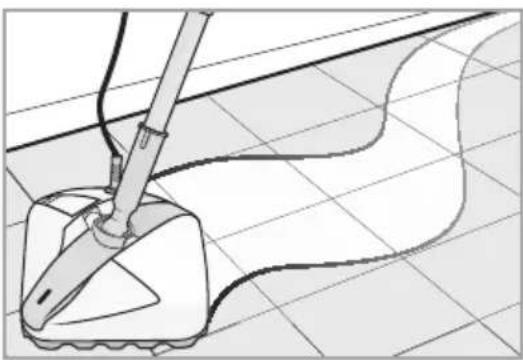
natural_image
Line drawing of a cleaning or cleaning tool on tiled floor, no text or symbols presentC
natural_image
Diagram of a mechanical or fluidic device with directional arrows indicating flow or movement (no text or symbols)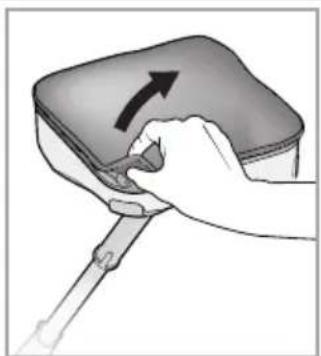
natural_image
Illustration of a hand holding a table tennis paddle with an arrow indicating direction (no text or symbols)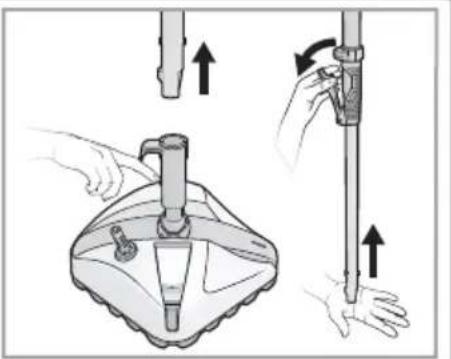
natural_image
Illustration of a hand holding a tool with an open lid and directional arrows indicating movement (no text or symbols)D
natural_image
Hand holding a rectangular object with an arrow indicating upward motion (no text or symbols)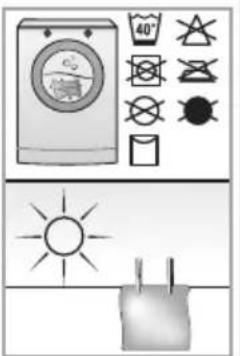
E
natural_image
Mechanical device with lever and base mount (no visible text or symbols)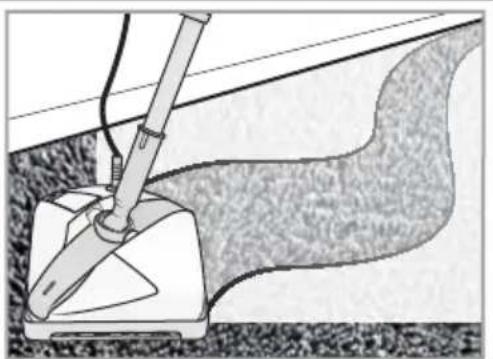
natural_image
Diagram of a mechanical device with a tool inserted, showing a textured surface and a curved line (no text or symbols)it ISTRUZIONI GENERALI PER LA SICUREZZA
• This appliance must not be used by children.
- Keep the appliance and its cord out of reach of children.
- This appliance can be used by children aged from 8 years and above and persons with reduced physical, sensory or mental capabilities or lack of experience and knowledge if they have been given supervision or instruction concerning use of the appliance in a safe way and understand the hazards involved.
- The equipment was designed for household and similar uses such as in:
- staff kitchen areas in shops, offices and other work environments;
- farm houses;
- hotels, motels and other residential environments by the guests;
- bed&breakfast-type environments.
• Supervise children to prevent them from playing with the appliance.
- Turn unit off and unplug from socket when not in use, before putting on or taking off parts, and before cleaning. To disconnect, turn unit off, grasp plug, and pull out from wall socket. Never pull on cord.
- Do not operate any appliance with a damaged cord or plug or after the appliance malfunctions or has been damaged in any manner. Return the appliance to an authorized service facility for examination, repair, or electrical or mechanical adjustment.
- Do not leave the appliance unattended while it is running.
DESCRIPTION OF THE APPLIANCE
- Cleaning head
- LED light
- Water tank
- Water tank cover
- Power cord
- Telescopic tube housing
- Telescopic handle unlocking button
- Lower cord-rewinding support
- Telescopic handle
- Telescopic handle lever
- Cord clip
- Upper telescopic handle with PVC rubber handle
- Upper quick release cord-rewinding support
- Handle
- Metal Plate
- Everyday Pad
- Scrubbing Pad*
- Hardfloor Pad*
- Parquet Pad*
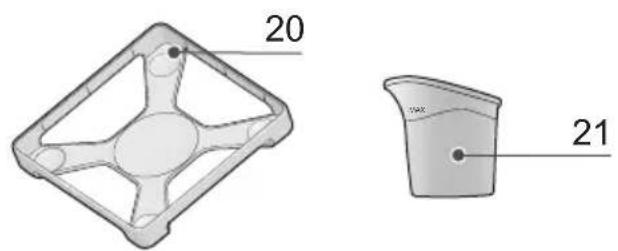
- Carpet glider
- Filling jug
*not included
INTRODUCTION
Welcome to Hotpoint's Floor Care. Thank you for purchasing our steam mop. We recommend registering this product on www.hotpoint.co.uk to make sure you are entitled to all the benefits made available by Hotpoint's Customer Service.
GENERAL SAFETY RULES
Before you begin using the appliance, it is important that you carefully read these instructions and keep them for further reference.
The safety features of your steam mop comply with the technical specifications and regulations in force.
Do not use the appliance for any use other than its intended use. Any improper use could cause damage to persons and/or property.
The voltage of your system must match the voltage of the appliance (220-240 V). Any connection error could cause irreversible damage to the appliance and void its warranty.
-
Never use the power cord to move or carry the appliance around.
• After use, disconnect the plug from the electrical socket and rewind the power cord. -
Do not unplug by pulling on power cord.
- Do not bend the power cord and keep it away from sharp edges or corners to avoid any damage.
- Never leave or use the appliance over or close to flames, ovens, flammable materials or other sources of heat.
- Should you suspect a failure, immediately unplug it from the electrical socket.
- Do not leave the appliance in the open air and exposed to inclement weather conditions.

DANGER OF BURN.
Please use caution when using the steam mop. The steam emitted from the steam mop is very hot.
The hot steam settles as moisture film on the cleaned surface. Until this film is dry, there is a risk of slipping and falling.
- Do not enter cleaned surfaces until they are dry.
-
Be careful when cleaning stairs.
-
For your safety, all repairs or maintenance operations on the appliance must be carried out exclusively by Hotpoint's authorised staff.
- The manufacturer shall assume no responsibility in case of damage resulting from any improper use of the appliance.
- Do not forcibly push the plug into the socket.
- Do not use extension cords or sockets with inadequate length.
Please use only manufacturer's recommended accessories.
• The following use are forbidden:
- as room humidifier or as heater
- on surfaces that come in contact with food
- on walls, counters, windows and abov head positions
- without cleaning the pad
- outdoors
• To protect against a risk of fire or electric shock, please note:
A) Do not immerse the steam mop into water or any other liquids.
B) Do not handle plug or steam mop with wet hands or operate appliance without shoes.
C) To avoid circuit overload, do not c another appliance on the same socket.
C) To avoid circuit overload, do not c another appliance on the same socket.
D) Do not try to disassembly or repair the appliance. Incorrect reassembly can cause a risk of electrical shock or injury to persons when the appliance is used.
E) Do not point mop head towards electrical devices, mains, cables, etc. or
ovens. During cleaning keep sufficient struditions from the floor manufacturer.
stance from sockets that are installed in the floor.
- Keep your work area well lighted.
• Use only on flat, horizontal surfaces. - Make sure that no part of the body is ever positioned underneath the mop head.
- Close attention is necessary when used by or near children, pets or plants.
- When in use, never turn the appliance on its side. Never direct steam towards people, animals or plants.
- Do not clean surfaces that are contaminated by substances hazardous to health. The hot steam can release these substances.
- Do not put any objects into openings. Do not use with any opening that is blocked.
- Do not put hands or feet under the steam mop. The unit gets very hot.
- Do not use the appliance to clean pressurized containers or containers with unknown content. There is a risk of rupture or explosion.
- Please add cleaning pad before using the unit.
- Do not use the appliance if the water tank is empty.
- Do not add boiling water, cleaning so scented perfumes, oils or any other to the water used in this appliance as this may damage the unit or make it unsafe for use.
- Carefully remove the microfibre cleaning pad immediately after you have unplugged and allowed the steam mop to cool (about 3-5 minutes).
• Always unplug before cleaning the appliance, then use dry/wet pad to clean. Do not use alcohol, benzene or thinners to clean the appliance, to avoid damage outlook.
• Store steam mop indoors in a cool and dry place.
- Do not store unit with damp or wet microfibre cleaning pad attached. Residual moisture on the cleaning pad can cause odours or even mould growth.
- When cleaning, never remain on one long. This may damage the surface.
- Ensure proper ventilation during and after work.
Your steam mop is designed to clean hard floor surfaces that will withstand high heat.
Do not use on unsealed wood or unglazed ceramic floors. On surfaces that have been treated with wax or some no wax floors, the sheen may be removed by the heat and steam action. It is always recommended to test an isolated area of the surface to be cleaned before proceeding. We also recommend that you check the use and care in-
BEFORE USE
The product will be inspected through many testing process before production and selling to make sure the best quality. So it is normal that you find drops in the water tank when you o package.
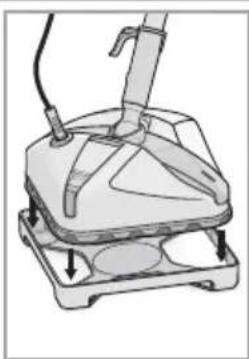
Assembling (A)
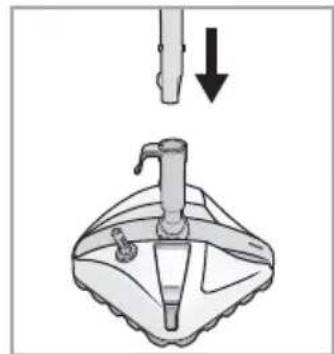
Assemble the steam mop as follows:
- Fit the telescopic tube (9) into its housing (6). Push until you hear the click.
- Adjust the length of the telescopic handle (14) operating on the lever (10).
- Put the cleaning pad on the floor with the back side (the side with care label) facing up. Pick up the steam mop and press on the cleaning pad.
USING THE STEAM MOP (B - C)
Do not use the steam mop without the pad because the appliance and the floor could get damaged.
Before pouring water into the tank, ple disconnect the power.
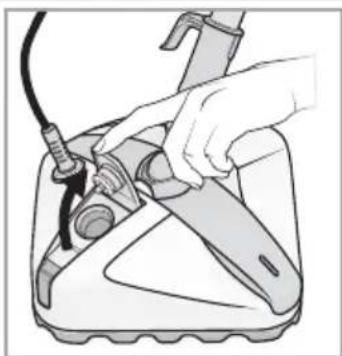
solutions Open the water tank cover
chemicals 2. Use the filling jug (21) to fill the water tank (3). Please do not overfill.
The “MAX” level on the filling jug (2 corresponds to the maximum capacity of the water tank (250ml).
To unsure a safety use of the product, don't put any chemical agent when pouring water into the tank.
In order to prolong the life of the product, if you live in hard water area, we recommend mixing tap water with demineralised water according to the following table.
| Hardness degree [°f] | Proportion [tap water:demineralised water] |
| ot <25° f 1:0 | |
| 25°f – 35°f | 2:1 |
| 35°f – 50 °f | 1:1 |
| 50°f – 75°f | 1:2 |
| >75°f 0:1 |
- Press and close the water tank cover (4) tightly.
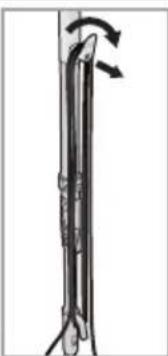
- Pull and twist the quick release cord holder (13) to unwrap the power cord completely. Put the power cord into the cord clip (11).
Before you plug the appliance into an electrical socket, we recommend unwinding the power cord to avoid any overheating and damage.
It could be useful to sweep or vacuum surface first.
-
Put cleaning pad underneath and place the cleaning head (1) on it.
-
Plug the appliance into an electrical socket (220-240V) to turn on the appliance. The LED light (2) turns on.
Before operating the appliance, wait product heats up (20 sec).
- Move the appliance as a regular mop. As soon as the appliance is moved, steam is produced.
The product only releases steam when moving, to avoid too much steam releasing onto the floor this helps to not damage delicate flooring (such as parquet floors). When cleaning delicate surfaces it is recommended to move the product slo avoids the floor becomes soaked. To remove stubborn stains it is recommended to move the steam mop quickly.
-
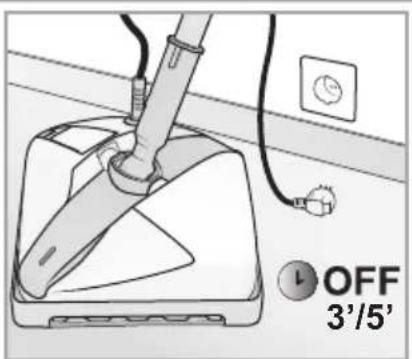
To switch off the unit unplug the cord from the socket.
-
Let the unit cool down for 3-5 minutes on the carpet glider before storage.
The product is hot and the pad wet after the usage. Be careful to not damage delicate flo-
ors.
-
Wrap the cable.
-
Remove the cleaning pad.
Do not store with a wet pad attached.
-
Wipe the metal plate with a soft, dry cloth.
-
Push the button (8) to unlock the handle.
-
Shorten the telescopic handle operating on the lever (10) for an easier storage.
Empty the water tank before storage if you do not use it for a long period.
CLEANING AND MAINTENANCE
Before cleaning or maintaining the appliance, make sure it has been unplugged from the electrical socket. Do not use aggressive substances or abrasive materials to clean the appliance, its internal parts and attachments.
Make sure the appliance is thoroughly dry before using again.
Cleaning the appliance
Use a dry or slightly damp soft cloth to clean the plastic parts and the telescopic handle.
Do not use any sharp or scouring cleansers or hard brushes.
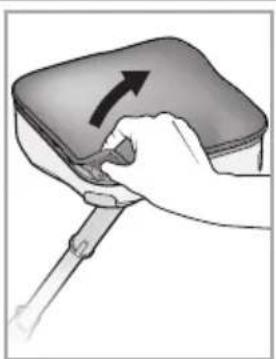
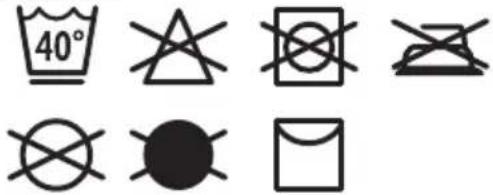
Pad cleaning (D)
entire We recommend changing the "everyday pad" (16) at least once a month and the other pads (17, 18, 19) at least every 3 months.
-
Before the first use, machine wash the pad and line dry.
-
We recommend washing your microfibre cleaning pad separately from other fabrics to avoid picking up lint.
-
Use only liquid detergent. Do not use any fabric until the softeners or bleach. Line dry. Do not tumble dry. Do not iron.
If this there are loose threads on the micro cleaning pad carefully cut the thread with scissors. Do not pull on them or cut at the base.
Maintenance of the metal plate
After using the appliance, the plate is hot. Let it cool down 3-5 minutes before proceeding with cleaning.
Only use special cleaners to avoid damaging the aluminum plate.
Use a special cleanser to clean the metal plate (15). Follow the instructions on the product label of the cleanser.
ACCESSORIES
Everyday Pad (16)
This pad is designed for everyday cleaning on all types of floor. It dries quickly after washing.
Scrubbing Pad (17)
This pad is especially designed to eliminate the toughest stains. It dries quickly after washing and is very resistant. We recommend it to clean kitchen floors.
Hardfloor Pad (18)
This pad is able to eliminate the stubborn marks even on delicate surfaces and is very resistant. We recommended it to clean bathroom tiles.
Parquet Pad (19)
This pad is able to catch the dust: you can use it to sweep the floor before cleaning it with the steam mop. We recommend it for light cleaning and everyday cleaning, especially for parquet.
Carpet Glider (E)
The carpet glider (20) allows using the product on carpet for cleaning and sanitizing. Place the unit with the accessory cloth installed carpet and move it to operate it.
PRODUCT SPECIFICATION
| Model Rated | Voltage | Frequency | Rated Power | Tank Capacity |
| SM S15 CAW 220 | -240V~50Hz | 1550W 250m | ||
| Performance standard | EN IEC60335-1:2012;EN60335-2-10:2002+A12008;EN60335-2-54:2008+A11:2012;EN55014-1:2006+A1;2009+2011;EN55014-2:1977+A1:2001+A22008EN61000-3-2:2006+A1:2009+A2:2009;EN61000-3-3:2013 | |||
DISPOSAL OF OLD ELECTRICAL APPLIANCES
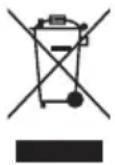
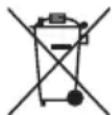
The European Directive 2012/19/EU on Waste Electrical and Electronic Equipment (WEEE), requires that old household electrical appliances must not be disposed of in the normal unsorted municipal waste stream.
CE Old appliances must be collected separately in order to optimise the recovery and recycling of the materials they contain and reduce the impact on human health and the environment.
The crossed out “wheeled bin” symbol on the product reminds you of your obligation, that when you dispose of the appliance it must be separately collected. Consumers should contact their local authority or retailer for information concerning the correct disposal of their old appliance.
TROUBLESHOOTING
| Problem Possible causes / | Solutions |
| Steam mop does not switch on | Check whether the plug is securely plugged into the electrical socket or not.Check your fuse or breaker.Check if the LED is on |
| Steam mop can not generate steam | Check whether there is water into the water tank.The steam temperature is not enough high. After plugging in, wait 20 sec to heat up.The steam rate is controlled by the movement frequency. Try to move the product a little faster on the floor. |
| Steam mop leaves water on the floor | Check to see if the cleaning pad is too wet.The steam temperature is not enough high. After plugging in, wait 20 sec to heat up. |
| Floors are too cloudy, streaky or spotty after steaming | The cleaning pad might be dirty. Turn off the product disconnecting the power cord and change the cleaning pad.If you wash the cleaning pad with power detergent, the power may stay in the pad. Please wash the pad with liquid detergent.If you need to clean the area with stubborn stains, please spread a chemical detergent on the floor and then clean it with steam mop.There may be residues on the floor after you clean the area with chemical detergent. Please clean the floor again with steam mop. |
| Steam mop is hard to push | Make sure the cleaning pad is correctly attached.Check to see if the pad is excessively dirty. If cleaning pad. |
| The metal plate is not glossy | Clean the metal plate following the instructions on this user manual.Remove the damp pad cloth and dry the metal plate after each use. |
ОПИСАНИЕ ПРИБОРА
natural_image
Simple black-and-white line drawing of a smiling face with curved lines (no text or symbols)Üretici Firma:
Indesit Company Spa
Viale Aristide Merloni, 47
60044 Fabriano Italy temizlikte
İthalatçı Firma:
Indesit Company Beyaz Eşya PAZARLAMA A.Ş. Balmumcu Cad. Karahasan Sok.
No: 11, 34349 – Balmumcu Beşiktaş – İstanbul
Tel: (0212) 355 53 00
Faks: (0212) 212 95 59
IMHA ETME

- it ISTRUZIONI GENERALI PER LA SICUREZZA
- DESCRIPTION OF THE APPLIANCE
- INTRODUCTION
- GENERAL SAFETY RULES
- DANGER OF BURN.
- Your steam mop is designed to clean hard floor surfaces that will withstand high heat.
- BEFORE USE
- Assembling (A)
- USING THE STEAM MOP (B - C)
- CLEANING AND MAINTENANCE
- Cleaning the appliance
- Pad cleaning (D)
- Maintenance of the metal plate
- ACCESSORIES
- Everyday Pad (16)
- Scrubbing Pad (17)
- Hardfloor Pad (18)
- Parquet Pad (19)
- Carpet Glider (E)
- DISPOSAL OF OLD ELECTRICAL APPLIANCES
- ОПИСАНИЕ ПРИБОРА
- Üretici Firma:
- İthalatçı Firma:
- IMHA ETME
Brand : Hotpoint Ariston
Model : SM S15 CAW
Category : Vacuum Cleaner