
KA2071B - Car kit Scosche - Free user manual and instructions
Find the device manual for free KA2071B Scosche in PDF.


| Product Type | Car Stereo Installation Kit |
| Brand | Scosche |
| Model | KA2071B |
| Compatibility | 2001-2005 Kia vehicles: Sorrento LX (excluding sport), Sedona, Rio, Spectra |
| Radio Size | Double DIN or two ISO DIN |
| Material | High-grade plastic and metal brackets |
| Color | Black |
| Weight | Approximately 0.5 kg |
| Dimensions | Approximately 7 x 4 x 2 inches |
| Includes | Left bracket (6223L), right bracket (6223R), mounting hardware, instruction manual |
| Installation Hardware | Philips screws and brackets |
| Features | Tab removal for specific vehicle models, secure mounting |
| Safety | Disconnect battery before installation; avoid airbag wiring |
| Maintenance | Wipe clean with dry cloth |
| Warranty | Limited lifetime warranty |
| Installation Difficulty | Moderate; requires basic tools |
Frequently Asked Questions - KA2071B Scosche
User questions about KA2071B Scosche
0 question about this device. Answer the ones you know or ask your own.
Ask a new question about this device
Download the instructions for your Car kit in PDF format for free! Find your manual KA2071B - Scosche and take your electronic device back in hand. On this page are published all the documents necessary for the use of your device. KA2071B by Scosche.
USER MANUAL KA2071B Scosche
For Factory Wiring Codes go to: WWV. scoring-cars.com
FACTORY WIRING CODES
instructions.
• Read all instructions accompanying your car stereo/cassette player for proper wiring and mounting. • See your vehicles' instructions for any special tools your installation might require.
NOTES:
DISCONNECTION YOUR EVOCULES NECESSIVE BATTERY TERMINAL BEFORE THE INSTALITATION TO HELP PREVENT ELECTRICAL DAMAGE WE RECOMMENDED THE USE OF VOL/TOH WITHER OVER A TEST LIGHT TO CHECK WRING A TEST LIGHT OR GROUDED WIRE PROBE CAN CAUSE DAMAGE TO THE VEHICLES COMPUTER AND/OR DIABOSOIC SYSTEMS, AVOID ALL FACTORY AIRBAS WRING - AIRBAS CAN ACCIDENTALUTY DELOY CAUSING SERIOUS UNIFY OR DEATH.
CAUTION:
This premium installation kit is for 2001-2005 Ka Double DIN devices. Included are all the parts you need to mount your stereo/cassette of CD player into your vehicles dash. Refer to the individual instruction in this manual to remove your vehicles factor and assemble the kit.
INTRODUCTION / PRELIMINARY
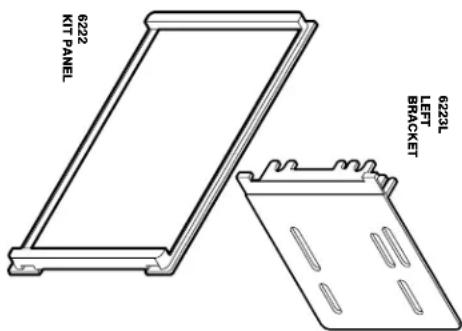
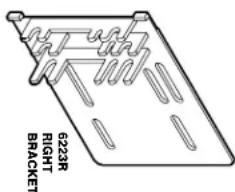
IN-DASH INSTALLATION KIT FOR 2001-2005 KIA DOUBLE DIN
.3HDSODS
KA2071B
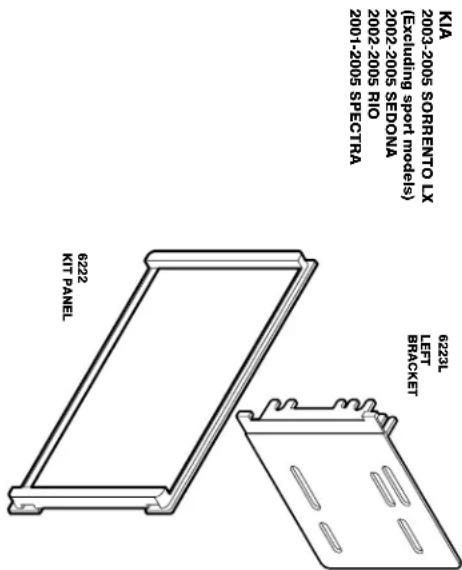
6223L LEFT BRACKET
6223R RIGHT BBACKET
KIA
2003-2005 SORRENTO LX
(Excluding sport models)
2002-2005 SEDONA
2002-2005 RIO
2001-2005 SPECTRA
2001-2005 SPECTRA
2002-2005 SEDONA
(Excluding sport models)
2002-2005 SORRENTOLX
NA
2001-2005 SPECTRA
2002-2005 SEDONA
(Excluding sport models)
2003-2005 SOBRENTO LX
2001-2005 SPECTRA
2002-2005 SEDONA
(Excluding sport models)
2003-2005 SORRENTO LX
NA
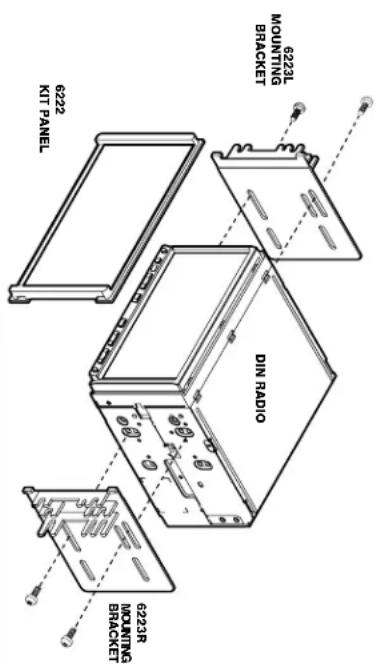
MOUNTING THE RADIO
TAB REMOVAL: Cut and Remove
TAB REMOVAL INSTRUCTIONS
TAB REMOVAL: Cut and Remove
- Align, position and bolt the aftermarket two ISODIN or one Double DIN head unit to the 6222 brackets. Use hardware supplied with radio to secure the mounting brackets.
- Open ashtray and unclip and remove side panels.
- Extract (8) Philips screws from the radio trim panel the remove the panel.
- Extract (4) Philips screws securing radio.
RADIO REMOVAL:
- Pull out ash try and extract (1) Philips head screw from underneath.
- Carefully pry out wood trim bezel, disconnect and remove.
- Extract (4) Philips head screws securing radio bezel, disconnect and remove.
- Extract (4) Philips head screws securing radio, Disconnect and remove.
2002-2005 RIO RADIO REMOVAL
- Remove the ashtray and extract (1) Philips screw exposed in the ashtray cavity. (Philips screw only in 2002 models)
- Unclip and remove entire panel surrounding radio and climate controls. (2002 models remove the knob from fresh air/recirculate control).
- Remove (4) Philips screws securing radio.
2001-2003 SPECTRA RADIO REMOVAL:
- Extract (2) Philips screws in an upward angle above instrument cluster.
- Vehicles without tilt steering only. Extract (3) Philips screws from under steering column on steering column housing. Pop out steering column housing and remove. Remove 213mm bolts from steering column support. [One on each side of column] lower down column out of dashes way.
- With tilt steering. Lower down steering weal and using panel removal tool pop out dash bezel that surrounds instrument cluster, ac controls and radio. Disconnect and remove.
- Extract (4) Philips screws from radio disconnect and remove.
2004-2005 SPECTRA RADIO REMOVAL:
- Using a panel removal tool remove the dash panel surrounding the radio. Disconnect and remove.
- Extract (4) Philips head screw securing the radio to the dash. Disconnect and remove.
2001-2003 KIA SPECTRA ASSEMBLY
2001-2003 SPECTRA
-
Place assembled radio, panel and brackets into dash opening, DO NOT bolt in.
-
Finish dash reassembly in reverse order of dash disassembly.
2003-2005 Kia Sorrento LX and 2004-2005 Kia Spectra use tabs marked by number one (1) on the brackets
2002-2005 Kia Sedona and 2001-2003 Kia Spectra use tabs marked number two(2) on the brackets. (Note: For 2001-2003 Kia Spectra final assembly please refer to 2001-2003 Kia Spectra final assembly below.) 2002-2005 Kia Rio use tabs marked number three (3) on the brackets.
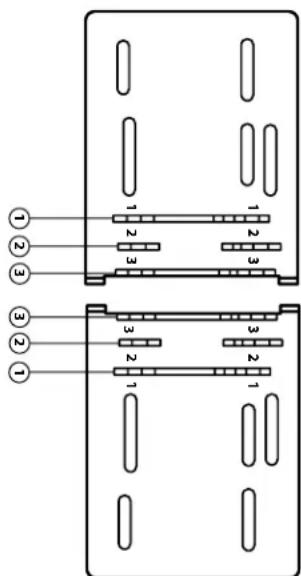
Cut and Remove the tabs according to the chart and referring to illustration below:
- For Factory Wiring Codes go to: WWV. scoring-cars.com
- FACTORY WIRING CODES
- INTRODUCTION / PRELIMINARY
- IN-DASH INSTALLATION KIT FOR 2001-2005 KIA DOUBLE DIN
- .3HDSODS
- KA2071B
- MOUNTING THE RADIO
- TAB REMOVAL INSTRUCTIONS
- RADIO REMOVAL:
- 2002-2005 RIO RADIO REMOVAL
- 2001-2003 SPECTRA RADIO REMOVAL:
- 2001-2003 KIA SPECTRA ASSEMBLY
- 2001-2003 SPECTRA
Brand : Scosche
Model : KA2071B
Category : Car kit