
HA1709B - Car kit Scosche - Free user manual and instructions
Find the device manual for free HA1709B Scosche in PDF.


| Brand | Scosche |
| Model | HA1709B |
| Product Type | Car Stereo Installation Kit |
| Compatible Vehicles | 2010 Honda Insight |
| Material | Plastic and Metal Brackets |
| Dimensions (Approx.) | 7 x 4 x 1 inches |
| Weight (Approx.) | 0.5 lbs |
| Supported Stereo Types | Single DIN and Double DIN |
| Included Components | 6801 Panel, 6842 Bracket, 6843 Bracket, 6761 Pocket, Screws |
| Installation Hardware | Screws and brackets for mounting |
| Installation Location | Dashboard |
| Factory Radio Removal | Unclip power outlet panel, remove 8mm screw, unclip radio |
| Single DIN Mounting | Attach brackets to panel, add pocket, mount stereo |
| Double DIN Mounting | Attach brackets to panel, mount stereo directly |
| Rear Support | Available separately for structural integrity |
| Safety Precautions | Disconnect negative battery terminal; avoid airbag wiring |
| Wiring Check | Use volt/ohm meter instead of test light |
| Factory Wiring Codes | Available at www.scosche-cars.com |
| Technical Support | 1-800-621-3695 x3 |
| Manufacturer | Scosche Industries, Inc. |
| Year of Manufacture | 2009 |
Frequently Asked Questions - HA1709B Scosche
User questions about HA1709B Scosche
0 question about this device. Answer the ones you know or ask your own.
Ask a new question about this device
Download the instructions for your Car kit in PDF format for free! Find your manual HA1709B - Scosche and take your electronic device back in hand. On this page are published all the documents necessary for the use of your device. HA1709B by Scosche.
USER MANUAL HA1709B Scosche
This premium installation kit is for 2010 Honda Insight vehicles. Included are all the parts you need to mount your car stereo or CD player into your vehicle's dash. Refer to the individual instruction in this manual to remove your vehicle's factory radio and assemble the kit.
CAUTION
Disconnect your vehicle's negative battery terminal before the installation to help prevent electrical damage. We recommend the use of a volt/ohm meter over a test light to check wiring. A test light or grounded wire probe can cause damage to the vehicle's computer and/or diagnostic systems. Avoid all factory airbag wiring - airbags can accidentally deploy causing serious injury or death.
NOTES
- See your vehicle's instructions for any special tools your installation might require.
- Read all instructions accompanying your car stereo for proper wiring and mounting instructions.
FACTORY WIRING CODES
For Factory Wiring Codes go to: www.scosche-cars.com



LIABILITY DISCLAIMER
This instruction booklet is based on carefully documented data and research of automobile dash disassembly, wire harness/codes and information pertaining to installation of this kit (HA1709B) in 2010 Honda Insight vehicles. Scosche Industries, Inc. can not be held responsible for discrepancies/inconsistencies that may occur due to the automobile manufacturing changes or options, or damage that may occur in the automobile during the installation of components while using this booklet.
If you have any further questions, call our toll free technical help line at: 1-800-621-3695x3
©2009 SCOSCHE INDUSTRIES, INC.
SI 11/09 - HA1709B (3000003)
FACTORY STEREO REMOVAL
2010 HONDA INSIGHT
- With panel removal tool, unclip power outlet panel underneath radio in front of shifter, unplug and remove.
- Extract (1) 8mm screw securing radio from behind.
- Using panel removal tool, unclip radio from face plate while with your other hand, pushing Radio forward from behind.
MOUNTING THE STEREO
SINGLE DIN-ISO MOUNT
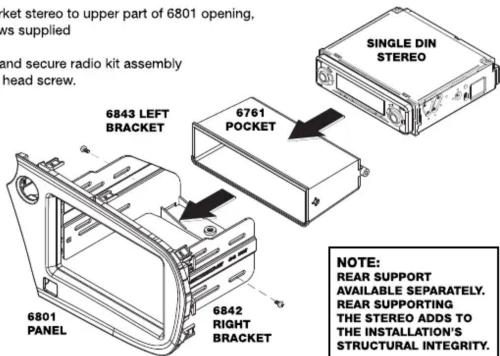
- Attach the 6842 & 6843 brackets to 6801 Panel using (4) screws supplied. (Shown in Figure 1).
- Align 6761 pocket to bottom of 6801 panel opening and attach to 6842 & 6843 using (2) supplied screws. (Shown in Figure 1).
- Align and screw aftermarket stereo to upper part of 6801 opening, and attached using screws supplied with aftermarket stereo.
- Reconnect radio, screw and secure radio kit assembly to dash using (1) Phillips head screw.
- Finish dash reassembly.
FIGURE 1
DOUBLE DIN-ISO MOUNT
- Attach the 6842 and 6843 brackets to 6801 panel using (4) screws supplied.
- Align and screw aftermarket double din stereo to 6842 and 6843 brackets using screws supplied with aftermarket stereo. Note: If hardware is not supplied with aftermarket stereo use hardware from factory stereo.
- Reconnect stereo. Screw and secure stereo kit assembly to dash using the removed (1) Phillips head screw.
- Finish dash reassembly.
- Reconnect stereo. Screw and secure stereo kit assembly to dash using the removed (1) Phillips head screw.
- Finish dash reassembly.

FIGURE 2
NOTE: REAR SUPPORT AVAILABLE SEPARATELY. REAR SUPPORTING THE STEREO ADDS TO THE INSTALLATION'S STRUCTURAL INTEGRITY.
NOTE: REAR SUPPORT AVAILABLE SEPARATELY. REAR SUPPORTING THE STEREO ADDS TO THE INSTALLATION'S STRUCTURAL INTEGRITY.
Brand : Scosche
Model : HA1709B
Category : Car kit