
11316 - Scanner TRUST - Free user manual and instructions
Find the device manual for free 11316 TRUST in PDF.


| Product Type | Flatbed Scanner |
| Model | 11316 |
| Brand | Trust |
| Scanning Method | Contact Image Sensor (CIS) |
| Optical Resolution | 600 x 1200 dpi |
| Maximum Document Size | 8.5 x 11.7 inches (A4/Letter) |
| Interface | USB 2.0 |
| Power Supply | USB bus power |
| Dimensions (L x W x H) | 420 x 290 x 80 mm |
| Weight | 2.5 kg |
| Color Depth | 48-bit input, 24-bit output |
| Operating Systems Support | Windows, Mac, Linux (via SANE) |
| Maintenance | Clean glass and exterior with a soft, damp cloth; avoid abrasive cleaners |
| Safety | Keep away from liquids; unplug when not in use for extended periods; use only supplied cable |
| Spare Parts & Repairability | Replacement USB cable available; no user-serviceable parts inside; contact Trust support |
| General Information | Compact design for home or office; energy-efficient; includes scanning software |
Frequently Asked Questions - 11316 TRUST
User questions about 11316 TRUST
0 question about this device. Answer the ones you know or ask your own.
Ask a new question about this device
Download the instructions for your Scanner in PDF format for free! Find your manual 11316 - TRUST and take your electronic device back in hand. On this page are published all the documents necessary for the use of your device. 11316 by TRUST.
USER MANUAL 11316 TRUST
Thank you very much for purchasing this product from the Trust range. We wish you hours of fun with it. Please read this manual carefully before using the product.
Registration
Register your purchase now at the Trust Internet site (www.trust.com) and you could win one of the fabulous prizes. The web site is also the place to look for dealer addresses, comprehensive product information, drivers, and FAQ (Frequently Asked Questions) sheets.
Copyright Statement
No part of this manual may be reproduced or transmitted, in any form or by any means, electronic or mechanical, including photocopying, recording, or information storage and retrieval systems, for any purpose other than the purchaser's personal use, without the prior written permission of the manufacturer.
Disclaimer Statement
The manufacturer specifically disclaims all warranties, either express or implied, including but not limited to implied warranties of merchantability and fitness for a particular purpose, with respect to the software, the product manual(s) and written materials, and any other accompanying hardware. The manufacturer reserves the right to revise or make improvements to its product at any time and without obligation to notify any person of such revisions or improvements.
In no event shall the manufacturer be liable for any consequential or incidental damages, including any loss of business profits or any other commercial damages, arising out of the use of its product.
All company or product names are trademarks or registered trademarks or service marks of their respective owners.
Contents
1. Introduction......3
1.1 Conventions used in the manual 3
1.2 Contents of the package ....3
1.3 Minimum system requirements 4
1.4 Safety....4
1.5 Adapters 5
2. Installing the scanner ....6
2.1 Unlocking the transport lock....6
2.2 Connecting the scanner to your computer 6
2.3 Installing the driver....7
2.4 Starting the Trust Software Installer .... 10
2.5 Installing TWAIN....12
3. Software installation....15
3.1 TextBridge Classic 2.0 ....15
3.2 Adobe Acrobat Reader....18
3.3 Installing Adobe PhotoDeluxe 2.0....21
4. Explanation of TWAIN....25
4.1 Advanced settings....28
4.1.1 Representation ......28
4.1.2 Image processing....29
5. Working with the applications.... 31
5.1 One Touch Access....31
5.1.1 Hotkey settings....33
5.1.2 Setting preferences.... 35
5.2 TextBridge Classic....37
5.2.1 Single installation of the scanner....37
5.2.2 Installing the language....38
5.2.3 Scanning with TextBridge Classic ....39
5.2.4 More information 41
5.3 Adobe PhotoDeluxe 42
5.3.1 Single installation of the scanner....42
5.3.2 Scanning with Adobe PhotoDeluxe 43
6. Power Saving ....44
- Maintenance....45
- Troubleshooting....46
8.1 Testing the scanner....46
8.2 Troubleshooting 47
- Specifications ....50
- Trust Service Centres....51
1. Introduction
This manual is intended for users of the Office Scan USB 19200. No prior knowledge is required for installation and use of this product.
If you have any questions after reading this manual, please contact one of the Trust service centres. You will find information on the service centre nearest to you at the back of this manual. You can also visit the Trust website (www.trust.com) for support, comprehensive product information, drivers, and FAQ (Frequently Asked Questions) sheets.
1.1 Conventions used in the manual
This manual uses the following layout conventions for instructions:
‘System’ This is a software-specific term, e.g. a term used by Windows.
[DIR] Text in this font is to be typed by the user.
(term) The text between the parentheses (....) is the English term, e.g. (File), referred to in the accompanying illustration.
Additional information is shown as follows:
Note: Do not connect the scanner to a USB-HUB.
The examples assume that your computer system has assigned the letter "D" to your CD-ROM drive. If your computer uses a different drive designation for your CD-ROM drive, e.g. "E", replace "D" in the text with "E".
1.2 Contents of the package
Before reading the manual, please check the contents of the package. It should contain the following:
- Scanner
- USB interface cable
• Power supply adapter - CD-ROM with driver, TWAIN, electronic manual and applications
- Quick installation manual
Please contact your dealer if anything is missing or damaged.
1.3 Minimum system requirements
To use this scanner you system must satisfy the following minimum requirements:
• Intel Pentium 166 MHz processor
- USB port
- 16 MB RAM
- 60 MB free space on your hard disk
- 4x CD-ROM drive
• Microsoft Windows 98
The following equipment is recommended for optimal use of this scanner:
- Printer
- Modem
• E-mail service / Subscription to an Internet Service Provider
1.4 Safety
- Do not use this equipment in humid environments like bathrooms, humid cellars, swimming pools, etc.
- Never insert objects into the openings on the outside of the device as you can come into contact with live electrical components. This can cause fire or give strong electrical shocks.
- Do not try to repair the equipment yourself. When opening or removing the casing you may accidentally come into contact with live parts. There are other risks as well.
- If any of the following conditions apply, disconnect the power plug from the mains and have the equipment serviced by qualified service personnel:
a) the power lead or the plug have become damaged or worn;
b) liquid has entered the equipment;
c) the equipment has been dropped and/or the casing has become damaged. - Do not connect or remove any equipment if the computer is still switched on. This may result in damage to the equipment.
- Place the equipment so that the cables cannot be damaged.
1.5 Adapters
- Insert the adapter into a suitable wall outlet.
- The adapter is intended for use within Europe.
- Use the adapter only with the equipment it was supplied with. Never use a different adapter with this equipment. Other uses, such as providing energy to a Walkman, can cause fire.
2. Installing the scanner
2.1 Unlocking the transport lock
The scanner is shipped with the transport lock locked. The transport lock is on the underside of the scanner.
Slide the transport lock to the 'unlock' position to use the scanner. Slide the transport lock to the 'lock' position to transport the scanner.

Figure 1: Transport lock
2.2 Connecting the scanner to your computer
The scanner must be connected to your computer before use.
Tip: USB equipment is hot swappable. This means that the equipment can be connected and disconnected from your computer whilst it is switched on.
- Remove the scanner from the packaging.
- Place the scanner on a horizontal surface.
- Connect the square USB plug to the rear of your scanner.
- Connect the flat USB plug to a free USB port on your computer.
- Connect the small power supply adapter plug to the rear of your scanner.
- Insert the power supply adapter plug into a suitable wall outlet.
2.3 Installing the driver
- Start Windows 98.
-
Insert the CD-ROM with the drivers into your CD-ROM drive.
-
New hardware is found when Windows 98 is started. Windows 98 finds an 'Unknown Device', Windows 98 Second Edition finds a 'USB Device'. Figure 2 will appear.

Figure 2: Add new hardware
- Click on 'Next' to continue. Figure 3 will appear.
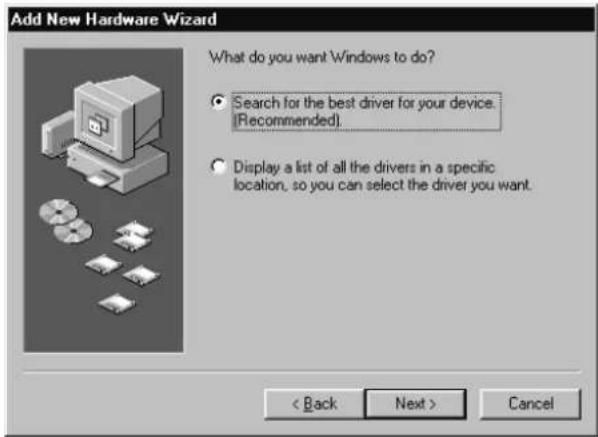
Figure 3: New hardware
- Select the option 'Search for the best driver for your device (recommended)'.
- Click on 'Next' to continue. Figure 4 will appear.
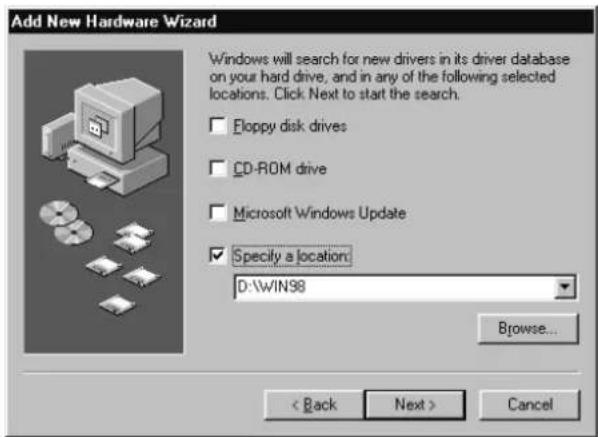
Figure 4: New hardware
- Select the option 'Specify a location' (Figure 4).
- Type: [D:\WIN98] (Figure 4).
- Click on 'Next' to continue. Figure 5 will appear.

Figure 5: New hardware
- Click on 'Next' to continue with the installation. The files will now be copied. Figure 6 will appear after a couple of seconds.

Figure 6: New hardware
- Click on 'Finish' to complete the installation.
The scanner is now installed in your systems manager. In order to use your scanner, the TWAIN and application software must be installed. Continue to Chapter 2.4.

2.4 Starting the Trust Software Installer
You must start the Trust Software Installer in order to install TWAIN and the applications. Extra functions of the software installer are reading the User's manual and a hyperlink to the Trust internet Site.
Before the Trust Software Installer can be started, Windows 98 must be started and the CD-ROM with the drivers must be inserted into your CD-ROM drive.
- Select 'Run' from the Start menu.
- Type: [D:\SETUP.EXE] (See Figure 7).

Figure 7: Starting setup
- Click on 'OK' to continue. Figure 8 will appear.

Figure 8: Software installer
- Select the language you wish to use for the program. Figure 9 will appear.
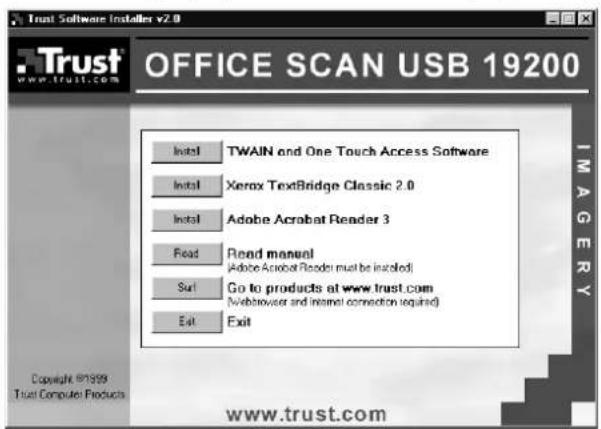
Figure 9: Selecting the program
Click on 'Install' to install an application.
| TWAIN and “One Touch Access” software Chapter 2.5 |
| TextBridge Classic 2.0 Chapter 3.1 |
| Adobe Acrobat Reader Chapter 3.2 |
Table 1: Installation summary

2.5 Installing TWAIN
TWAIN is an important part of the software. TWAIN manages the communication between the scanner and the computer. The scanner cannot be used if TWAIN is not installed.
Before installing TWAIN and One Touch Access, first start the Trust Software Installer. See Chapter 2.4.
- Select 'Install TWAIN and One Touch Access'. Figure 10 will appear.

Figure 10: Selecting the application language
-
Select the language you wish to use for the installation of TWAIN and One Touch Access.
-
Click on 'OK' to start the installation. Installation of One Touch Access will begin. After a short period of time, a window displaying welcome information will appear on your monitor (Figure 11).

Figure 11: TWAIN installation
- Click on 'Next' to continue. The window containing user information will appear (Figure 12).
- Fill in your information or, if necessary, change the information given (Figure 12).

Figure 12: TWAIN installation
Note: You cannot continue if you do not fill in the company name. Therefore, fill in 'None'.
- Click on 'Next' to continue.
- Click on 'Next' to accept the installation directory and to continue with the installation. The files will now be copied. You must restart the computer after the installation of TWAIN and One Touch Access.
- Click on 'Finish' to restart your computer.
TWAIN is now installed. Continue with the installation of the applications.
3. Software installation
3.1 TextBridge Classic 2.0
TextBridge Classic is a program which converts documents to text that can be edited with a word processor, such as Microsoft Word or Wordpad.
Before installing TextBridge Classic, first start the Trust Software Installer. See Chapter 2.4.
- Select 'TextBridge Classic 2.0' in the Trust Software Installer menu (Figure 8).
- Select the language you wish to use with the software (Figure 10).
- Click on 'OK' to start the installation. Figure 13 will appear after a couple of seconds.
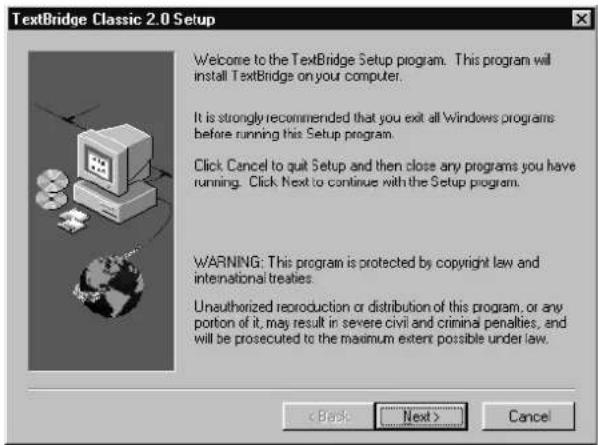
Figure 13: Installing TextBridge Classic
- Click on 'Next'. Figure 14 will appear.
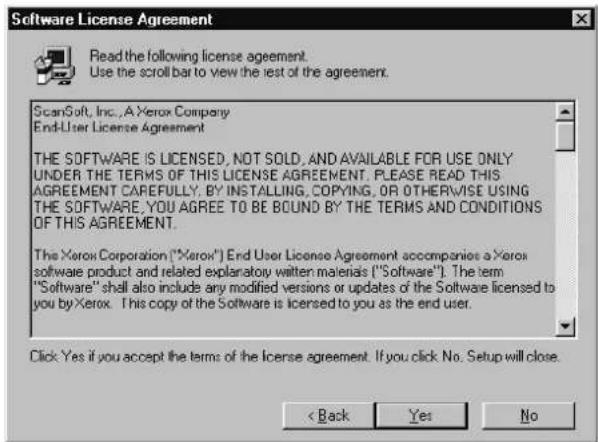
Figure 14: License agreement
- Click on 'Yes' to accept the license agreement and continue with the installation. Figure 15 will appear.

Figure 15: Selecting the type of installation
- Select 'Custom' (Figure 15) so that a bullet appears in the box.
-
Click on 'Next' to continue with the installation. Figure 16 will appear.
-
Click on 'Language packs' to select the languages to use (Figure 16).
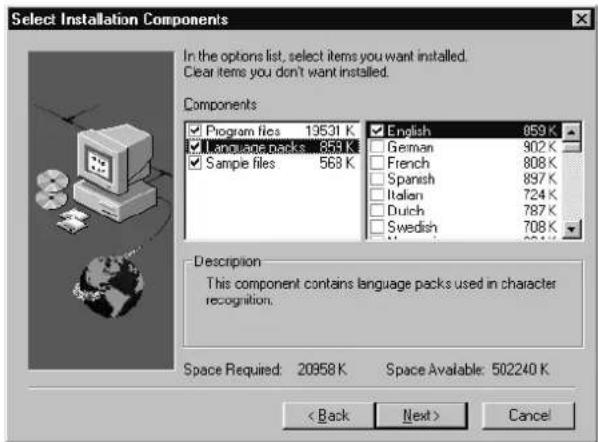
Figure 16: Selecting the languages
Note: You will only be able to recognise text in the languages you select. Once the installation has been completed, you will be able to add other languages for OCR (Optical Character Recognition).
- Click on 'Next' to continue with the installation of TextBridge Classic. The files required for this application will be installed. A new window about registration of TextBridge will appear.
- Click on 'Next'. A window about product registration will appear.
- Click on 'Cancel'. You will be asked whether you wish to cancel the product registration.
- Click on 'Yes'. You will see a window that explains that you will receive a reminder about product registration 2 weeks after the installation of TextBridge.
- Click on 'OK' to complete the installation of TextBridge Classic.
- Click on 'OK' to restart your computer.
You have now completed the installation of TextBridge Classic 2.0. Proceed with the installation of Adobe Acrobat Reader.
Refer to Chapter 5.1 for instructions on how to use TextBridge Classic.
3.2 Adobe Acrobat Reader
Adobe Acrobat Reader is a program that enables you to open an read PDF files. The User's manual for this product is contained on the CD-ROM in the same format.
Before installing Adobe Acrobat Reader, first start the Trust Software Installer. See Chapter 2.4.
- Select 'Adobe Acrobat Reader 3.01' in the Trust Software Installer menu (Figure 8).
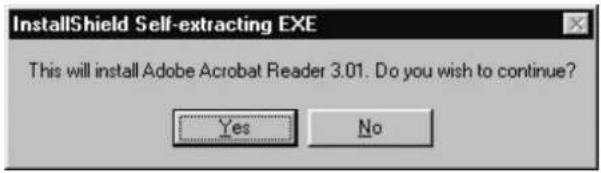
Figure 17: Installing Acrobat Reader
- Click on 'Yes' to continue. Figure 18 will appear.

Figure 18: Installing Acrobat Reader
- Click on 'Next' to continue. Figure 19 will appear.
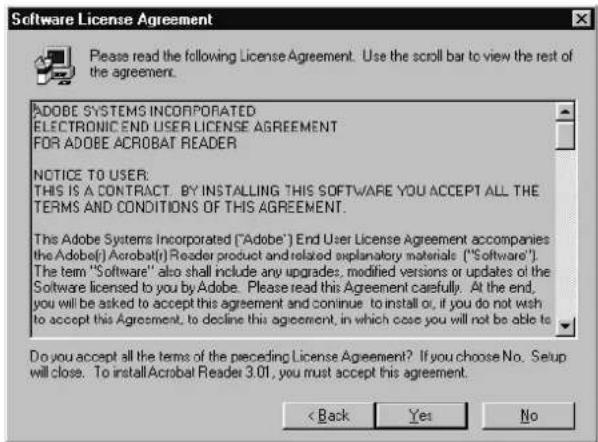
Figure 19: License agreement
- Click on 'Yes' to accept the license agreement (Figure 19) and to continue with the installation.

Figure 20: Installing Acrobat Reader
- Select the directory for the installation of the program (Figure 20). Click on 'Next' to continue. Figure 21 will appear on completion of the installation.
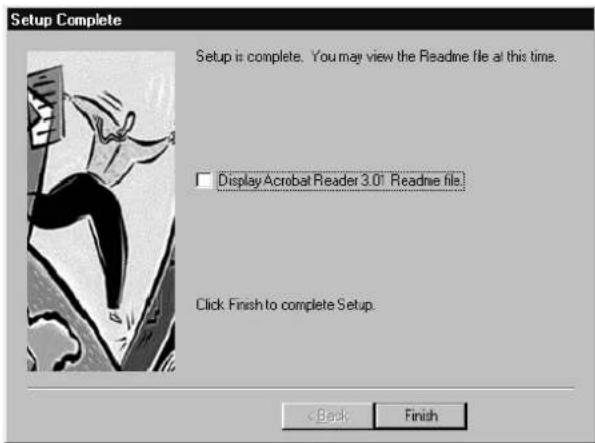
Figure 21: Completing the installation of Acrobat Reader
- Click on 'Finish' to complete the installation of Acrobat Reader.
- Click 'OK' to close the installation.
Adobe PhotoDeluxe must be installed after the installation of Adobe Acrobat Reader.
3.3 Installing Adobe PhotoDeluxe 2.0
Adobe PhotoDeluxe 2.0 is a program that enables you to scan and edit images. Follow the instructions below for the installation of PhotoDeluxe.
- Inset the 'Adobe PhotoDeluxe' CD-ROM into the CD-ROM drive.
- Using the mouse, click on 'Start' and select 'Run' if the installation does not start automatically.
- On the command line, type [D:\AUTORUN.EXE] and click on 'OK'. Figure 22 appears.
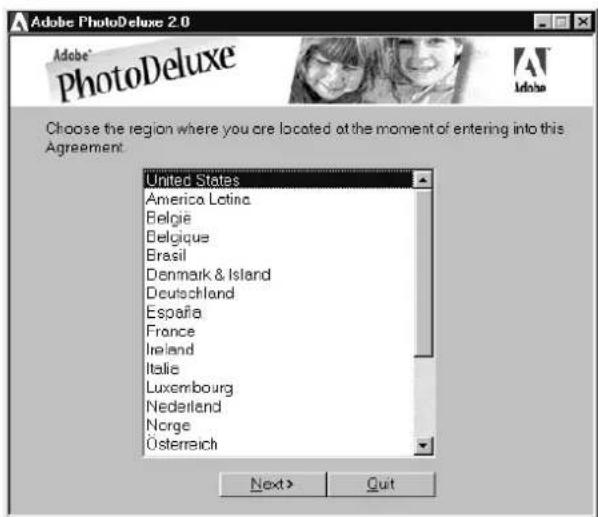
Figure 22: Installing PhotoDeluxe
-
Select your region (country).
-
Click on 'Next' to continue. Figure 23 appears.
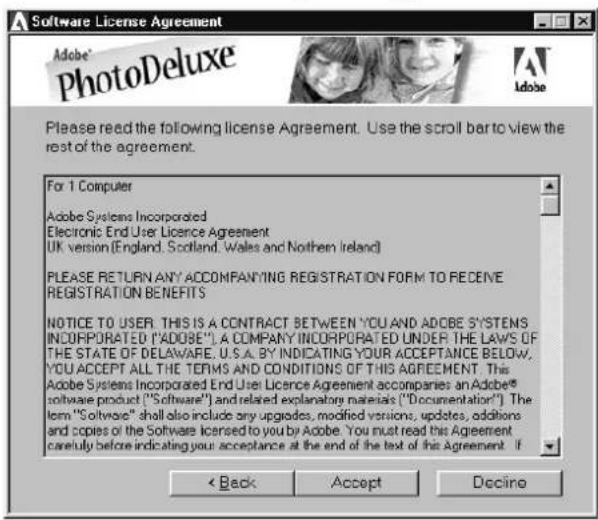
Figure 23: Licence agreement
- Click on 'Accept' (Figure 24) to accept the licence agreement and continue with the installation. Figure 24 appears.

Figure 24: Installing PhotoDeluxe 2.0
-
Click on 'Adobe PhotoDeluxe 2.0' to start the installation. The welcome window will be displayed.
-
Click on 'Next' to continue. Figure 25 appears.

Figure 25: Installing PhotoDeluxe 2.0
-
Select 'Typical'.
-
Click on 'Next' to continue. Figure 26 appears.
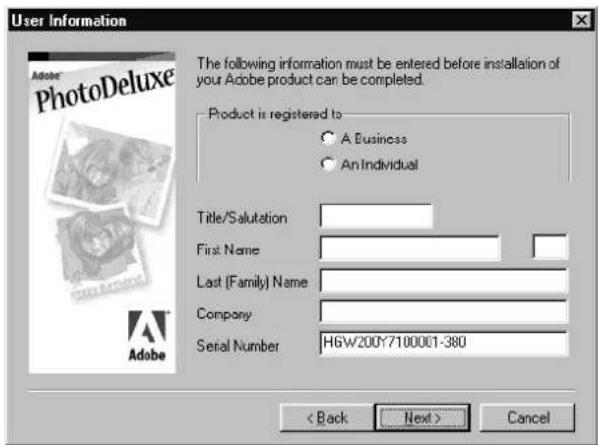
Figure 26: Installing PhotoDeluxe 2.0, User information
- Fill in your details. The serial number is filled in automatically.
-
Click on 'Next' when all the information has been filled in. A summary of the information filled in will be displayed.
-
Click on 'Yes' to continue with the installation. Figure 27 appears.

Figure 27: Installing PhotoDeluxe 2.0
- Click on 'Next' to start the installation. The files will now be copied. Figure 28 appears when the installation is complete.

Figure 28: Completing the installation of PhotoDeluxe 2.0
- Disable the option for 'PhotoDeluxe 2.0 on-line registration' (Figure 28). Click 'Finish' to complete the installation.
- Click on 'OK' to restart your computer.
You have now completed the installation of Adobe PhotoDeluxe 2.0. Refer to Chapter 5.3 for instruction on how to scan using Adobe PhotoDeluxe.
4. Explanation of TWAIN
The TWAIN functions will be described in this chapter to allow you to make optimal use of TWAIN.
The TWAIN window is opened when an image is scanned, for example when using TextBridge Classic and Adobe PhotoDeluxe.

Figure 29: TWAIN window
The basic scanner settings can be changed in the TWAIN window. The basic functions are shown in the table below.
| Item | Function Options | Description | |
| A Scan | Mode | ColorGreyLineArt(black and white) | Scan in colour (photographs, printed material etc).Scan in greyscale (black and white photographs).Scan in black and white tints (OCR, etc.). |
| B Resolution 50 – 192 | 00 DPI For setting the resolution. | ||
| C Paper type | PhotoNewspaperMagazineArtMagazineText | Sets the type of paper for the suppression of the moiré effect. | |
| D Brightness Sets the brightness. | |||
| E Contrast Sets the contrast. | |||
| F Advanced Various settings See Chapter 4.1. | |||
| G Reset Resets all the standard settings. | |||
| H IN / CM | INCM | Measurements are displayed in inches.Measurements are displayed in centimetres. | |
| I Zoom out Reduces the size of the image in the preview window. | |||
| J Zoom in 1x – 4x Increases the size of the image in the preview window. | |||
| K Close Closes the TWAIN window. | |||
| L | Scan / Abort | Scan | Scans the image. |
| Abort | Stops the scan process. | ||
| M Prescan Displays a preview image of the scan. | |||
Table 2: TWAIN functions

4.1 Advanced settings
Click on the 'Advanced' button to set a number of the scanner's extra functions.
4.1.1 Representation

Figure 30: Advanced settings
| Item Function Options Description | |||
| A Selects the colours to be changed | • R+Y+B channel | Sets the spectrum for all the channels or for each individual channel. | |
| • R channel only | |||
| • Y channel only | |||
| • B channel only | |||
| B Gamma Sets the gamma value. | |||
| C Gamma Curve The course of the gamma value. | |||
Table 3: Functions for the advanced settings
When the Gamma value is changed, the changes will be visible in the bottom right-hand corner of the image. The top right-hand corner of the image is the original image.
4.1.2 Image processing
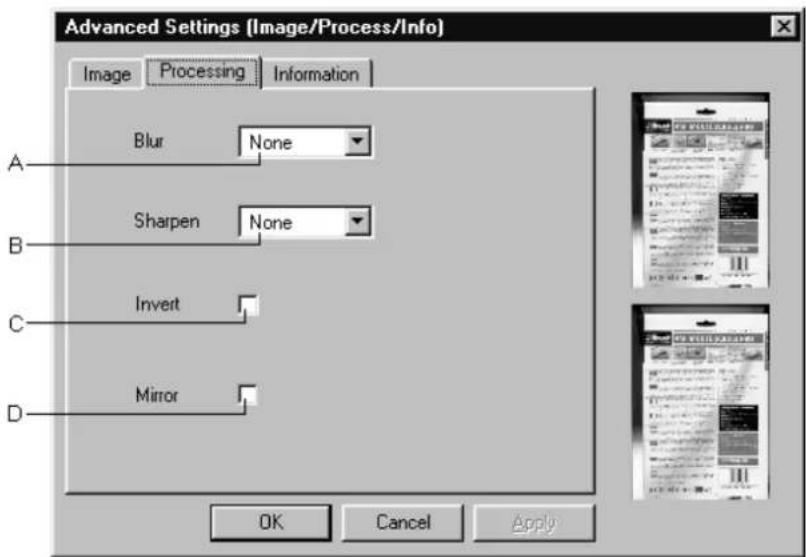
Figure 31: Image processing
| Item Function Options Description | |||
| A | B I | u• None | Shows less details in a sharp image. Use if the original image is fuzzy or has a moiré effect. |
| • Blur slightly | |||
| • Blur more | |||
| • Blur as much as possible | |||
| B Sharpen | • None | Show more details (contrast) in an unclear image. | |
| • Slightly sharpen | |||
| • Sharpen more | |||
| • Sharpen as much as possible | |||
| C Invert Converts colours into their negatives. | |||
| D Mirror Mirrors the image horizontally. | |||
Table 4: Functions for the advanced settings
When the settings are changed, the changes will be visible in the bottom right-hand corner of the image. The top right-hand corner of the image is the original image.
5. Working with the applications
The basic functions of the scanner and the additional software is described in the following chapters. Refer to the manual contained on the CD-ROM for more information concerning the programs.
5.1 One Touch Access
One Touch Access enables you to program the scanner's function buttons.
The One Touch Access software starts automatically when you start up Windows 98. An icon (Figure 32) appears in the bottom right corner of your taskbar.

Figure 32: Icon
- Click on the icon using the right mouse button (Hotkey). Figure 33 appears.

Figure 33: 'One Touch Access (Hotkey)' properties
- Click on 'About' to see information concerning the software version.
- Click on 'Disable' to turn off the function buttons and turn on power saving. Click on 'Enable' to turn on the function buttons.
- Click on 'Programmable Key' to see a summary of the function buttons.
Click on one of the scanner's function buttons to activate the One Touch Access program. Figure 34 appears.
The title bar shows which button has been pressed. Only the settings for this button can be changed.

Figure 34: One Touch Access
| Item Function Options | |
| A Color Mode | Colour (Color)GreyBlack and white (LineArt) |
| B Resolution Adjustable between 50 and 19200 | |
| C Paper size | A4LetterPhoto (4 x 6")Photo (3 x 5")Business card |
| D Auto Trim Removes/trims empty space around the image. | |
| E Preview Shows the scanned image area before the process continues. | |
| F Auto start ... Automatically starts the scanning process after 10 seconds. | |
| G Stop/Rescan Click this button to stop or restart the process. | |
| H Scan to ... Shows the function of where to send the scanned image. | |
Table 5: One Touch Access functions
5.1.1 Hotkey settings
In this window, you are able to change the function of the selected function key. Click on the 'Hotkey Settings' tab.

Figure 35: Hotkey settings
Click on one of the icons to select the function. When you hover with the mouse pointer over an application, the name of the application is displayed.
When you wish to enter a function yourself, click on the 'Add-In' button.
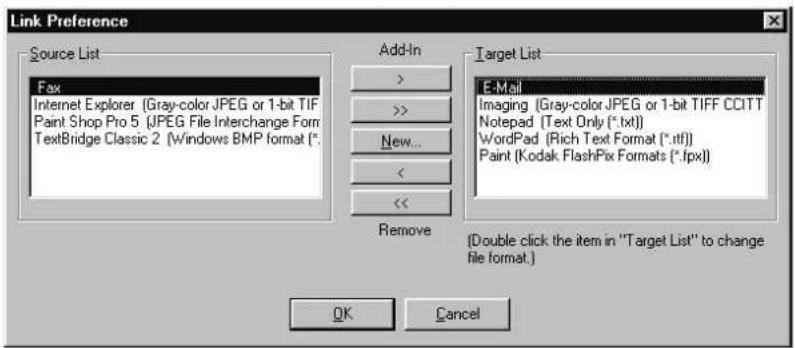
Figure 36: Adding a function
When you install a new function, this function is displayed in the source list.
Office Scan USB 19200
| Item Function |
| >Move the selected function from the source list to the target list. |
| >>Move all the functions in the source list to the target list. |
| <Move the selected function from the target list to the source list. |
| <<Move all the functions in the target list to the source list. |
| New Manually add a function. |
Table 6: Adding functions
5.1.2 Setting preferences
Click on the 'Preference' tab to determine the settings for the Printer, Fax, OCR and E-mail. Figure 37 appears.

Figure 37: Preferences
5.1.2.1 Mail
One Touch Access enables you to send a scanned image directly to friends or work colleagues via e-mail.
In this window, you can indicate the file format attached to the e-mail message.
If you have installed more than one e-mail program, select the program that you wish to use.
Note: Your e-mail program should be MAPI compatible to send scanned documents, e.g. Microsoft Outlook Express 4 or Netscape Messenger.
5.1.2.2 Fax
Using this option, you can set which appliance you wish to use for your fax. This may be a printer, but Microsoft Fax can also be used to send faxes.
Note: This function will not work if you have not installed a FAX driver or if your system is not connected to a modem.
5.1.2.3 Printer
Using this option, you can change the printer settings.
Check the 'Automatic Page Orientation' box to always print the image in the middle of the paper.
Click on 'Printer Setup' to change your printers settings.
5.1.2.4 OCR
If you wish to copy a scanned image to a word processor, such as Microsoft Word, Notepad, etc., the image will be converted into text. This can only take place if you scan using LineArt.
For optimal conversion of the text, the language chosen for OCR should be the same as the original.
Note: This OCR function does not use the TextBridge Classic properties.
5.2 TextBridge Classic
TextBridge Classic is a program for scanning text and converting it to a document format for editing in a word processor.
This chapter explains how the scanner should be set to a language and how to scan a document.
A detailed manual for TextBridge Classic is contained on the CD-ROM.
5.2.1 Single installation of the scanner
- Start TextBridge Classic.
- Click on 'File' (Figure 38).
- Click on 'Select Scanner...' (Figure 38). A new window is displayed.
- Select 'Office Scan USB 19200 scanner' (Figure 38).
- Click on 'OK' to select the scanner (Figure 38).
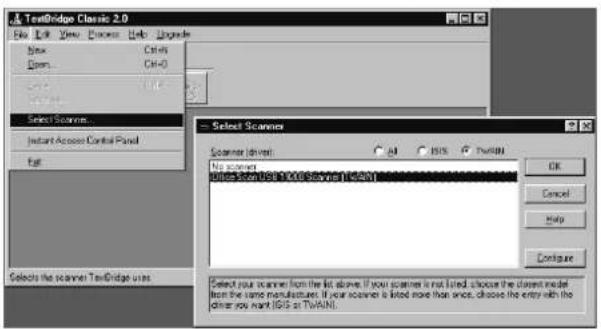
Figure 38: Selecting TWAIN
5.2.2 Installing the language
A language must now be selected for the document to be scanned.
-
Click on 'Process' in the menu bar.
-
Click on 'Settings'. Figure 39 is displayed.

Figure 39: TextBridge Classic settings
- Click on the 'Processing' tab (Figure 39).
- Select the language in the 'Process With' box by clicking on the arrow for the drop-down menu and selecting the language.
Note: All possible languages are given in the list. You can only select a language if you have installed this language. (See Chapter 3.1, number 8)
- Click on 'OK' (Figure 39).
You have now completed the TextBridge Classic settings.
5.2.3 Scanning with TextBridge Classic
Note: To show some non-English characters, e.g. Polish characters, 'Multi-language Support' should be selected in Windows. See Windows 'Help' feature for more information. You should also make sure your application is capable of showing non-English language characters.
- Position the document to be scanned on the scanner.
- Click on the button marked 'Auto Process' (Figure 40). Figure 41 appears.
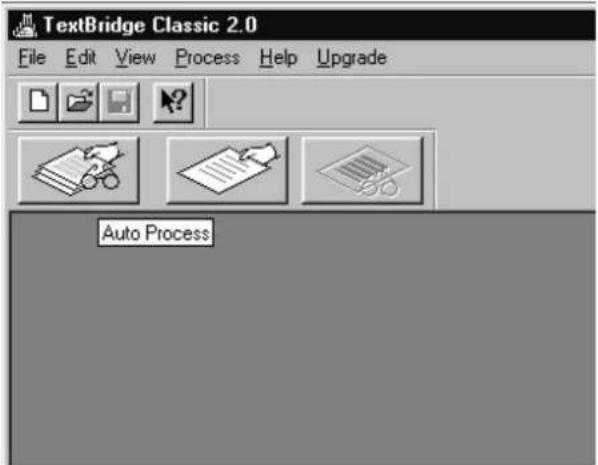
Figure 40: Starting the scanning process


Figure 41: Settings
- Select the document type (Figure 41).
- Select 'Scanner' as the Page Source (Figure 41).
- Click on 'OK'. The TWAIN dialog box (Figure 29) is opened.
- Click on 'Prescan' to make a test scan.
- Using the mouse, select the area you wish to scan.
- Set 'Scan Mode' to 'LineArt' (black & white).
- Set 'Paper Type' to 'Text'.
- Set the resolution to 300dpi.
- Click on 'Scan'.
- After completing the scan, TextBridge will start the OCR process of the scanned document and ask you if you wish to scan additional documents.
- Click on 'More Pages' or 'Other Side' to scan more pages. Click on 'No More' to stop scanning.
- A window will then be displayed which will ask you to save the scanned text.
-
Under 'File Name', type a name for the text produced.
-
Under 'Save as Type', select the format for the file. Select a file format that will be recognised by your word processor. If in doubt, select 'ASCII Std. (*.txt)'.
- Click on 'Save' to save the file. This completes the OCR process.
- Close TextBridge Classic.
In order to edit the scanned text you have just saved to disk, you need a word processing program. Start the program and point it to the name you just used to save the file in number 15.
5.2.4 More information
If you would like more information concerning TextBridge Classic, or you have problems with this program, you can consult the Help Function (F1) or the manual.
5.3 Adobe PhotoDeluxe
Adobe PhotoDeluxe is a drawing and image editing program with a large number of options. You can use this program to edit the scanned images.
5.3.1 Single installation of the scanner
- Start the 'Adobe PhotoDeluxe' program.
- Go to 'File - Open Special - Scan Photo...' (Figure 42).
- From the window, select 'Office Scan USB 19200 Scanner' (Figure 42).
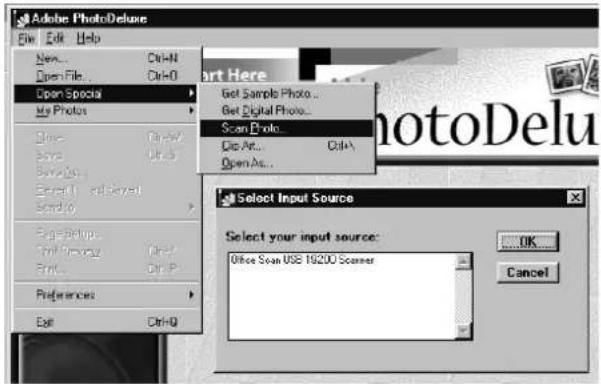
Figure 42: Selecting the scanner
- Click on 'OK'. The TWAIN dialog box will appear (Figure 29).
You have now adjusted the scanner settings ready for use. Go to number 5, Chapter 5.3.2, to scan a photograph.
5.3.2 Scanning with Adobe PhotoDeluxe
- Position the document to be scanned on the scanner.
- Click on 'Get Photo' (Figure 43).
- Click on the 'Get Photo' tab (Figure 43).

Figure 43: Scanning a photograph
- Using the mouse, click on the scanner icon. The Twain window will appear (Figure 29).
- Click on 'Prescan' to make a preview scan.
- Using the mouse, select the area you wish to scan.
- Set the scan mode to 'Color'.
- Set the desired resolution (600 dpi recommended).
- Click on 'Scan'. When the scan process has finished, the image data is transferred to Adobe PhotoDeluxe.
- When the scanner has finished scanning, click on 'Close' to return to Adobe PhotoDeluxe. You can now start editing the image.
This is only a short introduction to the program. Please refer to the program's Help function (F1) for more information. The CD-ROM contains a detailed manual.
6. Power Saving
The light in the scanner will be automatically switched off when the scanner has not been used for approximately 15 minutes. This function only works when the 'One Touch Access' function has been switched off. See Chapter 5.1.
Switching on the Power Saving function
- Using the right mouse button, click on the icon in the taskbar.
- Select 'Disable'
Switching off the Power Saving function
- Using the right mouse button, click on the icon in the taskbar.
- Select 'Enable'.
The scanner also switches to power saving if the USB cable is not connected to an active USB port.
7. Maintenance
Clean the glass plate regularly with a soft, clean cloth to remove dust and dirt. A clean glass plate is important since any dirt will show up in the scanned image.
When cleaning the equipment, observe the following safety measures:
- Disconnect the power plug from the mains supply before cleaning the equipment.
- Do not use aggressive cleaning liquids, liquid cleaners or aerosols to clean the scanner or the glass plate.
8. Troubleshooting
8.1 Testing the scanner
During the installation of the TWAIN driver and the applications, a test program was also installed. The test program provides a simple means of checking the correct operation of the basic features of the scanner.
Start the test program. Figure 44 appears on the screen.

Figure 44: Test program
You can perform a simple test on the scanner using this test program. If one or more of the program's functions do not work, check the points below to solve the problem.
8.2 Troubleshooting
| Problem Possible cause Solution | ||
| The computer does not recognise the scanner. | The scanner may not be connected to the computer correctly. | Check whether the scanner is correctly connected to the USB port (Chapter 2.1). |
| The error message 'Scanner Failure' is displayed. | The scanner driver has not been installed correctly. | Reinstall the TWAIN driver. |
| The interface cable has not been connected properly. | Connect the interface cable correctly (Chapter 2.1). Next, restart the computer and scanner. | |
| The power supply adapter has not been connected properly. | Connect the power supply adapter correctly (Chapter 2.1). Next, restart the computer and the scanner. | |
| The scan command is not carried out. | The scanner is not connected to the computer properly. | Check whether the scanner is connected properly (Chapter 2.1). |
| Scan is too dark. | Monitor is set too dark. | Adjust the monitor's brightness. |
| The number of colours for your display adapter is set too low. | Adjust your display adapter to a minimum of 65,535 colours (16 bit). | |
| Brightness is not set correctly. | Adjust the brightness in the TWAIN window (Chapter 4). | |
| Problem Possible cause | Use Solution | |
| Low scan quality. | Resolution is set too low. | Set your resolution to 600 dpi. |
| The number of colours for your display adapter is set too low. | Adjust your monitor adapter to a minimum of 65,535 colours (16 bit). | |
| Glass plate is dirty. Dirt on the glass plate shows up in the scanned image. | Thoroughly clean the scanner glass (Chapter 7). | |
| Brightness is not set correctly. | Adjust the brightness in the TWAIN window (Chapter 4). | |
| Contrast is not set correctly. | Adjust the contrast in the TWAIN window (Chapter 4). | |
| Scanner operates very slowly. | A too high resolution setting. | For normal purposes, a maximum resolution of 600 dpi should be enough. Use higher resolutions for small originals only. |
| Insufficient memory. You need a minimum of 16MB RAM. Recommended value is 64MB. | ||
| Error message during scanning. | Hard disk is full. You need 3 times the space required by the scanned image as free space on your hard drive. Make some free space on your hard drive or use a lower resolution. | |
| Resolution is too low. For normal purposes, a maximum resolution of 600 dpi should be enough. Use higher resolutions for small originals only. | ||
| Problem Possible cause Solution | ||
| The buttons do not work. | The 'Office Scan USB 19200' window is still open after installation. | Close the window. |
| The Hotkey function is turned off in the taskbar (Disable) | Switch on the Hotkey function (Enable). | |
| The interface cable is not connected properly. | Connect the interface cable correctly (Chapter 2.1). Next, restart the computer and the scanner. | |
| The power supply adapter is not connected properly. | Connect the power supply adapter correctly (Chapter 2.1). Next, restart the computer and the scanner. | |
| The scanner light does not switch off (Power Saving) | The Hotkey function is not switched off. | Switch off the Hotkey function (Chapter 6). |
Table 7: Troubleshooting
Visit our Internet site (www.trust.com) to check the FAQs and the latest version of the driver software.
If you still have problems with your scanner after trying these solutions, please contact your dealer.
Please have the following information ready:
-
Operating system
-
Hardware configuration CPU (MHz)
Memory (MB)
Free hard disk space (MB)
Display adapter: resolution and number of colours
- Scanner settings
Scan mode (colour, greyscale, black &white) Resolution (DPI)
Destination (application, printer, etc.) Size:
-
Version of the TWAIN program (see readme.txt on the CD-ROM)
-
Name and version of the application software
9. Specifications
| Type Flatbed, CCD scanner | |
| Optical resolution 600 x 1.200 DPI | |
| Maximum resolution (H x V) | 19.200 x 19.200 DPI |
| Scan method Single pass | |
| Scan modes | • 1-bit black and white• 12-bit greyscale• 36-bit colour |
| Document size | • 216 x 297 mm (A4)• 8.5 x 11.7 inch (Letter) |
| Interface USB | |
| Power supply adapter 12 Volt, 1.25A, max.: 15VA | |
| Dimensions (B x H x D) 288 x 88 x 468 | |
| Weight (excl. packaging) 1.9 Kg | |
Table 8: Specifications
10. Trust Service Centres
If you have any questions after reading this manual, please contact one of the Trust Service Centres.
Keep the following in mind, however:
- If you have any questions regarding the use of a product or if you are looking for the latest drivers, you can find this information at the Trust web site (www.trust.com). The majority of the FAQ's (Frequently Asked Questions) are listed here. You can also download the latest drivers directly from the site.
- If you are unable to find the information you need at the Trust web site or if you are unable to access the site, please contact your nearest Trust Service Centre.
- Keep in mind that the waiting time may be longer if you call between 12:00 AM and 2:00 PM.
- DO NOT return any products to the Trust Support Centre addresses below. You may return the products via your Trust dealer.
| Country: Contact: | |
| UKIreland | UK OfficeInternet www.trust.comE-mail trustuk@globalnet.co.ukMail Aashima Distribution U.K. Ltd.Trust SupportPO Box 5277WithamCM8 3XUUnited KingdomFax +44-(0)1376-514633Phone +44-(0)1376-500000 (from 9:30 AM until 5:00 PM) |
| Italy | Italian OfficeInternet www.trust.comE-mail trusttdp@tin.itMail Aashima Italia s.r.l.Trust SupportVia dei Pignattari, 174Blocco 37 40050 CentergrossFuno di Argelato (BO)ItaliaFax 051-6635843Phone 051-6635947 (from 9:00 AM until 5:00 PM) |
| FranceNorth Africa | French OfficeInternet www.trust.comE-mail support.trust@aashima.frMail Aashima France sarlTrust SupportBP 5000295945 Roissy C.D.G.FranceFax +33-(0)1-48174918Phone +33-(0)1-48174931 (from 9:00 AM until 5:00 PM) |
| All otherCountries | European Head OfficeInternet www.trust.comE-mail support@aashima.nlMail Aashima Technology B.V.Trust SupportP.O. Box 80433301 CA DordrechtThe NetherlandsFax +31-(0)78-6543299Phone +31-(0)78-6549999 (from 9:00 AM until 5:00 PM)For Germany only:Fax +49-(0)2821-58873Phone 0800-00TRUST (from 9:00 AM until 5:00 PM)(=0800-0087878) |

- Registration
- Copyright Statement
- Disclaimer Statement
- Contents
- Introduction......3
- Installing the scanner ....6
- Software installation....15
- Explanation of TWAIN....25
- Working with the applications.... 31
- Power Saving ....44
- Introduction
- Conventions used in the manual
- Contents of the package
- Minimum system requirements
- Safety
- Adapters
- Installing the scanner
- Unlocking the transport lock
- Connecting the scanner to your computer
- Installing the driver
- Starting the Trust Software Installer
- Installing TWAIN
- Software installation
- TextBridge Classic 2.0
- Adobe Acrobat Reader
- Installing Adobe PhotoDeluxe 2.0
- Explanation of TWAIN
- Advanced settings
- Representation
- Image processing
- Working with the applications
- One Touch Access
- Table 5: One Touch Access functions
- Hotkey settings
- Setting preferences
- Fax
- Printer
- OCR
- TextBridge Classic
- Single installation of the scanner
- Installing the language
- Scanning with TextBridge Classic
- More information
- Adobe PhotoDeluxe
- Single installation of the scanner
- Scanning with Adobe PhotoDeluxe
- Power Saving
- Switching on the Power Saving function
- Switching off the Power Saving function
- Maintenance
- Troubleshooting
- Testing the scanner
- Troubleshooting
- Specifications
- Trust Service Centres
Brand : TRUST
Model : 11316
Category : Scanner