VigorPhone 350 - Phone Draytek - Free user manual and instructions
Find the device manual for free VigorPhone 350 Draytek in PDF.


| Product Type | VoIP Phone |
| Brand | DrayTek |
| Model | VigorPhone 350 |
| Display | 2.8-inch color LCD with backlight |
| Keypad | Numeric keypad with 12 keys, 4 context-sensitive keys, navigation keys |
| Network Interfaces | 1x 10/100/1000 Base-T Ethernet (RJ-45) |
| Power Supply | PoE (802.3af) or 5V DC adapter (included) |
| Dimensions (W x D x H) | 215mm x 185mm x 85mm |
| Weight | Approx. 850g |
| Audio Codecs | G.711, G.722, G.729, iLBC |
| Protocols | SIP (RFC 3261), SDP, RTP, RTCP, STUN, NAT traversal |
| Key Features | HD audio, 4 SIP accounts, call hold/transfer/conference, phonebook up to 500 contacts, call log |
| Speakerphone | Full-duplex handsfree speakerphone |
| Headset Jack | RJ-9 headset port (2.5mm) |
| Mounting | Desktop stand with two angles, wall-mountable |
| Security | TLS, SRTP, HTTPS, 802.1X support |
| Management | Web interface, auto-provisioning via TR-069 |
| Operating Temperature | 0°C to 40°C |
| Humidity | 10% to 90% non-condensing |
| Compliance | CE, FCC, RoHS |
| Warranty | 2 years limited warranty |
| Package Contents | Phone, handset, handset cord, base, power adapter (if non-PoE), Ethernet cable, quick start guide |
Frequently Asked Questions - VigorPhone 350 Draytek
User questions about VigorPhone 350 Draytek
0 question about this device. Answer the ones you know or ask your own.
Ask a new question about this device
Download the instructions for your Phone in PDF format for free! Find your manual VigorPhone 350 - Draytek and take your electronic device back in hand. On this page are published all the documents necessary for the use of your device. VigorPhone 350 by Draytek.
USER MANUAL VigorPhone 350 Draytek
Your reliable networking solutions partner
User's Guide
V1.2
VigorPhone 350 User's Guide
Version: 1.1
Date: 21/06/2011
Copyright Information
Copyright Declarations
Copyright 2011 All rights reserved. This publication contains information that is protected by copyright. No part may be reproduced, transmitted, transcribed, stored in a retrieval system, or translated into any language without written permission from the copyright holders.
Trademarks
The following trademarks are used in this document:
● Microsoft is a registered trademark of Microsoft Corp.
- Windows, Windows 95, 98, Me, NT, 2000, XP, Vista and Explorer are trademarks of Microsoft Corp.
● Apple and Mac OS are registered trademarks of Apple Inc.
- Other products may be trademarks or registered trademarks of their respective manufacturers.
Safety Instructions and Approval
Safety Instructions
- Read the installation guide thoroughly before you set up the device.
- The router is a complicated electronic unit that may be repaired only be authorized and qualified personnel. Do not try to open or repair the router yourself.
- Do not place the device in a damp or humid place, e.g. a bathroom.
- The device should be used in a sheltered area, within a temperature range of +5 to +40 Celsius.
- Do not expose the device to direct sunlight or other heat sources. The housing and electronic components may be damaged by direct sunlight or heat sources.
- Do not deploy the cable for LAN connection outdoor to prevent electronic shock hazards.
- Keep the package out of reach of children.
- When you want to dispose of the device, please follow local regulations on conservation of the environment.
Warranty
We warrant to the original end user (purchaser) that the device will be free from any defects in workmanship or materials for a period of two (1) years from the date of purchase from the dealer. Please keep your purchase receipt in a safe place as it serves as proof of date of purchase. During the warranty period, and upon proof of purchase, should the product have indications of failure due to faulty workmanship and/or materials, we will, at our discretion, repair or replace the defective products or components, without charge for either parts or labor, to whatever extent we deem necessary tore-store the product to proper operating condition. Any replacement will consist of a new or re-manufactured functionally equivalent product of equal value, and will be offered solely at our discretion. This warranty will not apply if the product is modified, misused, tampered with, damaged by an act of God, or subjected to abnormal working conditions. The warranty does not cover the bundled or licensed software of other vendors. Defects which do not significantly affect the usability of the product will not be covered by the warranty. We reserve the right to revise the manual and online documentation and to make changes from time to time in the contents hereof without obligation to notify any person of such revision or changes.
Be a Registered Owner
Web registration is preferred. You can register your device via http://www.draytek.com.
Firmware & Tools Updates
Due to the continuous evolution of DrayTek technology, all devices will be regularly upgraded. Please consult the DrayTek web site for more information on newest firmware, tools and documents.
http://www.draytek.com
Regulatory Information
Federal Communication Commission Interference Statement
This equipment has been tested and found to comply with the limits for a Class B digital device, pursuant to Part 15 of the FCC Rules. These limits are designed to provide reasonable protection against harmful interference in a residential installation. This equipment generates, uses and can radiate radio frequency energy and, if not installed and used in accordance with the instructions, may cause harmful interference to radio communications. However, there is no guarantee that interference will not occur in a particular installation. If this equipment does cause harmful interference to radio or television reception, which can be determined by turning the equipment off and on, the use is encouraged to try to correct the interference by one of the following measures:
● Reorient or relocate the receiving antenna.
- Increase the separation between the equipment and receiver.
- Connect the equipment into an outlet on a circuit different form that to which the receiver is connected.
- Consult the dealer or an experienced radio/TV technician for help.
This device complies with Part 15 of the FCC Rules. Operation is subject to the following two conditions:
(1) This device may not cause harmful interference, and
(2) This device may accept any interference received, including interference that may cause undesired operation.
Please visit http://www.draytek.com/user/AboutRegulatory.php.

CE
FC
CE Notice (European Union)
The symbol indicates compliance of this equipment to the EMC Directive and the Low Voltage Directive of the European Union. These markings indicate that this system meets the following technical standards:
- EN 55022 — “Limits and Methods of Measurement of Radio Interference Characteristics of Information Technology Equipment.”
- EN 55024 — “Information technology equipment - Immunity characteristics - Limits and methods of measurement.”
- EN 61000-3-2 — “Electromagnetic compatibility (EMC) - Part 3: Limits - Section 2: Limits for harmonic current emissions (Equipment input current up to and including 16 A per phase).”
- EN 61000-3-3 — “Electromagnetic compatibility (EMC) -Part 3: Limits - Section 3: Limitation of voltage fluctuations and flicker in low-voltage supply systems for equipment with rated current up to and including 16 A.”
- EN 60950 — “Safety of Information Technology Equipment.”
Table of Contents
Chapter 1 Overview ......9
1.1 Package Contents....9
1.2 Product Description ....10
1.2.1 Front View.... 10
1.2.2 Back View 12
1.3 Setting Up the Phone ....13
Chapter 2 Display Screen Configuration....15
2.1 Call History ....16
2.1.1 Missed Calls.... 16
2.1.2 Answered Calls.... 16
2.1.3 Dialed Calls.... 16
2.2 Phone Book....17
2.2.1 Creating a New Entry.... 17
2.2.2 Modifying or Deleting a Contact.... 17
2.3 Phone Settings ....17
2.3.1 Always Forward 18
2.3.2 Busy Forward....18
2.3.3 No Answer Forward 18
2.3.4 Speed Dial / BLF (Busy Lamp Field)....18
2.3.5 Ring Tone 19
2.3.6 Music On Hold 19
2.3.7 Auto Answer....19
2.4 Alarm Clock....20
2.4.1 Alarm Time....20
2.4.2 Repeat 20
2.5 Calendar 20
2.5.1 Viewing the Schedule List.... 20
2.5.2 Setting up Schedules 20
2.6 System Settings....21
2.6.1 Date/ Time 21
2.6.2 LCD Contrast 21
2.6.3 LCD Back Light Timeout 21
2.6.4 Firmware Version....21
2.6.5 Serial Number 22
2.6.6 Factory Default....22
2.6.7 Reboot 22
2.7 General SIP Settings....23
2.7.1 Codec Priority 23
2.7.2 SIP Listen Port 23
2.7.3 RTP Port Base 23
2.7.4 RFC2833 Payload Type.... 23
2.7.5 G.711 Frame Size 24
2.7.6 G.723 Frame Size 24
2.7.7 G.729 Frame Size 24
2.7.8 G.722 Frame Size 24
2.7.9 Signaling Precedence 24
2.7.10 Voice Precedence....24
2.8 SIP Accounts....24
2.9 Network 26
2.9.1 LAN Port Settings 26
2.9.2 PC Port Settings 26
2.9.3 VLAN Settings.... 26
2.9.4 NAT / Bridge 27
2.9.5 NTP Server 27
2.9.6 LAN Port MAC Address 28
2.9.7 PC Port MAC Address 28
Chapter 3 Web Configuration ......29
3.1 Call History ....30
3.2 Phone Book....31
3.3 Phone Settings .... 32
3.3.1 Call Forward.... 32
3.3.2 Speed Dial 32
3.3.3 Ring Tone 34
3.3.4 Digit Map.... 35
3.3.5 Voice Settings.... 37
3.4 Alarm Clock....39
3.5 Calendar 39
3.6 System Settings....41
3.6.1 Firmware Upgrade 41
3.6.2 Backup & Recover Setting 42
3.6.3 Administrator Password 43
3.6.4 Factory Default....43
3.6.5 Reboot 43
3.7 General SIP Settings....44
3.7.1 Port Setting 44
3.7.2 Codec Setting 44
3.7.3 Other Settings 45
3.8 SIP Accounts 46
3.9 Network 48
3.9.1 Status 49
3.9.2 LAN Port Settings 49
3.9.3 PC Port Settings 51
3.9.4 NTP & Time Settings 52
3.9.5 IP Mapping....53
3.9.6 Routing Table....54
Chapter 4 Operation ....55
4.1 Answering a Call....55
4.2 Making a Call....55
4.2.1 Dialing with the Keypad 55
4.2.2 Looking up a Number from the Phone Book 55
4.2.3 Making a Call to an IP Address....55
4.2.4 Making a Call to SIP Server....55
4.2.5 Speed/BLF (Busy Lamp Field) 55
4.2.6 Dialing to Multiple SIP Accounts 56
4.2.7 Redialing a Number 56
4.3 Call Options....56
4.3.1 Using the Speaker Phone 56
4.3.2 Putting a Call on Hold 56
4.3.3 Conducting a Three-Way Conference Call....57
4.3.4 Transferring a Call 57
4.3.5 Using the Intercom Function 57
4.3.6 Blocking All Calls Using the DND Function....57
4.3.7 Checking Voice Messages....57
4.4 Set up VigorPhone 350 with VigorIPPBX2820....58
Appendix A Upgrade VigorPhone 350....63
Chapter 1 Overview
VigorPhone enables you to make phone calls through the IP network instead of calling through a tradition local PSTN line.
It is workable with VigorIPPBX series for auto provision capability. To manage various calling purposes, VigorPhone supports multi-sip registration with different accounts (up to 10) and support G.722 codec for promoting voice quality. The simple WEB UI based configuration allows you to operate VigorIPPBX with ease.
Read this user manual carefully to learn how to operate this product and take advantage of its features.
1.1 Package Contents
When unpacking the VoIP phone, ensure all the following items are present and undamaged. If anything appears to be missing or broken, contact your dealer for a replacement.
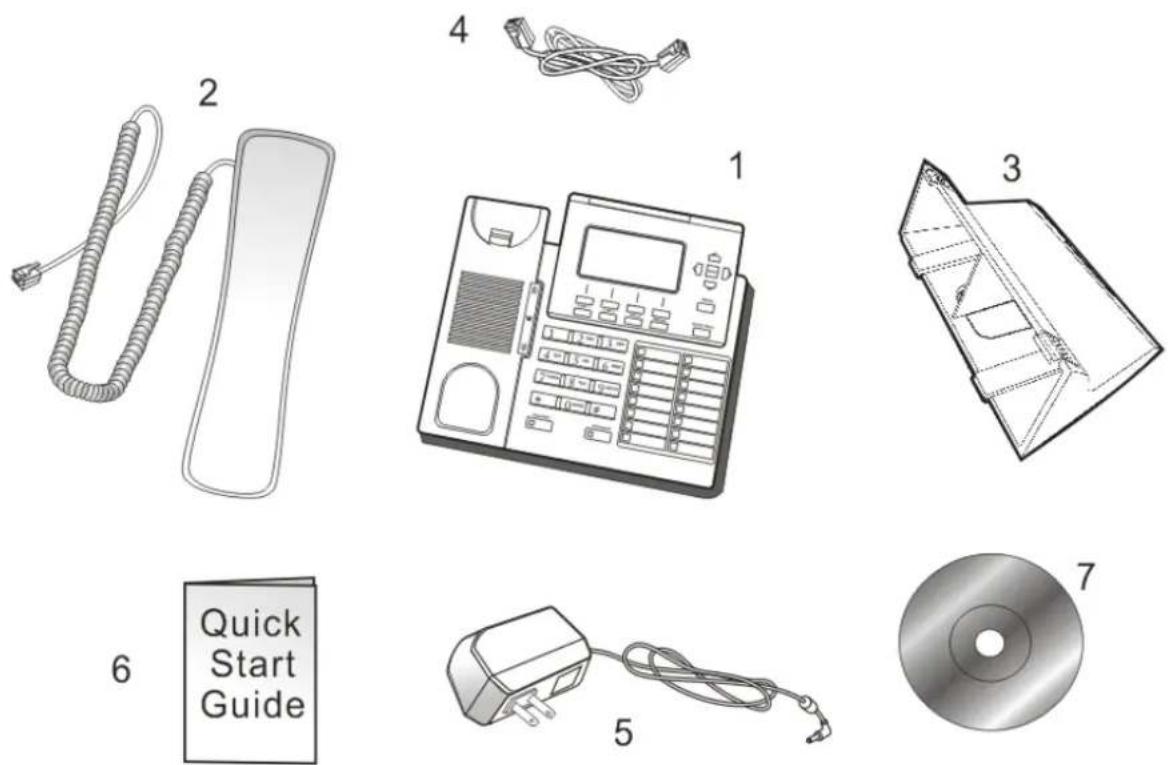
- IP Phone (main body) 1 pc
- Handset 1 pc
- Phone Stand /Bracket 1 pc
- Network Cable 1 pc
- AC Adapter 1 pc
- Quick Start Guide 1 pc
- CD (Documentation) 1 pc
1.2 Product Description
This VoIP Phone features based on SIP (RFC 3261). Please familiarize yourself with the functions of the VoIP phone.
1.2.1 Front View
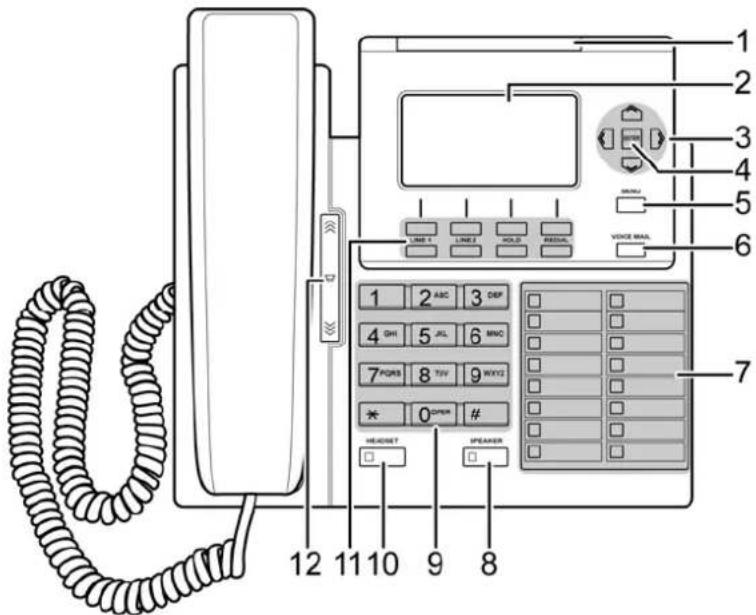
| Item | Name | Description |
| 1 | Incoming indicator | call A red light indicates an incoming call. |
| 2 | Display screen | Displays calls and status information. |
| 3 | 4-way keys | Navigation Press to scroll through lists and menus on the display. |
| 4 | ENTER key | Press to enter a menu. |
| 5 | MENU | Press to enter the menu options or exit to standby mode. |
| 6 | VOICE MAIL | Press to listen to voice mail messages.Steady red lights on means there is a new voice message. |
| 7 | Memory keys with LED indicators (Speed dial \BLF) | Press any of the keys to speed dial the preset contact number.By enable BLF (Busy Lamp Field) to a specify SIP server, each key enables indication of line status from a SIP server.There are three status that BLF lights on:Steady green lights when the line is not in use and registered to SIP server.Steady red lights when the line is busy.Blink red lights when the line is ringing |
| 8 | SPEAKER | Activates the speakerphone to allow hands free conversations. |
| 9 | Alphanumeric keys | Press these keys to enter phone numbers and texts. |
| 10 | Headset | Press to activate a call using external headset. |
11
Soft Keys
| Icom(Intercom) | Press the button and the extension number you want to dial. The call will be automatically established with the other end. |
| Missed Press to view missed calls information. | |
| DND(Do Not Disturb) | Press to block all incoming calls. |
| P.book (Phone Book) | Press to access the personal phonebook directory. |
| Trans.(Transfer) | Press to transfer a call. |
| Conf.(Conference) | Press to initiate a conference call. |
| Schdl.(Schedule) | Press to create, view, edit, or delete schedule. |
| Select Press to apply setting. | |
| Edit To edit the selected item. | |
| Back To go back to the previous level. | |
| Save Save the related information. | |
| Apply To save and apply changes. | |
| Info.(Information) | Press to view settings of the selected option. |
| Function Keys | |
| LINE 1 / LINE 2 | There are two LINEs buttons in this IP Phone. Each line represented a SIP call for the following status:- The line is not used the line stays no lights.- Dialing a call, the selected line key lights on steady green If a call has sent Green lights off and turns on steady red light.* When an existing call has been put on hold, the represented Line lights blanking green. |
| HOLD Press to put an active call on hold. | |
| REDIAL Press to call from call history dialed Calls. | |
| Volume control keys | Press to increase or decrease the volume of the ringer tone or talking volume in handset, handset, or speakerphone. |
1.2.2 Back View
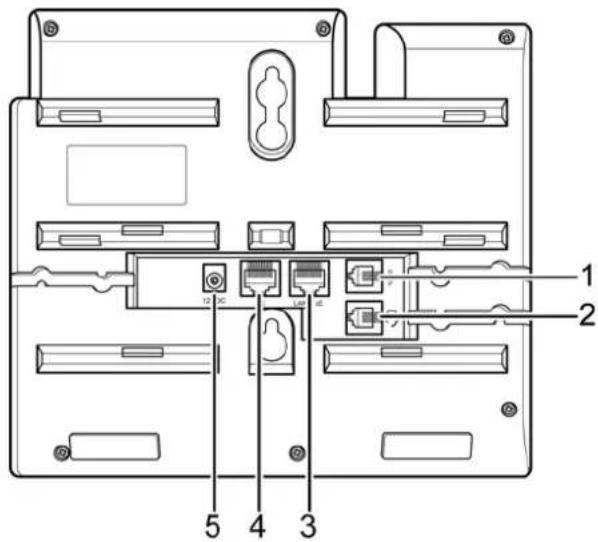
| Item | Name | Description |
| 1 | Handset Jack | Connects to the phone. RJ-9 |
| 2 | Headset Jack | Connects to an external headset.RJ-9 |
| 3 | LAN/ PoE Port | Connects to LAN cable. 10/100Mbps RJ-45 port for LAN (uplink) connection. If you are using Power over Ethernet (PoE), the power to the phone is supplied when you connect the Ethernet cable. Draws power from either spare line or signal line. |
| 4 | PC Port | Connects to PC. 10/100Mbps RJ-45 port for PC (downlink) connection. |
| 5 | Power Jack | Connects to AC power adapter. 12V DC power port. |
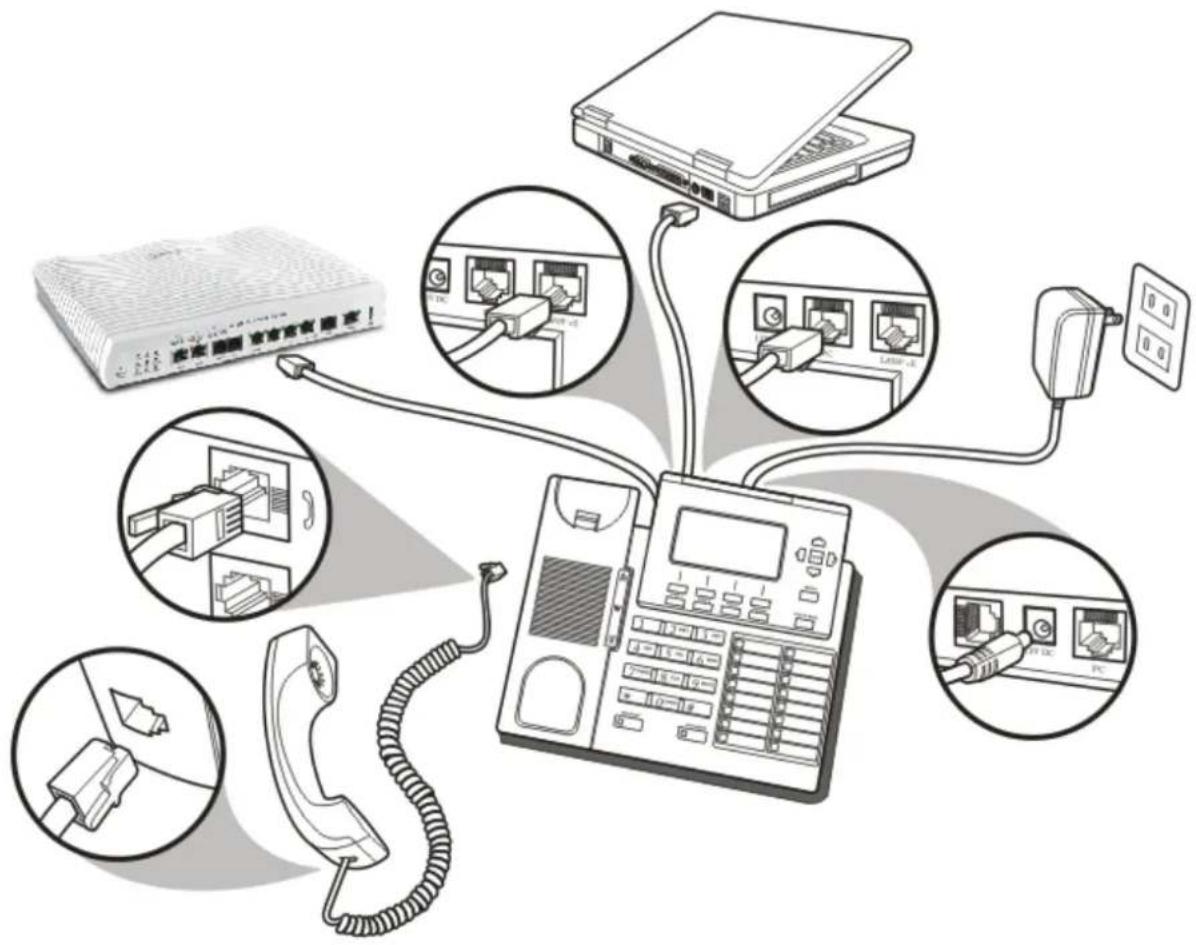
1.3 Setting Up the Phone
The following illustration shows how to connect the VoIP phone to power, LAN, WAN, and the handset or a headset.
This page is left blank.
Chapter 2 Display Screen Configuration
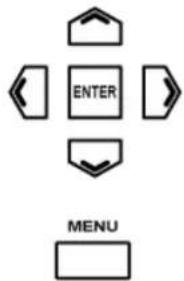
The menu directory enables you to setup the product configuration from Phone Settings, VoIP settings, and Network settings. Follow these steps to access the menu and the menu items.
flowchart
graph TD
    A["ENTER"] --> B["Arrow Left"]
    A --> C["Arrow Right"]
    A --> D["Arrow Down"]
    A --> E["Arrow Up"]
    F["MENU"] --> G["Arrow Bottom"]
- Press the Menu key to access the menu.
- Scroll through the main menu options using the 4-way navigation keys and press the Enter key to view the submenu.
- Repeat the previous step to browse through the menu items, submenus, and options.
- Press the Back soft key to cancel your selection and go back to the previous level of the menu.
- To choose a menu setting, press the Enter key.
flowchart
graph TD
    A["MENU"] --> B["Call History"]
    A --> C["Phone Book"]
    A --> D["Phone Settings"]
    A --> E["Alarm Clock"]
    A --> F["Calendar"]
    A --> G["System Settings"]
    A --> H["General SIP Settings"]
    A --> I["SIP Accounts"]
    A --> J["Network"]
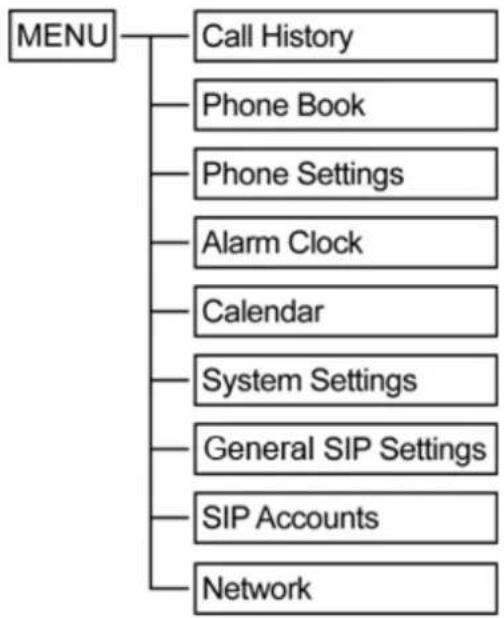
Entering to the areas Phone Settings, General SIP Settings, SIP Accounts and Network submenus.
NOTE: Default login-in timeout 2:00.
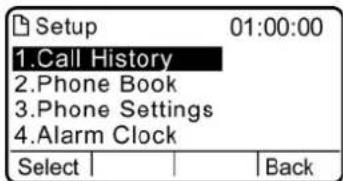
When you access the menu, the display screen shows the menu options and the soft key. There are four soft key located under the display screen. Soft key items vary depending on the menu options.
For example, the illustration below shows the main menu options and two available soft key, Select and Back.
2.1 Call History
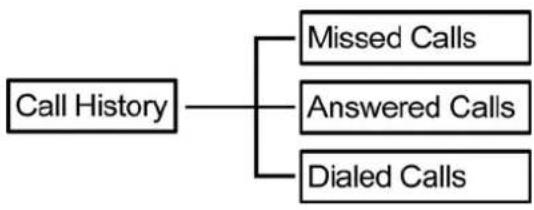
The VoIP phone stores information about all calls made or received.
flowchart
graph TD
    A["Call History"] --> B["Missed Calls"]
    A --> C["Answered Calls"]
    A --> D["Dialed Calls"]
NOTE: The lists are stored from the newest to oldest entries. The oldest entries are deleted as new entries are added. The maximum entry for each item is 200 records.
2.1.1 Missed Calls
The Missed Calls list consists of the calls that are not answered. You can choose to dial, save, or delete or see details of a single missed call from the missed call logs. For quick access to missed calls, simply press the Missed soft key from the main menu. Select a call from the list by pressing the up/down navigation keys and choose a soft key option.
Use the soft keys to do the following functions:
● Dial: Dial the number of the selected call.
- Save: Save the related information about the call.
● Detail: Press to view a call details or enter to submenu Delete to erase a record.
● Back: Press to go back to the previous level: Call History submenu.
2.1.2 Answered Calls
The Answered Calls list consists of the most recent numbers answered. You can choose to dial, save, or delete or see details of a single entry from the answered call logs. Select a call from the list by pressing the navigation up/ down keys and choose a soft key option.
Use the soft keys to do the following functions:
● Dial: Dial the number of the selected call.
- Save: Save the related information about the call.
● Detail: Press to view a call details or enter to submenu Delete to erase a record.
● Back: Press to go back to the previous level: Call History submenu.
2.1.3 Dialed Calls
The Dialed Calls list consists of the most recent numbers dialed. You can choose to save, dial or view a single entry from the dialed call logs. Select a call from the dialed history by pressing the up/down navigation keys and choose a soft key option.
Use the soft keys to do the following functions:
● Dial: Dial the number of the selected call.
- Save: Save the related information about the call.
● Detail: Press to view a call details or enter to submenu Delete to erase a record.
● Back: Press to go back to the previous level: Call History submenu.
2.2 Phone Book
The phone book feature enables you to view and create entries for your contacts and edit their contact information.
NOTE: The lists are stored from the newest to oldest entries. The oldest entries are deleted as new entries are added. The maximum entry for each item is 200 records.
2.2.1 Creating a New Entry
To create a new entry, follow the steps below:
- Press New.
- Type the name of the new contact.
- Input the number of the new contact.
- Press navigation down key to input Domain address or press Edit to choose Domain of the contact's IP address.
- Press the Save soft key to save the new contact's information.
NOTE: There are three options in "Domain" field: a. Empty: VoIP Phone will deliver dial the number into the current selected SIP profile. b. User Define: Entering SIP domain manually. c. Select an existing SIP profile.
2.2.2 Modifying or Deleting a Contact
To modify contact information, follow the steps below:
- Select the contact to modify or delete.
- Press Detail then select Edit to modify or select Delete to erase the current record.
Use the soft keys to do the following functions:
● Dial: Dial the number of the selected contact.
- New: Create a new contact and save the contact information: name, number and domain name.
● Detail: Press to view contact information or enter to submenu Edit/Delete to modify/erase a record.
● Back: Press to go back to the previous level: Main Menu.
2.3 Phone Settings
Phone Settings allows you to set up phone features such as call forwarding, speed dialing, and more.
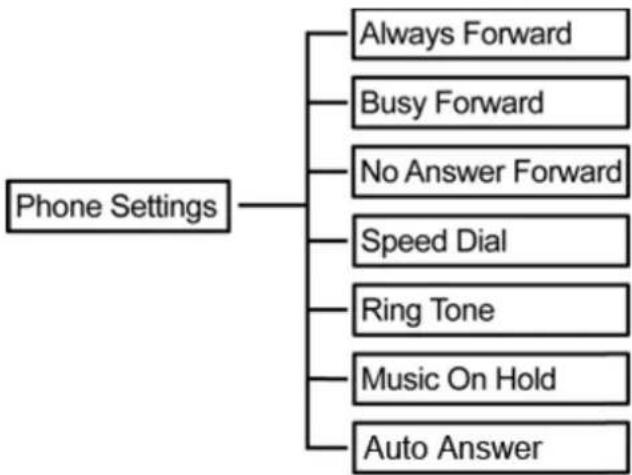
flowchart
graph TD
    A["Phone Settings"] --> B["Always Forward"]
    A --> C["Busy Forward"]
    A --> D["No Answer Forward"]
    A --> E["Speed Dial"]
    A --> F["Ring Tone"]
    A --> G["Music On Hold"]
    A --> H["Auto Answer"]
2.3.1 Always Forward
Always Forward allows you to set the account number to which all incoming calls are to be forwarded. This function requires you to input the following:
● Number: The phone number to forward all incoming calls.
- Account: This refers to the SIP account number.
Use the soft key to delete, clear, and save entries or to go back the previous menu.
Once you have completed "Number" and "Account" settings, using "Edit" to enable "Always Forward".
2.3.2 Busy Forward
Busy Forward allows you to set the account number to which incoming calls are to be forwarded when the line is busy. This function requires you to input the following:
● Number: The phone number to forward incoming calls.
● Account: This refers to the SIP account number.
Use the soft key to delete, clear, and save entries or to go back the previous menu.
Once you have completed "Number" and "Account" settings, using "Edit" to enable "Busy Forward".
2.3.3 No Answer Forward
No Answer Forward allows you to forward the phone number and a specific SIP account when no answered for a period of time. This function requires you to input the following:
● Number: The phone number to forward incoming calls.
● Account: This refers to the SIP account number.
- Timeout: This refers to a period of time (10 sec \~ 50 sec) without answering the call.
Use the soft key to delete, clear, edit and save entries or to go back the previous menu.
Once you have completed "Number", "Account", and "Timeout" settings, using "Edit" to enable "No Answer Forward".
2.3.4 Speed Dial / BLF (Busy Lamp Field)
Speed Dial: Allows you to enter an index code, press a button to place a call (rather than dialing the number manually).
BLF: Allows you to monitor the line status (in-use/idle/busy) of a phone line associated with a speed-dial button.
You can assign 16 speed dial or BLF up-to hotkeys to this VoIP phone. Select one of the memory keys you want to assign speed dial number, Press Select soft key. To assign speed dial, you are required to input the following:
● Number: The phone number to assign speed dial.
● Account: This refers to the SIP profile created in this VoIP Phone.
- Speed Dial/BLF: Select “Speed Dial” or “BLF” mode.
Once you have completed “Number” and “Account” settings, using “Edit” to select “Speed Dial” or “BLF”.
Use the soft key to do the following functions:
- Delete: Press to delete a character value.
● Clear: Press to clear the entire value. - Save: Press to save speed dial settings.
● Back: Press to go back to the previous level: Speed Dial submenu. - Edit: Press to modify the selected setting.
2.3.5 Ring Tone
The VoIP phone provides 3 ring tone types. You can select the ring tone type according to your preference. You can also upload the ring tones you like from the web.
To set the ring tone type, do the following:
- Use the up and down navigation keys to select the ring tone you prefer, and then press the Select soft key to confirm your selection.
- Press the Save soft key to save your settings.
To adjust the ring tone's volume, simply press the upper/bottom end of the volume control key to increase/decrease the ring tone volume.
2.3.6 Music On Hold
The Music on Hold function enables the VoIP phone to play music when a caller is placed on hold.
● Disable: Select to disable this function.
● Enable: Select to enable this function.
Press the Save soft key to save Music On Hold settings.
When you enable the Music On Hold function, next time you receive a second call, press the Hold soft key to attend to the new call, and the first caller will listen to the music while waiting for you to answer.
2.3.7 Auto Answer
When Auto Answer is enabled, VigorPhone 350 will automatically answer the incoming call in speakerphone mode.
● Disable: Select to disable this function.
- Enable: Select to enable this function.
Press the Save soft key to save the settings.
2.4 Alarm Clock
The Alarm Clock submenu allows you to set the phone to sound an alarm at a specific time.
2.4.1 Alarm Time
Specify the time for the alarm to sound. Use the soft keys to do the following functions:
- On / Off: Press to turn alarm on or off.
- Edit: Press to edit the alarm time.
● Apply: Press to save and apply settings.
● Back: Press to go back to the previous level: Main Menu.
2.4.2 Repeat
Setting Repeat On enables the alarm to sound everyday at the specified time. Use the soft keys to do the following functions:
● On / Off: Press to set repeat on or off.
- Apply: Press to save and apply settings.
● Back: Press to go back to the previous level: Main Menu.
2.5 Calendar
Use the Calendar function to plan your schedules. This function allows you to let the phone remind you through a ring at the scheduled time. You can use the navigation keys or the Goto soft key to select a date on the calendar.
Use the soft key to do the following functions:
● Schdl.: Press to create, view, edit, or delete schedule.
● New: Press to create a new schedule.
● Goto: Press to enter and go to a specific date.
● Back: Press to go back to the previous level: Main Menu.
2.5.1 Viewing the Schedule List
- Select the date on which you want to view the schedule list.
- Press the Schdl. soft key, you will see the schedule list set for the selected date.
- Use the soft key to do the following functions:
- New: Press to create a new schedule.
- Detail: Press to view the selected schedule. When the schedule is displayed on the screen, you can edit and delete the schedule using the soft key.
● Back: Press to go back to the previous level: Calendar submenu.
2.5.2 Setting up Schedules
You can make schedules/notes in the phone as your daily reminder. Follow the steps below:
-
Select the date to setup schedule.
-
Press the New soft key.
-
Use the soft keys to do the following functions:
● Edit: To edit the selected item.
- Apply: To save and apply changes.
● Back: To go back to the previous level: Calendar submenu.
You will see an alarm clock sign 🔒 appearing on the bottom right corner of the phone screen to denote set schedule.
2.6 System Settings
System Settings enables you to configure the phone system.
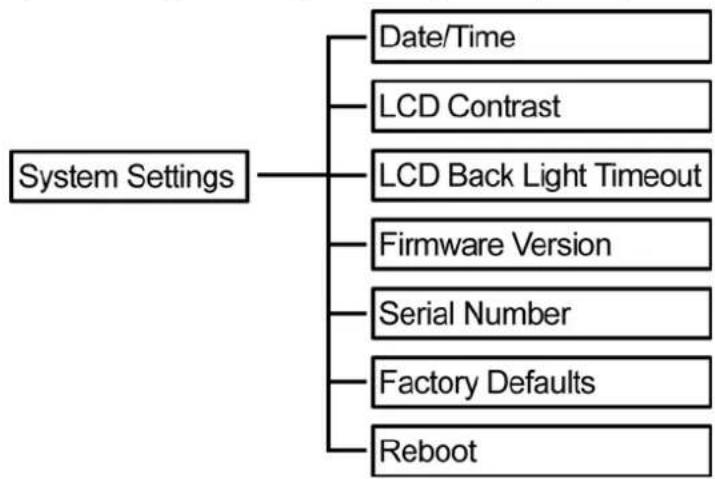
flowchart
graph TD
    A["System Settings"] --> B["Date/Time"]
    A --> C["LCD Contrast"]
    A --> D["LCD Back Light Timeout"]
    A --> E["Firmware Version"]
    A --> F["Serial Number"]
    A --> G["Factory Defaults"]
    A --> H["Reboot"]
2.6.1 Date/ Time
The system default is retrieving Date/ Time information from NTP server when it connects to Internet.
To manually set the date and time:
- Go to Network, NTP & Time Settings.
- Disable NTP.
For more information of Date/Time setting, you may go to Page 35 "Network & Time Settings."
2.6.2 LCD Contrast
To setup the LCD Contrast does the following:
- Choose the level of the contrast from 0 to 5.
- Select : Press to apply level. Save: Press to save settings.
2.6.3 LCD Back Light Timeout
To setup the LCD Back Light Timeout does the following:
- Choose the Timeout from 10 to 60 seconds.
- Select: Press to apply second. Save: Press to save settings.
2.6.4 Firmware Version
Firmware Version functions allows you to view the current firmware version on the display screen.
2.6.5 Serial Number
Serial Number function allows you to view the serial number of your VoIP phone.
2.6.6 Factory Default
Select to restore settings into factory default values.
2.6.7 Reboot
Use this option to reboot the system. A warning message appears on the display, select: Yes: to reboot; No: to cancel reboot.
2.7 General SIP Settings
General SIP Settings allows you setup the code priority, ports frame size, signaling and voice precedence.
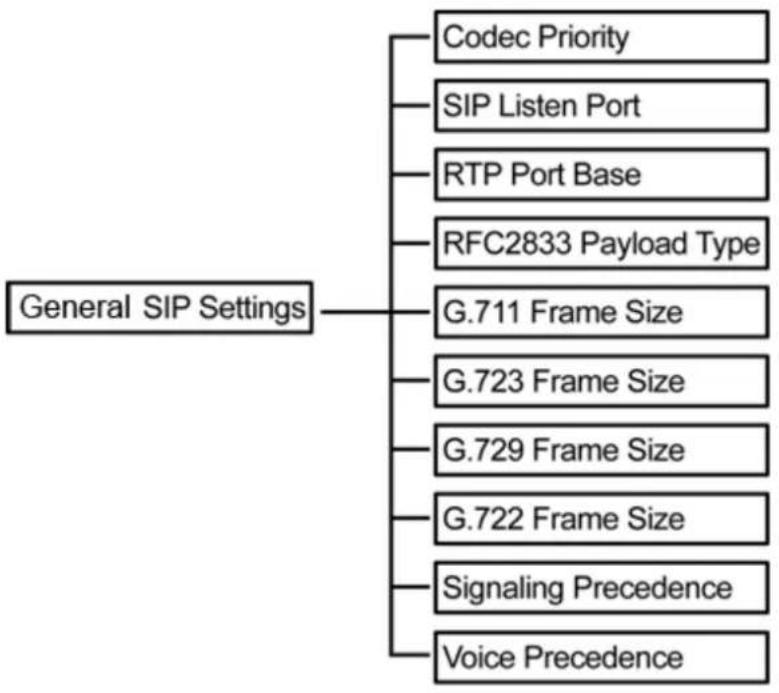
flowchart
graph TD
    A["General SIP Settings"] --> B["Cdec Priority"]
    A --> C["SIP Listen Port"]
    A --> D["RTP Port Base"]
    A --> E["RFC2833 Payload Type"]
    A --> F["G.711 Frame Size"]
    A --> G["G.723 Frame Size"]
    A --> H["G.729 Frame Size"]
    A --> I["G.722 Frame Size"]
    A --> J["Signaling Precedence"]
    A --> K["Voice Precedence"]
2.7.1 Codec Priority
This function allows you to set Codec priority and Codec types in SDP. This VoIP phone has enabled four Codec as following: G.711 u-law/G.711 a-law, G.723.1, G.729, G.722. There are four priority levels can be set in different order, “First Priority”, “Second Priority”, “Third Priority”, and “Fourth Priority” or “Disable”.
NOTE:
a. Due to the codec limitation, only G.723/G.729 codec can be available when G.722 codec is not selected. Please reboot the VoIP Phone after making changes in Codec Priority.
b. When disable all the codec priority, the SDP will automatically use G.711 codec as the default codec.
2.7.2 SIP Listen Port
This function allows you to set the port number of user-agent where it receives SIP messages. The default value is 5060.
2.7.3 RTP Port Base
This parameter defines the local RTP-RTCP port base use to listen and transmit. The default value is 10000.
2.7.4 RFC2833 Payload Type
This parameter defines RFC2833. The default value is 101.
2.7.5 G.711 Frame Size
This function allows you to select the G.711 frame size. Options are: 20, 30, 40, 50, 60, 80 ms.
2.7.6 G.723 Frame Size
This function allows you to select the G.723 frame size. Options are: 30, 60, 90, 120, 150, 180 ms.
2.7.7 G.729 Frame Size
This function allows you to select the G.729 frame size. Options are: 20, 30, 40, 50, 60, 80 ms.
2.7.8 G.722 Frame Size
This function allows you to select the G.722 frame size. Options are: 20, 30, 40, 50, 60, 80 ms.
2.7.9 Signaling Precedence
This function allows you to select 0\~5 priority level.
2.7.10 Voice Precedence
This function allows you to select 0\~5 priority level.
The following soft keys are displayed on the screen when entering Globe SIP settings:
- Delete: Press to delete a character value.
● Clear: Press to clear the entire value. - Edit: Press to edit the selected submenu option.
- Save: Press to save the specified SIP Listen Port.
● Apply: Press to save and apply Global SIP settings.
● Back: Press to go back to the previous level: Main Menu.
2.8 SIP Accounts
You can configure settings for up to ten SIP accounts with different SIP proxy. You will be able to make calls only after your SIP account is activated.
To configure an SIP account setting from the phone:
- Select one of the ten SIP accounts to display the submenu. The following items are required:
● Registration: Enable / disable this account.
- Registration ID: Input SIP ID
- Display name: Input the user name. The user name will be used for LCD SIP Profile name.
- Password: Input the register password.
- Registration Server: Input the domain server address. (You may press the pound key # to switch the input method from ABC text mode to 123 numeric mode. Use the * key to input dots“.” in the address.)
- Expire time: User can set the SIP expire time.
- DTMF Type: Input the DTMF type options: In-Band DTMF, Out-of-Band DTMF (RFC2833), and SIP INFO (RFC2976).
- Authentication Name: Input the Authentication Name used for authentication. It can be identical to or different from SIP Registration ID.
● Proxy Server: Input the proxy server address.
● Voice Mail: Input the access code base on requirement of your service provider.
Note: All information except Username will be provided by your ITSP or MIS.
- Press the Edit soft key to go into each option and make the required change.
- Press the Save soft key to save your settings.
If you have more than one SIP account, repeat steps 1 to 3 to register settings for other SIP accounts.
2.9 Network
The Network option allows you to setup your LAN Port, PC Port, VLAN, NAT/Bridge, NTP Server and MAC Address.
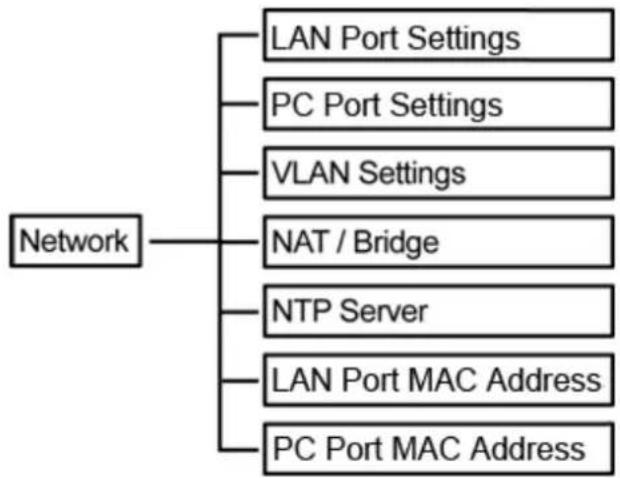
flowchart
graph TD
    A["Network"] --> B["LAN Port Settings"]
    A --> C["PC Port Settings"]
    A --> D["VLAN Settings"]
    A --> E["NAT / Bridge"]
    A --> F["NTP Server"]
    A --> G["LAN Port MAC Address"]
    A --> H["PC Port MAC Address"]
2.9.1 LAN Port Settings
This VoIP phone supports three different types of connections: Static IP, PPPoE, and DHCP.
To setup LAN Port:
- Select the type of connection, by pressing the Edit soft key.
- Select type of connection. Static IP, PPPoE, and DHCP.
- Press the Save soft key to save settings.
Once you have completed select type of connection, press Select to enter Static IP or PPPoE information.
2.9.2 PC Port Settings
To configure the PC Port settings, use the soft keys to access the submenu options and perform necessary functions.
LAN settings have the following submenu options:
IP Address
Select this option to modify the IP address.
Net Mask
Select this option to modify the Net mask.
DHCP Server
Select this option to modify the settings and enable/ disable DHCP server.
To configure the DHCP server settings, the following items are required: Lease Time, Domain Name, Primary DNS, and Secondary DNS.
2.9.3 VLAN Settings
To configure the VLAN settings, use the soft keys to access the submenu options and perform necessary functions.
VLAN settings have the following submenu options:
Activation
Select this option to enable/ disable VLAN connection.
Identifier
Select this option to set up VLAN settings ID.
Priority
Select this option to set the priority level (0-7).
2.9.4 NAT / Bridge
This VoIP phone supports NAT/ Bridge setting.
To enable the NAT or bridge function, do the following:
- Select NAT or Bridge.
- Press the Select soft key to choose between NAT or Bridge mode. Press the Save soft key to save your settings.
2.9.5 NTP Server
The Network Time Protocol (NTP) is a protocol for distributing the Coordinated Universal Time (UTC) by means of synchronizing the clocks of computer systems over packet-switched, variable-latency data networks.
This VoIP Phone supports getting date & time from NTP server or enters date & time manually. To configure the NTP Server settings, use the soft keys to access the submenu options and perform necessary functions. NTP Server settings have the following submenu options:
NTP
Select this option to enable/ disable NTP server connection.
Primary Server
Select this option to set the primary server.
Secondary Server
Select this option to set the secondary server.
From the NTP Server submenu:
- Press the Select soft key to select from a list of servers to assign as primary/secondary server.
- Press the Edit soft key to input the server address manually.
Time Zone
Select this option to select time zone settings from a list.
Location
Select this option to select location from a list.
2.9.6 LAN Port MAC Address
You can configure the LAN Port MAC Address settings from the VoIP phone.
- Select LAN Port MAC Address, and then press the Edit soft key.
- Input the LAN Port MAC address manually.
- Press the Save soft key to save your setting.
2.9.7 PC Port MAC Address
You can configure the PC Port MAC Address settings from the VoIP phone.
- Select PC Port MAC Address, and then press the Edit soft key.
- Input the PC Port MAC address manually.
- Press the Save soft key to save your setting.
NOTE: To activate the MAC address, please reboot VoIP Phone manually.
This chapter contains important information to help you configure the settings for your VoIP phone from the web browser.
If your VoIP phone is using factory default, it sets LAN/PoE port as DHCP client and enable Bridge mode for PC port. To access the web configuration menu, do the following:
- Connect one end of the Ethernet cable provided to the LAN/PoE port of your phone to your router with DHCP service enable.
- Connect one end of the network cable to the PC port of your phone, connecting to your personal computer.
- Plug in the power of the VoIP phone. Select the Menu soft key.
- Select Network, LAN Port Settings, and then press the Info soft key.
You should be able to see the IP address displayed on the LCD screen.
Open your browser (such as Internet Explorer, Firefox, etc.) and type in the web address of the phone. For example, if the IP address you obtain in step 4 above is 192.168.1.2, enter the web address: http://192.168.1.2.
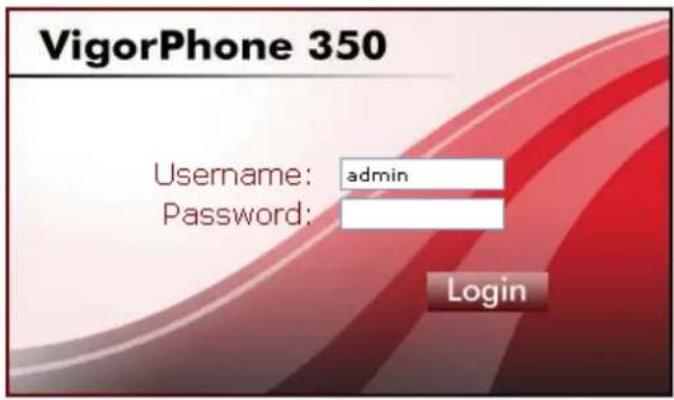
The Web login front page is displayed. Enter the user name and the password and click Login. The administrator's user name is "admin", and no password is needed.
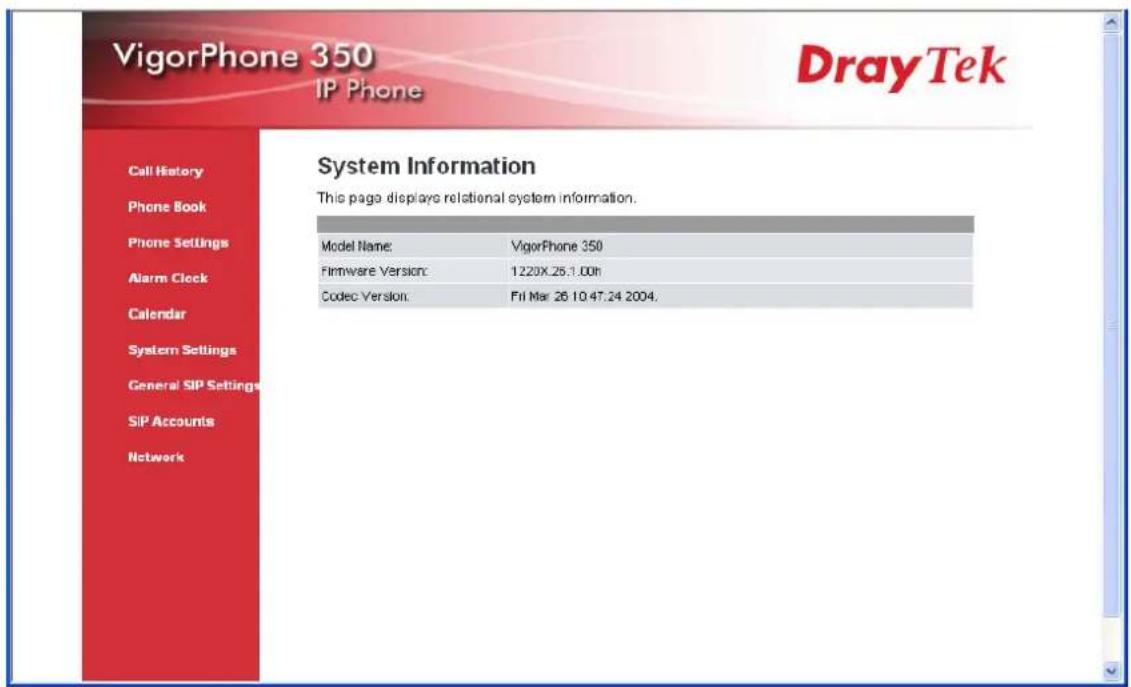
After you login, move the cursor over the menu items on the left navigation bar to access the dropdown menus.
3.1 Call History
To check the call history from the web browser, do the following:
- Click Call History. The following screen will be displayed.
Call History
This page allows you to check call log.
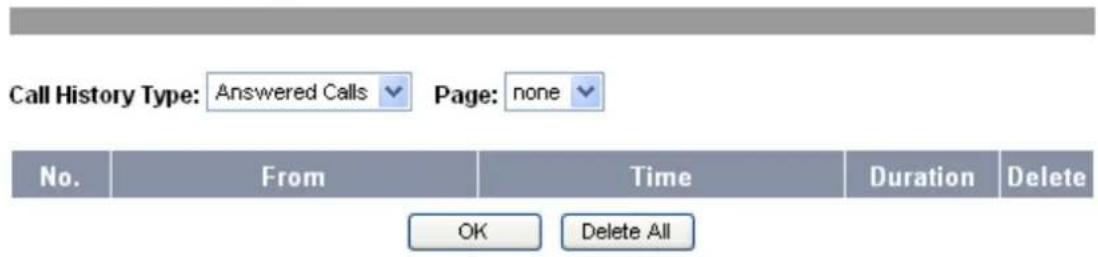
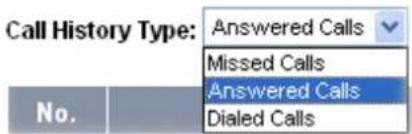
- If you intend to check the dialed calls, select Call History Type as Dialed Calls. Choose Answered Calls in Call History Type if you need to check the history of answered calls. Choose Missed Calls to see the records of calls that you didn't answer.
-
Select the page you want to display. The details of phone number, call time and duration of the each call record will then be shown.
-
To remove certain Call History, click in the Delete box of the corresponding option, and then click OK button.
-
To remove all Call History, click Reset Call History.
3.2 Phone Book
The phone book menu allows you to add, edit or delete any phone entry from the web browser.
To configure the phone book settings, do the following:
- Click Phone Book. The following screen will be displayed.
Phone Book
This page allows you to add, edit or delete phone name, phone number and domain for your phone book.
Phone Book Page: 1
| No. | Name | Number | Domain | Select |
| 1 | happy | 035679595 | 8522516@iptel.org |
Delete Selected Delete All
Add Phone
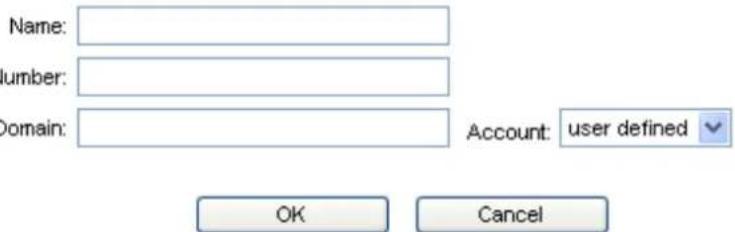
- Select the page number that you want to view from the Phone Book Page option, and then the web page will display all the phone book information for the selected phone book page.
- To remove a certain phone entry, click in the Select box of the entry number that you want to remove, and then click Delete Selected button.
- To remove all contact entries in the phone book, click Delete All button.
- To add a phone entry, input the contact information of all the required fields (name, number and domain) of Add Phone section.
- To edit a phone entry, click in the number column of the phone entry, and edit the option(s) you want to change in the Edit Phone section.
- Click OK to confirm your settings or Cancel to cancel.
3.3 Phone Settings
The phone settings menu provides a number of options to configure your phone, such as call forwarding, date and time, ringer, voice mail settings and so on. Read this section to adjust the settings to suit your own needs.
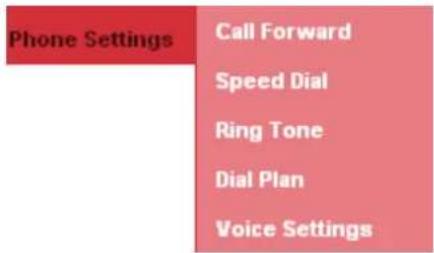
3.3.1 Call Forward
To configure Call Forward settings through the web browser, do the following:
- Click Phone Settings>>Call Forward. The following screen will be displayed.
Call Forward
This page allows you to set call forward settings..
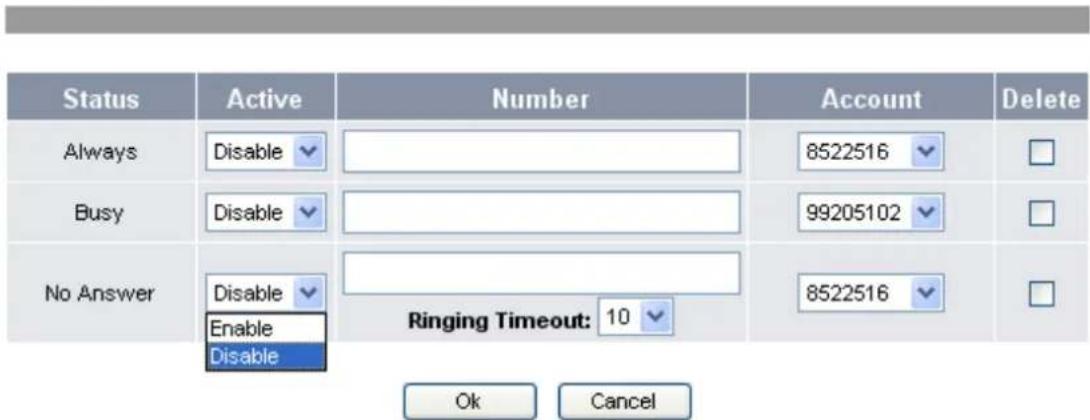
Always: To forward all incoming calls, enter the phone number and a specific SIP account in the Always field.
Busy: To forward incoming calls when the phone is busy, enter the phone number and a specific SIP account in the busy field.
No Answer: No Answer Forward allows you to forward the phone number and a specific SIP account when no answered for a period of time. Select Ringing Timeout to set a period of forward time (10 sec \~ 50 sec) without answering the call.
- To activate the Call Forward, select Enable of the corresponding option.
- To delete Always Forward, Busy Forward or No Answer Forward setting, check in the Delete box.
- Click OK to save your settings or Cancel to cancel.
3.3.2 Speed Dial
To configure speed dial settings through the web browser, do the following:
- Click Phone Book>>Speed Dial. The following screen will be displayed.
Speed Dial
This page allows you to set speed dial settings.
| Mkey | Type | Number | Account | Delete |
| 1 | SpeedDial | 8522516 | ||
| 2 | SpeedDialBLF | 8522516 | ||
| 3 | SpeedDial | 8522516 | ||
| 4 | SpeedDial | 8522516 | ||
| 5 | SpeedDial | 8522516 | ||
| 6 | SpeedDial | 8522516 | ||
| 7 | SpeedDial | 8522516 | ||
| 8 | SpeedDial | 8522516 | ||
| 9 | SpeedDial | 8522516 | ||
| 10 | SpeedDial | 8522516 | ||
| 11 | SpeedDial | 8522516 | ||
| 12 | SpeedDial | 8522516 | ||
| 13 | SpeedDial | 8522516 | ||
| 14 | SpeedDial | 8522516 | ||
| 15 | SpeedDial | 8522516 | ||
| 16 | SpeedDial | 8522516 |

- Add the numbers that you want to set as speed dial/BLF, and select an existing SIP profile (account).
- To delete a speed dial/BLF number, click the Delete box of the corresponding number.
- Click OK to save your settings, Delete All to delete all speed dial numbers/BLF or Cancel to cancel.
3.3.3 Ring Tone
To configure ring tone settings through the web browser, do the following:
- Click Phone Settings>>Ring Tone.
Ring Tone
This page allows you to set, delete or upload favorite ring tone for this device.
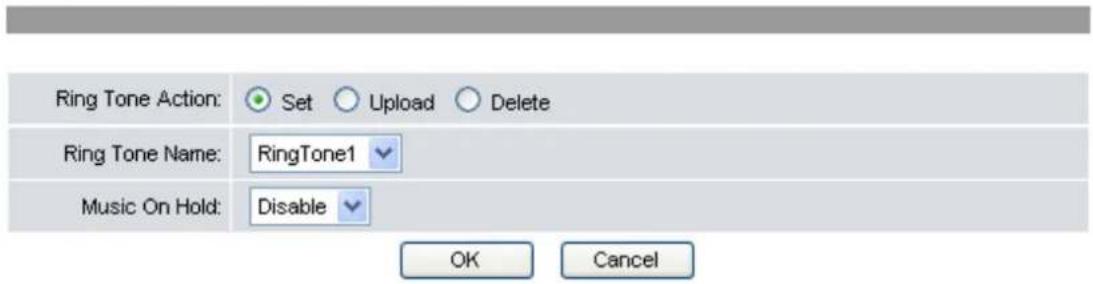
- Choose Set to enable the ring tone. Select the Ringtone Name from the drop-down box according to your preference.
- Choose the Music On Hold settings: select Enable to enable music on hold, or Disable to disable it.
- Click OK to save your settings or Cancel to cancel.
To upload a new ring tone from your personal computer drive, do the following:
- Choose Upload to enter the ring tone upload setting page.
Ring Tone
This page allows you to set, delete or upload favorite ring tone for this device.
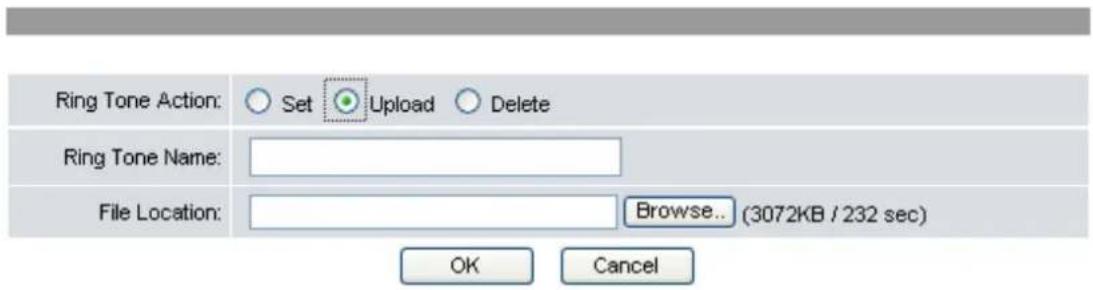
- Input the Ring Tone Name.
- Click the Browse button to select the location of the new ring tone file that you want to set.
- Click OK to save your settings or Cancel to cancel.
NOTE: This VoIP Phone can only accept "PCM unsigned 8 bit mono" ring tone format (e.g., .wav) and the file size should keep within 200kb.
To remove a ringer, do the following:
- Choose Delete to display all the ringers currently stored in the phone.
Ring Tone
This page allows you to set, delete or upload favorite ring tone for this device.

- Check the Select box of the ring tone that you want to remove.
- Click OK to save your settings or Cancel to cancel.
3.3.4 Digit Map
You can use this setting to modify the method used to filter the phone numbers. A digit map gives the unit a map to determine when a complete number has been entered and should be passed to the SIP server for resolution into an IP address. With the flexible dial plan provided by the phone, user can easily implement the following functions:
- Replace, delete or add prefix/ postfix of the dialed number.
- Place the call to different SIP servers according to the prefix/ postfix
To configure individual dial plan setting through the web browser, do the following:
- Click Phone Settings>>Digit Map. The following screen will be displayed.
Digit Map
This page allows you to add, edit or delete digit map rule.
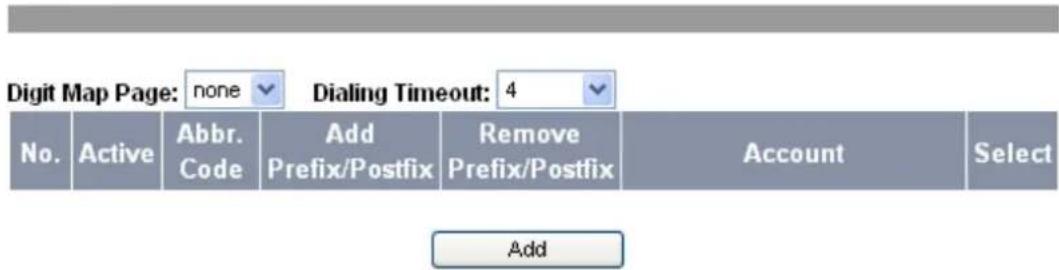
| Type | Active | Effective Length | Add Prefix |
| General Rule | No data | No data | No data |
| Edit |
NOTE: The "Dialing Timeout" is the mechanism that set a timer for sending out dialing digits automatically after the last entry for a period of time without press "#" key. Select from 1-10 seconds.
- Click Add to add a new dial plan. The following screen will be displayed.
Digit Map
This page allows you to create a new digit map for this device.
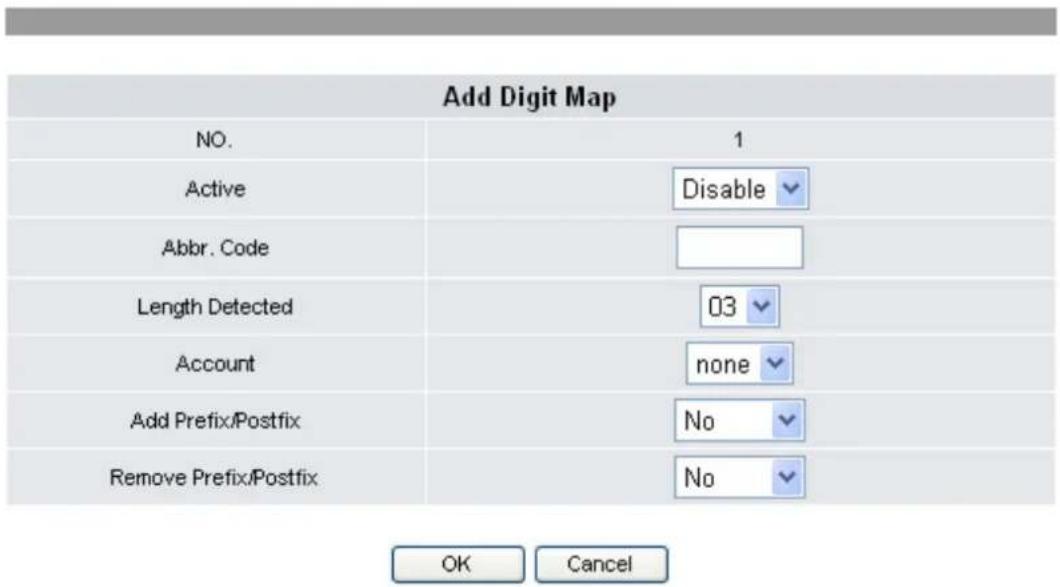
- Select Enable in Active field to activate the setting of the dial plan numbered 1.
- Input all the information required for the following parameters:
Abbr. Code:
Set abbreviation digits to screen dialing numbers one by one from the beginning. If it matches abbreviation digits, then this dialing rule will be executed. For example, set Abbr. Code as “3”. It means any number dial from “3” will be followed this dialing plan.
Length Detected:
Set detecting length. Once the length has matched, VoIP phone will send out digits immediately. Select from 03-20 digits in length through the drop-down list.
Account: Select a SIP account for this dialing plan.
Add Prefix/ Postfix:
Add the set prefix or postfix to match dialed number.
Remove Prefix/ Postfix: Remove the prefix or postfix to match dialed number.
- Click OK to save your settings or Cancel to cancel.
To configure General Rule setting through the web browser, do the following:
- Click Edit to add a new general dial plan rule. The following screen will be displayed.
Digit Map
This page allows you to edit general rule for this device.
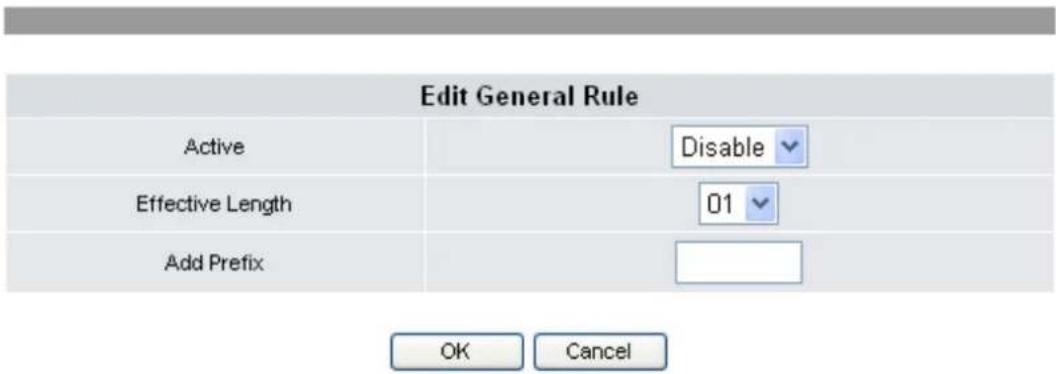
- Select Enable/Disable to activate/deactivate general Rule.
- Select Effective Length to detect the entry digits match length. If matches the entry digits then add prefix in front of entered.
- Entering Prefix digits to matched length dialed number.
3.3.5 Voice Settings
You can configure the tone frequency and cadence in voice settings menu. The voice setting is only accessible through the web browser. Do the following:
- Click Phone Settings>>Voice Settings. The following screen will be displayed.
Voice Settings
This page allows you to configure voice setting for this device.
| Play Dial Tone Frequency | 350 - 440 |
| Play RingBack Tone Frequency | 440 - 480 |
| Play Busytone Frequency | 480 - 620 |
| Play RingBack Tone cadence | 1440 ms On - 920 ms Off |
| Play Busytone cadence | 240 ms On - 240 ms Off |
| Side Tone Switch | Disable |
| Handset Digital In Gain | Level 10 |
| Handset Analog In Gain | Level 10 |
| Handset Out Gain | Level 10 |
| Speak Out Gain | Level 10 |
| Mic Digital In Gain | Level 10 |
| Mic Analog In Gain | Level 10 |
| Headset Digital In Gain | Level 10 |
| Headset Analog In Gain | Level 10 |
| Headset Out Gain | Level 10 |
- The following options are available:
Play Dial Tone Frequency: Set the dial tone frequency range when you pick up the handset.
Play RingBack Tone Frequency: Set the ring tone you hear before the recipient of your call picks up and answers your call.
Play Busytone Frequency: Set the busy tone frequency range when the number you dial is busy.
Play RingBack Tone cadence: Set the ring back tone cadence range you hear before the recipient of your call picks up and answers your call.
Play Busytone cadence: Set the busy tone cadence range when your line is busy.
Side Tone Switch: Select whether to Enable / Disable side tone switch.
Handset Digital In Gain: Set the volume sent in from a digital handset from Level 1-20. Default is Level 10.
Handset Analog in Gain: Set the volume sent in from an analog handset from Level 1-20. Default is Level 10.
Handset Out Gain: Set the volume sent out from the handset from Level 1-20. Default is Level 10.
Speak Out Gain: Set the volume sent out from the microphone from Level 1-20.
Default is Level 10.
Mic Digital In Gain: Set the volume sent in from a digital microphone from Level 1-20. Default is Level 10.
Mic Analog in Gain: Set the volume sent in from an analog microphone from Level 1-20. Default is Level 10.
Headset Digital In Gain: Set the volume sent in from a digital headset from Level 1-20. Default is Level 10.
Headset Analog In Gain: Set the volume sent in from an analog headset from Level 1-20. Default is Level 10.
Headset Out Gain: Set the volume sent out from the headset microphone from Level 1-20. Default is Level 10.
Frequencies should be configured with known values to avoid uncomfortable high pitch sounds.
- Click OK to save your settings or Cancel to cancel.
3.4 Alarm Clock
The Alarm Clock menu allows you to set the alarm of your VoIP phone through the web browser.
To activate alarm clock, do the following:
- Click Alarm Clock. The following screen will be displayed.
Alarm Clock
This page allows you to set alarm clock for this device.
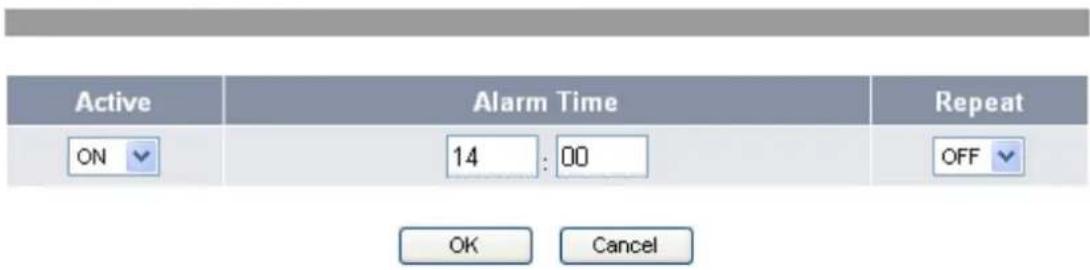
- Select On from the Active field.
- Input the alarm time.
-
Select Repeat field option:
-
On: to sound the alarm everyday at the specified time.
- Off: to disable the repeat function, the alarm will only sound at the specified time.
3.5 Calendar
The Calendar menu allows you to set the calendar and set schedules of your VoIP phone through the web browser.
To set the calendar, do the following:
- Click Calendar. The following screen will be displayed.
Calendar
This page allows you to set calendar for this device.
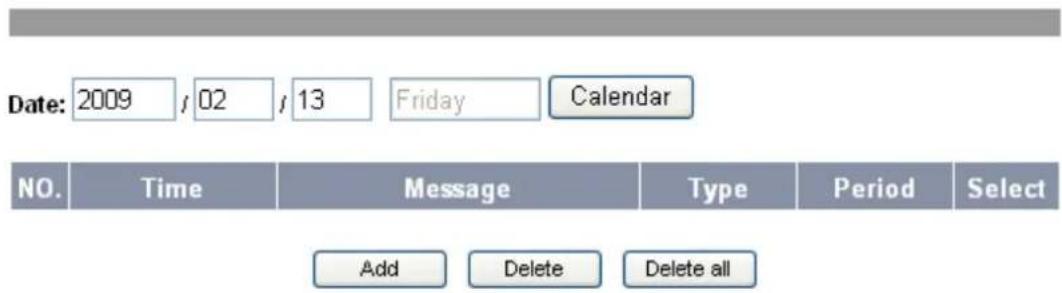
- Input the date on the Date field or click Calendar to select date from the calendar.
To create a new schedule:
- Click Add. The following screen will be displayed.
Calendar
This page allows you to set calendar for this device.
DATE: 2009/01/22 Thursday

- Input the following information:
Time: Time to set the alarm.
Message: Message or description.
Type: Select the type of schedule, options are: Reminder, Date, Meeting, Birthday, Phone Call, Recorder and Other.
Period: Select whether the schedule is Once, Daily, Weekly and Monthly. Select Once to schedule a one time event; alarm will sound only on the specified date and time. Select Daily to schedule an everyday event, the alarm will sound everyday on the specified time.
- Click OK to save your settings or Cancel to cancel.
To edit an existing schedule:
- Click the number of the corresponding schedule to edit. The following screen will be displayed.
Calendar
This page allows you to set calendar for this device.
Date: 2009/01/22 Thursday

-
Modify the necessary information.
-
Click:
OK: Save your settings and go back to Calendar main menu.
Cancel: Cancel changes and go back to Calendar main menu.
To delete a schedule:
-
Check the Select box of the corresponding item to delete. To delete all items, click Delete all.
-
Click Delete.
3.6 System Settings
System settings menu allows you to configure settings, upgrade firmware, backup, recover and reset settings.
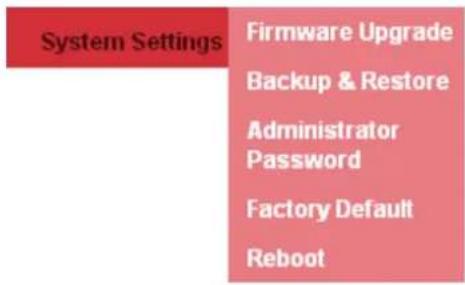
3.6.1 Firmware Upgrade
You can upgrade the firmware only through the web browser. Do the following:
- Click System Settings>>Firmware Upgrade. The following screen will be displayed.
Firmware Upgrade
This page allows you to upgrade newest firmware for this device.
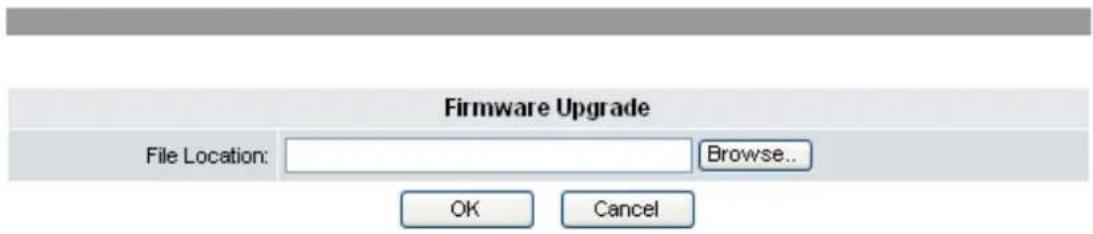
- Click Browse to select the file location of the newest firmware.
- Click OK to execute the firmware upgrade or Cancel to cancel.
Note: If your VigorPhone 350 Firmware Version is 12202.26.1.04 or after, please refer to Appendix A for upgrade.
3.6.2 Backup & Recover Setting
You can backup or recover the VoIP Phone configuration into a file to your PC. The setting is only accessible through the web browser. Do the following:
- Click System Settings>>Backup & Recover. The following screen will be displayed.
Backup & Restore
This page allows you to backup or restore the system configuration.
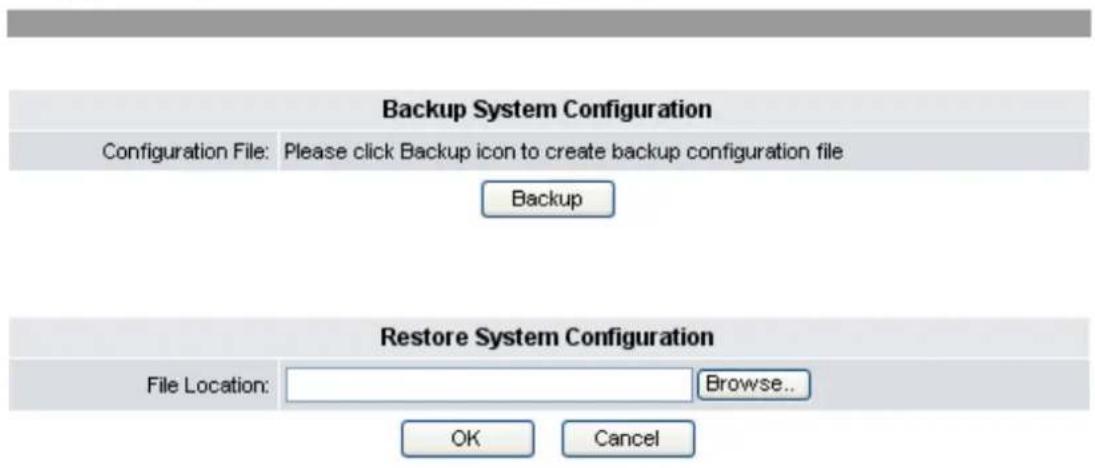
- Click Backup button in the Backup System Configuration section to create the configuration files. And click the file name to save the configuration file into your PC.
- The section of Recover System Configuration is used to restore the system configuration from a previously saved configuration file. Click Browse button to select a backup file from the PC.
- Click OK to execute restoring system configuration.
- After file upload is completed, the system will reboot.
3.6.3 Administrator Password
The system authority menu is only accessible through the web browser.
To change the user name and password, do the following:
- Click System Settings>>Administrator Password. The following screen will be displayed.
Administrator Password
This page allows you to change the login username and password for this device.
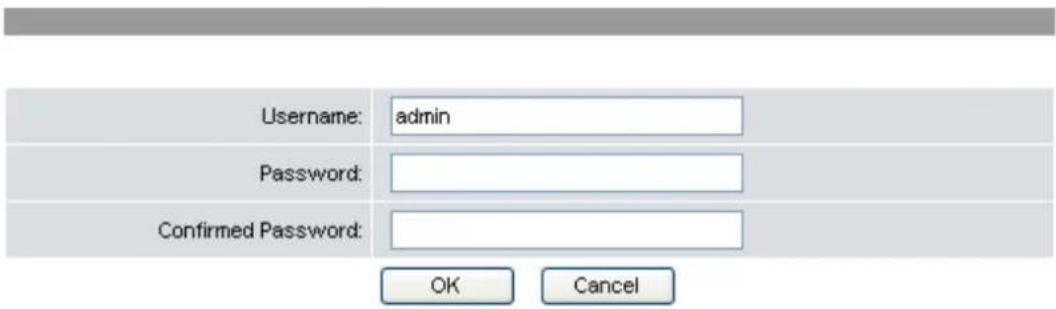
- Enter the new username and the new password. Enter the new password again in the Confirm Password field to confirm.
- Click OK to save your settings or Cancel to cancel.
3.6.4 Factory Default
You can reset all the settings on the VoIP phone to restore factory default settings.
- Click System Settings>>Factory Default. The following screen will be displayed.
Factory Default
This page allows you to load factory default setting for this device.
Using factory default configuration OK
- Click OK.
- A confirmation message appears. Click OK to proceed with reset. The system will automatically reboot.
3.6.5 Reboot
To reboot the VoIP phone manually, do the following:
- Click System Settings>>Reboot. The following screen will be displayed.
Reboot System
This page allows you to reboot the system.
Reboot system: OK
-
Click OK.
-
A confirmation message will appear, click OK to proceed with reboot. Click Cancel to cancel reboot.
3.7 General SIP Settings
The General SIP settings allow you to configure the port and codec priority and signal or voice precedence settings.
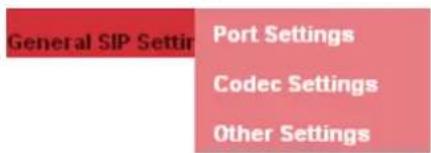
3.7.1 Port Setting
This setting menu is only accessible through the web browser.
To configure the port setting, do the following:
- Click General SIP Settings>>Port Settings. The following screen will be displayed.
Port Settings
This page allows you to set port number for this device.
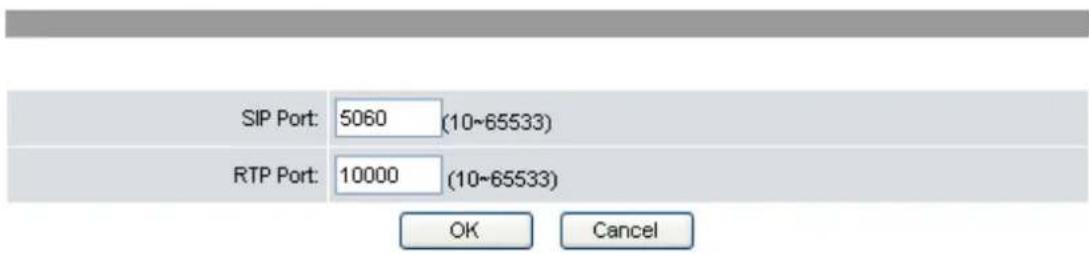
- Enter the SIP Port number and the RTP Port number provided by your ITSP or MIS.
- Click OK to confirm your settings or Cancel to cancel.
Note: You need not modify the Port Settings unless otherwise requested.
3.7.2 Codec Setting
You can also configure the Codec priority, and RTP packet length through the web browser.
To configure Codec settings from the web browser, do the following:
- Click General SIP Settings>>Codec Settings. The following screen will be displayed.
Codec Settings
This page allows you to set codec settings for this device.
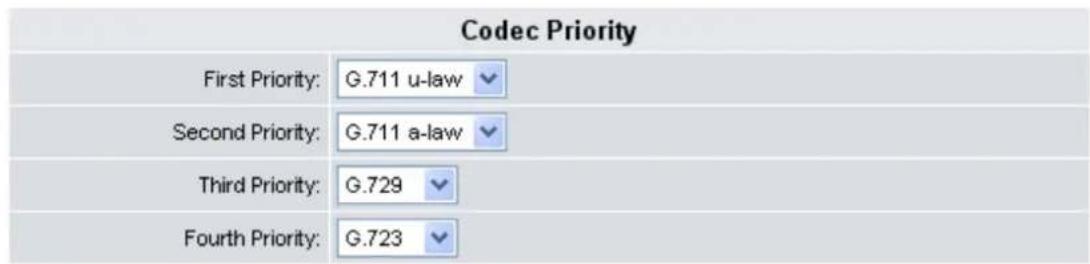
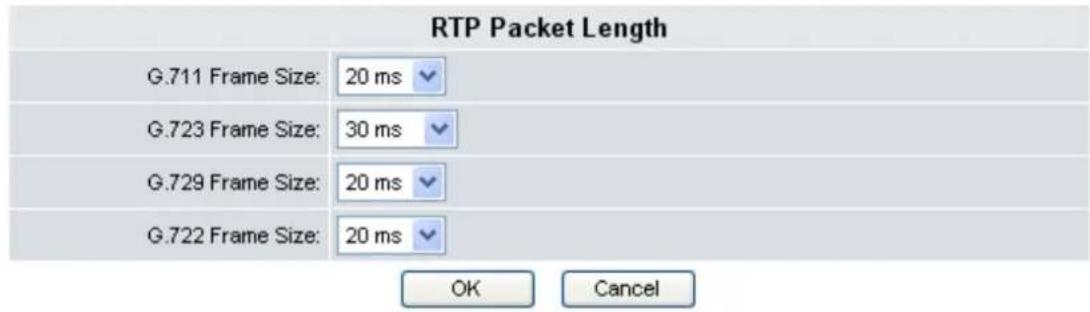
- Select the item you want to change and a drop-down box will display the available options. G.711 u-law/G.711 a-law, G.723.1, G.729, G.722.
NOTE1:
a. Due to the codec limitation, only G.723/G.729 codec can be available when G.722 codec is not selected. b. When disable all the codec priority, the SDP will automatically use G.711 codec as the default codec.
- Click OK to confirm your settings or Cancel to restore default value.
- Once updating "Codec Priority", it requires reboot the phone to make settings take affect.
3.7.3 Other Settings
To set other Global SIP settings through the web browser, do the following:
- Click Global SIP Settings>>Other Settings. The following screen will be displayed.
Other Settings
This page allows you to set other settings for this device.
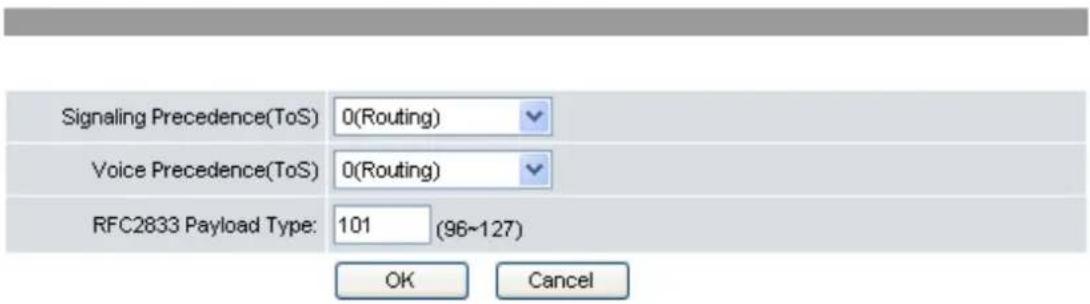
- Select the Signaling Precedence (ToS) from the options: 0 (Routing), 1 (Priority), 2 (Immediate), 3 (Flash), 4 (Flash Override), and 5 (CRITIC/ECP).
- Select the Voice Precedence (ToS) from the options: 0 (Routing), 1 (Priority), 2 (Immediate), 3 (Flash), 4 (Flash Override), and 5 (CRITIC/ECP).
- Enter settings for RFC2833 Payload Type between 95-255. Default value is 101.
- Click OK to confirm your settings or Cancel to cancel.
3.8 SIP Accounts
To configure the SIP account setting from the web browser, click SIP Accounts. The following screen will be displayed.
SIP Accounts
This page allows you to set SIP account for this device.
| SIP Accounts | |||||
| ID | Username | Registration Server | Status | Registration | Select |
| 1 | 8522516 | iptel.org | registered | Enable | |
| 2 | 99205102 | ubsip.ublink.org | Enable | ||
| 3 | OFF | Disable | |||
| 4 | OFF | Disable | |||
| 5 | OFF | Disable | |||
| 6 | OFF | Disable | |||
| 7 | OFF | Disable | |||
| 8 | OFF | Disable | |||
| 9 | OFF | Disable | |||
| 10 | OFF | Disable | |||
To delete an SIP account, do the following:
- Click the Select box of the corresponding item to delete.
- Click Delete button.
To edit an SIP account setting, do the following:
- Click the underlined ID number. The following screen will be displayed.
SIP Account Settings
This page allows you to set SIP account for this device.
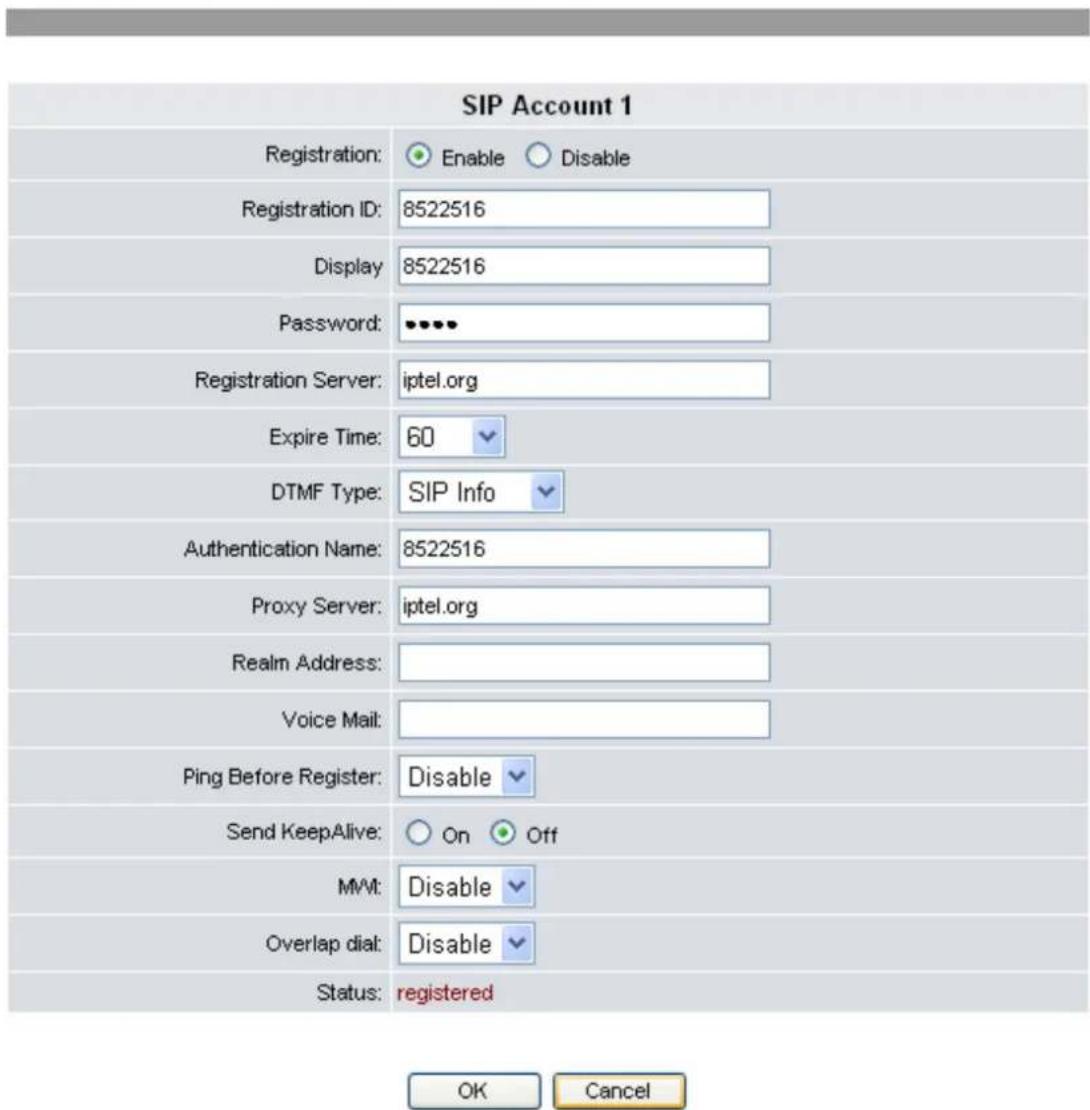
- Choose Enable for Registration to activate the account. Next, enter the information provided by your ITSP or MIS in each field.
The following options are available:
Registration: Enable / disable this account.
Registration ID: Input the registration ID.
Display Input the user name.
Password: Input the password.
Registration Server: Input the domain server address.
Expire time: User can set the timeout duration for registration request.
DTMF Type: Input the DTMF type options: RFC2833, SIP Info, Nortel Info, and In Band.
Authentication Name: Input the authentication name.
Proxy Server: Input the proxy server address.
Realm Address: Input the domain name.
Voice Mail: Input the voice mail speed dial number.
Ping before register: Disable/Enable. The setting is used to ping another device on the Internet from the VoIP phone to make sure the Internet connection works properly.
Send KeepAlive: On/Off. Typically enabled to instruct the phone to send SIP keep-alive messages for maintaining a “pinhole” in the user’s firewall through which SIP messages can pass.
MWI: Disable/Enable. When this setting is enabled, the LED on the top of the phone set will blink when there is voice message left by the incoming call.
Overlap dial: Disable/Enable. This function is to change your custom of phone dialing. The usual way of dialing out is to pick up the handset and dial the number directly. However, the way to dial VoIP phone call is to pick up the handset, dial the number and 1) wait for timeout or 2) press “#” to send out the number, or 3) press the Dial button on IPPhone. If you enable this function, the way of dialing VoIP phone will be the same as general analog phone. That is, simply dial the number and no need to wait or press any other button.
Note: the IP-PBX also needs to turn on this feature.
Status: Displays the status of the SIP Account. "ON" means registered, "OFF" means un-registered.
- Click OK to confirm your settings or Cancel to cancel.
NOTE: You can register up to ten SIP accounts. However, you will always call out with the first account number registered.
3.9 Network
Network menu allows you to view and setup LAN Port, PC Port, NTP and Time settings, IP mapping, and routing table settings.
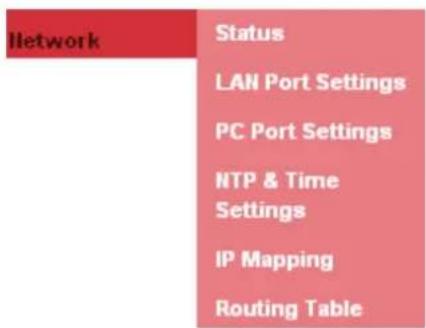
3.9.1 Status
You can view the WAN and LAN information from the Status submenu.
Click Network>>Status. The following screen will be displayed.
Network Status
This page displays status of network interfaces for this device.
| LAN Port Information | PC Port Information | ||
| Type: | DHCP Client | Mode: | NAT |
| IP Address: | 192.168.1.11 | IP Address: | 192.168.123.1 |
| Netmask: | 255.255.255.0 | Netmask: | 255.255.255.0 |
| Gateway: | 192.168.1.1 | DHCP Server: | Disable |
| Primary DNS: | 168.95.1.1 | ||
| Secondary DNS: | 168.95.192.1 | ||
3.9.2 LAN Port Settings
To configure IP settings through the web browser, do the following:
Click Network>>LAN Port Settings. The following screen will be displayed.
LAN Port Settings
This page allows you to configure LAN settings for your local network connection or Internet connection.
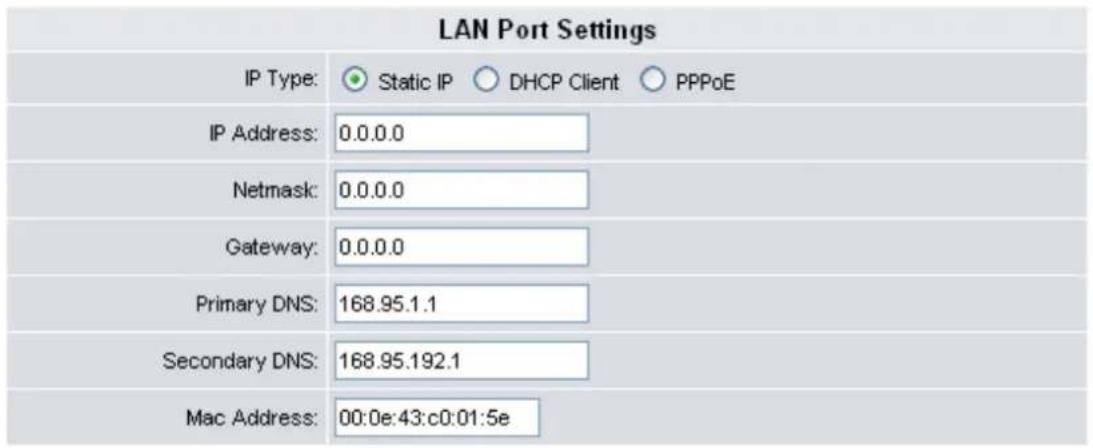
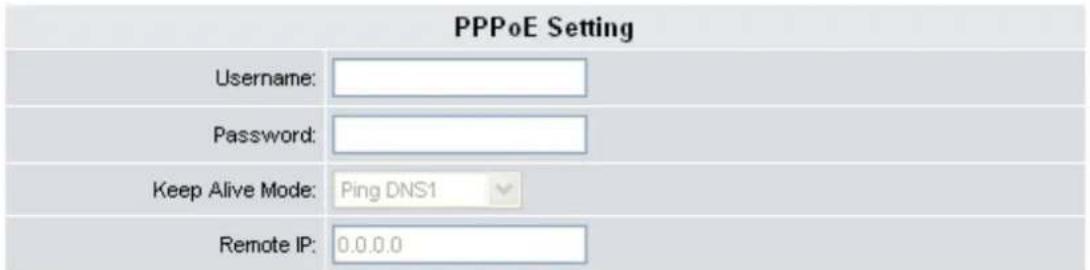
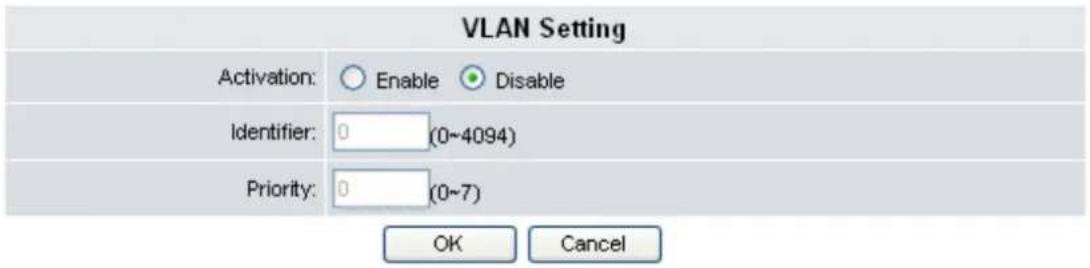
IP Type:
There are IP Types for you to choose. Select the one you need and fill in the required information.
IP Address: Enter the IP address.
Netmask: Enter Net mask.
Gateway: Enter the Gateway IP.
Primary DNS: Enter the primary DNS server.
Secondary DNS: Enter the secondary DNS server. Network connects to this server in case the primary DNS server is not available.
Mac Address: Enter the Mac address.
Username: Enter user name.
Password: Enter the password of PPPoE settings.
Keep Alive Mode: Select option, Ping DNS1 or Ping Remote IP.
Remote IP: Enter remote IP address.
Activation: Select On for activating VLAN setting.
Identifier/Priority: The Identifier and Priority fields are enabled for user input. Enter the necessary information.
Click OK to save your settings or Reset to cancel.
3.9.3 PC Port Settings
To configure LAN settings and DHCP server setting from the web browser, click Network>>PC Port Settings. The following screen will be displayed.
PC Port Settings
This page allows you to configure PC Port settings for your computer connection.
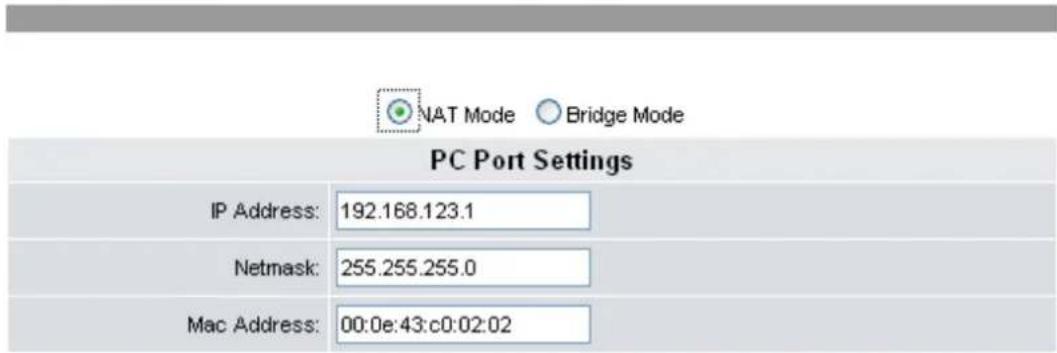
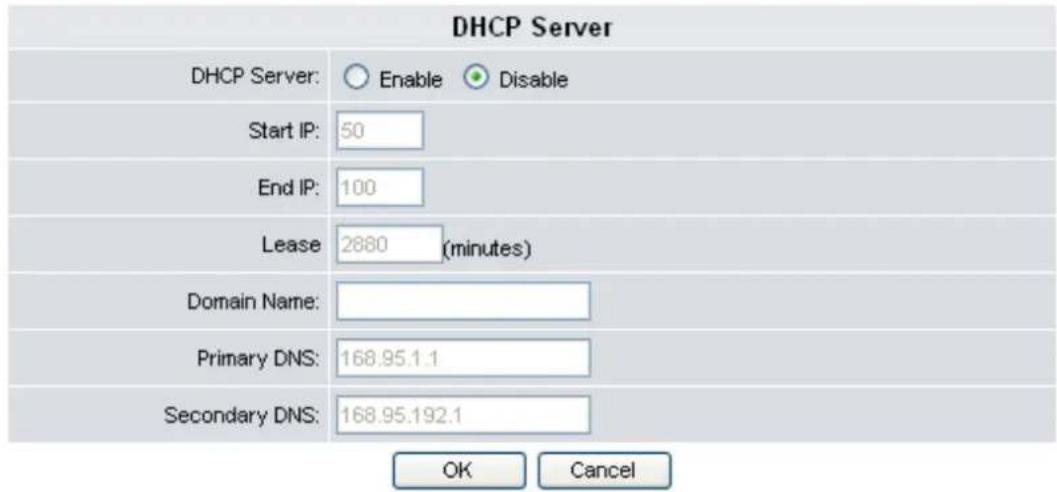
To configure PC Port settings, do the following:
- Select a suitable mode, options are:
NAT: This will enable PC port Setting required fields for user input. Enter
IP address, Netmask, and Mac address.
Bridge: Configure PC port mode using Bridge settings.
- If NAT is selected, you can activate DHCP Server settings. The required information are as follows:
DHCP Server: Select whether to enable/disable DHCP server.
Start IP: Input Start IP address.
End IP: Input End IP address.
Lease: Input lease time in minutes.
Domain Name: Input domain name.
Primary DNS: Input the primary DNS server.
Secondary DNS: Input the secondary DNS server.
- Click OK to save your settings or Cancel to cancel.
3.9.4 NTP & Time Settings
The NTP & Time Setting enables you to configure the date and time of the VoIP phone manually or synchronize the clock with the NTP (Network Time Protocol) server, and specify the time zone you are in. The NTP function should be disabled if you want to set the date and time manually.
To access NTP & Time settings, click Network>>NTP Settings. The following screen will be displayed.
NTP & Time Settings
This page allows you to set NTP server and time settings for this device.
![NTP : Enable Disable Primary Server: ntp.ucsd.edu Select: ntp.ucsd.edu[US] Secondary Server: clock.nc.fukuoka-u.ac.jp Select: clock.nc.fukuoka-u.ac.jp[JP] Location: GMT (+8:00) Taipei Daylight Saving: Off Auto Always Sync. Time: 0 : 12 (dd:hh) Set System Time: 2009 : 01 : 22 : 17 : 02 (YY:MM:DD:hh:mm) OK Cancel](/content/2026/05/960382/images/612bef215729bb079cf8f7b16f26a864eb4ab4464931602ecfd300f417d13435.jpg)
To synchronize clock with the NTP server:
- Choose Enable to enable NTP and enter the server information provided by your ITSP or MIS.
- Select the time zone you are in.
- Set up the synchronization time and system time.
- Click OK to save your settings or Cancel to cancel.
To configure date and time manually:
- Choose Disable to disable NTP.
- Enter the date and time manually on the Set System Time fields.
- Click OK to save your settings or Cancel to cancel.
3.9.5 IP Mapping
To set the IP mapping for hosts, click Network>>IP Mapping. The following screen will be displayed.
IP Mapping
This page allows you to set IP Mapping for hostnames.
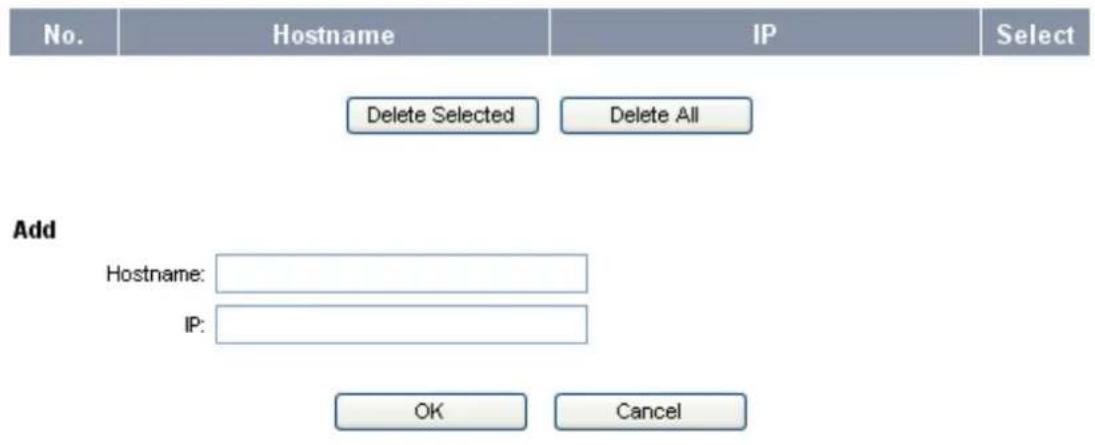
To add a new hostname, do the following:
- In the Add section, enter the information for Hostname, and IP field.
- Click OK to save your settings, the added IP is displayed on the list, or Cancel to cancel.
To edit a hostname, do the following:
- Click the underlined number of the corresponding hostname.
- Edit the necessary information.
- Click OK to save your settings or Cancel to clear information back to original settings, or Cancel to cancel edit function and go back to IP Mapping main window.
To delete a hostname, do the following:
- Click the Select box of the corresponding hostname to delete.
- Click Delete Selected to delete the checked item or click Delete All to delete all hostnames.
3.9.6 Routing Table
You can set routing table through the web browser. To do this, click Network>>Routing Table. The following screen will be displayed.
Routing Table
This page allows you to set routing table for this device.
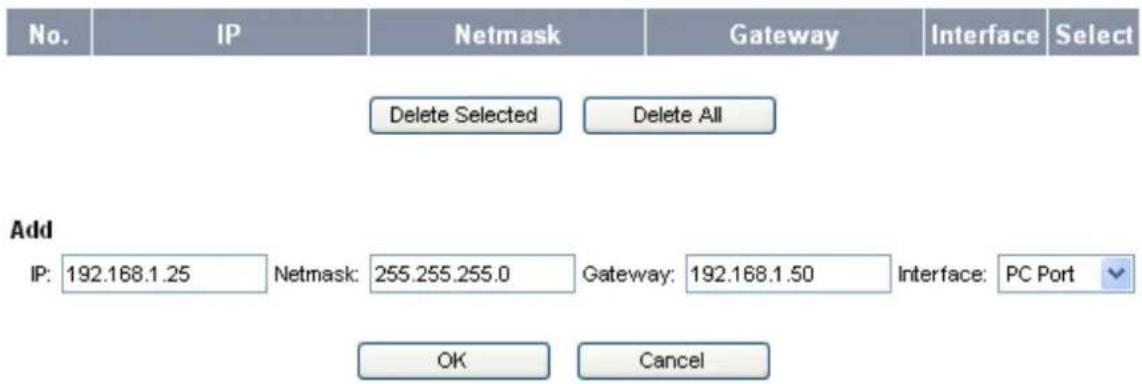
To add a new routing table, do the following:
- In the Add section, enter the information for IP address, Netmask, and Gateway field.
- Select the Interface, options are: LAN Port, PC Port, and Bridge.
- Click OK to save your settings, the added routing table is displayed on the list, or Cancel to cancel.
To edit a routing table, do the following:
- Click the underlined number of the corresponding hostname.
- Edit the necessary information.
- Click OK to save your settings or Cancel to reset information back to original settings, or Cancel to cancel edit function and go back to IP Mapping main window.
To delete a routing table, do the following:
- Click the Select box of the corresponding routing table to delete.
- Click Delete Selected to delete the checked item or click Delete All to delete all routing tables.
4.1 Answering a Call
An incoming call is indicated by a ringing tone and a red light on the incoming call indicator. You can answer the call by doing one of the followings:
- Pick up the handset to answer the call.
- Press the Speaker key on the phone to answer the call.
- Press the Line 1 / Line 2 on the phone to answer the call.
NOTE: You may also set "Auto Answer" to pick first in progress call automatically.
4.2 Making a Call
4.2.1 Dialing with the Keypad
- Enter the telephone number with the alphanumerical keypad, as shown below. If you enter an incorrect digit, press the Delete/Clear soft key to erase the incorrect digit.
- After entering the number you want to call, press the # key to force dialing or wait for 4 seconds before the number is dialed automatically.
NOTE: You may change waiting time from "Web Configuration" → "Dial Plan" → "Dialing Timeout". See page 20 for more information.
4.2.2 Looking up a Number from the Phone Book
You can call your contacts using the contact information stored in the phone book. To make a call to a person from the phone book, follow the steps below:
- Press the Menu key to display the menu options.
- Select Phone Book and press the Enter key to display your phone book.
- Scroll through the list until you find the contact you want to call.
- Select the name you want to make the call, and press the Dial soft key or pickup handset/headset to make the call.
4.2.3 Making a Call to an IP Address
You can also make a call to an IP address by inputting the IP address with the keypad. (For example: 192*168*1*100)
4.2.4 Making a Call to SIP Server
In order to make a SIP call, the phone must be registered to a SIP server. If there is more than one account registered, you can use 4-way Navigation keys "up" or "down" to select an account first.
4.2.5 Speed/BLF (Busy Lamp Field)
You can use the speed dial hotkeys, located on the right side of the phone, to configure the most commonly dialed numbers. Use the function to dial a number quickly, instead of keying in a complete number.
To call a number using speed dialing, press the speed dial memory hotkey (1\~16) that has been assigned to the phone number from the numeric keypad.
4.2.6 Dialing to Multiple SIP Accounts
This Phone allows two simultaneously SIP calls at the same time. You can use line buttons (LINE 1 and LINE 2) to make/receive/switch two calls. Each line button has a LED back light to help user identify line status.
● Green light means "dialing" status
● Red light means "occupied / Ring" status
● Green light blinking means "Hold" Status
For example:
First Call: Dialing by LINE1 button or using handset/headset or speaker.
Second Call: Dialing by LINE2 button or press "Hold" key to put the first call on hold.
Each of the line buttons (LINE 1 or LINE 2) is represented with a virtual SIP channel. By default, outgoing call uses the first VoIP account. You can switch to another account by pressing the navigation key up and down.
For example:
Configure ACCOUNT1 and ACCOUNT 2 with Registration ID as "VoIP1", "VoIP2" respectively and ensure that they are active and registered. If the first VoIP1 is selected, all calls will go through VoIP1.
4.2.7 Redialing a Number
To quickly dial a number that you have dialed recently, do one the following:
-
Press the Redial key on the phone. The LCD displays dialed numbers in call history.
-
To dial the number, press the Dial soft key or pickup handset/headset to make the call.
4.3 Call Options
While a call is in progress, a number of additional options are available.
4.3.1 Using the Speaker Phone
For hands free operation, you can use the built-in speaker to talk on the phone. To use the speakerphone, follow the steps as following:
- While talking on the phone, press the Speaker key on the bottom side of the phone to enable the Speakerphone function.
- Press Speaker key again to terminate the call.
4.3.2 Putting a Call on Hold
You may want to put a call on hold temporarily while doing some work or attending to a second incoming or outgoing call.
To put a call on hold, do one of the following:
-
Press the Hold soft key on the phone to put the call on hold.
-
When you receive a second call, press the next available LINE key to attend to the new call, and the first call will be put on hold automatically.
4.3.3 Conducting a Three-Way Conference Call
To initiate a three-way conference call, follow the steps below:
- Call the first participant of the conference call as described in Making a Call.
- Put the first participant on hold as described in Putting a Call on Hold.
- Call the extension number of the second participant of the call.
- Press the Conference soft key on the phone to include all participants in the call.
- To end the three-way conference call, simply hand up the call directly
Each line button has a LED back light to help user identify line status as follows:
● Green light means "dialing" status
● Red light means "occupied / Ring" also "two lines light in Red when Conference" status.
● Green light blinking means “Hold” Status
4.3.4 Transferring a Call
To transfer a call to another phone number, follow the steps below based on ways IP PBX or ITSP perform:
- Attend Transfer
While a call is in progress, press the Trans or Hold button on the phone. Dial the number to which you want to transfer the call. Once the call established, you can speak to the callee then hang up the phone to transfer the call.
- Un-Attend Transfer
While a call is in progress, press the Trans or Hold soft key on the phone. Dial the number to which you want to transfer the call and then hang up the phone to transfer the call.
4.3.5 Using the Intercom Function
- Press the Icom soft key on the phone, and then dial the extension number of the number you desire to talk to.
- After the call is connected, you may start talking. The person you called will hear your voice and talk to you directly.
- Press Speaker/Headset or hand off to end the call.
4.3.6 Blocking All Calls Using the DND Function
The DND (Do not Disturb) feature allows you to reject and block all incoming calls without ringing your phone.
To activate the DND function, follow the steps below:
- Press the DND soft key on the phone. A "DoNotDisturb" message is displayed on the screen.
- Press the DND soft key again to disable the DND function.
4.3.7 Checking Voice Messages
Press Voice Mail button to access voice mail. If the Voice Mail button lights red, it indicates that you have at least one new message left in your voicemail box.
NOTE: If there is more than one SIP profile in this phone, use NAVI key "up" "down" to select different SIP profile voice mail boxes. To enable Voice mail feature, please check with service provider for more information.
4.4 Set up VigorPhone 350 with Vigor/PPBX2820
DrayTek VigorIPPBX 2820/VigorIPPBX 2820n supports the function of auto-provisioning. VigorPhone 350 is also capable of auto-provisioning, it can get a configuration text file from the VigorIPPBX 2820 series. The configuration file contains SIP settings that the SIP devices can register with VigorIPPBX 2820 series.
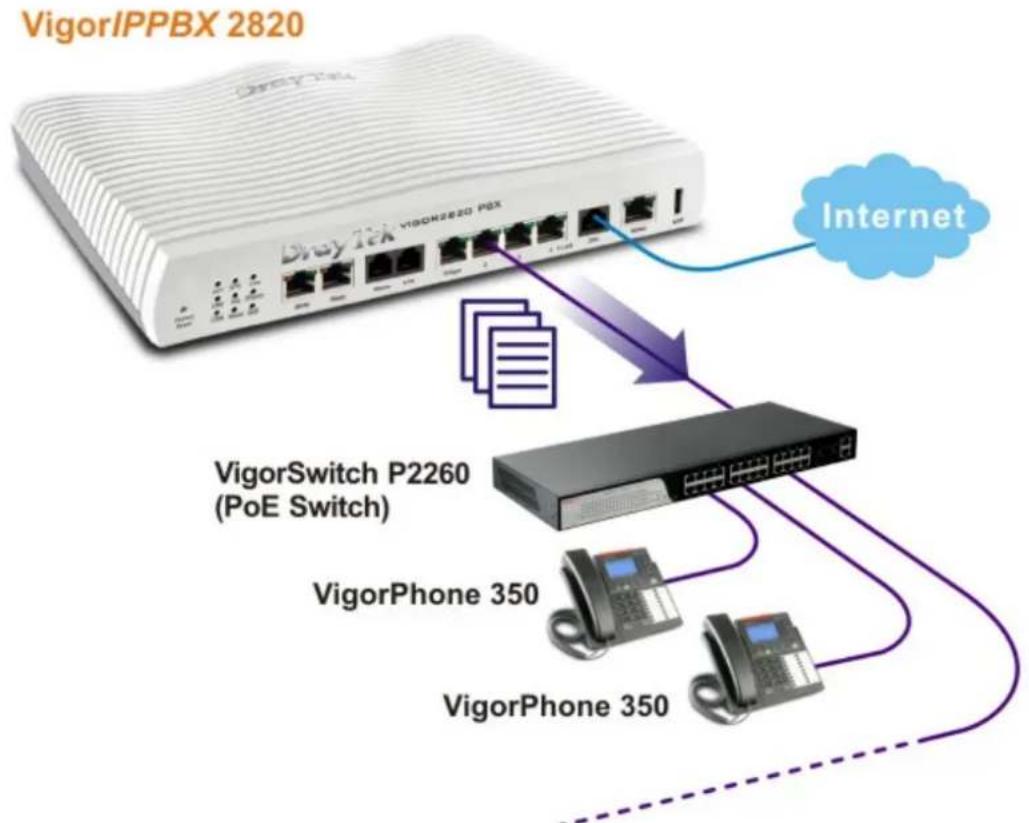
flowchart
graph TD
    A["VigorIPPBX 2820"] -->|Internet| B["VigorSwitch P2260 (PoE Switch)"]
    A --> C["VigorPhone 350"]
    A --> D["VigorPhone 350"]
- Configure the extension number and password for each IP phone on VigorIPPBX 2820. You can configure extensions from IP PBX Wizard.
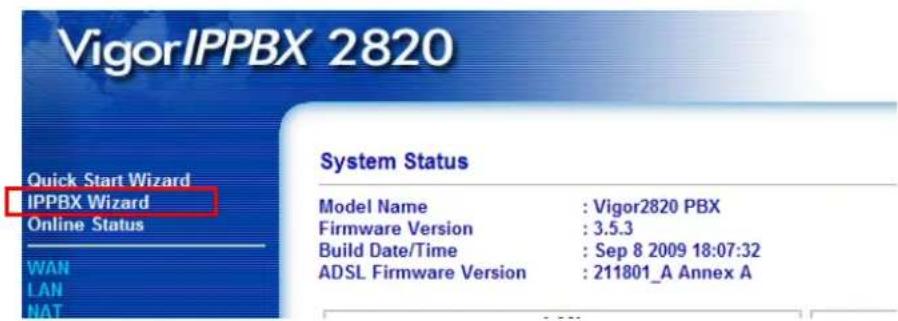
- Click IPPBX Wizard to get the first screen as shown below:
IPPBX Wizard
Extension & Groups Setup : Index 1
| Extension Group Name: | VigorPhone | (for example : sales) |
| Extension Group Number: | 910 | (for example : 100) |
| Start Number of the extension Group: | 911 | (for example : 101) |
| Number of extensions in this group: | 10 | (for example : 10, max = 20) |
| Index | Group Name | Group Extension | Hunt List(Max 20 Extension) |
| 1. | VigorPhone | 910 | 911-920 |
| 2. | |||
| 3. | |||
| 4. | |||
| 5. | |||
| 6. | |||
| 7. |
- Type the extension group name, group number, start number, and number of extension fields. Click OK to save them. The new added group will be displayed on the screen. Then click Next to access into next web page.
- In the SIP Trunk Setup page, you can set up to six SIP profiles outside lines at one time.
IPPBX Wizard
Sip Trunk Setup : Index 1
| Profile Name: | (11 characters max.) | |
| Domain/Realm: | (63 characters max.) | |
| Proxy: | (63 characters max.) | |
| Account Number/Name: | (63 characters max.) | |
| Password: | (63 characters max.) | |
| Trunk number: | 001 | (3 characters max.) |
| Index | Profile Name | Domain/Realm | Proxy | Account Number/Name | Trunk Number |
| 1. | 001 | ||||
| 2. | 002 | ||||
| 3. | 003 | ||||
| 4. | 004 | ||||
| 5. | 005 | ||||
| 6. | 006 |

- Type the profile name, domain/realm, proxy, account number/name, password and trunk number fields, then click OK to save them. The new added profile will be displayed on the screen.
| Index | Profile Name | Domain/Realm | Proxy | Account Number/Name | Trunk Number |
| 1. | SalesMarket | 192.168.1.55 | nat.draytel.org:5065 | salesgroup | 001 |
| 2. | 002 | ||||
| 3. | 003 | ||||
| 4. | 004 | ||||
| 5. | 005 | ||||
| 6. | 006 |
- Click Next to access into office hours setup page.
IPPBX Wizard
Office Hours Setup
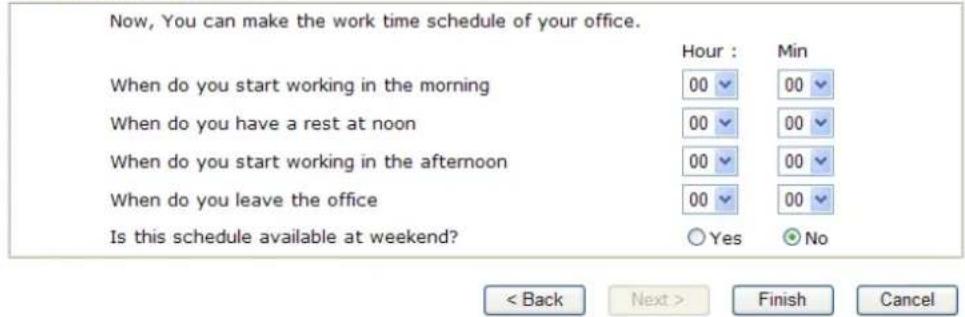
- Please specify office hours including starting point and ending point on duty day(s). Then, click Finish to save the settings and exit the wizard.
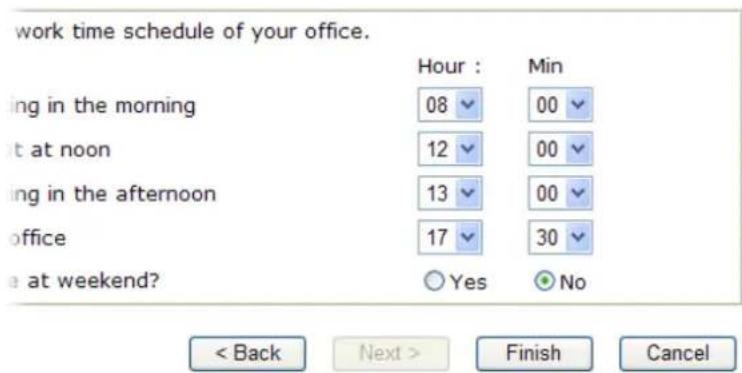
- After finishing the Wizard, please go to IPPBX>Extension to configure the Extension Number and the Password settings. Click the index number 1.
IP PBX >> Extension
Internal Phone Extension
| Index | Ext. | Name | Email Address | Outgoing Call | Status |
| 1. | 911 | --- | SIP1 SIP2 SIP3SIP4 SIP5 SIP5ISDN1-TE ISDN2-TE | v | |
| 2. | 912 | --- | SIP1 SIP2 SIP3SIP4 SIP5 SIP6ISDN1-TE ISDN2-TE | v | |
| 3. | 913 | --- | SIP1 SIP2 SIP3SIP4 SIP5 SIP6ISDN1-TE ISDN2-TE | v | |
| 4. | 914 | --- | SIP1 SIP2 SIP3SIP4 SIP5 SIP6ISDN1-TE ISDN2-TE | v | |
| 5. | 915 | --- | SIP1 SIP2 SIP3SIP4 SIP5 SIP6ISDN1-TE ISDN2-TE | v |
- Type in Extension Number and Password.
IP PBX >> Extension Profile
Internal Phone Extension Index 1
| Internal Phone Extension Active | Enable | Disable |
| Extension Number | 911 | |
| User Name | ... | |
| Authentication | ||
| Password | ||
| E-mail Address |  | |
| Voice mail Password | ||
| M&I | ||
| Notify User who Subscribed | Force Notify User | |
| Outgoing Call Use | ||
| SIP1 SIP2 SIP3 SIP4 SIP5 SIP6 ISDN1-TE ISDN2-TE | ||
| Answer Mode | ||
| No answer after | 120 sec then Keep Ring | |
| Busy then | Do Nothing | |
| Not on-line | Do Nothing | |
- Then connect VigorPhone to the network. Each user of VigorPhone can get the extension number/password respectively.
- The log-in request will be displayed on the screen of the phone. Please input the extension number. Press OK.
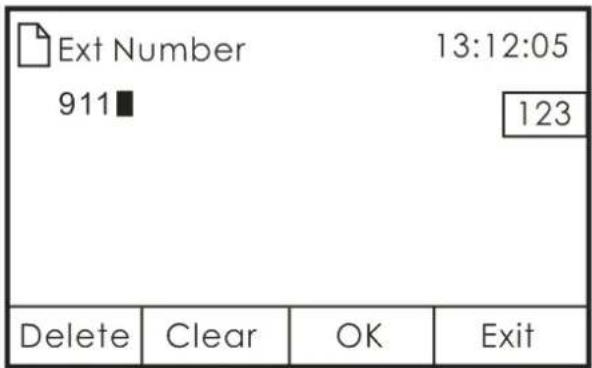
- Next, input the password. Press OK.
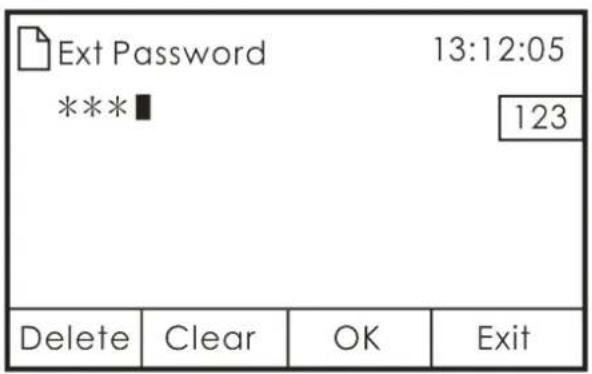
- VigorPhone can automatically configure itself with settings coming from VigorIPPBX 2820. Successful message will be shown as below. Now, all the configurations have been done.
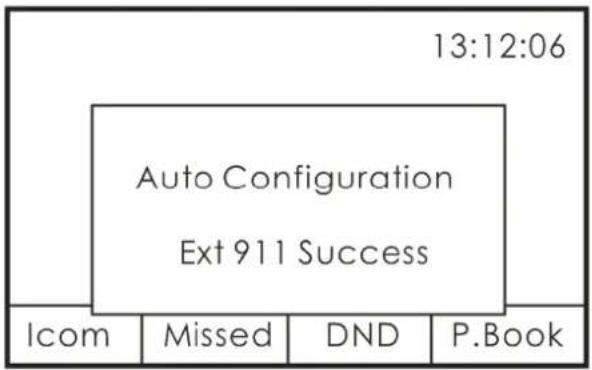
- Now, the extension number has been registered by VigorPhone successfully. (See the number on the right side of the arrow.)
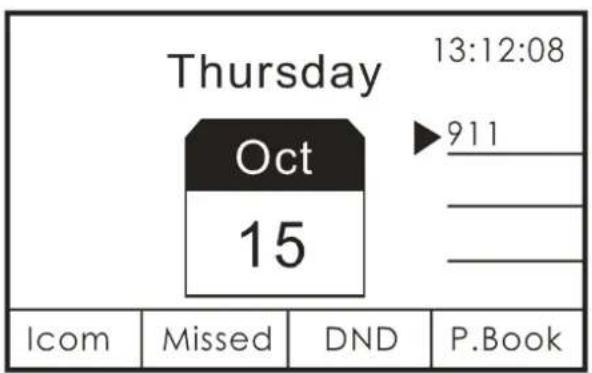
If the VigorPhone 350 Firmware Version is 12202.26.1.04 or after, please follow the steps below to upgrade the firmware.
- Install firmware upgrading tool, Router tools to your computer. Please download it through the following link. http://www.draytek.com/user/SupportDLUtility.php
- Connect your computer to the VigorPhone 350 PC port, and configure static IP (see below) in your computer:
IP address: 192.168.1.10
Subnet Mask: 255.255.255.0
Gateway: 192.168.1.1
-
Make sure the cable between the computer and VigorPhone 350 is connected firmly. Then unplug the power cable from VigorPhone 350 (power off).
-
Press and hold ENTER and MENU buttons in the VigorPhone 350 panel. Then plug in the power cable to VigorPhone 350 and release the ENTER and MENU buttons.
-
The LCM on VigorPhone 350 will show AUTO UPGRADE Wait for Image. If it does not show such message, please check the cable connection between VigorPhone 350 and computer, and repeat step 4.
-
Open DrayTek Firmware upgrade utility.
-
Type 192.168.1.2 in the field of router IP; select the firmware file that you want to update; then click SEND.
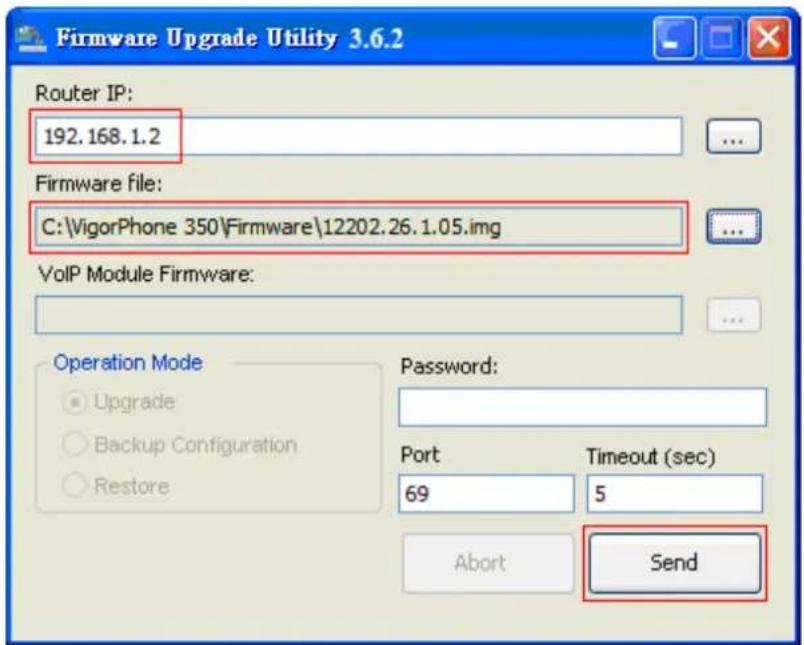
-
When you press SEND, VigorPhone 350 LCM will show AUTO UPGRADE Upgrade rootfs after few seconds. Then it will show AUTO UPGRADE Upgrade kernel → AUTO UPGRADE Upgrade Phone → AUTO UPGRADE Upgrade Successful boot.
-
When the LCD shows AUTO UPGRADE Upgrade Successful boot, VigorPhone 350 will reboot automatically to finish the upgrading procedure.
-
Update steps is completed, you can connect the VigorPhone 350 LAN port to IPPBX to use VigorPhone 350.
Note: If the VigorPhone 350 Firmware Version is 12202.26.1.03 or before, please update it to 12202.26.1.04 via VigorPhone 350 webpage before upgrading to 12202.26.1.05 or later.
- User's Guide
- VigorPhone 350 User's Guide
- Copyright Information
- Copyright Declarations
- Trademarks
- Safety Instructions and Approval
- Safety Instructions
- Warranty
- Be a Registered Owner
- Firmware & Tools Updates
- Regulatory Information
- CE Notice (European Union)
- Table of Contents
- Chapter 1 Overview ......9
- Chapter 2 Display Screen Configuration....15
- SIP Accounts....24
- Network 26
- Chapter 3 Web Configuration ......29
- Alarm Clock....39
- Calendar 39
- System Settings....41
- General SIP Settings....44
- Chapter 4 Operation ....55
- Appendix A Upgrade VigorPhone 350....63
- Chapter 1 Overview
- Package Contents
- Product Description
- Front View
- Back View
- Setting Up the Phone
- Chapter 2 Display Screen Configuration
- Call History
- Missed Calls
- Answered Calls
- Dialed Calls
- Phone Book
- Creating a New Entry
- Modifying or Deleting a Contact
- Phone Settings
- Always Forward
- Busy Forward
- No Answer Forward
- Speed Dial / BLF (Busy Lamp Field)
- Ring Tone
- Music On Hold
- Auto Answer
- Alarm Clock
- Alarm Time
- Repeat
- Calendar
- Viewing the Schedule List
- Setting up Schedules
- System Settings
- Date/ Time
- LCD Contrast
- LCD Back Light Timeout
- Firmware Version
- Serial Number
- Factory Default
- Reboot
- General SIP Settings
- Codec Priority
- NOTE:
- SIP Listen Port
- RTP Port Base
- RFC2833 Payload Type
- G.711 Frame Size
- G.723 Frame Size
- G.729 Frame Size
- G.722 Frame Size
- Signaling Precedence
- Voice Precedence
- SIP Accounts
- Network
- LAN Port Settings
- PC Port Settings
- IP Address
- Net Mask
- DHCP Server
- VLAN Settings
- Activation
- Identifier
- Priority
- NAT / Bridge
- NTP Server
- NTP
- Primary Server
- Secondary Server
- Time Zone
- Location
- LAN Port MAC Address
- PC Port MAC Address
- Call History
- Call History
- Phone Book
- Phone Book
- Add Phone
- Phone Settings
- Call Forward
- Call Forward
- Speed Dial
- Speed Dial
- Ring Tone
- Ring Tone
- To remove a ringer, do the following:
- Digit Map
- To configure individual dial plan setting through the web browser, do the following:
- Digit Map
- Voice Settings
- Voice Settings
- Alarm Clock
- Alarm Clock
- Calendar
- To set the calendar, do the following:
- Calendar
- To create a new schedule:
- To edit an existing schedule:
- To delete a schedule:
- System Settings
- Firmware Upgrade
- Firmware Upgrade
- Backup & Recover Setting
- Backup & Restore
- Administrator Password
- Administrator Password
- Factory Default
- Factory Default
- Reboot
- Reboot System
- General SIP Settings
- Port Setting
- Port Settings
- Codec Setting
- Codec Settings
- NOTE1:
- Other Settings
- Other Settings
- SIP Accounts
- SIP Accounts
- To delete an SIP account, do the following:
- To edit an SIP account setting, do the following:
- SIP Account Settings
- Network
- Status
- Network Status
- LAN Port Settings
- LAN Port Settings
- IP Type:
- PC Port Settings
- PC Port Settings
- NTP & Time Settings
- NTP & Time Settings
- To synchronize clock with the NTP server:
- To configure date and time manually:
- IP Mapping
- IP Mapping
- To add a new hostname, do the following:
- To edit a hostname, do the following:
- To delete a hostname, do the following:
- Routing Table
- Routing Table
- To add a new routing table, do the following:
- To edit a routing table, do the following:
- To delete a routing table, do the following:
- Answering a Call
- Making a Call
- Dialing with the Keypad
- Looking up a Number from the Phone Book
- Making a Call to an IP Address
- Making a Call to SIP Server
- Speed/BLF (Busy Lamp Field)
- Dialing to Multiple SIP Accounts
- Redialing a Number
- Call Options
- Using the Speaker Phone
- Putting a Call on Hold
- Conducting a Three-Way Conference Call
- Transferring a Call
- Using the Intercom Function
- Blocking All Calls Using the DND Function
- Checking Voice Messages
- Set up VigorPhone 350 with Vigor/PPBX2820
- IPPBX Wizard
- Office Hours Setup
Brand : Draytek
Model : VigorPhone 350
Category : Phone