
0G00199 - External hard drive G-TECHNOLOGY - Free user manual and instructions
Find the device manual for free 0G00199 G-TECHNOLOGY in PDF.


| Product Type | External Hard Drive |
| Brand | G-Technology |
| Model | 0G00199 |
| Interface | USB 3.0 (USB-C compatible with adapter) |
| Capacity | 2 TB |
| Dimensions (L x W x H) | 130 mm x 80 mm x 15 mm |
| Weight | 200 g |
| Power Supply | Bus-powered via USB (no external power adapter required) |
| Compatibility | Windows 10/11, macOS 10.12+, Chrome OS, Linux |
| File System | exFAT (pre-formatted) |
| Data Transfer Rate | Up to 140 MB/s read, 120 MB/s write |
| Shock Resistance | Drop resistant up to 1.5 m (with protective case) |
| Encryption | Hardware encryption (AES 256-bit) |
| Backup Software | Pre-loaded with G-Tech backup utility |
| Warranty | 3 years limited |
| Operating Temperature | 5°C to 35°C |
| Storage Temperature | -20°C to 60°C |
| Included Accessories | USB 3.0 cable, quick start guide |
| Repairability | Not user-serviceable; contact G-Tech support for service |
Frequently Asked Questions - 0G00199 G-TECHNOLOGY
User questions about 0G00199 G-TECHNOLOGY
0 question about this device. Answer the ones you know or ask your own.
Ask a new question about this device
Download the instructions for your External hard drive in PDF format for free! Find your manual 0G00199 - G-TECHNOLOGY and take your electronic device back in hand. On this page are published all the documents necessary for the use of your device. 0G00199 by G-TECHNOLOGY.
USER MANUAL 0G00199 G-TECHNOLOGY
natural_image
Exterior view of a silver and white electronic device with perforated grille and ventilation slots (no visible text or symbols)Table of Contents
Introduction
Safety Precautions
System Requirements
What's in the Box
G-DRIVE Overview
Installing G-DRIVE
Initializing G-DRIVE
Disconnecting G-DRIVE
Optimizing Performance
Technical Support
Limited Warranty

natural_image
Blue circular logo with a white stylized 'G' in the center (no text or symbols)G-Technology™ by Hitachi
G DRIVE™
IMPORTANT SAFEGUARDS
CAUTION
RISK OF ELECTRIC SHOCK
DO NOT OPEN

The lightning flash with arrowhead symbol within an equilateral triangle is intended to sign the user to the presence of unregulated dangerous voltage within the product enclosure and may be of significant risk of electrical shock to persons.
The examination point within an equilateral triangle is intended to silent the user to the presence of important operating maintenance (servicing). Instructions literature accompanying the appliance.
CAUTION: TO REDUCE THE RISK OF ELECTRIC SHOCK, DO NOT REMOVE COVER (OR BACK). NO USER-SERVICEABLE PART'S INSIDE. REFER SERVICING TO QUALIFIED SERVICE PERSONNEL.
WARNING: TO REDUCE THE RISK OF FIRE OR ELECTRIC SHOCK, DO NOT EXPOSE APPLIANCE TO RAIN OR MOISTURE.
1. READ INSTRUCTIONS
All the safety and operating instructions should be read before the unit is operated.
2. RETAIN INSTRUCTIONS
The safety and operating instructions should be retained for future reference.
3. HEED WARNINGS
All Warnings on the unit and in the operating instructions should be adhered to.
4. FOLLOW INSTRUCTIONS
All operating and use instructions should be followed.
5. ATTACHMENTS
Do not use attachments no recommended by the unit's manufacture as they may cause hazards.
6. WATER AND MOISTURE
Do not use this unit near water-for example, near a bathtub, washbowl, kitchen sink or laundry tub, in a wet basement or near a swimming pool.
7. ACCESSORIES
Do not place this unit on an unstable cart, stand, tripod, bracket or table. The unit may fall, causing serious injury and serious damage to the unit.
8. VENTILATION
Openings in the front and back of the unit are provided for ventilation to ensure reliable operation and to protect it from overheating. These openings must not be blocked or covered. This unit should never be placed near or over a radiator or heat source. This unit should not be placed in a built-in installation such as a bookcase or rack unless proper ventilation is provided.

9. POWER SOURCES
This unit should be operated only from the type of power source indicated on the rating label. If you are not sure of the type of power supply in your facility, consult your local dealer or power company.

10. GROUNDING AND POLARIZATION
This equipment is supplied with a power cord with a US style 3-wire grounding type plug at one end and a 3-wire IEC standard connector at the other. The 3-wire grounding type plug will hit into a US style grounding type power outlet and the IEC connector is intended to plug into the G-Tech unit. The 3-wire grounding type plug is a safety feature. If you are unable to insert the plug into the outlet, do not force it. Contact your electrician to replace the obsolete outlet. DO NOT DEEAT THE SAFETY PURPOSE OF THE GROUNDING TYPE PLUG. For use in Foreign Countries, contact your local G-Tech dealer or representative to obtain a power cord with a locally compatible 3-wire grounding plug on one end and a 3-wire IEC standard connector to the other.

11. POWER CORD PROTECTION
Power-supply cords should be routed so that they are not likely to be walked on or pinched by items placed upon or against them, paying particular attention to cords at plugs, convenience receptacles and the point where they exit the unit.

12. SERVICING
Do not attempt to service this unit yourself as opening or removing covers may expose you to dangerous voltages or tother hazards (see Caution Symbol at rear of power supply chassis). Refer all servicing to qualified service personnel.
Introduction
Thank you for purchasing the G-DRIVE™ from G-Technology™. G-DRIVE hard drives from G-Technology are the ideal storage solutions for content creation professionals.
natural_image
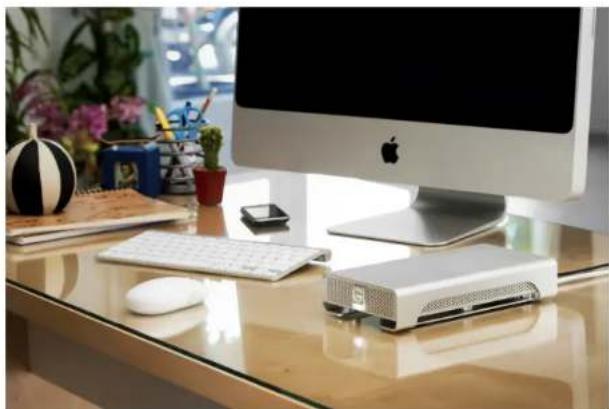
Office desk setup with a computer monitor, keyboard, mouse, and electronic device (no visible text or symbols)G-DRIVE high-speed interface external storage systems offer the ultimate in flexibility by providing a quad interface, which includes eSATA, FireWire™ 800, FireWire 400 (via an included 9 pin to 6 pin cable) and USB 2.0. With up to 2TB of storage capacity, G-DRIVE is the perfect high-performance solution for storage intensive applications including audio/video editing, digital photography, MP3 libraries and high-speed data back up. The system remains whisper quiet with its fan-less cooling system. The latest Hitachi 7200 RPM drives with up to 32MB of cache and an Oxford 934 chipset all encased in a rugged, stylish and recyclable enclosure.
The G-DRIVE is also ideal for backing up your Mac® automatically using Time Machine™. G-DRIVE is the only portable drive to feature a silent, "fan-less" design and an integrated cooling system to ensure reliable operation and long life.


NOTE: G-DRIVE is formatted for the MAC OS and will mount on the desktop right out of the box. For details on reinitializing the G-DRIVE, using the G-DRIVE on Windows ^® , or for using the G-DRIVE for both Windows and Mac, click here.
Safety Precautions
The disk drive contained in your G-DRIVE is a delicate electronic instrument and is susceptible to damage due to excessive physical shock. Place the unit in a vented area away from moisture or liquids. Please handle the unit with care. Do not open the case. Doing so will void the warranty. If the product is returned with damage caused by improper handling, the warranty will be void and liability will rest with the user.
System Requirements
eSATA/ FireWire 800 / USB 2.0 operation
• Mac OS X 10.3 or higher

G DRIVE™
• Windows XP / Vista/ Windows 7
FireWire 400 operation (via 9 pin to 6 pin cable)
• Mac OS 9.x or OS X
• Windows XP / Vista/ Windows 7
What's in the Box
Take a moment to ensure that the following items are included in the box.
G-DRIVE
• G-DRIVE external hard drive (eSATA/FW800/FW400/USB 2.0)
• Installation CD-ROM
- eSATA cable
• FireWire 800 cable (9 Pin to 9 Pin)
• FireWire 800 to 400 cable (9 Pin to 6 Pin)
- USB 2.0 cable
- AC Power Unit and cables
If anything is missing, please call G-Technology at (310) 449-4599. For more details on this, click here.
G-DRIVE Overview
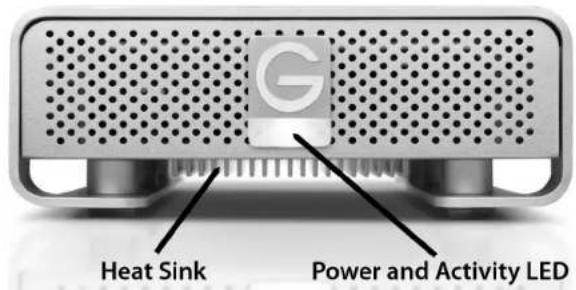
Note the various features of the G-DRIVE. There is a Power and Activity LED behind the grill on the front of the unit, while a heat sink is beneath it. On the rear of the unit is an eSATA port, 2 FireWire 800 ports, a USB 2.0 port, an On/Off Switch and DC Power In.

G DRIVE™
Attention Mac OS X Users

G-DRIVE is set up at the factory for use with Mac OS X systems. If you are running Mac OS X, G-DRIVE will mount on the OS X desktop right out of the box. If it becomes necessary to re-format G-DRIVE for Mac OS X, go here.
Attention Windows Users

G-DRIVE must be formatted for the Windows Operating System before using the G-DRIVE.
For more information about using the G-DRIVE for Windows XP, Windows Vista or Windows 7 use,
please visit: http://www.g-technology/support/windows
Attention Cross-Platform Users
G-DRIVE can be used on both MAC and PC systems by formatting the drive "FAT32." There are some limitations when using FAT 32. Alternatively you can install software on the Windows machine such as "MacDrive" which will allow you to mount MAC formatted drives on your PC.
For more information about using the G-DRIVE for cross-platform use, go here.


Installing G-DRIVE
G-DRIVE attaches to your computer via an eSATA, USB 2.0 or FireWire 800 port. FireWire 400 connectivity is handled by a 9 to 6 pin cable (included). Choose the connection appropriate for your system and connect G-DRIVE with the supplied cable. Connect the supplied power cord to the Power Supply and plug the other end into a surge protector or wall outlet. Turn on the power switch and the G-DRIVE will mount on the desktop.

G DRIVE™
Initializing G-DRIVE
G-DRIVE is set up at the factory for use with Mac OS X systems. If you are running Mac OS X, G-DRIVE will mount on the OS X desktop right out of the box. If it becomes necessary to re-format G-DRIVE, follow the instructions below.
natural_image
Exterior view of a silver storage device with ventilation grilles and drive slots (no visible text or symbols)- For Mac OS X installations see below
- For Windows XP / Vista / Windows 7 installations, proceed to http://www.g-technology/support/windows
• For Cross-Platform use, go here.
Reformatting for Mac OS X
You'll first need to open Apple Disk Utility in order to initialize the disk for Mac OS X. Apple Disk Utility is in the Utilities Folder located in the Applications Folder on the Macintosh HD (or press Shift + Command + U to open the Utilities folder).
natural_image
Close-up of a silver audio drive with ventilation grille and speaker grille (no visible text or symbols)A window like the following will appear. G-DRIVE will be displayed in the left-hand column.

- Select G-DRIVE by clicking on the drive icon in the left-hand column, as shown. Information about G-DRIVE will be displayed at the bottom of the window.
G DRIVE™

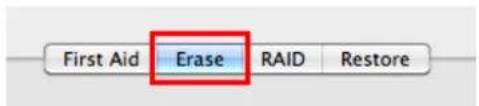
- Select the Erase tab to view the formatting options. By default, the Format is set to Mac OS Extended (Journaled), as indicated in the Format category.
- Choose the Format:
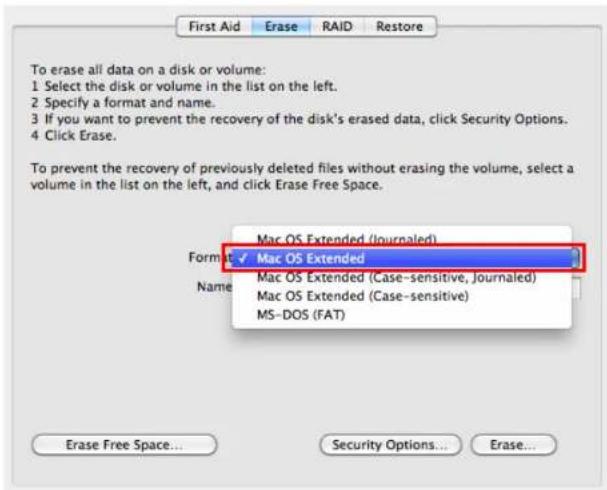
- Set the format to Mac OS Extended (Journaled) if you intend to use G-DRIVE for Time Machine or to create a
separate bootable installation of OS X.
- For best performance and for media storage, set the Format to Mac OS Extended. Click on the Format menu to change it to "Mac OS Extended".
G|DRIVE™
- Click the Erase Button in the lower corner of the window.

- A dialog box will launch after clicking the button.
WARNING: THIS NEXT STEP WILL ERASE ALL DATA ON YOUR DRIVE.

- Click on the Erase button to continue.
A progress bar in the lower right corner of the window will show you the progress of the disk's reformatting.

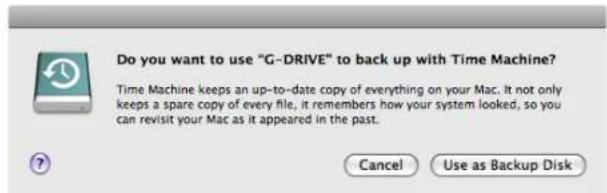
You may get a dialog box asking you if you want to use the drive with Time Machine. Click Don't Use or Decide Later if you do not want to use Time Machine at this point.

G DRIVE™
If you wish to use the drive for Time Machine, you can click on the Use as Backup Disk button. For more info about setting up the G-DRIVE with Time Machine, go here.
After reinitializing, the icon for the G-DRIVE has been erased. You can restore it.
Restore the icon by doing the following:
- Go to the G-Technology website and download the "icon package". Click here to download the package.

- Once downloaded, select the icon for the G-DRIVE in the G-Technology Icons disk.

-
Press Command + C to copy the icon.
-
Select the G-DRIVE FireWire icon on the Desktop and press Command + I.
-
Select the eSATA Icon in the "Get Info" window (left)

- Press Command + V to paste the icon into the icon area of the Get Info window (right).
The icon for your G-DRIVE has now been restored.
You can now close the Get Info window.
After reinitializing the drive and restoring your icon, your G-DRIVE is ready for use.

natural_image
Exterior view of a G-DRIVE drive unit (no text or symbols on the device itself)G DRIVE™
Using G-DRIVE with Time Machine
G-DRIVE is a perfect candidate to use with Apple Time Machine. Time Machine provides automatic backup for your crucial files. The following steps will guide you in setting up the G-DRIVE with Time Machine.
Format the drive as Mac OS Extended (Journaled) as described in "Reformatting for Mac OS X" here.
After the drive is reinitialized, you should see the following dialog box. Click the Use as Backup Disk button.
If the dialog box did not launch, go to the Apple Menu > System Preferences and click on the Time Machine icon.
The Time Machine pane of System Preferences will then launch and be automatically switched to on.
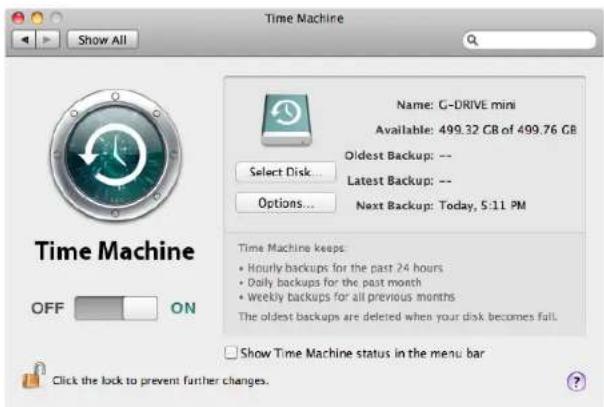
You are now free to set options by clicking the Options button. This chooses files you do not want to backup.
The G-DRIVE is now backing up your important files automatically with Time Machine.

natural_image
Green G-DRIVE drive icon with circular refresh symbol (no text or symbols on device)G|DRIVE™
Reformatting with Multiple Partitions
You can reformat the G-DRIVE to have multiple partitions. The following steps will guide you through this process.

Open Apple Disk Utility. Disk Utility is in the Utilities Folder located in the Applications Folder on the Macintosh HD (or press Shift + Command + U to open the Utilities folder).
- Select the FireWire icon (not the G-DRIVE) icon.
- Click on the Partition button in the main window, as shown.

Select the number of partitions you would like from the Volume Scheme menu. Here, there are 2 partitions selected.

- Click on a partition in the Volume Scheme area. Your partition will be highlighted by a blue bounding box.
- You can now create separate names, formats and sizes for each partition in the Volume Information area. Do so by doing the following:
- Type a Name for the partition in the Name field
G DRIVE™
- Choose a Format from the Format Menu (for more info on formats go here).
• Type in a Size for the partition - Click the Apply button
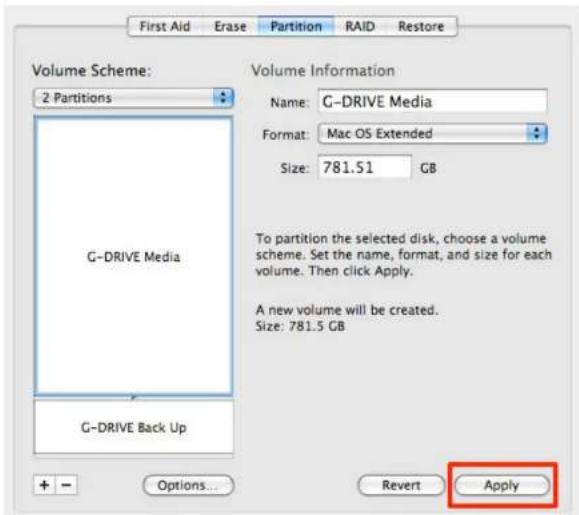
- After clicking on the Apply button. The dialog box, as shown on the on the next page, will appear.
WARNING: THIS NEXT STEP WILL ERASE ALL DATA ON YOUR DRIVE.
Partition Disk
Partitioning this disk will permanently erase all the data from the disk.
This volume will be erased: "G-DRIVE"
The following volumes will be added: "G-DRIVE Media" "G-DRIVE Back Up"
Are you sure you wish to partition the disk "Hitachi HDE721010SLA330 Media"?
Cancel Partition
- Click on the Partition button to continue.
A progress bar in the lower right corner of the window will show you the progress of the disk's reformatting.
G DRIVE™
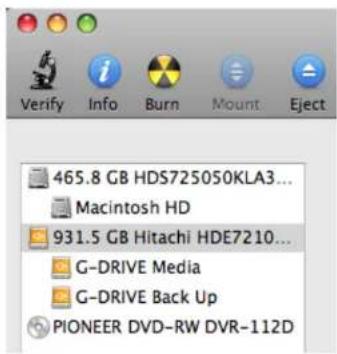
-
When partitioning is complete, G-DRIVE partitions will be displayed in the left-hand panel of Apple Disk Utility.
-
Reset the G-DRIVE icons as described here.
10.Exit Apple Disk Utility.
G-DRIVE will be displayed on the desktop as shown, right.
G-DRIVE is now setup with 2 partitions and ready for use.
Cross Platform Use
To setup your G-DRIVE for use on both Windows and Macintosh systems, use Apple Disk Utility and format G-DRIVE to MS-DOS (FAT), also known as "FAT32".
Open Apple Disk Utility. Apple Disk Utility is in the Utilities Folder located in the Applications Folder on the Macintosh HD (or press

Shift + Command + U to open the Utilities folder).
A window like the one below will appear.
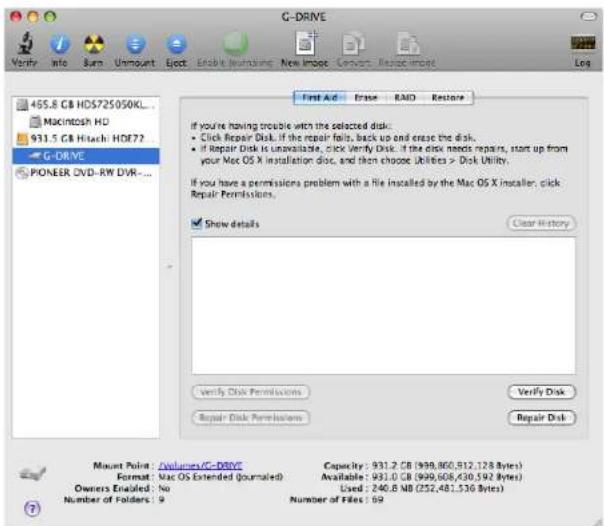
-
Select the G-DRIVE from the left-hand column
-
Click on the "Erase button at the top of the window as shown.

G DRIVE™
- Select MS-DOS File System from the Format drop down menu. NOTE: You may need to re-name the drive because FAT32 does not support more than 11 letters in the drive name.

- Click the Erase button in the lower right corner of the window.

5.A new dialog box appears.
WARNING: THIS NEXT STEP WILL ERASE ALL DATA ON YOUR DRIVE.
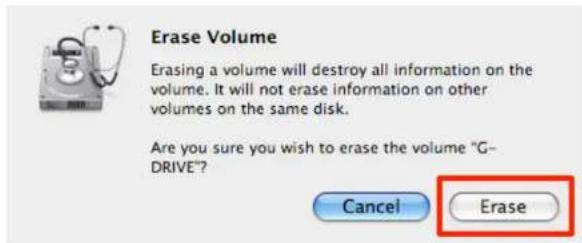
G DRIVE™
6. Click the Erase button.
A progress bar in the lower right corner of the window will show you the progress of the disk's reformatting.
Erasing Volume

Your drive will be formatted to its full capacity as FAT32.
-
Reset the G-DRIVE icons as described here.
-
Exit Apple Disk Utility.
With this format, you will be able to READ/WRITE on both Windows XP/Vista/Windows 7 and MAC OS X machines.
NOTE: You could format your drive on a Windows machine FAT32, however Windows currently limits FAT32 partitions to 32GB in size.
NOTE: The 'MS-DOS File System' cannot write files over 4 GB. If you are working with files over 4 GB, you may want to choose a software option like MacDrive. MacDrive is Windows software that enables the Windows OS to mount MAC formatted drives. (www.macdrive.com)
Disconnecting G-DRIVE
A great feature of G-DRIVE is its ability to be connected
and disconnected while your computer is running. To prevent failures and/or data loss it is important to follow the steps below when disconnecting or "unmounting" the G-DRIVE from your Mac.

-
Before powering down and disconnecting G-DRIVE, you must unmount the system by simply dragging the G-DRIVE mini icon to the trash located in the dock.
-
It is now safe to power off and remove G-DRIVE from your system.
For unmounting G-DRIVE with Windows based systems, see the Windows documentation at http://www.g-technology/support/windows
Optimizing Data Transfer Rates
G-DRIVE can be connected to any Mac or PC equipped with an eSATA, FireWire 400, FireWire 800 or USB 2.0 port.
For best performance, G-DRIVE should be connected via eSATA.
Technical Support
G-Technology appreciates and values its customers, striving to give you the finest service and support. If you encounter any difficulties while installing the G-DRIVE, or if the G-DRIVE needs maintenance, please contact G-Technology Technical Support via one of the following ways:
Telephone: (310) 449-4599
G DRIVE™
Fax: (310) 449-4670
E-mail: support@g-technology.com
Internet: http://www.g-technology.com
When contacting Technical Support, make sure to be in front of your computer and have the following information readily available:
- Your G-DRIVE serial number (on bottom of unit)
- Operating system and version
• Computer brand and model
• Amount of memory installed
• Other devices attached to your computer
Thank you for purchasing G-DRIVE. If you have any comments or questions about this manual or the product, please call (310) 449-4599, or send an email to support@g-technology.com
Limited Warranty
Hitachi Global Storage Technologies, ("Hitachi GST") including G-Technology by Hitachi Limited Warranty for External Hard Disk Drives
What does this limited warranty cover?
This Limited Warranty applies to new Hitachi GST external storage products purchased from an authorized Hitachi GST dealer by the original purchase for normal use and not for resale. Hitachi GST warrants that a covered product is free from defects in materials and workmanship, with the exceptions stated below.
How long does limited warranty coverage last?
This limited warranty lasts for 1 year, 2 years, 3 years or 5 years, or a fixed period from date of purchase, depending on when and where it was originally purchased. To determine the warranty specifically for your product, visit www.g-technology.com. A valid proof of purchase may be required to prove eligibility. If you do not have a valid proof of purchase, the limited warranty period will be measured from the date of sale from Hitachi GST to the authorized distributor.
What does this limited warranty not cover?
The limited warranty does not cover damage resulting from commercial use, misuse, accident, modification or alteration to hardware or software, tampering, unsuitable physical or operating environment beyond product specifications, improper maintenance, or failure caused by a product for which Hitachi GST is not responsible. There is no warranty of uninterrupted or error-free operation. There is no warranty for loss of data—you must regularly back up the data stored on your product to a separate storage product. There is no warranty for product with removed or altered identification labels. HITACHI GST DOES NOT PROVIDE ANY OTHER WARRANTIES OF ANY KIND, INCLUDING, BUT NOT LIMITED TO, THE IMPLIED WARRANTIES OR CONDITIONS OF MERCHANTABILITY AND FITNESS FOR A PARTICULAR PURPOSE. SOME JURISDICTIONS DO NOT ALLOW THE LIMITATION OF IMPLIED WARRANTIES, SO THIS LIMITATION MAY NOT APPLY TO YOU. Hitachi GST is not responsible for returning to you product which is not covered by this limited warranty.
G DRIVE™
What must you do?
If you are having trouble with a product, before seeking limited warranty service, first follow the troubleshooting procedures that Hitachi GST or your reseller provides.
To obtain limited warranty service, you must first obtain a Return Materials Authorization (RMA) and ship-to address by contacting G-Technology by Hitachi at http://www.g-technology.com/support Please follow the instructions found on the website. You must return the covered hard disk drive using approved packaging to our logistics center. You must pay any associated transportation charges, duties and insurance in shipping the drive to our logistics center. You should remove all personal information from the product prior to its return.
What will Hitachi GST do?
Hitachi GST will repair or replace covered defective product and ship you repaired or replaced product, transportation prepaid. You receive title to the repaired or replaced product at delivery to carrier at Hitachi GST shipping point. You are responsible for importation of the repaired or replaced product, if applicable. These limited warranty terms apply to the repaired or replaced product, except the limited warranty period is for the greater of the remainder of the original limited warranty period for the returned product or 90 days.
How is our liability limited?
HITACHI GST AND ITS AFFILIATES, SUPPLIERS, DISTRIBUTORS, AND RESELLERS ARE NOT LIABLE FOR ANY OF THE FOLLOWING: 1) THIRD-PARTY CLAIMS AGAINST YOU FOR DAMAGES (OTHER THAN BODILY INJURY INCLUDING DEATH AND TANGIBLE PERSONAL PROPERTY; 2) LOSS OF, OR
DAMAGE TO, YOUR DATA; OR 3) SPECIAL, INCIDENTAL, OR INDIRECT DAMAGES OR FOR ANY ECONOMIC CONSEQUENTIAL DAMAGES (INCLUDING LOST PROFITS OR SAVINGS), EVEN IF INFORMED OF THE POSSIBILITY. SOME JURISDICTIONS DO NOT ALLOW LIMITATION OF LIABILITY, INCIDENTAL DAMAGES, OR CONSEQUENTIAL DAMAGES, SO THE ABOVE LIMITATIONS MAY NOT APPLY TO YOU.
How do local laws apply?
THIS LIMITED WARRANTY GIVES YOU SPECIFIC LEGAL RIGHTS, AND YOU MAY ALSO HAVE OTHER RIGHTS WHICH VARY FROM JURISDICTION TO JURISDICTION.
G-Technology, a division of Hitachi
Global Storage
Technologies
Tel: (310) 449-4599
Fax: (310) 449-4670
support@g-technology.com

natural_image
Blue circular logo with a white stylized 'G' (no text or symbols)G-Technology™ by Hitachi
G-Technology by Hitachi Global Storage Technologies © 2010. All rights reserved. G-DRIVE, G-RAID, G-SAFE, and G-SPEED are registered trademarks of G-Technology by Hitachi GST. Apple, Mac, Macbook, Macbook Pro and the Mac logo are trademarks of Apple, Inc. Hitachi Global Storage Technologies and Hitachi Inspire the Next are trademarks of Hitachi Ltd. G-Technology is a trademark of Hitachi Global Storage Technologies. All other trademarks are the
G DRIVE™
property of their respective owners. Hitachi Global Storage Technologies trademarks are authorized for use in countries and jurisdictions in which Hitachi has the right to use, market and advertise the brands. The Travelstar trademark is authorized for use in the Americas, EMEA and the following Asia-Pacific countries and jurisdictions: Australia, Hong Kong, Japan, New Zealand, South Korea and Taiwan. Contact Hitachi for further information. Hitachi shall not be liable to third parties for unauthorized use of Hitachi trademarks.
One gigabyte (GB) is equal to one billion bytes and one terabyte (TB) equals 1,000 GB (one trillion bytes). Accessible capacity will vary from the stated capacity due to formatting and partitioning of the hard drive, the computer's operating system, and other factors. For G-Technology by Hitachi products less than 1TB: "One gigabyte (GB) is equal to one billion bytes when referring to hard drive capacity. Accessible capacity will vary depending on the operating environment and formatting.

- Table of Contents
- G DRIVE™
- IMPORTANT SAFEGUARDS
- CAUTION
- READ INSTRUCTIONS
- RETAIN INSTRUCTIONS
- HEED WARNINGS
- FOLLOW INSTRUCTIONS
- ATTACHMENTS
- WATER AND MOISTURE
- ACCESSORIES
- VENTILATION
- POWER SOURCES
- GROUNDING AND POLARIZATION
- POWER CORD PROTECTION
- SERVICING
- Introduction
- Safety Precautions
- System Requirements
- What's in the Box
- G-DRIVE
- G-DRIVE Overview
- Attention Mac OS X Users
- Attention Windows Users
- Attention Cross-Platform Users
- Installing G-DRIVE
- Initializing G-DRIVE
- Reformatting for Mac OS X
- G|DRIVE™
- Using G-DRIVE with Time Machine
- Reformatting with Multiple Partitions
- Partition Disk
- Cross Platform Use
- Click the Erase button.
- Disconnecting G-DRIVE
- Optimizing Data Transfer Rates
- Technical Support
- Limited Warranty
- What does this limited warranty cover?
- How long does limited warranty coverage last?
- What does this limited warranty not cover?
- What must you do?
- What will Hitachi GST do?
- How is our liability limited?
- How do local laws apply?
- G-Technology, a division of Hitachi
- Global Storage
- Technologies
Brand : G-TECHNOLOGY
Model : 0G00199
Category : External hard drive