
VM8514R - Car stereo JENSEN - Free user manual and instructions
Find the device manual for free VM8514R JENSEN in PDF.


| Product Type | Car Stereo / Multimedia Receiver |
| Brand | Jensen |
| Model | VM8514R |
| Dimensions (W x H x D) | 7.0 x 4.0 x 6.0 inches (178 x 102 x 152 mm) |
| Weight | 2.1 lbs (0.95 kg) |
| Power Supply | 12V DC (negative ground) |
| Maximum Power Output | 50W x 4 channels |
| RMS Power Output | 18W x 4 channels (at 4 ohms, 1% THD+N) |
| Radio Tuner | AM/FM with 30 presets, RDS support |
| Disc Playback | CD, CD-R/RW, DVD, DVD-R/RW |
| Digital Media Playback | USB (up to 64 GB), SD card slot, MP3/WMA/AAC |
| Bluetooth | Built-in for hands-free calling and audio streaming (A2DP, AVRCP) |
| Display | 3.5-inch TFT color LCD with touchscreen |
| Auxiliary Input | 3.5mm front auxiliary input |
| Video Output | RCA composite video output for external monitor |
| Camera Input | Rear camera input with auto-switching |
| Steering Wheel Control Compatible | Yes (requires adapter, not included) |
| Maintenance | Clean faceplate with soft, dry cloth; avoid solvents |
| Safety | Removable faceplate for theft deterrence; built-in fuse protection |
| Spare Parts / Repairability | Contact Jensen customer service or authorized service centers |
| General Information | For full details, refer to the user manual provided with the device |
Frequently Asked Questions - VM8514R JENSEN
User questions about VM8514R JENSEN
0 question about this device. Answer the ones you know or ask your own.
Ask a new question about this device
Download the instructions for your Car stereo in PDF format for free! Find your manual VM8514R - JENSEN and take your electronic device back in hand. On this page are published all the documents necessary for the use of your device. VM8514R by JENSEN.
USER MANUAL VM8514R JENSEN
Operating Instructions
CONTENTS
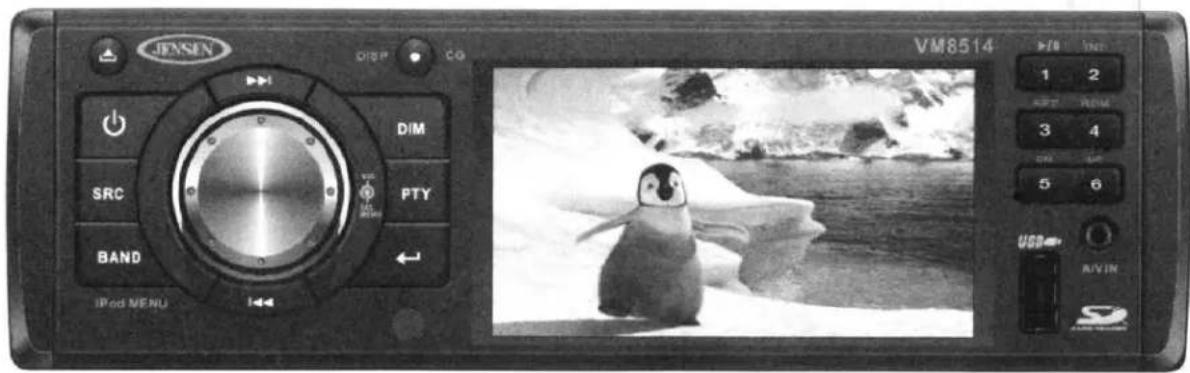
Thank you for choosing a Jensen product. We hope you will find the instructions in this owner's manual clear and easy to follow. If you take a few minutes to look through it, you'll learn how to use all the features of your new Jensen VM8514 Mobile Multimedia Receiver for maximum enjoyment.
Introduction 1
Front Panel Release 3
Remote Control 4
Operation 9
Radio Operation....14
Satellite Radio Operation 17
DISC/MP3/WMA Playback....21
iPod Operation 29
Bluetooth Operation 31
Setup Menu 38
Care and Maintenance....41
Troubleshooting 43
Specifications 44
INTRODUCTION
Congratulations on your purchase of the Jensen VM8514 Mobile Multimedia Receiver. It's a good idea to read all of the instructions before beginning the installation. We recommend having your Jensen VM8514 installed by a reputable installation shop.
Features
DVD
• Aspect Ratio - Full and Normal
• Fast Forward - 2X, 4X, 8X and 16X
• Slow Motion - 1/2, 1/4, 1/6 and 1/8
• Play, Pause, Stop, Next Chapter and Previous Chapter
CD / MP3 / WMA
• CD-Text Compatible
• ID3 Tag Compatible
• Directory Search (MP3 / WMA Only)
• Direct Track Access via Remote Control
• Burn up to 1500 MP3 and WMA Files onto a DVD+R / RW
• Audible Forward / Reverse Track Search (CD-DA Only)
• Random, Repeat and Intro
• Play, Pause, Stop, Next Track and Previous Track
AM-FM Tuner
• USA / Europe Frequency Spacing
• 30 Station Presets (18 FM / 12 AM)
• Auto Stereo / Mono
• Auto Store / Preview Scan
XM Radio
• XM Ready - Compatible with CNP2000 XM Satellite Tuner (Sold Separately)
iPod
• iPod via front panel or rear USB
- High Speed Direct Connect Interface to Access iPod Playlists, Artists, Albums and Songs. Play music and view video/photo* files from your iPod. *Video/photo playback requires jLink-USB iPod interface cable (sold separately).
• Power Management Charges iPod while Connected
Chassis
• 1.0 DIN (Import / ISO-DIN Mountable)
• 3.5" TFT Active Matrix LCD
• 74,800 Sub Pixels (320W X 234H)
- Beep Tone Confirmation (On/Off Option)
General
• USB Interface - Supports Most Flash Memory Devices
• SD Card Interface - Supports up to 8GB Cards
• Bluetooth Ready (BTM15 Sold Separately)
• 44-Key Infrared Remote Control
• One Composite Video Output for Additional Screens
• 3.5mm Front Panel Audio/Video Input
• Two-Band Tone control (Bass and Treble) w/ Four Preset EQ Curves
• Front, Rear and Subwoofer Line Output
• Programmable Volume Control
• Rear Camera Input (Normal and Mirror Image View)
• 2VRMS Line Output - All Channels
• Rotary Encoder Audio Control
- SWC Interface – Compatible with PAC adapter SWI-PS Steering Wheel Control Interface, sold separately
What's in the Box
• VM8514 Head Unit
- Mounting Sleeve
- Wiring Harness
• Installation Hardware (rubber cushion, mounting bolt, screws)
- Removal Keys
• Face Plate and Storage Case
• Parking Brake Extension Wire
• 3.5mm to 3.5mm A/V Adapter Cable
• Remote Control with Battery
• Installation Guide
FRONT PANEL RELEASE
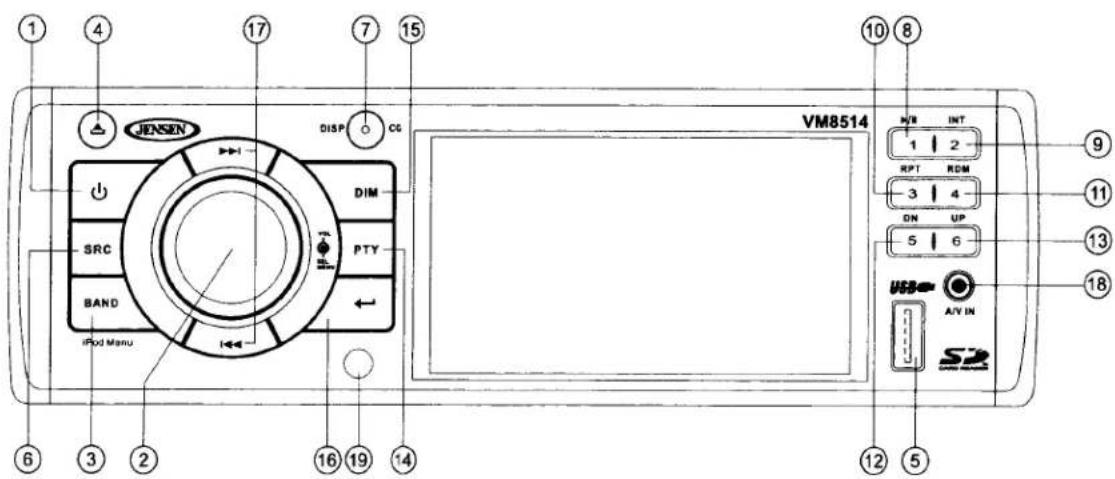
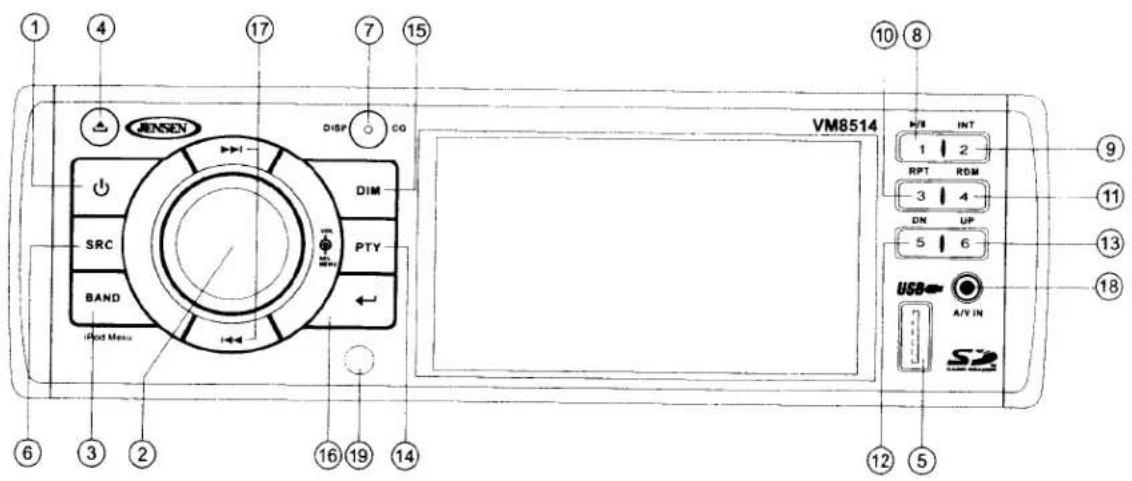
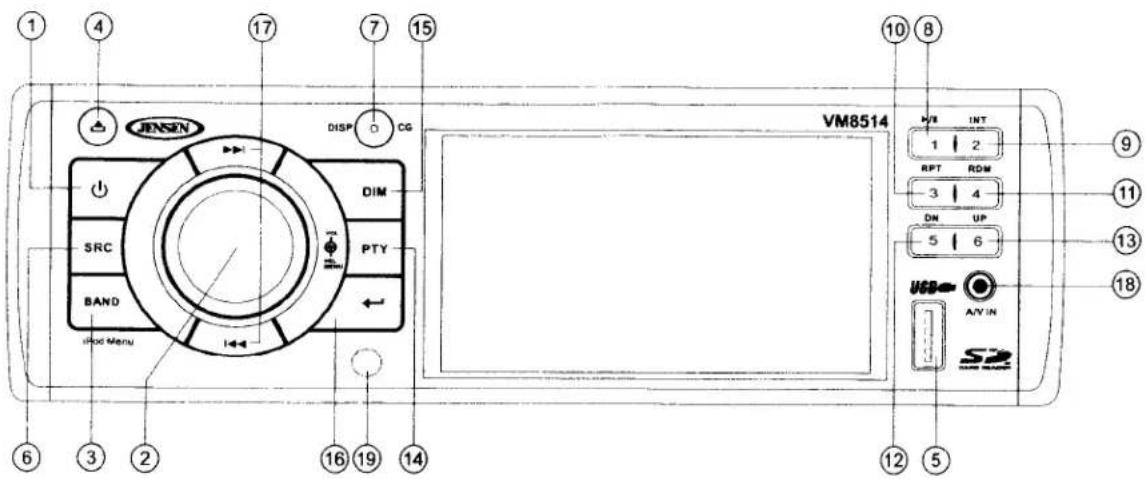
The front panel release button (4) releases the mechanism that holds the front panel to the chassis.
Detaching the Front Panel
To detach the front panel, perform the following steps:
- Press the power button (1) to turn the unit off.
- Press the front panel release button to flip the panel down.
- Grasp the right side to release the front panel and then pull it at an angle to remove the left side from the chassis.
- Store the front panel in the supplied carrying case to protect it from dirt and damage and take it with you to prevent theft.
Re-attaching the Front Panel
Before re-attaching the front panel, make sure the electrical terminals on the back of the panel are free of dust and dirt, as debris could cause intermittent operation or other malfunctions.
To re-attach the front panel:
- With the panel laying flat (in the "open" position), insert the left side of the panel in place until correctly engaged.
- Gently press the right side of the panel until the mechanism locks it into place.
- Lift upward to close the panel.
REMOTE CONTROL
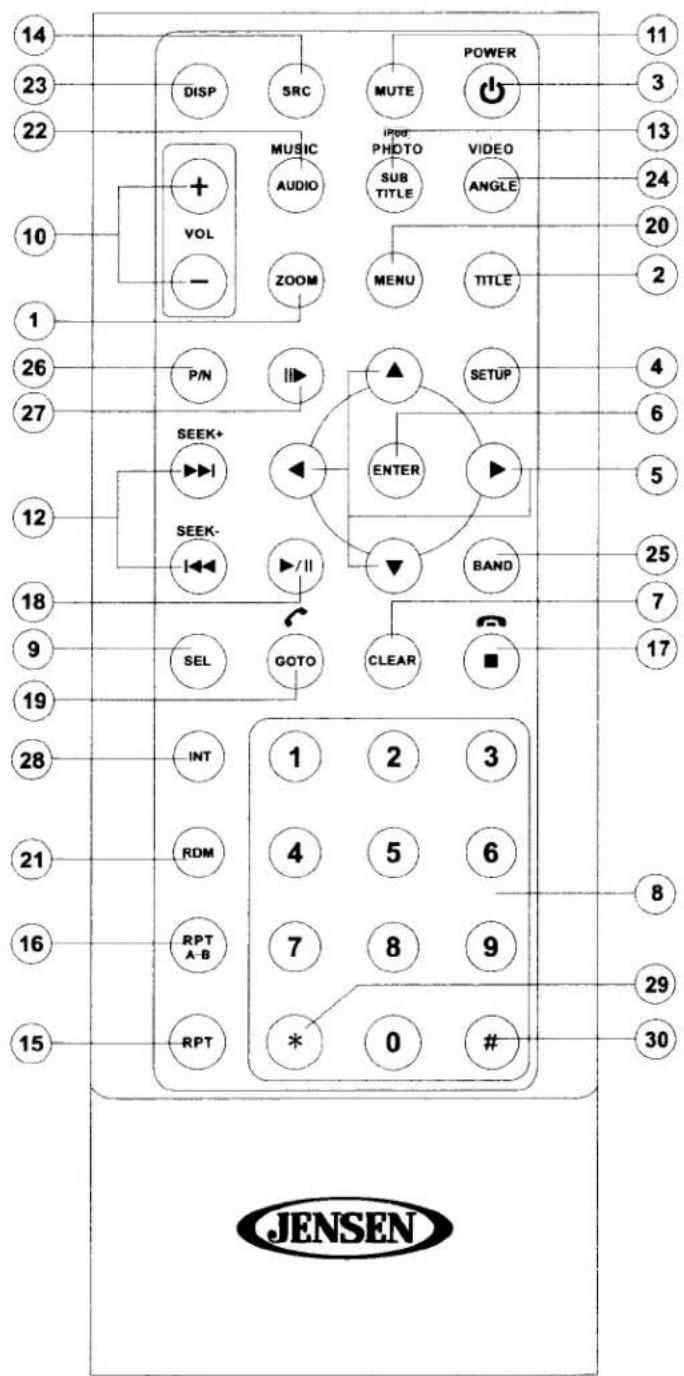
The remote control will allow you to control many functions of the VM8514.
Operating Range
The remote control sensor (19) is located near the bottom of the front panel, left of the LCD screen. The remote control can operate within a distance of 3\~5m.
Replacing the Battery
When the range of operation of the remote control becomes short or stops functioning,
replace the battery with a new lithium battery. Be sure to observe the proper polarity.
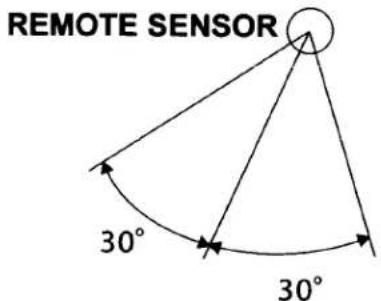
Table 1: Remote Control Functions
| # | Button | AM/FM Tuner | XM Radio | CD/SD/USB | iPod | Blue-tooth | DVD/VCD |
| 1 | ZOOM | Magnify Image | |||||
| 2 | TITLE | Select Video Mode | View DVD Title Screen | ||||
| 3 | Power | Power On Press and hold to Power Off | Power On Press and hold to Power Off | Power On Press and hold to Power Off | Power On Press and hold to Power Off | Power On Press and hold to Power Off | Power On Press and hold to Power Off |
| 4 | SETUP | Display Setup Menu | Display Setup Menu | Display Setup Menu | Display Setup Menu | Display Setup Menu | Display Setup Menu |
| 5 | Navigation Arrows | Down/Up: Preset Navigation | Down/Up: Change the setting of the items on the last page of diagnostic mode | Down/Up: Screen Navigation Left/Right: Folder Navigation | Down/Up: Screen Navigation | Left/Right: Fast Reverse/ Fast Forward Up/Down: Slow Reverse/ Slow Forward | |
| 6 | ENTER | Confirm Entry | Scan channels under the current category; press and hold to scan all the channels | Confirm Entry | Confirm Entry | Confirm selection / dial selected phone number from Missed Calls / Received Calls / Dialed Calls / Phone Book | Confirm Entry |
| 7 | CLEAR | Clear incorrect number input | Clear incorrect number input |
Table 1: Remote Control Functions
| # | Button | AM/FM Tuner | XM Radio | CD/SD/USB | iPod | Blue-tooth | DVD/VCD |
| 8 | Direct Entry | Press 1-6 to select Preset 1, 2, 3, 4, 5, 6. Press and hold to save the current channel as the preset channel. | Press 1-6 to select Preset 1, 2, 3, 4, 5, 6. Press and hold to save the current channel as the preset channel. Press 978 to enter or exit diagnostic mode. | Direct Track Entry | Enter digits | ||
| 9 | SEL | View/mod-ify audio control set-tings (bass, treble, fader, bal-ance) | View/mod-ify audio control set-tings (bass, treble, fader, bal-ance) | View/mod-ify audio control set-tings (bass, treble, fader, bal-ance) | View/mod-ify audio control set-tings (bass, treble, fader, bal-ance) | View/mod-ify audio control set-tings (bass, treble, fader, bal-ance) | View/mod-ify audio control set-tings (bass, treble, fader, bal-ance) |
| 10 | VOL (Vol-ume Control) | Volume up/down | Volume up/down | Volume up/down | Volume up/down | Volume up/down | Volume up/down |
| 11 | MUTE | Silence Audio Out-put | Silence Audio Out-put | Silence Audio Out-put | Silence Audio Out-put | Silence Audio Out-put | Silence Audio Out-put |
| 12 | SEEK | Search Next/Previ-ous Chan-nel Press and hold to Scan Chan-nels up/down | Search Next/Previ-ous Chan-nel | Next/Previ-ous Track Press and hold to Fast Forward/Reverse | Next/Previ-ous Track Press and hold to Fast Forward/Reverse | Next/Previ-ous Music File | Next/Previ-ous Track Press and hold to Fast Forward/Reverse |
| 13 | SUBTI-TLE | Select Photo Mode | View/Change Subtitle Language | ||||
| 14 | SRC (Source) | Select Play-ing Mode | Select Play-ing Mode | Select Play-ing Mode | Select Play-ing Mode | Select Play-ing Mode | Select Play-ing Mode |
| 15 | RPT | Repeat Current Track | Repeat Current Track | Transfer audio from the head unit back to the mobile phone while talking | Repeat Current Chapter |
Table 1: Remote Control Functions
| # | Button | AM/FM Tuner | XM Radio | CD/SD/USB | iPod | Blue-tooth | DVD/VCD |
| 16 | RPT A-B | Repeat Section | Repeat Section | ||||
| 17 | Stop/Return | Stop/Return | Stop/Return | End call/reject incoming call /return to the main menu (Missed Calls / Received Calls/ Dialed Calls/ Phone Book) | Stop/Return | ||
| 18 | Play/Pause | Play/Pause | Play/Pause | Play/Pause Music | Play/Pause | ||
| 19 | GOTO | Enter channel number directly | GOTO Specific Area of Disc | Answer incoming call or dial the last call received | GOTO Specific Area of Disc | ||
| 20 | MENU | Return to Previous Menu | Return to the Main menu (Missed Calls / Received Calls/ Dialed Calls/ Phone Book) | View DVD Setup Menu PBC for VCD 2.0 and up | |||
| 21 | RDM | Play all Tracks in Random Order | Play all Tracks in Random Order | Connect/disconnect paired device | Play all Chapters in Random Order | ||
| 22 | AUDIO | Select Audio Mode | View/ Change disc Audio Language |
Table 1: Remote Control Functions
| # | Button | AM/FM Tuner | XM Radio | CD/SD/USB | iPod | Blue-tooth | DVD/VCD |
| 23 | DISP | Press and hold to set clock | Press once to enter channel search mode; press twice to enter category search mode; press three times to enter direct channel search mode | Press and hold to set clock | Press and hold to set clock | Press and hold to set clock | |
| 24 | ANGLE | Show alternate angles, if available | |||||
| 25 | BAND | Select Band | Select PAL, NTSC, AUTO | ||||
| 26 | P/N | ||||||
| 27 | ||► | Slow motion forward/backward | |||||
| 28 | INT | Play first ten seconds of each song in current folder | Play first ten seconds of each song in current folder | Initiate or terminate pairing process | Play first ten seconds of each chapter | ||
| 29 | * | ||||||
| 30 | # | Move to the next page/ previous page under diagnostic mode / exit Diagnostic mode |
OPERATION
Power
Press the ⏻ (power) button (1) to turn the unit on. Press and hold the power button again to turn the unit off.
NOTE: LCD panels may take longer to respond when subjected to cold temperatures for an extended period of time. In addition, the visibility of the numbers on the LCD may decrease slightly. The LCD display will return to normal when the temperature increases to a normal range.
Source
Press the SRC button (6) repeatedly to scan the various sources. A source is only displayed when accessible (optional equipment required for some sources). Available modes include Radio (FM1, FM2, FM3, AM1, AM2), XM Radio (SAT1, SAT2, SAT3), DISC, SD, USB1 (front panel), USB2 (rear pigtail) BT and auxiliary (AUX IN).
External Devices
External peripheral devices, including a game console, camcorder, navigation unit, iPod, Zune, etc. can be connected to the A/V IN connector (18) on the front of this unit using the 3.5mm A/V Media Cable (included). Select "SOURCE >> AUX IN" to access auxiliary devices. You cannot directly control external devices connected to the A/V IN input.
Audio Mute
Press the ⏻ (power) button (1) to silence the audio volume. “☐” appears on the display. Press ⏻ again to restore volume to the previous setting.
Volume Control
To increase the volume, turn the VOL/SEL/MENU (rotary encoder) (2) clockwise. To decrease the volume, turn the rotary encoder counter-clockwise. When volume is adjusted, the volume level is shown on the display panel as a number ranging from "0" (lowest) to "40" (highest).
Steering Wheel Control (SWC)
The VM8514 is compatible with the PAC (Pacific Accessory Corporation) steering wheel control adapter SWI-PS. A 3.5mm female connector (labeled "SWC Interface") on the back of the head unit allows connectivity to the PAC adapter. Please refer to the instructions included with the PAC adapter for detailed installation information.
SWC Functions
The following controls are available for most vehicles:
- Vol Down
- Vol Up
- Mute
- Seek Down / Previous Track / ** Preset Down
- Seek Up / Next Track / ** Preset Up
- SRC (Source)
- ** Select
- **Select
- Band
** If additional steering wheel control buttons are available on the vehicle, function 7 / 8 may be assigned the "Select" feature. This feature / function may not be available on some vehicles.
Select Operation
If "Select" (function 7 or 8) is held down and function 4 is pressed momentarily, Preset Up is selected. If "Select" (function 7 or 8) is held down and function 5 is pressed momentarily, Preset Down is selected.
Audio Menu
Press the VOL/SEL/MENU button (2) to access the audio menu. Press the VOL/SEL/MENU button repeatedly to move through the list of menu options.
NOTE: Audio settings only apply to the current source (Source Tone Memory). You must make audio adjustments for another source when that source is active.
- Sub_w: When the Low Pass Filter is activated (see "Sub LPF (Low Pass Frequency)" on page 12), you can use the VOL/SEL/MENU rotary encoder to adjust the subwoofer volume from "-14" to "0".
- BASS: Turn the VOL/SEL/MENU rotary encoder (2) to adjust the bass level from “+7” to “-7”.
- TREBLE: Turn the VOL/SEL/MENU rotary encoder to adjust the treble level from “+7” to “-7”.
• BALANCE: Turn the VOL/SEL/MENU rotary encoder to adjust the balance from "R16" (full right) to "L16" (full left). - FADER: Turn the VOL/SEL/MENU rotary encoder to adjust the fader from "F16" (full front) to "R16" (full rear).
The unit automatically saves your changes and exits the audio control menu after five seconds of inactivity.
Menu Operation
Press and hold the VOL/SEL/MENU button (2) for more than two seconds to access the SETTING MENU. Press the VOL/SEL/MENU button to move through the following menu options: Equalizer, Loud Set, Beep Set, 12/24 Mode (clock), Mirror Image, Vol Mode, A-VOL, Sub LPF and Area Set. The following procedures assume you have already accessed the menu.
Press the VOL/SEL/MENU button to select the highlighted setting and move to the next menu option.
Equalizer
The Equalizer function applies preset sound effects to the unit's audio output signal. Turn the rotary encoder to select from the following equalizer options: "Off", "Rock", "Hip Hop", "Dance" and "Acoustic". With the equalizer function activated, if bass or treble is adjusted, the EQ Mode will revert to "Off".
When the equalizer function is activated, the most recently selected bass/treble levels cannot be adjusted. When the equalizer function is not active, the unit will return to the most recently selected bass and treble levels.
Loud Set
When listening to music at low volumes, this feature will selectively boost certain bass and treble frequencies. "Off" is the default setting. Turn the rotary encoder to select "On".
Beep Set
The beep tone feature allows the selection of an audible beep tone to be heard each time the menu is accessed. "On" is the default setting. Turn the rotary encoder to select "Off".
12/24 Mode
This option allows selection of a 12 hour or 24 hour clock format. "12 Hours" is the default setting. Turn the rotary encoder to change to the 24 hour clock format.
Mirror Image
This option allows for selection of a mirror image view when a rear view backup camera (sold separately) is connected to the CAMERA IN input on the back of the radio. Turn the rotary encoder to select "On" or "Off".
Vol Mode
Turn the rotary encoder to select "Last" or "Adjust".
- Last: When the unit is turned on, the volume will resume at the level selected when last turned off.
- Adjust: If choosing "Adjust", use the A-VOL setting to specify a turn-on volume.
Turn-On Volume (A-VOL)
After selecting “Adjust” for Vol Mode, press the VOL/SEL/MENU button to access the A-VOL setting and then turn the rotary encoder to select the desired turn-on volume level. When this option is selected, the unit will revert to the adjusted volume each time the unit is turned on.
Sub LPF (Low Pass Frequency)
After connecting a subwoofer to the back of the unit, turn the rotary encoder to select a crossover frequency: OFF, 80, 120 or 160Hz.
Area Set
This option allows you to select the appropriate frequency spacing for your area. "U.S.A." is the default setting. Turn the rotary encoder to select "EUROPE". The unit will automatically shut down when the Area is changed.
| Tuner Region Specifications | |
| EUROPE (region1)UKEuropeRussiaAfrica | FM Band: 87.6MHz - 107.9MHz, channel separation @ 100kHzAM Band: 531kHz - 1602kHz, channel separation @ 9kHz |
| U.S.A. (region 2)USACanadaMexicoSouth America | FM Band: 87.9MHz - 107.9MHz, channel separation @ 200kHzAM Band: 530kHz - 1710kHz, channel separation @ 10kHz |
Dimmer
Press the DIM button (15) on the front panel to dim the screen by 1/2. Press again to darken the screen completely. Press a third time to resume full brightness.
Clock Set
- Press and hold the DISP button (7) until the clock blinks.
- Turn the VOL/SEL/MENU rotary encoder (2) to set the minutes.
- Press the VOL/SEL/MENU button (2) to confirm and move to the hour field.
- Turn the VOL/SEL/MENU rotary encoder to set the hour.
- Press the DISP button to set the clock and exit the clock set function.
Reset Button
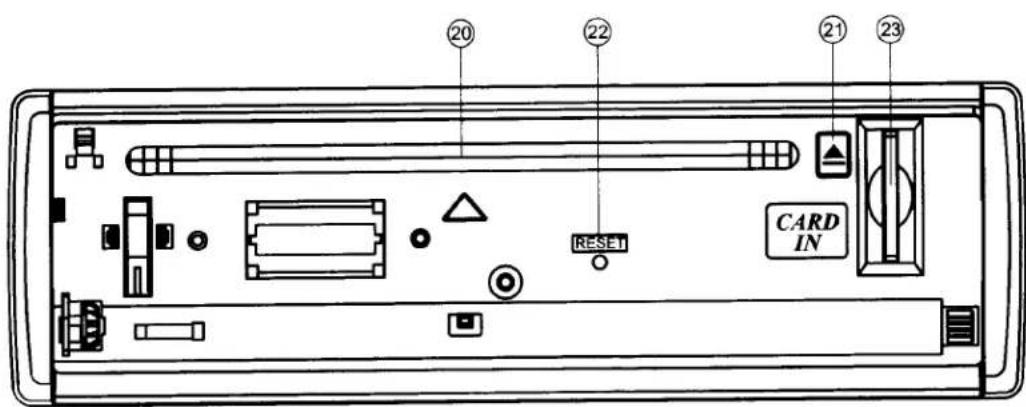
The RESET button is located behind the front panel and can only be accessed with the front panel opened. Resetting the unit will erase the time and preset memories. It should only be activated upon initial installation after all wiring is complete, or if there is a malfunction of any of the switches on the unit. In these circumstances, pressing the RESET button (22) will clear the system and return the unit to default operation.
RADIO OPERATION
Accessing Radio Mode
Press the SRC button (6) on the front panel or remote control (14) to switch to the RADIO source.
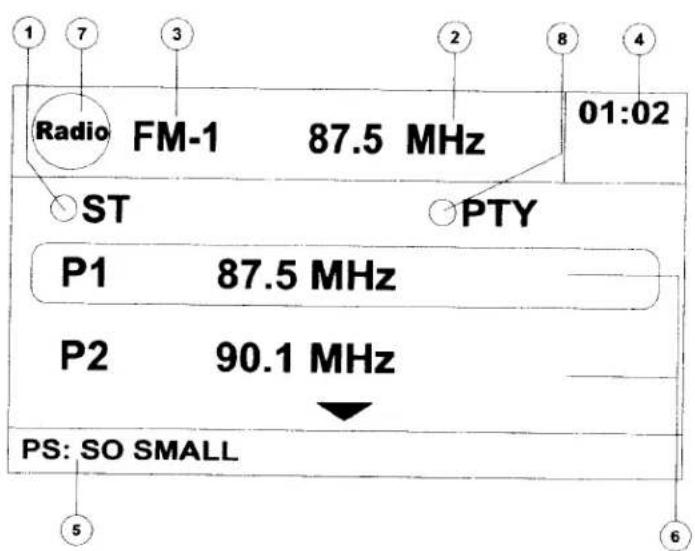
- Stereo Reception Indicator
- Radio Station Frequency
- AM/FM Band
- Time/Clock
- RDS Information
- Current Preset Channels
- Source Indicator
- PTY Indicator
Select a Band
Press the BAND button (3) on the front panel or remote control (25) to change between three FM and two AM bands. Each band stores up to six preset stations.
Tuning
Seek Tuning
Press the TUNE/TRACK >>| or |<< buttons (17) on the front panel or remote control (12) to seek the next/previous station automatically.
Manual Tuning
Press and hold the TUNE/TRACK >>| or |<< buttons (17) on the front panel or remote control (12) to enter Manual tuning mode. Press the buttons again to move the radio frequency number up or down one step.
Program Information
To view available program information, press the PTY button (14) on the control panel. Press repeatedly to choose between Program Type (PTY) category, Program Service station call letters (PS), and Radio Text (RT).
PTY Search
To view the Program Type categories, press and hold the PTY button (14) on the control panel. Program type categories are listed at the bottom of the screen, allowing listeners to find similar programming by genre. Press the TUNE/TRACK >>| or |<< buttons (17) to select a category. After a few seconds, the radio will start scanning for stations broadcasting in the selected category.
NOTE: Program information is broadcaster dependant. Not all broadcasters supply accurate information.
Preset Stations
Up to six stations on each band can be stored as presets, which can then be instantly recalled by pressing the associated preset button (8-13). To store a station, turn the radio on and select the desired band and station. Press and hold the desired preset button (numbered one through six on the face of the radio or remote control) for more than two seconds. When stored, the preset number will appear in the display. The station is now stored and can be recalled by pressing the corresponding preset button. Repeat for the remaining five presets on the current band and for presets on the other four bands.
Preview Scan
Press the ← button (16) to scan and play all strong stations for 5 seconds each. Press ← again to stop scanning and play the current station.
Automatic Store (AS)
Press and hold the ← button (16) to select six strong stations and store them in the current band using the Auto Store feature. After entering the stations into memory, the unit will automatically stop at each station for five seconds, allowing you to preview each selection. When using the Auto Store feature, the new stations replace any stations already stored in preset memory.
NOTE: You can stop the Auto Store function at any time by pressing the button again.
Listeners can subscribe to XM® Radio on the Web by visiting www.xmradio.com, or by calling (800) 967-2346. Customers should have their Radio ID ready (see "Displaying the Identification (ID) Code"). Customers can receive a limited number of free-to-air channels without activation.
Accessing Satellite Radio Mode
Press the SRC button (6) on the front panel or remote control (14) to switch to the SAT source.
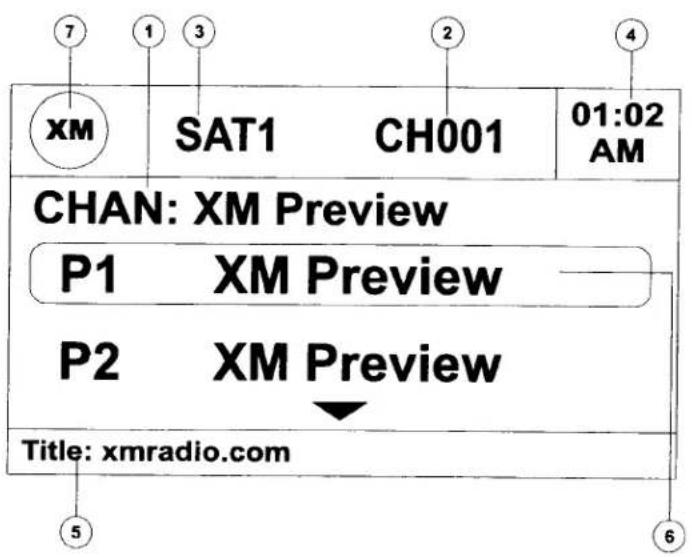
- SAT Channel Name
- SAT Channel Number
- SAT Band
- Time/Clock
- Artist and Title Information
- Current Preset Channels
- Source Indicator
Displaying the Identification (ID) Code
Before you listen to satellite radio, you must subscribe to the service using your radio's identification number. To display the radio ID, press the DISP button three times or use the >>| / |<< tuning buttons (17) to tune to channel "000". The screen displays the radio ID where the channel name is usually displayed.
Select a Band
Press the BAND button (3) on the front panel or remote control (25) to change between three SAT bands (SAT1, SAT2 and SAT3). Each band stores up to six preset stations.
Selecting a Station
Press the TUNE/TRACK >>| or |<< buttons (17) on the front panel or remote control (12) to tune to another station.
Preset Mode
Six numbered preset buttons store and recall stations for each band.
Storing a Station
- Select a band (if needed), then select a station.
- Press and hold a preset button (numbers 1-6) on the front panel or remote control.
- The preset number and station is displayed and highlighted.
Recalling a Station
- Select a band (if needed).
- Press a front panel or remote control preset button (numbers 1-6) to select the corresponding stored station.
Channel Search
To access Channel Search mode, press the DISP button on the front panel (7) or remote control (23). The list of all available channels appears on the screen.
- Rotate the VOL/SEL/MENU rotary encoder (2) on the control panel or press the ▲/▼ keys (5) on the remote control to navigate the list of channels.
- Press the VOL/SEL/MENU button on the control panel or the ENTER button (6) on the remote control to select a channel.
Category Search
- To access Category Search mode, press the DISP button on the front panel (7) or remote control (23) twice. The list of available categories appears on the screen.
| XM | CAT | CH001 | 01:02AM |
| CAT: News | |||
| 01 | News | ||
| 02 | Sports | ||
| Title: News Radio | |||
- Rotate the VOL/SEL/MENU rotary encoder (2) on the control panel or press the ▲/▼ keys (5) on the remote control to navigate the list of categories.
- Press the VOL/SEL/MENU button on the control panel or the ENTER button (6) on the remote control to select the desired category. A list of stations in the selected category appears on the screen.
- Rotate the VOL/SEL/MENU rotary encoder on the control panel or press the ▲/▼ keys on the remote control to navigate the list of stations in the selected category.
- Press the VOL/SEL/MENU button on the control panel or the ENTER button (6) on the remote control to select a station.
Direct Channel Input
To enter a radio station directly, press the DISP button on the front panel (7) or remote control (23) three times or press the GOTO button (19) on the remote control to display the DIRECT channel input screen.
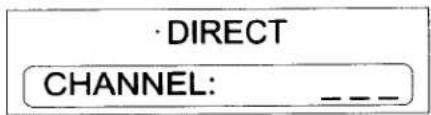
Enter the desired radio station using the remote control number pad (8) followed by the ENTER button, or perform the following steps:
-
Turn the VOL/SEL/MENU rotary encoder to select the third digit of the desired channel (0-9).
-
Press the VOL/SEL/MENU button to enter the number and move to the second position.
-
Turn the rotary encoder again to select the second digit of the desired channel (0 - 9).
-
Press VOL/SEL/MENU to enter the second number and move to the first position. (Press and hold if channel is only 2 digits and you are ready to tune to the channel.)
-
Turn the rotary encoder again to select the first digit of the channel you want to tune to (0 - 2).
-
Press the VOL/SEL/MENU button to tune to the selected station.
DISC/MP3/WMA PLAYBACK
Acceptable Media
The MP3/WMA recording media acceptable to this unit are CD-R, CD-RW, and DVD. The unit will also play MP3, WMA, JPEG photo and video files (MPEG 1, 2, xVid, SVCD and VCD) written to SD Cards and USB Devices.
Depending on the media type and recording method, some CD-R/RWs may be incompatible with this unit. When using CD-RW, use full format rather than quick format to prevent malfunction.
This unit supports playback of MP3/WMA and CDDA (CDA), Mixed-Mode CDs and CD-Extra (including multi-session discs). Discs on which the session has not been closed will not play.
Acceptable Medium Formats
The following formats are available for the media used in this unit. The maximum number of characters used for file name, including the delimiter (".") and three-character extension, are indicated in parentheses.
• ISO 9660 Level 1 (11 characters)
• ISO 9660 Level 2 (31 characters)
• Joliet (31 characters)
• Romeo (31 characters)
Up to 200 characters can be displayed in the long file name format. For a list of available characters, see the instruction manual of the writing software and the section "Entering File and Folder Names" that follows. The media reproducible on this unit has the following limitations:
• Maximum number of nested folders: 8
• Maximum number of files per disc: 1500
• Maximum number of folders per disc: 255
MP3/WMA files written in formats other than those listed above will not play successfully and their file or folder names will not display properly.
MP3/WMA Encoder and CD Writer Settings
Use the following settings when compressing audio data with the MP3 encoder.
• Transfer bit rate: 8 - 320 kbps
• Sampling frequency: 8, 11.025, 12, 16, 22.05, 24, 32, 44.1, 48 kHz
When using a CD writer to record MP3/WMA up to the maximum disc capacity, disable additional writing. To record an empty disc up to the maximum capacity at once, select the "disc at once" option.
Entering ID3 Tag
This unit supports ID3 tag version 2.0. For character codes, refer to the table to the right.
Entering File and Folder Names
Names using the code list characters are the only file names and folder names that can be entered and displayed. Using any other character will cause the file and folder names to be displayed incorrectly. The unit recognizes and plays only files with the MP3/WMA extension.
| 0 | 1 | 2 | 3 | 4 | 5 | 6 | 7 | 8 | 9 | A | B | C | D | E | F | ||
| 0 | 0 | @ | P | P | ■ | ° | A | D | à | d | |||||||
| 1 | ! | 1 | A | Q | a | q | i | ± | A | N | á | n | |||||
| 2 | " | 2 | B | R | b | r | c | 2 | A | O | á | ó | |||||
| 3 | # | 3 | C | S | c | s | £ | 3 | A | O | á | ó | |||||
| 4 | $ | 4 | D | T | d | t | ☐ | A | O | á | ó | ||||||
| 5 | % | 5 | E | U | e | u | ¥ | μ | A | O | á | o | |||||
| 6 | & | 6 | F | V | f | v | : | ¶ | AE | O | æ | o | |||||
| 7 | ' | 7 | G | W | g | w | § | · | C | × | ç | ÷ | |||||
| 8 | ( | 8 | H | X | h | x | ♪ | † | E | ∅ | è | ø | |||||
| 9 | ) | 9 | I | Y | i | y | © | 1' | É | Ü | é | ü | |||||
| A | · : J Z j z | ||||||||||||||||
| B | + ; K [ k { | ||||||||||||||||
| C | |||||||||||||||||
| D | |||||||||||||||||
NOTE: A file name entered with characters not on the code list may not play correctly.
Electronic Shock Protection
• 10 seconds for CD-DA (CDA)
• >45 seconds for MP3 recorded at 44.1kHz, 128kbps
• >90 seconds for WMA recorded at 44.1kHz, 128kbps
Bit Rates
The unit supports bit rates from 32 - 320 kbps.
Inserting and Ejecting a Disc
Press the ▲ button (4) to flip the front panel down. Insert a disc, label side up, into the disc slot (20).
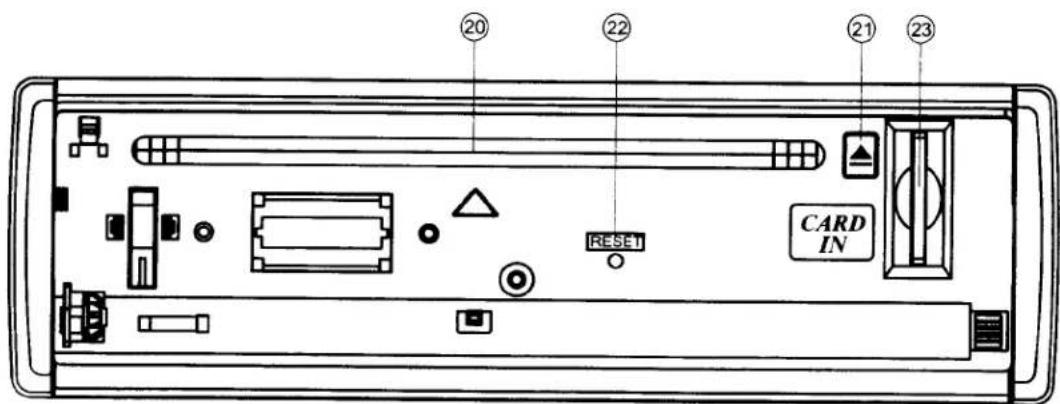
To stop disc play and eject the disc, press the ▲ button to flip the front panel down and then press the eject button (21).
NOTE: The unit is designed for play of standard 5" (12 cm.) discs only. Do not attempt to use 3" (8 cm.) CD singles in this unit, either with or without an adaptor, as damage to the player and/or the disc may occur. Such damage will not be covered by the warranty on this product.
Loading an SD Card
Open the panel and insert the SD card into the SD Card slot (23). Close the panel and the unit will read the files on the card automatically.
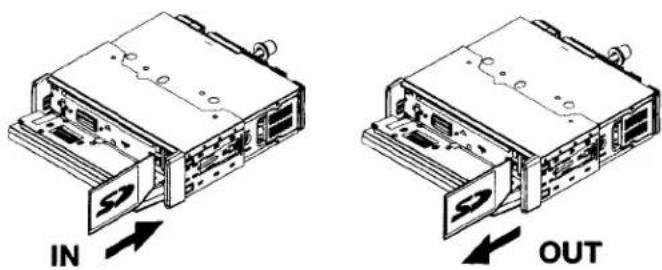
To remove the card, first press the SRC button (6) to switch to another mode and stop SD playback. Press the SD card to pop it out, and then remove the card.
NOTE: The VM8514 supports up to 8GB SD cards.
Loading a USB Device
Insert the USB device into the USB connector (5) on the front of the unit. The unit will read the files on the USB device automatically.
To remove the USB device, press the SRC button (6) to switch to another mode and then remove the USB device from the USB connector.
NOTE: The USB ports will recognize most USB flash memory devices.
Notes on MP3/WMA Play
MP3 and WMA (Windows Media Audio) music files are digital audio files that are compressed to allow more files to be stored. This unit can play MP3/WMA and video directly from files contained on a CD-R/RW, DVD+RW, DVD-RW, DVD+R, DVD-R and DVD-VIDEO, or an SD card or USB Device using the buttons on the receiver (or remote control) as described below.
Many types of software are available for converting audio files into MP3/WMA formats. Jensen recommends Nero or Roxio Easy CD Creator.
This unit can play MP3 (MPEG1, 2, 2.5 Audio Layer 3). However, the MP3 recording media and accepted formats are limited. When writing MP3/WMA, pay attention to the following restrictions.
MP3 Playing Order
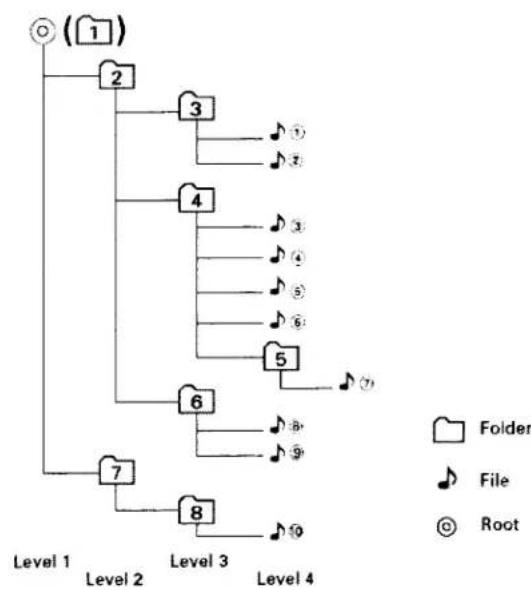
When selected for play, files and folders (Folder Search, File Search or Folder Select) are accessed in the order in which they were written to the media. As a result, the order in which they are expected to be played may not match the order in which they are actually played. You may be able to set the order in which MP3/WMA files are to be played by assigning file names beginning with play sequence numbers such as "01" to "99". For example, a medium with the following folder/file hierarchy is subject to Folder Search, File Search or Folder Select as shown below.
flowchart
graph TD
    A["Level 1"] --> B["2"]
    B --> C["3"]
    C --> D["4"]
    D --> E["5"]
    E --> F["6"]
    F --> G["7"]
    G --> H["8"]
    style A fill:#fff,stroke:#000
    style B fill:#fff,stroke:#000
    style C fill:#fff,stroke:#000
    style D fill:#fff,stroke:#000
    style E fill:#fff,stroke:#000
    style F fill:#fff,stroke:#000
    style G fill:#fff,stroke:#000
    style H fill:#fff,stroke:#000
    note right of A
        Folder
        File
        Root
    end
The VM8514 player will only recognize three folder levels and does not display folders containing only other folders. In the example above, the unit will display folders 3, 4, 6, and 8, but not 2 and 7 since they do not contain any tracks directly. Folder 5 is not recognized at all since it is at the fourth level.
Changing the Source
If a disc is already in the disc slot but is not playing, press the SRC button (6) on the front panel or remote control (14) to switch to the DISC source. To play files from an SD card or USB device that is already inserted, choose the SD CARD or appropriate USB source. The MP3 playback screen is indicated below:
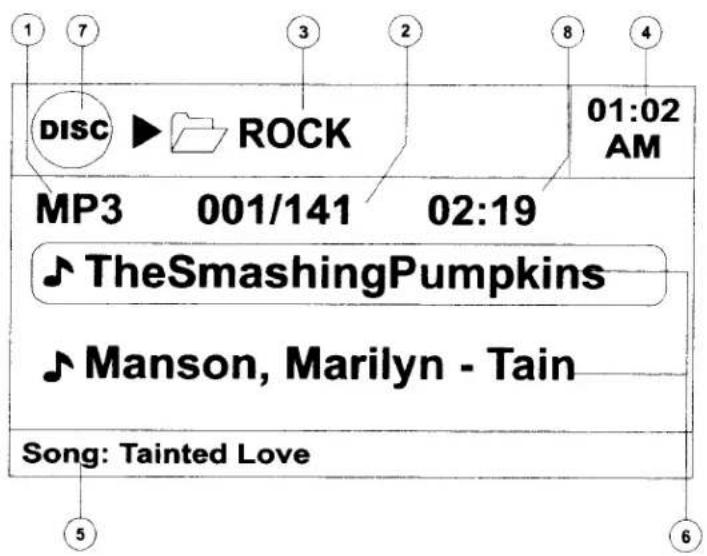
- CD/MP3/WMA Indicator
- Current of Total Tracks
- Current Folder Level
- Time/Clock
- ID3 Artist and Title Information
- Songs on Disc
- Source Indicator
- Elapsed Playing Time for Current Song
Controlling Disc or File Playback
Pause
Press the 1/>/|| button (8) to suspend playback. Press the 1/>/|| button again to resume playback. Tracks are played in the order they are written to the disc/card, unless another operation is requested.
Stop
Press and hold the 1/>|/|| button (8) on the head unit or the ■ button (17) on the remote control to stop playback. If viewing video or photos, the system returns to the file menu.
Track Select
Press the TUNE/TRACK >>| or |<< buttons (17) for less than one second to advance to the next/previous track/file. The selected track number will appear on the display.
Navigate Files (MP3)
The 5/DN (12) and 6/UP buttons (13) on the front panel or the ▲ / ▼ buttons (5) on the remote control are used to navigate up and down within the file menu. Press and hold the 5/DN (12) and 6/UP buttons on the front panel or the ◀ / ▶ buttons (5) on the remote control to move down/up a folder level. The current folder name is displayed at the top of the screen.
Fast Forward/Reverse
Press and hold the TUNE/TRACK >>| or |<< buttons (17) on the front panel or the SEEK +/ - buttons (12) on the remote control to fast forward or fast reverse. Press and hold once for 2X. Press and hold additional times for 4X, 8X, 16x. Press the play/pause >/|| button (8) to end fast forward or reverse and resume normal playback.
Intro Scan (INT) (No DVD Operation)
During playback, press the 2/INT button (9) to select "INTRO" and play the first
10 seconds of each track/file, as indicated by the ↑↓ symbol. When the desired track is reached, press 2/INT again to end the scan and play the selected track.
Repeat (RPT)
Press the 3/RPT button on the front panel (10) or the RPT button (15) on the remote control multiple times during playback to select from the following repeat play options:
• VCD/CD: RPT ONE (track), RPT ALL (disc), RPT OFF
• DVD: RPT CHAPTER, RPT TITLE, RPT OFF
- MP3/WMA: Repeat File (1), Repeat Folder/Directory, Repeat All (disc), Repeat Off
• iPod: RPT ONE (Track), Repeat All, Repeat Off
Random (RDM)
Press the 4/RDM button (11) on the front panel or the RDM button (21) on the remote control during playback to play all tracks/files in random, shuffled order. Press 4/RDM again to stop random play.
Section Repeat (A-B)
To repeat a specified section of a track, perform the following steps:
- Press the RPT A->B button (16) on the remote control to select the starting point.
- Press RPT A->B when you reach the desired ending point. The selected section will play repeatedly.
To cancel section repeat, press the A->B button again.
GOTO Track Time Access (DVD and VCD Only)
Use the GOTO function to directly access a specific playback point on a DVD or VCD disc.
- Press the GOTO button (19) on the remote control. When playing a DVD, the following window will appear:
| Search | |
| Title | 29 |
| Chapter | 1 |
| Time | 00:00:08 |
NOTE: When playing a VCD disc, only the "Time" field appears.
- Press the remote control arrow keys to move between the "Title", "Chapter" and "Time" fields.
- Use the number keys (8) to enter the Title, Chapter and track location from which you would like playback to begin.
- Press the ENTER button (6) to confirm and begin playback from the selected point.
VCD PlayBack Control (VCD Only)
If you insert a VCD with playback control, playback automatically starts at the beginning of the first track. Press the MENU button (20) on the remote control to turn playback control on/off.
Additional DVD/Video Playback Features
NOTE: You cannot view video while driving the car. When attempting to view video while the parking break is not engaged, the following message will appear on the screen: WARNING !! Engage Parking Brake to View Video.
The following remote control features are available during DVD playback:
• AUDIO: Press to choose an alternate audio language, if available. This button may also show different surround sound options encoded on the DVD.
• SUBTITLE: Press to select an alternate subtitle language, if available.
- TITLE: Press to display the title or chapter list. Use the ▲, ▼, ◀ or ▶ cursor buttons or the numeric buttons to enter a title or chapter number, and then press ENTER to play.
• ANGLE: Press to select an alternate viewing angle, if available.
- ZOOM: Press repeatedly to zoom the picture at x1, x2, x3, x4 or select OFF to return to normal view.
- Slow Forward/Slow Reverse: Press the ▲/▼ buttons on the remote control or the 5 and 6 buttons (12, 13) on the control panel to slow rewind/slow reverse. Press once for 1/2 speed. Press additional times for 1/4, 1/6, or 1/8 speed. Press the play/pause >/|| button (8) to end fast forward or reverse and resume normal playback.
NOTE: Feature availability is dependent on DVD embedded information.
NOTE: The VM8514 does not support Surround Sound decoding.
iPod OPERATION
Accessing iPod Mode
This unit is Made for iPod. You can control your iPod via the head units front panel buttons and access Playlist, Artist, Album, Songs, etc. Models supported but not limited to:
- iPod Classic
• iPod Touch / 2G / 3G
• iPod Nano / 2G / 3G / 4G / 5G - iPhone / 2G / 3GS
NOTE: Be sure your iPod has the latest Apple firmware installed to avoid connectivity issues.
The unit will automatically switch to iPod mode when an iPod is plugged into either USB connector. To return to the iPod screen from any other source, press the SRC button on the front panel (6) or remote control (14) and select SOURCE >> USB1 (or USB2). After switching to iPod source, the iPod menu appears on the screen.
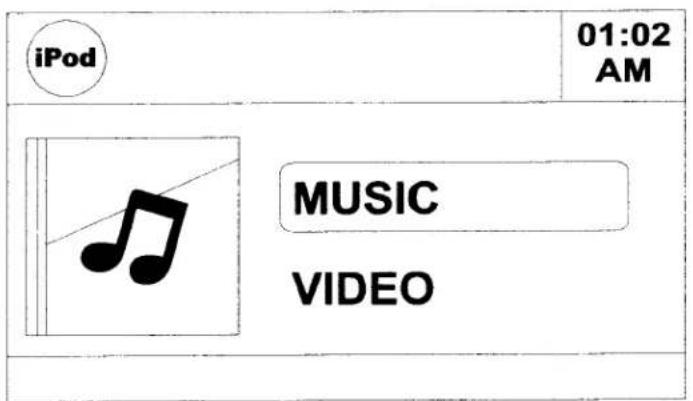
NOTE: For basic iPod connectivity, you can use the white 30-pin to USB iPod cable that came with your Apple device. For iPod video or photo playback, you must purchase the jLink-USB cable.
The following remote control buttons are used to access the iPod menus:
| Menu | Remote Control |
| Music | AUDIO |
| Videos | ANGLE |
| Photos | SUBTITLE |
iPod File Playback
The iPod menu is automatically accessed when an iPod is connected to the unit or the source is changed to iPod while the iPod is connected.
- Use the navigation arrows on the remote control (5) or the 5 DN/6 UP buttons (12,13) on the control panel to navigate the iPod menu and choose "MUSIC", "VIDEO" or "PHOTO".
- Press the ENTER (←) button on the front panel (16) or remote control (6) to select the highlighted menu option.
- Press the BAND button on the front panel (3) or the MENU button (20) on the remote control to return to the previous menu.
- Press the > / || button on the front panel (8) or remote control (18) to play or pause the selected track.
- Press the >>| button on the front panel (17) or remote control (12) to play the next file.
- Press the |<< button on the front panel (17) or remote control (12) to return to the beginning of the current file.
- To return to the iPod menu while viewing a video/photo, press the BAND button (3).
Fast Forward/Fast Reverse
Press and hold the |<< or >>| buttons on the control panel (17) or remote control (12) for 1 second and continue to hold for fast forward or fast reverse. Release to resume normal playback.
NOTE: To transmit the video from your iPod to the VM8514 screen, you must set the following options through the iPod video settings menu: TV Out = On, TV Signal = NTSC, and Widescreen = On.
NOTE: After disconnecting your iPod, the VM8514 will always return to tuner mode.
BLUETOOTH OPERATION
NOTE: Bluetooth operation requires optional BTM15 accessory.
About Bluetooth
Bluetooth is a short-range wireless radio connectivity technology that is developed as a cable replacement for mobile phones, handheld PCs and other devices. Bluetooth operates in 2.4 GHz frequency range and transmits voice and data at speeds up to 1 megabit per second. Bluetooth was launched by a special interest group (SIG) comprised of Ericsson Inc., Intel Corp., Nokia Corp., Toshiba and IBM in 1998, and it is currently developed by nearly 2,000 companies worldwide. The Bluetooth word mark and logos are owned by the Bluetooth SIG, Inc. and any use of such marks by Audiovox Corporation is under license. Other trademarks and trade names are those of their respective owners.
NOTE: The line-of-sight distance between this unit and your cellular phone must be 8 meters or less for sending and receiving voice and data via Bluetooth wireless technology. However, the transmission distance may become shorter than the estimated distance, depending on the environment in use.
Before attempting to use the Bluetooth functions on the VM8514, you must purchase and install the BTM15. When connected properly, the blue light on the BTM15 appears illuminated. Bluetooth features are only available when the BTM15 is installed.
Please make sure your mobile phone supports Bluetooth functions (Headset or Handsfree profiles or both). Adhere to the following guidelines for successful operation.
- Before using Bluetooth functions, you must pair your mobile phone to the VM8514 head unit (see "Pairing the Bluetooth System with Your Mobile Phone and Head Unit"). To ensure the best reception for pairing and reconnection, please make sure the phone battery is fully charged before you begin.
• Try to perform pairing within a few minutes of the phone being turned on. -
Once the unit has been paired with the phone, the unit's model number, "VM8514", will be displayed on the mobile phone.
• To achieve the best performance, always keep the mobile phone within 3 meters of the head unit.
• Always keep a clear path between the mobile phone and the head unit. Never place a metal object or any other obstacle between the mobile phone and the head unit. -
Some mobile phones (like Sony Ericsson) may have a "Power Saving Mode" option. PLEASE DO NOT use the power saving mode with the VM8514.
- Before accepting or making a call, make sure your mobile phone's "Bluetooth function" is turned on.
• To ensure the best conversation quality/performance, stay within one meter of the BTM15 when talking. - Phone Book direct searching through the head unit is only available if the mobile phone supports Phone Book Download. If the feature is not supported, the head unit will display "Phone book not provided by this phone" when an attempt is made to download a phone book.
Hands Free Profile (HFP)
To use a phone wirelessly with this unit, it is necessary to first establish a connection using Bluetooth wireless technology. Connection is normally established using HFP (Hands Free Profile), which gives you full control of functions available on the telephone source. However, depending on your phone, the connection may be made using HSP (Head Set Profile), making some functions unavailable. This is a limitation of your phone, not the VM8514.
Since there are a number of Bluetooth mobile phone implementations available on the market, operations with your Bluetooth mobile phone using this unit vary greatly.
Please refer to the instruction manual that came with your Bluetooth mobile phone along with this manual while operating your phone with this unit.
Pairing the Bluetooth System with Your Mobile Phone and Head Unit
- Press the SRC button on the front panel (6) or remote control (14) and select SOURCE >> BT.
- Press the 2/INT button (9) to initiate the pairing process. Keep the mobile phone within 2 meters of the head unit when pairing. (To terminate the pairing process, press the INT button again.)
- Select the Bluetooth setup option on the mobile phone to be paired (please refer to the phone's instruction manual to learn how to enter Bluetooth setup, turn Bluetooth on/off, and perform pairing).
NOTE: Some phones require a "pass key" or pairing code to connect. If your phone requires a pass key or pairing code, you will need to enter this number in the Pairing Code field under the Bluetooth SETUP menu. The default pairing code for many phones is "0000". The default code for the VM8514 is "1234". See "Set PinCode" on page 40 for instructions on entering a new pin code.
-
Select "VM8514" from the pairing list on the mobile phone.
-
If pairing is successful, the TFT will display the paired mobile phone model number or name (as specified in your phone's Bluetooth Setup menu).
- If pairing fails, "Phone Pairing Fail" is displayed at the bottom of the screen.
Reconnecting
Once the Bluetooth device has been paired, you can press the connect RDM button (11) on the front panel or remote control (21).
Each time the RDM button (11) is pressed, the head unit will automatically reconnect or disconnect with the mobile phone (only if the mobile phone was previously paired with the head unit).
Press and hold the RDM button to connect/disconnect A2DP (if supported by your mobile device).
Managing Incoming Calls
When connected to a Bluetooth phone, the unit will mute audio output, pause CD play, and change to the Bluetooth screen when a call is received. An incoming phone number will appear at the top of the screen.
Answering an Incoming Call
To answer the call, press the press the ← button on the front panel (16) on the GOTO button (19) on the remote control.
NOTE: The TALK button on the BTM15 can be used to answer calls or hang up.
For best reception, speak loudly and clearly.
To end the conversation, press the BAND button (3) on the control panel or the ■ button (17) on the remote control. The screen will display the call duration for 3 seconds, and then return to the previous mode.
Rejecting an Incoming Call
Press the BAND button (3) on the control panel or the ■ button (17) on the remote control to reject an incoming call. The call will go directly to voice mail.
Volume Control
To increase or decrease the volume level, turn the VOL/SEL/MENU rotary encoder (2) on the front panel or press the VOL+/- buttons (10) on the remote control.
Microphone Mute
To mute the microphone, press the PTY button (14) on the front panel or the BAND button (25) on the remote control. Touch again to resume microphone functionality.
Making an Outgoing Call
NOTE: Press the GOTO button (19) on the remote control to automatically dial the last call received.
- Use the 0-9, *, and # buttons on the remote control to input the phone number. (Press the CLEAR button (7) to clear the last digit.)
- After entering the phone number, press the ← button on the front panel (16) or the ENTER button (6) on the remote control.
To end the conversation, press the BAND button (3) on the control panel or the ■ button (17) on the remote control button.
Call Transfer
While talking, to transfer audio from the head unit back to the mobile phone, press the RPT button (10) on the front panel or remote control (6). You can only transfer a call after it has been answered.
Menu List
Use the ▲/▼ buttons on the remote control or the 5/DN and 6/UP buttons (12, 13) on the control panel to navigate the Menu List. Press the ← button on the front panel (16) or the ENTER button (6) on the remote control to select the highlighted menu option.
When navigating Menu List features, press and hold the BAND button (3) on the front panel or press the MENU button (20) on the remote control to return to the main Menu List (Missed Calls / Received Calls / Dialed Calls / Phone Book).
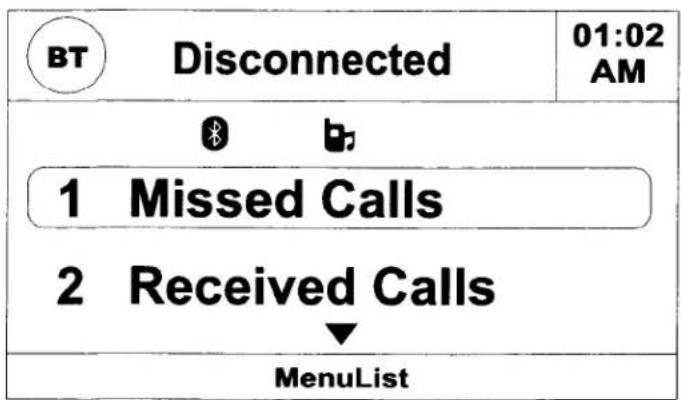
NOTE: Not all phones allow access to missed, received or dialed calls and some will not allow uploading of your phone's address book.
Missed Calls
The Missed Calls list retrieves the list of Missed numbers from your phone. The last missed number is the first number on the list. Select the Missed Calls menu option to view the list. To make a call from the Missed Calls list, select the number and then press the ← button on the front panel (16) or the ENTER button (6) on the remote control. The TFT will display “Cannot get missed record” when the feature is not available.
Dialed Calls
The Dialed Calls list retrieves the list of dialed numbers from your phone. The last dialed number is the first number on the list. Select the Dialed Calls menu option to view the list. To make a call from the Dialed Calls list, press the ← button on the front panel (16) or the ENTER button (6) on the remote control. The TFT will display "Cannot get dialed record" when the feature is not available.
Received Calls
Use the Received Calls list to view the last 10 received numbers stored on your phone. To access the Received list, select the Received Calls menu option. The last received number is the first number on the list. To make a call from the Received Calls list, press the ← button on the front panel (16) or the ENTER button (6) on the remote control. The TFT will display "Cannot get received record" when the feature is not available.
Phone Book
- Select the Phone Book menu option to display the phone book stored on your mobile phone, if compatible. The screen will display "Reading" while the phone book is downloading.
- Once the download is completed, use the ▲/▼ buttons on the remote control or the 5/DN and 6/UP buttons (12, 13) on the control panel to navigate the phone book list. Since the unit downloads one page of entries at a time, there may be a slight delay while the next page of numbers is downloaded.
- Select to highlight the number you want to dial and then press the ← button on the front panel (16) or the ENTER button (6) on the remote control.
NOTE: Some mobile phones do not support Phone Book upload through Bluetooth and will display the message "Error". This is a limitation of the phone, not the VM8514.
Bluetooth Setup
Auto Connect
The auto Connect option will allow the VM8514 to automatically connect to your previously paired Bluetooth when it is in range. When the Connect option is set to "Off", you must press the RDM button to re-establish a connection with your phone. To turn "AutoConnect" on using the remote control:
- Press the SETUP button (4) on the remote control to access the SYSTEM SETUP menu.
- Use the ▲, ▼, ◀ or ▶ cursor buttons to select the MISC setup option.
- Use the ▲, ▼, ◀ or ▶ cursor buttons and the ENTER button to set the "AutoConnect" function to "On".
Auto Answer
You can choose to have the VM8514 automatically answer incoming calls to your paired Bluetooth phone. To turn "AutoAnswer" on using the remote control:
- Press the SETUP button (4) on the remote control to access the SYSTEM SETUP menu.
- Use the ▲, ▼, ◀ or ▶ cursor buttons to select the MISC setup option.
- Use the ▲, ▼, ◀ or ▶ cursor buttons and the ENTER button to set the "AutoAnswer" function to "On".
Advanced Audio Distribution Profile (A2DP)
The VM8514 allows you to play back audio files from your phone, PDA or personal music player using a Bluetooth connection.
Before using an audio player, it may be necessary to enter a PIN code into the unit. Enter the PIN code referring to "Set PinCode" on page 40 for instructions on entering a new pairing code.
NOTE: Please quit A2DP mode before attempting to make a phone call, as unexpected results may occur depending on your mobile phone model.
The VM8514 can control a Bluetooth audio player via Advanced Audio Distribution Profile (A2DP) or Audio/Video Remote Control Profile (AVRCP). Bluetooth audio players (or Bluetooth adapters) compatible with these profiles can be connected to this unit.
- Press the >/|| button to suspend playback. Press the >/|| button again to resume playback.
- Press the TUNE/TRACK >>| or |<< buttons to advance to the next/previous track/file.
- Press and hold the RDM button to connect/disconnect an audio playback device.
SETUP MENU
While in any mode except AUX, press the SETUP button (4) on the remote control to access the SYSTEM SETUP menu.
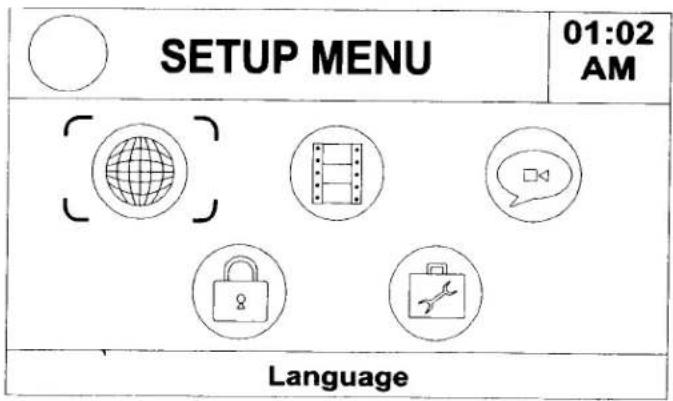
- Use the ▲, ▼, ◀ or ▶ cursor buttons (5) to choose between LANGUAGE, VIDEO, AUDIO, RATING or MISC setup options.
- Press the ◀ button within the menu option list to return to the main menu screen.
- Press the SETUP button (4) to exit the SETUP MENU.
Table 2: System Setup Menu
| LANGUAGE | ||
| OSD language | English | Select the appropriate on-screen language for the DVD. |
| Francais | ||
| Espanol | ||
| Subtitle | English | Choose the language you would like subtitles to appear in (if available). |
| French | ||
| Spanish | ||
| Auto | Select subtitle language automatically based on OSD language. | |
| Off | Turn subtitles off | |
| DVD menu | English | Choose the language you would like DVD menu to appear in (if available). |
| French | ||
| Spanish | ||
| VIDEO | ||
| Aspect Ratio | 4:3 | Image is presented with 4:3 aspect ratio. |
| 16:9 | Image is presented in wide view with a 16:9 aspect ratio. | |
Table 2: System Setup Menu
| Video Format | NTSC | The color signals are output in the standard NTSC format. |
| PAL | The color signals are output in the standard PAL format. | |
| AUTO | The color signal output is switched automatically based on the current video input signal - NTSC or PAL. | |
| Smart Picture | Standard | Select preferred display setting. |
| Bright | ||
| Soft | ||
| Dynamic | ||
| AUDIO | ||
| DVD Language | English | Select the appropriate audio language for the DVD. |
| French | ||
| Spanish | ||
| RATING | ||
| Parental CTR | 1 KID SAFE | Select the appropriate rating level for the intended audience.You may override higher ratings by using your password. |
| 2 G | ||
| 3 PG | ||
| 4 PG13 | ||
| 5 PG-R | ||
| 6 R | ||
| 7 NC-17 | ||
| 8 ADULT | ||
| Set Password | ---- | Enter a 4-digit password to activate the "Rating" feature. The original password is "0000" and must be entered before you can change the password to a different 4-digit code. |
| MISC | ||
| Demo | DemoRun | Demo Mode scrolls through the various source screens, simulating activity on the display. "Demo Mode" is discreetly displayed in blue text (below the clock), to indicate the unit is in Demo Mode. To stop Demo Mode, press and hold the SRC button. |
| Demo Auto | On | When "Demo Auto" is On, the unit will automatically display Demo Mode when powered on. |
| Off | When "Demo Auto" is Off, you can select "Demo > DemoRun" to start Demo Mode. | |
| AutoConnect | Off | Manually connect to your Bluetooth phone each time. |
| On | Allow the VM8514 to automatically connect to your previously paired Bluetooth when it is in range. | |
Table 2: System Setup Menu
| AutoAnswer | Off | Manually answer incoming calls to your paired Bluetooth phone. |
| On | Have the VM8514 automatically answer incoming calls to your paired Bluetooth phone. | |
| Set PinCode | Enter a new pincode for Bluetooth pairing and A2DP playback. Default code is “1234.” | |
| Use Default Settings | Yes/No | Select “Yes” to restore the factory default settings. |
CARE AND MAINTENANCE
DVD Player
The following guidelines will help you extend the life of your DVD player:
- When cleaning the vehicle interior, do not get water or cleaning fluids on the unit.
- The DVD player will not operate properly in extreme hot/cold or under damp conditions. In case of such conditions, wait until the vehicle interior reaches a normal temperature or any condensation on the disc player lens has evaporated before using the player.
- Always remove the disc when the player is not in use.
- The unit is designed with a vibration dampening disc mechanism to minimize interruption of disc play due to normal vibration in a moving vehicle. However, occasional sound skips may occur when driving on very rough roads. This will not scratch or damage the disc, and normal play will resume when the rough conditions cease.
CD-R and CD-RW Capability
Depending on media type and method of "recording/burning", some CD-R/RWs may be incompatible with this unit. After "recording/burning", the session must be closed. Please refer to your software's recommended procedures for closing a disc/session. Review your recording software to familiarize yourself with the correct "recording/burning" procedures. We recommend using the latest versions of ROXIO™ or NERO™ burning software.
In addition, this unit will only recognize the CDDA (Compact Disc Digital Audio), .MP3 and .WMA formats "recorded / burned" onto a CD-R/RW. This unit does not support .WAV, .OGG or other formats.
Disc Care and Handling
Dirt, dust, scratches and warpage can cause skips in the playback and deterioration of sound quality. Please follow these guidelines to take care of your compact discs.

- Do not touch the disc surface.
- Never use chemicals such as record sprays or household cleaners to clean discs, as they can irreparably damage the disc's surface.
-
Discs should be kept in their storage cases when not in use.
-
Do not expose discs to direct sunlight, high temperatures or high humidity for long periods.
- Carefully wipe fingerprints, dust and dirt from the disc's playing surface with a soft cloth. Wipe in a straight motion from the inside to the outside of the disc.
- Do not stick paper, tape or disc labels on disc surfaces, as internal damage may occur.
TROUBLESHOOTING
| Problem | Cause | Corrective Action |
| Does not operate (dis-play does not light) | No power to yellow wire; no power to red wire | Check connection with test light; check vehicle fuse with test light |
| Fuse blown | Replace fuse | |
| No power to unit | Fuse blown | Check/replace fuse |
| No/low audio output | Improper audio output con- nection | Check wiring and correct |
| Volume set too low | Increase volume level | |
| Speakers damaged | Replace speakers | |
| Heavily biased volume bal- ance | Adjust the channel balance to the center position | |
| Speaker wiring is in contact with metal part of car | Insulate all speaker wiring connections | |
| Blows fuses | Power wire shorting to ground | Make sure wire is not pinched |
| Speaker wires shorting to ground | Make sure wire is not pinched | |
| Incorrect fuse; fuse too small | Install fuse of correct rating | |
| No image | Incorrect connection to park- ing brake wire | Check Parking SW wiring and correct |
| Parking SW wire is connected but parking brake is not engaged | Stop vehicle in safe place and apply parking brake | |
| Flashing image or interference appears on screen | DVD is not compatible with current TV system settings | Change setup to accommo- date disc |
| Improper video signal con- nections | Check wiring and correct | |
| Prolonged image or improper height/width ratio display | Improper aspect ratio setup | Use correct ASPECT RATIO setting |
| Disc does not play back | Disc is warped or scratched | Use disc in good condition |
| Disc is dirty or wet | Clean disc with soft cloth | |
| Laser pickup is dirty | Clean laser pickup with clean- ing disc | |
| Incompatible disc is used | Use compatible disc | |
| Disc rating exceeds RATING limit | Change RATING settings to lower restriction | |
| Disc region code is not com- patible with unit | Use disc with proper region code | |
| Disc is inserted upside down | Insert disc with label side up | |
| Image blurred, dis- torted, or dark | Disc is illegally copied | Use original disc |
SPECIFICATIONS
CEA Power Ratings

Power Output .... 13 watts RMS X 4 channels .... into 4-ohms @ ≤ 1% THD+N
Signal to Noise Ratio .... 70dBA below reference ..... (reference: 1 watt, 4-ohms)
Frequency Response....20Hz to 20kHz (-3dB) ....Auxiliary input used as source reference
Reference Supply Voltage 14.4VDC
DVD/CD Player
Compatible Disc Media. DVD + R / RW and CD-R / RW
Compatible Media Formats ..... CD-DA, MP3, WMA, VCD, SVCD, AVI ..... MPEG1 / 2, XviD and Kodak picture CD (JPEG)
Signal to Noise Ratio ....>95dBA
Dynamic Range ....>95dB
Frequency Response....20Hz to 20 kHz, -3dB
Channel Separation ....> 60dB @ 1 kHz
Video
Format .....NTSC, PAL (auto-detection)
Output. 1Vp-p (75-ohm)
Input 1Vp-p (75-ohm)
FM Analog Tuner
Tuning Range....87.5MHz - 107.9MHz
Mono Sensitivity (-30dB) 9dBf
Quieting Sensitivity (-50dB) 15dBf
Alternate Channel Selectivity 70dB
Signal to Noise Ratio @ 1 kHz....58dB
Image Rejection 80dB
Stereo Separation @ 1 kHz ....>30dB
Frequency Response....30Hz - 15 kHz, -3dB
AM Tuner
Tuning Range....530 kHz - 1710 kHz
Sensitivity (-20dB) 12uV
Signal to Noise Ratio @ 1 kHz....50dB
Image Rejection 60dB
Frequency Response 50Hz - 2 kHz, -3dB
Monitor
Screen Size 3.5" Digital (Measured diagonally)
Active Area.... 76.32mm(W)×42.822mm(H)
Screen Type....TFT Liquid Crystal Display (LCD) active matrix
Resolution 960(W) x 240(H) sub pixels
Auxiliary Input Impedance 10k
Power Supply....11 to 16VDC, negative ground
Power Antenna (Blue) .....500mA max, current limited protection
Operating Temperature -20C \~ 65C
Fuse 15-amp, ATO type
DIN Chassis Dimensions .....7" x 7" x 2" (178mm x 178mm x 50mm)
*Specifications subject to change without notice.

Audiovox Electronics Corporation
Hauppauge, NY 11788
Technical Assistance: 1-800-323-4815
www.jensen.com
© 2010 Audiovox
Ver. 052010
Printed in China
PN:127075002436
VM8514
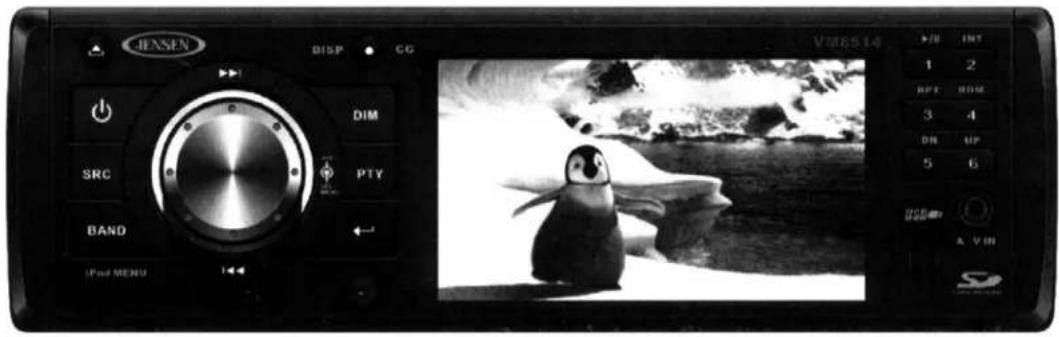
What's in the Box
VM8514 Head Unit
Mounting Sleeve
Wiring Harness
Installation Hardware (rubber cushion,
mounting bolt, screws)
Removal Keys
Face Plate and Storage Case
Parking Brake Extension Wire
3.5mm to 3.5mm A/V Adapter Cable
Remote Control with Battery
Installation Guide
Owner's Manual
Tools and Supplies
You will need these tools and supplies to install your VM8514:
• Torx type, flat-head and Philips screwdrivers
• Wire cutters and strippers
• Tools to remove existing radio (screwdriver, socket wrench set or other tools)
- Electrical tape
- Crimping tool
• Volt meter/test light
• Crimp connections
• 18 gauge wire for power connections
• 16 – 18 gauge speaker wire
WARNING! Never install this unit where operation and viewing could interfere with safe driving conditions.
Speaker Requirements
Only connect speakers rated with a load impedance of 4 ohms. Speakers with a load impedance of less than 4 ohms could damage the unit.
Preparation
This unit is designed for installation in cars, trucks and vans with an existing radio opening. In many cases, a special installation kit will be required to mount the radio to the dashboard. These kits are available at electronics supply stores and car stereo specialty shops. Always check the kit application before purchasing to make sure the kit works with your vehicle. If you need a kit but cannot locate one, call our customer support line at 1-800-323-4815. (U.S.A. and Canada only.)
1 To prevent a short circuit, be sure to turn off the ignition and remove the negative (-) battery cable prior to installation.
NOTE: If this unit is to be installed in a car equipped with an on-board drive or navigation computer, do not disconnect the battery cable. If the cable is disconnected, the computer memory may be lost. Under these conditions, use extra caution during installation to avoid causing a short circuit.
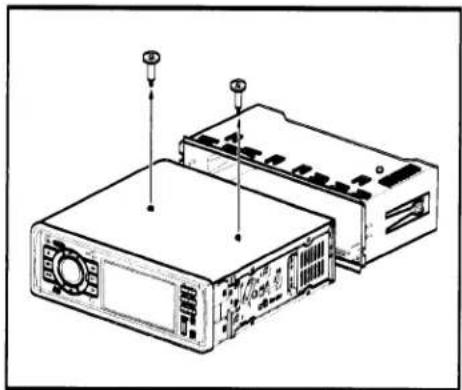
2 Remove transport screws.
natural_image
Line drawing of a computer setup with two monitors and connectors (no text or symbols)ISO-DIN Installation
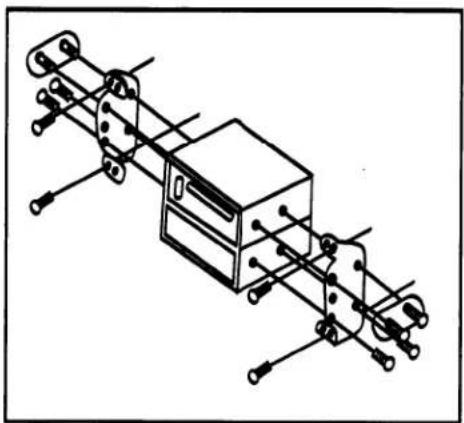
This unit has threaded holes in the chassis side panels which may be used with the original factory mounting brackets of some vehicles to mount the radio to the dashboard. Please consult with your local car stereo shop for assistance on this type of installation.
1 Remove the existing factory radio from the dashboard or center console mounting. Save all hardware and brackets as they will be used to mount the new radio.
2 Remove the mounting sleeve as explained in Step 2 of "Mounting Sleeve Installation" on page 3.
3 Remove the factory mounting brackets and hardware from the existing radio and attach them to the new radio.
CAUTION: Do not exceed M5 X 9MM screw size. Longer screws may damage components inside the chassis.
4 Wire the new radio to the vehicle as outlined in the Mounting Sleeve Installation instructions.
5 Mount the new radio assembly to the dashboard or center console using the reverse procedure in step 1.
natural_image
Technical line drawing of a mechanical assembly with rods and components (no text or symbols)CAUTION! Be careful not to damage the car wiring.
Mounting Sleeve Installation
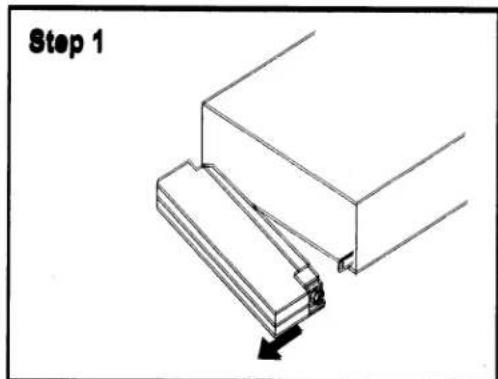
1 Push the RELEASE button and remove the detachable front panel from the chassis.
2 Remove the mounting sleeve.
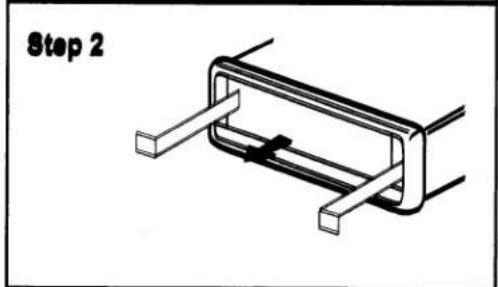
a. Insert the removal keys straight back until they lock. If removal keys are inserted at an angle, they will not lock properly to release the unit.
b. Slide the mounting sleeve off the chassis.
- Install the mounting sleeve in the dashboard.
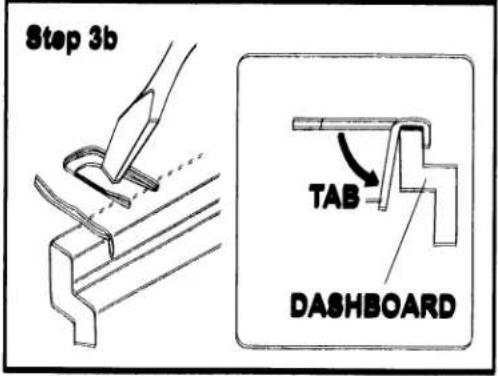
a. Check the dashboard opening size by sliding the mounting sleeve into it. If the opening is not large enough, carefully cut or file as necessary until the sleeve easily slides into the opening. Do not force the sleeve into the opening or cause it to bend or bow.
b. Locate the series of bend tabs along the top, bottom and sides of the mounting sleeve. With the sleeve fully inserted into the dashboard opening, bend as many of the tabs outward as necessary to firmly secure the sleeve to the dashboard.
4 Place the radio in front of the dashboard opening so the wiring can be brought through the mounting sleeve.
5 Follow the wiring diagram carefully and make certain all connections are secure and insulated with crimp connectors or electrical tape to ensure proper operation.
WARNING! Only connect the unit to a 12-volt power supply with proper grounding.
6 After completing the wiring connections, attach the front panel and turn the unit on to confirm operation (vehicle ignition switch must be on). If the unit does not operate, re-check all wiring until the problem is corrected. Once proper
operation is achieved, turn the ignition switch off and proceed with final mounting of the chassis.
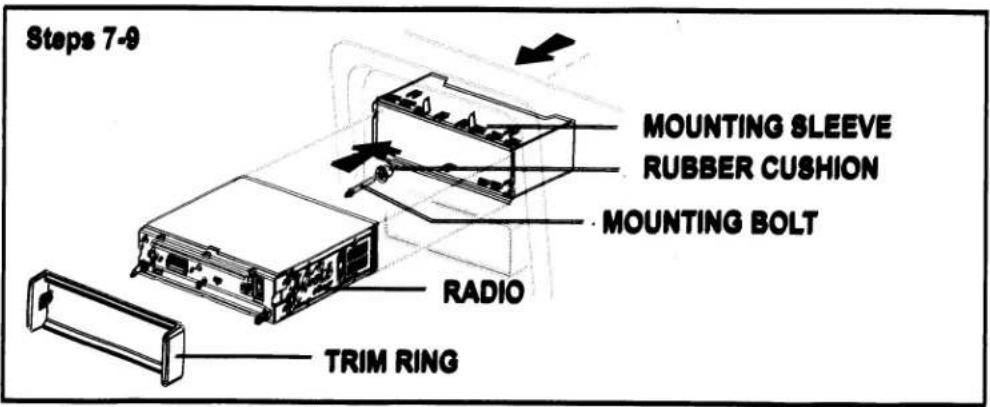
7 Carefully slide the radio into the half-sleeve, making sure it is right-side-up until it is fully seated and the spring clips lock it into place.
3 Secure the rear of the unit to the car body using the mounting bolt and rubber cushion.
9 Attach the decorative trim ring.
10 Re-attach the front panel to the chassis and test radio operation by referring to the operating instructions for the unit.
NOTE: For proper operation of the CD/MP3 player, the chassis must be mounted within 20° of horizontal. Make sure the unit is mounted within this limitation.
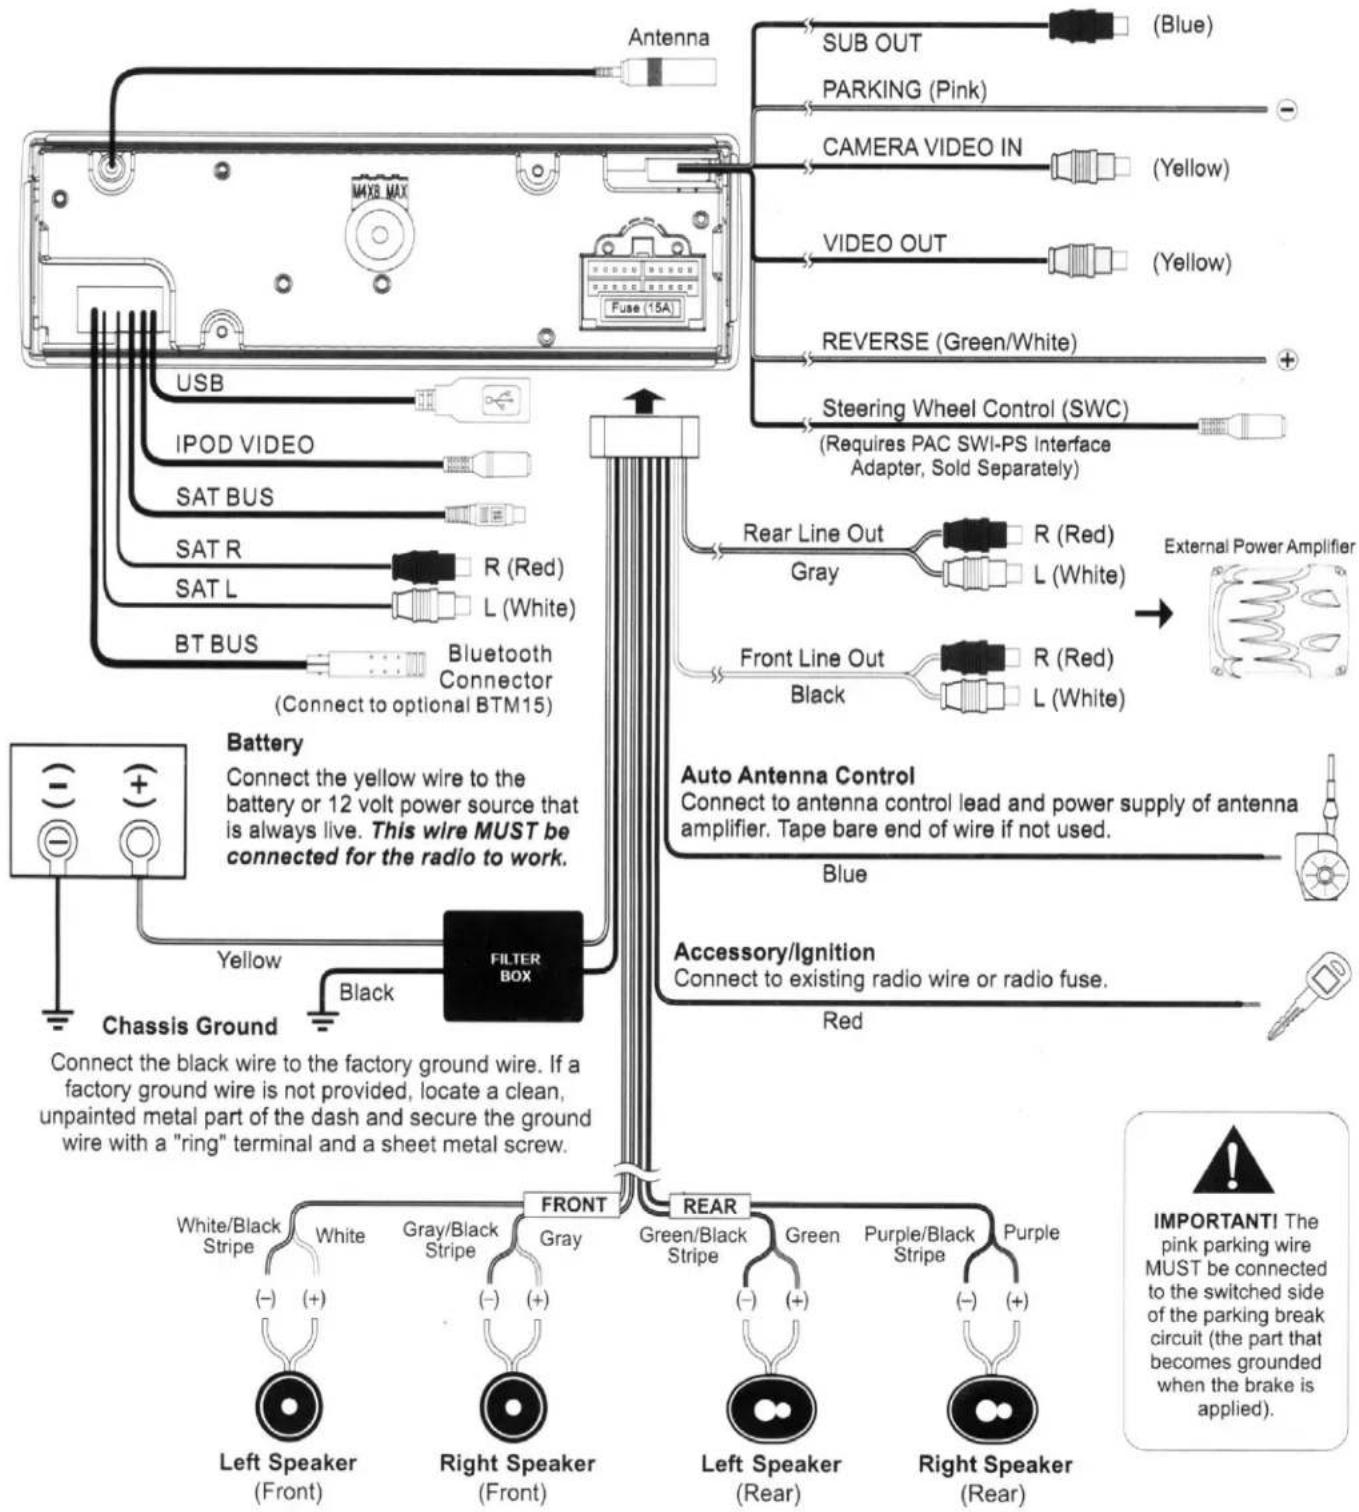
Wiring Diagram
IMPORTANT: Incorrect wiring connections can damage the unit. Follow the wiring instructions carefully, or have the installation handled by an experienced technician.
When wiring is complete, reconnect the battery negative terminal.
Need Help? For technical assistance, call the Jensen customer support line at 1-800-323-4815.
STOP
DO NOT RETURN THIS PRODUCT TO THE RETAIL STORE! FOR ASSISTANCE, PLEASE CALL: 1.800.323.4815 OR VISIT OUR WEBSITE: WWW.JENSEN.COM
InstallerNet
"Leave the Installation to us"

PROFESSIONAL INSTALLATION OR DIY INSTALLATION INSTRUCTIONS

Do-it-Yourself with our easy instructions
if
you can't do it

natural_image
Portrait of a smiling man in a light green uniform with a badge, seated against a blue background (no visible text or symbols)Online Scheduling
Customer Service
Certified Installers
The Right Tools

Need Professional Installation?

InstallCard
installation to go
Choose DIY or Professional Installation

natural_image
Person in blue uniform operating a device (no visible text or symbols)Professional Installation

56-2000
PROFESSIONAL INSTALLATION\* OR DIY SERVICES
*separate purchase required
Online Scheduling
Customer Service



Certified Installers

The Right Tools

Including In-Car Product Demonstration
DO-IT-YOURSELF INSTALLATION SUPPORT

Download Instructions Day or Night 24-7

Easy-to-follow instructions just a click away

Professional Installation services available if needed*
THE PROFESSIONAL INSTALLATION ADVANTAGE

Friendly Customer Service available 24-7

Certified Installers

Lifetime Warranty on your Installation

Convenient Online Scheduling
*SEPARATE PURCHASE REQUIRED
INCLUDES BASIC INSTALLATION IN MOST VEHICLES
Visit www.Jensen.InstallCard.com for more information

Questions or Comments
e-mail: service@InstallerNet.com
InstallerNet
(800) 950-9869
NOT VALID FOR RETURN IF INSTALLCARD IS DETACHED
How to Activate your InstallCard and Choose DIY or Schedule Installation
1 Visit www.Jensen.InstallCard.com
② Choose DIY or Schedule Installation
③ Enter the InstallCard Number below
4 Download your instructions or Schedule your installation
InstallCard No:
managed by Installer Net (800) 950-9869
After activating this InstallCard, you may use it to install your mobile electronics product at any of our authorized InstallerNet member locations nationwide. Some vehicles will require additional parts or labor which may be purchased separately at time of installation. Lifetime warranty on installation for as long as you own the vehicle. This InstallCard is valid up to one year from date of purchase where permitted by law. Visit www.InstallCard.com for more information. NOT VALID UNTIL PURCHASED.
emusic.

JENSEN
35 FREE SONGS
+1 FREE AUDIOBOOK
- Choose from over 6 million songs and 6,000+ audiobooks
- DRM-free MP3 tracks play on your computer or any MP3 player
• Free 14-day trial – Cancel anytime, keep your downloads
REDEEM YOUR FREE MP3s HERE:

www.emusic.com/jensen35

natural_image
Woman smiling while wearing a red top and black headphones (no text or symbols visible)Get up to 35 music downloads and 1 audiobook download free with 14-day eMusic trial subscriptions. Offers available to first time eMusic customers only, located in the USA. Separate subscriptions required. Audiobook offer valid for one audiobook credit; some titles require multiple credits for download. Certain songs will not be available during your free trial. Internet access, registration and credit or debit card required. Limited time offers. You will automatically become a paying member unless you cancel your subscriptions before the end of your free trials or before you exceed your free trial downloads. Offers and eMusic's prices are subject to change without notice and are subject to eMusic's terms of use. eMusic and the eMusic logo are either trademarks or registered trademarks of eMusic.com Inc. in the U.S.A. and other countries. All rights reserved. eMusic is not responsible for products, services or claims made by Jensen or Audiovox Corporation.
35 CHANSONS GRATUITES + 1 LIVRE AUDIO GRATUIT
www.emusic.com/jensen35
www.emusic.com/jensen35
- Operating Instructions
- CONTENTS
- INTRODUCTION
- Features
- DVD
- CD / MP3 / WMA
- AM-FM Tuner
- XM Radio
- iPod
- Chassis
- General
- What's in the Box
- FRONT PANEL RELEASE
- Detaching the Front Panel
- Re-attaching the Front Panel
- REMOTE CONTROL
- Operating Range
- Replacing the Battery
- OPERATION
- Power
- Source
- External Devices
- Audio Mute
- Volume Control
- Steering Wheel Control (SWC)
- SWC Functions
- Select Operation
- Audio Menu
- Menu Operation
- Equalizer
- Loud Set
- Beep Set
- 12/24 Mode
- Mirror Image
- Vol Mode
- Turn-On Volume (A-VOL)
- Sub LPF (Low Pass Frequency)
- Area Set
- Dimmer
- Clock Set
- Reset Button
- RADIO OPERATION
- Accessing Radio Mode
- Select a Band
- Tuning
- Seek Tuning
- Manual Tuning
- Program Information
- PTY Search
- Preset Stations
- Preview Scan
- Automatic Store (AS)
- Accessing Satellite Radio Mode
- Displaying the Identification (ID) Code
- Selecting a Station
- Preset Mode
- Storing a Station
- Recalling a Station
- Channel Search
- Category Search
- Direct Channel Input
- DISC/MP3/WMA PLAYBACK
- Acceptable Media
- Acceptable Medium Formats
- MP3/WMA Encoder and CD Writer Settings
- Entering ID3 Tag
- Entering File and Folder Names
- Electronic Shock Protection
- Bit Rates
- Inserting and Ejecting a Disc
- Loading an SD Card
- Loading a USB Device
- Notes on MP3/WMA Play
- MP3 Playing Order
- Changing the Source
- Controlling Disc or File Playback
- Pause
- Stop
- Track Select
- Navigate Files (MP3)
- Fast Forward/Reverse
- Intro Scan (INT) (No DVD Operation)
- Repeat (RPT)
- Random (RDM)
- Section Repeat (A-B)
- GOTO Track Time Access (DVD and VCD Only)
- VCD PlayBack Control (VCD Only)
- Additional DVD/Video Playback Features
- iPod OPERATION
- Accessing iPod Mode
- iPod File Playback
- Fast Forward/Fast Reverse
- BLUETOOTH OPERATION
- About Bluetooth
- Hands Free Profile (HFP)
- Pairing the Bluetooth System with Your Mobile Phone and Head Unit
- Reconnecting
- Managing Incoming Calls
- Answering an Incoming Call
- NOTE: The TALK button on the BTM15 can be used to answer calls or hang up.
- Rejecting an Incoming Call
- Microphone Mute
- Making an Outgoing Call
- Call Transfer
- Menu List
- Missed Calls
- Dialed Calls
- Received Calls
- Phone Book
- Bluetooth Setup
- Auto Connect
- Auto Answer
- Advanced Audio Distribution Profile (A2DP)
- SETUP MENU
- CARE AND MAINTENANCE
- DVD Player
- CD-R and CD-RW Capability
- Disc Care and Handling
- SPECIFICATIONS
- DVD/CD Player
- Video
- FM Analog Tuner
- AM Tuner
- Monitor
- VM8514
- Tools and Supplies
- Speaker Requirements
- Preparation
- ISO-DIN Installation
- Mounting Sleeve Installation
- Wiring Diagram
- InstallerNet
- PROFESSIONAL INSTALLATION OR DIY INSTALLATION INSTRUCTIONS
- InstallCard
- PROFESSIONAL INSTALLATION\* OR DIY SERVICES
- DO-IT-YOURSELF INSTALLATION SUPPORT
- THE PROFESSIONAL INSTALLATION ADVANTAGE
- How to Activate your InstallCard and Choose DIY or Schedule Installation
- FREE SONGS
- +1 FREE AUDIOBOOK
- CHANSONS GRATUITES + 1 LIVRE AUDIO GRATUIT
Brand : JENSEN
Model : VM8514R
Category : Car stereo