
iD879 - Camcorder POLAROID - Free user manual and instructions
Find the device manual for free iD879 POLAROID in PDF.


| Product Type | Digital Camcorder |
| Brand | Polaroid |
| Model | iD879 |
| Dimensions | Approx. 120 x 70 x 30 mm |
| Weight | Approx. 300 g |
| Power Supply | Rechargeable lithium-ion battery (3.7V) |
| Storage Medium | SD/SDHC memory card (up to 32GB) |
| Video Resolution | 720p HD (1280 x 720) or standard definition |
| Still Photo Resolution | Up to 5 megapixels (interpolated) |
| Lens | Fixed focus lens with digital zoom |
| Display | 2.0-inch TFT LCD screen |
| Connectivity | USB 2.0, AV-out (composite), HDMI (if available) |
| Optical Zoom | None (digital zoom only) |
| Digital Zoom | Up to 4x |
| Microphone | Built-in mono microphone |
| Cleaning | Use a soft, dry cloth; avoid solvents |
| Safety | Keep away from moisture and heat; use only specified charger |
| Spare Parts | Battery, charger, USB cable available online |
| General | User manual included; suitable for home videos |
Frequently Asked Questions - iD879 POLAROID
User questions about iD879 POLAROID
0 question about this device. Answer the ones you know or ask your own.
Ask a new question about this device
Download the instructions for your Camcorder in PDF format for free! Find your manual iD879 - POLAROID and take your electronic device back in hand. On this page are published all the documents necessary for the use of your device. iD879 by POLAROID.
USER MANUAL iD879 POLAROID
About This Manual....6
Safety Warning and Notice 8
1 Overall Introduction ...... 12
1.1 System Requirements 12
1.2 Features.... 12
1.3 Accessories.... 13
1.4 External View.... 14
1.5 Adjusting LCD Display.... 15
2 Getting Started 16
2.1 Inserting SD Card(s) 16
2.2 Loading the Battery 17
2.3 Charging the Battery.... 19
2.4 The gestures of using the touch screen ... 20
2.4.1 Single touch....20
2.4.2 Slide....21
2.4.3 Rotate 21
2.5 Buttons & Functions.... 22
2.6 About LED Indicators 23
2.7 Initial settings before use.... 24
2.7.1 Setting Date and Time 24
3 LCD Display Information......25
3.1 In DV Mode....25
3.2 In Voice Recording Mode 27
3.3 In DSC Mode....28
4 Using the Camera....30
4.1 Shooting a Movie Clip....30 4.2 Voice Recording Mode.... 32 4.3 Movie clip / Voice Clip Playback 33 4.4 Shooting / Playback images.... 36
4.4.1 Taking a picture 36 4.4.2 Images Playback 37
5 LCD Display Information......39
5.1 DV Playback Mode 39 5.2 Voice Recording Playback Mode 41 5.3 DSC Playback Mode...... 42
6 Menu Mode 43
6.1 Menu options of DV Mode 43
6.1.1 Movie clip Resolution....43 6.1.2 White Balance 44 6.1.3 Effect 45 6.1.4 Metering.... 46 6.1.5 Backlight 47 6.1.6 Night Mode 48 6.1.7 Motion Detection....49 6.1.8 EV Compensation....50
6.2 Menu options of DV/Voice Playback...... 51
6.2.1 Delete 51 6.2.2 Protect 53
6.3 Menu options of DSC Mode....54
6.3.1 Still Image Resolution 54
6.3.2 White Balance 55
6.3.3 Effect 56
6.3.4 Metering....57
6.3.5 Backlight 58
6.3.6 Night Mode 59
6.3.7 Self-timer 60
6.3.8 Burst 61
6.3.9 EV compensation 62
6.4 Menus of DSC Playback 63
6.4.1 Delete 63
6.4.2 Protect 65
6.4.3 Autoplay 66
6.4.4 Rotate 67
6.4.5 DPOF 68
6.5 Setting Menu 70
6.5.1 Information 70
6.5.2 Date / Time 70
6.5.3 Beep 71
6.5.4 Default 72
6.5.5 TV standard 73
6.5.6 Auto Power Off 74
6.5.7 Frequency 75
6.5.8 Language 76
6.5.9 Format 77
6.5.10 File Number (Default: Series) 78
6.5.11 LCD Brightness 79
6.5.12 Instant Review 80
6.5.13 Memory 81
6.5.14 Volume 82
6.5.15 Start-up Logo 83 6.5.16 Face Detection 85
7 PC and TV Connection 86
7.1 Connecting to the Computer 86 7.2 Connecting to a Standard TV 86 7.3 Connecting to an HD TV 87
8 Installing the Software 88
9 Editing Software 89
10 Appendix 90
Specifications 90
Troubleshooting 92
Warranty 94
E-Waste/FCC Declaration 95
Thank you for purchasing this Digital Video Camera. Please make sure to read this manual thoroughly before using it and keep this manual in a safe place for future reference.
Disclaimer
This company will endeavor to make sure the contents of this manual are correct and up to date. However, we do not guarantee the accuracy of the contents of this manual. In case there is any discrepancy between this manual and the Digital Video Camera, please use this camera as the basis. We reserve the right to change any content or technical rule without prior notification. In addition, the manufacturer reserves the right to change technical specifications and package contents without prior notification.
© 2012 All Rights Reserved
Preface
Congratulations on your purchase of this advanced camcorder (digital video camera). Ensure that you read this manual carefully and keep it in a safe place for future reference.
About This Manual
This manual is designed to assist you in using your new camcorder. All information presented is as accurate as possible but is subject to change without notice.

Battery
Disposal of Waste Electrical and Electronic Equipment and/or Battery by users in private households in the European Union.
This symbol on the product or on the packaging indicates that this cannot be disposed of as household waste. You must dispose of your waste equipment and/or battery by handing it over to the applicable take-back scheme for the recycling of electrical and electronic equipment and/or battery. For more information about recycling of this equipment and/or battery, please contact your city office, the shop where you purchased the equipment, or your household waste disposal service. The recycling of materials will help to conserve natural resources and ensure that it is recycled in a manner that protects human health and the environment.
Safety Warning and Notice
Before operating the camcorder, please make sure that you read and fully understand the content in this section. If you ignore and violate all safety warning notices indicated in this section, the camcorder warranty may be void. Meanwhile, not only the camcorder but also you and all other people and things around you may be severely damaged, injured, or even placed in danger of death.
For your safety
- Do not attempt to charge any other battery with this camcorder.
- Operate the power supply only on even surfaces, without any cover. Air circulation around the product must always be provided. The maximum ambient temperature is 40 °C.
- Risk of explosion if battery is replaced by an incorrect type. Dispose of used batteries according to the instructions.
- Keep the camcorder and its accessories out of the reach of babies, toddlers, and children. In particular, small parts such as memory card and battery could be easily dismantled and swallowed by them.
- Use only the original accessories to avoid possible risks to health and property, and thus meet all related legal regulations.
- Do not dismantle the camcorder under any circumstances.
- When using the flash, do not go too close to human eyes (particularly for babies, toddlers, and children) or animal eyes. Otherwise, when the flash fires, the light may cause damage to human eyes or irritate animals.
- Batteries could explode, for instance. All batteries can cause property damage, injury or burns if a conductive material such as jewelry, keys or beaded chains touch exposed terminals. The material may complete an electrical circuit and become quite hot. Exercise care in handling any batteries, particularly
when placing it inside your pocket, purse, or other container with metal objects. Do not dispose of batteries in fire as they may explode.
- To prevent electric shock, do not attempt to disassemble or repair your camcorder by yourself.
- Some camcorder models accept non-rechargeable batteries. When using these batteries, do not charge them. Otherwise, dangers such as explosion and fire may occur.
- The Digital Video Camera is not suitable for barcode photography.
Warranty
- Warranty is void if damage or system failure occurred due to outside factors such as collision, fire, flood, dirt, sewage, earthquake, and other force majeure events as well as incorrect usage of electricity or use of non-original accessories.
- It is the sole responsibility of the user if problems (such as data loss and system failure) occurred due to non-factory installed software, parts, and/or non-original accessories.
- Do not change the camcorder. Any changes to the camcorder invalidate the warranty.
Taking care of your camcorder
- Always keep the camcorder in a leather case or pouch for better protection against splashes, dust, and collision.
- The only way of replacing the battery and the memory card is to open the Battery / Memory cover.
- Dispose of unwanted batteries and camcorders as permitted by the laws in your countries.
- Water may cause a fire or electric shock. Therefore, store your camcorder in a dry place.
- If your camcorder becomes wet, wipe it with a dry cloth as soon as possible.
- Salt or seawater may cause severe camcorder damage.
- Do not drop, knock, or shake the camcorder. A rude behavior of using the camcorder may damage the internal electronic circuit board or deform the lens shape.
- Do not use harsh chemicals, cleaning solvents, or strong detergents to clean the camcorder.
- Finger grease may be left on the camcorder lens and will result in unclear images or videos. To avoid this problem, be sure to clean the camcorder lens before taking pictures or recording videos. You should also clean the camcorder lens on a regular basis.
- If the lens is dirty, use a lens brush or soft cloth to clean the lens.
- Do not touch the lens with your fingers.
- If a foreign substance or water gets in your camcorder, please turn the power off immediately and disconnect the batteries. Next, remove the foreign substance or water and send it to the maintenance center.
- Whenever there is data on the external memory card, you should make a backup copy to a computer or disc. This way, you can have a backup solution in case of data loss.
- All original accessories are designed only for use with this camcorder model you purchased. Do not use these accessories with other camcorder models or camcorders of other brands to avoid unpredictable danger or damage.
- Before initial use of a memory card, always use the camcorder to format the card first.
- Remember to slide the write-protect tab (if available) to the unlock position. Otherwise, all data (if any) on the memory card is protected and the card cannot be edited or formatted.
Operating environment
- Do not use or store your camcorder in the environments listed below:
- Direct sunlight
- Dusty places
- Next to an air conditioner, electric heater or other heat sources
- In a closed car that is in direct sunlight
- Unstable locations
- Do not use your camcorder outdoors when it is raining or snowing.
- Do not use your camcorder in or near water.
- The camcorder operating temperature is between 0°C 40°C ( 32°F 104°F ). It is normal for the operating time to be shortened when the temperature is low.
- The capacity of your camcorder batteries will reduce each time it is charged/emptied.
- Storage at too high or low temperatures will also result in a gradual capacity loss. As a result, the operating time of your camcorder may be considerably reduced.
- It is normal for the camcorder to become warm during operation, because the camcorder casing can conduct heat.
1 Overall Introduction
Please read this chapter carefully to understand the features and functions of this Digital Video Camera. The description of this chapter also includes the description of system requirement, package contents, and hardware components.
1.1 System Requirements
This Digital Video Camera requires a unit of computer with the following specifications:
Windows® Vista / XP / 2000 operating system or Mac OS 10.3 \~10.4
A CPU of at least the equivalent of Intel® Pentium 4 2.8GHz
At least 2GB of RAM
Standard USB 1.1 connection port or higher
At least 64MB of display card
Note: USB 1.1 allows you to transmit files to the host, but using USB 2.0 connection port could increase the transmission speed far faster.
1.2 Features
This Digital Video Camera provides many features and functions including:
High resolution pixel camera (DV : maximum 1080P, DSC: maximum 16 million pixels)
Touch screen
Dual card slot (1 SD and 1 Micro SD)
Slow motion Playback
In addition, the device may also serve the function as a USB/SD card reader.
1.3 Accessories
This package should contain the following items. In case there is any missing or damaged item, please contact your dealer immediately.
① Digital video camera
② Pouch
③ Quick guide


④ Software CD
⑤ HDMI cable
⑥ Video cable


⑦ USB cable
⑧ Lithium battery
⑨ Adaptor


1.4 External View

| 1 | Lens | 10 | Menu Button |
| 2 | LED Torch | 11 | Power |
| 3 | Self-timer Indicator | 12 | Light Button |
| 4 | Status Display | 13 | Mode Button |
| 5 | Recording Button | 14 | Tripod socket |
| 6 | USB/HD/TV Output | 15 | Battery / Memory Card Compartment |
| 7 | Zoom Button | 16 | Microphone |
| 8 | Speaker | 17 | Hand Strap |
| 9 | Playback Button |
1.5 Adjusting LCD Display
Before taking picture or recording movie clips, please rotate according to the illustrations below.

2 Getting Started
2.1 Inserting SD Card(s)
- Open the battery cover.

- Insert the SD card gently into the slot. Make sure the copper contact faces upwards.

SD card 1: ▶: SD card;
SD card 2: :Micro SD card
Note:
Do not remove or insert SD cards when the power of the Digital Video Camera is on to avoid damaging files.
2.2 Loading the Battery
Please use only the battery provided or recommended by the manufacturer or dealer.
Note: Insert the battery correctly according to this description. Error in inserting the battery could result in damage to this Digital Video Camera and result in fire.
- Open the battery cover.

Battery Status Indicator:
 | Battery full |
 | Battery half full |
 | Battery empty |
 | • Charging battery (A new battery should be charged at least 4 hours.)• The device power is supplied by DC input. (No battery inside.) |
- Insert the battery according to the illustration.

- Close the battery cover.

2.3 Charging the Battery
You can use the adaptor attached to charge the lithium battery, whether the system is on or off
Insert the lithium battery into the Digital Video Camera and connect the camera to the cable of the adaptor. You can also charge the battery by a PC when the system is off.

2.4 The gestures of using the touch screen
2.4.1 Single touch
The single touch function acts as a hotkey menu to adjust basic settings directly on the display.
- Mode change (DV, DSC and Voice Recording)
- Resolution change (Full HD, HD, WVGA, WEB or 16M, 8M, 5M, 3M)


2.4.2 Slide
Slide right or left to view the previous file or the next file in Playback Mode.

2.4.3 Rotate
Under Playback Mode, you can rotate the image by 90 degrees per step as shown below.

2.5 Buttons & Functions
| Description | Button | Function |
| Power Button |  | Press the button to turn ON/OFF the power. |
| Menu Button |  | Press the button to display the main OSD menu. |
| LIGHT Button & MODE Button |   | - Press [MODE] to access different models of DV, DSC and Voice recording.- Press [LIGHT] to turn ON/OFF the LED Torch-[MENU] and [PLAY BACK], 2 buttons can be used for selection of the relevant functions. [LIGHT] is for left and [MODE] is for right. |
| Zoom Button |  | - This Digital Video Camera is equipped with 5X optical zoom and 4X digital zoom function. Please note that the 4X digital zoom is supported in 720P or lower video resolutions.- The [T] and [W] buttons can be used for function selection in the mode of [MENU] |
| Recording Button |  | Press the start/stop buttonto take the image, or to start/stop movie clip and voice recording. |
| Playback Button |  | Press the Playback button to enter Playback mode and playback the last file. |
2.6 About LED Indicators
Below table describes the meaning of the camera LED indicators:
| Indicator Color | Definition | |
| Power (Rear LED) | Green | Turning power on. |
| Recording (Front LED) | Red blinking | Recording |
| Self-timer | Red blinking | Start of Self-timer. |
2.7 Initial settings before use
2.7.1 Setting Date and Time
- Turn on the Digital Video Camera to set up the date and time for the first time. Set the date and time by pressing the Zoom Button ( ) or touching the screen to select.

- Press Mode Button ( ) to highlight each column. Use Zoom Button ( ) to adjust the value. Press Recording Button ( ) to store your changes, or touch the screen to adjust the date and time before pressing the Return Button ( ) to store the value and leave the setting.

3 LCD Display Information
3.1 In DV Mode
The following illustration shows the LCD display layout and icon description in the DV Mode (☐).

| 1 |  | DV(Movie Clip) Mode icon |
| 2 |  | Motion Detection icon |
| 3 |  | Night Mode icon |
| 4 |  | Exposure compensation icon |
| 5 |  | Color effect icon |
| 6 |  | Metering Mode icon |
| 7 |  | White balance icon |
| 8 |  | Battery status icon |
| 9 | 00:00:00 | Remaining recording time icon |
| 10 |  | Resolution Button |
| 11 |  | Backlight icon |
| 12 |  | Histogram icon |
| 13 |  | Playback Button |
| 14 |   | Digital Zoom Button |
| 15 |  | Menu Button |
| 16 |  | Memory Status icon▶1 : SD card 1 icon;▶2 : Micro SD card 2 iconINT : Internal memory icon (displayed when there is no SD card) |
3.2 In Voice Recording Mode
The following illustration shows the LCD display layout and icon description in the Voice Recording Mode ().

| 1 |  | Voice Recording Mode icon |
| 2 |  | Battery status icon |
| 3 | 00:00:00 | Recording time left icon |
| 4 |  | Playback Button |
| 5 |  | Menu Button |
| 6 |  | Memory Status icon▶ 1 : SD card 1 icon;▶ 2 : Micro SD card 2 iconINT : Internal memory icon (displayed when there is no SD card) |
3.3 In DSC Mode
The following illustration shows the LCD display layout and icon description in the DSC Mode ().

| 1 |  | DSC Mode icon |
| 2 |  | Night Mode icon |
| 3 |  | EV compensation icon |
| 4 |  | Effect icon |
| 5 |  | Metering Mode icon |
| 6 |  | White balance icon |
| 7 |  | Battery icon |
| 8 | 0001 | Number of pictures left icon |
| 9 |  | Resolution Button |
| 10 |  | Backlight icon |
| 11 |  | Histogram icon |
| 12 |  | Playback Button |
| 13 |   | Digital zoom Button |
| 14 |  | Menu Button |
| 15 |  | Memory Status icon▶1: SD card 1 icon;▶2: Micro SD card 2 iconINT: Internal memory icon (displayed when there is no SD card) |
| 16 |  | Burst icon |
| 17 |  | Self-timer icon |
4 Using the Camera
4.1 Shooting a Movie Clip
- Turn on the Digital Video Camera. Press the Mode Button ( ) or touch the screen to select the "DV Mode icon" to switch to DV mode.
- Press the Recording Button (☐) to start moving recording. Press the Recording Button again ( ) to stop moving recording.
- The Digital Video Camera will store the movie clip automatically.

- LCD screen ratio will be different depending on the setting of Movie Clip resolution. Please refer to the table shown below:
Video Resolution
FHD (1920 x 1080)
HD (1280 x 720)
WVGA (848 x 480)
WEB (320 x 240)
Preview
16:9 ratio

4:3 ratio

4.2 Voice Recording Mode
- Turn on the Digital Video Camera. Press the Mode Button ( ) or touch the screen to select the “Voice Recording Mode icon” to switch to Voice Recording Mode.
- Press the Recording Button ( ) to start voice recording. Press the Recording Button again ( ) to stop voice recording.

4.3 Movie clip / Voice Clip Playback
Files may not be played back.
- The folder/file name has been changed on your computer.
- If the image file has been processed on a computer or the image file is stored on another digital video camera after recording, this digital video camera cannot guarantee that the file can be played back normally.
- In DV/Voice Recording Mode, pressing the Playback Button ( ) or touching the screen to select the Playback Mode icon will display the last file stored on the LCD screen.
Playback
Playback Mode icon
Playback Mode icon
- Press the Zoom Button ( ) to select the file, and press the Recording Button ( ) or touch the screen to select the file for playback.


- To pause the playback of a file, press the Recording Button ( ) or touch the screen icon ( ).


- Press the Playback Button ( ) again or touch the screen to select the Return Button ( ), and the digital video camera will return to DV/Voice Recording Mode.
- You can also playback the movie clip at a different speed by touching the screen icon () ON/OFF.

Playback speed is as below when the Slow Motion is "OFF":

Rewind
2X play
Forward
Rewind
4X play
Forward
Rewind
8X play
Forward
Rewind
16X play
Forward
Playback speed is as below when the Slow Motion is "ON":

Rewind
1/2X play

Rewind
1/4X play
Forward
Rewind
1/8X play
Forward
Rewind
1/16X play
Forward
4.4 Shooting / Playback images
4.4.1 Taking a picture
- Turn on the Digital Video Camera. Press the Mode Button ( ) or touch the screen to select the “DSC Mode icon” to switch to DSC Mode.
- Press the Recording Button ( ) to capture images. The Digital Video Camera will store the picture automatically.

4.4.2 Images Playback
- In DSC Mode, press Playback Button ( ) or touch the screen to select the Playback Button icon to display the images on the LCD screen.

- Press Zoom Button ( ) will select a file. Pressing Recording Button ( ) or touch the screen to select the file to playback.

- Press Zoom Button ( ) or touch the screen to select the Zoom Button (/T) will zoom in or zoom out the picture. Press the Mode Button ( ) or touch the screen to select the 4-way Button to move the image.

- Press Zoom Button ( ) or touch the Return Button ( ) to return to full screen for viewing images.


- Press the Playback Button ( ) again or touch the screen to select the Return Button ( ) will restore to DSC Mode.
5 LCD Display Information
5.1 DV Playback Mode
Please refer to the following table regarding the description of each icon and symbol.
1 Slow Motion Playback Button 2 File Protect icon 3 Battery status icon 4 Playback Mode icon 5 00:00:00 Length of each Movie clip icon 6 Resolution icon 7 Return Button 8 Fast forward Playback Button
| 9 |  | Playback/Pause Button |
| 10 |  | Fast rewind Playback Button |
| 11 |  | Menu Button |
| 12 |  | Sound volume Button |
| 13 | 100-0001 | Folder and file number |
Notes:
- Maximum capacity of each recorded file is 4GB.
- Setting a high resolution will result in a larger file and therefore a shorter recording time.
5.2 Voice Recording Playback Mode
Please refer to the following table for a description of each icon and symbol.

| 1 |  | File Protect icon |
| 2 |  | Battery status icon |
| 3 |  | Playback Mode icon |
| 4 |  | Length of each voice recording icon |
| 5 |  | Return Button |
| 6 |  | Fast forward Playback Button |
| 7 |  | Playback/Pause Button |
| 8 |  | Fast rewind Playback Button |
| 9 |  | Menu Button |
| 10 |  | Sound volume Button |
| 11 | 100-0001 | Folder and file number |
5.3 DSC Playback Mode
Please refer to the following illustration to familiarize yourself with the icons and symbols of DSC Playback Mode.

| 1 |  | DPOF (Digital Print Order Format) icon |
| 2 |  | File Protect icon |
| 3 |  | Battery status icon |
| 4 |  | Image Playback Mode icon |
| 5 | 0001 | Number of pictures left icon |
| 6 |  | Resolution icon |
| 7 |  | Return Button |
| 8 |  | Menu Button |
| 9 |  | Zoom- Out Button |
| 10 |  | Zoom- In Button |
6 Menu Mode
When a menu screen is displayed, the Menu button is used to move through the highlighted items in the submenu or to select a menu item.
6.1 Menu options of DV Mode
Set your Digital Video Camera to DV Mode and press the MENU Button ( ) to show the DV options menu.
6.1.1 Movie clip Resolution
- Turn on the Digital Video Camera and make sure it is in DV Mode.
- Press the Menu Button ( ) and press the Zoom Button ( ) to highlight the Resolution item. Press the Recording Button ( ) to display the submenu; or touch the screen to select the item.

- Press the Zoom Button ( ) to select FHD, HD, WVGA, or WEB.
Press the Recording Button ( ) to confirm; or touch the screen to select the item.


| FHD | 1920 x 1080 |
| HD | 1280 x 720 |
| WVGA | 848 x 480 |
| WEB | 320 x 240 |
Note: 1. When setting to FHD, HD, or WVGA resolution, the LCD display aspect ratio is 16:9. 2. When setting to WEB video resolution, the LCD display aspect ratio is 4:3.
6.1.2 White Balance
- Turn on the Digital Video Camera and make sure it is in the DV Mode.
- Press the Menu Button ( ) and press the Zoom Button ( ) to highlight the White Balance item. Press the Recording Button ( ) to display the submenu; or touch the screen to select the item.
- Press the Zoom Button ( ) to select Auto, Daylight, Cloudy, Fluorescent, or Tungsten. Press the Recording Button ( ) to confirm; or touch the screen to select the item.


| Auto | The Digital Video Camera automatically adjusts white balance. |
| Daylight | The setting is suitable for outdoor recording in daylight. |
| Cloudy | The setting is suitable for recording in cloudy or shady environments. |
| Fluorescent | The setting is suitable for indoor with fluorescent lamp lighting, or environments with high color temperature. |
| Tungsten | The setting is suitable for indoor with incandescent lamp light, or environments with low color temperature. |
6.1.3 Effect
- Turn on the Digital Video Camera and make sure it is in the DV Mode.
- Press the Menu Button ( ) and press the Zoom Button ( )

to highlight the Effect item. Press the Recording Button ( )

to display the submenu; or touch the screen to select the item.
- Press the Zoom Button ( ) to select Normal, B/W, or Sepia.
Press the Recording Button ( ) to confirm; or touch the screen to select the item.


 Normal Normal | Make recordings in nature color |
 B&W B&W | Make recordings in B&W (Black and White) color |
 Sepia Sepia | Make recordings in Sepia-toned color |
6.1.4 Metering
- Turn on the Digital Video Camera and make sure it is in the DV Mode.
- Press Menu Button ( ) and press Zoom Button ( )

to highlight the Metering item. Press the Recording Button ( ) to display submenu; or touch the screen to select the item.
- Press Zoom Button ( ) to select Spot, Center or Touch
AE. Press the Recording Button ( ) to confirm; or touch the screen to select the item.

![[•] Spot [•] Center [•] Touch AE 1/1](/content/2026/05/959482/images/a886f44dafd08a829b1757c14f9bc4942cf7b62c997304e5b5a71f353ed5cee9.jpg)
| [○] Spot | This setting is to ensure correct exposure for the object even if the background is very bright or very dark. |
| [→] Center | Use this setting to preserve background details while letting lighting conditions at the center of the frame define exposure. |
| [→] Touch AE | Touch the object to make it with suitable light. |
6.1.5 Backlight
- Turn on the Digital Video Camera and make sure it is in the DV Mode.
- Press Menu Button ( ) and press Zoom Button ( ) to highlight the Backlight item. Press the Recording Button ( ) to display submenu; or touch the screen to select the item.
- Press Zoom Button ( ) to select On or Off. Press the Recording Button ( ) to confirm; or touch the screen to select the item.


6.1.6 Night Mode
- Turn on the Digital Video Camera and make sure it is in the DV Mode.
- Press Menu Button ( ) and press Zoom Button ( ) to highlight the Night Mode item. Press the Recording Button ( ) to display submenu; or touch the screen to select the item.
- Press Zoom Button ( ) to select On or Off. Press the Recording Button ( ) to confirm; or touch the screen to select the item.

6.1.7 Motion Detection
When Motion Detection is turned on, it is possible to undergo motion detection recording without the need to operate beside the camera. When motion is detected, the camera will start recording. When the image stops moving, the camera will stop recording.


- Turn on the Digital Video Camera and make sure it is in the DV Mode.
- Press the Menu Button ( ) and press the Zoom Button ( ) to highlight the Motion Detection item. Press the Recording Button ( ) to display the submenu; or touch the screen to select the item.
- Press the Zoom Button ( ) to select On or Off. Press the Recording Button ( ) to confirm; or touch the screen to select the item.


6.1.8 EV Compensation
You can adjust the value of the exposure compensation, which ranges from -2.0EV to +2.0EV (at 0.5EV increments). The higher the EV value, the brighter the image will be.
- Turn on the Digital Video Camera and make sure it is in the DV Mode.
- Press the Menu Button ( ) and press the Zoom Button ( ) to highlight the EV Compensation item. Press the Recording Button ( ) to display the submenu; or touch the screen to select the item.
- Press the Mode Button ( ) to select left/right to increase or decrease the EV value in steps. Press the Recording Button ( ) to confirm; or touch the screen to select the item.

6.2 Menu options of DV/Voice Playback
When in DV/Voice Playback Mode, press the Menu Button ( ) to show the Movie clip options menu.
6.2.1 Delete
- Turn on the Digital Video Camera and make sure it is in the DV/Voice Playback Mode.
- Select the file to be deleted and press the Menu Button ( ) to enter Menu. Press Zoom Button ( ) to highlight the Delete item, or touch the screen and select on the file to be deleted.
- Press Zoom Button ( ) or touch the screen to select Delete One or Delete All, and press Recording Button ( ) to delete file(s).


- Touch the screen to select "Yes" or "No" to delete file(s).

| Delete One | Delete the current file |
| Delete All | Delete all files stored in the Digital Video Camera |
Note: The file cannot be recovered once it is deleted. Therefore, please make sure you have backed up the file before Delete. Protect files cannot be deleted. Before deleting, you must unlock it
6.2.2 Protect
- Turn on the Digital Video Camera and make sure it is in the DV/Voice Playback Mode.
- Press Menu Button ( ) and press Zoom Button ( )

to highlight the Protect item. Press the Recording Button to display submenu; or touch the screen to select the item.

- Display the lock icon to indicate the file is being protected.


Note: To unlock the file from Protect, repeat the steps stated above. When the Protection is relieved from Protect mode, the locked icon will disappear.
6.3 Menu options of DSC Mode
When in DSC Mode, press the Menu Button ( ) to display the DSC Mode option Menu.
6.3.1 Still Image Resolution
- Turn on the Digital Video Camera and make sure it is in the DSC Mode.
- Press the Menu Button ( ) and press the Zoom Button ( )

to highlight the Resolution item. Press the Recording Button ( ) to display the submenu; or touch the screen to select the item.
- Press the Zoom Button ( ) to select 16M, 8M, 5M, or 3M.
Press the Recording Button ( ) to confirm; or touch the screen to select the item.


| 16M | 4608 x 3456 pixels (Interpolation) |
 8M 8M | 3200 x 2400 pixels (Interpolation) |
 5M 5M | 2592 x 1944 pixels |
 3M 3M | 2048 x 1536 pixels |
6.3.2 White Balance
- Turn on the Digital Video Camera and make sure it is in the DSC Mode.
- Press the Menu Button ( ) and press the Zoom Button ( ) to highlight the White Balance item. Press the Recording Button ( ) to display the submenu; or touch the screen to select the item.
- Press Zoom Button ( ) to select Auto, Daylight, Cloudy, Fluorescent or Tungsten. Press the Recording Button ( ) to confirm; or touch the screen to select the item.


6.3.3 Effect
This digital video camera can record normal color image, black and white image, or image with sepia effect.
- Turn on the Digital Video Camera and make sure it is in the DSC Mode.
- Press Menu Button ( ) and press Zoom Button ( )

to highlight the Effect item. Press the Recording Button ( ) to display submenu; or touch the screen to select the item.

- Press Zoom Button ( ) to select Normal, B/W or Sepia.
Press the Recording Button ( ) to confirm; or touch the screen to select the item.


6.3.4 Metering
- Turn on the Digital Video Camera and make sure it is in the DSC Mode.
- Press Menu Button ( ) and press Zoom Button ( ) to highlight the Metering item. Press the Recording Button ( ) to display submenu; or touch the screen to select the item.
- Press Zoom Button ( ) to select Spot, Center or Touch AE. Press the Recording Button ( ) to confirm; or touch the screen to select the item.

![[•] Spot [=] Center Touch AE 1/1](/content/2026/05/959482/images/1a0240881b7e82c3f6b98a5745f8ecbd3702f117ece954f2167309eb2cd15839.jpg)
6.3.5 Backlight
- Turn on the Digital Video Camera and make sure it is in the DSC Mode.
- Press the Menu Button ( ) and press the Zoom Button ( ) to highlight the Backlight item. Press the Recording Button ( ) to display the submenu; or touch the screen to select the item.
- Press the Zoom Button ( ) to select On or Off. Press the Recording Button ( ) to confirm; or touch the screen to select the item.

6.3.6 Night Mode
- Turn on the Digital Video Camera and make sure it is in the DSC Mode.
- Press the Menu Button ( ) and press the Zoom Button ( ) to highlight the Night Mode item. Press the Recording Button ( ) to display the submenu; or touch the screen to select the item.
- Press the Zoom Button ( ) to select On or Off. Press the Recording Button ( ) to confirm; or touch the screen to select the item.

6.3.7 Self-timer
- Turn on the Digital Video Camera and make sure it is in the DSC Mode.
- Press the Menu Button ( ) and press the Zoom Button ( )

to highlight the Self-timer item. Press the Recording Button ( ) to display the submenu; or touch the screen to select the item.
- Press the Zoom Button (☐) to select Off, 2 secs., or 10 secs. Press the Recording Button () to confirm; or touch the screen to select the item.

With 2 secs. Self-timer:
The image will be taken 2 seconds after the shutter is released.
With 10 secs. Self-timer:
The image will be taken 10 seconds after the shutter is released.
6.3.8 Burst
You can continuously shoot three pictures with this function, started by pressing the Recording Button () and ending automatically after taking three pictures.
- Turn on the Digital Video Camera and make sure it is in the DSC Mode.
- Press the Menu Button ( ) and press the Zoom Button ( ) to highlight the Burst item. Press the Recording Button ( ) to display the submenu; or touch the screen to select the item.
- Press the Zoom Button (☐) to select Off, 2 secs., or 10 secs. Press the Recording Button (☐) to confirm; or touch the screen to select the item.

6.3.9 EV compensation
You can adjust the value of the exposure compensation which is ranged from -2.0EV to +2.0EV (at 0.5EV increment). The higher the EV value, the brighter the image will be.
- Turn on the Digital Video Camera and make sure it is in the DSC Mode.
- Press Menu Button ( ) and press Zoom Button ( ) to highlight the EV Compression item. Press the Recording Button ( ) to display submenu; or touch the screen to select the item.
- Using Mode Button ( ) to select left/right will increase or decrease EV value by steps. Press the Recording Button ( ) to confirm; or touch the screen to select the item.


6.4 Menus of DSC Playback
6.4.1 Delete
- Turn on the Digital Video Camera and make sure it is in the Playback Mode.
- Select the file to be deleted, press Menu Button ( ) and press Zoom Button ( ) to highlight the Delete item. Press the Recording Button ( ) to display submenu; or touch the screen to select the item.
- Press Zoom Button ( ) to select Delete one or Delete All. Press the Recording Button ( ) to confirm; or touch the screen to select the item.


- Press Zoom Button (☐☐☐) to select "Yes" or "No" to delete file(s), or touch the screen to select the item.

Note: The files cannot be recovered once deleted. Therefore, please make sure you have a backup file before delete. The protect files will not be able to delete. Before delete of Protected file, you must unlock the file.
6.4.2 Protect
- Turn on the Digital Video Camera and make sure it is in the Playback Mode.
- Press the Menu Button ( ) and press the Zoom Button ( ) to highlight the Protect item. Press the Recording Button ( ) to display the submenu; or touch the screen to select the item.
- Press the Zoom Button ( ) to select Lock One, Lock All, Unlock One, or Unlock All. Press the Recording Button ( ) to confirm; or touch the screen to select the item. The Locked icon will be displayed to indicate that the file is Protected.


Note: Repeat the above steps to unlock the file. When the file is unlocked, the locked icon will disappear.
6.4.3 Autoplay
This digital video camera includes an Autoplay function for playing back each image at a fixed interval.
- Turn on the Digital Video Camera and make sure it is in the Playback Mode.
- Press the Menu Button ( ) and press the Zoom Button ( ) to highlight the Autoplay item. Press the Recording Button ( ) to display the submenu; or touch the screen to select the item.
- Press the Zoom Button ( ) to select Off, 1 sec., or 3 secs. Press the Recording Button ( ) to confirm; or touch the screen to select the item. The images will be displayed automatically.

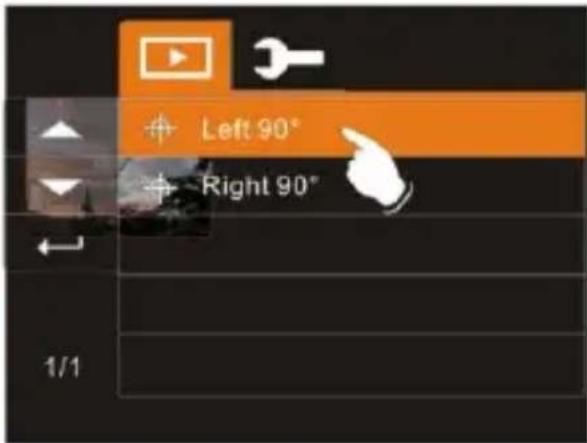
6.4.4 Rotate
- Turn on the Digital Video Camera and make sure it is in the Playback Mode.
- Press the Menu Button ( ) and press the Zoom Button ( ) to highlight the Rotate item. Press the Recording Button ( ) to display the submenu; or touch the screen to select the item.
- Press the Zoom Button ( ) to select Left 90° or Right 90°. Press the Recording Button ( ) to confirm; or touch the screen to select the item.

6.4.5 DPOF
Use the DPOF (Digital Print Order Format) function to indicate the printing information stored in the memory card.
- Turn on the Digital Video Camera and make sure it is in Playback Mode.
- Press the Menu Button ( ) and press the Zoom Button ( ) to highlight the DPOF item. Press the Recording Button ( ) to display the submenu; or touch the screen to select the item.

- Press the Zoom Button ( ) to select One, All, Reset One, or Reset All. Press the Recording Button ( ) to confirm; or touch the screen to select the item. The DPOF icon will be shown to indicate the files that are ordered for printing.

Note: 1. A memory card is required for the DPOF function. 2. If DPOF is set, the pictures to be printed are ordered to print.
6.5 Setting Menu
The Setting Menu can be used to select all kinds of Digital Video Camera settings.
6.5.1 Information
This function can be used to display information on the LCD screen to help you capture the best movie and image clips.
- Turn on the Digital Video Camera and press the Menu Button (☐), then switch to SET Mode.
- Press the Zoom Button (☐) to highlight the Information item. Press the Recording Button ( ) to display the submenu; or touch the screen to select the item.
- Press the Zoom Button ( ) to select Normal, Histogram, or Off. Press the Recording Button ( ) to confirm; or touch the screen to select the item.

6.5.2 Date / Time
Please refer to section 2.7.1 for setting the date and time.
6.5.3 Beep
- Turn on the Digital Video Camera and press the Menu Button ( ), then switch to SET Mode.
- Press the Zoom Button ( ) to highlight the Beep item. Press the Recording Button ( ) to display the submenu; or touch the screen to select the item.
- Press the Zoom Button ( ) to select On or Off. Press the Recording Button ( ) to confirm; or touch the screen to select the item.


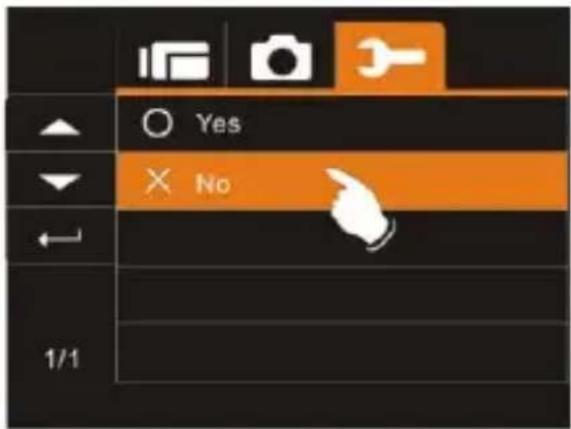
6.5.4 Default
Use this function to reset all settings to default settings.
- Turn on the Digital Video Camera and press the Menu Button ( ), then switch to SET Mode.
- Press the Zoom Button ( ) to highlight the Default item. Press the Recording Button ( ) to display the submenu; or touch the screen to select the item.
- Press Zoom Button (☐) to select "O" Yes or "X" No. Press the Recording Button (☐) to confirm; or touch the screen to select the item.

6.5.5 TV standard
Use the TV standard to set the TV system for your area.
- Turn on the Digital Video Camera and press Menu Button and switch to SET Mode.

- Press Zoom Button ( ) to highlight TV standard item. Press the Recording Button ( ) to display submenu; or touch the screen to select the item.
- Press Zoom Button ( ) to select NTSC or PAL. Press the Recording Button ( ) to confirm; or touch the screen to select the item.


| TV out standard setting reference | |
 NTSC NTSC | USA, Canada, Japan, Korea, Taiwan, Mexico |
 PAL PAL | Australia, Austria, Belgium, China, Denmark, Finland, Germany, UK, Italy, Kuwait, Malaysia, New Zealand, Singapore, Spain, Sweden, Switzerland, Thailand, Norway |
6.5.6 Auto Power Off
This function can be used to turn off the Digital Video Camera automatically after not using it for a period of time.
- Turn on the Digital Video Camera and press Menu Button and switch to SET Mode.

- Press Zoom Button ( ) to highlight Auto Power Off item. Press the Recording Button ( ) to display submenu; or touch the screen to select the item.
- Press Zoom Button ( ) to select Off, 3 mins, or 5 mins. Press the Recording Button ( ) to confirm; or touch the screen to select the item.


6.5.7 Frequency
Use the Frequency option to set the frequency system for your area.
- Turn on the Digital Video Camera and press Menu Button ( ), and switch to SET Mode.
- Press Zoom Button (☐) to highlight Frequency item. Press the Recording Button ( ) to display submenu; or touch the screen to select the item.
- Press Zoom Button ( ) to select 50HZ or 60HZ. Press the Recording Button ( ) to confirm; or touch the screen to select the item.


| Frequency setting reference: | |
| 50HZ 50HZ | UK, Germany, Spain, Italy, France, Netherlands, Portugal, Russia, China, Japan |
| 60HZ 60HZ | USA, Taiwan, Korea, Japan |
6.5.8 Language
- Turn on the Digital Video Camera and press Menu Button and switch to SET Mode.

- Press Zoom Button ( ) to highlight Language item. Press the Recording Button ( ) to display submenu; or touch the screen to select the item.

- Press Zoom Button ( ) to select the following languages: English, German, French, Italian, Japanese, Spanish, Portuguese, Traditional Chinese, Simplified Chinese, Turkish, Russian, Thai, Arabian or Korean. Press the Recording Button ( ) to confirm; or touch the screen to select the item.

6.5.9 Format
This function allows you to format the memory card or the built-in memory.
- Turn on the Digital Video Camera and press Menu Button and switch to SET Mode.

- Press Zoom Button ( ) to highlight Format item. Press the Recording Button ( ) to display submenu; or touch the screen to select the item.
- Press Zoom Button (☐) to select "O" Yes or "X" No. Press the Recording Button (☐) to confirm; or touch the screen to select the item.

Note: All the data stored in the memory card or flash memory will be deleted after formatting.
6.5.10 File Number(Default: Series)
This setting allows you to name the files. If “Series” is selected, the file name will follow the latest stored file consecutively. If “Reset” is selected, the next file name will start from 0001 even after formatting, deleting or inserting a new memory card.
- Turn on the Digital Video Camera and press Menu Button and switch to SET Mode.

- Press Zoom Button ( ) to highlight File Number item. Press the Recording Button ( ) to display submenu; or touch the screen to select the item.
- Press Zoom Button ( ) to select Series or Reset. Press the Recording Button ( ) to confirm; or touch the screen to select the item.


6.5.11 LCD brightness
This function can be used to adjust the brightness of the screen.
- Turn on the Digital Video Camera and press Menu Button and switch to SET Mode.

- Press Zoom Button ( ) to highlight LCD brightness item. Press the Recording Button ( ) to display submenu; or touch the screen to select the item.
- Press Zoom Button ( ) to select High, Medium, or Low. Press the Recording Button ( ) to confirm; or touch the screen to select the item.


6.5.12 Instant Review
This function can be used to instantly browse the files after taking the picture.
- Turn on the Digital Video Camera and press Menu Button and switch to SET Mode.

- Press Zoom Button ( ) to highlight Instant Review item. Press the Recording Button ( ) to display submenu; or touch the screen to select the item.
- Press Zoom Button (☐) to select 1 second, 3 secs., or 5 secs.. Press the Recording Button (☐) to confirm; or touch the screen to select the item.

6.5.13 Memory
Use this function to select data storage location.
- Turn on the Digital Video Camera and press the Menu Button, then switch to SET Mode.

- Press the Zoom Button to highlight the Memory item. Press the Recording Button to display the submenu, or touch the screen to select the item.
- Press the Zoom Button to select SD1 or SD2. Press the Recording Button to confirm, or touch the screen to select the item.

Note: When inserting an SD card, slot 1 or slot 2 can be selected for storage. If the camera does not have an SD card, the file will be stored in the built-in storage.
6.5.14 Volume
Use this function to adjust the sound volume.
- Turn on the Digital Video Camera and press the Menu Button, then switch to SET Mode.
- Press the Zoom Button to highlight the Volume item. Press the Recording Button to display the submenu, or touch the screen to select the item.
- Press the Zoom Button to select High, Medium, or Low. Press the Recording Button to confirm, or touch the screen to select the item.

6.5.15 Start-up LOGO
Use this function to set the image that is displayed on the LCD when the digital camcorder is turned on.
- Turn on the Digital Video Camera and press the Menu Button, then switch to SET Mode.

- Press the Zoom Button ( ) to highlight the Start-up Logo item. Press the Recording Button ( ) to display the submenu, or touch the screen to select the item.
- Press the Zoom Button ( ) to select Default or User Setting. Press the Recording Button ( ) to confirm, or touch the screen to select the item.

- Use the "User Setting" to select the image you intend to use as the Start-up Logo. Press the Zoom Button ( ) to select the image you intend to use as the Start-up Logo. Press the Recording Button ( ) to confirm, or touch the screen to select the item.

- Turn the camera off and on again. The DV will use the preset image as the Start-up Logo.
- If you want to cancel the Start-up Logo of User Setting, please enter the Start-up Logo item and select the Default item. The camera will return to the preset Start-up Logo.
6.5.16 Face Detection
You can use the Face Detection function to automatically detect faces in a scene during a photo shoot.
- Turn on the Digital Video Camera and press the Menu Button, then switch to SET Mode.

- Press the Zoom Button ( ) to highlight the Face Detection item. Press the Recording Button ( ) to display the submenu, or touch the screen to select the item.
- Press the Zoom Button (☐) to select "O" for Yes or "X" for No. Press the Recording Button (☐) to confirm; or touch the screen to select the item.

7 PC and TV Connection
7.1 Connecting to the Computer
As shown in the illustration, use the provided USB cable to connect the Digital Video Camera to a PC for file transmission.

7.2 Connecting to a Standard TV
As shown in the illustration, use the video cable to connect the Digital Video Camera to a standard TV.

7.3 Connecting to an HD TV
As shown in the illustration, use the provided HDMI cable to connect the Digital Video Camera to an HD TV for high-resolution picture display.
Note: Some TVs may not recognize this image format (1080p, 30fps). Please confirm the resolution of the connected TV.
8 Installing the Software
- Place the attached CD-ROM into the CD player.
- If the CD does not run automatically, please use the computer's root menu to locate the Install_CD.exe file in the CD's root menu.
The following screen will be displayed.

- Press the Menu item and follow the installation process, following the instructions on screen.
9 Editing Software

ArcSoft Total Media Extreme (TME) ™ manages your media for you and gives you tons of fun and exciting ways to create and share projects featuring your photos, videos, and music files. Edit, enhance, and add creative effects to your photos. You can
- Create your own movies or photo slideshows complete with soundtrack.
- Upload your files easily to YouTube™!
- Or share them through simple email attachments or popular photo printing services.
- You can go to http://www.arcsoft.com/ for more information.
10 Appendix
Specifications
| Image sensor | 1/3.2 inch. 5 mega pixels CMOS sensor | ||
| Effective pixels | 5 Megapixel (2592X1944) | ||
| Storage media | Support SD / Micro SD card and SDHC card (32GB) | ||
| ISO Equipment | Auto | ||
| Color effect | Normal / BW / Sepia | ||
| Lens | f = 5-25 mm; F=3.5-3.7(f = 38-190 mm, 35mm equivalent) | ||
| Focus range | Wide: 10cm~InfinityTele: 100cm~ Infinity | ||
| Still image | Format : JPEG (DPOF, EXIF)Resolution: 3MP, 5MP, 8MP (Interpolation), 16M (Interpolation) | ||
| Resolution | NTSC | PAL | |
| Full HD (1920 x 1080) | 30fps | 30fps | |
| Recording method (fps) | HD (1280x720) | 30fps | 30fps |
| WVGA (848x480) | 60fps | 30fps | |
| WEB (320x240) | 30fps | 30fps | |
| Format: H.264 (MOV) | |||
| TV output | NTSC/PAL | ||
| Zoom | Optical Zoom: 5x ; Digital Zoom: 4xStatic image playback: 8x digital zoom (depending | ||
| on the size of the image) | |||
| Audio | Sound: ADPCMVideo: MOV | ||
| TFT screen | 3.0" Touch Panel screen | ||
| LED Flashlight | Range : Below 1.0mDV: On / OffDSC: On / Off | ||
| White balance | Auto / Daylight / Cloudy / Fluorescent / Tungsten | ||
| Exposure | -2.0 EV~+2.0 EV (0.5EV / step) | ||
| Self-Timer | Off, 2 seconds, 10 seconds | ||
| Interface | Camera: USB 2.0 (high-speed)Mass storage high disk: USB 2.0(high-speed), MIC input, HDMI, USB DC IN | ||
| Shutter | Electronic shutter1/2 ~1/4000 sec | ||
| Auto Power Off | Off, 3 minutes, 5 minutes | ||
| Power Source | NP-60 Lithium battery (1050mAh) | ||
| Dimensions | 110 (L) x 68 (H) x 37 (W) mm | ||
| Weight | About 186g (without battery and SD card) | ||
Troubleshooting
| Problem | Possible Cause | Solution |
| Can not turn on the power of Digital Video Camera. | 1. Batteries are not inserted correctly.2. Batteries are exhausted. | 1. Please insert batteries correctly.2. Replace the batteries. |
| Camera shutdown suddenly. | 1. Power saving mode already activated.2. Battery exhausted. | 1. Please turn on the power again.2. Replace the batteries. |
| Pictures are not stored in the memory. | Power off before storing the images. | Please change to new batteries when the battery indicator turns to red color. |
| Camera shutdown when using Self-timer shooting picture. | Batteries in camera are exhausted. | Change new batteries. |
| Images are out of focus | Object exceeds the range of focus. | Please take the picture within the focusing range and select normal. |
| Unable to use the external memory card. | 1. Memory card is Protected.2. Memory card contains non-DCF images taken by other cameras. | 1. Unlock the memory card.2. Reformat the memory card. Please make sure to backup the file before reformatting memory card. |
| All Buttons can not work or camera hangs. | Short circuit occurred when connecting the camera to other device. | Take out batteries in the camera and re-insert again. |
Technical Support
For technical support issues, please visit our website at www.polaroid.com. For further assistance, you can also call our technical support department toll-free at 877-408-0033, or for email support, please contact us at polaroid@sakar.com.
© 2012 All Rights Reserved
Warranty Card
This warranty covers the original consumer purchaser only and is not transferable.
This warranty covers products that fail to function properly under normal usage, due to defects in material or workmanship. Your product will be repaired or replaced at no charge for parts or labor for a period of one year.
What Is Not Covered by Warranty
Damages or malfunctions not resulting from defects in material or workmanship and damages or malfunctions from other than normal use, including but not limited to, repair by unauthorized parties, tampering, modification, or accident.
To obtain warranty service and troubleshooting information:
Call 877-408-0033 or visit our website at www.polaroid.com.
To receive warranty service along with the name and address of an authorized product service center, the original consumer purchaser must contact us for problem determination and service procedures. Proof of purchase in the form of a bill of sale or receipted invoice, evidencing that the product is within the applicable warranty period(s), must be presented in order to obtain the requested service. It is your responsibility to properly package and send any defective products along with a dated copy of proof of purchase, a written explanation of the problem, and a valid return address to the authorized service center at your expense. Do not include any other items or accessories with the defective product. Any products received by the authorized service center that are not covered by warranty will be returned unrepaired.
No warranties, whether express or implied, including, but not limited to, any implied warranties of merchantability or fitness for a particular purpose, other than those expressly described above shall apply. Distributor further disclaims all warranties after the express warranty period stated above. No other express warranty or guaranty given by any person, firm, or entity with respect to the product shall be binding on distributor. Repair, replacement, or refund of the original purchase price - at distributor's sole discretion - are the exclusive remedies of the consumer. In no event will distributor, its manufacturers, or PLR IP Holdings, LLC be liable for any incidental, direct, indirect, special, punitive, or consequential damages (such as, but not limited to, damages for loss of profits, business, savings, data, or records) caused by the use, misuse, or inability to use the product. Except as stated herein, no other warranties shall apply. Notwithstanding the foregoing, consumer's recovery against distributor shall not exceed the purchase price of the product sold by distributor. This warranty shall not extend to anyone other than the original consumer who purchased the product and is not transferable.
Some countries, states or provinces do not allow the exclusion or limitation of incidental or consequential damages or allow limitations on warranties, so limitation or exclusions may not apply to you. This warranty gives you specific legal rights, and you may have other rights that vary from state to state or province to province. Contact your authorized retailer to determine if another warranty applies.
This product is manufactured, distributed and sold by SAKAR International, Inc. Polaroid, Polaroid & Pixel, Made in Polaroid and Polaroid Classic Border Logo are trademarks of PLR IP Holdings, LLC, used under license. All other trademarks are the property of the respective owner, who has not sponsored, endorsed or approved this product. PLR IP Holdings, LLC does not manufacture this product or provide any Manufacturer's Warranty or support.
E-Waste - PLR IP Holdings, LLC, its licensees, affiliates, and Sakar International, Inc. fully supports all electronic waste initiatives. As responsible stewards of the environment, and to avoid violating established laws, you should properly dispose of this product in compliance with all applicable regulations, directives or other governances in the area where you reside. Please check with local authorities or the retailer where you purchased this product to determine a location where you can appropriately dispose of the product.
You may also go to www.polaroid.com and reference Social Responsibility to learn more about the specific laws in your area and to locate a collection facility near your home.
If your electronic device has internal memory on which personal or other confidential data may be stored, you may want to perform a data sanitization process before you dispose of your device to assure another party cannot access your personal data. Data sanitization varies by the type of product and its software, and you may want to research the best sanitization process for your device before disposal. You may also check with your local recycling facility to determine their data sanitization procedures during the recycling process.
This device complies with the part 15 of the FCC rules. Operation is subject to the following two conditions: (1) this device may not cause harmful interference, and (2) this device must accept any interference received, including interference that may cause undesired operation.
Caution: changes or modifications not expressly approved by the party responsible for compliance could void the user's authority to operate the equipment. NOTE: This equipment has been tested and found to comply with the limits for a Class B digital device, pursuant to Part 15 of the FCC Rules. These limits are designed to provide reasonable protection against harmful interference in a residential installation. This equipment generates, uses and can radiate radio frequency energy and, if not installed and used in accordance with instructions may cause harmful interference to radio or television reception, which can be determined by turning the equipment off and on. The user is encouraged to try to correct the interference by one or more of the following measures:
Reorient or relocate the receiving antenna.
Increase the separation between the equipment and receiver.
Connect the equipment into an outlet on a circuit different from that to which the receiver is connected.
Consult the dealer or experienced radio/TV technician for help.


- OVERALL INTRODUCTION
- GETTING STARTED
- LCD DISPLAY INFORMATION
- USING THE CAMERA
- MENU MODE
- MENU OPTIONS OF DV/VOICE PLAYBACK
- MENU OPTIONS OF DSC MODE
- MENUS OF DSC PLAYBACK
- SETTING MENU
- PC AND TV CONNECTION
- INSTALLING THE SOFTWARE
- EDITING SOFTWARE
- APPENDIX
- DISCLAIMER
- PREFACE
- ABOUT THIS MANUAL
- DISPOSAL OF WASTE ELECTRICAL AND ELECTRONIC EQUIPMENT AND/OR BATTERY BY USERS IN PRIVATE HOUSEHOLDS IN THE EUROPEAN UNION
- SAFETY WARNING AND NOTICE
- FOR YOUR SAFETY
- WARRANTY
- TAKING CARE OF YOUR CAMCORDER
- OPERATING ENVIRONMENT
- SYSTEM REQUIREMENTS
- FEATURES
- ACCESSORIES
- EXTERNAL VIEW
- ADJUSTING LCD DISPLAY
- INSERTING SD CARD(S)
- LOADING THE BATTERY
- CHARGING THE BATTERY
- THE GESTURES OF USING THE TOUCH SCREEN
- SINGLE TOUCH
- SLIDE
- ROTATE
- BUTTONS & FUNCTIONS
- ABOUT LED INDICATORS
- INITIAL SETTINGS BEFORE USE
- SETTING DATE AND TIME
- IN DV MODE
- IN VOICE RECORDING MODE
- IN DSC MODE
- SHOOTING A MOVIE CLIP
- VIDEO RESOLUTION
- PREVIEW
- VOICE RECORDING MODE
- MOVIE CLIP / VOICE CLIP PLAYBACK
- FILES MAY NOT BE PLAYED BACK
- SHOOTING / PLAYBACK IMAGES
- TAKING A PICTURE
- IMAGES PLAYBACK
- DV PLAYBACK MODE
- NOTES
- VOICE RECORDING PLAYBACK MODE
- DSC PLAYBACK MODE
- MENU OPTIONS OF DV MODE
- MOVIE CLIP RESOLUTION
- WHITE BALANCE
- EFFECT
- METERING
- BACKLIGHT
- NIGHT MODE
- MOTION DETECTION
- EV COMPENSATION
- DELETE
- PROTECT
- STILL IMAGE RESOLUTION
- SELF-TIMER
- WITH 2 SECS. SELF-TIMER
- WITH 10 SECS. SELF-TIMER
- BURST
- AUTOPLAY
- DPOF
- INFORMATION
- DATE / TIME
- BEEP
- DEFAULT
- TV STANDARD
- AUTO POWER OFF
- FREQUENCY
- LANGUAGE
- FORMAT
- FILE NUMBER(DEFAULT: SERIES)
- LCD BRIGHTNESS
- INSTANT REVIEW
- MEMORY
- VOLUME
- START-UP LOGO
- FACE DETECTION
- CONNECTING TO THE COMPUTER
- CONNECTING TO A STANDARD TV
- CONNECTING TO AN HD TV
- SPECIFICATIONS
- TECHNICAL SUPPORT
- WARRANTY CARD
- WHAT IS NOT COVERED BY WARRANTY
- TO OBTAIN WARRANTY SERVICE AND TROUBLESHOOTING INFORMATION
- CALL 877-408-0033 OR VISIT OUR WEBSITE AT WWW.POLAROID.COM
Brand : POLAROID
Model : iD879
Category : Camcorder