
OfficeConnect Remote 812 - Router 3COM - Free user manual and instructions
Find the device manual for free OfficeConnect Remote 812 3COM in PDF.


| Product Type | ADSL Router / BRouter |
| Brand | 3Com |
| Model | OfficeConnect Remote 812 |
| Part Number | 1.024.2427-00 |
| WAN Interface | 1 RJ-11 ADSL port (ANSI T1.413) |
| LAN Interface | 4 RJ-45 10Base-T Ethernet ports (auto MDI/X on port 1) |
| Console Interface | 1 DB-9 (DCE, 9600 baud) |
| Power Consumption | 10 watts maximum |
| Power Supply | External 15V DC adapter |
| Operating Temperature | 0°C to 50°C |
| Storage Temperature | -35°C to +70°C |
| Operating Humidity | 0% to 95% non-condensing |
| MTBF | 165,000 hours |
| Boot Modes | DHCP Smart Mode, Default Bridge Mode, Unconfigured Mode |
| Protocols Supported | IP, IPX, Bridging (802.1d), PPP, RFC 1483 (routed/bridged), DHCP server, NAT, RIP, SNMP, Telnet, Packet Filtering |
| Management | Web-based Remote 812 Manager, CLI via console, IP Wizard utility |
| LED Indicators | Power, Alert, ADSL Link, LAN Ports 1-4 (link/activity) |
| Dimensions | Approximately 25 x 18 x 4 cm (estimated from typical OfficeConnect form factor) |
| Weight | Approximately 0.6 kg (estimated) |
| Regulatory Approvals | FCC Class B, CE, UL/cUL, IC, VCCI |
| Warranty | 5 years hardware, 90 days software, Year 2000 warranty |
| Maintenance & Cleaning | Keep in clean, dust-free area; do not spill liquids; no user-serviceable parts inside; disconnect power before cleaning. |
| Spare Parts & Repairability | No user-replaceable fuses or parts. Contact 3Com reseller for service. |
Frequently Asked Questions - OfficeConnect Remote 812 3COM
DHCP Smart Mode (switches: off, on, off, off) – assigns LAN IP 192.168.200.254 and acts as DHCP server.
Default Bridge Mode (off, off, on, off for VPI=0 VCI=35; or off, off, off, on for VPI=8 VCI=35) – works as a bridge with preconfigured VPI/VCI.
Unconfigured Mode (all off) – all parameters must be set manually. These modes only take effect on a factory-reset unit.
Alert: flashing during initialization.
ADSL: off – no signal; green – link up; blinking green – data transfer; orange – synchronizing with CO equipment.
LAN (Ports 1-4): on when a client is connected, blinking with activity. If an LED is off when it should be on, check cable connections and power.
User questions about OfficeConnect Remote 812 3COM
0 question about this device. Answer the ones you know or ask your own.
Ask a new question about this device
Download the instructions for your Router in PDF format for free! Find your manual OfficeConnect Remote 812 - 3COM and take your electronic device back in hand. On this page are published all the documents necessary for the use of your device. OfficeConnect Remote 812 by 3COM.
USER MANUAL OfficeConnect Remote 812 3COM
OfficeConnect™ Remote 812 ADSL Router Getting Started Guide
Version 1.0

natural_image
Group of four people in a business setting, one smiling while holding a phone to another (no visible text or symbols)http://www.3com.com/
Part No. 1.024.2427-00 Published February 2000
3Com Corporation
5400 Bayfront Plaza Santa Clara, California 95052-8145
Copyright ©2000 3Com Corporation. All rights reserved. No part of this documentation may be reproduced in any form or by any means or used to make any derivative work (such as translation, transformation, or adaptation) without written permission from 3Com Corporation.
3Com Corporation reserves the right to revise this documentation and to make changes in content from time to time without obligation on the part of 3Com Corporation to provide notification of such revision or change.
3Com Corporation provides this documentation without warranty of any kind, either implied or expressed, including, but not limited to, the implied warranties of merchantability and fitness for a particular purpose. 3Com may make improvements or changes in the product(s) and/or the program(s) described in this documentation at any time.
UNITED STATES GOVERNMENT LEGENDS:
If you are a United States government agency, then this documentation and the software described herein are provided to you subject to the following:
United States Government Legend: All technical data and computer software is commercial in nature and developed solely at private expense. Software is delivered as Commercial Computer Software as defined in DFARS 252.227-7014 (June 1995) or as a commercial item as defined in FAR 2.101(a) and as such is provided with only such rights as are provided in 3Com's standard commercial license for the Software. Technical data is provided with limited rights only as provided in DFAR 252.227-7015 (Nov 1995) or FAR 52.227-14 (June 1987), whichever is applicable. You agree not to remove or deface any portion of any legend provided on any licensed program or documentation contained in, or delivered to you in conjunction with this Install Guide.
Unless otherwise indicated, 3Com registered trademarks are registered in the United States and may or may not be registered in other countries.
3Com, the 3Com logo, and OfficeConnect Remote 812 are registered trademarks of 3Com Corporation. 3ComFacts is a service mark of 3Com Corporation.
Acrobat and Acrobat Reader are trademarks of Adobe. Artisoft and LANtastic are registered trademarks of Artisoft, Inc. Banyan and VINES are registered trademarks of Banyan Systems Incorporated. CompuServe is a registered trademark of CompuServe, Inc. DEC and PATHWORKS are registered trademarks of Digital Equipment Corporation. Intel and Pentium are registered trademarks of Intel Corporation. AIX, AT, IBM, NetView, and OS/2 are registered trademarks and Warp is a trademark of International Business Machines Corporation. Internet Explorer, Microsoft, MS-DOS, Windows, Windows 95, and Windows NT are registered trademarks of Microsoft Corporation. Novell and NetWare are registered trademarks of Novell, Inc. PictureTel is a registered trademark of PictureTel Corporation. UNIX is a registered trademark of X/Open Company, Ltd. in the United States and other countries.
Other brand and product names may be registered trademarks or trademarks of their respective holders.
CONTENTS
ABOUT THIS GUIDE
Introduction 1
Conventions 2
1 GETTING STARTED
Introduction 1-1
What's in the Package? 1-1
What Can the OfficeConnect Remote 812 do? 1-2
OfficeConnect Remote 812 Boot Mode Options 1-3
Option One: DHCP Smart Mode 1-3
Option Two: Default Bridge Mode 1-4
Option Three: Unconfigured Mode 1-4
2 INSTALLING THE OFFICE CONNECT REMOTE 812 ADSL ROUTER
Introduction 2-1
OfficeConnect Remote 812 Hardware Installation 2-1
Back Panel Features 2-1
Hardware Configuration 2-3
LED Light Operation 2-4
Workstation Configuration 2-4
Workstation Configuration Using DHCP Smart Mode 2-5
Workstation Configuration Using the Default Bridge Mode 2-5
Workstation Configuration Using the Unconfigured Mode 2-5
OfficeConnect Remote 812 Software Installation 2-6
Configuring the OfficeConnect Remote 812 Manager 2-7
Configuring in Bridge Only Mode 2-7
Configuring in DHCP Smart Mode 2-8
Configuring in Unconfigured Mode 2-8
Getting Started with the OfficeConnect Remote 812
Manager 2-9
Configuration Using the Remote Site Wizard 2-10
Remote Site IP Wizard field descriptions 2-11
Remote Site Name 2-11
Network Service 2-11
ATM VC Parameters 2-12
Network Address Translation 2-12
WAN IP Information 2-12
Option 1: OfficeConnect Remote 812 Manager Ping to ISP or
Remote Site Network 4-3
Ping Responses 4-3
DNS Errors 4-4
Option 2: DOS Ping to ISP or Remote Site Network 4-4
Option 3: Internet Browser (Internet Access Only) 4-5
Advanced Troubleshooting 4-6
A RESTORING THE FACTORY DEFAULT CONFIGURATION WITH THE RESET BUTTON
Resetting the Configuration of Your Router B-1
B CONFIGURING YOUR WORKSTATION TO BE A DHCP CLIENT
Workstation Configuration Using DHCP Smart Mode A-1
C SAFETY INFORMATION
Important Safety Information C - 2
General Specifications D-1
Power requirements D-1
Temperature requirements D-1
Humidity requirements D-1
MTBF (Mean Time Between Failures) D-1
Jacks D-1
ADSL Interface (one RJ-11 jack) D-2
LAN Interface (four RJ-45 jacks) D-2
Console Interface (DB-9) (Default configured as
DCE) D-2
FCC DECLARATION OF CONFORMITY
3COM CORPORATION LIMITED WARRANTY
ABOUT THIS GUIDE
Introduction
The guide describes the features, installation, and initial configuration of the OfficeConnect ^TM Remote 812 ADSL Router. The guide is intended for both first-time and experienced computer network users who want to install and use the OfficeConnect Remote 812.
If you are working with a bridge or router for the first time, it is possible you may make mistakes. We have tried to identify the likely errors you may make and have provided hints and tips to help you recover from error situations.
With your new Remote 812, we have provided an Installation CD and an Installation Map. If you are using Windows, you should should put the Installation CD in your C-ROM drive and follow the steps given on the screens using your foldout Map. If your operating system is MAC or Unix based, you will commence by following the steps on the Map to set up the hardware and then copying (or referencing) files on the CD at Step 4. In Step 5, Configuring the Remote 812, you will follow the instructions given for the type of Boot Mode you have configured. There will be small differences in the procedure.
Once you have carried out the initial configuration of the unit, you can carry out additional configuration to optimize the unit's performance on your network. Refer to the OfficeConnect Remote 812 Online User's Guide (install from your OfficeConnect Remote 812 Installation CD) for advanced configuration options and the Online HTML Help (click the context-sensitive help button at the bottom of each configuration screen) for more information.
These and other user guides and release notes are available in Adobe Acrobat Reader Portable Document Format (PDF) or HTML on the 3Com World Wide Web site:
http://www.3com.com/
Conventions
Table 1 and Table 2 list conventions that are used throughout this guide.
Table1 Notice Icons
| Icon Notice Type Description | |
| Information note Information that describes important features or instructions | |
| Caution Information that alerts you to potential loss of data or potential damage to an application, system, or device | |
| Warning Information that alerts you to potential personal injury | |
Table 2 Text Conventions
| Convention Description | |
| Screen displays | This typeface represents information as it appears on the screen. |
| The words “enter” and “type” | When you see the word “enter” in this guide, you must type something, and then press Return or Enter. Do not press Return or Enter when an instruction simply says “type.” |
| Keyboard key names | If you must press two or more keys simultaneously, the key names are linked with a plus sign (+). Example:Press Ctrl+Alt+Del |
Table 2 Text Conventions (continued)
| Convention Description |
| Words in italics Italics are used to: |
| Emphasize a point. |
| Denote a new term at the place where it is defined in the text. |
| Identify menu names, menu commands, and software button names. Examples: |
| From the Help menu, select Contents. |
| Click OK. |
1
GETTING STARTED
Introduction
This chapter provides instructions for pre-installation of the Remote 812.
■ What's in the Package?
■ What can the Remote 812 do?
■ Remote 812 Boot Modes
What's in the Package?
Before you install the Remote 812 ADSL Router, check the contents of the box against the packed contents checklist below. If any of the items have been damaged in transit or are missing, contact the 3Com dealer from whom the equipment was purchased.
Remote 812 Package Contents:
■ Remote 812 unit
■ Power adapter and power cord
■ Ethernet cable (RJ45 — RJ45)
■ DSL Modem cable (RJ11 — RJ11)
■ Console cable (DB-9 — DB-9)
■ Remote 812 ADSL Router Installation Map
- CD-ROM containing the Remote 812 ADSL Router Online User's Guide (viewable in your web browser), the viewable and printable Remote 812 CLI User's Guide (.pdf format), this Getting Started Guide (.pdf format), Remote 812 Manager help files, the Instant Update Install program, and the IP Wizard.
Note: The Instant Update Install program and the IP Wizard are operational only for Windows users at this time.
What Can the OfficeConnect Remote 812 do?
The Remote 812 is a stand-alone BRouter with data interfaces to a Local Area Network (LAN) and a Wide Area Network (WAN).
Below is a representation of how your Remote 812 connects a LAN and WAN.

flowchart
graph TD
    A["Local LAN"] --> B["HTML Management"]
    B --> C["OfficeConnect Remote ADSL Router"]
    C --> D["ATM"]
    D --> E["Edge Router"]
    E --> F["Internet"]
    D --> G["Edge Router"]
    G --> H["Remote Office"]
The Remote 812 contains one ADSL WAN interface port. It also provides support for ATM.
The Remote 812 supports Point-to-Point Protocol (PPP) and RFC 1483 over the WAN interface. The LAN interface is a four-port Ethernet 10Base-T hub.
The Remote 812 allows one or more networked workstations to connect to other computers on a remote LAN and can also provide high-speed access to the Internet. The Remote 812 provides static and dynamic routing of the Internet Protocol (IP) and Internetwork Packet Exchange (IPX) protocols as well as bridging, with support for learning bridge and 802.1d spanning tree functionality to eliminate loops. Other important features include: Routing Information Protocol (RIP), Simple Network Management Protocol (SNMP), address translation, telnet, and packet filtering. It can also provide DHCP services for your LAN, including automatic assignment of IP addresses to workstations.
The web browser-based Remote 812 Manager and the IP Wizard provide a user-friendly configuration interface.
OfficeConnect Remote 812 Boot Mode Options
To simplify the installation process, the Remote 812 can be initialized with pre-configured parameters using the DIP switches located on the back of the unit. There are three Boot Mode options:
■ DHCP Smart Mode
■ Default Bridge Mode
■ Unconfigured Mode
It is important to note that these boot modes only take effect if the unit has not been previously configured. To erase the existing configuration, reference Appendix A.
The DIP switch settings and the corresponding Boot Mode option are as follows:
Table 1-1 DIP Switch Settings
| 1 2 3 4 Mode | |
| off on off off DHCP Smart Mode | |
| off off on off Default Bridge Mode, VPI=0, VCI=35 | |
| off off off on Default Bridge Mode, VPI=8, VCI=35 | |
| off off off off Unconfigured Mode |
Option One: DHCP Smart Mode
You can use the DHCP Smart Mode if:
■ You plan on using private addresses on the LAN (i.e. your Service Provider has provided you with only 1 public IP address),
■ You plan on using the Remote 812's DHCP Server
The Remote 812 will power up with the following “DHCP Smart Mode” configuration:
■ LAN IP address = 192.168.200.254, Netmask 255.255.255.0.
■ DHCP IP address pool (40 addresses): 192.168.200.1-40
■ DNS name: ocrdsl-3com.com.
■ Administrative Login profile, User Name: root and Password:!root
Option Two: Default Bridge Mode
Use this mode if you want the Remote 812 to function as a bridge automatically, with no special configuration. You will not be required to use the Setup Wizard or install any software from the CD unless you want to change the configuration or if you would like to use Instant Update in the event a software update to your Remote 812 is posted on 3Com's web site (you can install from the CD at any time).
Verify the VPI/VCI settings in the table above match values your Service Provider has given you. The Remote 812 will power up with the following configuration:
■ Bridge network on the LAN Interface
■ A remote site profile named "bridge" is set up to bridge all traffic with RFC 1483 encapsulation on the specified VPI/VCI.
■ Spanning Tree Disabled
■ Administrative Login profile: User Name: root and Password:!root
Option Three: Unconfigured Mode
Set all switches to OFF to boot your unit in Unconfigured Mode. You must set all of the configuration parameters. This allows you complete flexibility with your configuration.
2
INSTALLING THE OFFICE CONNECT REMOTE 812 ADSL ROUTER
Introduction
In this release of the OfficeConnect Remote 812, we have provided an Installation Map and Install CD to assist in your setting up your unit and getting started. This chapter provides more information on the process for your assistance:
■ OfficeConnect Remote 812 Hardware Installation
■ Hardware Configuration
■ LED Light Operation
■ Workstation Configuration (and selecting a Mode)
■ Remote 812 Software Installation
■ Changing the Login Name and Password
■ Starting the Remote 812 Manager
■ Configuring the Remote 812
OfficeConnect Remote 812 Hardware Installation
This section provides a quick hardware setup procedure for the Remote 812. Follow the steps below to learn more about setting up your router:
Back Panel Features
Below is a representation of the back panel. Familiarizing yourself with the connections will help in properly setting up your Remote 812.

■ Console Port — You should not need to use the Console Port unless you are setting up in Unconfigured Mode and thus need to use the Command Line Interface (CLI) to configure your router. The DB-9 terminal port connects the Remote 812 with your console. Then you would use a terminal emulator program to access CLI and run Quick Setup and QuickVC. The Installation Map gives instructions.
- Reset button — This button resets the configuration of the router. See Appendix B for more information about resetting your router's configuration with the reset button.
■ DIP (Dual Inline Package) Switches (4) — Switches 1 through 4 can be turned on and off in certain combinations for different configurations. See the section titled “OfficeConnect Remote 812 Boot Options” in Chapter 1 for complete instructions on which switches to set for which options.
■ Power Inlet — The power port attaches to an external, 15-volt DC power supply included in your package. The other end of the power supply cable connects to a standard electrical socket.
- Ethernet (LAN) Ports (4) — The shielded, 8-pin, RJ45 Ethernet (10Base-T) ports connect the Remote 812 with the LAN. A 10Base-T cable is supplied in the package to make this connection.
■ MDI/X Switch — Swaps the transmit (Tx) and receive (Rx) signal pairs on Ethernet port 1. When MDI/X is “out” (not depressed), Port 1 is pinned the same as the remaining 3 ports. In this mode, a workstation’s Ethernet port or the cascade port on another hub can be connected to any of the four ports on the unit. When MDI/X is pressed “in,” then Port 1 on the unit becomes a cascade hub port, for connection to a non-cascade port on another hub. The MDI/X button must be “out” to use Port 1 for connection to a workstation.
■ ADSL Modem Port — An RJ11 line port connects your Remote 812 to the telephone company wall jack. An RJ11 modem cable is provided.
■ Stacking Clip—A stacking clip is provided which will allow you to stack your OfficeConnect Remote 812 with other 3Com equipment if necessary.
Hardware Configuration
1 Select a Boot Option — The Remote 812 has three boot options. These are controlled by the settings of the 4 DIP (Dual Inline Package) switches on the back of the unit. Boot options only affect the operation of a unit which does not presently have any configuration settings (i.e., the unit is new, the Configuration reset button has been pressed, or a delete configuration command has been executed from the CLI or Remote 812 Manager interface). See the section about DIP switch settings in Chapter 1, "Getting Started".
2 Connect the DSL Modem Line — Use the modem cable provided to connect the Remote 812 ADSL port to telephone company wall jack.
3 Connect the Power — Connect the power plug to the back of the unit. Make sure the power plug is connected securely to the Remote 812. Then, plug the unit into an electrical outlet.
4 Connect to a Local LAN (select one of below)
■ Connect directly to a workstation — Connect the 10Base-T cable into any LAN port. The MDI/X button must be out to use the LAN port furthest to the right(Port 1) to connect to a workstation. Up to four workstations can be directly connected to the Remote 812.
■ Connect to an Ethernet Hub — Press the MDI/X button on the back panel so it is in the “in” position and plug the 10Base-T cable into the right-hand LAN port (Port 1).
5 Connect the Console Cable (optional) — If Windows is your operating system, you will not need to connect the console cable because you will use the Remote 812 Manager to configure your unit. The Remote 812 Manager uses a web browser instead of a Command Line Interface (CLI). If your operating system is MAC or Unix, you will be
using CLI. Locate the serial cable included in your package. Connect one end of the cable to the DB-9 console port on the Remote 812 and plug the other end into a serial port on your workstation.
The Remote 812 Hardware Installation is now complete. Continue with the next section to verify your Remote 812 is operating correctly.
LED Light Operation
After you boot up, the LEDs indicate whether the Remote 812 is working properly and when certain features are in use. There are four sets of LEDs on the Remote 812. They operate as shown in the following table:
Table 2-1 LED Operation
| LED Group LED Indicator Status Operation | |||
| Alert Flashing Software is initializing. | |||
| Power Power ON Power is on. | |||
| ADSL Link Status | ADSL connection | OFF | No signal has been detected.* |
| Green | Link is up. | ||
| Blinking Green | Link is up, data transfer is occurring. | ||
| Orange | The unit is attempting to achieve synchronization with the CO equipment. | ||
| LAN Status (Ports 1-4) | Client Connection | ON A client is connected to the corresponding port on the hub. | |
If an LED is not operating properly, consult the OfficeConnect Remote 812 Online User's Guide and refer to the section on Troubleshooting.
* If the ADSL LED is off, there may be a problem with the ADSL cable or line. However, you can continue setting up your Remote 812 even if the ADSL Link Status LED is off.
Workstation Configuration
The IP configuration on your Workstations must correspond with the Remote 812 configuration. The
following sections detail your options given the Boot Mode you have selected.
Workstation Configuration Using DHCP Smart Mode
If you have chosen to utilize DHCP Smart Mode, you will need to configure some parameters on your workstation.
For DHCP Smart Mode, you must set up all workstations on the Remote 812's LAN to automatically obtain their IP address. This is the default setting in Windows 95.
If you have configured IP addresses manually on your workstation, verify that the IP address is on the 192.168.200.0 Class C subnet and that the default router is 192.168.200.254.
Note: Refer to Appendix B for instructions on how to change or verify that your workstation is configured for automatic assignment of an IP address and corresponding parameters.
After you have configured your workstation, proceed to the next section, "Software Installation".
Workstation Configuration Using the Default Bridge Mode
When the Remote 812 is configured as a bridge, refer to your Service Provider's instructions on how to set up your workstation. Proceed to Chapter 3, "Testing the Configuration".
Workstation Configuration Using the Unconfigured Mode
When the Remote 812 is not configured with an IP address on the LAN, you must use the IP Wizard program, which is included on your CD, or connect to the console port to configure an IP address before you can access the unit with a Web Browser.
Proceed to the next section, Office Connect 812 Software Installation, for instructions on installing the CD. Then, if you are using Windows, refer to the subsequent section, Assigning an IP Address with the IP Wizard. The IP Wizard will detect your Remote 812 on the LAN and then prompt you to specify the IP address you want to configure it with.
If you are using MAC or Unix, you will need to use the console port and a terminal emulator program to access CLI, using the settings: 9600 Bits per Second, 8 Data Bits, No Parity, Flow control equal to Xon/Xoff. Refer to the CLI Users Guide (which is a .pdf file on the Install CD) for a description of the commands to use.
OfficeConnect Remote 812 Software Installation
The Remote 812 Install CD contains the Online Guides, the IP Wizard Utility, and the 3Com Instant Update software.
The IP Wizard and Instant Update are available at this time only for Windows users. If you are a Windows user and are doing a normal install, your install CD should be automatically copying the basic files you need to complete your installation at this point. The CD also contains Microsoft Internet Explorer 4, and Adobe Acrobat Reader 3.01.
If you are a MAC or Unix-based user, copy or refer to the CLI Users Guide for instructions on using the CLI and the "Quick Setup" and "QuickVC" programs to complete your installation.

If you do not have at least Microsoft Internet Explorer 3.02 or Netscape Navigator 3.0, you should install the Microsoft Internet Explorer 4 included on this CD in order to use the web-based OfficeConnect Remote 812 Manager for configuring your Remote 812. You must also have Adobe Acrobat Reader installed to view the PDF formatted CLI Guide included on this CD.
If you are not installing the Remote 812 at this time but you want to copy the information and help files, you may do so from the Install CD Main Menu:
The Remote 812 is shipped with its operational software pre-installed in the unit's FLASH memory. A copy of the operational software is also provided on the CD.

The Remote 812 operational software (the *.nac file) included on the CD is copied to your hard drive and not the Remote 812 unit. Unless you specify otherwise, it is
installed to the default location:
C:\Program Files\3Com\ocr812\1\_0\Update
If you need to reload the software on your unit, please refer to the OfficeConnect Remote 812 ADSL Router Online User's Guide (on your installation CD).
If you need to install Microsoft Internet Explorer 4, launch the installation by putting the Remote 812 Installation CD in your CD-ROM drive and selecting "Install Internet Explorer 4" from the menu.
If you need to install the Adobe Acrobat Reader to view your printable files, launch the installation by putting the Remote 812 Installation CD in your CD-ROM drive and selecting "Install Adobe Acrobat 3.01" from the menu.
- You may optionally choose to install the 3Com Instant Update utility. Launch the installation by putting the Remote 812 Installation CD in your CD-ROM drive and selecting “Install 3Com Instant Update” from the menu.
Instant Update periodically checks the 3Com web site for a new release of the Remote 812 code. When a new release of the code is found, Instant Update copies it to your workstation. You will then need to install the code onto your Remote 812 unit. This procedure is explained in the OfficeConnect Remote 812 ADSL Router Online User's Guide (on your Installation CD).
Configuring the OfficeConnect Remote 812 Manager
Configuring in Bridge Only Mode
If you selected Bridge Only Mode as your Boot Option, no further action is needed. You should be connected to your ISP or remote office. If you can't access the remote site, examine the DIP switch settings on your unit. To reset to a different Boot Mode, change the DIP switch settings and then hold the reset button (on the back of the router) in for five seconds while powering on the router.
If you selected DHCP Smart Mode or Unconfigured Mode, your Remote 812 must be assigned an IP address in order for your web browser to communicate with it. You must also have an administrative login profile (user name and password) assigned.

If you assign the IP address with DHCP Smart Mode or with the IP Wizard, the administrative login name is root and the password is !root. After you access the unit with your web browser, you are strongly advised to delete this login profile and create a new one with a secure name and password. (Maximum character length of login name = 32, password maximum character length = 15.)
Configuring in DHCP Smart Mode
In Windows, the browser will automatically launch at the conclusion of your automated installation procedure and you will have the assistance of the IP Wizard. In MAC or Unix, you must manually start the browser.
Proceed to the section: Getting Started with the OfficeConnect Remote 812 Manager
Configuring in Unconfigured Mode
Windows Users: Windows users will have the assistance of the IP Wizard, as in DHCP Smart Mode.
You will need to input a static address that agrees with other addresses on your LAN.
The IP Wizard: IP Wizard will search the LAN for all unconfigured Remote 812s. As each unconfigured unit is found, the unit's MAC address is placed in the selection box. For multiple Remote 812s, you can determine which MAC address belongs to the one you want to configure by disconnecting the Remote 812's Ethernet cable and running IP Wizard again. The missing MAC Address belongs to that Remote 812. If the IP Wizard does not find any unconfigured units, and you are sure your unit is unconfigured, refer to the chapter on Troubleshooting in the OfficeConnect Remote 812 ADSL Router Online User's Guide.
Select which Remote 812 you want to configure and enter its LAN IP address and netmask; then press Set.
Proceed to the next section.
MAC and Unix Users: MAC and Unix users (and those configured in Bridge Only Mode but with alternate VPI/VCI settings) will be using Command Line Interface (CLI).
Connect the console cable provided with the Remote 812 kit to the router and a Com port on your workstation.
Use a terminal emulator program to access the Command Line Interface, using the following settings:
Then run Quick Setup and then QuickVC.
Getting Started with the OfficeConnect Remote 812 Manager
1 When your web browser opens up, to get to the Remote 812 "home page," either enter the unit's LAN IP address or, if DHCP Smart Mode is in use, the DNS host name (ocrdsl-3com.com) into the Location or Address field of your web browser. Notice that typing the http://is optional (for example, you can type simply 192.168.200.254).
2 The web browser will then prompt you to log in.

Enter the administrative login name and password (default login name root and Password !root).
After successful authentication, you will be presented with the Remote 812 "Wizard page."
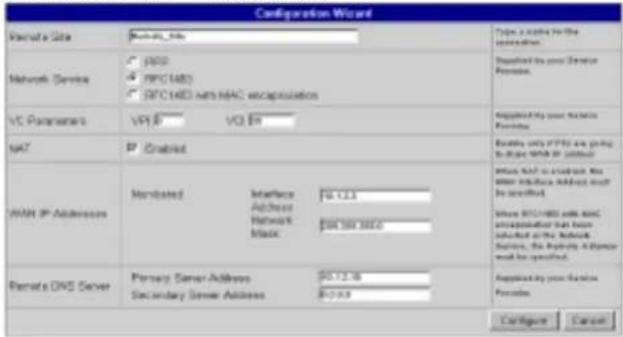
If you do not see this screen, refer to the section on Troubleshooting in the Online User's Guide (install from your CD).
Configuration Using the Remote Site Wizard
When you first connect to the Remote 812 Manager and a VC profile has not yet been configured, you will be automatically directed to the Remote Site Wizard page shown below. This page prompts the User for the bare minimum information it takes to set up a Remote Site profile to your ISP. Once the Remote Site has been configured, the user will be directed to the Remote 812 Home Page, where he or she will have access to a more advanced feature set.

A description of each field follows. After you have entered in your configuration, when you want to send down the configuration to the Remote 812, press the "configure" button. You will then be redirected to the OfficeConnect Remote 812 Home page. If you do not want to configure the Remote Site profile, press the "cancel" button and you will be redirected to the OfficeConnect Remote 812 Home page. If you want to access additional features not provided to you when using the Remote Site Wizard, access the Remote Site profile from the Home page by selecting Configuration, then Remote Sites.
Remote Site IP Wizard field descriptions
Remote Site Name
The Remote Site Name is used to identify the profile and it's associated parameters. The name can be up to 32 characters and typically describes the remote site you are connected to, such as my_isp or my_corp.
Network Service
Your Service provider should provide you with the type of Network Service to configure for your WAN connection. The Remote 812 supports the following Network Services:
- PPP – The Point to Point Protocol is a WAN interface protocol between the Remote 812 and your ISP's Remote Server. The protocol provides built in negotiation for addresses and connection parameters, and can route multiple protocols over a single link.
■ RFC 1483 – Is a defined protocol standard that describes two encapsulation methods for carrying network traffic over ATM AAL5. The encapsulation methods; routed and bridged, must be configured the same on both ends of the link. To select routed encapsulation, select RFC 1483. To select bridged encapsulation, select RFC 1483 with MAC encapsulation.
■ RFC 1483 with MAC encapsulation – specifies RFC 1483 with a bridge encapsulation. This feature enables the Remote 812 to function as a router but to work in a
bridged environment. When enabled, the network level addresses are used for forwarding, but the MAC layer addresses are pre-pended in the ethernet header over the Wide Area Connection.
ATM VC Parameters
Your Service provider should provide you with the Virtual Path Identifier (VPI) and Virtual Connection Identifier (VCI) values to configure for your connection. These are pre-assigned virtual path information used to route ATM cells through the network to your ISP.
Network Address Translation
This feature enables many workstations on the LAN to share a single public address when accessing information over a public network (Internet). Enable this feature if you have a Single User Account with your ISP and disable it if you have been provided public IP addresses to use on the LAN.
WAN IP Information
Your Service provider will provide you with the public IP address(es) to use on your WAN Interface or on the LAN.
If you have selected PPP as your Network Service, the WAN IP addresses will be dynamically learned from the Remote PPP Server. The Remote 812 will not prompt you for WAN IP Information if PPP has been selected.
If you have selected RFC 1483 and have enabled Network Address Translation (NAT), you will be prompted for the WAN interface Address. This is the single public address that will be shared by all privately addressed clients on your LAN when they access the public network. You will also be prompted for a corresponding netmask, which will default to a class C (255.255.255.0) value.
If you have selected RFC 1483 and have not enabled NAT, you can configure a WAN Interface address or a Remote Subnet address and corresponding netmask.
When selecting RFC 1483 with MAC encapsulation, you must specify the Remote Gateway Address. If you have
enabled NAT, you will also be prompted for the WAN interface. If you did not enable NAT, the WAN interface address is optional. If you do not configure the WAN Interface address, the Remote 812 LAN ethernet address should be a public address.
3
This chapter contains information on testing the Configuration.
■ General Testing
■ IP Testing
■ Advanced Troubleshooting
General Testing
After configuring the OfficeConnect Remote 812 for remote site connection(s), follow these steps to test the connections.
Step 1: Check Interface Status
1 Be sure the DSL cable is connected to the OfficeConnect Remote 812 and the phone jack, and then check the ADSL Status LED on the front of the unit. It should be green or blinking green.
2 If the unit is not in a location where you can see the LEDs, go to the OfficeConnect Remote 812 Manager home page. Select Monitor > Interface Status. The following table should display:
| Interface Status | ||
| Name | Oper Status | Admin Status |
| loopback | UP | UP |
| eth:1 | UP | UP |
| atm:1 | UP | UP |
Ensure that Oper Status of interface atm:1 is UP.
If the status of atm:1 is not UP, check the cable connection to make sure it is securely plugged into the unit and check
the cable to make sure it is not damaged. If there are no apparent cable problems, contact your service provider.
Step 2: Check Network Status
Check that all LAN and WAN networks are up. From the OfficeConnect Remote 812 Manager "home page," select Monitor > Networks > Network Status. You should see one active network for each of the LAN protocols configured (IP, IPX, and/or Bridge).
You should also see an active network for each of the protocols configured over each remote site. For example, if you have a remote site profile for Internet access, you should see a corresponding IP network in the table. If you are connected to a remote office, with IP routing, you should see corresponding networks for this, too.
Below is an example wherein an IP network is configured over the LAN (indicated by eth:1), and the remote site "red" is configured for IP over the WAN (indicated by atm:1).
| Name | Prot | Int | State | Type | Network Address |
| ip | IP | eth:1 | ENABLED | STATIC | 192.168.200.254/C |
| red-ip-I4 | IP | atm:1 | ENABLED | DYNAMIC | 10.0.0.254/H |
If you don't see the expected networks, there is probably a remote site profile configuration error. You should check the following in the Configuration > Remote Site (WAN) screens.
■ Is the remote site enabled?
■ Is the protocol (IP) enabled?
■ Are the network addresses correct?
■ Is the Network Service (PPP or RFC 1483) correct?
■ Is the remote site profile ATM information (VPI / VCI) correct?

If necessary, contact your ISP or remote site administrator to confirm the information provided to you. When all
problems are resolved, continue to the IP testing section below.
IP Testing
Run a PING to make sure the OfficeConnect Remote 812 can reach the remote router. You can PING by using the OfficeConnect Remote 812 Manager, from MS-DOS, or test the connection through your Internet Service Provider.
PINGing from the OfficeConnect Remote 812 Manager will test the connection from the OfficeConnect Remote 812 to the network.
The DOS PING will check the connection from your PC through the OfficeConnect Remote 812 ADSL Router to the network.
You can also test the connection using your Internet Browser, if you have Internet access.
Option 1: OfficeConnect Remote 812 Manager Ping to ISP or Remote Site Network
Open the OfficeConnect Remote 812 Manager, select
Tools > Ping. Enter the address you wish to ping, whether it is the ISP or a remote site. Press the Submit button.
A Ping Response screen will appear, with the response from the ping. The following responses may occur.
Ping Responses
The PING was successful.

If a name was entered in the Ping page input field, the corresponding IP address is displayed on the Response page.
PING: no route to host
A valid IP address or name was entered but the routing table does not indicate how to reach the network that the IP address belongs to.
PING: host unreachable
This means that the IP address is currently unreachable. This is indicative of a network problem. The router sent the message either to the specific network to which the IP address belongs or to a default gateway. If it was sent to the specific network and the network was learned via RIP, there is probably a temporary network problem. If the network is a static entry in the routing table, it may have been entered incorrectly.
PING: timeout waiting for reply from .
The host network is probably reachable but there is no answer from this IP Address. There are a couple of possible explanations for this: The IP Address might not be assigned to any unit; the path from the OfficeConnect Remote 812 to the unit is so slow that the PING response did not get back in the allotted time frame; or there may be a temporary break in the path.
DNS Errors
Network Name:
The name could not be resolved. Either no DNS server was located or the server(s) did not have the name in the host table list. This error will also appear if the user entered an invalid IP address such 10.100.100.256.
Network Name:
No response was received from the DNS server to which the DNS request was sent. This could be due to a network connection problem or Internet congestion.
Option 2: DOS Ping to ISP or Remote Site Network
1 From the a workstation on the local LAN, get to an MS-DOS prompt and type ping
address was provided, contact the ISP or the remote site administrator for an IP address to ping.
2 The OfficeConnect Remote 812 will send the PING request. A reply from 10.0.0.12 indicates success.
An example script of a failed ping is:
C:\ping 10.0.0.12
Pinging 10.0.0.12 with 32 bytes of data:
Request timed out.
Request timed out.
Request timed out.
Request timed out.
An example script of a successful ping is:
C:\ping 10.0.0.12
Pinging 10.0.0.12 with 32 bytes of data:
Reply from 10.0.0.12 bytes=32 time=140ms TTL=240
Reply from 10.0.0.12 bytes=32 time=147ms TTL=240
Reply from 10.0.0.12 bytes=32 time=140ms TTL=240
Reply from 10.0.0.12 bytes=32 time=135ms TTL=240
C:_
It is not unusual for the first few attempts to time out. If you don't receive a response the first time, try PINGing the router again. If you still don't receive a response, the most likely cause is incorrect routing entries.
Option 3: Internet Browser (Internet Access Only)
If you are connecting to the Internet, start a web browser and enter an address, such as http://www.3com.com. If the 3com web site home page comes up, all is configured correctly and you are on your way!

If the 3Com web site home page does not appear, the problem may be incorrect DNS server addresses on your workstation. To investigate other possible problems, refer to the section on Troubleshooting in the OfficeConnect Remote 812 ADSL Router Online User's Guide.
Advanced Troubleshooting
For more detailed troubleshooting information, refer to Troubleshooting in the OfficeConnect Remote 812 ADSL Router Online User's Guide (on your Installation CD).

RESTORING THE FACTORY DEFAULT CONFIGURATION WITH THE RESET BUTTON
Resetting the Configuration of Your Router
To reset your unit and select a different boot option:
■ Unplug the power cable from your OfficeConnect Remote 812.
■ Set the appropriate DIP switch.
- Plug the power cable back WHILE pressing in the Reset button on the back of your router for five seconds.
Following the above steps will power on the OfficeConnect Remote 812 with the desired boot option and erase all previous parameters.

CONFIGURING YOUR WORKSTATION TO BE A DHCP CLIENT
Workstation Configuration Using DHCP Smart Mode
If you have chosen to utilize DHCP Smart Mode, you will need to configure some parameters on your workstation.
You should set up the workstations on the OfficeConnect Remote 812's LAN to automatically obtain their IP address. This is the default setting in Windows 95.
If you have configured IP addresses manually on your LAN, you should use the following procedure on each workstation to allow them to automatically learn the new addresses instead

The following is an example of this procedure on a workstation running Windows 95.
1 Open the Control Panel. Select Network > Configuration > TCP/IP to access the TCP/IP Properties Menu.

Select the Gateway tab. Remove any IP addresses in the Installed Gateways field.
2 Select the IP Address tab.

3 Check the Obtain an IP Address Automatically button. This will cause the workstation to request an IP address from the OfficeConnect Remote 812.
4 Select the DNS Configuration tab.
![TCP/IP Properties Bindings | Advanced | NetBIOS DNS Configuration | Gateway | WINS Configuration | IP Address □ Double DNS IP Enable DNS [Host: ] Dgmain DNS Server Search Order • • • Add • • • Remove Domain Suffix Search Order Add Remove OK Cancel](/content/2026/05/959471/images/c1c83aed2765d4bd7aaa6fcd340d72c757acf3250af2ee94b0f4c33788a7dcf9.jpg)

Be careful not to remove the Host Name accidentally, if there is one in the box.
Remove any DNS servers listed after the DNS Server Search Order field.
Accept all of the networking changes. Reboot your workstation, then proceed to the next section, Software Installation.
C
SAFETY INFORMATION
When using the unit, observe the following safety information:
■ Retain this user guide for later use and pass it on to subsequent owners/managers of the unit.
■ The power adapter supplied with the unit is fitted with a molded plug for connection to a standard electrical mains system supply socket. If this plug is not suitable for connection to your mains supply, contact your reseller for advice. Do not attempt to connect to the mains supply using an inappropriate mains adapter.
■ Protect the unit from sudden, transient increases and decreases in electrical power by fitting it with an in-line surge suppressor or uninterruptible power supply.
■ Products manufactured by 3Com are safe and without risk provided they are installed, used, and maintained in good working order and in accordance with their instructions and recommendations.
■ Should any of the following conditions occur, isolate the electricity supply and refer to your 3Com reseller.
■ If the case or cover is not correctly fitted.
■ If the case is damaged.
■ If the unit begins to make an odd noise, smell or smoke.
■ If the unit shows signs of a distinct change in performance.
■ Never install telephone wires during a thunder storm, or install telephone connection sockets in wet locations (unless the socket is specifically designed for wet locations).
■ Do not touch uninstalled telephone wires or terminals unless the telephone line has been disconnected at the network interface. Always exercise caution when installing or modifying telephone lines.
■ Do not spill food or liquids on the unit. If the unit gets wet, isolate the electrical supply and contact your 3Com reseller.
- Do not push any objects into the openings of the unit. Doing so can cause fire or electric shock by shorting out internal components.
- Ensure nothing rests on the unit's system cables and that the cables are not located where they can be stepped on and cause damage to the unit.
- Keep the unit away from radiators and heat sources. Allow 25 mm (1 inch) around the unit or stack to provide adequate air circulation.
■ Install the unit in a clean area that is free from dust or extreme temperatures.
The unit has been designed to be a free-standing unit or stacked with other OfficeConnect Remote units. Do not place anything else on top of the unit's case.
■ Allow a clearance gap of at least 50 mm (2 in) from the rear panel of the unit, to allow for cable access.
This unit contains a lithium battery which is attached to a microchip on the printed circuit board. The defective battery must be disposed of safely in accordance with the manufacturers instructions.
■ Normal operations of this unit could be interrupted by a lightning surge. In this event, the user must recycle the power to the unit in order to establish normal operating conditions.
Important Safety Information

WARNING: Warnings contain directions that you must follow for your personal safety. Follow all instructions carefully.
Please read the following information carefully and thoroughly before installing the unit:
■ Take exceptional care during the installation and removal of the unit.
- Locate the unit close to the main socket outlet, and ensure that the main socket is accessible.
■ Use the power adapter supplied with the unit to ensure compliance with national and international safety standards. If there is no power adapter supplied, the main cordset used must be compliant with the local and national regulations of the target country and must not violate the safety approval of the product (refer to the section at the back of this manual).
■ Disconnect the power adapter before moving the unit. Power can only be disconnected from the unit by removing the power adapter from the unit or from the socket outlet.
■ Only connect apparatus complying with the relevant interface requirements to the ports on this unit. The safety status of the ports on this equipment are as follows.
- Ports identified by the labels XXXX and YYYY = TNV. TNV (Telecoms Network Voltage) is a circuit which, under normal operating conditions, carries telecommunication signals.
- Ports identified by the labels AAAA and BBBB = SELV. SELV (Safety Extra Low Voltage) is a secondary circuit which is designed and protected so that under normal and single-fault conditions, the voltage between any two accessible parts does not exceed a safe value (42.2 V peak or 60 V DC).
There are no user-replaceable fuses or user-serviceable parts inside the unit. If there is a physical problem with the unit that cannot be solved with problem solving actions in this guide, contact the 3Com reseller from whom the equipment was purchased.
■ If the units are stackable, only stack similar units.
WARNING: Twisted Pair RJ45 data ports. These are shielded RJ45 data sockets. They cannot be used as telephone sockets. Only connect RJ45 data connectors to these ports.

This appendix features the Specifications for the OfficeConnect Remote 812 ADSL Router.
General Specifications
Power requirements
10 watts maximum
Temperature requirements
0 - 50 degrees C (operating) -35 to +70 degrees C (shipping and storage)
Humidity requirements
0-95% non-condensing (operating) 0-100% non-condensing (shipping and storage)
MTBF (Mean Time Between Failures)
165,000 hours
Jacks
The OfficeConnect Remote 812 has one RJ-11 jack for the ADSL Modem, four RJ-45 jacks for the LAN interface, one DB-9 jack for the console interface, and one DC jack.
ADSL Interface (one RJ-11 jack)
Pin 1 — (Not loaded)
Pin 2 — (Not used)
Pin 3 — Ring
Pin 4 — Tip
Pin 5 — (Not used)
Pin 6 — (Not loaded)
LAN Interface (four RJ-45 jacks)
Pin 1 — Transmit Data +
Pin 2 — Transmit Data -
Pin 3 — Receive Data +
Pin 4 — NC
Pin 5 — NC
Pin 6 — Receive Data -
Pin 7 — NC
Pin 8 — NC
Console Interface (DB-9) (Default configured as DCE)
Pin 1 — DCD LL <= PC
Pin 2 — Transmit Data LL => PC
Pin 3 — Receive Data LL <= PC
Pin 4 — DTR LL <= PC
Pin 5 — Ground
Pin 6 — DSR LL => PC
Pin 7 — RTS LL <= PC
Pin 8 — CTS LL => PC
Pin 9 — RI LL => PC
A
About This Guide 1, C-8
ADSL Modem Port 2-2
Advanced Troubleshooting 4-6
Assigning an IP address 2-8
B
boot option, selecting 2-3
C
Changing Boot Options 2-6
Configuration Planning Forms 2-6
Configuration, Testing the 4-1
Console Cable, Connecting 2-3
Console Port 2-2
conventions
notice icons. About This Guide 2
text, About This Guide 2
D
Default Bridge Mode, Workstation Configuration Using 2-6
Default Bridge Mode, workstation configuration using A-1
DHCP Smart Mode, Configuration using A-1
DIP Switches 2-2
DNS Errors 4-4
DOS Ping 4-4
E
Ethernet (LAN) Ports 2-2
Ethernet Hub, connecting to 2-3
F
FLASH memory 2-6
G
General Testing 4-1
H
Hardware Installation 2-1
home page 2-10
|
Interface Status, Checking 4-1
IP Testing 4-3
IPX Testing 4-6
J
Jacks D-1
L
LAN port 1-2
LED Operation 2-4
Local LAN, Connecting to 2-3
M
MDI/X button 2-3
MDI/X Switch 2-2
Monitor 4-1
MTBF (Mean Time Between
Failures) D-1
N
Network Status, Checking 4-2
0
OfficeConnect Remote 812
Hardware Installation 2-1, 2-4
Safety Information C-2, C-8
Software Installation 2-6
What's in the Package? 1-1
OfficeConnect Remote 812
Manager 2-7, 2-8, 2-9
OfficeConnect Remote 812 Manager
Ping 4-3
P
Phone Line, Connecting 2-3
Ping 4-3
Ping Response 4-3
Power requirements D-1
Power, Connecting 2-3
R
Reset button 2-2
S
Safety Information C-2 to C-8
Software Installation 2-6
Specifications B-1, A-1, C-1, D-1
U
Unconfigured Mode 2-6
Using 2-6
W
Workstation Configuration A-1
Workstation, Connecting to 2-3
FCC DECLARATION OF CONFORMITY
We declare under our sole responsibility that the
Model: 0900
Description: 3Com OfficeConnect Remote 812 ADSL Router
To which this declaration relates, is in conformity with the following standards or other normative documents:
■ ANSI C63.4-1992 Methods of Measurement
■ Federal Communications Commission 47 CFR Part 15, subpart B
15.107 (e) Class B Conducted Limits
15.109 (g) Class B Radiated Emissions Limits
3Com Corporation
3800 Golf Road
Rolling Meadows, IL 60008
U.S.A.
Telephone: (847)-262-5000
FCC Class B Statement
This device complies with Part 15 of the FCC Rules. Operation is subject to the following two conditions:
1 this device may not cause harmful electromagnetic interference, and
2 this device must accept any interference received including interference that may cause undesired operations.
FCC Notice: Radio and Television Interference
Note: This equipment has been tested and found to comply with the limits for a Class B digital device, pursuant to Part 15 of the FCC Rules. These limits are designed to provide reasonable protection against harmful interference in a residential installation. This equipment generates, uses and can radiate radio frequency energy and, if not installed and used in accordance with the instructions, may cause harmful interference to radio communications. However, there is no guarantee that interference will not occur in a particular installation. If this equipment does cause harmful interference to radio or television reception, which can be determined by turning the equipment off and on, the user is encouraged to try to correct the interference by one or more of the following measures:
■ Reorient of relocate the receiving antenna.
■ Increase the separation between the equipment and receiver.
■ Connect the equipment into an outlet on a circuit different from that to which the receiver is connected.
■ Consult the dealer or an experienced radio/TV technician for help.
A FCC compliant, 26 AWG, telephone cord with a modular plug is provided with this equipment.
The user may find the following information prepared by the Federal Communications Commission helpful: The CIB Interference Handbook and The CIB Telephone Interference Bulletin.
These documents are available on the Internet through the FCC Compliance and Interference Bureau Home Page at http://www.fcc.gov/cib listed under documents. Select CIB Interference Handbook or CIB Telephone Interference Bulletin.
CAUTION: CHANGES OR MODIFICATIONS NOT EXPRESSLY APPROVED BY THE PARTY RESPONSIBLE
UL/c UL Listing:
This Information Technology Equipment is UL and cUL listed for both the US and Canadian markets respectively.
Canadian Notice:
This digital apparatus does not exceed the Class B limits for radio noise emissions from digital apparatus set out in the interference-causing equipment standard entitled Digital Apparatus, ICES-003 of Industry Canada.
The Industry Canada (IC) label identifies certified equipment. This certification means that the equipment meets certain telecommunications network protective, operation, and safety requirements. Industry Canada does not guarantee the equipment will operate to the users' satisfaction.
Before installing this equipment, users should ensure that it is permissible to be connected to the facilities of the local telecommunications company. The equipment must also be installed using an acceptable method of connection. In some cases, the inside wiring associated with a single-line individual service may be extended by means of a certified connector assembly (telephone extension cord). The customer should be aware that compliance with the above conditions might not prevent degradation of service in some situations.
Repairs to certified equipment should be made by an authorized Canadian maintenance facility designated by the supplier. Any repairs or alterations made by the user to this equipment, or equipment malfunctions, may give the telecommunications company cause to request the user to disconnect the equipment.
Users should ensure for their own protection that the electrical ground connections of the power utility, telephone lines, and internal metallic water pipe system, if present, are connected together. This precaution may be particularly important in rural areas.
CAUTION: Users should not attempt to make electrical ground connections by themselves, but should contact the appropriate inspection authority or an electrician, as appropriate.
Canadian Modem Users
Your warranty and repair service center is:
Keating Technologies
25 Royal Crest Court, Suite 200
Markham, ONT L3R 9X4
Centre de guarantee et de service apresvente:
Keating Technologies
25 Royal Crest Court, Suite 200
Markham, ONT L3R 9X4
INTERNATIONAL
DECLARATION OF
CONFORMITY
Electromagnetic Compatibility
This equipment was tested and found to conform to the Council Directive 89/336/EEC for electromagnetic compatibility. Conformity with this Directive is based upon compliance with the following harmonized standards:
EN55022:1994 A1:1995 A2:1997(CISPR 22, 1993) Limits and Methods of Measurements of Radio Interference. This equipment conforms to the Class B limits.
AS/NZS3548 Australian/New Zealand Limits and Methods of Measurement of Information Technology equipment. This equipment conforms to the Class B limits.
EN 50082-1: 1992 Electromagnetic Compatibility Generic Immunity Standard: Residential, Commercial and Light-Industrial Environment (January 1992) With IEC 801-2(1984); IEC 801-3 (1984); IEC801-4 (1988).
Safety (Low Voltage Directive)
This equipment was tested and found to conform to the Council Directive 72/23/EEC for safety of electrical equipment. Conformity with this Directive is based upon compliance with the following harmonized standard:
IEC 950 (1991) Second Edition with Amdts. No. 1(1992), 2(1993), 3(1995) and 4(1996) Safety of Information Technology Equipment Including Electrical Business Equipment; EMKO-TSE (74-SEC) 207/98; EN60950 (1992) with Amdts. 1,2,3 and 4, and with National Differences as specified in the Test Report.
TS001 and AS/NZS3260 Australian/ New Zealand standard for Safety of Information technology equipment Including Electrical Business Equipment.
Special Notes:
This is a Class B product based on the standard of the Voluntary Control Council for Interference from Information Technology Equipment (VCCI). If this is used near a radio or television receiver in a domestic environment, it may cause radio interference. Install and use the equipment according to the instruction manual.
3COM CORPORATION LIMITED WARRANTY
This warranty applies to customers located in the United States, Australia, Canada (except Quebec), Ireland, New Zealand, U.K., and other English language countries, and countries for which a translation into the local language is not provided.
HARDWARE
3Com warrants to the end user ("Customer") that this hardware product will be free from defects in workmanship and materials, under normal use and service, for the following length of time from the date of purchase from 3Com or its authorized reseller: Five (5) years
3Com's sole obligation under this express warranty shall be, at 3Com's option and expense, to repair the defective product or part, deliver to Customer an equivalent product or part to replace the defective item, or if neither of the two foregoing options is reasonably available, 3Com may, in its sole discretion, refund to Customer the purchase price paid for the defective product. All products that are replaced will become the property of 3Com. Replacement products may be new or reconditioned. 3Com warrants any replaced or repaired product or part for ninety (90) days from shipment, or the remainder of the initial warranty period, whichever is longer.
SOFTWARE
3Com warrants to Customer that each software program licensed from it will perform in substantial conformance to its program specifications, for a period of ninety (90) days from the date of purchase from 3Com or its authorized reseller. 3Com warrants the media containing software against failure during the warranty period. No updates are provided. 3Com's sole obligation under this express warranty shall be, at 3Com's option and expense, to refund the purchase price paid by Customer for any defective software product, or to replace any defective media with software which substantially conforms to applicable 3Com published specifications. Customer assumes responsibility for the selection of the appropriate applications program and associated reference materials. 3Com makes no warranty or representation that its software products will meet Customer's requirements or work in combination with any hardware or applications software products provided by third parties, that the operation of the software products will be uninterrupted or error free, or that all defects in the software products will be corrected. For any third party products listed in the 3Com software product documentation or specifications as being compatible, 3Com will make reasonable efforts to provide compatibility, except where the non-compatibility is caused by a "bug" or defect in the third party's product or from use of the software product not in accordance with 3Com's published specifications or user manual.
THIS 3COM PRODUCT MAY INCLUDE OR BE BUNDLED WITH THIRD PARTY SOFTWARE, THE USE OF WHICH IS GOVERNED BY A SEPARATE END USER LICENSE AGREEMENT. THIS 3COM WARRANTY DOES NOT APPLY TO SUCH THIRD PARTY SOFTWARE. FOR THE APPLICABLE WARRANTY, PLEASE REFER TO THE END USER LICENSE AGREEMENT GOVERNING THE USE OF SUCH SOFTWARE.
YEAR 2000 WARRANTY
In addition to the Hardware Warranty and Software Warranty stated above, 3Com warrants that each product sold or licensed to Customer on and after January 1, 1998 that is date sensitive will continue performing properly with regard to such date data on and after January 1, 2000, provided that all other products used by Customer in connection or combination with the 3Com product, including hardware, software, and firmware, accurately exchange data with the 3Com product, with the exception of those products identified at 3Com's Web site, http://www.3com.com/products/yr2000.html, as not meeting this standard. If it appears that any product that is stated to meet this standard does not perform properly with regard to such date data on and after January 1, 2000, and Customer notifies 3Com before the later of April 1, 2000, or ninety (90) days after purchase of the product from 3Com or its authorized reseller, 3Com shall, at its option and expense, provide a software update which would effect the proper performance of such product, repair such product, deliver to Customer an equivalent product to replace such product, or if none of the foregoing is feasible, refund to Customer the purchase price paid for such product. Any software update or replaced or repaired product will carry a Year 2000 Warranty for ninety (90) days after purchase or until April 1, 2000, whichever is later.
OBTAINING WARRANTY SERVICE
Customer must contact a 3Com Corporate Service Center or an Authorized 3Com Service Center within the applicable warranty period to obtain warranty service authorization. Dated proof of purchase from 3Com or its authorized reseller may be required. Products returned to 3Com's Corporate Service Center must be pre-authorized by 3Com with a Return Material Authorization (RMA) number or User Service Order (USO) number marked on the outside of the package, and sent prepaid and packaged
appropriately for safe shipment, and it is recommended that they be insured or sent by a method that provides for tracking of the package. Responsibility for loss or damage does not transfer to 3Com until the returned item is received by 3Com. The repaired or replaced item will be shipped to Customer, at 3Com's expense, not later than thirty (30) days after 3Com receives the defective product. 3Com shall not be responsible for any software, firmware, information, or memory data of Customer contained in, stored on, or integrated with any products returned to 3Com for repair, whether under warranty or not. Dead- or Defective-on-Arrival. In the event a product completely fails to function or exhibits a defect in materials or workmanship within the first forty-eight (48) hours of installation but no later than thirty (30) days after the date of purchase, and this is verified by 3Com, it will be considered dead- or defective-on-arrival (DOA) and a replacement shall be provided by advance replacement. The replacement product will normally be shipped not later than three (3) business days after 3Com's verification of the DOA product, but may be delayed due to export or import procedures. The shipment of advance replacement products is subject to local legal requirements and may not be available in all locations. When an advance replacement is provided and Customer fails to return the original product to 3Com within fifteen (15) days after shipment of the replacement, 3Com will charge Customer for the replacement product, at list price.
WARRANTIES EXCLUSIVE
IF A 3COM PRODUCT DOES NOT OPERATE AS WARRANTED ABOVE, CUSTOMER'S SOLE REMEDY FOR BREACH OF THAT WARRANTY SHALL BE REPAIR, REPLACEMENT, OR REFUND OF THE PURCHASE PRICE PAID, AT 3COM'S OPTION. TO THE FULL EXTENT ALLOWED BY LAW, THE FOREGOING WARRANTIES AND REMEDIES ARE EXCLUSIVE AND ARE IN LIEU OF ALL OTHER WARRANTIES, TERMS, OR CONDITIONS, EXPRESS OR IMPLIED, EITHER IN FACT OR BY OPERATION OF LAW, STATUTORY OR OTHERWISE, INCLUDING WARRANTIES, TERMS, OR CONDITIONS OF MERCHANTABILITY, FITNESS FOR A PARTICULAR PURPOSE, SATISFACTORY QUALITY, CORRESPONDENCE WITH DESCRIPTION, AND NON-INFRINGEMENT, ALL OF WHICH ARE EXPRESSLY DISCLAIMED. 3COM NEITHER ASSUMES NOR AUTHORIZES ANY OTHER PERSON TO ASSUME FOR IT ANY OTHER LIABILITY IN CONNECTION WITH THE SALE, INSTALLATION, MAINTENANCE OR USE OF ITS PRODUCTS.
3COM SHALL NOT BE LIABLE UNDER THIS WARRANTY IF ITS TESTING AND EXAMINATION DISCLOSE THAT THE ALLEGED DEFECT OR MALFUNCTION IN THE PRODUCT DOES NOT EXIST OR WAS CAUSED BY CUSTOMER'S OR ANY THIRD PERSON'S MISUSE, NEGLECT, IMPROPER INSTALLATION OR TESTING, UNAUTHORIZED ATTEMPTS TO OPEN, REPAIR OR MODIFY THE PRODUCT, OR ANY OTHER CAUSE BEYOND THE RANGE OF THE INTENDED USE, OR BY ACCIDENT, FIRE, LIGHTNING, POWER CUTS OR OUTAGES, OTHER HAZARDS, OR ACTS OF GOD.
LIMITATION OF LIABILITY
TO THE FULL EXTENT ALLOWED BY LAW, 3COM ALSO EXCLUDES FOR ITSELF AND ITS SUPPLIERS ANY LIABILITY, WHETHER BASED IN CONTRACT OR TORT (INCLUDING NEGLIGENCE), FOR INCIDENTAL, CONSEQUENTIAL, INDIRECT, SPECIAL, OR PUNITIVE DAMAGES OF ANY KIND, OR FOR LOSS OF REVENUE or profits, LOSS OF BUSINESS, LOSS OF INFORMATION OR DATA, OR OTHER FINANCIAL LOSS ARISING OUT OF OR IN CONNECTION WITH THE SALE, INSTALLATION, MAINTENANCE, USE, PERFORMANCE, FAILURE, OR INTERRUPTION OF ITS PRODUCTS, EVEN IF 3COM OR ITS AUTHORIZED RESELLER HAS BEEN ADVISED OF THE POSSIBILITY OF SUCH DAMAGES, AND LIMITS ITS LIABILITY TO REPAIR, REPLACEMENT, OR REFUND OF THE PURCHASE PRICE PAID, AT 3COM'S OPTION. THIS DISCLAIMER OF LIABILITY FOR DAMAGES WILL NOT BE AFFECTED IF ANY REMEDY PROVIDED HEREIN SHALL FAIL OF ITS ESSENTIAL PURPOSE.
DISCLAIMER
Some countries, states, or provinces do not allow the exclusion or limitation of implied warranties or the limitation of incidental or consequential damages for certain products supplied to consumers, or the limitation of liability for personal injury, so the above limitations and exclusions may be limited in their application to you. When the implied warranties are not allowed to be excluded in their entirety, they will be limited to the duration of the applicable written warranty. This warranty gives you specific legal rights which may vary depending on local law.
GOVERNING LAW
This Limited Warranty shall be governed by the laws of the State of California, U.S.A. excluding its conflicts of laws principles and excluding the United Nations Convention on Contracts for the International Sale of Goods.
3Com Corporation, 5400 Bayfront Plaza. P.O. Box 58145, Santa Clara, CA 95052-8145 (408) 326-5000 June 7, 1999
- OfficeConnect™ Remote 812 ADSL Router Getting Started Guide
- 3Com Corporation
- Bayfront Plaza Santa Clara, California 95052-8145
- UNITED STATES GOVERNMENT LEGENDS:
- CONTENTS
- ABOUT THIS GUIDE
- GETTING STARTED
- INSTALLING THE OFFICE CONNECT REMOTE 812 ADSL ROUTER
- A RESTORING THE FACTORY DEFAULT CONFIGURATION WITH THE RESET BUTTON
- B CONFIGURING YOUR WORKSTATION TO BE A DHCP CLIENT
- C SAFETY INFORMATION
- FCC DECLARATION OF CONFORMITY
- Introduction
- Conventions
- 1
- GETTING STARTED
- What's in the Package?
- What Can the OfficeConnect Remote 812 do?
- OfficeConnect Remote 812 Boot Mode Options
- Option One: DHCP Smart Mode
- Option Two: Default Bridge Mode
- Option Three: Unconfigured Mode
- 2
- INSTALLING THE OFFICE CONNECT REMOTE 812 ADSL ROUTER
- OfficeConnect Remote 812 Hardware Installation
- Back Panel Features
- Hardware Configuration
- Connect to a Local LAN (select one of below)
- LED Light Operation
- Workstation Configuration
- Workstation Configuration Using DHCP Smart Mode
- Workstation Configuration Using the Default Bridge Mode
- Workstation Configuration Using the Unconfigured Mode
- OfficeConnect Remote 812 Software Installation
- C:\Program Files\3Com\ocr812\1\_0\Update
- Configuring the OfficeConnect Remote 812 Manager
- Configuring in Bridge Only Mode
- Configuring in DHCP Smart Mode
- Configuring in Unconfigured Mode
- Getting Started with the OfficeConnect Remote 812 Manager
- Configuration Using the Remote Site Wizard
- Remote Site IP Wizard field descriptions
- Remote Site Name
- Network Service
- ATM VC Parameters
- Network Address Translation
- WAN IP Information
- 3
- General Testing
- Step 1: Check Interface Status
- Step 2: Check Network Status
- IP Testing
- Option 1: OfficeConnect Remote 812 Manager Ping to ISP or Remote Site Network
- Ping Responses
- PING: no route to host
- PING: host unreachable
- PING: timeout waiting for reply from .
- DNS Errors
- Option 2: DOS Ping to ISP or Remote Site Network
- Option 3: Internet Browser (Internet Access Only)
- Advanced Troubleshooting
- RESTORING THE FACTORY DEFAULT CONFIGURATION WITH THE RESET BUTTON
- Resetting the Configuration of Your Router
- CONFIGURING YOUR WORKSTATION TO BE A DHCP CLIENT
- C
- SAFETY INFORMATION
- Important Safety Information
- General Specifications
- Power requirements
- Temperature requirements
- Humidity requirements
- MTBF (Mean Time Between Failures)
- Jacks
- ADSL Interface (one RJ-11 jack)
- LAN Interface (four RJ-45 jacks)
- Console Interface (DB-9) (Default configured as DCE)
- A
- B
- D
- E
- F
- G
- H
- |
- J
- L
- M
- N
- 0
- P
- R
- FCC Class B Statement
- FCC Notice: Radio and Television Interference
- Canadian Notice:
- Canadian Modem Users
- Electromagnetic Compatibility
- Safety (Low Voltage Directive)
- 3COM CORPORATION LIMITED WARRANTY
- HARDWARE
- SOFTWARE
- YEAR 2000 WARRANTY
- OBTAINING WARRANTY SERVICE
- WARRANTIES EXCLUSIVE
- LIMITATION OF LIABILITY
- DISCLAIMER
- GOVERNING LAW
Brand : 3COM
Model : OfficeConnect Remote 812
Category : Router