
Axim X5 - Smartphone DELL - Free user manual and instructions
Find the device manual for free Axim X5 DELL in PDF.


| Product Type | Pocket PC (PDA) |
| Model | Dell Axim X5 |
| Dimensions | 127 x 81 x 18 mm |
| Weight | 196 g (including battery) |
| Display | 3.5-inch TFT, 240 x 320 pixels (QVGA), 65k colors |
| Processor | Intel XScale PXA250 400 MHz |
| Memory (RAM) | 64 MB SDRAM |
| Memory (ROM) | 64 MB Flash ROM |
| Operating System | Microsoft Windows Mobile 2003 for Pocket PC |
| Battery | Li-Ion 1500 mAh, removable |
| Connectivity | USB 1.1 (via cradle), IrDA (Infrared) |
| Expansion Slots | 1 x CompactFlash (CF) Type II, 1 x Secure Digital (SD) |
| Input Method | Touchscreen with stylus, handwriting recognition, on-screen keyboard |
| Camera | None |
| Audio | Built-in speaker, microphone, 3.5mm headphone jack |
| Cradle/USB Sync | Dell docking cradle with USB sync and charging |
| Stylus | Plastic stylus stored in unit |
| Power Supply | AC adapter 5V DC, 2A |
| Cleaning Instructions | Wipe gently with a soft, dry cloth. Avoid liquids. |
| Safety Precautions | Do not expose to moisture; use only approved accessories. |
| Spare Parts Availability | Battery, stylus, cradle, AC adapter available online |
Frequently Asked Questions - Axim X5 DELL
User questions about Axim X5 DELL
0 question about this device. Answer the ones you know or ask your own.
Ask a new question about this device
Download the instructions for your Smartphone in PDF format for free! Find your manual Axim X5 - DELL and take your electronic device back in hand. On this page are published all the documents necessary for the use of your device. Axim X5 by DELL.
USER MANUAL Axim X5 DELL
CAUTION: Follow the safety instructions in the System Information Guide to help protect your computer from damage and ensure your own personal safety.
Notes, Notices, and Cautions

NOTE: A NOTE indicates important information that helps you make better use of your computer.

NOTICE: A NOTICE indicates either potential damage to hardware or loss of data and tells you how to avoid the problem.

CAUTION: A CAUTION indicates a potential for property damage, personal injury, or death.
Abbreviations and Acronyms
For a complete list of abbreviations and acronyms, see "Glossary" on page 155.
Information in this document is subject to change without notice.
© 2002 Dell Computer Corporation. All rights reserved.
Reproduction in any manner whatsoever without the written permission of Dell Computer Corporation is strictly forbidden.
Trademarks used in this text: Dell, the DELL logo, Axim, and DellNet are trademarks of Dell Computer Corporation; Intel is a registered trademark and XScale and StrataFlash are trademarks of Intel Corporation; Microsoft, Windows, and ActiveSync are registered trademarks of Microsoft Corporation; EMC is a trademark of EMC Corporation.
Other trademarks and trade names may be used in this document to refer to either the entities claiming the marks and names or their products. Dell Computer Corporation disclaims any proprietary interest in trademarks and trade names other than its own.
Model HC01U
November 2002 P/N 1X471 Rev. A01
Contents
Finding Information 9
1 About Your Device
Front, Side, and Back Views 12
Front and Side Views 12
Back View 14
Using the Batteries 15
Installing and Removing the Main Battery 16
Installing and Removing the Backup Battery 17
Charging the Main Battery 18
Connecting to a Computer 19
Using the Cradle 19
Using the Sync Cable 22
Using Cards 23
CompactFlash Cards 23
Secure Digital Memory Cards ..... 24
Performing a Reset 24
Soft Reset 24
Hard Reset 25
2 Using Microsoft ^® Pocket PC
Device Buttons and the Stylus 28
Today Screen 28
Status Icons 30
Programs 31
Program Buttons.... 31
Switcher Bar 31
Navigation Bar and Command Bar 33
Pop-Up Menus 34
Finding and Organizing Information ..... 35
Backing Up Data. 36
3 Entering Information
Entering Text Using the Input Panel ..... 38
Typing With the Soft Keyboard....40
Letter Recognizer 40
Block Recognizer 40
Transcriber 41
Editing Typed Text 41
Writing on the Screen 41
Editing Written Text 42
Drawing on the Screen 45
Creating a Drawing 45
Editing a Drawing 46
Recording a Message 47
Using My Text 48
4 Adjusting Settings
Personal Tab 50
System Tab 50
5 Using Microsoft ^® ActiveSync ^®
About ActiveSync....54
Installing and Using ActiveSync 55
6 Scheduling and Communicating
About Microsoft® Pocket Outlook ..... 58
Calendar 58
Using the Summary Screen 60
Creating Meeting Requests 60
Contacts 61
Finding a Contact 62
Using the Summary Screen 63
Tasks 63
Notes 64
Inbox 66
Synchronizing E-Mail Messages ..... 66
Connecting Directly to an E-Mail Server ..... 67
Using the Message List 67
Composing Messages 69
Managing E-Mail Messages and Folders ..... 71
Notifications 72
7 Adding and Removing Programs
Adding Programs Using Microsoft® ActiveSync® 74
Downloading Programs From the Internet ..... 75
Adding a Program to the Start Menu ..... 76
Using File Explorer on the Device ..... 76
Using ActiveSync on the Computer ..... 76
Removing Programs 77
8 Using Companion Programs
Microsoft ^® Pocket Word 80
Pocket Excel 82
Tips for Working in Pocket Excel 84
MSN Messenger 85
Setting Up 85
Working With Contacts 86
Chatting With Contacts 86
Windows ^® Media Player for Pocket PC ..... 87
Microsoft Reader 87
Using the Library 88
Reading a Book 88
Using Reader Features 89
Removing a Book 91
9 Using Microsoft ^® Pocket Internet Explorer
Mobile Favorites 94
Conserving Memory 95
Mobile Favorites Folder 95
Favorite Links 96
Using AvantGo Channels 96
Browsing Mobile Favorites and the Web ..... 97
10 Getting Connected
Using Infrared 100
Connecting to the Internet 101
Creating a Modem Connection to an ISP . . . 101
Creating an Ethernet Connection to an ISP 103
Connecting to Work 104
Creating a Modem Connection to a Network 104
Creating an Ethernet Connection to a Network 106
Ending a Connection 107
Connecting Directly to an E-Mail Server ..... 107
Getting Help on Connecting . . . . . . . . . . 108
11 Appendix
Specifications 110
Regulatory Notices 113
FCC Notices (U.S. Only) 115
IC Notice (Canada Only) 117
CE Notice (European Union) ..... 117
CE Mark Notice 118
EN 55022 Compliance
(Czech Republic Only) 120
NOM Information (Mexico Only) ..... 121
Contacting Dell 122
Limited Warranties and Return Policy ..... 141
Limited Warranty for the U.S. 141
"Total Satisfaction" Return Policy
(U.S. Only) 146
Limited Warranty Terms for Canada ..... 146
"Total Satisfaction" Return Policy
(Canada Only) 151
Dell Software and Peripherals
(Canada Only) 151
One-Year End-User Manufacturer Guarantee
(Latin America and the Caribbean Only) . . . 152
Glossary 155
Index 157
Finding Information
| What Are You Looking For? Find It Here: | |
| How to set up my device and information on the connectors and buttons on my device | Getting Started placemat and the DellTM User's Guide |
| Information on using my device. | Dell User's Guide and Pocket PC Help.To view Help, tap the Start button and tap Help. |
| Additional programs that can be installed on my device | Dell Companion CD |
| Information on using programs on my device | Pocket PC Help and, if available, tap Help within a specific program |
| Connecting to and synchronizing with a computer | Dell User's Guide and Microsoft® ActiveSync® Help on your computer.To view Help, click Help and click Microsoft ActiveSync Help. |
| Last-minute updates and detailed technical information | The readme files, located in the ActiveSync folder on the computer and on the Dell Companion CD. |
| Up-to-date information on your Pocket PC | www.microsoft.com/mobile/pocketpc |
| My service tag Label located in the main battery slot (remove the main battery) | |
SECTION 1
About Your Device
Front, Side, and Back Views
Using the Batteries
Connecting to a Computer
Using Cards
Performing a Reset
Front, Side, and Back Views
Front and Side Views
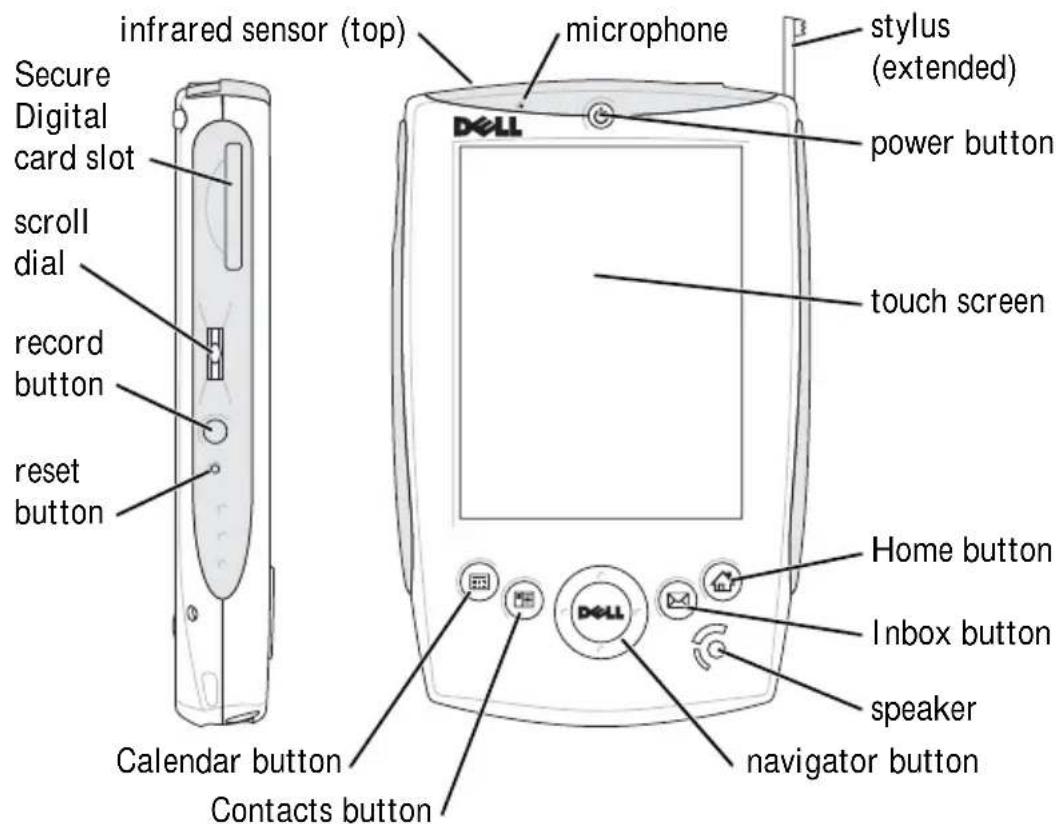
INFRARED SENSOR — The infrared sensor lets you transfer files from your device to another infrared-compatible device without using cable connections.
MICROPHONE — Allows you to record audio.
STYLUS — Use the stylus to write or draw on the screen. To remove the stylus, pull it straight up and out of the holder. To avoid losing the stylus, store the stylus in the holder when you are not using it. Ensure that the stylus is oriented correctly when you replace it in the slot.
POWER BUTTON — Press the power button to turn the device on or off. Press and hold the power button to dim the display. Repeat to light the display.
- When the device is connected to external power and the main battery is fully charged, the power button light is solid green.
-
When the main battery charge is low, the power button light flashes amber.
-
When the main battery is charging, the power button light is solid amber.
- When the device relays a notification, the power button light flashes green.
TOUCH SCREEN — Use the touch screen and the stylus to enter information into your device. See "Entering Information" on page 37.
HOME BUTTON — Press this button to launch Home or to turn on the device.
INBOX BUTTON — Press this button to launch your Inbox or to turn on the device.
SPEAKER — Tap the speaker icon to adjust the volume.
NAVIGATOR BUTTON — Press the right, left, top, or bottom of the navigator button to move the cursor on the screen.
CONTACTS BUTTON — Press this button to launch Contacts or to turn on the device.
CALENDAR BUTTON — Press this button to launch Calendar or to turn on the device.
RESET BUTTON — See "Performing a Reset" on page 24 for information on using the reset button.
RECORD BUTTON — See "Recording a Message" on page 47 for information on using the record button.
SCROLL DIAL
- Press the scroll dial to perform actions similar to pressing
on a keyboard. - Rotate the scroll dial up or down to perform actions similar to using the up- and down-arrow keys on a keyboard.
For information on the functionality of the scroll dial within programs, see Pocket PC Help.
SECURE DIGITAL CARD SLOT — See "Secure Digital Memory Cards" on page 24 for information on using Secure Digital memory cards.
Back View
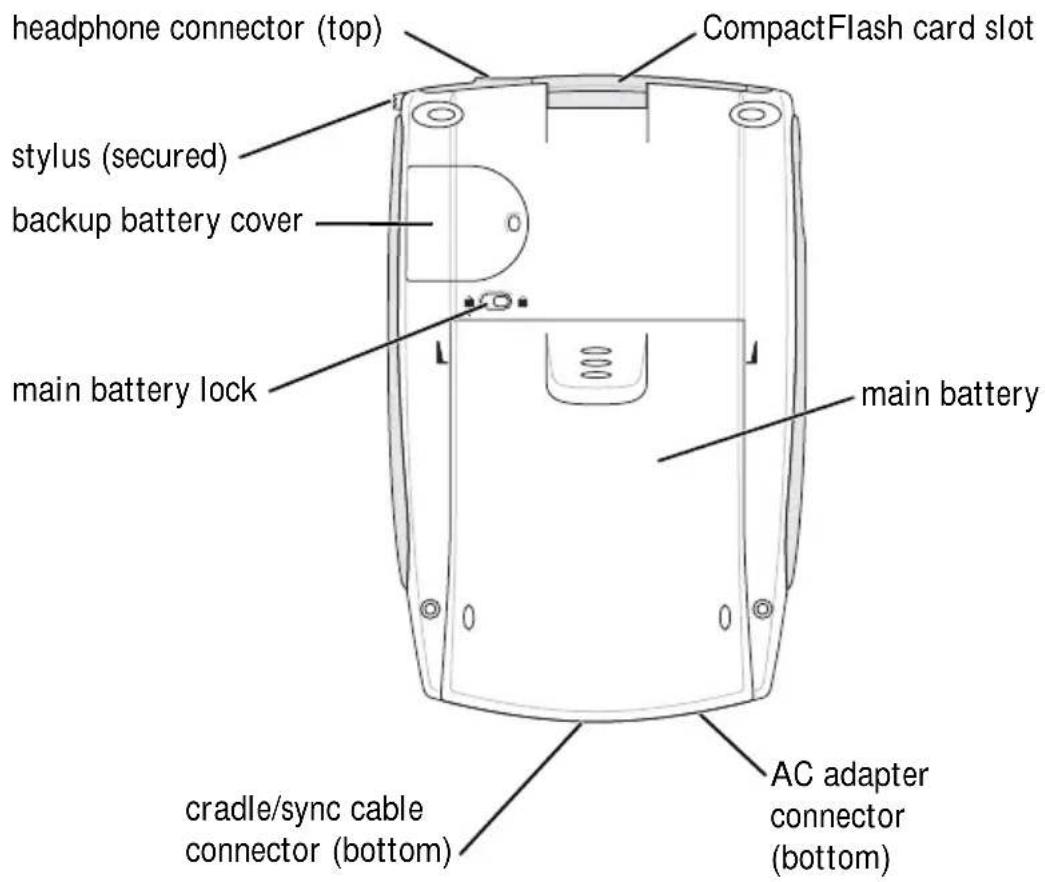
COMPACTFLASH CARD SLOT — See "CompactFlash Cards" on page 23 for information on using CompactFlash cards.
MAIN BATTERY — See "Using the Batteries" on page 15 for information on the main battery.
AC ADAPTER CONNECTOR — Connect the AC adapter.
CRADLE/SYNC CABLE CONNECTOR — Connect a cradle or sync cable. See "Connecting to a Computer" on page 19.
MAIN BATTERY LOCK — Use this switch to release and remove the main battery. See "Installing and Removing the Main Battery" on page 16.
BACKUP BATTERY COVER — Secures the backup battery. See "Installing and Removing the Backup Battery" on page 17.
HEADPHONE CONNECTOR — Attach headphones.
Using the Batteries
Your device uses two batteries:
- rechargeable main battery
• lithium coin-cell backup battery

NOTICE: Do not use your device until you have charged the main battery for at least 4 hours.
Before you use your device for the first time, you must install both batteries and completely charge the main battery. Once the main battery is charged, use the power properties to monitor the battery charge. See Pocket PC Help on the device for more information.

NOTICE: After you install the batteries for the first time, do not remove the main battery and the backup battery from the device at the same time. Doing so results in the loss of all data stored in SDRAM.

NOTICE: If you need to replace both batteries at the same time, ensure that you replace the main battery first.
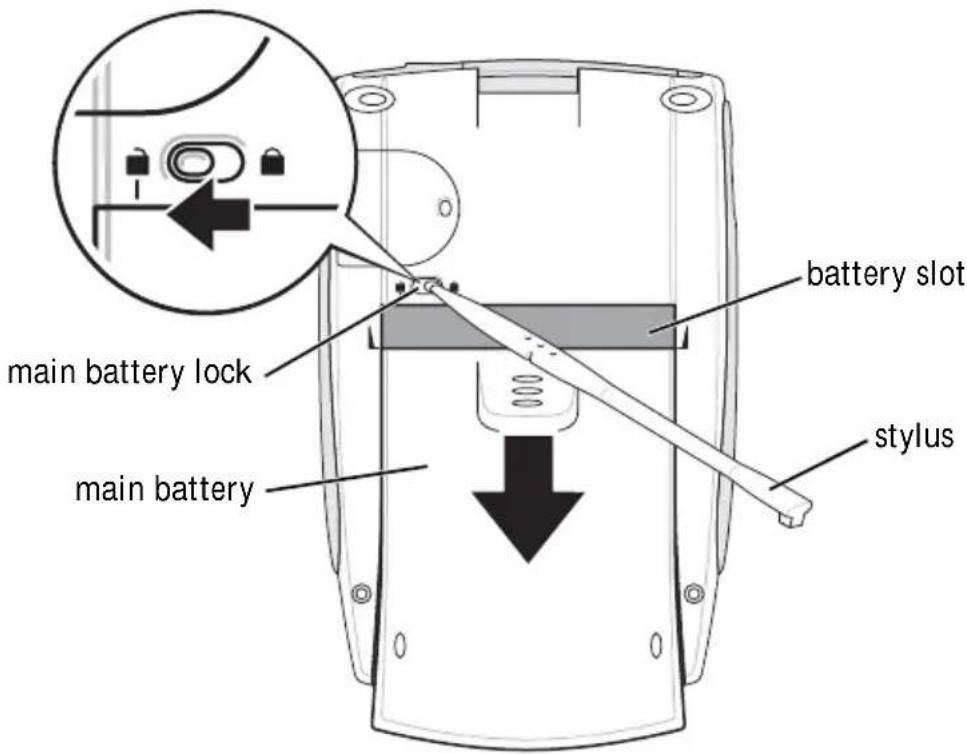
Installing and Removing the Main Battery
To install the main battery:
1 Ensure that the device is turned off.
2 Ensure that the main battery is oriented correctly and slide the battery into the slot until you feel a click.
To remove the main battery:
1 Insert the tip of the stylus into the main battery lock.
2 Slide and hold the lock in the unlock position.
3 Slide the battery out of the slot.
Installing and Removing the Backup Battery

NOTICE: Do not remove the backup battery unless the AC adapter is connected or the main battery is installed. Otherwise, you might lose data.
To install the backup battery:
1 Ensure that the device is turned off.
2 Insert the stylus into the backup battery release and slide the release to the left to remove the cover.
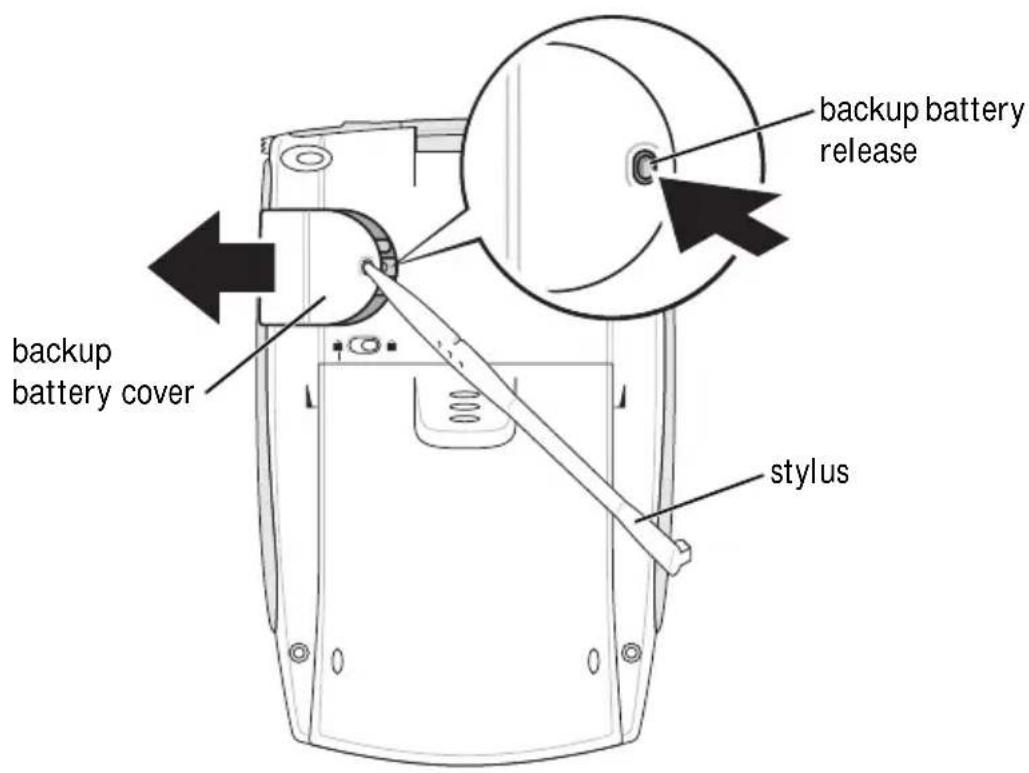
3 Wipe off the backup battery with a dry cloth.
4 Insert the backup battery with the positive side (+) facing up.
5 Slide the cover on and ensure that it is flush with the back of the device.
To remove the backup battery:
1 Insert the tip of the stylus into the backup battery release.
2 Slide the release to the left and remove the cover.
3 With your finger tip, gently press the right side of the battery to tilt up the left side of the battery.
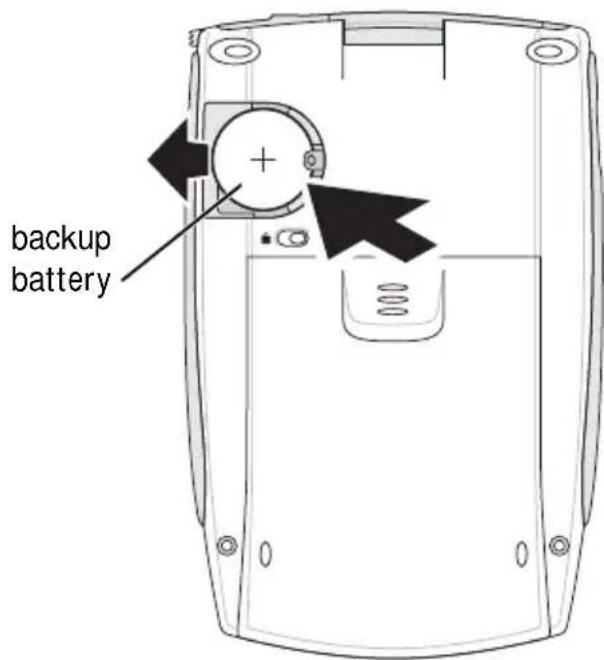
4 Remove the battery.
Charging the Main Battery
Use one of the following options to charge the main battery:
- Connect the AC adapter directly to the device and to an electrical outlet.
- Connect the AC adapter to the cradle, and insert the device into the cradle. See "Using the Cradle" on page 19 for more information.
Connecting to a Computer
You either connect your device to a computer using a cradle or directly to a computer using a sync cable. Connect your device to a computer to:
- Add programs to your device. See "Adding Programs Using Microsoft® ActiveSync®" on page 74 for more information.
- Synchronize data on your device with data on your computer.
For information on synchronizing your data, see the following resources:
- "U s i n® ActivSynic® conrpage 53 o f t
• ActiveSync Help on your computer
• ActiveSync Help on your device
Using the Cradle

NOTE: Depending on the configuration of your device, the cradle is optional.
You can use the cradle to:
- Synchronize the data on your device with the data on your computer.
- Power the device with AC power to conserve battery power.
- Charge the main battery. See "Using the Batteries" on page 15 for more information.
- Charge a spare battery.
Before connecting your device to a computer for the first time, ensure that you install ActiveSync on the computer from the Dell™ Companion CD.
To connect your device to the cradle:
1 Place the cradle on a flat, level surface near your computer.
2 Depending on the type of cradle that you have, connect the cradle cable to either the USB or serial connector on your computer.
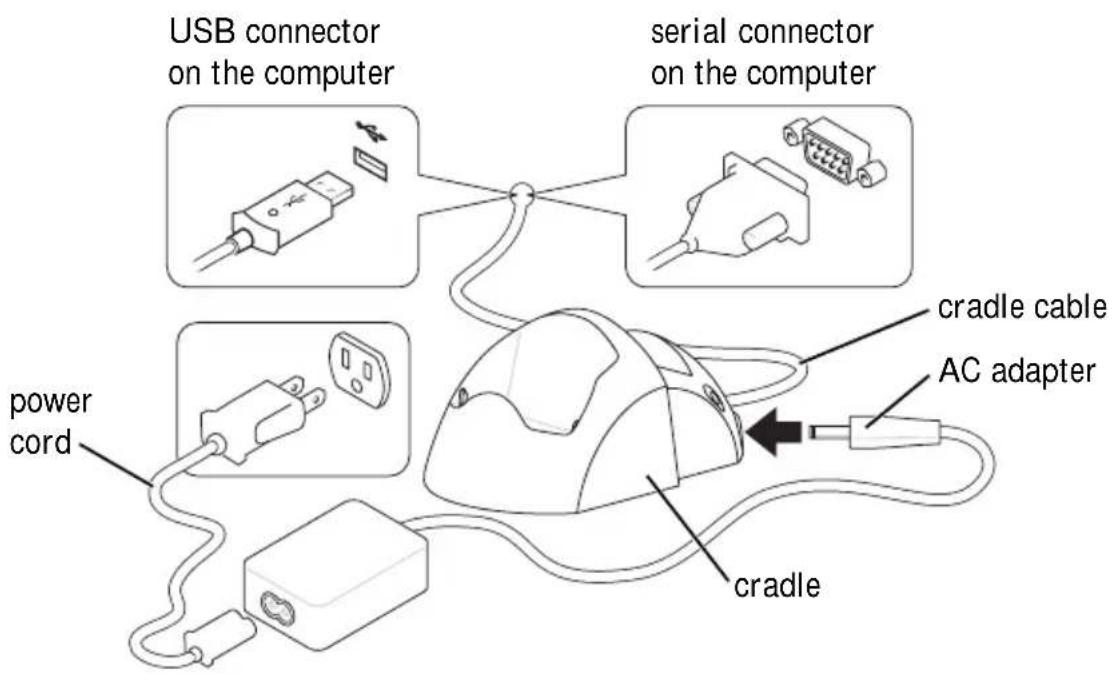
3 Connect the AC adapter to the cradle and to an electrical outlet.
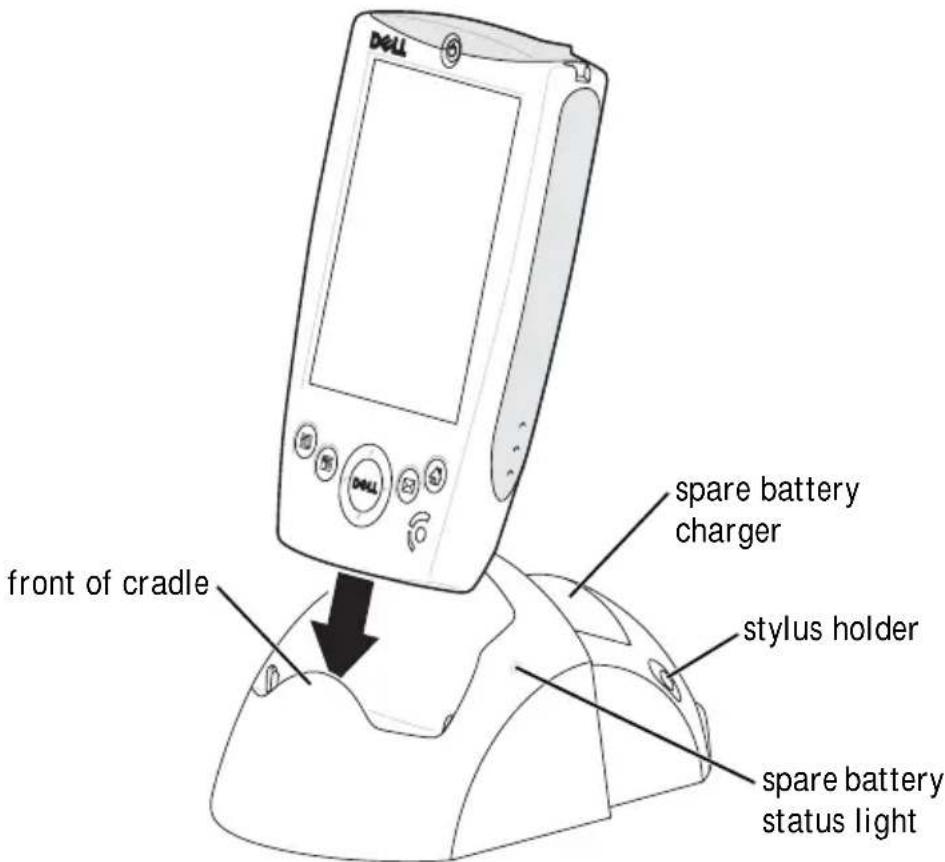
4 Align the connector on the bottom of the device with the connector on the cradle, and, keeping the front of the device flush with the front of the cradle, lower the device onto the cradle.
When the device is docked in the cradle, the DELL™ logo on the cradle lights up and the connection status icon appears on the command bar (see page 29).
The spare battery status light on the cradle operates as follows:
• Green: The spare battery is fully charged.
- Amber: The spare battery is charging.

NOTE: The power button on the device indicates the charge status of the main battery. See the description of the device status lights on page 12 for more information.
To remove the device from the cradle, pull the device straight up and out of the cradle.
Using the Sync Cable
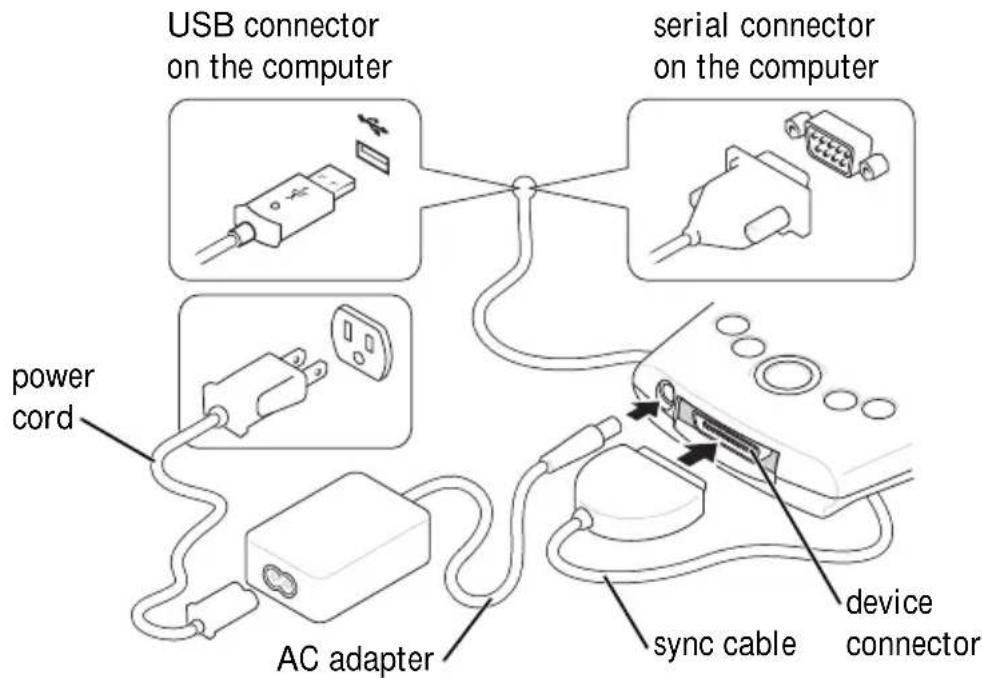
Use the sync cable to connect your device directly to the computer without using the cradle.

NOTE: Depending on the configuration of your device, the sync cable is optional.
To connect the sync cable:
1 Depending on the type of sync cable that you have, connect one end of the cable to either the USB connector or the serial connector on your computer.
2 Connect the other end of the cable to your device.
Using Cards
CompactFlash Cards
Your device supports CompactFlash Type I and Type II cards. Some common types of cards include:
- Modem — Connect a telephone line for modem data communications.
- Wireless communication — Perform data communications without the use of cable connections. You can use cards, such as Bluetooth and 802.11b wireless LAN.
- Storage — Save data or install programs on a storage card.
When you do not have a CompactFlash card installed, insert the plastic blank to protect the CompactFlash card slot.
To install a CompactFlash card:
1 If a blank is installed, remove it.
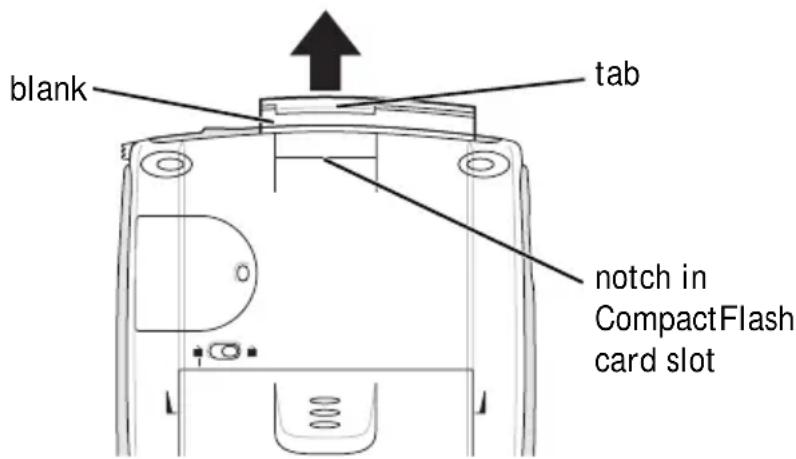
2 Align the tab on the back of the CompactFlash card with the notch in the CompactFlash card slot, and slide the card into the slot.

NOTICE: Do not force the card. If you feel resistance, remove the card, check the orientation, and reinsert it.
See the documentation that came with the card for information on using the card.
Secure Digital Memory Cards
Use Secure Digital memory cards to save or back up data.
To install an Secure Digital memory card:
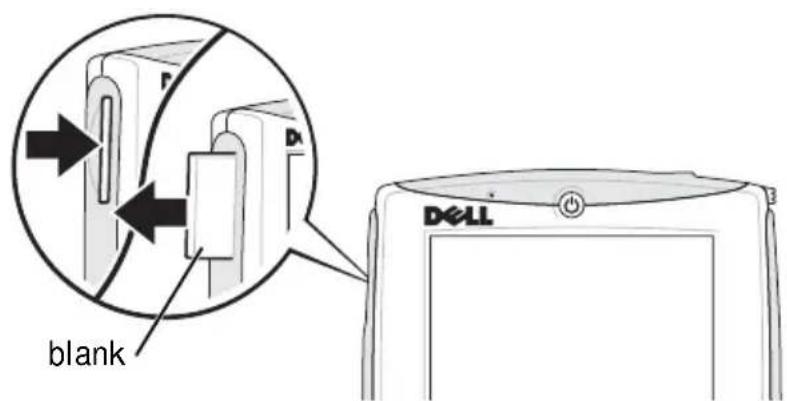
1 If a card is already installed, press in the card to release it, and then remove it.
2 Ensure that the card is oriented correctly, and slide it into the slot until you feel a click.

NOTICE: Do not force the card. If you feel resistance, remove the card, check the orientation, and reinsert it.
See the documentation that came with the card for information on using the card.
Performing a Reset
Soft Reset
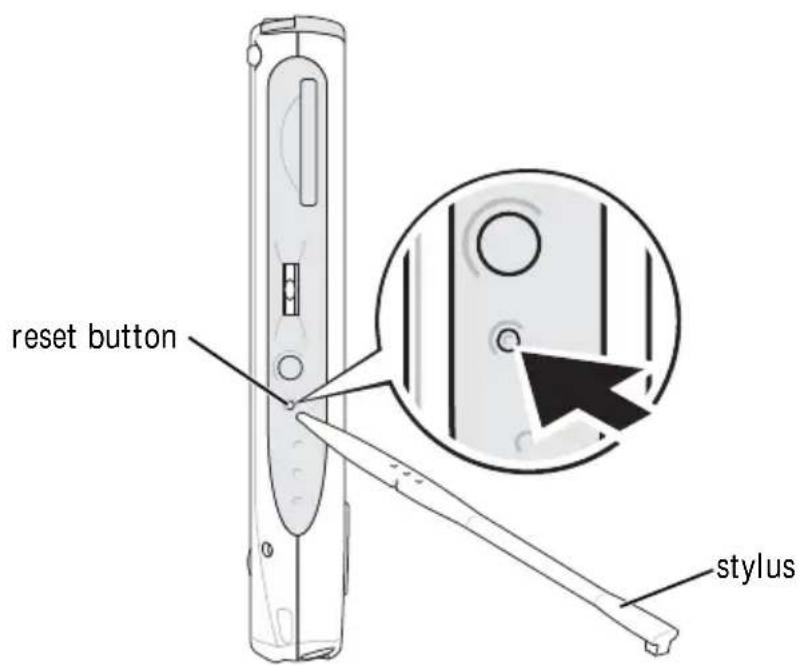
When you perform a soft reset, the device deletes any data that has not been saved but saves any data that has been stored in memory. Try performing a soft reset if the device does not respond when you tap the display or press a button.
To perform a soft reset, use the stylus to press the reset button.
Hard Reset

NOTICE: When you perform a hard reset, you lose all the data stored on your device.
Perform a hard reset if:
- You want to delete all the data stored on your device.
- You forget your password and need to clear it.
- Your device is experiencing severe operational problems and you have already attempted a soft reset.

NOTICE: It is strongly recommended that you back up your data before you perform a hard reset. See ActiveSync Help on your computer for more information.
To perform a hard reset:
1 Press and hold the power button.
2 With the stylus, hold the reset button for about 2 seconds.
3 Follow the instructions on the screen.
2
SECTION 2
Using Microsoft® Pocket PC
Device Buttons and the Stylus
Today Screen
Status Icons
Programs
Navigation Bar and Command Bar
Pop-Up Menus
Finding and Organizing Information
Backing Up Data
Device Buttons and the Stylus
Your device has hardware buttons that control actions and scroll functions, and a stylus for selecting items and entering information.
On the device, the stylus replaces the mouse:
- Tap — Touch the screen once with the stylus to open items and select options.
- Drag — Hold the stylus and drag across the screen to select text and images. Drag in a list to select multiple items.
- Tap and hold — Tap and hold the stylus on an item to see a list of actions available for that item. On the pop-up menu that appears, tap the action you want to perform.
See "Entering Information" on page 37 for more information.
Today Screen
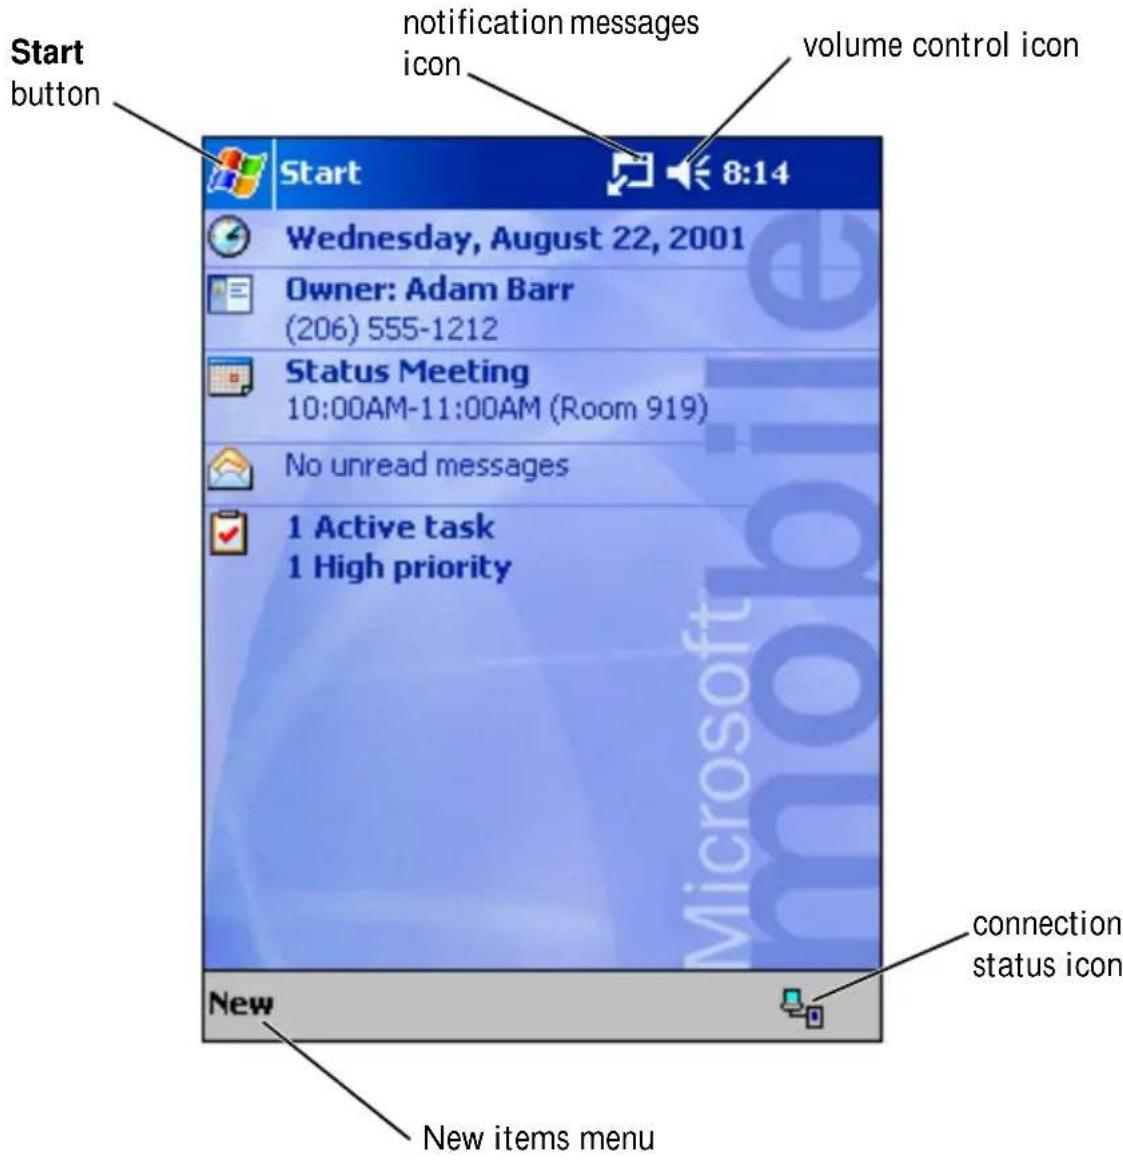
When you turn on your device for the first time each day (or after 4 hours of inactivity), the Today screen appears. You can also view the Today screen by tapping the Start button and then tapping Today. The Today screen displays the date and information about the device owner, today's calendar, and important tasks. To customize the Today screen:
1 Tap the Start button and tap Settings.
2 Tap the Personal tab and tap Today.
Use the Appearance tab to change the background that displays on the Today screen.
Use the Items tab to change the items that appear on the Today screen.
Status Icons

NOTE: If there is not enough room to display all notification icons, the notification icon, , displays. Tap the notification icon to view all notifications.

Turns sound on and off.

Backup battery is low.

Main battery is charging.

Main battery is low.

Main battery is very low.

Main battery is full.

Connection is active.

Synchronization is beginning or ending.

Synchronization is occurring.

New instant message(s).

New e-mail message(s).
Programs
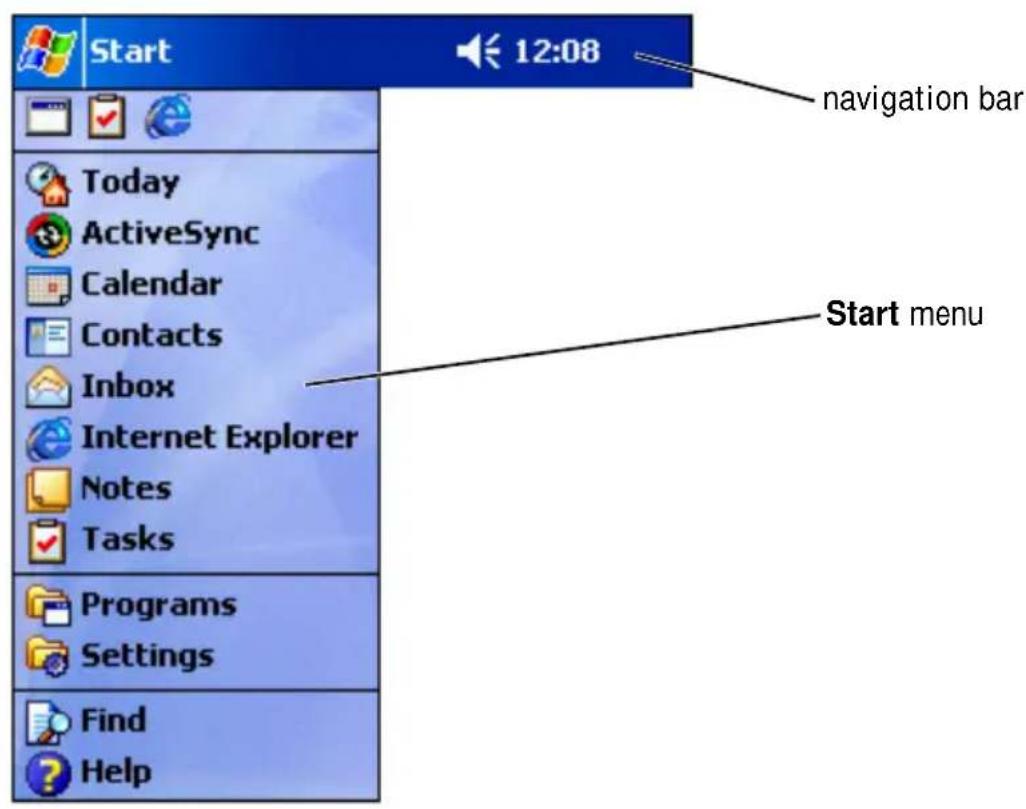
You can switch from one program to another by selecting a program from the Start menu. To access programs that are not listed in the Start menu, tap the Start button, tap Programs, and then tap the program name.

NOTE: Some programs have abbreviated labels for check boxes and drop-down menus. To see the full spelling of an abbreviated label, tap and hold the stylus on the label. Drag the stylus off the label so that the command is not carried out.
Program Buttons
You can also switch to some programs by pressing a program button. Your device has four program buttons located on the front of the device. The icons on the buttons identify the programs that they switch to. By default, the buttons launch Home, Inbox, Contacts, and Calendar.
Switcher Bar
You can also use Switcher Bar to switch to or close open programs. To launch Switcher Bar:
1 Tap the Start button and tap Settings.
2 Tap the System tab and tap Switcher Bar.
The Switcher Bar icon, , appears in the navigation bar.
Tap to view a list of all open programs. In the Switcher Bar menu:
- Tap a program name to switch to that program.
- Tap Exit current program to close the current program.
• T a p Exit all programs to close all open programs. - T a p Exit Switcher Bar to close the menu.
The following table contains a partial list of programs that are on your device. See the Dell™ Companion CD for additional programs that you can install on your device.
| Icon Program Description | ||
 | ActiveSync | Synchronize information between your device and your computer. |
 | Calendar | Keep track of your appointments and create meeting requests. |
 | Contacts | Keep track of your friends and colleagues. |
 | Inbox | Send and receive e-mail messages. |
 | Pocket Internet Explorer | Browse websites and WAP sites, and download new programs and files from the Internet. |
 | Notes | Create handwritten or typed notes, drawings, or recordings. |
 | Tasks Keep track of your tasks. | |
 | Pocket Excel | Create new workbooks or view and edit Excel workbooks that you created on your computer. |
 | MSN Messenger | Send and receive instant messages with your MSN Messenger contacts. |
 | Pocket Word | Create new documents or view and edit Word documents that you created on your computer. |
Navigation Bar and Command Bar
The navigation bar is located at the top of the screen. It displays the active program and current time and allows you to switch to other programs and close screens.
Use the command bar at the bottom of the screen to perform tasks in programs. The command bar includes menu names, icons, and the input panel icon. To create a new item in the current program, tap New. To see the name of an icon, tap and hold the stylus on the icon. Drag the stylus off the icon so that the command is not carried out.

Pop-Up Menus
With pop-up menus, you can quickly select an action for an item. For example, you can use the pop-up menu in the contact list to delete a contact, make a copy of a contact, or send an e-mail message to a contact. The actions in the pop-up menus vary from program to program. To access a pop-up menu, tap and hold the stylus on an item name. When the menu appears, lift the stylus and tap the action you want to perform. To close the menu without performing an action, tap anywhere outside the menu.
![Tasks All Tasks Priority Tap here to add a new task Send status report Create Copy Delete Task Beam Task... gift 123 1 2 3 4 5 6 7 8 9 0 - = Tab q w e r t y u i o p [ ] CAP a s d f g h j k l ; ' Shift z x c v b n m , . / Ctl áü ` \ ↓ ↑ ← → New Tools](/content/2026/05/959461/images/2bbd17998d2f5dd4ff255dc3626c5eddbc2ec69c2a79bf33eb04552c11e027b4.jpg)
Finding and Organizing Information
The Find feature on your device helps you to quickly locate information.
On the Start menu, tap Find. Enter the item that you want to find, select a data type from the drop-down menu, and then tap Go to start the search.
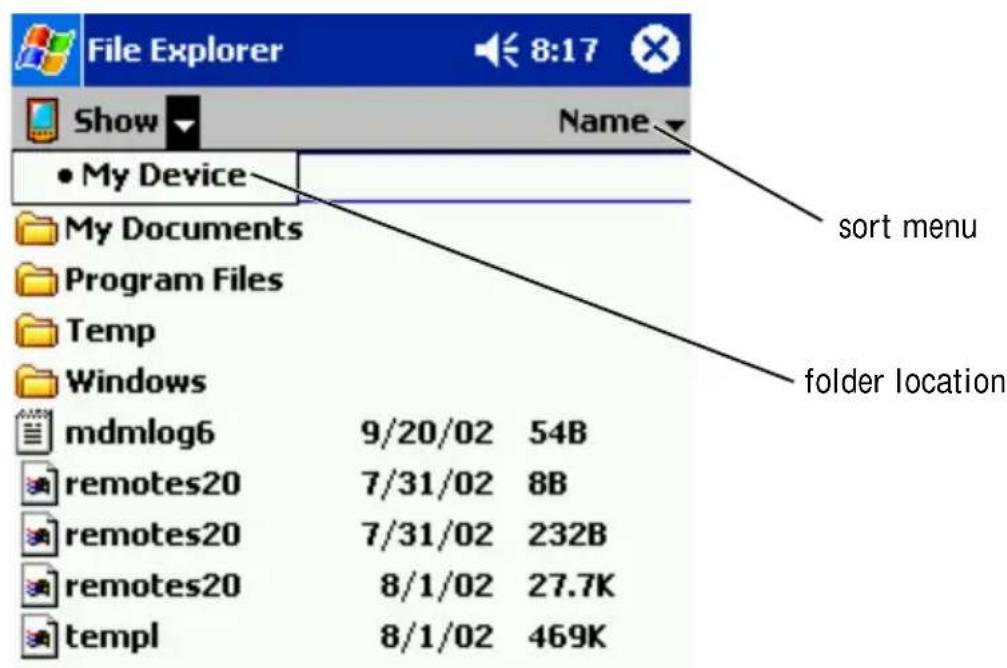
You can also use the File Explorer to find files on your device and to organize your files into folders. On the Start menu, tap Programs and tap File Explorer.
Backing Up Data
To prevent or minimize data loss, you should periodically back up the data stored on your device. Use ActiveSync to create a backup file and store the file on your computer. See the ActiveSync Help on your computer for additional information.
Use the Data Backup program on your device to back up your data to an external CompactFlash or Secure Digital storage card. You can back up all your files or one or more of your personal information manager (PIM) databases (Calendar, Contacts, Notes, Inbox, and Tasks).
To create a backup file:
1 Tap the Start button and tap Settings.
2 Tap Programs and tap Data Backup.
3 Select the files that you want to back up.
4 In the Backup to drop-down menu, select the location to which you want to save the backup file.
5 Next to Filename, enter a name for the backup file.
6 Tap Start.
If you lose data or your files become corrupt, you can use Data Backup to restore the data on your device from a backup file that you previously created.
To restore from a backup file:
1 Tap the Start button, tap Settings, and then tap Data Backup.
2 Tap the Restore tab.
3 Select the file from which you want to restore.
4 Click Start.
SECTION 3
Entering Information
Entering Text Using the Input Panel
Writing on the Screen
Drawing on the Screen
Recording a Message
Using My Text
You have several options for entering information:
- Use the input panel to enter typed text using the soft keyboard or another input method.
- Write directly on the screen with the stylus.
- Draw pictures on the screen with the stylus.
- Speak into your device microphone to record a message.
Use Microsoft ^® ActiveSync ^® to synchronize or copy information from your computer to your device. For more information on ActiveSync, see ActiveSync Help on your computer.
Entering Text Using the Input Panel
Use the input panel to enter information in any program on your device. You can type using the soft keyboard or write using Letter Recognizer, Block Recognizer, or Transcriber. In any case, the characters appear as typed text on the screen.
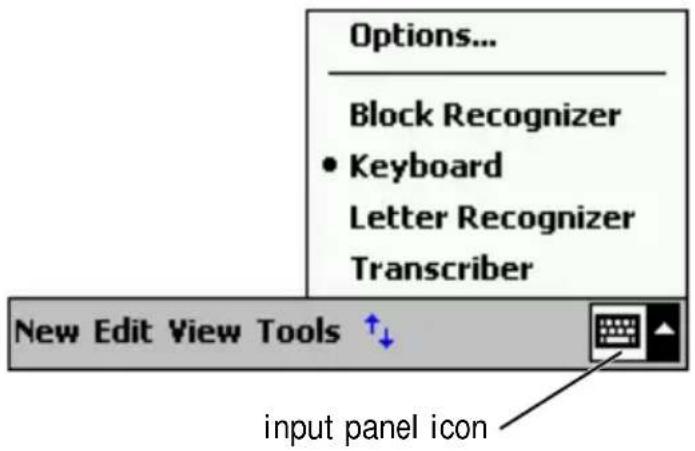
To show or hide the input panel, tap the input panel icon. Tap the arrow next to the input panel icon to change input methods.
When you use the input panel, your device anticipates the word you are typing or writing and displays it above the input panel. When you tap the displayed word, the word is inserted at the insertion point. The more you use your device, the more words it learns to anticipate.
![mee meet meeting meetings meets_ 123 1 2 3 4 5 6 7 8 9 0 - = Tab q w e r t y u i o p [ ] CAP a s d f g h j k l ; ' Shift z x c v b n m , . / Ctl áü ` \ ↓ ↑ ← → New Edit Tools](/content/2026/05/959461/images/7b567bef7e84313f5364f74beb08a5c188d9e36e7b74f58cf4f98f57e474c0a3.jpg)
To change word suggestion options, such as the number of words suggested:
1 Tap the Start button and tap Settings.
2 Tap the Personal tab, tap Input, and then tap the Word Completion tab.
3 Select the desired settings and tap OK.
Typing With the Soft Keyboard
1 Tap the arrow next to the input panel icon and tap Keyboard.
2 Tap the keys on the soft keyboard with your stylus.
Letter Recognizer
Letter Recognizer allows you to use your stylus to write letters on the screen as you would write them on paper.
1 Tap the arrow next to the input panel icon and tap Letter Recognizer.
2 With your stylus, write a letter between the lines that appear on the bottom of the screen.
The letters are converted to typed text on the screen. For specific instructions on using Letter Recognizer, tap the question mark next to the writing area.

NOTE: Tap Demo to learn the character strokes that the device can recognize.
Block Recognizer
Block Recognizer allows you to use character strokes that are similar to those used on other handheld devices.
1 Tap the arrow next to the input panel icon and tap Block Recognizer.
2 Using your stylus, write the appropriate character stroke in the box that appears at the bottom of the screen.
The character strokes are converted to typed text on the screen. For specific instructions on using Block Recognizer, tap the question mark next to the writing area.

NOTE: Tap Demo to learn the character strokes that the device can recognize.
Transcriber
Transcriber allows you to write anywhere on the screen using the stylus similar to the way that you would write on paper. Unlike Letter Recognizer and Block Recognizer, you can write a sentence or more, and then pause to let Transcriber change the written characters to typed characters.
1 Tap the arrow next to the input panel icon and tap Transcriber.
2 With your stylus, write anywhere on the screen.
When you pause, Transcriber converts your written characters to typed characters. For specific instructions on using Transcriber, tap the question mark in the lower right hand corner of the screen.
Editing Typed Text
To edit or format typed text, you must select it first:
1 Drag the stylus across the text that you want to select.
2 Tap and hold the selected text.
3 Tap the appropriate editing command in the pop-up menu.
You can also tap Edit at the bottom of the screen to select editing commands.
Writing on the Screen
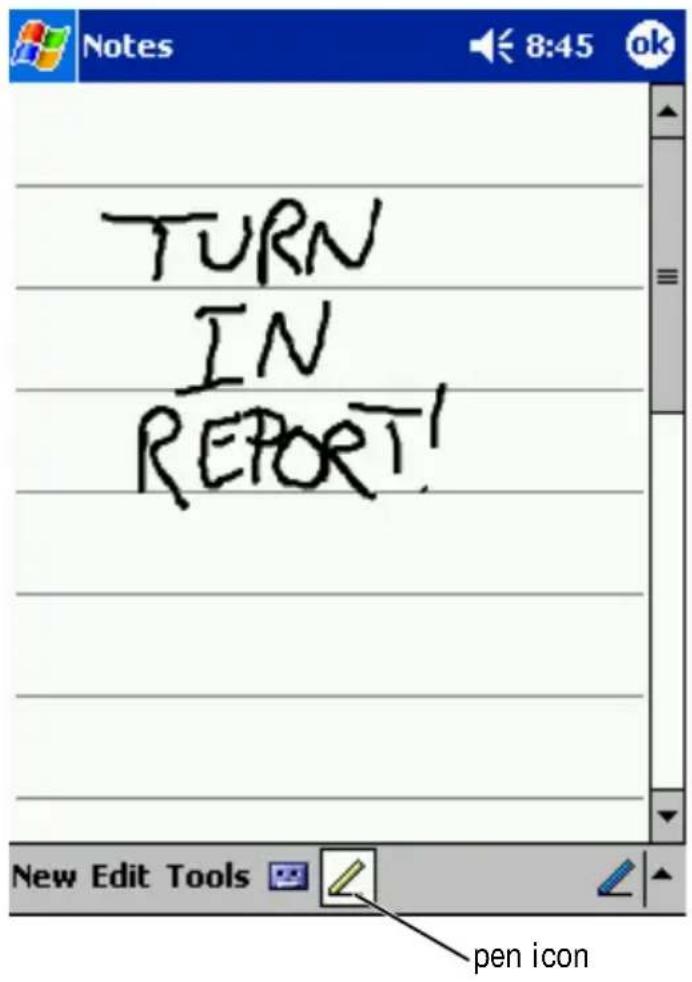
In any program that accepts written text, such as the Notes program and the Notes tab in some programs, you can use your stylus to write directly on the screen. You can edit and format what you have written and convert the information to text at a later time.

NOTE: Some programs that accept written text may not have the pen icon. See the documentation for that program to find out how to switch to writing mode.
To write on the screen, tap the pen icon to switch to writing mode. This action displays lines on the screen to help you write.
Editing Written Text
To edit or format written text, you must select it first:
1 Tap the pen icon to deselect it.
2 Drag the stylus across the text that you want to select.
3 Tap and hold the selected text.
4 Tap the appropriate editing command in the pop-up menu.
You can also tap Edit at the bottom of the screen to select editing commands.
5 Tap the pen icon to switch back to writing mode.
To convert written text to print-style text, tap Tools and tap Recognize.
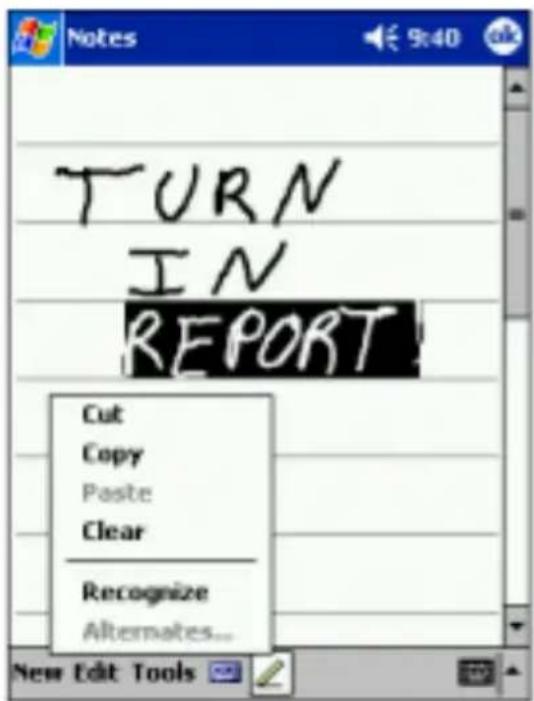
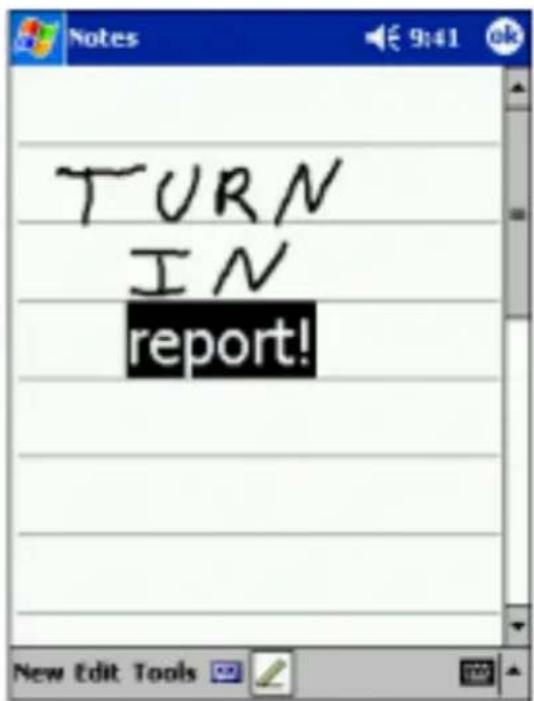
If you want to convert only certain words, select them before tapping Recognize (or tap and hold the selected words and then tap Recognize on the pop-up menu). If a word is not recognized, it is not converted to print-style text.
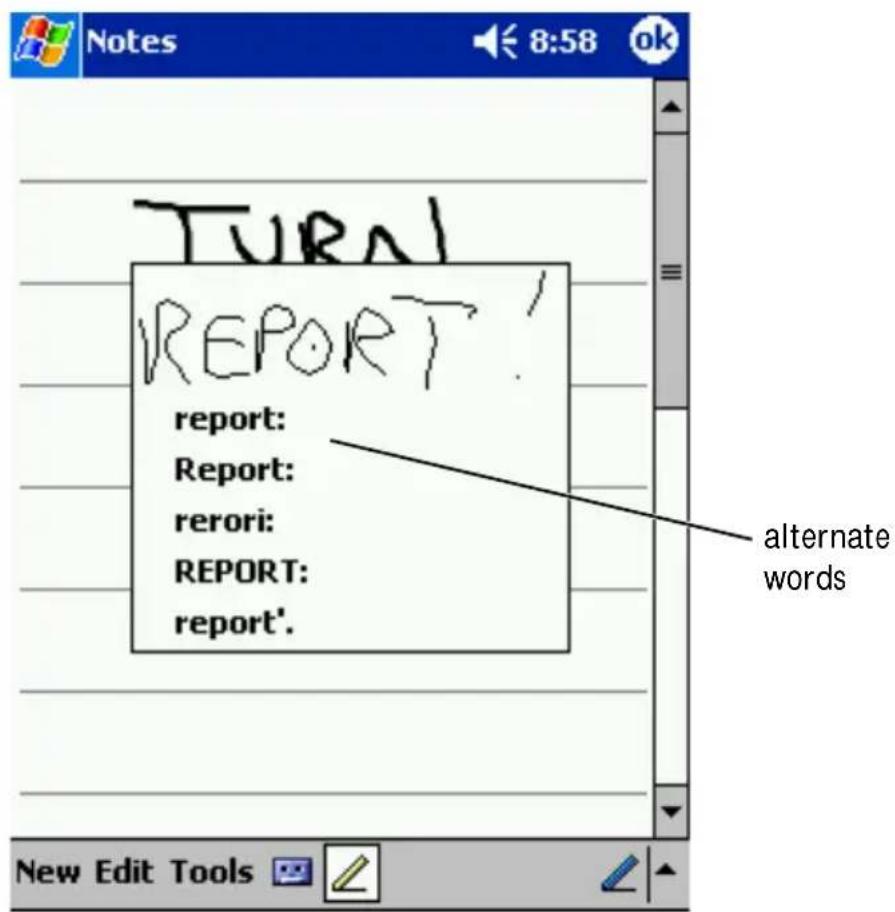
If the conversion is incorrect, you can select different words from a list of alternatives or return to the original written text:
1 Tap and hold the incorrect word.
2 On the pop-up menu, tap Alternates.
A menu with a list of alternative words appears.
3 Tap the word correct word, or tap the written text at the top of the menu to return to the original written text.
Tips for getting good recognition:
- Write neatly.
- Write on the lines and draw descendants below the line. Write the cross of the "t" and apostrophes below the top line so that they are not confused with the word above. Write periods and commas above the line.
- For better recognition, try changing the zoom level to 300 percent using the Tools menu.
- Write the letters of a word closely and leave big gaps between words so that the device can easily determine where words begin and end.
- Hyphenated words, foreign words that use special characters such as accents, and some punctuation cannot be converted.
- You cannot add written text to a word to change it after the word has been recognized. You must delete the written word and write the new word.
Drawing on the Screen
You can draw on the screen the same way that you write on the screen; however, selecting and editing drawings is different than selecting and editing written text. For example, selected drawings can be resized, while written text cannot.
Creating a Drawing

NOTE: To zoom in or out on your drawing, tap Tools and tap a zoom level.
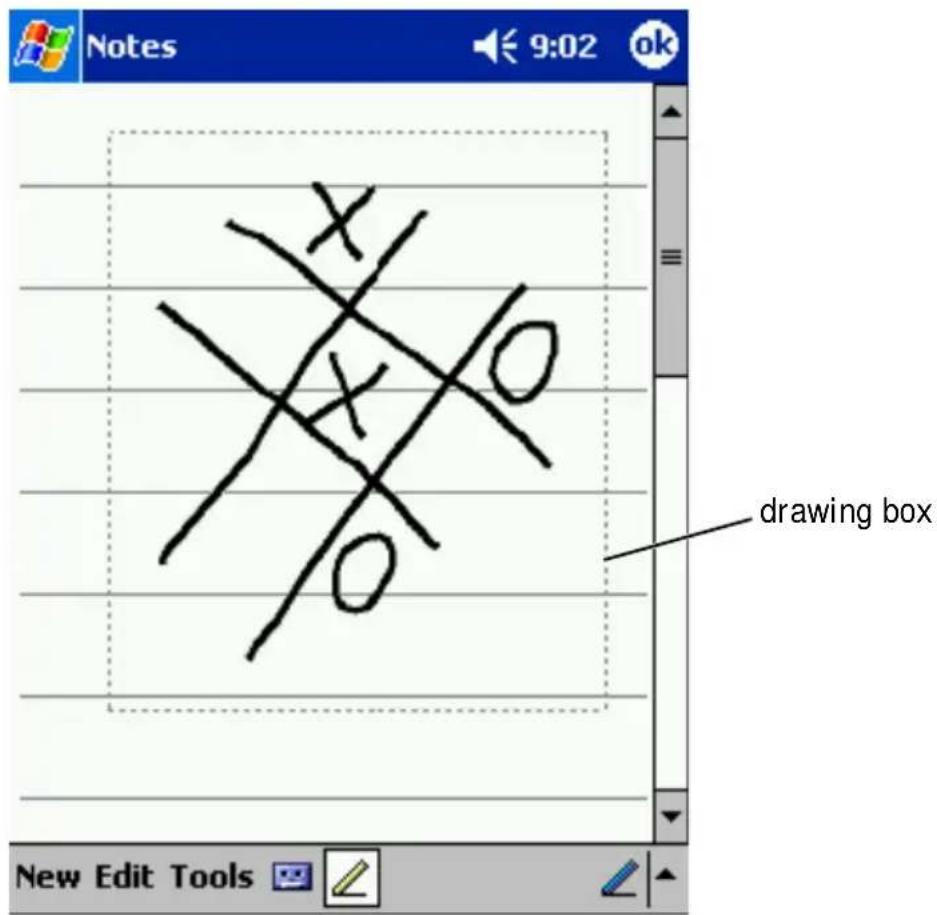
Cross three ruled lines on your first stroke. A drawing box appears. Subsequent strokes that touch or are inside of the drawing box become part of the drawing. Drawings that do not cross three ruled lines are treated as written text.
Editing a Drawing
To edit or format a drawing, you must select it first:
1 Tap and hold the stylus on the drawing until the selection handle appears.
To select multiple drawings, deselect the pen icon and drag to select the drawings.
2 Tap and hold the selected drawing and tap an editing command on the pop-up menu.
3 You can cut, copy, and paste selected drawings by tapping and holding the selected drawing and then tapping an editing command on the pop-up menu.
You can also tap Edit at the bottom of the screen to select editing commands.
To resize a drawing, ensure that the Pen icon is not selected, and drag a selection handle.
Recording a Message
In any program where you can write or draw on the screen, you can also quickly capture thoughts, reminders, and phone numbers by recording a message. In Calendar, Tasks, and Contacts, you can include a recording in the Notes tab. In the Notes program, you can either create a stand-alone recording or include a recording in a written note. If you want to include the recording in a note, open the note first. In the Inbox program, you can add a recording to an e-mail message.
To record a message:
1 Hold the microphone near your mouth or other source of sound.
2 Press and hold the Record hardware button on your device until you hear a beep.
3 While holding down the Record button, make your recording.
4 To stop recording, release the Record button.
The device beeps twice. The new recording appears in the note list or as an embedded icon.

NOTE: You can also make a recording by tapping the Record icon on the Recording toolbar.
To play a recording, tap the name of the recording in the list or tap the speaker icon in the note.
Using My Text
When using Inbox or MSN Messenger, use My Text to quickly insert preset or frequently used messages. To insert a message, tap My Text and tap a message.
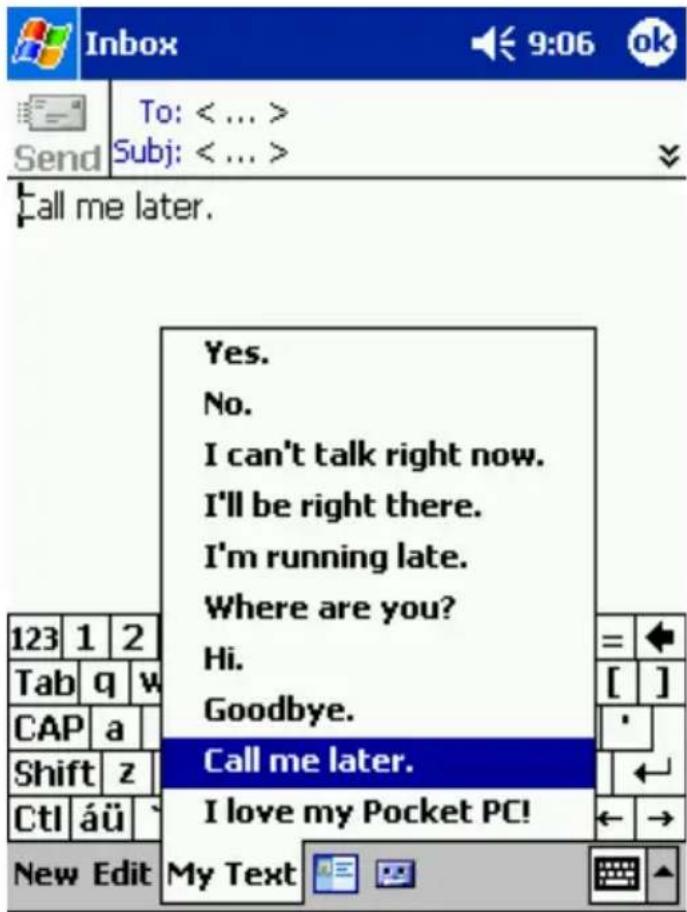

NOTE: You can add text to a My Text message after you insert the message.
To edit a My Text message:
1 In Inbox or MSN Messenger, tap Tools.
2 Tap Edit My Text Messages.
3 Make the desired changes and tap OK.
4
SECTION 4
Adjusting Settings
Personal Tab
System Tab
You can adjust the device settings to suit the way you work. To see available options, tap the Start button and tap Settings. You can adjust the settings on the Personal and System tabs.

NOTE: Depending on the features of your device, you might have additional tabs and additional items on the tabs.
See Pocket PC Help on your device for additional information on adjusting settings (tap the Start button and tap Help).
Personal Tab
- Buttons — Assign the programs that launch when you press the hardware buttons.
- Input — Adjust the settings for input method, word completion, and other options.
- Menus — Add or remove items from the Start menu.
- Owner Information — Enter your contact information.
- Password — Set a password to protect the data stored on your device.
- Sounds & Notification — Adjust the volume and set notifications. See "Notifications" on page 72 for more information.
- Today — Customize the look and the information that is displayed on the Today screen.
System Tab
- About — Find information about Microsoft ^ Pocket PC and your device.
- System Information — View technical information about your device.
- Brightness — Adjust the brightness settings to conserve power.
-
Clock — Change the time or set the alarm.
-
Power — Check the battery or charge status. Set the amount of time that the device can remain idle before it turns off.
- Microphone — Adjust the microphone gain.
- Regional Settings — View and change the formatting for regional settings, such as currency, time, and date.
- Remove Programs — Remove programs from your device. For more information, see "Adding and Removing Programs" on page 73.
- Screen — Adjust the screen if your device is not responding accurately to taps.
- Switcher Bar — Adjust the settings of the Switcher Bar program launcher utility.
SECTION 5
Using Microsoft ^® ActiveSync ^®
About ActiveSync
Installing and Using ActiveSync
About ActiveSync
You can synchronize the information on your computer with the information on your device with ActiveSync. Synchronization compares the data on your device with the data on your computer and updates both with the most recent information. For example:
- Keep Microsoft Pocket Outlook data up-to-date by synchronizing your device with Microsoft Outlook data on your computer.
- Synchronize Microsoft Word and Microsoft Excel files between your device and your computer. Your files are automatically converted to the correct format.

NOTE: By default, ActiveSync does not automatically synchronize all types of information. You can change ActiveSync options to synchronize specific types of information.
With ActiveSync, you can also:
- Back up and restore your device data.
- Copy (rather than synchronize) files between your device and your computer.
- Select a synchronization mode to control when synchronization occurs. For example, you can synchronize continuously or only when you select the synchronize command.
- Select which information types are synchronized and control how much data is synchronized. For example, you can choose how many weeks of past appointments you want synchronized.
Before you begin synchronization, install ActiveSync on your computer using the Dell™ Companion CD. ActiveSync is already installed on your device.

NOTICE: Ensure that your device is not connected to the computer before you install ActiveSync.
Installing and Using ActiveSync
To install ActiveSync:
1 Insert the Dell Companion CD.
2 Click the yellow triangle to access the main menu.
3 Click Start Here.
4 Click Install ActiveSync and follow the instructions on the screen.
After the installation is complete, the ActiveSync Setup Wizard helps you to connect your device to your computer, set up a partnership so that you can synchronize information between your device and your computer, and customize your synchronization settings. Your first synchronization process automatically begins when you complete the wizard.
During your first synchronization, information that was stored in Outlook on your computer is copied to Calendar, Contacts, and Tasks on your device.
After you set up ActiveSync and complete the first synchronization process, you can initiate synchronization from your device. To switch to ActiveSync on your device, tap the Start button and tap ActiveSync. If you have a wireless LAN card, you can synchronize remotely from your device.
To find information on using ActiveSync on your device, open ActiveSync on your device, tap the Start button, and then tap Help.
To find information on using ActiveSync on your computer, open ActiveSync on your computer, and click Help→ Microsoft ActiveSync Help.
SECTION 6
Scheduling and Communicating
About Microsoft® Pocket Outlook
Calendar
Contacts
Tasks
Notes
Inbox
Notifications
About Microsoft® Pocket Outlook
Pocket Outlook includes Calendar, Contacts, Tasks, Inbox, and Notes. You can use these programs individually or together. For example, e-mail addresses stored in Contacts can be used to address e-mail messages in Inbox.
Using Microsoft ActiveSync ^® , you can synchronize information in Microsoft Outlook or Microsoft Exchange on your computer with your device. You can also synchronize this information directly with an Exchange server. Each time you synchronize, ActiveSync compares the changes you made on your device and computer or server and updates both computers with the latest information. For information on using ActiveSync, see ActiveSync Help on your computer.
You can switch to any of the following programs through the Start menu.
Calendar
Use Calendar to schedule appointments, including meetings and other events. You can check your appointments in one of several views (Agenda, Day, Week, Month, and Year) and easily switch views by using the View menu. Tap the today icon to view the current date.
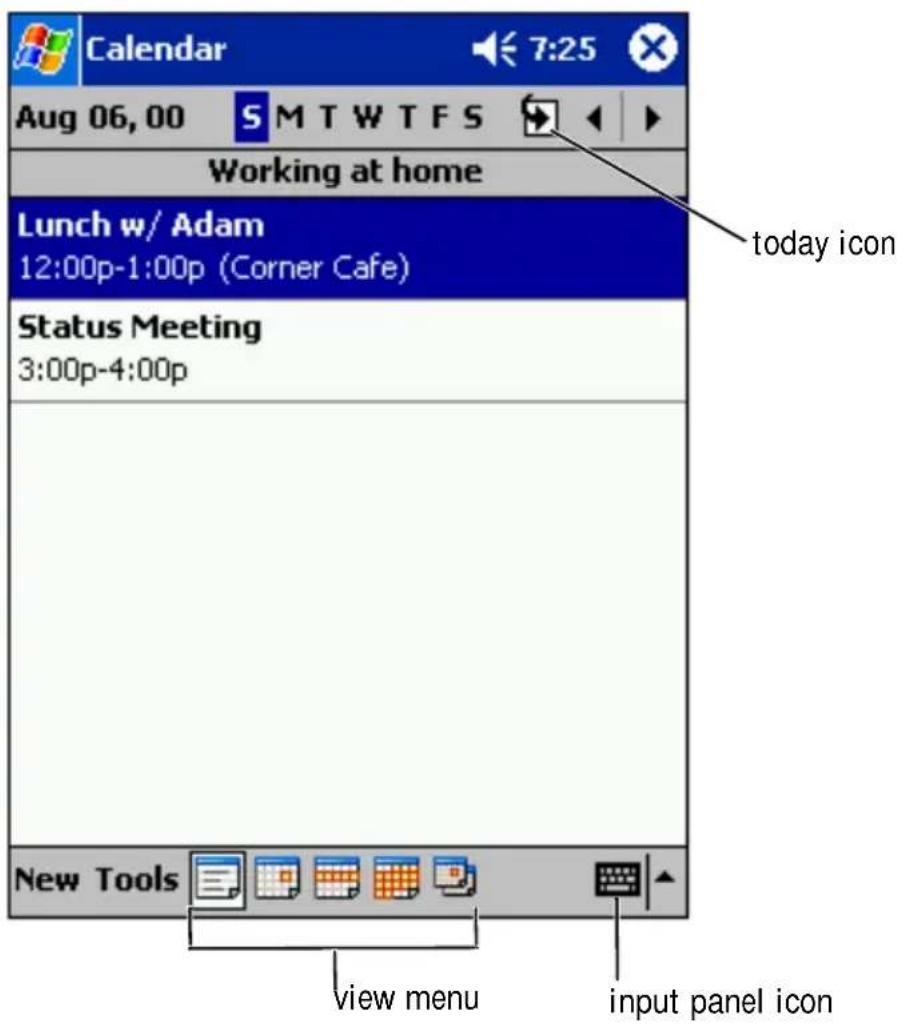

NOTE: To customize Calendar, such as changing the first day of the week, tap Tools and tap Options.
To create an appointment:
1 In the Day or Week view, tap the desired date and time for the appointment.
2 Tap New.
3 Tap a field to select it, and enter a description and a location using the input panel.
4 If necessary, tap the date and time to change them.
5 To see all available fields, tap the input panel icon to hide it. Enter the remaining information, if necessary.
6 To add notes, tap the Notes tab.
You can enter text, draw, or create a recording. For more information on creating notes, see "Notes" on page 64.
7 When you have finished entering information, tap OK to return to the calendar.
To receive a notification for an appointment, select Remind me in the appointment settings. You can configure notifications through the Sounds & Notifications icon. For more information, see "Notifications" on page 72.
Using the Summary Screen
When you tap an appointment in Calendar, a summary screen displays. To change the appointment, tap Edit.
Creating Meeting Requests
You can use Calendar to set up meetings with users of Outlook or Pocket Outlook. The meeting request is automatically created when you synchronize Inbox or when you connect to your e-mail server. To set how you want meeting requests sent, tap Tools and tap Options. If you send and receive e-mail messages through ActiveSync, select ActiveSync.
To schedule a meeting:
1 Create an appointment.
2 On the Appointment tab, tap the input panel to hide it, and then tap Attendees.
The Attendees field lists the e-mail addresses that you have entered in Contacts.
3 Select the meeting attendees.
The meeting notice is created automatically and placed in the Outbox folder.
For more information on sending and receiving meeting requests, tap the Start button, tap Help, and then tap Calendar or Inbox.
Contacts
Use Contacts to maintain a list of your friends and colleagues. You can quickly share Contacts information with other device users using the infrared port.
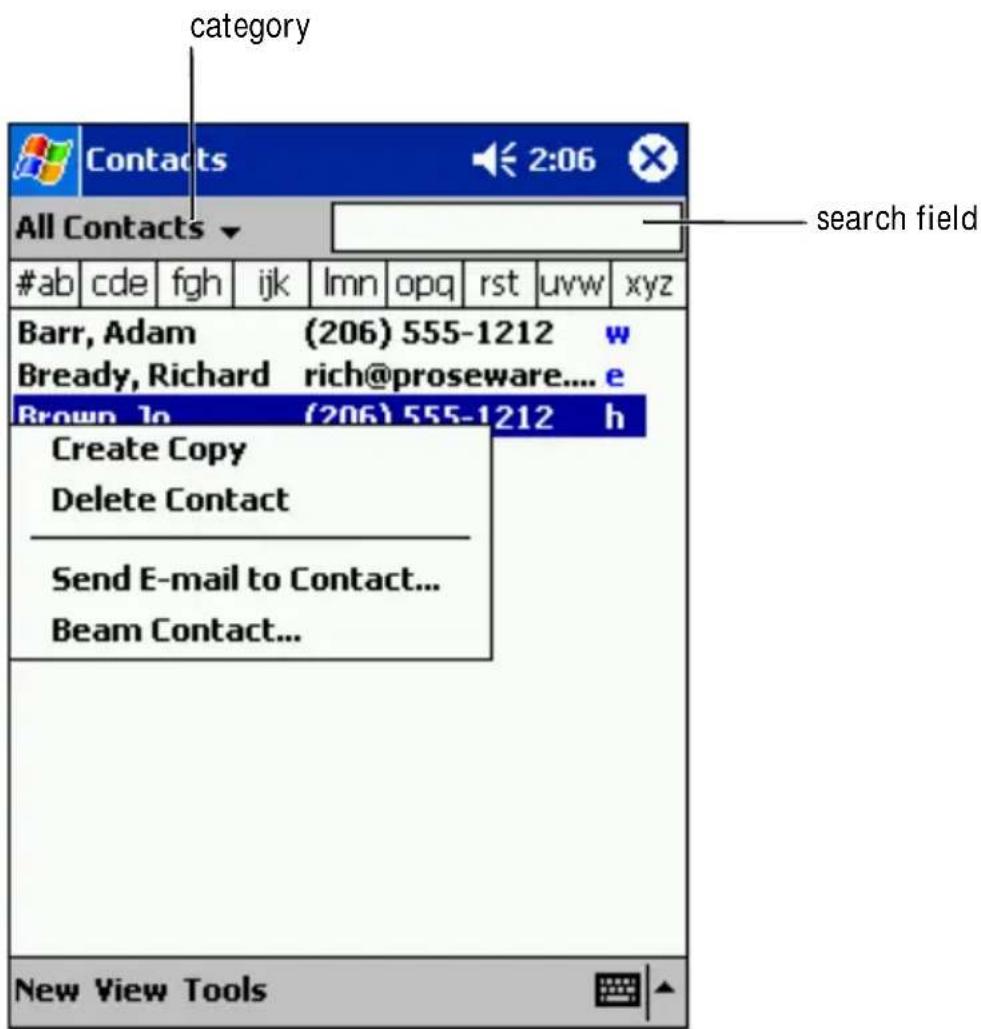

NOTE: To change the way information is displayed in the list, tap Tools and tap Options.
To create a contact:
1 Tap the Start button and tap Contacts.
2 Tap New.
3 Using the input panel, enter a name and other contact information. Scroll down to see all available fields.
4 To assign the contact to a category, tap Categories and select a category from the list.
In the contact list, you can display contacts by category.
5 To add notes, tap the Notes tab. You can enter text, draw, or create a recording. For more information on creating notes, see "Notes" on page 64.
6 When you have finished entering information, tap OK to return to the calendar.
Finding a Contact
You can find a contact using one of the following methods:
- In Contacts, enter a contact name in the field under the navigation bar. To show all contacts, clear text from the box or tap the arrow to the right of the box.
- In Contacts, tap the category list (labeled All Contacts by default) and select a category. To show all contacts again, tap All Contacts. To view a contact not assigned to a category, select None.
- To view the names of companies your contacts work for, tap View in the contact list and tap By Company. The number of contacts that work for that company will be displayed to the right of the company name.
- Tap the Start button, tap Find, and then enter the contact name. In the Type drop-down menu, tap Contacts, and then tap Go.
Using the Summary Screen
When you tap a contact in the contact list, a summary screen is displayed. To change the contact information, tap Edit.
Tasks

NOTE: To change the way information is displayed in the list, tap Tools and tap Options.
Use Tasks to keep a list of things that you need to do.
![Tasks All Tasks Priority Tap here to add a new task Send status report Create Copy Delete Task Beam Task... sort menu 123 1 2 3 4 5 6 7 8 9 0 - = Tab q w e r t y u i o p [ ] CAP a s d f g h j k l ; ' Shift z x c v b n m , . / Ctl áü ` \ New Tools](/content/2026/05/959461/images/7b50b22e11e43155d1be47c1624e37fc5215d52c64c5ccf5abd2a25fdbfe660c.jpg)
To create a task:
1 Tap the Start button and tap Tasks.
2 Tap New.
3 Enter a description using the input panel.
4 If necessary, enter a start date and due date or other information by first tapping the field. Tap the input panel icon to hide it to see all available fields.
5 To assign the task to a category, tap Categories and select a category from the list. In the task list, you can display tasks by category.
6 To add notes, tap the Notes tab. You can enter text, draw, or create a recording. For more information on creating notes, see "Notes" on page 64.
7 When you have finished entering information, tap OK to return to the calendar.

NOTE: To quickly create a task with only a subject, tap Tools and tap Entry Bar. Tap Tap here to add a new task, and enter your task information.
Notes
Quickly capture thoughts, reminders, ideas, drawings, and phone numbers with Notes. You can create a written note or a recording. You can also include a recording in a note. If a note is open when you create the recording, it is included in the note as an icon. If a note is not open, the recording is saved as a stand-alone recording.
![Notes 123 1 2 3 4 5 6 7 8 9 0 - = Tab q w e r t y u i o p [ ] CAP a s d f g h j k l ; ' Shift z x c v b n m , . / Ctl áü ` \ New Edit Tools record icon pen icon input panel icon 9:48 ok](/content/2026/05/959461/images/d4716f68168d2d6d362f3fe15025d43d4082f8b2218cf1d8355aab91727afe22.jpg)
To create a note:
1 Tap the Start menu and tap Notes.
2 Tap New.
3 Create your note by writing, drawing, typing, or recording. For more information on using the input panel, writing and drawing on the screen, and creating recordings, see "Entering Information" on page 37.
Inbox
Use Inbox to send and receive e-mail messages:
- Synchronize e-mail messages using Exchange or Outlook on your computer.
- Send and receive e-mail messages by connecting directly to an e-mail server through an ISP or a network.
Synchronizing E-Mail Messages
You can synchronize e-mail messages along with the rest of your data if you enable Inbox synchronization in ActiveSync. For information on enabling Inbox synchronization, see ActiveSync Help on your computer.

NOTE: You can also synchronize e-mail messages with your computer from a remote location. For more information, see "Getting Connected" on page 99.
During synchronization:
- Messages are copied from the e-mail folders of Exchange or Outlook on your computer to the ActiveSync folder in Inbox on your device. By default, you will receive:
– Messages from the past 3 days
– The first 100 lines of each message
- File attachments of less than 100 KB in size
- E-mail messages in the Out to Exchange or Outlook on your computer, and then sent from those programs.
- E-mail messages in subfolders on your computer must be selected in ActiveSync to be transferred.
Connecting Directly to an E-Mail Server
In addition to synchronizing e-mail messages with your computer, you can send and receive e-mail messages by connecting to an e-mail server using a modem or network card connected to your device. You need to set up a remote connection to a network or an ISP, and a connection to your e-mail server. For more information, see "Getting Connected" on page 99.
When you connect to the e-mail server:
- New messages are downloaded to the device Inbox folder.
- Messages in the device Outbox folder are sent.
- Messages that have been deleted on the e-mail server are removed from the device Inbox folder.
Messages that you receive directly from an e-mail server are linked to your e-mail server rather than to your computer. When you delete a message on your device, it is also deleted from the e-mail server the next time you connect depending on the settings you selected in ActiveSync.
When you are working online, you read and respond to messages while connected to the e-mail server. Messages are sent as soon as you tap Send, which saves space on your device.
After you have downloaded new message headers or partial messages, you can disconnect from the e-mail server and then decide which messages to download completely. The next time you connect, Inbox downloads the messages you have marked for retrieval and sends the messages you have composed.
Using the Message List
Messages you receive are displayed in the message list. By default, the most recently received messages are displayed first in the list.
When you receive a message, tap to open it. Unread messages are displayed in bold.
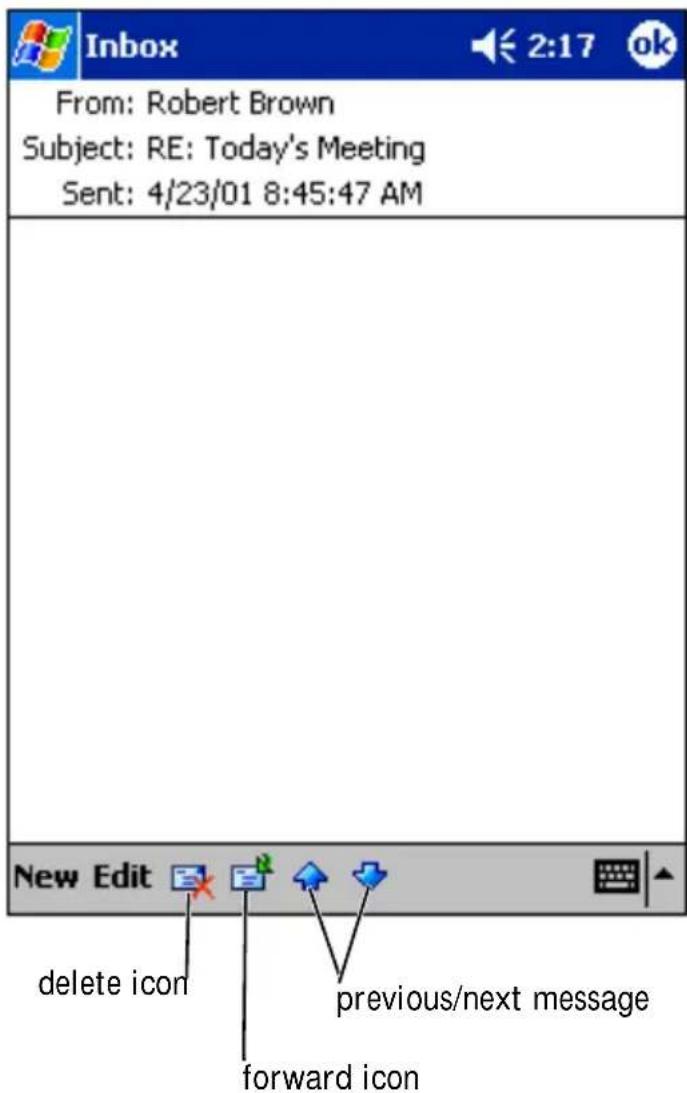
When you connect to your e-mail server or synchronize with your computer, you will receive by default:
- Messages from the last 5 days
• The first 100 lines of each new message - File attachments of less than 100 KB in size
The original messages remain on the e-mail server or your computer. You can mark the messages that you want to retrieve in full during your next synchronization or e-mail server connection. In the message list, tap and hold the message that you want to retrieve. On the pop-up menu, tap
Mark for Download. The icons in the Inbox message list indicate message status.
You specify your downloading preferences when you set up the service or select your synchronization options. You can change the settings at any time:
- Change options for Inbox synchronization using ActiveSync options. For more information, see ActiveSync Help.
- Change options for direct e-mail server connections in Inbox on your device. Tap Tools and tap Options. On the Service tab, tap the service that you want to change. Tap and hold the service and select Delete to remove a service.
Composing Messages
To compose a message:
1 Tap the Start button and tap Inbox.
2 Tap New.
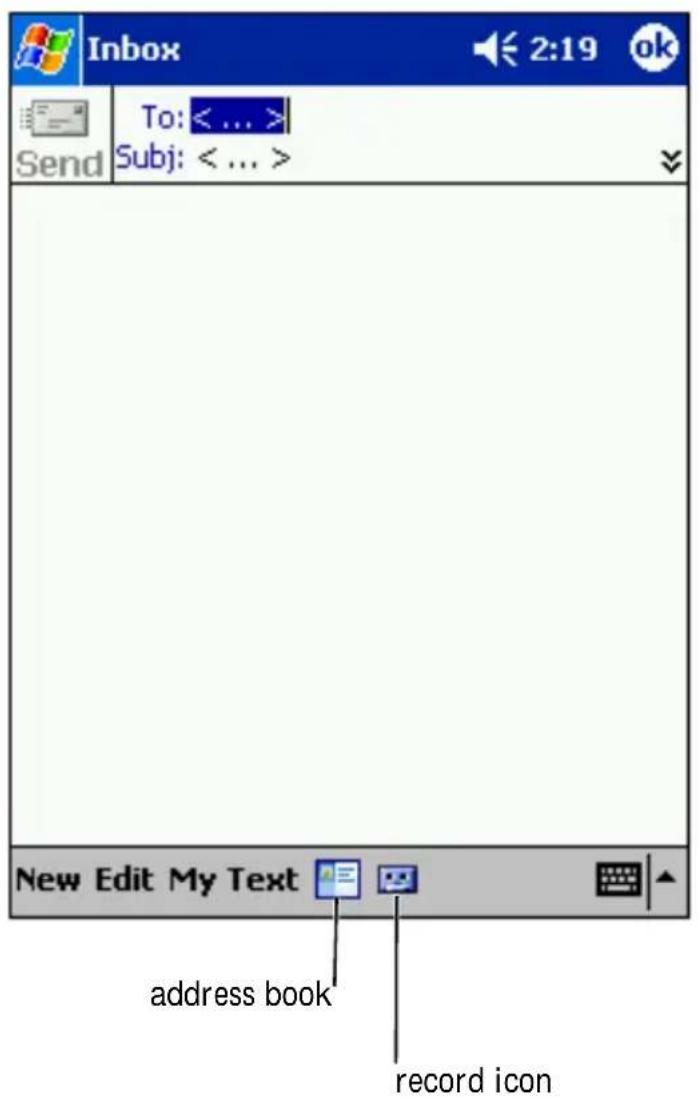
3 In the To field, enter an e-mail or SMS address of one or more recipients, separating them with a semicolon. Or tap the Address Book icon to select names from the contact list.

NOTE: All e-mail addresses entered in the e-mail fields in Contacts appear in the Address Book.
4 Compose your message. To enter preset or frequently used messages, tap My Text and select a message.
5 Tap Send when you have finished the message.
If you are working offline, the message is moved to the Outbox folder and will be sent the next time you connect.
If you are sending an SMS message and want to know if it was received, tap Edit→Options, and then select Request SMS text message delivery notification before sending the message.
Managing E-Mail Messages and Folders
By default, messages are displayed in one of five folders for each service you have created: Inbox, Deleted Items, Drafts, Outbox, or Sent Items. The Deleted Items folder contains messages that have been deleted on the device. The behavior of the Deleted Items and Sent Items folders depends on the options you have selected. To change the options, tap Tools in the message list and tap Options. On the Message tab, select your options.
To create a new folder, tap Tools, and tap Manage Folders. To move a message to another folder, tap and hold the message in the message list and tap Move to on the pop-up menu.
Folder Behavior With a Direct Connection to an E-Mail Server
The behavior of the folders you create depends on whether you use ActiveSync, SMS, POP3, or IMAP4.
-
If you use ActiveSync, e-mail messages in the Inbox folder in Outlook are automatically synchronized with your device. You can select to synchronize additional folders by designating them for ActiveSync.
The folders you create and the messages you move are then mirrored on the server. For example, if you move messages from the Inbox folder to a folder named Family, and you have designated Family for synchronization, the server creates a copy of the Family folder and copies the messages into that folder. You can then read the messages while away from your computer.
• If you use SMS, e-mail messages are stored in the Inbox folder. -
If you use POP3 and you move e-mail messages to a folder you created, the link is broken between the messages on the device and their copies on the e-mail server. The next time you connect, the e-mail server will detect that the messages are missing from the device Inbox and delete them from the server. This prevents you from having duplicate copies of a message. However, you will no longer have access to messages that you move to folders created from anywhere except the device.
- If you use IMAP4, the folders you create and the e-mail messages you move are mirrored on the server. Therefore, messages are available to you any time you connect to your e-mail server, whether it is from your device or computer. This synchronization of folders occurs whenever you connect to the server, create new folders, or rename/delete folders when connected.
Notifications
You can set your device to remind you when you have something to do. For example, if you have set up an appointment in Calendar, a task with a due date in Tasks, or an alarm in Clock, you are notified in one of the following ways:
- A message box appears on the screen.
- A sound, which you can specify, is played.
- A light flashes on your device.
To configure the reminders and sounds for your device, tap the Start button and tap Settings. In the Personal tab, tap Sounds & Notifications. The options you select apply for all programs on your device.
SECTION 7
Adding and Removing Programs
Adding Programs Using Microsoft ^® ActiveSync ^®
Downloading Programs From the Internet
Adding a Program to the Start Menu
Removing Programs
Programs that were already installed when you received your device are stored in ROM. You cannot remove these programs, and you never accidentally lose ROM contents. ROM programs can be updated using installation programs with the *.xip extension. You can save data to either ROM or RAM.
You can install any program created for your device as long as your device has sufficient memory. The most popular place to find software for your device is on the Microsoft Pocket PC website:
www.microsoft.com/mobile/pocketpc.
Adding Programs Using Microsoft® ActiveSync®
You need to install the appropriate software for your device on your computer before installing software on your device. See "Using Microsoft® ActiveSync®" on page 53 for more information.
1 Determine your device and processor type so that you know which version of the software to install:
a Tap the Start button and tap Settings.
b On the System tab, tap About.
c From the Version tab, record the processor information.
2 Download the software to your computer (or insert the CD or floppy disk that contains the software into your computer). You may see a single *.zip, *.exe, or *.zip file, a Setup.exe file, or several versions of files for different device types and processors. Ensure that you select the program designed for the Pocket PC and your device processor type.
3 Read any installation instructions, readme files, or documentation that comes with the program. Many programs provide special installation instructions.
4 Connect your device to your computer.
5 Double-click the *.exe file.
If the file is an installer file, the installation wizard will begin. Follow the directions on the screen. Once the software has been installed on your computer, the installer will automatically transfer the software to your device.
If the file is not an installer file, you will receive an error message stating that the program is valid but that it is designed for a different type of computer. You will need to move this file to your device. If you cannot find any installation instructions for the program in the readme file or documentation, use ActiveSync Explore to copy the program file to the Program Files folder on your device. For more information on copying files using ActiveSync, see ActiveSync Help.
To open a program after the installation is complete, tap the Start button, tap Programs, and then tap the program icon.
Downloading Programs From the Internet
1 Determine your device and processor type so that you know which version of the software to install:
a Tap the Start button and tap Settings.
b On the System tab, tap About.
c From the Version tab, record the processor information.
2 Using Pocket Internet Explorer, download the program to your device. You may see a single *.zip, *.exe or *.zip file, a Setup.exe file, or several versions of files for different device types and processors. Ensure that you select the program designed for the Pocket PC and your device processor type.
3 Read any installation instructions, readme files, or documentation that comes with the program. Many programs provide special installation instructions.
4 Tap the file, such as a *.xip or *.exe file. The installation wizard will begin. Follow the directions on the screen.
Adding a Program to the Start Menu
1 Tap the Start button and tap Settings.
2 Tap Menus, tap the Start Menu tab, and then tap the check box for the program.
If the program is not listed, you can either use File Explorer on the device to move the program to the Start Menu folder, or use ActiveSync on the computer to create a shortcut to the program and place the shortcut in the Start Menu folder.
Using File Explorer on the Device
1 Tap the Start button, tap Programs, and tap File Explorer.
2 Locate the program. Tap the folder list (labeled My Documents by default) and then tap My Device to see a list of all folders on the device.
3 Tap and hold the program name and tap Cut on the pop-up menu.
4 Open the Start Menu folder located in the Windows ^® folder.
5 Tap and hold a blank area of the window, and tap Paste on the pop-up menu.
The program now appears on the Start menu. For more information on using File Explorer, see "Finding and Organizing Information" on page 35.
Using ActiveSync on the Computer
Use Explorer in ActiveSync to explore your device files and locate the program. Right-click the program and click Create Shortcut. Move the shortcut to the Start Menu folder in the Windows folder. The shortcut now appears on the Start menu. For more information, see ActiveSync Help.
Removing Programs
1 Tap the Start button and tap Settings.
2 Tap the System tab and tap Remove Programs.
If the program does not appear in the list of installed programs, use File Explorer on your device to locate the program.
3 Tap and hold the name of the program, and tap Delete on the pop-up menu.
SECTION 8
Using Companion Programs
Microsoft® Pocket Word
Pocket Excel
MSN Messenger
Windows® Media Player for Pocket PC
Microsoft Reader
The companion programs include Microsoft Pocket Word, Microsoft Pocket Excel, Microsoft Money, Windows Media Player for Pocket PC, and Microsoft Reader.
To switch to a companion program on your device, tap the Start button, tap Programs, and then tap the program name.
Microsoft® Pocket Word
Pocket Word works with Microsoft Word on your computer to give you easy access to copies of your documents. You can create new documents on your device, or you can copy documents from your computer to your device. Synchronize documents between your computer and your device so that you have the most up-to-date content in both locations.
Use Pocket Word to create documents, such as letters, meeting minutes, and travel reports. To create a new file:
1 Tap the Start button, tap Programs, and then tap Pocket Word.
2 Tap New.
A blank document appears. Or, if you selected a template for new documents in the Options dialog box, the template appears with appropriate text and formatting already provided.
![Pocket Word 10:22 ok F B I U | 123 1 2 3 4 5 6 7 8 9 0 - = Tab q w e r t y u i o p [ ] CAP a s d f g h j k l ; ' Shift z x c v b n m , . / Ctl áü ` \ New Edit View Tools ↑↓ show/hide formatting toolbar](/content/2026/05/959461/images/6c79b37041601c50b531eb2792f7c53abf0751e2cbe5fb2a0d0b98ca9e534d6a.jpg)
You can open only one document at a time. If you open a second document, you are asked to save the first one. You can create, save, or edit a document in a variety of formats, including Word (.doc), Pocket Word (.psw), Rich Text Format (.rtf), and Plain Text (.txt).
Pocket Word contains a list of the files stored on your device. Tap a file in the list to open it. To delete, make copies of, or send files, tap and hold a file in the list. Then select the appropriate action in the pop-up menu.
You can enter information in Pocket Word in one of four modes: typing, writing, drawing, or recording. These modes are displayed on the View menu. Each mode has its own toolbar, which you can show and hide by tapping the Show/Hide Toolbar icon on the command bar.
To change the zoom magnification, tap View, tap Zoom, and then select the percentage that you want. Select a higher percentage to enter text and a lower percentage to see more of your document.
If you are opening a Word document created on a computer, select Wrap to Window on the View menu so that you can see the entire document.
Pocket Excel
Pocket Excel works with Microsoft Excel on your computer to give you easy access to copies of your workbooks. You can create new workbooks on your device, or you can copy workbooks from your computer to your device. Synchronize workbooks between your computer and your device so that you have the most up-to-date content in both locations.
Use Pocket Excel to create workbooks, such as expense reports and mileage logs. To create a new file:
1 Tap the Start button, tap Programs, and then tap Pocket Excel.
2 Tap New.
A blank workbook appears. Or, if you selected a template for new workbooks in the Options dialog box, the template appears with appropriate text and formatting already provided.
![Pocket Excel 10:55 ok A2 345 A B C 1 123 2 345 3 4 5 6 Ready Sheet1 Sum=345 F_F ≡≡≡ Σ $ , .00 123 1 2 3 4 5 6 7 8 9 0 - = Tab qw e r t y u i o p [ ] CAP a s d f g h j k l ; ' Shift z x c v b n m , . / Ctl áü ` \_ New Edit View Format Tools show/hide formatting toolbar](/content/2026/05/959461/images/b17bbbf3077ae123aa7440d585bdd50de171ff70a6cb198a81997421912bffef.jpg)
You can open only one workbook at a time. If you open a second workbook, you are asked to save the first one. You can create, save, or edit a workbook in a variety of formats, including Pocket Excel (.pxl) and Excel (.xls).
Pocket Excel contains a list of the files stored on your device. Tap a file in the list to open it. To delete, make copies of, or send files, tap and hold a file in the list. Then select the appropriate action from the pop-up menu.
Pocket Excel provides fundamental spreadsheet tools, such as formulas, functions, sorting, and filtering. To display the toolbar, tap View and tap Toolbar.
If your workbook contains sensitive information, you can protect it with a password. To set a password, open the workbook, tap Edit, and then tap Password. Every time you open the workbook, you need to enter the password, so choose one that is easy for you to remember but difficult for others to guess.
Tips for Working in Pocket Excel
Use the following tips when working in large worksheets in Pocket Excel:
- Tap View and tap Full Screen to see as much of your worksheet as possible. To exit full-screen mode, tap Restore.
- Show and hide window elements. Tap View and then tap the elements that you want to show or hide.
- Freeze panes on a worksheet. First select the cell where you want to freeze panes. Tap View and tap Freeze Panes. You might want to freeze the top and leftmost panes in a worksheet to keep row and column labels visible as you scroll through a sheet.
- Split panes to view different areas of a large worksheet. Tap View and tap Split. Drag the split bar to where you want it. To remove the split, tap View and tap Remove Split.
- Show and hide rows and columns. To hide a row or column, select a cell in the row or column you want to hide. Tap Format, tap Row or Column, and then tap Hide. To show a hidden row or column, tap Tools, tap Go To, and then type a reference that is in the hidden row or column. Then tap Format, tap Row or Column, and then tap Unhide.
For more information on using Pocket Excel, tap the Start button and tap Help.
MSN Messenger
With the MSN Messenger instant message program, you can:
• See who is online.
- Send and receive instant messages.
- Have instant message conversations with groups of contacts.
To use MSN Messenger, you must have a Microsoft Passport account or a Microsoft Exchange e-mail account. You must have a Passport to use MSN Messenger Service. If you have a Hotmail or MSN account, you already have a Passport. Once you have obtained either a Microsoft Passport or a Microsoft Exchange account, you are ready to set up your account.

NOTE: Sign up for a Microsoft Passport account at www.passport.com. Get a free Microsoft Hotmail e-mail address at www.hotmail.com.
To switch to MSN Messenger, tap the Start button, tap Programs, and then tap MSN Messenger.
Setting Up
Before you can connect, you must enter Passport or Exchange account information.
To set up an account and sign in:
1 Tap the Start button, tap Programs, and tap MSN Messenger.
2 Tap Tools and tap Options.
3 On the Accounts tab, enter your Passport or Exchange account information.
4 To sign in, tap the sign-in screen and enter your e-mail address and password.
Working With Contacts
The MSN Messenger window shows all of your messenger contacts at a glance, divided into Online and Not Online categories. From this view, while connected, you can chat, send an e-mail, block the contact from chatting with you, or delete contacts from your list using the pop-up menu.

NOTE: If you already use MSN Messenger on your computer, your contacts will show up on your device without having to be added.
To see others online without being seen, tap Tools, tap My Status, and tap Appear Offline.
If you block a contact, you will appear offline but remain on the blocked contact's list. To unblock a contact, tap and hold the contact, and then tap Unblock on the pop-up menu.
Chatting With Contacts
- Tap a contact name to open a chat window. Enter your message in the text entry area at the bottom of the screen or tap My Text to enter a preset message, and then tap Send.
- To invite another contact to a multiuser chat, tap Tools, tap Invite, and then tap the contact you want to invite.
- To switch back to the main window without closing a chat, tap the Contacts icon. To revert back to your chat window, tap Chats, and select the person with whom you were chatting.
- To know if the contact you are chatting with is responding, look for the message under the text entry area.
For more information on using MSN Messenger, tap the Start button and tap Help.
Windows ^® Media Player for Pocket PC
Use Windows Media Player for Pocket PC to play digital audio and video files that are stored on your device or on a network. To switch to Media Player for Pocket PC, tap the Start button, tap Programs, and then tap Windows Media.
Use Windows Media Player on your computer to copy digital audio and video files to your Pocket PC. You can play Windows Media and MP3 files on your Pocket PC.
For more information about using Windows Media Player for Pocket PC, tap the Start button and tap Help.
Microsoft Reader
Use Reader to read eBooks on your device. Download books to your computer from your favorite eBook Web site. Then use ActiveSync to copy the book files to your activated device. The books appear in the Reader Library. Tap the name of a book in the list to open it.
With Reader, you can:
- Page through the book by using the up/down control on your device or by tapping the page number on each page.
- Annotate the book with highlighting, bookmarks, notes, and drawings.
- Search for text and look up definitions for words.
The Guidebook contains all the information you need to use the software. To open the Guidebook, tap Help on the Reader command bar. Or, on a book page, tap and hold the book title, and then tap Help on the pop-up menu.
To switch to Microsoft Reader, tap the Start button, tap Programs, and then tap Microsoft Reader.
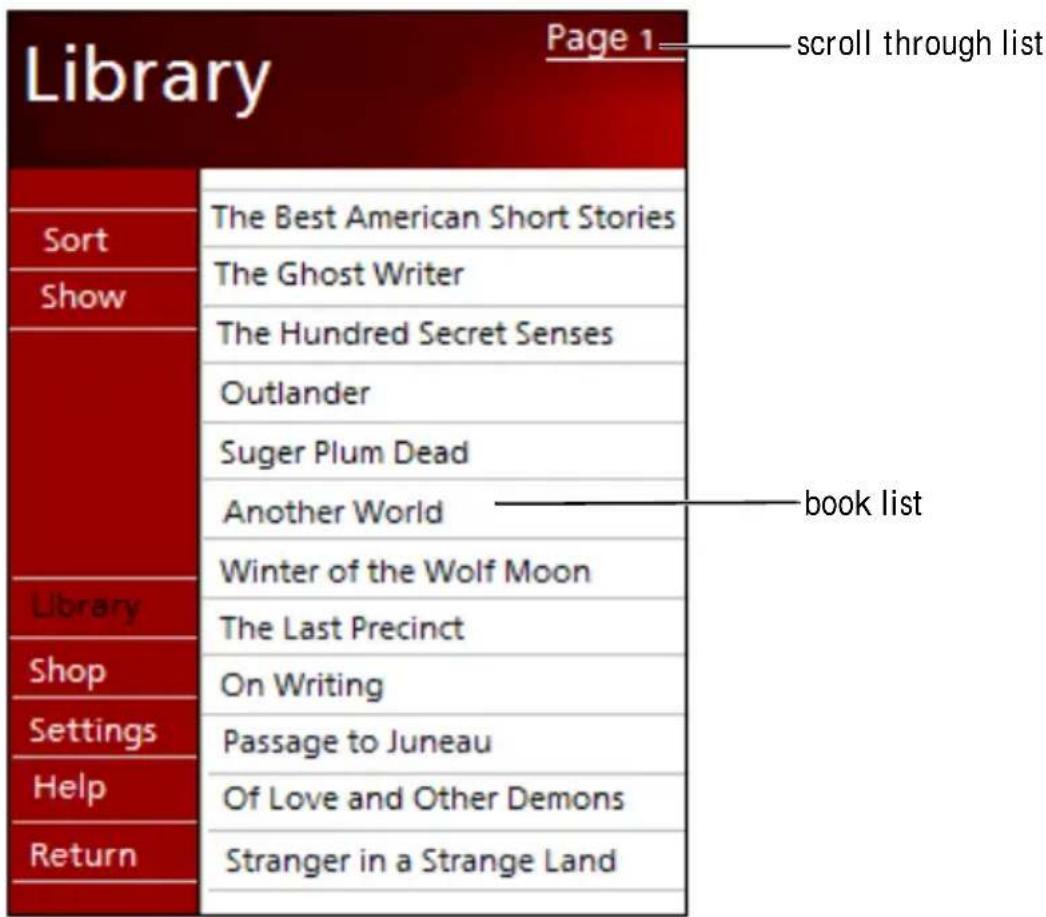
Using the Library
The Library displays a list of all books stored on your device or storage card. To open the Library:
- On the Reader command bar, tap Library.
- On a book page, tap the book title, and then tap Library on the pop-up menu.
Reading a Book
Each book consists of a cover page, an optional table of contents, and the pages of the book. Navigation options are listed at the bottom of the cover page.
The first time you open a book, you might want to go to the first page or to the table of contents, if there is one. Subsequently, whenever you open the book, you will be automatically taken to the last page read.
In addition to text, each book page includes a page number and book title. You can also page through a book by using the up/down control on your device.
Using Reader Features
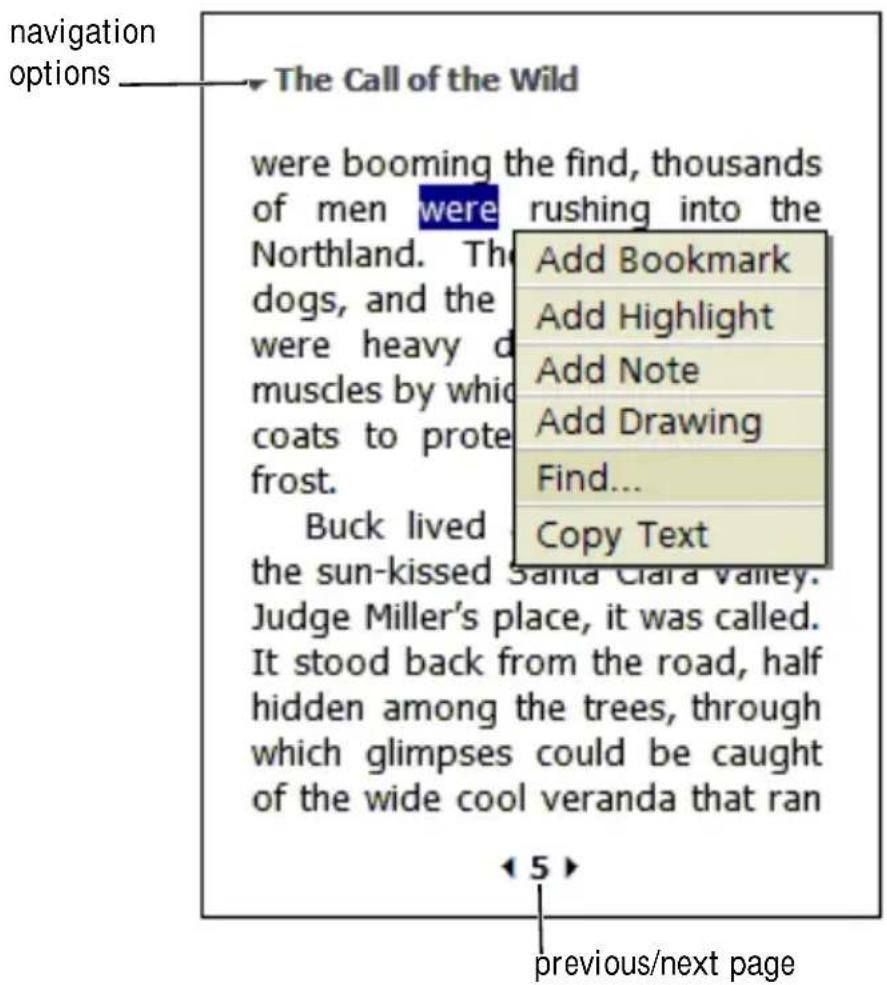
Reading a book electronically gives you several options not available with paper books. The options are available from any book page.
Select text by dragging across the text on the page. Then tap an option on the pop-up menu:
- Search for Text — Tap Find on the pop-up menu to find text in a book. Enter the word that you want to search for and tap a Find option. Reader highlights text found on the page. To close Find, tap outside the box. To return to your original page, tap the title and tap Return on the pop-up menu.
- Copy Text — You can copy text from books that support this feature into any program that accepts text. On a book page, select the text you want to copy. Then tap Copy Text on the pop-up menu. The text can be pasted into the program of your choice.
- Bookmarks — When you add a bookmark to a book, a color-coded bookmark icon appears in the right margin. You can add multiple bookmarks to a book. From anywhere in the book, tap the bookmark icon to go to the bookmarked page.
- Highlights — When you highlight text, it appears with a colored background.
- Notes — When you attach a note to text, you enter the text in a note pad that appears on top of the book page. A note icon will display in the left margin. To show or hide the note, tap the icon.
- Drawings — When you add a drawing, a drawing icon appears in the lower-left corner of the page, and drawing tools appear across the bottom of the page. Draw by dragging your stylus.
- To see a list of a book's annotations, including bookmarks, highlights, text notes, and drawings, tap Annotations Index on the book cover page. You can tap an entry in the list to go to the annotated page.
Removing a Book
When you finish reading a book, you can delete it to conserve space on your device. If a copy of the book is stored on your computer, you can download it again at any time.
To remove a book from your device, tap and hold the title in the Library list, and tap Delete on the pop-up menu.
SECTION 9
Using Microsoft® Pocket Internet Explorer
Mobile Favorites
Using AvantGo Channels
Browsing Mobile Favorites and the Web
Use Pocket Internet Explorer to view web or WAP pages:
- During synchronization with your computer, download your favorite links and mobile favorites that are stored in the Mobile Favorites subfolder in Internet Explorer on your computer.
- Connect to an Internet service provider (ISP) or network and browse the web. For more information on connecting to the Internet, see "Getting Connected" on page 99.
When the device is connected to an ISP or network, you can also download files and programs from the Internet or intranet.
To switch to Pocket Internet Explorer, tap the Start button and tap Internet Explorer.
Mobile Favorites
If you are using Microsoft Internet Explorer 5.0 or later on your computer, you can download mobile favorites to your device. Synchronizing mobile favorites downloads web content to your device so that you can view pages while you are disconnected from your ISP and computer. Use the Internet Explorer plug-in installed with Microsoft ActiveSync ^® to create mobile favorites quickly.
To create a mobile favorite on your computer and download it to your device:
1 On your computer, open Internet Explorer and click Tools→ Create Mobile Favorite.
2 To change the link name, enter a new name in the Name box.
3 Specify an update schedule next to Update (optional).
4 Click OK. Internet Explorer downloads the latest version of the page to your computer.
5 In Internet Explorer on the computer, right-click the mobile favorite and click Properties.
6 On the Download tab, specify the number of levels deep you want to download. To conserve device memory, go only one level deep.
7 Synchronize your device and computer. Mobile favorites that are stored in the Mobile Favorites folder in Internet Explorer are downloaded to your device.
If you did not specify an update schedule in step 3, you will need to manually download content to keep the information updated on your computer and device. Before synchronizing with your device, click Tools in Internet Explorer on your computer and click Synchronize. The date in the Last Updated column was the last time content was downloaded to the computer. You can manually download content, if necessary.

NOTE: You can add an icon to the Internet Explorer toolbar for creating mobile favorites. In Internet Explorer on your computer, click View→Toolbars, and then click Customize.
Conserving Memory
Mobile favorites take up storage memory on your device. To minimize the amount of memory used:
- Turn off pictures and sounds or stop some mobile favorites from being downloaded to the device in the Favorites settings in the ActiveSync options. For more information, see ActiveSync Help.
- Limit the number of downloaded linked pages. In Internet Explorer on the computer, right-click the mobile favorite you want to change and click Properties. On the Download tab, specify 0 or 1 for the number of linked pages you want to download.
Mobile Favorites Folder
Only items stored in the Mobile Favorites subfolder (in the Favorites folder) in Internet Explorer on your computer are synchronized with your device. The folder was created automatically when you installed ActiveSync.
Favorite Links
During synchronization, the list of favorites in the Mobile Favorites folder on your computer is synchronized with Pocket Internet Explorer on your device. The computer and the device are updated with changes made to either list each time you synchronize. Unless you mark the favorite link as a mobile favorite, only the link will be downloaded to your device—you will need to connect to your ISP or network to view the content. For more information on synchronization, see ActiveSync Help on your computer.
Using AvantGo Channels
AvantGo is a free interactive service that gives you access to personalized content and thousands of popular websites. You subscribe to AvantGo channels directly from your device. Then synchronize your device and computer, or connect to the Internet to download the content. For more information, visit the AvantGo website.
To sign up for AvantGo:
1 In ActiveSync options on your computer, turn on synchronization for the AvantGo information type.
2 In Pocket Internet Explorer on your device, tap Favorites to display your list of favorites.
3 Tap the AvantGo Channels link.
4 Tap Activate.
5 Follow the directions on the screen.
You will need to synchronize your device with your computer and then tap the My Channels to complete the AvantGo setup.
When synchronization is complete, tap the AvantGo Channels link in your list of favorites to see a few of the most popular channels. To add or remove channels, tap the Add or Remove link.
Browsing Mobile Favorites and the Web
You can use Pocket Internet Explorer to browse mobile favorites and channels that you have downloaded to your device without connecting to the Internet. You can also connect to the Internet through an ISP or a network connection and browse the web.
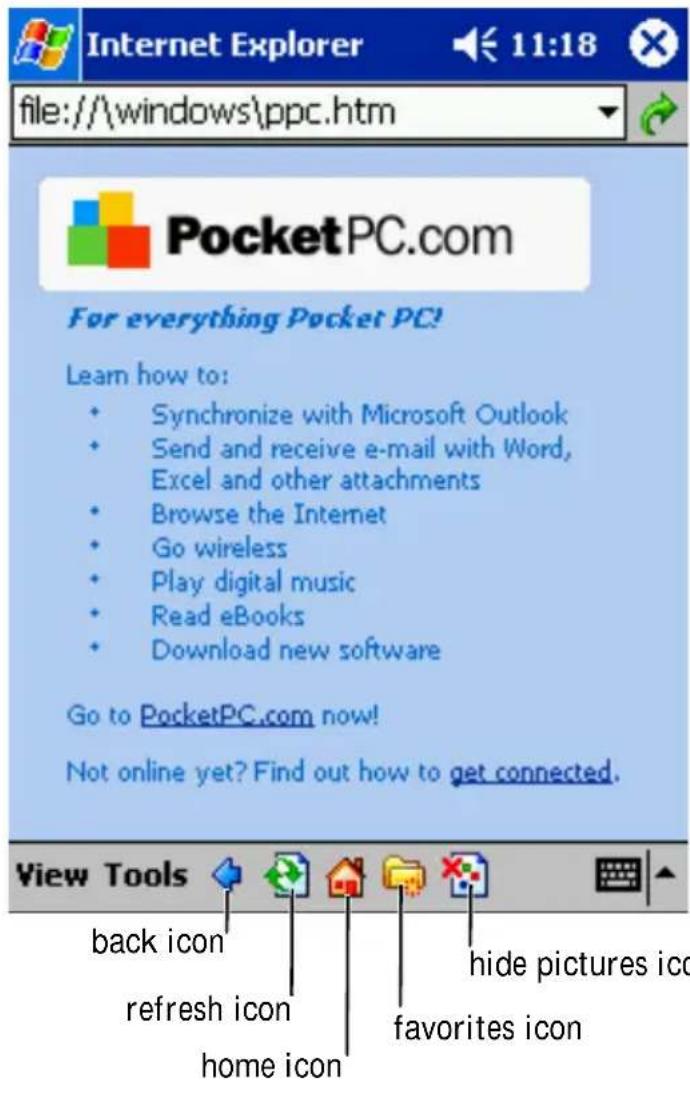
To view mobile favorites and channels:
1 Tap the favorites icon to display your list of favorites.
2 Tap the page you want to view.
The page that was downloaded the last time you synchronized with your computer appears. If the page is not on your device, the favorite is dimmed. You will need to synchronize with your computer again to download the page to your device, or connect to the Internet to view the page.
To browse the Internet, set up a connection to your ISP or corporate network using Connections, as described in "Getting Connected" on page 99.

NOTE: To add a favorite link, go to the page that you want to add, tap and hold the page, and then tap Add to Favorites.
To connect and browse the Internet:
- Tap the favorites icon and tap the favorite you want to view.
- Tap View and tap Address Bar. In the address bar that appears at the top of the screen, enter the web address that you want to visit and tap Go. Tap the arrow to select previously entered addresses.
SECTION 10
Getting Connected
Using Infrared
Connecting to the Internet
Connecting to Work
Ending a Connection
Connecting Directly to an E-Mail Server
Getting Help on Connecting
You can use your device to exchange information with other mobile devices or with a computer, a network, or the Internet. You can use any of the following connection options:
- Use the infrared (IR) port on your device to send and receive files between two devices. See the following section, "Using Infrared," for more information.
- Connect to your Internet service provider (ISP). Once you are connected, you can send and receive e-mail messages by using Inbox, and view web or WAP pages by using Microsoft® Pocket Internet Explorer. The communication software for creating an ISP connection is already installed on your device. Your service provider will provide software needed to install other services, such as paging and fax services. See "Connecting to the Internet" on page 101 for more information.
- Connect to the network at your company or organization where you work. Once you are connected, you can send and receive e-mail messages by using Inbox, view web or WAP pages by using Pocket Internet Explorer, and synchronize with your computer. See "Connecting to Work" on page 104 for more information.
- Connect to your computer to synchronize remotely. Once you are connected, you can synchronize information such as your Pocket Outlook information. See Microsoft ActiveSync® Help on your computer or Connections Help on the device for more information.
Using Infrared
Using infrared, you can send and receive information, such as contacts and appointments, between two devices.
To send information:
1 Switch to the program where you created the item you want to send and locate the item in the list.
2 Align the infrared sensors so that they are unobstructed and within a close range.
3 Tap and hold the item, and tap Beam Item on the pop-up menu.
You can also send items (excluding folders) from File Explorer. Tap and hold the item you want to send, and tap Beam File on the pop-up menu.
Connecting to the Internet
You can connect to your ISP and use the connection to send and receive e-mail messages and view web or WAP pages. You can connect to the Internet using the following methods:
- Create a modem connection. See "Creating a Modem Connection to an ISP" on page 101 for more information.
- Use an Ethernet card and a net tap to connect to the network. See "Creating an Ethernet Connection to an ISP" on page 103 for more information.
Creating a Modem Connection to an ISP
1 Obtain the following information from your ISP:
– ISP dial-up access telephone number
- Username and password
- TCP/IP settings
Some ISPs require information in front of the username, such as MSN/username.
2 Install a modem card, or use a null modem cable and appropriate adapters to connect an external modem to your device through the serial port.
3 Tap the Start button and tap Settings. In the Connections tab, tap Connections. Under The Internet, select Internet Settings from the drop-down menu, and tap Modify.
4 On the Modem tab, tap New.
5 Enter a name for the connection, such as ISP Connection.
6 From the Select a modem list, select your modem type.
If your modem type does not appear, try reinserting the modem card. If you are using an external modem that is connected to your device with a cable, select Hayes Compatible on COM1.

NOTE: You should not need to change any settings in Advanced. Most ISPs now use a dynamically assigned address.
7 If the ISP you are connecting to does not use a dynamically assigned address, tap Advanced, tap the TCP/IP tab, and then enter the address.
8 Tap OK and tap Next.
9 Enter the access phone number and tap Next.
10 Select other appropriate options and tap Finish.
11 On the Dialing Locations tab, specify your current location and phone type (most phone lines are tone). The settings will apply to all connections you create.
When you open Inbox, Pocket Internet Explorer, or MSN Messenger, your device automatically connects. Once you are connected, you can:
- Send and receive e-mail messages using Inbox. Before you can use Inbox, you need to provide the information Inbox needs to communicate with the e-mail server. See "Connecting Directly to an E-Mail Server" on page 107 for more information.
- Visit web and WAP pages using Pocket Internet Explorer. For more information, see "Using Microsoft® Pocket Internet Explorer" on page 93.
- Send and receive instant messages with MSN Messenger. For more information, see "MSN Messenger" on page 85.
Creating an Ethernet Connection to an ISP
You do not need to create a new connection on your device. Instead, you must purchase and configure an Ethernet card that is compatible with your device.
1 Obtain the following information from your ISP:
- U s e r n a m e
- P a s s w o r d
- Domain name
2 Insert the Ethernet card into your device.
For instructions on inserting and using the Ethernet card, see the documentation that came with the card.
The first time you insert the card, Network Settings appears automatically so that you can configure the Ethernet card. Most networks use DHCP, so you should not have to change the settings unless your network administrator instructs you to do so.

NOTE: If Network Settings does not appear or if you want to change the settings later, tap the Start button and tap Settings. On the Connections tab, tap Network, tap the adapter that you want to change, and then tap Properties.
3 Tap OK.
4 Connect the Ethernet card to the network using a network cable. For more information, see the documentation that came with your card.
5 Tap the Start button, tap Settings, tap the Connections tab, and then tap Connections.
6 From the My network card connects to list, select Internet.
When you open Inbox, Pocket Internet Explorer, or MSN Messenger, your device automatically connects.
Connecting to Work
If you have access to a network at work, you can send e-mail messages, view intranet pages, synchronize your device, and access the Internet (if applicable). You can connect to work using one of the following methods:
- Create a modem connection by using a RAS account. Before you can create this modem connection, your network administrator needs to set up a RAS account for you. For more information, see "Creating a Modem Connection to a Network" on page 104. Your network administrator may also give you VPN settings.
- Use an Ethernet card and a net tap to connect to the network. For more information, see "Creating an Ethernet Connection to a Network" on page 106.
Creating a Modem Connection to a Network
1 Obtain the following information from your network administrator:
– Dial-up access telephone number
- U s e r n a m e
- Password
- D o m a i n n a m e
- TCP/IP settings
2 Install a modem card.
3 Tap the Start button and tap Settings.
4 On the Connections tab, tap Connections. Under The Internet, select Internet Settings and tap Modify.
5 On the Modem tab, tap New.
6 Enter a name for the connection, such as Company Connection.
7 From the Select a modem list, select your modem type.
If your modem type does not appear, try reinserting the modem card. If you are using an external modem that is connected to your device with a cable, select Hayes Compatible on COM1.

NOTE: You should not need to change any settings in Advanced. Most servers now use a dynamically assigned address.
8 If the server you are connecting to does not use a dynamically assigned address, tap Advanced, tap the TCP/IP tab, and then enter the address.
9 Enter the access phone number and tap Next.
10 Select other appropriate options and tap Finish.
11 In the Dialing Locations tab, specify your current location and phone type (most phone lines are tone). The settings will apply to all connections you create.
When you open Inbox, Pocket Internet Explorer, or MSN Messenger, your device automatically connects. Once connected, you can:
- Send and receive e-mail messages using Inbox. Before you can use Inbox, you need to provide the information Inbox needs to communicate with the e-mail server. See "Connecting Directly to an E-Mail Server" on page 107 for more information.
- Visit Internet or intranet web and WAP pages using Pocket Internet Explorer. For more information, see "Using Microsoft® Pocket Internet Explorer" on page 93.
- Send and receive instant messages with MSN Messenger. For more information, see "MSN Messenger" on page 85.
- Synchronize. For more information, see ActiveSync Help on the computer.
Creating an Ethernet Connection to a Network
You do not need to create a new connection on your device. Instead, you must purchase and configure an Ethernet card that is compatible with your device.
1 Get the following information from your network administrator:
- U s e r n a m e
- Password
- D o m a i n n a m e
2 Insert the Ethernet card into your device.
For instructions on inserting and using the Ethernet card, see the documentation that came with the card.
The first time you insert the card, Network Settings appears automatically so that you can configure the Ethernet card. Most networks use DHCP, so you should not have to change the settings unless your network administrator instructs you to do so.

NOTE: If Network Settings does not appear or if you want to change the settings later, tap the Start button and tap Settings. On the Connections tab, tap Network, tap the adapter that you want to change, and then tap Properties.
3 Tap OK.
4 Connect the Ethernet card to the network by using a network cable. For more information, see the documentation that came with your card.
5 Tap the Start button and tap Settings.
6 Tap the Connections tab and tap Connections. On the My network card connects to list, select Work.
7 If you want to synchronize your device:
a Tap the Start button and tap ActiveSync.
b Tap Tools and tap Options.
c On the PC tab, select Include PC when synchronizing remotely and connect to, and select your computer name.
To synchronize with a computer, you must have a partnership set up with the computer through ActiveSync and set up ActiveSync to allow remote connections. Other restrictions apply. For more information on synchronizing remotely, see ActiveSync Help on your computer.
When you open Inbox, Pocket Internet Explorer, or MSN Messenger, your device automatically connects.
Ending a Connection
To disconnect:
- When connected through dial-up or VPN, tap the Connection icon on your navigation bar and tap End.
- When connected through a cable or cradle, detach your device from the cable or cradle.
- When connected through the infrared sensor, move the device away from the computer.
- When connected through a network (Ethernet) card, remove the card from your device.
Connecting Directly to an E-Mail Server
You can set up a connection to an e-mail server so that you can send and receive e-mail messages by using a modem or network connection and Inbox on your device.

NOTE: The ISP or network must use a POP3 or IMAP4 e-mail server and an SMTP gateway.
You can use multiple e-mail services to receive your messages. For each e-mail service you intend to use, you must first set up and name the e-mail service. If you use the same service to connect to different mailboxes, set up and name each mailbox connection.
To set up an e-mail service:
1 In Inbox on your device, tap Services and tap New Service.
2 Follow the directions in the New Service wizard.
For more information, tap the Start button and tap Help.
To connect to your e-mail server, tap Services and tap Connect. For more information on using the Inbox program, see "Inbox" on page 66.
Getting Help on Connecting
For more information on getting connected, see the following resources:
- "Inbox" on page 66.
• Online Help on the device. Tap the Start button and tap Help. Tap View, tap All Installed Help, and then tap Inbox or Connections.
• ActiveSync Help on your computer. In ActiveSync, click Help and click Microsoft ActiveSync Help.
• See www.microsoft.com/mobile/pocketpc for troubleshooting information.
11
SECTION 11
Appendix
Specifications
Regulatory Notices
Contacting Dell
Specifications
| System Information | |
| Processor Intel | ^ XScale ^TM processor at 400 or 300 MHz |
| Memory | |
| RAM 64- or 32-MB SDRAM | |
| ROM 48- or 32-MB Intel | ^ StrataFlash ^TM ROM |
| Operating System Microsoft | ^ Pocket PC 2002 Premium |
| Display | |
| Type TFT Color 16-bit, touch-sensitive | transflective display |
| Size 3.5 inches | |
| Resolution 240 x 320 at 65,536 colors | |
| Controls and Lights | |
| Navigation 5-way navigation button | |
| Scroll Dial up, down, action | |
| Buttons: four program buttons: Calendar, | Contacts, Inbox, Home |
| power on/off | |
| voice record button | |
| reset button | |
| Lights: synchronization/communication | |
| event notification | |
| charge status | |
| Expansion Slots | |
| CompactFlash one Type II CompactFlash card slot (3.3v) | |
| Secure Digital one Secure Digital card slot (3.3v) | |
| Ports and Connectors | |
| Infrared standard v1.2 (115 kbps) | |
| Power DC power in | |
| Cradle/synchronization connector 40-pin connector | |
| Audio stereo headphone connector | |
| Physical | |
| Dimensions: | |
| Length 128 mm (5.04 inches) | |
| Width 81.5 mm (3.21 inches) | |
| Height 18 mm (0.71 inch) | |
| Weight 196 g (0.43 lb) | |
| Audio | |
| Audio controller | AC-97 Codec chip; W M9705 sound chip |
| Stereo conversion | 16-bit stereo; 8.0, 11.025, 22.05 and 44.1KHz sample rate |
| Record | full duplex record and playback |
| Microphone/speaker | integrated |
| Headphone | stereo connector |
Power Supply
Battery type:
Main 1440-mAh Lithium-ion removable, rechargeable battery (standard) 3400-mAh Lithium-ion removable, rechargeable battery (optional)
Backup CR2032 lithium battery
AC adapter:
Supply voltage 100–240 VAC Frequency 50–60 Hz Current consumption 0.4 A Output voltage 5.4 VDC Output current 2.41 A
Environmental
Temperature range:
operating 0^ to 40^ ( 32^ to 104^ ) storage -20^ to 60^ ( -4^ to 140^ )
Thermal gradient:
operating 15°C (59°F) per hour maximum storage 20°C (68°F) per hour maximum
Relative humidity (maximum):
operating 10% to 90% non-condensing storage 5% to 95% non-condensing
Altitude (maximum):
operating 0 to 3048 m (0 to 10,000 ft) storage 0 to 12,190 m (0 to 40,000 ft)
Environmental (continued)
Maximum shock:
operating 200 G
storage 400 G
Maximum vibration:
operating 2.6 GRMS
storage 3.41 GRMS
Regulatory Notices
Electromagnetic Interference (EMI) is any signal or emission, radiated in free space or conducted along power or signal leads, that endangers the functioning of a radio navigation or other safety service or seriously degrades, obstructs, or repeatedly interrupts a licensed radio communications service. Radio communications services include but are not limited to AM/FM commercial broadcast, television, cellular services, radar, air-traffic control, pager, and Personal Communication Services (PCS). These licensed services, along with unintentional radiators such as digital devices, including computers, contribute to the electromagnetic environment.
Electromagnetic Compatibility (EMC) is the ability of items of electronic equipment to function properly together in the electronic environment. While this computer has been designed and determined to be compliant with regulatory agency limits for EMI, there is no guarantee that interference will not occur in a particular installation. If this equipment does cause interference with radio communications services, which can be determined by turning the equipment off and on, you are encouraged to try to correct the interference by one or more of the following measures:
- Reorient the receiving antenna.
- Relocate the computer with respect to the receiver.
- Move the computer away from the receiver.
- Plug the computer into a different outlet so that the computer and the receiver are on different branch circuits.
If necessary, consult a Dell Technical Support representative or an experienced radio/television technician for additional suggestions.
Dell™ computers are designed, tested, and classified for their intended electromagnetic environment. These electromagnetic environment classifications generally refer to the following harmonized definitions:
• Class A is typically for business or industrial environments.
• Class B is typically for residential environments.
Information Technology Equipment (ITE), including devices, expansion cards, printers, input/output (I/O) devices, monitors, and so on, that are integrated into or connected to the computer should match the electromagnetic environment classification of the computer.
A Notice About Shielded Signal Cables: Use only shielded cables for connecting devices to any Dell device to reduce the possibility of interference with radio communications services. Using shielded cables ensures that you maintain the appropriate EMC classification for the intended environment. For parallel printers, a cable is available from Dell. If you prefer, you can order a cable from Dell on the World Wide Web at accessories.us.dell.com/sna/category.asp?category_id=4117.
Most Dell computers are classified for Class B environments. However, the inclusion of certain options can change the rating of some configurations to Class A. To determine the electromagnetic classification for your computer or device, refer to the following sections specific for each regulatory agency. Each section provides country-specific EMC/EMI or product safety information.
FCC Notices (U.S. Only)
Most Dell computers are classified by the Federal Communications Commission (FCC) as Class B digital devices. To determine which classification applies to your computer, examine all FCC registration labels located on the bottom, side, or back panel of your computer, on card-mounting brackets, and on the cards themselves. If any one of the labels carries a Class A rating, your entire computer is considered to be a Class A digital device. If all labels carry an FCC Class B rating as distinguished by either an FCC ID number or the FCC logo, (A)your computer is considered to be a Class B digital device.
Once you have determined your computer's FCC classification, read the appropriate FCC notice. Note that FCC regulations provide that changes or modifications not expressly approved by Dell could void your authority to operate this equipment.
This device complies with Part 15 of the FCC Rules. Operation is subject to the following two conditions:
- This device may not cause harmful interference.
- This device must accept any interference received, including interference that may cause undesired operation.
Class A
This equipment has been tested and found to comply with the limits for a Class A digital device pursuant to Part 15 of the FCC Rules. These limits are designed to provide reasonable protection against harmful interference when the equipment is operated in a commercial environment. This equipment generates, uses, and can radiate radio frequency energy and, if not installed and used in accordance with the manufacturer's instruction manual, may cause harmful interference with radio communications.
Operation of this equipment in a residential area is likely to cause harmful interference, in which case you will be required to correct the interference at your own expense.
Class B
This equipment has been tested and found to comply with the limits for a Class B digital device pursuant to Part 15 of the FCC Rules. These limits are designed to provide reasonable protection against harmful interference in a residential installation. This equipment generates, uses, and can radiate radio frequency energy and, if not installed and used in accordance with the manufacturer's instruction manual, may cause interference with radio communications. However, there is no guarantee that interference will not occur in a particular installation. If this equipment does cause harmful interference to radio or television reception, which can be determined by turning the equipment off and on, you are encouraged to try to correct the interference by one or more of the following measures:
- Reorient or relocate the receiving antenna.
- Increase the separation between the equipment and the receiver.
- Connect the equipment into an outlet on a circuit different from that to which the receiver is connected.
- Consult the dealer or an experienced radio/television technician for help.
The following information is provided on the device or devices covered in this document in compliance with FCC regulations:
• Model number: HC01U
- Company name:
Dell Computer Corporation
One Dell Way
Round Rock, Texas 78682 USA
512-338-4400
Fax Branding
The Telephone Consumer Protection Act of 1991 makes it unlawful for any person to use a computer or other electronic device, including fax machines, to send any message unless such message clearly contains in a margin at the top or bottom of each transmitted page or on the first page of the transmission, the date and time it is sent, identification of the business, other entity, or individual sending the message, and the telephone number of the sending machine or such business, other entity, or individual. The telephone number provided may not be a 900 number or any other number for which charges exceed local or long-distance transmission charges.
IC Notice (Canada Only)
Most Dell computers (and other Dell digital apparatus) are classified by the Industry Canada (IC) Interference-Causing Equipment Standard #3 (ICES-003) as Class B digital devices. To determine which classification (Class A or B) applies to your computer (or other Dell digital apparatus), examine all registration labels located on the bottom, side, or the back panel of your computer (or other digital apparatus). A statement in the form of "IC Class A ICES-003" or "IC Class B ICES-003" will be located on one of these labels. Note that Industry Canada regulations provide that changes or modifications not expressly approved by Dell could void your authority to operate this equipment.
CE Notice (European Union)
Marking by the symbol indicates compliance of this Dell computer to the EMC Directive and the Low Voltage Directive of the European Union. Such marking is indicative that this Dell system meets the following technical standards:
- EN 55022 — "Information Technology Equipment — Radio Disturbance Characteristics — Limits and Methods of Measurement."
- EN 55024 — "Information Technology Equipment - Immunity Characteristics - Limits and Methods of Measurement."
- EN 61000-3-2 — "Electromagnetic Compatibility (EMC) - Part 3: Limits - Section 2: Limits for Harmonic Current Emissions (Equipment Input Current Up to and Including 16 A Per Phase)."
- EN 61000-3-3 — "Electromagnetic Compatibility (EMC) - Part 3: Limits - Section 3: Limitation of Voltage Fluctuations and Flicker in Low-Voltage Supply Systems for Equipment With Rated Current Up to and Including 16 A."
• EN 60950 — "Safety of Information Technology Equipment."
NOTE: EN 55022 emissions requirements provide for two classifications:
• C I a s s A i s f o r t y p i cal commercial areas.
• Class B is for typical domestic areas.
This Dell device is classified for use in a typical Class B domestic environment.
A "Declaration of Conformity" in accordance with the preceding directives and standards has been made and is on file at Dell Computer Corporation Products Europe BV, Limerick, Ireland.
CE Mark Notice
This equipment complies with the essential requirements of the European Union Directive 1999/5/EC.
EN 55022 Compliance (Czech Republic Only)
This device belongs to Class B devices as described in EN 55022, unless it is specifically stated that it is a Class A device on the specification label. The following applies to devices in Class A of EN 55022 (radius of protection up to 30 meters). The user of the device is obliged to take all steps necessary to remove sources of interference to telecommunication or other devices.
NOM Information (Mexico Only)
The following information is provided on the device(s) described in this document in compliance with the requirements of the official Mexican standards (NOM):
Exporter: Dell Computer Corporation
One Dell Way
Round Rock, TX 78682
Importer: Dell Computer de México,
S.A. de C.V.
Ship to: Dell Computer de México,
Avenida Soles No. 55
Supply voltage: 100–240 VAC
Frequency: 50–60 Hz
Current Consumption: 0.4 A
Output voltage: 5.4 VDC
Output current: 2.41 A
Contacting Dell
To contact Dell electronically, you can access the following websites:
- www.w.dell.com
• support.dell.com (technical support) - premiersupport.dell.com (technical support for educational, government, healthcare, and medium/large business customers, including Premier, Platinum, and Gold customers)
For specific web addresses for your country, find the appropriate country section in the table below.
NOTE: Toll-free numbers are for use within the country for which they are listed.
When you need to contact Dell, use the electronic addresses, telephone numbers, and codes provided in the following table. If you need assistance in determining which codes to use, contact a local or an international operator.
| Country (City) International Access Code Country Code City Code | Department Name or Service Area, Website and E-Mail Address | Area Codes, Local Numbers, and Toll-Free Numbers |
| Australia (Sydney) International Access Code: 0011 Country Code: 61 City Code: 2 | E-mail (Australia): au_tech_support@dell.com E-mail (New Zealand): nz_tech_support@dell.com Home and Small Business 1-300-65-55-33 Government and Business toll-free: 1-800-633-559 Preferred Accounts Division (PAD) | toll-free: 1-800-060-889 339 Corporate Sales toll-free: 1-800-808-385 Transaction Sales toll-free: 1-800-808-312 Fax toll-free: 1-800-818-341 |
| Austria (Vienna) International Access Code: 900 Country Code: 43 City Code: 1 | Website:support.euro.dell.com | |
| E-mail: tech_support_central_europe@ dell.com | ||
| Home/Small Business Sales 01 795 67602 | ||
| Home/Small Business Fax 01 795 67605 | ||
| Home/Small Business Customer Care | 01 795 67603 | |
| Preferred Accounts/Corporate Customer Care | 0660 8056 | |
| Home/Small Business Technical Support | 01 795 67604 | |
| Preferred Accounts/Corporate Technical Support | 0660 8779 | |
| Switchboard 01 491 04 0 | ||
| Belgium (Brussels) International Access Code: 00 Country Code: 32 City Code: 2 | Website:support.euro.dell.com | |
| E-mail: tech_be@dell.com | ||
| E-mail for French Speaking Customers: | ||
| support.euro.dell.com/be/fr/email dell/ | ||
| Technical Support 02 481 92 88 | ||
| Customer Care 02 481 91 19 | ||
| Home/Small Business Sales toll-free: 0800 16884 | ||
| Corporate Sales 02 481 91 00 | ||
| Fax 02 481 92 99 | ||
| Switchboard 02 481 91 00 | ||
| Canada (North York, Ontario) | Automated Order-Status System toll-free: 1-800-433-9014 | |
| International Access Code: 011 | AutoTech (automated technical support) TechFax toll-free: 1-800-950-1329 | |
| Customer Care (home/small business) | toll-free: 1-800-847-4096 | |
| Customer Care (med./large business, government) | toll-free: 1-800-326-9463 | |
| Technical Support (home/small business) | toll-free: 1-800-847-4096 | |
| Technical Support (med./large bus., government) | toll-free: 1-800-847-4096 | |
| Sales (direct sales—from outside Toronto) | toll-free: 1-800-387-5752 | |
| Sales (direct sales—from within Toronto) | 416 758-2200 | |
| Sales (federal government, education, and medical) | toll-free: 1-800-567-7542 | |
| Czech Republic (Prague) | Website:support.euro.dell.com | |
| International Access Code: 00 | E-mail: czech_dell@dell.com | |
| Technical Support 02 22 83 27 27 | ||
| Country Code: 420 | Customer Care 02 22 83 27 11 | |
| City Code: 2 | Fax 02 22 83 27 14 | |
| TechFax 02 22 83 27 28 | ||
| Switchboard 02 22 83 27 11 | ||
| Denmark (Copenhagen) International Access Code: 00 Country Code: 45 | Website:support.euro.dell.comE-mail Support (portable computers):den_nbk_support@dell.comE-mail Support (desktop computers):den_support@dell.comE-mail Support (servers):Nordic_server_support@dell.comTechnical Support 7023 0182Customer Care (Relational) 7023 0184Home/Small Business Customer CareSwitchboard (Relational) 3287 1200Fax Switchboard (Relational) 3287 1201Switchboard (Home/Small Business)Fax Switchboard (Home/Small Business) | 3287 55053287 50003287 5001 |
| Finland (Helsinki) | Website: support.euro.dell.com | |
| International Access Code: 990 | E-mail: fin_support@dell.com | |
| E-mail Support (servers): | ||
| Country Code: 358 | Nordic_support@dell.com | |
| City Code: 9 | Technical Support 09 253 313 60 | |
| Technical Support Fax 09 253 313 81 | ||
| Relational Customer Care 09 253 313 38 | ||
| Home/Small Business Customer Care | 09 693 791 94 | |
| Fax 09 253 313 99 | ||
| Switchboard 09 253 313 00 | ||
| France (Paris) (Montpellier) | Website: support.euro.dell.com | |
| International Access Code: 00 | E-mail: support.euro.dell.com/fr/fr/email dell/ | |
| Country Code: 33 | Home and Small Business | |
| City Codes: (1) (4) | Technical Support 0825 387 270 Customer Care 0825 823 833 Switchboard | 0825 |
| Switchboard (calls from outside of France) | 04 99 75 40 00 | |
| Sales 0825 004 700 Fax 0825 004 701 | 04 99 75 40 01 | |
| Fax (calls from outside of France) | ||
| Corporate | ||
| Technical Support 0825 004 719 Customer Care 0825 338 339 Switchboard | 0155947100 | |
| Sales | 0155947100 | |
| Fax | 0155947101 | |
| Germany (Langen) | Website: support.euro.dell.com | |
| International Access Code: 00 | E-mail: tech_support_central_europe@ dell.com | |
| Country Code: 49 | ||
| City Code: 6103 | Technical Support 06103 766-7200 | |
| Home/Small Business Customer Care | 0180-5-224400 | |
| Global Segment Customer Care 06103 766-9570 | ||
| Preferred Accounts Customer Care | 06103 766-9420 | |
| Large Accounts Customer Care 06103 766-9560 | ||
| Public Accounts Customer Care 06103 766-9555 | ||
| Switchboard 06103 766-7000 | ||
| Ireland (Cherrywood) | Website: support.euro.dell.com | |
| International Access Code: 16 | E-mail: dell_direct_support@dell.com | |
| Country Code: 353 | Ireland Technical Support 1850 543 543 | |
| City Code: 1 | U.K. Technical Support (dial within U.K. only) | 0870 908 0800 |
| Home User Customer Care 01 204 4095 | ||
| Small Business Customer Care 01 204 4444 | ||
| U.K. Customer Care (dial within U.K. only) | 0870 906 0010 | |
| Corporate Customer Care 01 204 4003 | ||
| Ireland Sales 01 204 4444 | ||
| U.K. Sales (dial within U.K. only) 0870 907 4000 | ||
| SalesFax 01 204 0144 | ||
| Fax 01 204 5960 | ||
| Switchboard | 01 204 4444 | |
| Italy (Milan) International Access Code: 00 Country Code: 39 City Code: 02 | Website:support.euro.dell.comE-mail:support.euro.dell.com/it/it/email dell/Home and Small BusinessTechnical Support 02 577 826 90Customer Care 02 696 821 14Fax 02 696 821 13Switchboard 02 696 821 12CorporateTechnical Support 02 577 826 90Customer Care 02 577 825 55Fax 02 575 035 30Switchboard 02 577 821 | |
| Luxembourg International Access Code: 00 Country Code: 352 | Website:support.euro.dell.comE-mail: tech_be@dell.comTechnical Support (Brussels, Belgium)Home/Small Business Sales (Brussels, Belgium)Corporate Sales (Brussels, Belgium)Customer Care (Brussels, Belgium)Fax (Brussels, Belgium) 02 481 92 99Switchboard (Brussels, Belgium) 02 481 91 00 | 02 481 92 88toll-free: 08001688402 481 91 0002 481 91 19 |
| Malaysia (Penang) International Access Code: 00 Country Code: 60 City Code: 4 | Technical Support toll- | free: 1 800 888 298 |
| Customer Service 04 633 4949 | ||
| Transaction Sales toll- | free: 1 800 888 202 | |
| Corporate Sales toll- | free: 1 800 888 213 | |
| Mexico International Access Code: 00 Country Code: 52 | Customer Technical Support 001-877-384-8979 | or 001-877-269-3383 |
| Sales 50-81-8800 | or 01-800-888-3355 | |
| Customer Service 001-877-384-8979 | or 001-877-269-3383 | |
| Main 50-81-8800 | or 01-800-888-3355 | |
| Netherlands Antilles General Support 001-800-882-1519 | ||
| Netherlands (Amsterdam) | Website:support.euro.dell.com | |
| International Access Code: 00 | E-mail (Technical Support): (Enterprise): nl_server_support@dell.com | |
| Country Code: 31 | (Latitude): nl_latitude_support@dell.com | |
| City Code: 20 | (Inspiron): nl-inspired_support@dell.com (Dimension): nl_dimension_support@dell.com (OptiPlex): nl_optiplex_support@dell.com (Dell Precision): nl_workstation_support@ dell.com Technical Support 020 674 45 00 Technical Support Fax 020 674 47 66 Home/Small Business Customer Care Relational Customer Care 020 674 4325 Home/Small Business Sales 020 674 55 00 Relational Sales 020 674 50 00 Home/Small Business Sales Fax 020 674 47 75 Relational Sales Fax 020 674 47 50 Switchboard 020 674 50 00 Switchboard Fax 020 674 47 50 | |
| New Zealand International Access Code: 00 Country Code: 64 | E-mail (New Zealand): nz_tech_support@dell.com E-mail (Australia): au_tech_support@dell.com Home and Small Business 0800 446 255 Government and Business 0800 444 617 Sales 0800 441 567 Fax 0800 441 566 | |
| Norway (Lysaker) International Access Code: 00 Country Code: 47 | Website:support.euro.dell.com E-mail Support (portable computers): nor_nbk_support@dell.com E-mail Support (desktop computers): nor_support@dell.com E-mail Support (servers): nordic_server_support@dell.com Technical Support 671 16882 Relational Customer Care 671 17514 Home/Small Business Customer Care Switchboard 671 16800 Fax Switchboard 671 16865 | |
| Singapore (Singapore) International Access Code: 005 Country Code: 65 | Technical Support toll- | free: 800 6011 051 |
| Customer Service (Penang, Malaysia) Transaction Sales toll- | 604 633 4949 | |
| free: 800 6011 054 | ||
| Corporate Sales toll- | free: 800 6011 053 | |
| Southeast Asian and Pacific Countries | Customer Technical Support, Customer Service, and Sales (Penang, Malaysia) | 604 633 4810 |
| Spain (Madrid) International Access Code: 00 Country Code: 34 City Code: 91 | Website: support.euro.dell.comE-mail: support.euro.dell.com/es/es/email dell/Home and Small BusinessTechnical Support 902 100 130Customer Care 902 118 540Sales 902 118 541Switchboard 902 118 541Fax 902 118 539CorporateTechnical Support 902 100 130Customer Care 902 118 546Switchboard 91 722 92 00Fax 91 722 95 83 | |
| Sweden (Upplands Vasby) International Access Code: 00 Country Code: 46 City Code: 8 | Website:support.euro.dell.comE-mail: swe_support@dell.comE-mail Support for Latitude and Inspiron:Swe-nbk_kats@dell.comE-mail Support for OptiPlex:Swe_kats@dell.comE-mail Support for Servers:Nordic_server_support@dell.comTechnical Support 08 590 05 199Relational Customer Care 08 590 05 642Home/Small Business Customer CareEmployee Purchase Program (EPP) SupportFax Technical Support 08 590 05 594Sales 08 590 05 185 | |
| 08 587 70 52720 140 14 44 | ||
| Switzerland (Geneva) | Website:support.euro.dell.com | |
| International Access Code: 00 | E-mail: swisstech@dell.com | |
| Country Code: 41 | E-mail for French-speaking HSB and Corporate Customers: | |
| City Code: 22 | support.euro.dell.com/ch/fr/email dell/Technical Support (Home and Small Business) | 0844 811 411 |
| Technical Support (Corporate) 0844 822 844 | ||
| Customer Care (Home and Small Business) | 0848 802 202 | |
| Customer Care (Corporate) 0848 821 721 | ||
| Fax 022 799 01 90 | ||
| Switchboard 022 799 01 01 | ||
| Turks and Caicos Islands | General Support toll-free: 1-866-540-3355 | |
| U.K. (Bracknell) | Website:support.euro.dell.com | |
| International Access Code: 00 | Customer Care website: dell.co.uk/lca/customerservices | |
| Country Code: 44 | E-mail: dell_direct_support@dell.com | |
| City Code: 1344 | Technical Support (Corporate/Preferred Accounts/PAD [1000+ employees]) | 0870 908 0500 |
| Technical Support (direct/PAD and general) | 0870 908 0800 | |
| Global Accounts Customer Care 01344 373 185 or 01344 373 186 | ||
| Home and Small Business Customer Care | 0870 906 0010 | |
| Corporate Customer Care 0870 908 0500 | ||
| Preferred Accounts (500–5000 employees) Customer Care | 01344 373 196 | |
| Central Government Customer Care | 01344 373 193 | |
| Local Government & Education Customer Care | 01344 373 199 | |
| Health Customer Care 01344 373 194 | ||
| Home and Small Business Sales 0870 907 4000 | ||
| Corporate/Public Sector Sales 01344 860 456 | ||
| U.S.A. (Austin, Texas) International Access Code: 011 Country Code: 1 | Automated Order-Status Service toll-free: 1-800-433-9014 | |
| AutoTech (portable and desktop computers) | toll-free: 1-800-247-9362 | |
| Consumer (Home and Home Office) | ||
| Technical Support toll-free: 1-800-624-9896 | ||
| Customer Service toll-free: 1-800-624-9897 | ||
| DellNetTM Service and Support toll-free: 1-877-Dell-net(1-877-335-5638) | ||
| Employee Purchase Program (EPP) Customers | toll-free: 1-800-695-8133 | |
| Financial Services website: www.dellfinancialservices.com | ||
| Financial Services (lease/loans) toll-free: 1-877-577-3355 | ||
| Financial Services (Dell Preferred Accounts [DPA]) | toll-free: 1-800-283-2210 | |
| Business | ||
| Customer Service and Technical Support | toll-free: 1-800-822-8965 | |
| Employee Purchase Program (EPP) Customers | toll-free: 1-800-695-8133 | |
| Projectors Technical Support toll-free: 1-877-459-7298 | ||
| Public (government, education, and healthcare) | ||
| Customer Service and Technical Support | toll-free: 1-800-456-3355 | |
| Employee Purchase Program (EPP) Customers | toll-free: 1-800-234-1490 | |
| Dell Sales toll-free: 1-800-289- | 3355 | |
| or toll-free: 1-800-879-3355 | ||
| Dell Outlet Store (Dell refurbished computers) | toll-free: 1-888-798-7561 | |
| Software and Peripherals Sales toll-free: 1-800-671- | 3355 | |
| Spare Parts Sales toll-free: 1-800-357- | 3355 | |
| Extended Service and Warranty Sales | toll-free: 1-800-247-4618 | |
| Fax toll-free: 1-800-727- | 8320 | |
| Dell Services for the Deaf, Hard-of-Hearing, or Speech-Impaired | toll-free: 1-877-DELLTTY(1-877-335-5889) | |
Limited Warranties and Return Policy
Dell-branded hardware products purchased in the U.S. or Canada come with either a 90-day (U.S. only), one-year, two-year, three-year, or four-year limited warranty. To determine which warranty you purchased, see the invoice that accompanied your hardware product(s). The following sections describe the limited warranties and return policy for the U.S., the limited warranties and return policy for Canada, and the manufacturer guarantee for Latin America and the Caribbean.
Limited Warranty for the U.S.
What is covered by this limited warranty?
This limited warranty covers defects in materials and workmanship in your—our end-user customer's—Dell-branded hardware products, including Dell-branded peripheral products.
What is not covered by this limited warranty?
This limited warranty does not cover:
- Software, including the operating system and software added to the Dell-branded hardware products through our factory-integration system, third-party software, or the reloading of software
• Non-Dell-branded products and accessories - Problems that result from:
– External causes such as accident, abuse, misuse, or problems with electrical power
– Servicing not authorized by us
– Usage that is not in accordance with product instructions
– Failure to follow the product instructions or failure to perform preventive maintenance
– Problems caused by using accessories, parts, or components not supplied by us
- Products with missing or altered service tags or serial numbers
- Products for which we have not received payment
THIS WARRANTY GIVES YOU SPECIFIC LEGAL RIGHTS, AND YOU MAY ALSO HAVE OTHER RIGHTS WHICH VARY FROM STATE TO STATE (OR JURISDICTION TO JURISDICTION). DELL'S RESPONSIBILITY FOR MALFUNCITONS AND DEFECTS IN HARDWARE IS LIMITED TO REPAIR AND REPLACEMENT AS SET FORTH IN THIS WARRANTY STATEMENT. ALL EXPRESS AND IMPLIED WARRANTIES FOR THE PRODUCT, INCLUDING BUT NOT LIMITED TO ANY IMPLIED WARRANTIES AND CONDITIONS OF MERCHANTABILITY AND FITNESS FOR A PARTICULAR PURPOSE, ARE LIMITED IN TIME TO THE TERM OF THE LIMITED WARRANTY PERIOD REFLECTED ON YOUR INVOICE. NO WARRANTIES, WHETHER EXPRESS OR IMPLIED, WILL APPLY AFTER THE LIMITED WARRANTY PERIOD HAS EXPIRED. SOME STATES DO NOT ALLOW LIMITATIONS ON HOW LONG AN IMPLIED WARRANTY LASTS, SO THIS LIMITATION MAY NOT APPLY TO YOU.
WE DO NOT ACCEPT LIABILITY BEYOND THE REMEDIES PROVIDED FOR IN THIS LIMITED WARRANTY OR FOR CONSEQUENTIAL OR INCIDENTAL DAMAGES, INCLUDING, WITHOUT LIMITATION, ANY LIABILITY FOR THIRD PARTY CLAIMS AGAINST YOU FOR DAMAGES, FOR PRODUCTS NOT BEING AVAILABLE FOR USE, OR FOR LOST DATA OR LOST SOFTWARE. OUR LIABILITY WILL BE NO MORE THAN THE AMOUNT YOU PAID FOR THE PRODUCT THAT IS THE SUBJECT OF A CLAIM. THIS IS THE MAXIMUM AMOUNT FOR WHICH WE ARE RESPONSIBLE.
SOME STATES DO NOT ALLOW THE EXCLUSION OR LIMITATION OF INCIDENTAL OR CONSEQUENTIAL DAMAGES, SO THE ABOVE LIMITATION OR EXCLUSION MAY NOT APPLY TO YOU.
How long does this limited warranty last?
This limited warranty lasts for the time period indicated on your invoice, except that the limited warranty on Dell-branded batteries lasts only one year and the limited warranty on the lamps for Dell-branded projectors lasts only ninety days. The limited warranty begins on the date of the invoice. The warranty period is not extended if we repair or replace a warranted product or any parts. Dell may change the availability of limited warranties, at its discretion, but any changes will not be retroactive.
What do I do if I need warranty service?
Before the warranty expires, please call us at the relevant number listed in the following table. Please also have your Dell service tag number or order number available.
Individual Home Consumers:
Technical Support 1-800-624-9896
Customer Service 1-800-624-9897
| Individual Home Consumers who purchased through an Employee Purchase Program: | |
| Technical Support and Customer Service 1-800-822-8965 | |
| Home and Small Business Commercial Customers: | |
| Technical Support and Customer Service 1-800-456-3355 | |
| Medium, Large, or Global Commercial Customers, Healthcare Customers, and Value Added Resellers (VARs): | |
| Technical Support and Customer Service 1-800-822-8965 | |
| Government and Education Customers: | |
| Technical Support and Customer Service 1-800-234-1490 | |
| Dell-Branded Memory | 1-888-363-5150 |
What will Dell do?
During the first 90 days of the 90-day limited warranty and the first year of all other limited warranties: For the first 90 days of the 90-day limited warranty and the first year of all other limited warranties, we will repair any Dell-branded hardware products returned to us that prove to be defective in materials or workmanship. If we are not able to repair the product, we will replace it with a comparable product that is new or refurbished.
When you contact us, we will issue a Return Material Authorization Number for you to include with your return. You must return the products to us in their original or equivalent packaging, prepay shipping charges, and insure the shipment or accept the risk if the product is lost or damaged in shipment. We will return the repaired or replacement products to you. We will pay to ship the repaired or replaced products to you if you use an address in the United States (excluding Puerto Rico and U.S. possessions and territories). Otherwise, we will ship the product to you freight collect.
If we determine that the product is not covered under this warranty, we will notify you and inform you of service alternatives that are available to you on a fee basis.
NOTE: Before you ship the product(s) to us, make sure to back up the data on the hard drive(s) and any other storage device(s) in the product(s). Remove any confidential, proprietary, or personal information and removable media such as floppy disks, CDs, or PC Cards. We are not responsible for any of your confidential, proprietary, or personal information; lost or corrupted data; or damaged or lost removable media.
During the remaining years: For the remaining period of the limited warranty, we will replace any defective part with new or refurbished parts, if we agree that it needs to be replaced. When you contact us, we will require a valid credit card number at the time you request a replacement part, but we will not charge you for the replacement part as long as you return the original part to us within thirty days after we ship the replacement part to you. If we do not receive the original part within thirty days, we will charge to your credit card the then-current standard price for that part.
We will pay to ship the part to you if you use an address in the United States (excluding Puerto Rico and U.S. possessions and territories). Otherwise, we will ship the part freight collect. We will also include a prepaid shipping container with each replacement part for your use in returning the replaced part to us.
NOTE: Before you replace parts, make sure to back up the data on the hard drive(s) and any other storage device(s) in the product(s). We are not responsible for lost or corrupted data.
What if I purchased a service contract?
If your on-site service contract is with Dell, on-site service will be provided to you under the terms of the on-site service agreement. Please refer to that contract for details on how to obtain service.
If you purchased through us a service contract with one of our third-party service providers, please refer to that contract for details on how to obtain service.
How will you fix my product?
We use new and refurbished parts made by various manufacturers in performing warranty repairs and in building replacement parts and systems. Refurbished parts and systems are parts or systems that have been returned to Dell, some of which were never used by a customer. All parts and systems are inspected and tested for quality. Replacement parts and systems are covered for the remaining period of the limited warranty for the product you bought.
What do I do if I am not satisfied?
We pride ourselves on our great customer service. If you are not satisfied with the service you receive under this limited warranty, please let us know. We have found that the best way to resolve issues regarding our limited warranty is to work together. If, after those discussions, you are still not satisfied, we believe arbitration is the most expeditious way to resolve your concerns. Therefore, ANY CLAIM, DISPUTE, OR CONTROVERSY (WHETHER IN CONTRACT, TORT, OR OTHERWISE, WHETHER PREEXISTING, PRESENT, OR FUTURE, AND INCLUDING STATUTORY, COMMON LAW, INTENTIONAL TORT, AND EQUITABLE CLAIMS) AGAINST DELL arising from or relating to this limited warranty, its interpretation, or the breach, termination, or validity thereof, the relationships which result from this limited warranty (including, to the full extent permitted by applicable law, relationships with third parties), Dell's advertising, or any related purchase SHALL BE
RESOLVED EXCLUSIVELY AND FINALLY BY BINDING ARBITRATION ADMINISTERED BY THE NATIONAL ARBITRATION FORUM (NAF) under its Code of Procedure then in effect (available via the Internet at www.arb-forum.com/ or via telephone at 1-800-474-2371). The arbitration will be limited solely to the dispute or controversy between you and Dell. Any award of the arbitrator(s) shall be final and binding on each of the parties, and may be entered as a judgment in any court of competent jurisdiction. Information may be obtained and claims may be filed with the NAF at P.O. Box 50191, Minneapolis, MN 55405. This provision applies only to individual home consumers and consumers who purchased through an employee purchase program. It does not apply to small, medium, large, and global commercial customers or government, education, and healthcare customers.
May I transfer the limited warranty?
Limited warranties on systems may be transferred if the current owner transfers ownership of the system and records the transfer with us. The limited warranty on Dell-branded memory may not be transferred. You may record your transfer by going to Dell's website:
- If you are an Individual Home Consumer, go to www.dell.com/us/en/dhs/topics/sbtopic_015_ccare.htm
- If you are a Small, Medium, Large, or Global Commercial Customer, go to www.dell.com/us/en/biz/topics/sbtopic_ccare_nav_015_ccare.htm
- If you are a Government, Education, or Healthcare Customer, or an Individual Consumer who purchased through an employee purchase program, go to www.dell.com/us/en/pub/topics/sbtopic_015_ccare.htm
If you do not have Internet access, call your customer care representative or call 1-800-624-9897.
"Total Satisfaction" Return Policy (U.S. Only)
We value our relationship with you and want to make sure that you're satisfied with your purchases. That's why we offer a "Total Satisfaction" return policy for most products that you—the end-user customer—purchase directly from Dell. Under this policy, you may return to Dell products that you purchased directly from Dell for a credit or a refund of the purchase price paid, less shipping and handling and applicable restocking fees as follows:
- New Hardware Products and Accessories — All new hardware, accessories, parts, and unopened software still in its sealed package, excluding the products listed below, may be returned within thirty days from the invoice date. To return applications software or an operating system that has been installed by Dell, you must return the entire computer. A different return policy applies to nondefective products purchased through Dell's Software and Peripherals division by customers of our Small and Medium Business divisions. Those products may be returned within thirty days from the invoice date, but a fifteen percent (15%) restocking fee will be deducted from any refund or credit. The "Total Satisfaction" Return Policy and Software and Peripherals division return policy are not available for Dell | EMC storage products, EMC-branded products, or enterprise software.
- Reconditioned or Refurbished Dell-Branded Hardware Products and Parts — All reconditioned or refurbished Dell-branded server and storage products may be returned within thirty days from the invoice date. All other reconditioned or refurbished Dell-branded hardware products and parts may be returned within fourteen days of the invoice date.
To return products, e-mail or call Dell customer service to receive a Credit Return Authorization Number within the return policy period applicable to the product you want to return. You must obtain a Credit Return Authorization Number in order to return the product. See "Contacting Dell" on page 122 (or www.dell.com/us/en/gen/contact.htm) to find the appropriate contact information for obtaining customer assistance.
You must ship the products to Dell within five days of the date that Dell issues the Credit Return Authorization Number. You must also return the products to Dell in their original packaging, in as-new condition along with any media, documentation, and all other items that were included in the original shipment, prepay shipping charges, and insure the shipment or accept the risk of loss or damage during shipment.
Limited Warranty Terms for Canada
What is covered by this limited warranty?
This limited warranty covers defects in materials and workmanship in your—our end-user customer's—Dell-branded hardware products, including Dell-branded peripheral products.
What is not covered by this limited warranty?
This limited warranty does not cover:
- Software, including the operating system and software added to the Dell-branded hardware products through our factory-integration system, or the reloading of the software
• Non-Dell branded products and accessories -
Problems that result from:
-
External causes such as accident, abuse, misuse, or problems with electrical power
– Servicing not authorized by us
– Usage that is not in accordance with product instructions
– Failure to follow the product instructions or failure to perform preventive maintenance
– Problems caused by using accessories, parts, or components not supplied by us -
Products with missing or altered service tags or serial numbers
- Products for which we have not received payment
THIS WARRANTY GIVES YOU SPECIFIC LEGAL RIGHTS, AND YOU MAY ALSO HAVE OTHER RIGHTS WHICH VARY FROM PROVINCE TO PROVINCE. DELL'S RESPONSIBILITY FOR MALFUNCTIONS AND DEFECTS IN PRODUCT IS LIMITED TO REPAIR AND REPLACEMENT AS SET FORTH IN THIS WARRANTY STATEMENT, FOR THE TERM OF THE WARRANTY PERIOD REFLECTED ON YOUR INVOICE. EXCEPT FOR THE EXPRESS WARRANTIES CONTAINED IN THIS WARRANTY STATEMENT, DELL DISCLAIMS ALL OTHER WARRANTIES AND CONDITIONS, EXPRESS OR IMPLIED, INCLUDING WITHOUT LIMITATION IMPLIED WARRANTIES AND CONDITIONS OF MERCHANTABILITY AND FITNESS FOR A PARTICULAR PURPOSE, STATUTORY OR OTHERWISE. SOME PROVINCES DO NOT ALLOW THE EXCLUSION OF CERTAIN IMPLIED WARRANTIES OR CONDITIONS, OR LIMITATIONS ON HOW LONG AN IMPLIED WARRANTY OR CONDITION LASTS. THEREFORE, THE FOREGOING EXCLUSIONS AND LIMITATIONS MAY NOT APPLY TO YOU.
WE DO NOT ACCEPT LIABILITY BEYOND THE REMEDIES PROVIDED FOR IN THIS WARRANTY STATEMENT OR FOR SPECIAL, INDIRECT, CONSEQUENTIAL, OR INCIDENTAL DAMAGES, INCLUDING, WITHOUT LIMITATION, ANY LIABILITY FOR THIRD PARTY CLAIMS AGAINST YOU FOR DAMAGES, FOR PRODUCTS NOT BEING AVAILABLE FOR USE, OR FOR LOST DATA OR LOST SOFTWARE. OUR LIABILITY WILL BE NO MORE THAN THE AMOUNT YOU PAID FOR THE PRODUCT THAT IS THE SUBJECT OF A CLAIM. THIS IS THE MAXIMUM AMOUNT FOR WHICH WE ARE RESPONSIBLE.
SOME PROVINCES DO NOT ALLOW THE EXCLUSION OR LIMITATION OF SPECIAL, INDIRECT, INCIDENTAL, OR CONSEQUENTIAL DAMAGES, SO THE ABOVE LIMITATION OR EXCLUSION MAY NOT APPLY TO YOU.
How long does this limited warranty last?
This limited warranty lasts for the time period indicated on your invoice, except that the limited warranty on Dell-branded batteries lasts only one year and the limited warranty on the lamps for Dell-branded projectors lasts only ninety days. The limited warranty begins on the date of the invoice. The warranty period is not extended if we repair or replace a warranted product or any parts. Dell may change the terms and availability of limited warranties, at its discretion, but any changes will not be retroactive (that is, the warranty terms in place at the time of purchase will apply to your purchase).
What do I do if I need warranty service?
Before the warranty expires, please call us at the relevant number listed in the following table. Please also have your Dell service tag number or order number available.
| Individual Home Consumers; Home Office and Small Business Customers: | |
| Technical Support and Customer Service 1-800-847-4096 | |
| Medium, Large, and Global Commercial Customers; Government, Education, and Healthcare Customers; and Value Added Resellers (VARs): | |
| Technical Support 1-800-387-5757 | |
| Customer Service 1-800-326-9463 | |
| Government or Education Customers, or Individual Home Consumers who purchased through an Employee Purchase Program: | |
| Technical Support 1-800-387-5757 | |
| Customer Service 1-800-326-9463 | (Extension 8221 for Individual Consumers) |
| Dell-Branded Memory | 1-888-363-5150 |
What will Dell do?
During the first year of all limited warranties: During the first year of all limited warranties, we will repair any Dell-branded hardware products returned to us that prove to be defective in materials or workmanship. If we are not able to repair the product, we will replace it with a comparable product that is new or refurbished.
When you contact us, we will issue a Return Material Authorization Number for you to include with your return. You must return the products to us in their original or equivalent packaging, prepay shipping charges, and insure the shipment or accept the risk if the product is lost or damaged in shipment. We will return the repaired or replacement products to you. We will pay to ship the repaired or replaced products to you if you use an address in Canada. Otherwise, we will ship the product to you freight collect.
If we determine that the problem is not covered under this warranty, we will notify you and inform you of service alternatives that are available to you on a fee basis.
NOTE: Before you ship the product(s) to us, make sure to back up the data on the hard drive(s) and any other storage device(s) in the product(s). Remove any confidential, proprietary or personal information, removable media, such as floppy disks, CDs, or PC Cards. We are not responsible for any of your confidential, proprietary or personal information; lost or corrupted data; or damaged or lost removable media.
During the remaining years following the first year of all limited warranties: We will replace any defective part with new or refurbished parts, if we agree that it needs to be replaced. When you contact us, we will require a valid credit card number at the time you request a replacement part, but we will not charge you for the replacement part as long as you return the original part to us within thirty days after we ship the replacement part to you. If we do not receive the original part within thirty days, we will charge to your credit card the then-current standard price for that part.
We will pay to ship the part to you if you use an address in Canada. Otherwise, we will ship the part freight collect. We will also include a prepaid shipping container with each replacement part for your use in returning the replaced part to us.
NOTE: Before you replace parts, make sure to back up the data on the hard drive(s) and any other storage device(s) in the product(s). We are not responsible for lost or corrupted data.
What if I purchased an on-site service contract?
If your service contract is with Dell, service will be provided to you under the terms of the service contract. Please refer to that contract for details on how to obtain service. Dell's service contracts can be found online at www.dell.ca or by calling Customer Care at 1-800-847-4096. If you purchased through us a service contract with one of our third-party service providers, please refer to that contract (mailed to you with your invoice) for details on how to obtain service.
How will you fix my product?
We use new and refurbished parts made by various manufacturers in performing warranty repairs and in building replacement parts and systems. Refurbished parts and systems are parts or systems that have been returned to Dell, some of which were never used by a customer. All parts and systems are inspected and tested for quality. Replacement parts and systems are covered for the remaining period of the limited warranty for the product you bought. Dell owns all parts removed from repaired products.
What do I do if I am not satisfied?
We pride ourselves on our great customer service. If you are not satisfied with the service you receive under this limited warranty, please let us know. We have found that the best way to resolve issues regarding our limited warranty is to work together. If, after those discussions, you are still not satisfied, we believe arbitration is the most expeditious way to resolve your concerns. Therefore, ANY CLAIM, DISPUTE, OR CONTROVERSY (WHETHER IN CONTRACT, TORT, OR OTHERWISE, WHETHER PREEXISTING, PRESENT OR FUTURE, AND INCLUDING STATUTORY, COMMON LAW, INTENTIONAL TORT, AND EQUITABLE CLAIMS) AGAINST DELL arising from or relating to this limited warranty, its interpretation, or the breach, termination or validity thereof, the relationships which result from this limited warranty (including, to the full extent permitted by applicable law, relationships with third parties), Dell's advertising, or any related purchase SHALL BE RESOLVED EXCLUSIVELY AND FINALLY BY BINDING ARBITRATION ADMINISTERED BY THE NATIONAL ARBITRATION FORUM (NAF) under its Code of Procedure then in effect (available via the Internet at www.arb-forum.com/, or via telephone at 1-800-474-2371). The arbitration will be limited solely to the dispute or controversy between you and Dell. Any award of the arbitrator(s) shall be final and binding on each of the parties, and may be entered as a judgment in any court of competent jurisdiction. Information may be obtained and claims may be filed with the NAF at P.O. Box 50191, Minneapolis, MN 55405.
May I transfer the limited warranty?
Limited warranties on systems may be transferred if the current owner transfers ownership of the system and records the transfer with us. The limited warranty on Dell-branded memory may not be transferred. You may record your transfer by going to our website:
- If you are an Individual Home Consumer, go to www.dell.com/us/en/dhs/topics/sbtopic_016_ccare.htm
- If you are a Home Office, Small, Medium, Large, or Global Commercial Customer, go to www.dell.com/us/en/biz/topics/sbtopic_ccare_nav_016_ccare.htm
- If you are a Government, Education, or Healthcare Customer, or an Individual Home Consumer who purchased through an Employee Purchase Program, go to www.dell.com/us/en/pub/topics/sbtopic_016_ccare.htm
If you do not have Internet access, please call Dell at 1-800-326-9463.
"Total Satisfaction" Return Policy (Canada Only)
If you are an end-user customer who bought new products directly from Dell, you may return them to Dell up to 30 days after you receive them for a refund or credit of the product purchase price. If you are an end-user customer who bought reconditioned or refurbished products from Dell, you may return them to Dell within 14 days after the date of invoice for a refund or credit of the product purchase price. In either case, the refund or credit will not include any shipping and handling charges shown on your invoice and will be subject to a fifteen percent (15%) restocking fee, unless otherwise prohibited by law. If you are an organization that bought the products under a written agreement with Dell, the agreement may contain different terms for the return of products than specified by this policy.
To return products, you must call Dell Customer Service at 1-800-387-5759 to receive a Credit Return Authorization Number. To expedite the process of your refund or credit, Dell expects you to return the products to Dell in their original packaging within five days of the date that Dell issues the Credit Return Authorization Number. You must also prepay shipping charges and insure the shipment or accept the risk of loss or damage during shipment. You may return software for a refund or credit only if the sealed package containing the floppy disk(s) or CD(s) is unopened. Returned products must be in as-new condition, and all of the manuals, floppy disk(s), CD(s), power cables, and other items included with a product must be returned with it. For customers who want to return, for refund or credit only, either application or operating system software that has been installed by Dell, the whole system must be returned, along with any media and documentation that may have been included in the original shipment.
The "Total Satisfaction" Return Policy does not apply to Dell | EMC storage products. It also does not apply to products purchased through Dell's Software and Peripherals division. For those products, please instead refer to Dell's Software and Peripheral's then-current return policy (see the following section, "Dell Software and Peripherals (Canada Only)").
Dell Software and Peripherals (Canada Only)
Third-Party Software and Peripherals Products
Similar to other resellers of software and peripherals, Dell does not warrant third-party products. Third-party software and peripheral products are covered by the warranties provided by the original manufacturer or publisher only. Third party manufacturer warranties vary from product to product. Consult your product documentation for specific warranty information. More information may also be available from the manufacturer or publisher.
While Dell offers a wide selection of software and peripheral products, we do not specifically test or guarantee that all of the products we offer work with any or all of the various models of Dell computers, nor do we test or guarantee all of the products we sell on the hundreds of different brands of computers available today. If you have questions about compatibility, we recommend and encourage you to contact the third-party software and peripheral product manufacturer or publisher directly.
Dell-Branded Peripheral Products
Dell does provide a limited warranty for new Dell-branded peripheral products (products for which Dell is listed as the manufacturer) such as monitors, batteries, memory, docking stations, and projectors). To determine which limited warranty applies to the product you purchased, see the Dell invoice and/or the product documentation that accompanied your product. Descriptions of Dell's limited warranties are described in preceding sections.
Return Policy
If you are an end-user customer who bought Dell Software and Peripherals products directly from a Dell company, you may return Dell Software and Peripherals products that are in as-new condition to Dell up to 30 days from the date of invoice for a refund of the product purchase price if already paid. This refund will not include any shipping and handling charges shown on your invoice; you are responsible for those.
To return products, you must call Dell Customer Service at 1-800-387-5759 to receive a Credit Return Authorization Number. You must ship the Dell Software and Peripherals products back to Dell in their original manufacturer's packaging (which must be in as-new condition), prepay shipping charges, and insure the shipment or accept the risk of loss or damage during shipment.
To qualify for refund or replacement, returned products must be in as-new condition, software products must be unopened, and all of the manuals, floppy disk(s), CD(s), power cables, and other items included with a product must be returned with it.
One-Year End-User Manufacturer Guarantee (Latin America and the Caribbean Only)
Guarantee
Dell Computer Corporation ("Dell") warrants to the end user in accordance with the following provisions that its branded hardware products, purchased by the end user from a Dell company or an authorized Dell distributor in Latin America or the Caribbean, will be free from defects in materials, workmanship, and design affecting normal use, for a period of one year from the original purchase date. Products for which proper claims are made will, at Dell's option, be repaired or replaced at Dell's expense. Dell owns all parts removed from repaired products. Dell uses new and reconditioned parts made by various manufacturers in performing repairs and building replacement products.
Exclusions
This Guarantee does not apply to defects resulting from: improper or inadequate installation, use, or maintenance; actions or modifications by unauthorized third parties or the end user; accidental or willful damage; or normal wear and tear.
Making a Claim
Claims must be made in Latin America or the Caribbean by contacting the Dell point of sale within the guarantee period. The end user must always supply proof of purchase, indicating name and address of the seller, date of purchase, model and serial number, name and address of the customer, and details of symptoms and configuration at the time of malfunction, including peripherals and software used. Otherwise, Dell may refuse the guarantee claim. Upon diagnosis of a warranted defect, Dell will make arrangements and pay for ground freight and insurance to and from Dell's repair/replacement center. The end user must ensure that the defective product is available for collection properly packed in original or equally protective packaging together with the details listed above and the return number provided to the end user by Dell.
Limitation and Statutory Rights
Dell makes no other warranty, guarantee or like statement other than as explicitly stated above, and this Guarantee is given in place of all other guarantees whatsoever, to the fullest extent permitted by law. In the absence of applicable legislation, this Guarantee will be the end user's sole and exclusive remedy against Dell or any of its affiliates, and neither Dell nor any of its affiliates shall be liable for loss of profit or contracts, or any other indirect or consequential loss arising from negligence, breach of contract, or howsoever.
This Guarantee does not impair or affect mandatory statutory rights of the end user against and/or any rights resulting from other contracts concluded by the end user with Dell and/or any other seller.
Dell World Trade LP
One Dell Way, Round Rock, TX 78682, USA
Dell Computadores do Brasil Ltda (CNPJ No. 72.381.189/0001-10)/
Dell Commercial do Brasil Ltda (CNPJ No. 03 405 822/0001-40)
Avenida Industrial Belgraf, 400
92990-000 - Eldorado do Sul - RS - Brasil
Dell Computer de Chile Ltda
Coyancura 2283, Piso 3- Of.302,
BLUETOOTH — A wireless technology standard for short-range (10 m [30 ft]) networking devices that allows for enabled devices to automatically recognize each other.
COMPACTFLASH CARD — A removable card that is used to expand the capabilities of a device. Common types of CompactFlash cards include memory and wireless cards.
CRADLE — A device that allows your handheld device to synchronize with a computer, recharge its battery, and run on AC power.
DHCP — dynamic host configuration protocol — A communication protocol that allows network administrators to manage and automate the assignment of Internet Protocol addresses to computers in a network.
IMAP — Internet message access protocol — A standard client/server protocol that allows you to access your e-mail from a server. Using IMAP, you can store and browse your e-mail on the server.
INFRARED SENSOR — A port that allows you to transfer data between the computer and infrared-compatible devices without using a cable connection.
ISP — Internet service provider — A company that allows you to access its host server to connect directly to the Internet, send and receive e-mail, and access websites. The ISP typically provides you with a software package, username, and access phone numbers for a fee.
LAN — local area network — A computer network covering a small area. A LAN usually is confined to a building or a few nearby buildings. A LAN can be connected to another LAN over any distance via telephone lines and radio waves to form a wide area network (WAN).
PIM — personal information manager — A program that stores and organizes your personal information, such as Calendar, Contacts, Inbox, and Tasks.
POP3 — post office protocol 3 — A standard client/server protocol that allows you to access your e-mail from a server. Using POP3, you must download your e-mail to your local system to view and browse your messages.
RAM — random-access memory — The primary temporary storage area for program instructions and data. Any information stored in RAM is lost when you perform a reset.
RAS — remote access server — A type of server that allows users to access a network from a remote location.
ROM — read-only memory — Memory that stores data and programs that cannot be deleted or written to by the device. ROM, unlike RAM, retains its contents after you perform a reset. Some programs essential to the operation of your device reside in ROM.
SDRAM — synchronous dynamic random-access memory — A type of DRAM that is synchronized with the optimal clock speed of the microprocessor.
SECURE DIGITAL CARD — A type of removable memory commonly used in digital cameras, handheld devices, cell phones, and other devices. Secure Digital cards are approximately the size of a postage stamp.
SERIAL CONNECTOR — An I/O port often used to connect devices such as a handheld digital device or digital camera to your computer.
SMS — short message service — A service that is capable of sending short messages to wireless devices.
SMTP — simple mail transfer protocol — A type of protocol used for sending and receiving e-mail. SMTP is typically coupled with POP3 or IMAP.
SYNC CABLE — A cable through which you can connect a handheld device to a computer to transfer or synchronize files.
SYNCHRONIZATION — An automated process that replaces the files in one location with the most updated files from another location. For example, you can synchronize the files on your computer with the files on your handheld device.
TCP/IP — transmission control protocol/Internet protocol — The basic communication language of the Internet. TCP/IP can also be used as a communication protocol in an intranet or extranet.
USB — universal serial bus — A hardware interface for a low-speed device such as a USB-compatible keyboard, mouse, joystick, scanner, set of speakers, printer, broadband devices (DSL and cable modems), imaging devices, or storage devices. Devices are plugged directly into a 4-pin socket on your computer or into a multiport hub that plugs into your computer. USB devices can be connected and disconnected while the computer is turned on, and they can also be daisy-chained together.
VPN — virtual private network — A set of communication protocols that allows remote users to securely access a network.
WAP — wireless application protocol — A standardization for the way that wireless devices access the Internet.
Index
A
ActiveSync
about 53
installing 55
appointments
scheduling 59
audio
Media player 87
notifications 72
AvantGo
about 96
buttons
about 28
Calendar 13
Contacts 13
Home 13
Inbox 13
locations 12
navigator 13
power 12
program buttons 31
record 13
reset 13
scroll dial 13
B
battery
backup 17
charging 18
main 16
using and installing 15
block recognizer 40
books
library 88
Reader 87
reading ebooks 88
removing 91
C
Calendar
about 58
appointments 59
meeting requests 60
command bar 33
communicating
with other devices 99
CompactFlash
about 23
installing 23
slot 12
computer connecting to 19
Contacts about 61 creating 62 finding 62
cradle connecting to a computer 19
D
data backing up 36 restoring 36
disconnecting dial-up connection 107 from a cable or cradle 107 from a network 107 infrared sensor 107
drawing creating 45
E
editing written text 42
e-mail composing messages 69 connecting to a server 67, 107 Inbox 66 message list 67 organizing 71 synchronizing 66
ethernet connecting to a network 106 connecting to an ISP 103
Excel about 82 tips 84
expansion slots CompactFlash 23 locations 12 Secure Digital card slot 24
F
files backing up 36 File Explorer 76 finding 76 finding and organizing 35 restoring 36 synchronizing 53
finding information 9 contacting Dell 122
H
help ActiveSync Help 108 contacting Dell 122 finding 108 Pocket PC Help 9
|
icons
program 32
status 30
Inbox
about 66
infrared
using 100
input panel 38
Internet
connecting to 99, 101
Internet Explorer
about 93
browsing the web 97
favorite links 96
mobile favorites 94, 95
K
keyboard
soft 40
L
letter recognizer 40
M
Media Player
about 87
meeting requests
creating 60
memory
conserving 95
microphone
recording a message 47
modem
connecting to a network 104
connecting to an ISP 101
MSN Messenger
about 85
setting up 85
working with contacts 86
My Text
inserting 48
N
navigation bar 33
network
connecting to 99, 104
ethernet connection 106
modem connection 104
Notes
creating 64
notifications
about 72
P
Pocket Outlook about 58
Pocket PC getting started 27
pop-up menus 34
print-style text converting written text to 40, 41
programs accessing 31
ActiveSync 53
adding and removing 73
adding programs using ActiveSync 74
AvantGo 96
Calendar 58
Contacts 61
downloading 75
Inbox 66
Media Player 87
MSN Messenger 85
Notes 64
Pocket Excel 82
Pocket Internet Explorer 93
Pocket Outlook 58
Pocket Word 80
Reader 87
removing 77
Start menu 76
Switcher Bar 31
Tasks 63
R
Reader about 87 features 89
recording voice messages 47
reminders. See notifications
reset button 13 performing 24
resources finding 9
S
scroll dial 13
Secure Digital card slot about 24 installing cards 24 location 12
service tag 9
settings adjusting 49 personal tab 50 system tab 50
software. See programs specifications 110
stylus using 28 writing methods 37
Switcher Bar 31
sync cable
connecting to a computer 22
synchronizing
with your computer 19
T
Tasks
about 63
creating 63
text
converting written text to print-style text 40, 41
editing 41, 42
input panel 38
typing 40
written 40, 41
Today screen 28
transcriber 41
V
video
Media Player 87
W
warranty 141
Word
about 80
writing
block recognizer 40
converting written text to print-style text 40, 41
drawing 45
editing 41
letter recognizer 40
methods 37
on the screen 41
transcriber 41
- Notes, Notices, and Cautions
- Abbreviations and Acronyms
- Contents
- About Your Device
- Using Microsoft ® Pocket PC
- Entering Information
- Adjusting Settings
- Using Microsoft ® ActiveSync ®
- Scheduling and Communicating
- Adding and Removing Programs
- Using Companion Programs
- Using Microsoft ® Pocket Internet Explorer
- Getting Connected
- Appendix
- SECTION 1
- About Your Device
- Front, Side, and Back Views
- Front and Side Views
- SCROLL DIAL
- Back View
- Using the Batteries
- Installing and Removing the Main Battery
- To install the main battery:
- To remove the main battery:
- Installing and Removing the Backup Battery
- Charging the Main Battery
- Connecting to a Computer
- Using the Cradle
- Using the Sync Cable
- To connect the sync cable:
- Using Cards
- CompactFlash Cards
- Performing a Reset
- Soft Reset
- Hard Reset
- 2
- SECTION 2
- Using Microsoft® Pocket PC
- Device Buttons and the Stylus
- Today Screen
- Status Icons
- Programs
- Program Buttons
- Switcher Bar
- Navigation Bar and Command Bar
- Pop-Up Menus
- Finding and Organizing Information
- Backing Up Data
- Entering Information
- Entering Text Using the Input Panel
- Typing With the Soft Keyboard
- Letter Recognizer
- Block Recognizer
- Transcriber
- Editing Typed Text
- Writing on the Screen
- Editing Written Text
- Drawing on the Screen
- Creating a Drawing
- Editing a Drawing
- Recording a Message
- Using My Text
- 4
- Adjusting Settings
- Personal Tab
- System Tab
- Using Microsoft ® ActiveSync ®
- About ActiveSync
- Installing and Using ActiveSync
- SECTION 6
- Scheduling and Communicating
- About Microsoft® Pocket Outlook
- Calendar
- Using the Summary Screen
- Creating Meeting Requests
- Contacts
- To create a contact:
- Finding a Contact
- Tasks
- To create a task:
- Notes
- To create a note:
- Inbox
- Synchronizing E-Mail Messages
- Connecting Directly to an E-Mail Server
- Using the Message List
- Composing Messages
- Managing E-Mail Messages and Folders
- Notifications
- Adding and Removing Programs
- Adding Programs Using Microsoft® ActiveSync®
- Downloading Programs From the Internet
- Adding a Program to the Start Menu
- Using File Explorer on the Device
- Using ActiveSync on the Computer
- Removing Programs
- SECTION 8
- Using Companion Programs
- Microsoft® Pocket Word
- Pocket Excel
- Tips for Working in Pocket Excel
- MSN Messenger
- Setting Up
- Working With Contacts
- Chatting With Contacts
- Windows ® Media Player for Pocket PC
- Microsoft Reader
- Using the Library
- Reading a Book
- Using Reader Features
- Removing a Book
- Using Microsoft® Pocket Internet Explorer
- Mobile Favorites
- Conserving Memory
- Mobile Favorites Folder
- Favorite Links
- Using AvantGo Channels
- To sign up for AvantGo:
- Browsing Mobile Favorites and the Web
- SECTION 10
- Getting Connected
- Using Infrared
- Connecting to the Internet
- Creating a Modem Connection to an ISP
- Creating an Ethernet Connection to an ISP
- Connecting to Work
- Creating a Modem Connection to a Network
- Creating an Ethernet Connection to a Network
- Ending a Connection
- To disconnect:
- Getting Help on Connecting
- 11
- Appendix
- Power Supply
- Battery type:
- AC adapter:
- Environmental
- Temperature range:
- Thermal gradient:
- Relative humidity (maximum):
- Altitude (maximum):
- Environmental (continued)
- Regulatory Notices
- FCC Notices (U.S. Only)
- Class A
- Class B
- Fax Branding
- IC Notice (Canada Only)
- CE Notice (European Union)
- CE Mark Notice
- EN 55022 Compliance (Czech Republic Only)
- NOM Information (Mexico Only)
- Contacting Dell
- Limited Warranties and Return Policy
- Limited Warranty for the U.S.
- What will Dell do?
- May I transfer the limited warranty?
- "Total Satisfaction" Return Policy (U.S. Only)
- Limited Warranty Terms for Canada
- SOME PROVINCES DO NOT ALLOW THE EXCLUSION OR LIMITATION OF SPECIAL, INDIRECT, INCIDENTAL, OR CONSEQUENTIAL DAMAGES, SO THE ABOVE LIMITATION OR EXCLUSION MAY NOT APPLY TO YOU.
- How long does this limited warranty last?
- What do I do if I need warranty service?
- "Total Satisfaction" Return Policy (Canada Only)
- Dell Software and Peripherals (Canada Only)
- Third-Party Software and Peripherals Products
- Dell-Branded Peripheral Products
- Return Policy
- One-Year End-User Manufacturer Guarantee (Latin America and the Caribbean Only)
- Guarantee
- Exclusions
- Making a Claim
- Limitation and Statutory Rights
- Index
- A
- B
- C
- D
- E
- F
- H
- |
- K
- L
- M
- N
- P
- R
- S
- T
- V
- W
Brand : DELL
Model : Axim X5
Category : Smartphone