
EA1251 - Bluetooth speaker CLARION - Free user manual and instructions
Find the device manual for free EA1251 CLARION in PDF.

| Product Type | Bluetooth speaker (iPod interface for CeNET compatible car stereo) |
| Brand | CLARION |
| Model | EA1251 |
| Dimensions (approx.) | 100 x 50 x 30 mm |
| Weight (approx.) | 150 g |
| Power Supply | 12 V DC via CeNET cable (power bus) |
| Connectivity | CeNET (proprietary bus), iPod Dock connector (cable included) |
| Main Functions | iPod control via CeNET car stereo, track playback, playlists (max 5), repeat, shuffle, scan, direct search |
| Track Display | CD-Text display (artist, album, title) on compatible car stereo |
| iPod Compatibility | iPod 3G (v2.2+), 4G (v3.01+), mini (v1.2+), photo (no image display) |
| Playlists | Accepted playlist names: clarion1 to clarion5 (lowercase, no spaces) |
| Installation | Keep away from direct sunlight and moisture, mounting with velcro, double-sided tape or screws (M4x14) |
| Maintenance and Cleaning | Clean with a soft dry cloth. Do not use abrasive products. |
| Safety | Follow wiring and fuse specifications (3 A). Avoid shocks and moisture. |
| Spare Parts and Repairability | Contact a Clarion dealer. No user-serviceable parts. |
| General Information | The iPod must remain connected to retain playback position. Do not update smart playlists during use. |
Frequently Asked Questions - EA1251 CLARION
User questions about EA1251 CLARION
0 question about this device. Answer the ones you know or ask your own.
Ask a new question about this device
Download the instructions for your Bluetooth speaker in PDF format for free! Find your manual EA1251 - CLARION and take your electronic device back in hand. On this page are published all the documents necessary for the use of your device. EA1251 by CLARION.
USER MANUAL EA1251 CLARION
The interface adapter for iPod® by Clarion, EA1251, works by simulating the iPod as a 6 Disc CeNET CD Changer. Please consult your main unit's Owner's Manual for CD Changer operations before beginning to use EA1251.
Clarion Multimedia Station of VRX series cannot control EA1251 through the KEY PAD screen or the list screen. If required so, please use the function buttons instead. Some EA1251 functions might not be available.
Some main unit models with CD-Text function have the capability to show ID3 TAG if iPod is connected through EA1251. Please refer to Title Display Section for more details.
For list of main unit compatible to EA1251, please consult your nearest Clarion dealer.
For iPod operations, please refer to iPod Owner's Manual.
2. CAUTION
Please check your iPod Owner's Manual for the operating temperature as leaving iPod in your vehicle might damage it due to temperature variations and moisture.
3. CONNECTION
Please consult your nearest Clarion dealer before attempting to connect EA1251 to your main unit and iPod. Improper connection might damage your main unit, EA1251, iPod or your vehicle wiring.
Please make sure the Yellow wire (Bus power lead) is connected on the CeNET compatible Main Unit (This wire usually has a 3 Amp Fuse inserted) connects to battery. If this wire is not connected, the iPod interface will not function.
Please refer to the wiring instructions for your CeNET Main Unit or contact your Clarion Dealer.
Note:
The C-Bus conversion adaptor (RCB-138) is not compatible with current system.
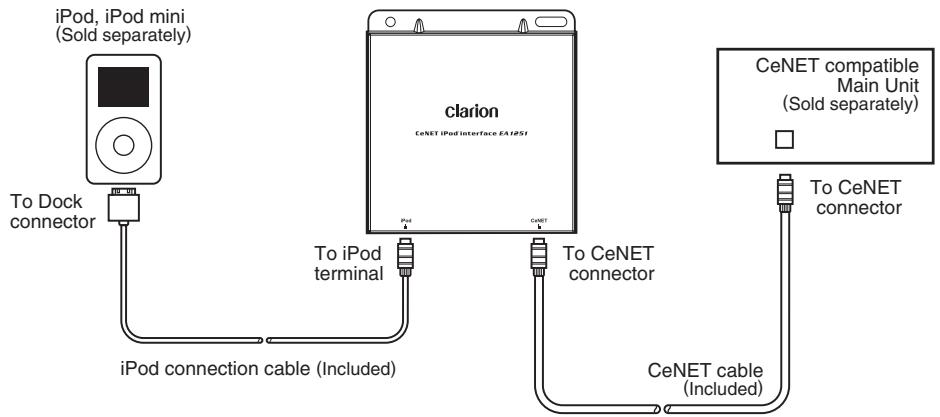
1. Connect the iPod to the CeNET compatible Main Unit.
flowchart
graph TD
    A["iPod, iPod mini (Sold separately)"] -->|To Dock connector| B["iPod connection cable (Included)"]
    C["Clarion CeNET iPod interface EA1d5f"] -->|To iPod terminal| B
    C -->|To CeNET connector| D["CeNET compatible Main Unit (Sold separately)"]
    D -->|To CeNET connector| E["CeNET cable (Included)"]
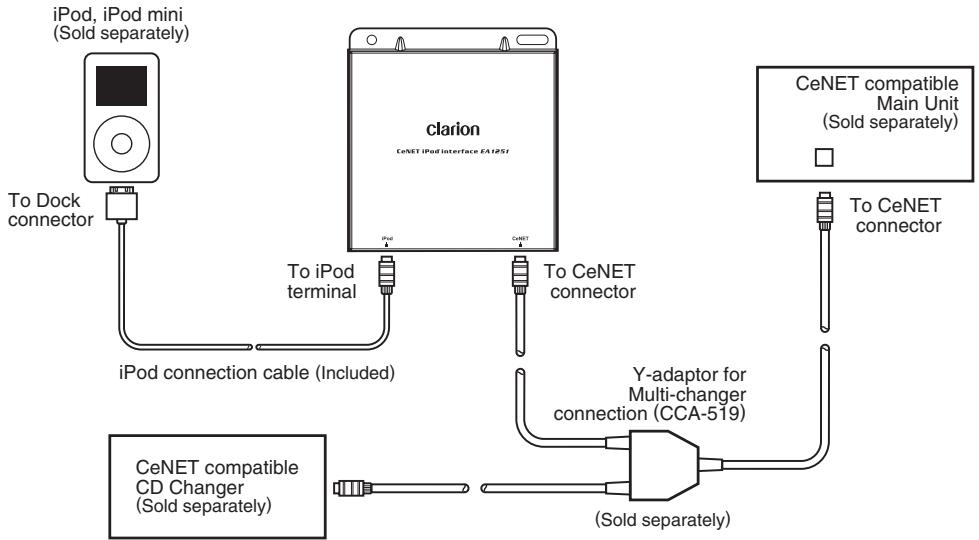
2. Connect the iPod to the CeNET compatible Main Unit and CD Changer.
flowchart
graph TD
    A["iPod, iPod mini (Sold separately)"] --> B["To Dock connector"]
    B --> C["iPod connection cable (Included)"]
    C --> D["Clarion CeNET iPod Interface EA1PSI"]
    D --> E["To iPod terminal"]
    D --> F["To CeNET connector"]
    G["CeNET compatible Main Unit (Sold separately)"] --> H["To CeNET connector"]
    I["CeNET compatible CD Changer (Sold separately)"] --> J["To iPod terminal"]
    J --> K["Y-adaptor for Multi-changer connection (CCA-519)"]
    K --> L["(Sold separately)"]
If user want to connect CD Changer together, please change address switch to No.2
4. INSTALLATION
There are no moving parts in EA1251. However, caution must be taken to make sure minimum damage to the unit. Do not press, puncture or drop the unit at anytime. Install the unit where there is no direct sunlight, away from air condition ducts or high moisture areas and away from other vehicle electronic components.
Using Velcro or 2-Sided Tapes
Stick velcro or 2-sided tapes to the unit.
Note:
In case of using velcro or 2-sided tapes, make sure the unit will not fall down as this might damage the electronic component inside.
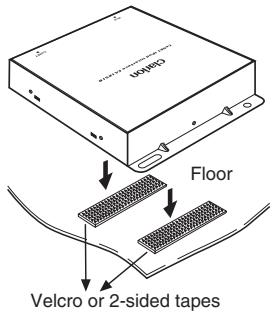
Using Screw
There are screw mounting holes in EA1251. Before drilling, make sure there are no hidden wires and parts that might be damaged.
CAUTION
Improper wiring might damage EA1251, main unit and iPod.

5. OPERATION
Start-up
After connecting your iPod to the EA1251, the iPod display will change to the following:
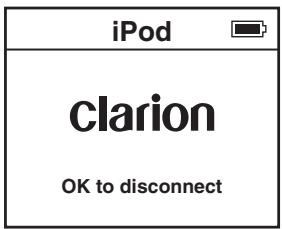
To start iPod operations, change the main unit mode to CD Changer mode. Playback will start automatically.
The display changes from:
Disc Check → Disc Repeat → Start Playing
If the iPod is not connected, the main unit will display "No Magazine".
The main unit is unable to detect the presence of iPod if the battery of the iPod is flat.
Please refer to the Playback section for detailed operation information.
Disconnecting
iPod automatically switches “on” after connecting to EA1251, and it’s power is charged as long as it stays connected with the vehicle ignition key turn to ACC or ON.
To switch off iPod manually, disconnect from EA1251 adaptor.
If vehicle ignition is turned to ACC off, playback is changed to pause, and iPod will go to power off mode in a few minutes.
Playback
iPod buttons are disabled and the display is lock after it is connected to EA1251. All operations of the iPod are controlled from the main unit. Some iPod operations and features will be unavailable. Please read this manual carefully to optimize your iPod operations.
To understand playback features better, please refer to PLAYLIST section.
Default playback setting
By default, the playback setting will be:
- Start to play from DISC1 (All Songs Play)
- Shuffle (Random) Off
- DISC Repeat On
When the iPod is connected, the main unit will initially display "DISC" and "RPT".
Songs number display
During playback, the main unit will display the song number in sequence. However, only a maximum of two digits are displayed. If there are more than 99 songs in your iPod, only the last two digits will be displayed. For example, songs number 102 and 1002 will both be displayed as "02".
Play/Pause
Press Play/Pause button on the main unit to play/pause iPod playback.
Song (Track) Up/Down
Press Track Up/Down button to jump from song to song.
Short press Track Down button jumps playback to the beginning of current song. Short press Track button twice within 2 to 3 seconds jumps playback to the beginning of previous song.
If the last song is playing, by short press Track Up button, will enable playback to jump to the first song in the current disc.
If the first song is playing, short press Track Down jumps to the last song in the current disc.
Fast Forward/Fast Backward
Press and hold Track Up/Down button for more than one second for Fast Forward or Fast Backward functions.
If Track Up button is pressed until end of a current song (Fast Forward operation), normal playback will start for next song (Fast Forward stops automatically).
If Track Down button is pressed until the beginning of current song (Fast Backward operation), normal playback will restart for current song (Fast Backward stops automatically).
During Fast Forward/Backward functions, time display for the song might not be accurate.
Repeat, Random and Scan
By default, Repeat All is on, Shuffle (Random) is off. Scan operation is disabled.
Refer to below table for Repeat and Random functions.
| Key | Acceptable Playlist Mode (DISC 2-6) | All Play Mode (DISC 1) | |
| RANDOM | Short Press | Random playback within a playlist | Random all songs |
| Press and hold for more than 1 second | Random Album playback selection within a playlist | Album Random for all songs | |
| REPEAT | Short Press | Repeat a song | Repeat a song |
| Press and hold for more than 1 second | Repeat a playlist | Repeat all songs | |
- Press and hold Repeat button for more than one second to toggle between Repeat All and Repeat Off.
- Short press Repeat button to toggle between Repeat On and Repeat Off.
- Press Random button one second or longer to toggle between Random Album playback selection On or Off.
- Short press Random button to toggle between Random song selection On or Off.
During Repeat Off function, playback order is DISC1 → DISC2 → DISC3 →...
During Random mode, iPod display is different from normal CD Changer Operation.
Please refer to Playlist Section for further explanation (Pg8).
Direct search
Direct search from the main unit is possible, depending on the main unit features. Use the feature to select file or file from playlist directly.
Using Direct Search function, some limitations apply:
- Only current title of the playlist (disc) can be displayed. Other playlist titles might be displayed as “NO TITLE”, just blank.
- File direct search function cannot be used correctly after the 99th song.
- EA1251 does not support List Screen and KEY PAD screen, as available in certain Multimedia Station models (i.e. VRX745VD).
Playlist
EA1251 simulates iPod as a 6 Disc CD Changer. Therefore, a maximum of five acceptable playlists will be indicated as “Disc” in a 6 Disc CD Changer.
Disc 1 is assigned for All Songs Play Mode.
Discs 2 to Discs 6 are assigned for 5 acceptable playlists.
Other playlist will not be assigned and can only be played under DISC1.
EA1251 can search up to about 400 playlists. If there are more than 400, the main unit might not response to iPod and displays ER2. If so, reduce iPod playlists numbers.
How to create playlist
Playlist must be created in iPod prior to connection to the main unit. Main unit cannot be used to create playlist. Please consult iPod Users Manual for playlist creation.
Acceptable playlist
To create acceptable playlist, assign playlist name as clarion1, clarion2, clarion3, clarion4, and clarion5. Do not add any character before, after or in between the characters. Use lower case for all characters.
When iPod is connected to EA1251 and main unit, main unit will search for available playlist, and automatically assign acceptable playlists to Disc 2, 3, 4, 5 and 6. Only a maximum of 5 playlists are recognized and assigned. If there are less than 5 acceptable playlists, unassigned Disc(s) will show as “No DISC”.
“DISC CHECK” is shown during loading.
Playback position and setting
Playback position and setting will remain the same as long as the iPod stays connected to EA1251. If the iPod is disconnected, playback position will return to the default playback setting.
Playlist assignment
DISC1 → All Songs Play Mode
DISC2 → clarion1
DISC3 → clarion2
DISC4 → clarion3
DISC5 → clarion4
DISC6 → clarion5
Changing playlist
Press Disc Up button to change to next playlist.
Press Disc Down button to change to previous playlist.
Press Band (TOP) button to change to next playlist.
Every time Disc Up, Disc Down or TOP buttons are pressed, playback will start from the first song of the playlist (Disc).
Smart playlist
EA1251 might not play updated songs of “Smart Playlist” properly.
6. TITLE DISPLAY
Some main unit models with CD-Text function have the capability to show CD-Text. When iPod is connected to these models, the following text will be displayed:
• Artist Name as Artist Title (64 byte)
- Song Name as Track Title (255 byte)
- Album Name as Disc Title (64 byte)
Long press Title button to change text as follows: User Title → Disc Title → Artist → Track Title ...
- If there are more than 2 bytes of UTF8 data, EA1251 will change these to space character.
- If every title data is non ASCII, the display will show "NO TITLE".
• Disc Title will display as Album Title.
Note:
Some of main unit may not display title properly. In this case, please press "DISPLAY" key and refresh TITLE display again.
7. USABLE iPod MODELS
iPod 3rd Generation (Software Version 2.2 or higher).
iPod 4th Generation (Software Version 3.01 or higher).
iPod photo (does not apply to picture display).
8. USER TITLE
When EA1251 receives this command, main unit will show as "NO TITLE".
9. CHANGING MODE FROM iPod TO OTHER
If the main unit source button is continuously pressed, the main unit will change from iPod mode to other mode (depends on connections and system installed). iPod playback is temporarily paused.
iPod setting and play position is kept as long as iPod is still connected during this period.
10. ERROR DISPLAYS
| Error Display | Reason | Corrective Measure |
| ER 2 | Main unit does not receive any response from iPod. | Disconnect iPod, reset and reconnect (refer to iPod document).Reduce playlist number or check connection. |
| ER 3 | Communication error. | Change mode of main unit to others and change back to iPod or disconnect/reconnect iPod. |
Table des matières
- INTRODUCTION ...... 11
- PRÉCAUTIONS ...... 11
- BRANCHEMENT 12
- INSTALLATION 13
- CAUTION
- CONNECTION
- Note:
- Connect the iPod to the CeNET compatible Main Unit.
- Connect the iPod to the CeNET compatible Main Unit and CD Changer.
- INSTALLATION
- Using Velcro or 2-Sided Tapes
- Using Screw
- CAUTION
- OPERATION
- Start-up
- Disconnecting
- Playback
- Default playback setting
- Songs number display
- Play/Pause
- Song (Track) Up/Down
- Fast Forward/Fast Backward
- Repeat, Random and Scan
- Direct search
- Playlist
- How to create playlist
- Acceptable playlist
- Playback position and setting
- Playlist assignment
- Changing playlist
- Smart playlist
- TITLE DISPLAY
- USABLE iPod MODELS
- USER TITLE
- CHANGING MODE FROM iPod TO OTHER
- ERROR DISPLAYS
- Table des matières
Brand : CLARION
Model : EA1251
Category : Bluetooth speaker