
CUBE-2025WM - Heating Amantii - Free user manual and instructions
Find the device manual for free CUBE-2025WM Amantii in PDF.


| Product Type | Electric Fireplace Heater |
| Model | CUBE-2025WM |
| Brand | Amantii |
| Mounting Type | Wall-mounted |
| Dimensions (W x H x D) | 20 x 25 x 12 inches |
| Weight | 35 lbs |
| Power Supply | 120V AC, 60Hz |
| Heating Capacity | Up to 400 sq. ft. |
| Heat Output | 4,600 BTU (1,350 W) |
| Control Type | Remote control and touch panel |
| Flame Effect | Realistic 3D flame with multiple colors |
| Thermostat | Adjustable thermostat with digital display |
| Safety Features | Overheat protection, tip-over switch, cool-touch glass |
| Installation | Hardwired or plug-in (cord included) |
| Maintenance | Wipe with dry cloth; no internal cleaning required |
| Warranty | 1 year limited warranty against defects |
| Certifications | UL listed, ETL certified |
Frequently Asked Questions - CUBE-2025WM Amantii
User questions about CUBE-2025WM Amantii
0 question about this device. Answer the ones you know or ask your own.
Ask a new question about this device
Download the instructions for your Heating in PDF format for free! Find your manual CUBE-2025WM - Amantii and take your electronic device back in hand. On this page are published all the documents necessary for the use of your device. CUBE-2025WM by Amantii.
USER MANUAL CUBE-2025WM Amantii
natural_image
Isometric line drawing of a rectangular block with a stepped base (no text or symbols)SAFETY INFORMATION

WARNING
If the information in these instructions are not followed exactly, a fire or explosion may result causing property damage, personal injury or loss of life.
Do not store or use gasoline or other flammable vapors and liquids in the vicinity of this or any other
INSTALLER: LEAVE THIS MANUAL WITH THE APPLIANCE.
CONSUMER: RETAIN THIS MANUAL FOR FUTURE REFERENCE.

WARNING: This product can expose you to chemicals including Lead in the wiring, which is [are] known to the State of California to cause birth defects or other reproductive harm. For more information visit: www.p65warnings.ca.gov
TABLE OF CONTENTS
Please read and carefully follow all of the instruction found in this manual. Please pay special attention to the safety instructions provided in this manual. The instructions included here will assure that you have many years of dependable and enjoyable service from your Amantii product.
Contents
IMPORTANT INSTRUCTIONS ....3
UNPACKING AND TESTING APPLIANCE 4
GROUNDING APPLIANCE 4
LOCATING THE FIREPLACE....4
CUBE-2025WM....5
INSTALLATION WALL-MOUNT....6
INSTALLATION CUBE-BASE-LEGS....7
INSTALLATION CUBE-BASE-SPEAKER....8
HARD- WIRE INSTALLATION ....10
MEDIA OPTIONS....11
OPERATION 12
MANUAL OPERATION....12
AUTO MODE 12
REPLACEMENT PARTS....15
EXPLODED VIEW....16
TROUBLE SHOOTING....17
SERVICE HISTORY....18
IMPORTANT INSTRUCTIONS
- Do not operate appliance before reading and understanding operating instructions. Failure to operate appliance according to operating instructions could cause fire or injury.
- Keep combustible materials, such as furniture, pillows, bedding, papers, clothes and curtains at least 3 feet from the front of the heater; keep them away from sides and rear as well.
- Always unplug heater when it's not in use.
- Do not operate the fireplace if it has a damaged cord or plug, after it has malfunctioned, or if the unit has been dropped or damaged in any way.
- Never place the heater where it may fall into a bathtub or other water containers.
- Do not run cord under carpeting. Do not cover cord with throw rugs, runners, or the like. Arrange cord away from traffic area and where it will not be tripped over.
- To disconnect the heater, turn the controls to "OFF" before removing the plug from the outlet.
- Do not insert or allow foreign objects to enter any ventilation or exhaust opening, as this may cause an electric shock, fire or damage to the heater.
- To prevent a possible fire, do not block air intakes.
- A heater has hot and arcing or sparking parts inside. Do not use it in areas where gasoline, paint or flammable liquids are used or stored.
- Use this heater only as described in this manual. Any other use not recommended by the manufacturer may cause fire, electric shock or injury to persons.
- Always plug appliances directly into a wall outlet/receptacle. Never use an extension cord or relocatable power tap (outlet/power strip).
- Always use properly grounded fused and polarized outlets.
- Always use ground fault protection where it is required by electrical codes.
- Always disconnect the power before performing any cleaning, maintenance or relocation of the heater.
- To prevent a possible fire, do not burn wood or other materials in this heater.
- To prevent electric shock or fire, always use a certified electrician, should new circuits or outlets be required.
- When transporting or storing the heater, keep it in a dry place, free from excessive vibration.
- This appliance should not be modified under any circumstances.
- Keep the packaging material out of reach of children and dispose of the material in a safe manner. As with all plastic bags, these are not toys and should be kept away from children and infants.
- Do not use this heater in small rooms when they are occupied by persons not capable of leaving the room on their own, unless constant supervision is provided.
- If the glass is damaged, do not use the heater in order to avoid a hazard.
- Young children should be carefully supervised when they are in the same room as the appliance. Toddlers, young children and others may be susceptible to accidental contact burns. A physical barrier is recommended if there are at risk individuals in the house. To restrict access to an appliance or stove, install an adjustable safety gate to keep toddlers, young children and other at-risk individuals out of the room and away from hot surfaces.
- CAUTION Some parts of this product can become very hot and cause burns. Particular attention has to be given where children and vulnerable people are present.
UNPACKING AND TESTING APPLIANCE
Carefully remove the appliance from the box.
Prior to installing the appliance, test to make sure the appliance operates properly by plugging the power supply cord into a conveniently located 120 Volt grounded outlet.
Test all aspects of its operation (manual switches, remote and heater) to make sure all components operate correctly.
As with most electronic devices, your new electric fireplace has been designed to operate at temperatures between 5 (41) and 35 (95). During the cold winter months, allow the fireplace to reach room temperature before turning it on.
NOTE: There may be trace of odor during the first few minutes of initial use. This is harmless, normal and will never occur again.
GROUNDING APPLIANCE
This appliance is for use on 120 Volts. The cord has a plug as shown in (A). An adapter as shown in (C) is available for connecting three-blade grounding type plugs to two-slot receptacles. The green grounding lug extending from the adapter must be connected to a permanent ground such as a properly grounded outlet box. The adapter should not be used if a three-slot grounded receptacle is available.
To disconnect appliance, turn controls to off, then remove plug from outlet.
| Cover of Grounded Outlet Box | |
| Metal Screws | |
| Grounding Pin | |
| Adapter | |
| Grounding Means | |
| Grounding Pin |
LOCATING THE FIREPLACE
Plan where to locate and frame the fireplace. This will save time and money later when you install the fireplace. Before installation consider the following:
- Where the fireplace is located must allow for wall and ceiling clearances.
- Consider a location where the fireplace screen will not be exposed to direct sunlight from windows or doors.
- A 15 ampere, 120 Volt, 60 Hz branch circuit with proper ground must be available at the location. Preferably a dedicated branch circuit should be provided to avoid circuit breakers to trip of fuses to blow.
CUBE-2025WM
| Description | ELECTRIC FIREPLACE |
| Voltage 230V AC 60Hz | |
| Watts 1500W Max | |
| NO HEATER 25W | |
| MOTOR HEATER 19W | |
| Appliance Width 19 5/8" or 50 cm | |
| Appliance Height 25 1/4" or 64.1 cm | |
| Appliance Depth 11 3/4" or 30 cm | |
| Gross Weight 50.7 lbs or 22 kgs | |
| Plug Location Left side | |
| Cord Length 70 7/8" or 180 cm | |
| BTU | 4800 |
![25½" [640.8] S½" [140.8] 16½" [420] 4½" [110] 19½" [500]](/content/2026/05/959167/images/3d60822d1dd55ecb62111a94981d495b6381540df3dcf2d8a2f51c3a4f3c4390.jpg)
![153/8" [390] 61/4" [160.2] 37/8" [100] 113/4" [300]](/content/2026/05/959167/images/45176953365dc4a7854d9ca922be065d62732cfc9b599376645fc1890f0f1dcb.jpg)
INSTALLATION WALL-MOUNT
NOTE: Due to the many different materials used on different walls, it is highly recommended that you consult your local builder before you install this appliance.
- Select a location that is not prone to
moisture and is located at least 0.91 m or 3 feet away from combustible materials such as curtains or drapes, furniture, bedding, paper, etc.
- Select a suitable position in which to mount the heater horizontally – use a spirit level to achieve this (Fig. 1).

Fig. 2
- Check the wall to ensure there is no wiring, pipe wires etc. in the area to be drilled. Drill 8 or more pilot holes (8mm diameter & 40mm depth) using a suitable size drill and put the wall plugs into the holes.
- Take out the hanger from the fireplace by unscrew the screw (Fig.2).
- Fix the hanger to the wall. Referring to Fig. 3.
- A void fireplace to move, use fireplace to wall (Fig. 4).
Warning!
Be sure that the bolts have been fixed firmly enough to withstand the weight!
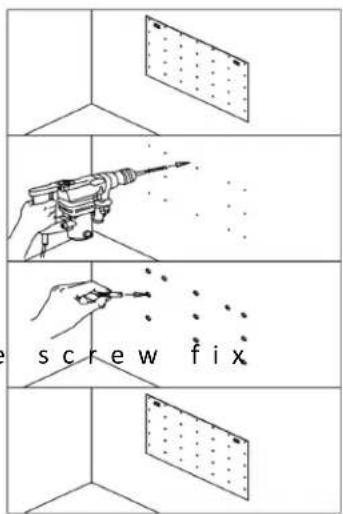
Fig.3

Fig. 1
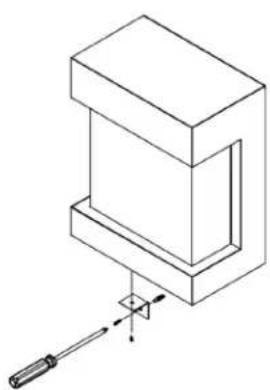
natural_image
Isometric line drawing of a mechanical component with a screwdriver inserted (no text or symbols)Fig. 4
INSTALLATION CUBE-BASE-LEGS
- Screw the base legs to the steel panel.

natural_image
Isometric line drawing of a rectangular plate with four corner brackets and three separate triangular supports (no text or symbols)- Unscrew the adjustable feet from the bottom of the unit.
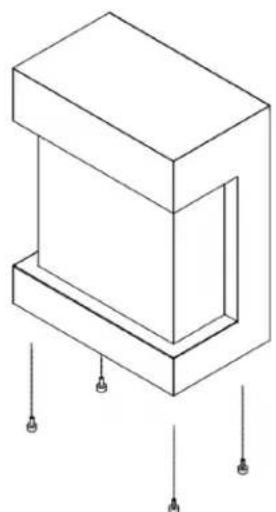
natural_image
Isometric line drawing of a rectangular electronic component with mounting holes and mounting points (no text or symbols)- Place the unit onto the base leg and screw and screw in the adjustable feet, fixing the unit and the base leg.

natural_image
Technical line drawing of a rectangular electronic component with four pins, shown from top and bottom views (no text or symbols)- You have completed the installation of the CUBE-BASE-LEGS.
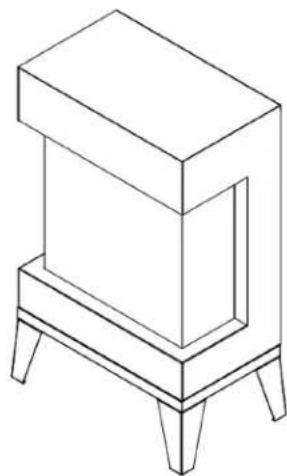
natural_image
Line drawing of a simple rectangular box mounted on a four-legged base (no text or symbols)INSTALLATION CUBE-BASE-SPEAKER
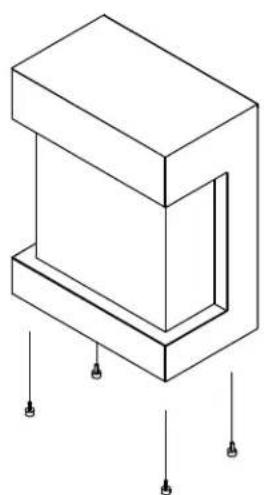
- Unscrew the adjustable feet from the unit.
natural_image
Isometric line drawing of a 3D rectangular block with four vertical supports at the base (no text or symbols)-
Unscrew the rear screws and remove the back steel panel
-
Place the unit on the CUBE-BASE-SPEAKER and screw in the adjustable feet, fixing the unit and the speaker box.

natural_image
Isometric line drawing of a mechanical assembly with two views (top and side), no text or symbols present.- Plug into the back of the unit. Re-install the back steel panel.

natural_image
Pure geometric diagram showing a 3D cube with internal lines and a separate 2D rectangular plane (no text or symbols)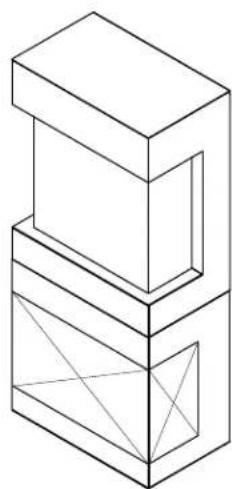
natural_image
Isometric line drawing of a stacked rectangular structure with internal geometric lines (no text or symbols)INSTALLATION OUTDOOR
CUBE electric fireplaces are suitable for installation in outdoor areas protected from direct water impingement. In addition to maintaining the listed mantel and combustibles clearances, a rain protection overhang factor of 1/2 shall be constructed to the front and to each side of the installed appliance. See illustration below. All wiring connections to line power shall be in accordance with local building code requirements.
NOTE: The CUBE Wall Mount Unit is approved for outdoor use. The Cube Speaker Base and Cube Leg Base are NOT approved for use outdoors.

The overhang (A) must extend at least 1/2 the roof-line height (B). Height is measured from the base of the fireplace.
For example: if the roof-line (B) is 8' above the base of the fireplace, the overhang (A) must be at least 4'.
HARD- WIRE INSTALLATION
Turn off the appliance completely and let cool before servicing. Only a qualified technician should service and repair this electric appliance.
If it is necessary to hard wire this appliance, a qualified electrician must remove the cord connection, and wire the appliance directly to the house hold wiring.
This appliance must be electrically connected and grounded in accordance with local codes, if hard wired. In the absence of local codes, use the current CSA C22.1 CANADIAN ELECTRICAL CODE in Canada or the current ANSI/NFPA 70 NATIONAL ELECTRICAL CODE in the United States.
- Remove the cover plate from the left side of the appliance by removing the two screws, as shown below. Unscrew and remove power cord.

natural_image
Close-up of a black electronic device with two red circular annotations pointing to ports, and a cable inserted (no visible text or symbols)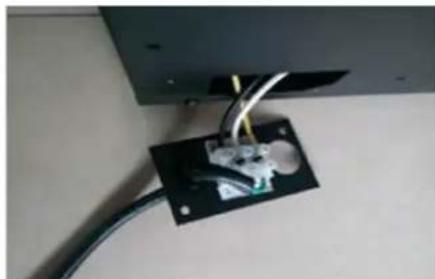
natural_image
Close-up of a black electrical panel with wires and a small inset image, mounted on a wall (no visible text or symbols)- Attach the wiring to the junction block. Please make sure the live wire goes into the "L", the neutral wire into "N" and the ground wire into "G".

natural_image
Close-up of a black metal bracket with three circular holes and wires, no visible text or symbols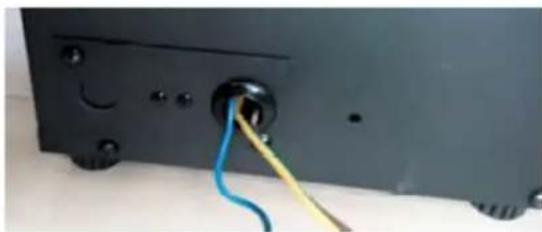
natural_image
Close-up of a black electronic device with a blue and yellow cable inserted into a socket (no visible text or symbols)- Replace the steel plate and screws.
MEDIA OPTIONS
Your fireplace shipped with log set and sable glass.

natural_image
Close-up of five dried plant roots arranged in a row (no text or symbols visible)LOG SET

natural_image
Pile of brown seeds on a white background (no text or symbols)SABLE GLASS
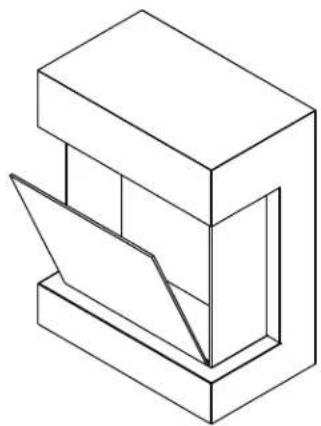
STEP 3: Remove the front glass p decorate your fireplace. Pour the decorative media into the tray. Feel free to us combination of fire glass media that you find most appealing.
natural_image
Isometric line drawing of a mechanical or architectural component with layered structure (no text or symbols)STEP 4: After finishing decoration, re-install the front glass panel using the securing screws removed in step 2.
MEDIA INSTALLATION
STEP 1: Unplug the unit and make sure controls are switched off.
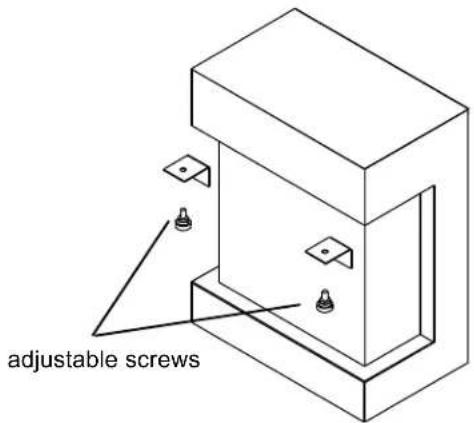
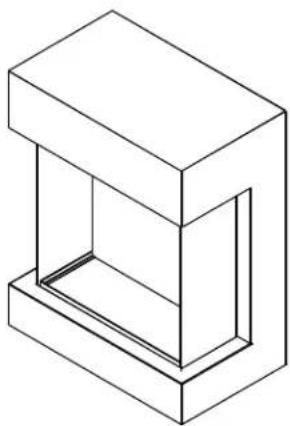
STEP 2: Unscrew 2 adjustable screws that securing the front glass panel. (Always secure the front glass before unscrewing the securing screws, removal of the securing screws may cause the front glass to fall out suddenly)
natural_image
Isometric line drawing of a rectangular container with a recessed top (no text or symbols)OPERATION
The fireplace can be operated either by the switches located on the left front of the fireplace unit or by supplied remote control.
MANUAL OPERATION

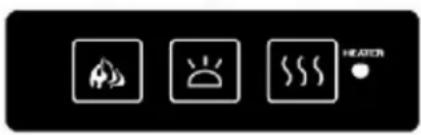
- The main power ON/OFF switch in position O, the fireplace is OFF.
- When main power ON/OFF switch is at position I, the fireplace is ready to use.
- Press the 🎨 button repeatedly to set the heater to desired heat setting. The heater indicator LED will glow which shows the current heater settings.
a) RED 1500W HEAT OUTPUT
b) BLUE 750W HEAT OUTPUT
c) PURPLE AUTO MODE
AUTO MODE
Under this mode the heater will automatically turn ON at high heat setting 1500W heat output when the room temperature drops below 22^(72^) . When the room temperature is between 22-25^(72-77^) the heater output will switch to low heat setting 750W. When the room temperature goes above 25^(77^) the heater will be turned off and the cycle will continue. The LED indicator will be PURPLE in colour under this mode.
- Flame effect: Press the button marked 📋 to adjust the flame brightness. The flame brightness will cycle through -Low-Medium-High -OFF.
- Mood light effect: Press the button marked ✕ to change the mood light colour.
NOTE: If operated at the Low heat setting, the fireplace will not provide as much heat output as in the High heat setting, however the low setting will not require as much electrical power to operate.
To avoid overloading a circuit, do not plug the fireplace into a circuit appliances working. When the fireplace is not in use switch off and unplug.
SAFETY CUT-OFF
- This appliance is fitted with a safety cut-off which will operate if the fireplace overheats (eg. Due to blocked air vents). For safety reasons, the fireplace will NOT automatically reset.
- To reset the appliance, disconnect the appliance from the main supply for at least 10 minutes. Reconnect the supply to the main and switch on the appliance.
natural_image
Line drawing of a remote control unit with batteries and a remote device (no text or symbols)For remote to function make sure the heater is plugged in and main power switch located on the bottom left hand side is at position 1.
When operating the remote make sure you point the remote to the center of the fireplace and make sure each time you press the button the buzzer inside the unit will beep once. It takes some time for the receiver to respond to the transmitter. Do not PRESS the buttons more than once within two seconds for correct operation.
Power on ⏻ button: The power-on button at top left corner of the remote is the main ON/OFF power button. This will turn off all the functions and the fireplace will be in standby mode.
DISPLAY ON/OFF button: Switching the fireplace flame and tray light ON/OFF. It has functions of setting memory.
DISPLAY BLUE button: Adjust the blue color brightness of flame and tray.
DISPLAY YELLOW button: Adjust the yellow color brightness of flame and tray.
DISPLAY ORANGE button: Adjust the orange color brightness of flame and tray.
MOOD LIGHT ON/OFF button: Switching the mood light ON/OFF.
ADJUST button: Switching the color of the mood light.
FLASH button: Switches the mood light into flash mode, this cycles through all mood light colors.
HEATER ON/OFF button: Switching the heater ON/OFF. It has functions of setting memory.
HIGH button: Press the high button to switch the heater to high heat setting 1500W.
LOW button: Press the low button to switch the heater to low heat setting 750W.
TEMP. button: Press the TEMP. button to switch the heater to AUTO mode. Under this mode the heater will operate in similar way as explained above for the manual operation.
INSTALLING WALL THERMOSTAT
WALL THERMOSTAT WIRING DIAGRAMS

Wire the wall thermostat prior to installing the fireplace.
WALL THERMOSTAT WIRING (24 VAC)
Install Wall Thermostat per instructions provided with kit and per the following information:
- Turn off circuit breaker.
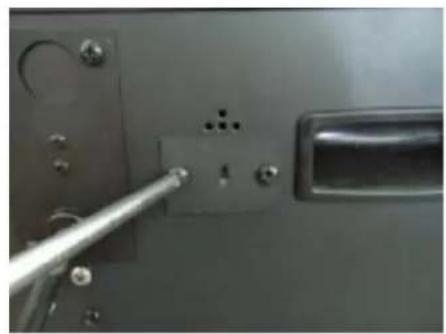
- Remove cover plate located on the left side of appliance.
- Pull the wire out and cut the inside thermostat. Connect the wires to the wall thermostat as shown below. Follow instructions provided with wall switch kit.
natural_image
Close-up of a metallic tool inserted into a black electrical socket on a metal panel (no visible text or symbols)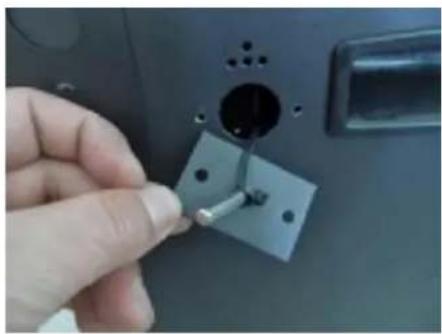
natural_image
Close-up of a hand inserting a small metallic component into a dark socket (no text or symbols visible)
natural_image
Close-up of a hand using pliers to adjust a white cable inside a device (no visible text or symbols)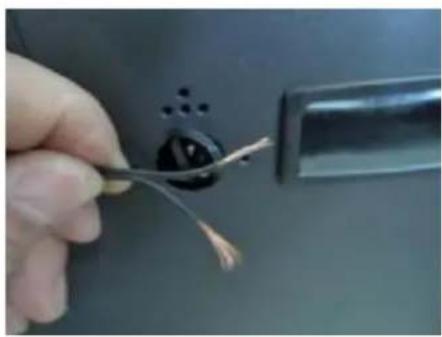
natural_image
Close-up of a hand holding a wire with wires inserted into a black electrical socket (no text or symbols visible)REPLACEMENT PARTS
This list contains replacement parts
| NO. | PART NUMBER | DESCRIPTION QTY. | |
| 1 | 10701357 FRONT CLEAR GLASS (MIDDLE) 1 | ||
| 2 | 10201505 ADJUSTABLE SCREW 2 | ||
| 3 | 3123010 FIXER FOR FRONT GLASS PANEL 1 | ||
| 4 | 10701356 | SIDE GLASS PANEL 2 | |
| 5 | 10702216 VISUAL GLASS 1 | ||
| 6 | 10702215 | BOTTOM GLASS | 1 |
| 7 | 602082 BLOWER AND HEATER ASSEMBLY 1 | ||
| 8 | 601036 | CONTROL PANEL | 1 |
| 9 | 10104002 SWITCH | 1 | |
| 10 | 3158501 FIRE BOX | 1 | |
| 11 | 601032B | CIRCUIT BOARD | 1 |
| 12 | 301506 REMOTE RECEIVER 1 | ||
| 13 | 10101225 FLAME MOTOR 1 | ||
| 14 | 3173502 | FLICKER ASSEMBLY | 1 |
| 15 | 1 | LED STRIP | 1 |
| 16 | 10105063 | REMOTE CONTROL | 1 |
| 17 | 10125025 | TOP LIGHT | 1 |
*Remote control and top light are not shown in the exploded view.
EXPLODED VIEW

Wiring Diagram

TROUBLE SHOOTING
| PROBLEM POSSIBLE CAUSE SOLUTION | ||
| Dim or no flame | Flame LED's are burnt out. | Inspect the LED's and replace them if necessary. |
| Back black cloth is falling off and rolled up in the flicker. | Change a flicker and back black cloth. | |
| Ember bed is not glowing or dimming | Ember LED's are burnt out Inspect the ember bed LED's and replace them if necessary. | |
| Appliance turns off and will not turn on | Appliance has overheated, and safety device has caused the thermal switch to disconnect. | Turn off the main appliance to cool for 10 minutes, turn back on. |
| House circuit breaker has tripped. | Reset house circuit breaker. | |
| Appliance's fuse has blown. Replace the fuse. | ||
| Appliance will not co on when switch is flipped to ON | Appliance is not plugged into an electrical outlet. | Check plug and plug in. |
| Appliance has overheated and safety device has caused the thermal switch to disconnect. | Turn off the main appliance to cool for 10 minutes, turn back on. | |
| Circuit board is burnt out. Inspect the circuit board and replace it if necessary. | ||
| No warm air coming out of appliance | Heater is burnt out. | Inspect the burner and heater assembly and replace it if necessary. |
| Flame sputters | Flame motor is defective. | Call a qualified service technician and replace flame motor. |
| Remote Control does not work. | Low batteries. Unit switch in "O" position. | Replace AAA batteries in remote control. Turn the switch in "I" position. |
| Flame is fixed. | Wiring may be loose or the flame motor may be defective. | |
n s w i t
n s w i t
SERVICE HISTORY
This heater must be serviced annually depending on usage.
| Date | Dealer Name | Service technician Name | Service Performed | Special Concerns |
NOTES:
WARRANTY FOR PRODUCTS MANUFACTURED AFTER JANUARY 1st, 2016
Amantii Imports Corp. ("Amantii") warrants that your newly purchased Amantii electric fireplace is free from manufacturing and material defects for a period of two (2) years from the date of the first purchase, subject to the conditions and limitations contained below.
Warranty Application & Exclusions
This limited warranty applies to your newly purchased Amantii electric fireplace; the limited warranty's application is limited to purchases made in any province of Canada or in any of the 52 States of the United States of America, including the District of Columbia. Only the original purchaser of the product is eligible for coverage under this limited warranty; the warranty is not transferable.
Products excluded from this limited warranty
Light bulbs are not covered by this limited warranty and are the sole responsibility of the owner/ purchaser. Amantii does not cover service or labor charges.
Warranty Coverage and Term
Products covered by this limited warranty have been tested and inspected prior to shipment and, subject to the provisions of this warranty, Amantii warrants such products to be free from defects in material and workmanship for a period of two (2) years from the date of the first purchase of such products.
The limited two (2) year warranty period for products also applies to any implied warranties that may exist under applicable law. Some jurisdictions do not allow limitations on how long an implied warranty lasts, so the above limitation may not apply to the purchaser.
All other warranties-expressed or implied-with respect to the product, its components and accessories or any obligation/liabilities on the part of Amantii are hereby expressly excluded.
Limitations to Coverage Under Limited Warranty
This limited warranty does not apply to products that have been repaired, except by Amantii or its authorized service representatives, or otherwise altered. This limited warranty further does not apply to defects resulting from misuse, abuse, accident, neglect, incorrect installation, improper maintenance or handling, or operation with an incorrect power source. Products made by other manufacturers, sold with the product or thereafter, are not covered by this limited warranty. The use of unauthorized components will render this warranty null and void.
Outdoor Units
All units that are installed outdoors or in moisture intense conditions must include a rain protection overhang factor of 1/2 shall be constructed to the front and to each side of the installed appliance. See outdoor installation instructions for more information. Failure to comply will result in voiding the warranty.
Defects
Defects must be brought to the attention of the selling dealer. Please have your proof of purchase, catalogue/model and serial numbers available when contacting dealer; any and all service under the limited warranty requires a proof of purchase of the product. Should a product or part covered by this limited warranty be proven to be defective, in material or workmanship, and during the two (2) year limited warranty period, Amantii will replace such defective product or part without charge. If Amantii is unable to replace such product, or if replacement is not commercially practicable or cannot be timely done, in its sole discretion Amantii may, in lieu of replacement, choose to refund the purchase price for such product or part. Amantii does not cover labor or service charges to replace said parts.
Limitations
In no event will Amantii, including without limitation any of its directors, officers, shareholders, employees, consultants, agents, heirs, executors, administrators and assigns, be liable to the purchaser or any third party, whether in contract, in tort, or on any other basis for any indirect , special, punitive, exemplary, consequential, or incidental loss, cost or damage arising out of or in connection with the sale, maintenance, use or inability to use the product, even if Amantii, including without limitation any of its directors, officers, shareholders, employees, consultant s, agents, heirs, executors, administrators and assigns, have been advised of the possibility of such losses, costs or damages, or if such losses, costs or damages are foreseeable. In no event will Amantii, including without limitation any of its directors, officers, shareholders, employees, consultants, agents, heirs, executors, administrators and assigns, be liable for any direct losses, costs or damages that exceed the purchase price of the product.
Some jurisdictions do not allow the exclusion or limitation of incidental or consequential damages, so the above limitation or exclusion may not apply to the purchaser.
Application of Provincial and State Law
This limited warranty gives you specific legal rights, and you may also have other rights which vary from jurisdiction to jurisdiction. The provisions of the United Nations Convention on Contracts for the Sale of Goods shall not apply to this limited warranty or the sale of products covered by this limited warranty.
General
Amantii reserves the right to make changes at any time without notice, in design, material, specifications, prices and the right to discontinue styles and products.



- TABLE OF CONTENTS
- Contents
- IMPORTANT INSTRUCTIONS
- UNPACKING AND TESTING APPLIANCE
- GROUNDING APPLIANCE
- LOCATING THE FIREPLACE
- INSTALLATION WALL-MOUNT
- INSTALLATION CUBE-BASE-LEGS
- INSTALLATION CUBE-BASE-SPEAKER
- INSTALLATION OUTDOOR
- HARD- WIRE INSTALLATION
- MEDIA OPTIONS
- MEDIA INSTALLATION
- OPERATION
- MANUAL OPERATION
- AUTO MODE
- SAFETY CUT-OFF
- INSTALLING WALL THERMOSTAT
- WALL THERMOSTAT WIRING DIAGRAMS
- WALL THERMOSTAT WIRING (24 VAC)
- REPLACEMENT PARTS
- TROUBLE SHOOTING
- SERVICE HISTORY
- NOTES:
- WARRANTY FOR PRODUCTS MANUFACTURED AFTER JANUARY 1st, 2016
- Warranty Application & Exclusions
- Products excluded from this limited warranty
- Warranty Coverage and Term
- Limitations to Coverage Under Limited Warranty
- Outdoor Units
- Defects
- Limitations
- Application of Provincial and State Law
- General
Brand : Amantii
Model : CUBE-2025WM
Category : Heating