GT-7 - Radar detector Beltronics - Free user manual and instructions
Find the device manual for free GT-7 Beltronics in PDF.


| Product Type | Radar/Laser Detector with GPS |
| Brand | Beltronics |
| Model | GT-7 |
| Mounting Type | Windshield mount with StickyCup |
| Power Source | 12V DC via SmartCord (cigarette lighter adapter) |
| Display | Multicolor OLED with speed display |
| Radar Bands Detected | X, K, Ka, POP, Laser |
| GPS Features | TrueLock false alert lockout, AutoLock, Mark Locations, DEFENDER Database |
| Sensitivity Modes | Highway, Auto, Auto No X |
| Voice Alerts | Digital voice announcements (can be turned off) |
| Audio Alerts | Standard (Geiger counter) and Mild (doorbell chime) tones; AutoMute, SmartMute |
| Connectivity | Mini USB for updates, earphone jack, modular jack for SmartCord |
| SmartCord Features | Power indicator, alert light, mute button |
| Additional Features | Over-Speed Alert, Cruise Alert, TSR (traffic sensor rejection), ESCORT Live compatible |
| Software Updates | Via USB connection; register at Beltronics.com |
| Warranty | One-year limited warranty |
| FCC Compliance | FCC ID: QM67M5, Part 15 compliant |
| Safety | AutoPower feature to prevent battery drain; dark mode for discreet driving |
| Maintenance | Clean StickyCup with warm water; detector surface wipe clean |
| Spare Parts / Accessories | Coiled SmartCord, DirectWire SmartCord, SmartCord Live, SHIFTER ZIR4, replacement cases |
Frequently Asked Questions - GT-7 Beltronics
User questions about GT-7 Beltronics
0 question about this device. Answer the ones you know or ask your own.
Ask a new question about this device
Download the instructions for your Radar detector in PDF format for free! Find your manual GT-7 - Beltronics and take your electronic device back in hand. On this page are published all the documents necessary for the use of your device. GT-7 by Beltronics.
USER MANUAL GT-7 Beltronics
5442 West Chester Road
West Chester OH 45069
866.468.0322
Beltronics.com
The following table is a duplicate of the text to be corrected as follows:
©2013 Beltrorics USA, Inc. Beltrorics, 61-74, ESCOT LIVE, Delaware, ARH, PUELock, SmartShen, SpectDisplay, AutoSensitivity and ExeterMeter™ we trademarks of Beltronics USA, Inc.
Manufactured in Canada, Features, specifications, and prices subject to change without notice.
FCC NOTE: Modifications not expressly approved by the manufacturer could void the user's FCC granted authority to operate the equipment.
FCC ID: QM67M5. This device complies with part 15 of the FCC rules. Operation is subject to the following two conditions (If this device may not
cause harmful interference, and (2) this device must accept any interference received including interference that may cause undesired operation.
Live life in the passing lane.
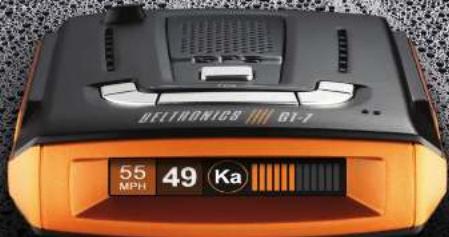
GPS-accelerated accuracy blocks false alarms.


Extreme radar / laser detection protection.
Powerful Digital Signal Processor | Instantly clear voice alerts | Convenient magnetic mount system
Owner's Manual
Congratulations
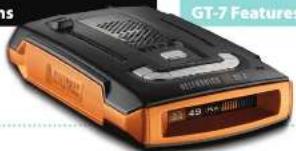
Take the freedom of the road back with the supercharged Beltronics GT-7, equipped with GPS technology accuracy to eliminate false alerts.
You've just purchased the first and only radar/laser detector to offer High Definition (HD) performance and accuracy—the all-new Beltronics GT-7. Now you can take ticket protection to the max, and protect your wallet too.
(1) 2017. The following table provides the original text: "The General Public Service
- GT-7's HD Performance accurately identifies real threats sooner than any other detector, providing more advanced warning when you need it.
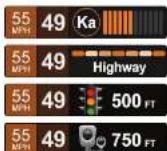
- GT-7's new multicolor OLED display features brilliant graphics and intuitive icons that help you identify threats at a glance.
- GT-7's GPS location-based intelligence automatically locks out false alerts and allows you to mark locations for future reference.
- GT-7 gives you access to DEFENDER Database, which warns you of verified speed traps, speed cameras, and red light cameras.
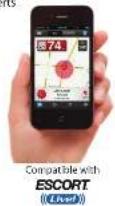
- Plus, it's compatible with ESCORT Live, the award-winning ticket protection network that warns you of upcoming alerts received and reported by other users in the area, and gives you access to local speed limit data for over-speed alerts (requires optional SmartCord Live and app subscription).
HIGH DEFINITION RADAR PERFORMANCE
Table of Contents
Getting Started 4
Controls & Features 5-9
• GT-7 Detector 5
- SmartCord 5
• AutoPower 6
• Volume 6
- Mute 6
AutoMute 6
SmartMute 6
- User Mode 6
Advanced 6
Novice 6
• Display Color 6
• Display Brightness
- Speed Display 6
• Radar Sensitivity 7
Highway 7
Auto 7
Auto No X 7
• TrueLock/Locking Out False Alerts
• AutoLock
- Marking Locations 7-8
• Over-Speed Alert
- Alert Tones
Standard 8
Mild 8
• Voice Alerts 9
- Signal-Strength Meter 9
Standard 9
Tech 9
Threat 9
Programming 10-11
• How to use Programming 10
• Overview of Programming 10-11
■ Notes for Programming 10
- Clearing the Database 10
■ Restoring Factory Settings 10
■ ESCORT Live! 10
Understanding Your Detector 12-14
• Interpreting Alerts 12
• How Radar Works 13
- How Pop Works 13
• How Laser Works 13
• How TSR Works 13
• How Red Light Cameras Work 14
• How Speed Cameras Work 14
■ How GPS Works 14
Troubleshooting 15
Software Updates 16
Service 16
Parts & Accessories 17
Warranty 17
Getting Started
What's Included
- Radar/laser detector unit
- StickyCup windshield mount
• SmartCord power adapter - Quick Reference Guide
Travel case
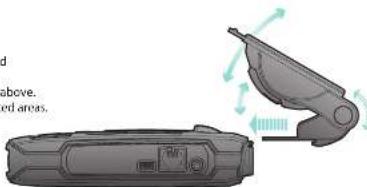
Mounting Tips
• Center on windshield between driver and
passenger
- Ensure clear view of road ahead and sky above.
- Avoid windshield wipers and heavily tinted areas.
natural_image
Illustration of a handheld device with a fan and sensor, showing no text or symbols on the device itself.To Mount In Your Vehicle:
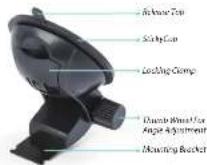
1 Remove backing from StickyCup mount.
2 Firmly press StickyCup onto windshield and flip locking clamp to secure.
3 Slide the detector onto the mounting bracket until it's fully engaged. The magnet inside holds the detector in place
4 To adjust view, loosen thumb wheel and adjust angle of mounting bracket. Tighten thumb wheel to secure.
5 To remove detector, gently pull the detector off the mounting bracket.
6 To remove mount from windshield, release locking clamp and pull tab on top of StickyCup
StickyCup Care Instructions
To clean your StickyCup, simply rinse under warm water, gently wipe off any debris and allow to air dry.
Using GT-7:
1 Plug small end of SmartCord into modular jack on GT-7 and large end of SmartCord into your car's lighter/accessory socket.
2 GT-7 should power on automatically. If not, press the device's power button.
NOTE: You can easily access and customize all of your Settings and Preferences by pressing and holding the MRK and SEN buttons. See Programming for details
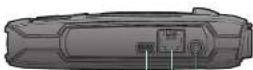
Earphone Jack
Connects to optional 3.5 mm stereo earphone.
Modular Jack
Connects to SmartCord for powering your device
Mini USB Jack
Connects to your computer via USB A/mini B cable for downloading software updates
Controls & Features
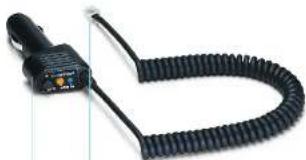
SmartCord
The SmartCord is a special power cord that has a power-on indicator, a bright alert light that wams of radar or laser, and a convenient MUTE button right on the plug. It's perfect for any car where reaching the detector's MUTE button on the windshield is a stretch. For discreet night driving, put GT-7 Max in Dark mode and use the SmartCord for your visual alerts. Other drivers won't know you have a detector.
For descriptions of features and functions available when connected to SmartCord Live with ESCORT Live, visit escortinc.com and download the SmartCord Live user manual for your IOS or Android OS smartphone.
Using SmartCord
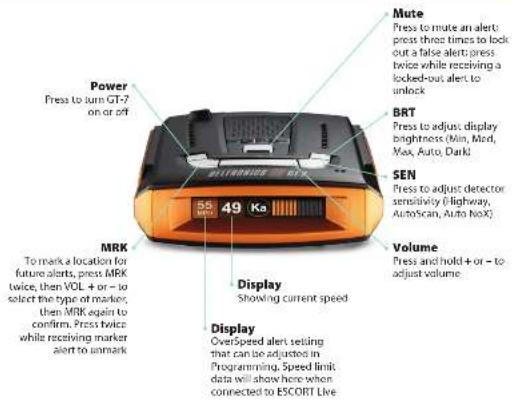
- Mute Button: Press to mute an alert; press three times to lock out a false alert; press twice while receiving a locked-out alert to unlock.
- Alert Light: Blinks orange when receiving an alert.
• Power Light: Lights blue when receiving power.
natural_image
Close-up of a black flexible cable with a connector and indicator lights (no text or symbols visible)Modular Connector
Plugs into detector jack
Lighter Adapter
Connects to lighter/accessory socket


Controls & Features
AutoPower
This feature automatically turns off GT-7 after a set period of time to save unnecessary drain on your battery. This is especially useful if your vehicle has a constant-power ignition. See the Settings & Preferences section for details on how to customize the AutoPower feature.
NOTE: When AutoPower is ON, the display will go dark after the vehicle has been sitting still for 30 minutes, to save screen life. The screen will turn back on automatically once your vehicle reaches a speed of 10 mph.
Volume
To adjust GT-7 to your preferred audio level for alerts, simply press and hold VOLUME + or -, The audio will increase/decrease while it is depressed. Once you reach the desired audio level, simply release the button. GT-7 will retain this setting in its memory, even if the system is turned off.
Mute
The MUTE button allows you to silence the audio during an alert. Simply press the button during the alert. Once the radar encounter has passed, the mute will disengage, and the audio will return to your pre-set level. You can also silence an alert by pressing the SmartCord MUTE button.
AutoMute
Your GT-7 also includes the patented AutoMute feature. Once GT-7 alerts you to a radar encounter at your selected volume level, it automatically reduces the volume more than 50%. This keeps you informed without the annoyance of a continuous full-volume alert. If you prefer, you can turn the AutoMute feature off. See the Programming section for details.
SmartMute
If AutoMute has already reduced the volume for one alert and a higher-priority band is detected, GT-7 will sound an alert at your set volume for the second band before adjusting the volume back down to the AutoMute level.
User Mode
GT-7 offers two unique user modes:
Advanced
In this mode, you can access and customize all of GT-7's settings and preferences.
Novice
In this mode, you can access and customize units (English or metric) and display color only. All other preferences are set to the factory defaults. To view all settings and preferences, you must switch back to Advanced mode.
Display Color
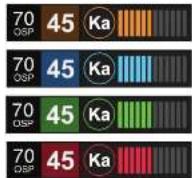
Your detector screen can be displayed with copper, blue, green or red accents to match the dashboard lighting of various vehicles. See the Programming section for details on how to change the display color.
Copper
Blue
Green
Red
Display Brightness
GT-7's display brightness is automatically adjusted to suit ambient lighting conditions in your car. (The light sensor is located inside the controller, so the display may dim momentarily when you access the buttons.) If you prefer, you can press the BRT button to set a fixed brightness level:
Auto Automatically adjusts brightness
(factory setting)
Dark Dark mode
Minimum Minimum brightness
Medium Medium brightness
Maximum Maximum brightness
NOTE: If you select Dark mode, the display will not provide any indication that it is on. Therefore, only audible alerts will notify you of detected signals.
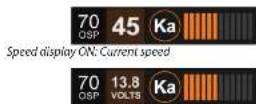
Speed Display
GT-7 displays your current speed just to the right of the Over-Speed Alert setting (or posted speed limit for your current location, if connected to ESCORT Live). If you prefer, you can turn off the speed display feature (see Programming section for details). If speed display is OFF, GT-7 will simply display your battery voltage in this location.
Speed display OFF: Battery voltage
Radar Sensitivity
The SEN button allows you to select your preferred radar sensitivity: Highway, Auto or Auto No X. In general, Beltronics recommends Auto for everyday driving.
Highway
In this setting, GT-7 will detect all radar signals on all bands at maximum range.
Auto
In this setting, GT-7 will continuously analyze all incoming signals and intelligently adjust the sensitivity circuits, providing long-range warning with minimal false alarms.
Auto No X
Auto No X works the same as Auto mode; however, X band is completely turned off.
WARNING: Do not use GT-7 in Auto No X unless you are absolutely certain that there are no traffic radar guns using X band in your area.
TrueLock/Locking Out False Alerts
GT-7 is equipped with a TrueLock GPS Filter to lock out and store in its memory false alerts. To lock out a false alert (X band, X band or laser only), press the MUTE button on the detector or the SmartCord three times during an alert. Pressing the first time will silence the audio. Pressing a second time will generate a prompt on the display that will read "Lockout?" Press a third time to confirm you went to lock this signal out by location and frequency. A "Stored" message will be displayed.
Once a signal has been stored, GT-7 will reject the signal the next time you approach this area and will display the locked-out alert.
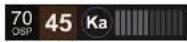
Locked out alert
To unlock a signal that has already been stored, simply press and hold the detector or SmartCord MUTE button while receiving the locked out alert. The display will read "Unlock?" Press the detector or SmartCord MUTE button again to unlock it from memory. The display will then read "Unlocked" to confirm your action.
For details on how to turn the GPS Filter off, refer to the Programming section.
NOTE: When the GPS Filter is set to OFF, you do not have access to GT-7's other GPS-enabled features (e.g., DEFENDER Database alerts, marking locations, etc.).
AutoLock
The Autolock feature analyzes (over time) the source of radar signals by location and frequency. This allows GT-7 to determine if a signal is a real threat or a false one. If it determines that the signal is an automatic door opener, motion sensor, etc., it automatically locks out this source at this particular location. A "Stored" message will appear on the display when a signal has been automatically locked out. If you prefer, you can turn the Autolock feature off. See the Programming section for details.
NOTE: AutoLock typically needs to encounter the exact frequency in the same location approximately three times to lock it out. Since some door openers are turned on and off routinely, some variations may occur. When AutoLock is on, GT 7 will also unlearn signals to protect you from locking out real threats. If a particular signal is no longer present at a location that was previously locked out, GT 7 will unlock that signal.
Marking Locations
The MRK button allows you to mark a specific location and label it for future reference. Once marked, GT-7 will provide an alert when you reach this area again.
Controls & Features
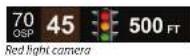
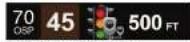
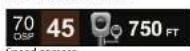
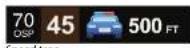
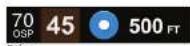
GT-7 gives an advanced warning of upcoming markers at the following distances:
• Red light cameras: 250 ft or 10 seconds
• Red light & speed cameras: 250 ft or 10 seconds
• Speed cameras: 500 ft when traveling below 55
mph; 1,000 ft when traveling above 55 mph
• Speed traps: 0.3 mi or approximately 1,584 ft
- Other: 500 ft when traveling below 55 mph; 1,000 ft
- Red light cameras: 250 ft or 10 seconds
- Red light & speed cameras: 250 ft or 10 seconds
- Speed cameras: 500 ft when traveling below 55 mph; 1,000 ft when traveling above 55 mph
- Speed traps: 0.3 mi or approximately 1,584 ft
- Other: 500 ft when traveling below 55 mph; 1,000 ft when traveling above 55 mph
To mark a location, press the MRK button. The display will read "Mark?" Press MRK again to bring up a menu of markers to choose from. Press VOLUME + or - to scroll through the markers, then press MRK to select the marker you wish to use at this location. The display will read "Marked!"
NOTE: When a location is marked the first time, you must travel at least 1 mile away from that location to receive an alert when you return to the area.
To unmark a location, touch the MRK button when you are receiving a marked-location alert. The display will read "Unmark?" Touch the MRK button again to confirm. The display will read "Unmarked!" To customize the types of markers you want to be able to set and receive, see the Settings & Preferences section.
Over-Speed Alert
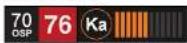
With GT-7, you can set the Over-Speed Alert to notify you when you are travelling over a specified speed (factory default is 70 mph; see Programming for details). When you travel above the speed threshold you have set, the background display for your current speed will turn red to alert you that you have exceeded the specified speed.
Standard
Alert Tones
Standard
GT-7's factory default for alert tones is the Beltronics Standard mode, in which GT-7 uses a Gelger counter-type sound to indicate the signal strength and type of radar signal being encountered. When you encounter radar, a distinct audible alert will sound and will increase as the signal gets stronger. This allows you to judge the distance from the signal source without taking your eyes off of the road. Each band has a distinct tone for easy identification:
X band = beep tone
K band = brap tone
Ka band = double-brap tone
Laser = solid brap tone
Pop = solid brap tone
Mild
If you prefer, you can change your alert tone settings to Mild mode, which offers softer, simpler alert tones that are less obtrusive to the driving experience:
X band, K band,
Ka band and Pop = Doorbell chime
Low signal strength = Double chime
High signal strength = Triple chime
If alert remains in area
more than 15 seconds = Single chime
(as a reminder)
Laser = Solid brap tone (Since laser signals are a possible threat no matter how weak, GT-7 alerts you to all laser signals with a full laser alert.)
See the Programming section for details on switching your alert tones.
Cruise Alert
The Cruise Alert feature allows you to modify your alert tones when traveling below a specified speed (factory default is 20 mph; see Programming for details). For all alerts received while traveling below the specified speed, GT-7 will sound a simple double-beep alert.
Voice Alerts
GI-7 provides digital voice announcements for alerts and selection feedback. If you prefer, you can turn off the voice feature. See the Programming section for details..
GT-7 offers four different settings for displaying alerts:
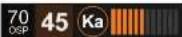
Standard
The Standard option provides information on a single radar signal. When GT-7 detects radar, it displays the band of the radar (X, K or Ka) and a bar graph of the signal's strength. When laser is detected, the display will simply read "Laser." If there are multiple signals present, GT-7 will determine which one is the most important threat to display.
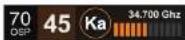
Tech
The Tech option is an advanced display for experienced detector users. In this mode, it will display the actual numeric radar frequency being received. Even long time detector users will require some time to get familiar with this new level of information about detected signals. To use GT-7 in Tech meter mode, you must select it in Programming
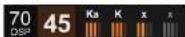
Threat
The Threat option is also designed for the advanced detector user. In this mode, GT-7 simultaneously tracks up to four radar signals (Ka band, X band, K band and X band) and shows each signal along with a bar graph of its strength. Threat meter mode can help you spot a change in your normal driving environment (e.g., a traffic radar unit being operated in an area where there are normally other signals present). To use GT-7 in Threat meter mode, you must select it in Programming.
ExpertMeter simultaneously tracks up to four radar signals: Ka band, X band, K band and X band. It shows each signal along with a bar graph of its strength. ExpertMeter can help you spot a change in your normal driving environment (e.g., a traffic radar unit being operated in an area where there are normally other signals present).
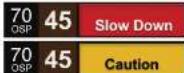
Basic
In this mode, Basic messages replace actual bands and signal strengths or frequencies. "Caution" is used when an alert is received while you are traveling below your current Cruise Alert setting (or posted speed limit for current location, when connected to ESCORT Live). "Slow Down" is displayed when an alert is received while you are traveling above the current Cruise Alert setting (or posted speed limit for current location, when connected to ESCORT Live).
NOTE: GT-7's selectable bands feature allows you to customize which bands are monitored. For details on modifying your band detection, see the Programming section. For details on the various radar/laser bands and how they work, see the Understanding Your Detector section.
Programming
How To Use Programming
To access Programming, press and hold both the MRK and SEN buttons. GT-7 will display
"Program," indicating it is in program mode.
Once the unit is in Programming mode, the MRK button is used to review the preference categories, and the VOLUME + AND - buttons are used to change the individual settings within the selected option.
To exit Programming, simply wait a few seconds without pressing a button. The unit will display "Completed" and return to normal operation.
Example:
Here's how you would turn the AutoMute feature off.
1 Enter Programming by pressing and holding both the MRK and SEN buttons. GT-7 will display "Program."
2 Press the MRK button to scroll through the categories to "AutoMute."
3 Since the factory setting is for AutoMute to be on, GT-7 will show AutoMute as ON.
4 Press the VOLUME + or - button to change from ON to OFF.
5 To complete this change, simply wait a few seconds without pressing a button. The unit will display "Complete" to confirm your selection.
NOTE: You can only access and customize the AutoMute feature while in the Advanced user mode. See Overview of Programming below for details on how to switch user modes.
Overview Of Programming
Press and hold the MRK and SEN buttons to access Programming. To exit Programming, simply wait a few seconds without pressing a button. The unit will display Completed to confirm your selections.
NOTE: AutoPower works only with constant-power ignitions.
NOTE: When AutoPower is ON, the display will go dark after the vehicle has been sitting still for 30 minutes, to save screen life. The screen will turn back on automatically once your vehicle reaches a speed of 10 mph.
To view your device's serial number and software version, press and hold the MRK and MUTE buttons while powering on the detector.
Notes For Programming
For descriptions of features and functions available when connected to SmartCord Live with ESCORT Live visit EscortInc.com and download the SmartCord Live user manual for your iOS or Android OS smartphone. Also visit Beltronics.com for the GT-7 Owner's Manual.
To view serial number and software revision press MRK and MUTE while powering on detector.
Clearing The Database
At some point, you may wish to clear some of the data in GT-7's database. This may include any of the following: DEFENDER Database data, marked locations or locked-out locations. For details on how to clear, see the Programming section.
Restoring Factory Settings
To restore GT-7 to its original factory Settings, press and hold SEN and BRT while turning the power on. A Restored message will display, acknowledging the reset.
ESCORT Live!
GT-7 is fully compatible with the new SmartCord Live and ESCORT Live smartphone application. For comprehensive information on these options and all of ESCORT Live's features and functions, visit escortradar.com.
Press MRK to go from Press VOLUME + or - to change
| User Mode | Advanced®Novice | Access and automatic All Settings and PreferencesAccess and customize units and display color (all other |
| Settings are set to factory details | ADTE Switch back to Advance mode to view all Preferences | |
| Plot | Scan Bar®Full Word | Scanning Run with Full WordFull Word: AutoScan, Auto NaxL or Highway |
| Display Color | Copper®/Blue/Green/Red | Set colors to match your vehicle's dash display |
| Speed Display | On®Off | Displays current speedDisplays battery voltage |
| Cruise Alert | Off / 20-160 mph20 mph* | Offers double beep alert tones below specified speed |
| Over Speed | Off / 20-160 mph70 mph* | Remindy you whom you exceed a specified speed |
| Meter Mode | Standard®TechThroatBasic | Single band with bar graph of signal strengthSingle band with matrix frequencyMultiple bands with bar graph of signal strengthsSimple messages replace hardwareCaution [if traveling below cruise alert limit]Slow Down [if traveling above cruise alert limit] |
| Tones | Standard®Mild | Standard Behroves alert tonesMild door ball chimer alert tones |
| AutoMode | On* / Off | Automatically reduces audio during alert |
| AutoLock | On* / Off | Automatically stores and binds out false alarms |
| Units | English®/Mebric | Units for distance and speed |
| Language | English®/Spanish | Language for voice and text |
| Voice | On* / Off | Voice announcements |
| CPS filter | On* / Off | Enables GPS-powered features |
| AutoPowertype in constant power as world hit=1 | Off1 Hour2 Hours4 Hours*8 Hour | Power turns one or off expending on your vehicle's ignition |
| Powers off automatically after 1 hourPowers off automatically after 2 hoursPowers off automatically after 4 hoursPowers off automatically after 8 hoursADTE if AutoScan is true for display screen given minute after 30 minutes to drive screen. Me. Display screens will turn on automatically after you reach 24 MPH | ||
| Band Features | Default®Modified | Default Settings for both AmericaCustomize the bands you want to monitor |
| Press SEN to go from one band category to the next | Press VOLUME + or - to change your setting within a category | |
| X Band | On* / Off | |
| R Band | On* / Off | |
| Ke Band | On* / Off | |
| Ke-POP | On / Diff* | |
| Layer | On* / Off | |
| DSH | On* / Off | Automatically rejects traffic flow sensors-monitoring false alarms |
| Marker Enable | On* / OffModified | Other, Red Light Camera, Red and Speed Camera, and Speed TrapCustomize the types of locations you want to mark for future reference |
| Press SEN to go from one marker category to the next | Press VOLUME + or - to change your setting within a category | |
| Other | On* / Off | Other location |
| Redlight | On* / Off | Red light camera |
| Red & Speed | On* / Off | Red light & speed camera |
| Speed Cam | On* / Off | Speed camera |
| Speed Trap | On* / Off | Speed trap |
| Air Panel | On / Off* | Known aircraft patrolled areas NONE. User cannot recall on Air Panel location |
| Clear Locations | MarkedLockoutsDefenderFormat | Clear all user Marked locations. Press SEN button to confirmClear all lockouts. Press SEN button to confirmClear all DEFENDER data. Press SEN button to confirmClear OFF ENDRDENature, all markers, and all lockouts. |
Understanding Your Detector
Interpreting Alerts
Although GT-7 has a comprehensive warning system, only experience will teach you what to expect from your detector and how to interpret what it tells you. The specific type of radar being used, the type of transmission (continuous or instant-on) and the location of the radar source affect the alerts you receive.
The following examples will give you an introduction to understanding your detector's warning system for radar and laser alerts.
Alert Explanation
Detector begins to sound slowly; rate of alert. You are approaching a continuous radar source increases until it becomes a solid tone. The aimed in your direction. signal meter ramps accordingly.
Detector emits short alerts for a few seconds. An instant-on radar source is being used ahead then falls silent, only to briefly alert and fall of you and out of your view. Silent again.
Detector suddenly sounds a continuous tone. An instant-on radar or laser source is being used for the appropriate band received. nearby. This kind of alert requires immediate attention.
Detector sends a brief laser alert. Laser is being used in the area. Because laser is inherently difficult to detect, any laser alert may indicate a source very close by.
Detector receives weak signals. Signals may be: A moving patrol car with continuous radar is a little stronger as you pass large, roadside objects. Signals increase in frequency. large objects), they may or may not eventually melt into a solid point; even when the patrol car is directly behind you.
Detector alerts slowly for a while then abruptly jumps to a strong alert. You are approaching a radar unit concealed by a hill or an obstructed curve.
Detector alerts intermittently. Rate and strength of alerts may be consistent or vary wildly. A patrol car is traveling in front of you with a radar source aimed forward. Because signals are sometimes reflected off of large objects and
Detector alerts intermittently; rate and strength of signal increases with each alert. Such alerts should be taken seriously. A patrol car is approaching from the other direction, sampling traffic with instant-on radar.
Detector gives an X band alert intermittently. radar motion sensors (e.g., door openers or burglar alarms). Since these transmitters are usually contained inside buildings or aimed toward or away from you, they are typically not as strong or lasting as a real radar encounter.
CAUTION: Overconfidence in an unfamiliar area can be dangerous. Likewise, if an alert in a commonly traveled area is suddenly stronger or on a different band than usual, speed radar may be set up nearby.
How Radar Works
Traffic radar, which consists of microwaves, travels in straight lines and is easily reflected by objects such as cars, trucks, and even guardrails and overpasses. Radar works by directing its microwave beam down the road. As your vehicle travels into range, the microwave beam bounces off your car, and the radar antenna looks for the reflections. Using the Doppler principle, the radar equipment then calculates your speed by comparing the frequency of the reflection of your car to the original frequency of the beam sent out.
Traffic radar has limitations, the most significant of these being that it typically can monitor only one target at a time. If there is more than one vehicle within range, it is up to the radar operator to decide which target is producing the strongest reflection. Since the strength of the reflection is affected by both the size of the vehicle and its proximity to the antenna, it is difficult for the radar operator to determine if the signal is from a sports car nearby or a semi truck several hundred feet away.
Radar range also depends on the power of the radar equipment itself. The strength of the radar unit's beam diminishes with distance. The farther the radar has to travel, the less energy it has for speed detection.
Because intrusion alarms and motion sensors often operate on the same frequency as X and K band radar, your detector will occasionally receive non-police radar signals. Since these X band transmitters are usually contained inside of a building or aimed toward the ground, they will generally produce much weaker readings than will a true radar encounter. As

you become familiar with the sources of these pseudo alarms in your daily driving, they will serve as confirmation that the device's radar detection abilities are fully operational.
How POP Works
POP works by transmitting an extremely short burst, within the allocated band, to identify speeding vehicles in traffic. Once the target is identified, or "popped," the gun is then turned to its normal operating mode to provide a vehicle tracking history (required by law).
NOTE: According to radar gun manufacturers, tickets should not be issued in pop mode.
How Laser Works
Laser speed detection is actually light detection and ranging (UDAR). Laser guns project a beam of invisible infrared light. The signal is a series of very short infrared light energy pulses that move in a straight line, reflecting off your car and returning to the gun. Laser uses these light pulses to measure the distance to a vehicle. Speed is then calculated by measuring how quickly these pulses are reflected, given the known speed of light.
Laser is a newer technology whose use is not as widespread as conventional radar; therefore, you may not encounter it on a daily basis. And unlike radar detection, laser is not prone to false alarms. Because laser transmits a much narrower beam than does radar, it is much more accurate in its ability to distinguish between targets and is also more difficult to detect. As a result, even the briefest laser alert should be taken seriously.
There are limitations to laser, however. Laser is much more sensitive to weather conditions than radar, and a laser gun's range will be decreased by anything affecting visibility, such as rain, fog or smoke. A laser gun cannot operate through glass, and it must be stationary to get an accurate reading. Because laser must have a clear line of sight and is subject to cosine error (an inaccuracy that increases as the angle between the gun and the vehicle increases), police typically use laser equipment parallel to the road or from an overpass. Laser can be used day or night.
How TSR Works
GT-7 Includes a new boost in anti-falsing software to eliminate excessive alerts from erroneous X and K band sources, such as traffic flow monitoring systems. These systems, which are becoming more widely used in several countries, generate K band signals to measure the flow of traffic on a given road. Unfortunately, most detectors see this as a real threat and will alert you to it unnecessarily. Our new proprietary software, TSR, intelligently sorts, ranks and rejects these types of false alarms automatically. The result is ultimate protection without excessive false alarms.
Understanding Your Detector
How Red Light Cameras Work
Red light cameras use three basic things: a camera, a device to trigger the camera and a computer. An intersection may have more than one camera to monitor traffic from multiple directions. The trigger is typically a series of wires buried just beneath the surface of the road. These wires are separated by a pre-set distance to create a magnetic field or induction loop. Once a vehicle is in the intersection, the loop or circuit becomes closed and alerts the computer to take a picture.
In some states, tickets are issued to the car's owner, no matter who's actually driving. In this case, the red light camera only needs to photograph the vehicle's rear license plate. In other states, the actual driver is responsible for paying the ticket. In this case, the system needs a second camera in front of the car to get a shot of the driver's face.
How Speed Cameras Work
There are several types of fixed position speed cameras used, including radar, laser, induction-loop and photo-based. Radar and laser based cameras are typically mounted near the road and transmit a short range signal across the lanes monitored. Since this signal is transmitted across the road instead of down the road like with many handheld systems, detecting them in time is critical.
Another technology used is an induction loop system. This type of system utilizes wires buried just beneath the surface of the road to trigger a computer that calculates speed between the two points. Photo based systems take two sets of pictures of all passing vehicles between two separate fixed locations. Both sets of photographs are date and time stamped, which enables the system to calculate average speed between the two locations.
Fixed speed cameras can also be set up to monitor one to four lanes of traffic in the same direction. To achieve this, a sensor is installed in each lane, and a wide angle camera lens is used to photograph the vehicle that is speeding.


How GPS Works
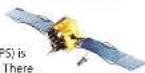
Developed by the U.S. military, the global positioning system (GPS) is made up of 24 orbiting satellites. There are at least four satellites visible at any given time every day. A GPS receiver is designed to locate and receive data from four of these satellites. These data include the distance to your location from each of the satellites. Once the distance from each satellite is known, the receiver can calculate and pinpoint your exact location.
Troubleshooting
Problem Explanation/Solution
Detector beeps briefly at the same location every day. An X band motion sensor or intrusion alarm is located but no radar source is in sight, within range of your route.
Detector did not alert when a police car was in view. VASCAR (Visual Average Speed Computer and Recorder), a stopwatch method of speed detection, may be in use.
Officer may not have radar or laser unit turned on.
Detector's audible alerts become softer after the first. Detector is in AutoMute mode. See "AutoMute" in the few alerts. Settings & Preferences section for details.
The power-on sequence reoccurs while you are driving. A loose power connection can cause GT-7 to be briefly disconnected and will retrigger the power-on sequence. Check all connections.
You wish to restore the factory default settings. Press and hold the SEN and BRT buttons while powering on the detector. A "Restored" message will display, acknowledging the reset.
| The device will not turn on. | Check that vehicle ignition is on. |
| Check all connections. | |
| The display feels warm. | It is normal for the device to feel warm. |
| The display is blank, the brightness. | GT-7 is in Dark mode. Press the BRT button to adjust |
Software Updates
GT-7's red light and speed camera database is easily updated using our exclusive detector software tools found on our web site. Firmware, or the operating software for the detector, can also be updated using these tools.
In order to have access to these updates, you must register your GT-7 at www.Beltronics.com. Once registered, you will receive email notifications that updates are now available for your database or firmware. To handle your software and DEFENDER updates you need to connect your GT-7 to a computer first. You can connect GT-7 to a computer via USB/USB Mini B cable.
To update your software, follow these simple steps: 1 Connect the mini USB end of the USB data cable to GT-7
2 Plug the standard USB connector end of the cable into your computer.
3 Log on to www.escortradar.com/download. 4 Follow the instructions online.
Service
Service
To obtain service, contact Beltronics (800-341-2288) to obtain a Return Authorization Number. Properly pack your product and Include: your name, complete return address, written description of the problem with your product, daytime telephone number and a copy of the original purchase receipt.
Label the outside of the package clearly with your Return Authorization Number.
Ship the product prepaid (insured, for your protection) to:
Customer Service Department
Return Authorization Number 5447 West Chester Road
West Chester OH 45069
Parts & Accessories
The following accessories and replacement parts are available for GT-7:
Coiled SmartCord
- DirectWire SmartCord
SmartCord Live
SmartCord Live DirectWire
- SHIFTER ZIR4™ Laser Shifting System
- Replacement detector cases
Visit Beltronics.com for selection and pricing.
Warranty
Beltronics One-Year Limited Warranty
What this warranty covers: Beltronics USA, Inc. ("Beltronics") warrants your Product against all defects in materials and workmanship.
For how long: One (1) year from the date of original purchase from an authorized Beltronics dealer.
What we will do: If a breach of warranty occurs, Beltronics, at its discretion, will either repair or replace your Product free of charge.
What we will not do: Beltronics will not pay shipping charges that you incur for sending your Product to us. What you must do to maintain this warranty: Show original proof of purchase or receipt from an authorized Beltronics dealer.
Warranty exclusions: This warranty does not apply to your product under any of the following conditions: 1. The serial number has been removed or modified. 2. Your product has been subjected to misuse or damage (including water damage, physical abuse, and/or improper installation). 3. Your product has been modified in any way. 4. Your receipt or proof of purchase is from a non-authorized dealer or Internet auction site, including E-bay, U-bid, or other non-authorized resellers. 5. You are not the original purchaser of the Product from an authorized dealer or did not receive it as a gift from the original purchaser of the Product from an authorized dealer.
To obtain service: 1. Contact Beltronics (1-800-341-2258) to obtain a Return Authorization Number. 2. Properly pack your Product and include: your name, complete return address, written description of the problem with your Product, daytime telephone number, and a copy of the original proof of purchase or receipt. 3. Label the outside of the package clearly with your Return Authorization Number. Ship the Product pre-paid (insured, for your protection) to: Beltronics USA, Inc., 5442 West Chester Rd., West Chester, OH 45069.
LIMITATION OF WARRANTY: The obligations set forth above are Beltronics' sole obligations and your exclusive remedy. Beltronics makes no other express warranty. Any implied warranty of merchantability or fitness for a particular purpose that may be applicable to the Product is limited in duration to the duration of this warranty. Some States do not allow limitations on how long an implied warranty lasts, so the above limitation may not apply to you. BELTRONICS SHALL NOT BE LIABLE FOR CONSEQUENTIAL, SPECIAL OR INCIDENTAL DAMAGES INCLUDING, WITHOUT LIMITATION, DAMAGES ARISING OUT OF THE USE, MISUSE OR MOUNTING OF THE PRODUCT. Some States do not allow the exclusion or limitation of incidental or consequential damages, so the above limitation or exclusion may not apply to you. Beltronics is not responsible for products lost in shipment between the owner and our service center.
Other legal rights: This warranty gives you specific legal rights, and you may also have other rights which vary from State to State.
- Live life in the passing lane.
- Congratulations
- Table of Contents
- Getting Started 4
- Controls & Features 5-9
- Programming 10-11
- Understanding Your Detector 12-14
- Troubleshooting 15
- Software Updates 16
- Service 16
- Parts & Accessories 17
- Warranty 17
- Getting Started
- What's Included
- Mounting Tips
- To Mount In Your Vehicle:
- StickyCup Care Instructions
- Using GT-7:
- Earphone Jack
- Mini USB Jack
- Controls & Features
- SmartCord
- Using SmartCord
- Lighter Adapter
- AutoPower
- Volume
- Mute
- AutoMute
- SmartMute
- User Mode
- Advanced
- Novice
- Display Color
- Display Brightness
- Speed Display
- Radar Sensitivity
- Highway
- Auto
- Auto No X
- TrueLock/Locking Out False Alerts
- AutoLock
- Marking Locations
- Over-Speed Alert
- Alert Tones
- If alert remains in area
- Voice Alerts
- Programming
- How To Use Programming
- Example:
- Overview Of Programming
- Notes For Programming
- Clearing The Database
- Restoring Factory Settings
- ESCORT Live!
- Understanding Your Detector
- Interpreting Alerts
- Alert Explanation
- How Radar Works
- How POP Works
- How Laser Works
- How TSR Works
- How Red Light Cameras Work
- How Speed Cameras Work
- How GPS Works
- Troubleshooting
- Problem Explanation/Solution
- Software Updates
- Service
- Parts & Accessories
- Warranty
- Beltronics One-Year Limited Warranty
Brand : Beltronics
Model : GT-7
Category : Radar detector