
34HC5CUR P - Screen AOPEN - Free user manual and instructions
Find the device manual for free 34HC5CUR P AOPEN in PDF.


| Product Type | LCD Monitor |
| Brand | AOpen |
| Model | 34HC5CUR P |
| Screen Size | 34 inches |
| Resolution | 3440 x 1440 (UltraWide QHD) |
| Refresh Rate | Up to 144 Hz (DP only) |
| Aspect Ratio | 21:9 |
| Panel Type | VA (curved) |
| Connectivity | 2x HDMI, 1x DisplayPort, 1x USB-C, 1x VGA, Audio In/Out |
| Power Supply | 100-240V AC, 50/60Hz, Universal |
| Tilt Range | -5° to 35° |
| Height Adjustment | 130 mm |
| VESA Mount | 100 x 100 mm (M4 screws) |
| Special Features | FreeSync Premium Pro, Adaptive-Sync, Over Drive, Low Blue Light, Power-off USB Charge |
| Power Saving | Active OFF state recovery ~3 seconds |
| Compliance | CE, FCC, RoHS, ErP |
| Package Contents | Monitor, stand, DP cable, HDMI cable, USB-C cable, power cord, quick start guide |
| Cleaning | Unplug, use soft cloth, no ammonia/alcohol cleaners |
| Safety | Do not use near water, ensure proper ventilation, use grounded outlet |
Frequently Asked Questions - 34HC5CUR P AOPEN
User questions about 34HC5CUR P AOPEN
0 question about this device. Answer the ones you know or ask your own.
Ask a new question about this device
Download the instructions for your Screen in PDF format for free! Find your manual 34HC5CUR P - AOPEN and take your electronic device back in hand. On this page are published all the documents necessary for the use of your device. 34HC5CUR P by AOPEN.
USER MANUAL 34HC5CUR P AOPEN
Copyright © 2018. AOPEN Incorporated. All Rights Reserved.
AOPEN LCD Monitor User Guide Original Issue: 7/2018
Changes may be made periodically to the information in this publication without obligation to notify any person of such revisions or changes. Such changes will be incorporated in new editions of this manual or supplementary documents and publications. This company makes no representations or warranties, either expressed or implied, with respect to the contents hereof and specifically disclaims the implied warranties of merchantability or fitness for a particular purpose.
Record the model number, serial number, purchase date and place of purchase information in the space provided below. The serial number and model number are recorded on the label affixed to your computer. All correspondence concerning your unit should include the serial number, model number and purchase information.
No part of this publication may be reproduced, stored in a retrieval system, or transmitted, in any form or by any means, electronically, mechanically, by photocopy, recording or otherwise, without the prior written permission of AOPEN Incorporated.
AOPEN LCD Monitor User Guide
Model number: ____
Serial number:
Date of purchase:
Place of purchase: ____
AOPEN and the AOPEN logo are registered trademarks of AOPEN Incorporated. Other companies' product names or trademarks are used herein for identification purposes only and belong to their respective companies.
Special notes on LCD monitors
The following are normal with the LCD monitor and do not indicate a problem.
- Due to the nature of the fluorescent light, the screen may flicker during initial use. Turn off the power switch and then turn it on again to make sure the flicker disappears.
- You may find slightly uneven brightness on the screen depending on the desktop pattern you use.
• The LCD screen has 99.99% or more effective pixels. It may include blemishes of 0.01% or less such as a missing pixel or a pixel lit all the time. - Due to the nature of the LCD screen, an afterimage of the previous screen may remain after switching the image, when the same image is displayed for hours. In this case, the screen is recovered slowly by changing the image or turning off the power switch for a few hours.
- Aopen monitor is purposed for video and visual display of information obtained from electronic devices.
Information for your safety and comfort
Safety instructions
Read these instructions carefully. Keep this document for future reference. Follow all warnings and instructions marked on the product.
Cleaning your monitor
Please carefully follow these guidelines when cleaning the monitor:
• Always unplug the monitor before cleaning.
• Use a soft cloth to wipe the screen and cabinet front and sides.
Connecting/disconnecting the device
Observe the following guidelines when connecting and disconnecting power from the LCD monitor:
• Make sure the monitor is attached to its base before connecting the power cord to the AC power outlet.
• Make sure both the LCD monitor and the computer are turned off before connecting any cable or unplugging the power cord.
- If the system has multiple sources of power, disconnect power from the system by unplugging all power cords from the power supplies.
iv
Accessibility
Be sure that the power outlet you plug the power cord into is easily accessible and located as close to the equipment operator as possible. When you need to disconnect power from the equipment, be sure to unplug the power cord from the electrical outlet.
Safe listening
To protect your hearing, follow these instructions.
• Gradually increase the volume until you can hear it clearly and comfortably and without distortion.
• After setting the volume level, do not increase it after your ears have adjusted.
- Limit the amount of time listening to music at high volume.
- Avoid turning up the volume to block out noisy surroundings.
• Turn the volume down if you can't hear people speaking near you.
Warnings
• Do not use this product near water.
- Do not place this product on an unstable cart, stand or table. If the product falls, it could be seriously damaged.
- Slots and openings are provided for ventilation to ensure reliable operation of the product and to protect it from overheating. These openings must not be blocked or covered. The openings should never be blocked by placing the product on a bed, sofa, rug or other similar surface. This product should never be placed near or over a radiator or heat register, or in a built-in installation unless proper ventilation is provided.
- Never push objects of any kind into this product through cabinet slots as they may touch dangerous voltage points or short-out parts that could result in a fire or electric shock. Never spill liquid of any kind onto or into the product.
• To avoid damage of internal components and to prevent battery leakage, do not place the product on a vibrating surface.
- Never use it under sporting, exercising, or any vibrating environment which will probably cause unexpected short current or damage internal devices.
Using electrical power
• This product should be operated from the type of power indicated on the marking label. If you are not sure of the type of power available, consult your dealer or local power company.
• Do not allow anything to rest on the power cord. Do not locate this product where people will walk on the cord.
• If an extension cord is used with this product, make sure that the total
ampere rating of the equipment plugged into the extension cord does not exceed the extension cord ampere rating. Also, make sure that the total rating of all products plugged into the wall outlet does not exceed the fuse rating.
- Do not overload a power outlet, strip or receptacle by plugging in too many devices. The overall system load must not exceed 80% of the branch circuit rating. If power strips are used, the load should not exceed 80% of the power strip's input rating.
- This product's power cord is equipped with a three-wire grounded plug. The plug only fits in a grounded power outlet. Make sure the power outlet is properly grounded before inserting the power cord plug. Do not insert the plug into a non-grounded power outlet. Contact your electrician for details.

Warning! The grounding pin is a safety feature. Using a power outlet that is not properly grounded may result in electric shock and/or injury.

Note: The grounding pin also provides good protection from unexpected noise produced by other nearby electrical devices that may interfere with the performance of this product.
- Use the product only with the supplied power supply cord set. If you need to replace the power cord set, make sure that the new power cord meets the following requirements: detachable type, UL listed/CSA certified, type SPT-2, rated 7 A 125 V minimum, VDE approved or its equivalent, 4.5 meters (15 feet) maximum length.
Product servicing
Do not attempt to service this product yourself, as opening or removing covers may expose you to dangerous voltage points or other risks. Refer all servicing to qualified service personnel.
Unplug this product from the wall outlet and refer servicing to qualified service personnel when:
• the power cord or plug is damaged, cut or frayed
• liquid was spilled into the product
• the product was exposed to rain or water
• the product has been dropped or the case has been damaged
• the product exhibits a distinct change in performance, indicating a need for service
• the product does not operate normally after following the operating instructions

Note: Adjust only those controls that are covered by the operating instructions, since improper adjustment of other controls may result in damage and will often require extensive work by a qualified technician to restore the product to normal condition.
Potentially explosive environments
Switch off your device in any area with a potentially explosive atmosphere and obey all signs and instructions. Potentially explosive atmospheres include areas where you would normally be advised to turn off your vehicle engine. Sparks in such areas could cause an explosion or fire resulting in bodily injury or even death. Switch off the device near gas pumps at service stations. Observe restrictions on the use of radio equipment in fuel depots, storage and distribution areas; chemical plants; or where blasting operations are in progress. Areas with a potentially explosive atmosphere are often, but not always, marked. They include below deck on boats, chemical transfer or storage facilities, vehicles using liquefied petroleum gas (such as propane or butane), and areas where the air contains chemicals or particles such as grain, dust or metal powders.
Additional safety information
Your device and its enhancements may contain small parts. Keep them out of the reach of small children.
Disposal of Waste Equipment by Users in Private Househ old in the European Union
This symbol on the product or on its packaging indicates that this product must not be disposed of with your other household waste. Instead, it is your responsibility to dispose of your waste equipment by handing it over to a designated collection point for the recycling of waste electrical and electronic equipment. The separate collection and recycling of your waste equipment at the time of disposal will help to conserve natural resources and ensure that it is recycled in a manner that protects human health and the environment. For more information about where you can drop off your waste equipment for recycling, please contact your local office, your household waste disposal service or the shop where you purchased the product.
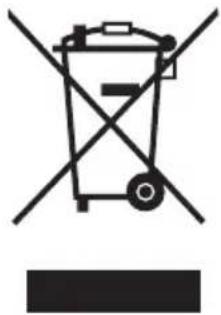
natural_image
Symbol of a trash bin crossed with two crossed lines and a horizontal bar below (no text or labels)LCD pixel statement
The LCD unit is produced with high-precision manufacturing techniques. Nevertheless, some pixels may occasionally misfire or appear as black or red dots. This has no effect on the recorded image and does not constitute a malfunction.
This product has been shipped enabled for power management:
- Activate display's Sleep mode within 5 minutes of user inactivity.
- Wake the monitor when it is in Active Off mode, move the mouse or press any keyboard key.
Tips and information for comfortable use
Computer users may complain of eyestrain and headaches after prolonged use. Users are also at risk of physical injury after long hours of working in front of a computer. Long work periods, bad posture, poor work habits, stress, inadequate working conditions, personal health and other factors greatly increase the risk of physical injury.
Incorrect computer usage may lead to carpal tunnel syndrome, tendonitis, tenosynovitis or other musculoskeletal disorders. The following symptoms may appear in the hands, wrists, arms, shoulders, neck or back:
• numbness, or a burning or tingling sensation
• aching, soreness or tenderness
• pain, swelling or throbbing
• stiffness or tightness
• coldness or weakness
If you have these symptoms, or any other recurring or persistent discomfort and/or pain related to computer use, consult a physician immediately and inform your company's health and safety department.
The following section provides tips for more comfortable computer use.
Finding your comfort zone
Find your comfort zone by adjusting the viewing angle of the monitor, using a footrest, or raising your sitting height to achieve maximum comfort. Observe the following tips:
• refrain from staying too long in one fixed posture
• avoid slouching forward and/or leaning backward
- stand up and walk around regularly to remove the strain on your leg muscles
Taking care of your vision
Long viewing hours, wearing incorrect glasses or contact lenses, glare, excessive room lighting, poorly focused screens, very small typefaces and low-contrast displays could stress your eyes. The following sections provide suggestions on how to reduce eyestrain.
Eyes
• Rest your eyes frequently.
- Give your eyes regular breaks by looking away from the monitor and focusing on a distant point.
- Blink frequently to keep your eyes from drying out.
Display
- Keep your display clean.
- Keep your head at a higher level than the top edge of the display so your eyes point downward when looking at the middle of the display.
- Adjust the display brightness and/or contrast to a comfortable level for enhanced text readability and graphics clarity.
• Eliminate glare and reflections by:
- placing your display in such a way that the side faces the window or any light source
• minimizing room light by using drapes, shades or blinds
• using a task light
• changing the display's viewing angle
• using a glare-reduction filter
• using a display visor, such as a piece of cardboard extended from the display's top front edge
- Avoid adjusting your display to an awkward viewing angle.
- Avoid looking at bright light sources, such as open windows, for extended periods of time.
Developing good work habits
Develop the following work habits to make your computer use more relaxing and productive:
• Take short breaks regularly and often.
• Perform some stretching exercises.
• Breathe fresh air as often as possible.
• Exercise regularly and maintain a healthy body.
AOPEN monitor is purposed for video and visual display of information obtained from electronic devices.
Special notes on LCD monitors iii
Information for your safety and comfort iii
Safety instructions iii
Cleaning your monitor iii
Connecting/disconnecting the device iii
Accessibility iv
Safe listening iv
Warnings iv
Using electrical power iv
Product servicing v
Potentially explosive environments vi
Additional safety information vi
Disposal of Waste Equipment by Users in vii
Private Househ old in the European Union
LCD pixel statement vii
Tips and information for comfortable use viii
Declaration of Conformity
Federal Communications Commission
Declaration of Conformity
Unpacking 1
Attaching/Removing the base 2
Screen position adjustment 4
Connecting the Power cord 5
Power saving 7
Display Data Channel (DDC) 7
Connector pin assignment 8
Standard timing table 10
Installation 11
Users controls 12
The Function page 13
Trouble shooting 25
UNPACKING
Please check the following items are present when you unpack the box, and save the packing materials in case you will need to ship or transport the monitor in future.
*Below items shown here is indicative only. The actual product may be different.
- LCD Monitor

natural_image
Simple line drawing of a blank monitor with a stand at the bottom (no text or symbols)• Power adapter (Optional)

natural_image
Simple line drawing of a U-shaped cable with a connector (no text or symbols)• DP cable (Optional)

natural_image
Line drawing of a broadband cable with two connectors (no text or symbols)• USB Type C Cable (Optional)

natural_image
Pure diagram of a coiled cable with two connectors and two terminal blocks, no text or symbols present.- Quick Start Guide
• D-Sub Cable (Optional)
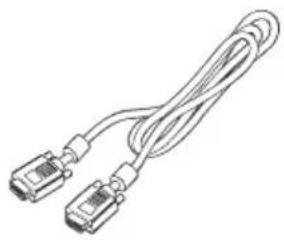
natural_image
Line drawing of a two-up straight cord with two connectors (no text or symbols)• Audio Cable (Optional)

natural_image
Simple line drawing of a U-shaped tube with two connectors (no text or symbols)• AC Power Cord (Optional)
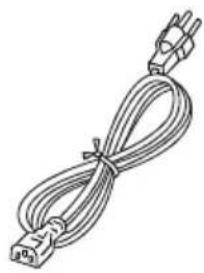
natural_image
Line drawing of a coiled electrical plug with terminal connectors (no text or symbols)• HDMI Cable (Optional)

natural_image
Line drawing of a broadband cable with two connectors (no text or symbols)• USB Cable (Optional)

natural_image
Coiled cable with two USB connectors (no text or symbols visible)ATTACHING / REMOVING THE BASE

Note: Remove the monitor and monitor base from its packaging. Carefully place the monitor face-down on a stable surface -- use a cloth to avoid scratching the screen.
-
Attach the monitor stand arm to the base.
-
Secure the base to the arm of the monitor stand base.


Note: If installing with a wall mounting kit, it is recommended to use VESA mounting kit (100mmx100mm) with M4 x 10 (L) mm screws to fix your monitor on the wall.
Follow these instructions to remove the base from the monitor.

Note: Carefully place the monitor face down on a flat surface-sue a cloth pad to prevent scratching the screen.
- Remove the screws with a screwdriver.
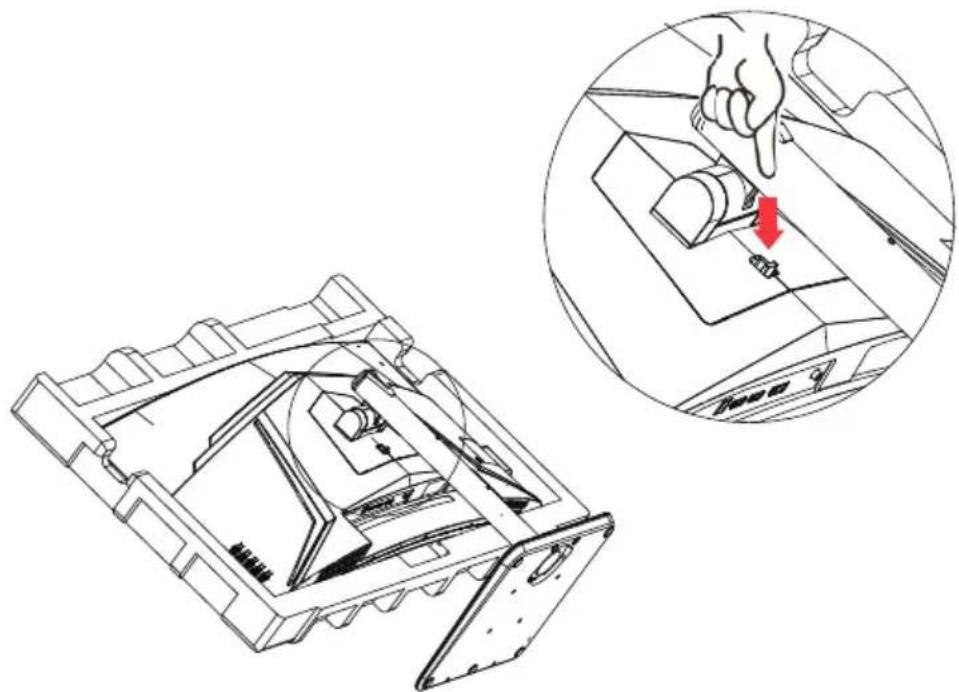
natural_image
Technical line drawing of a device interior with a hand operating the button, showing a zoomed-in view (no text or symbols present)SCREEN POSITION ADJUSTMENT
In order to optimize the best viewing position, you can adjust the height/tilt of the monitor.
- Tilt
Please see the illustration below for an example of the tilt range.
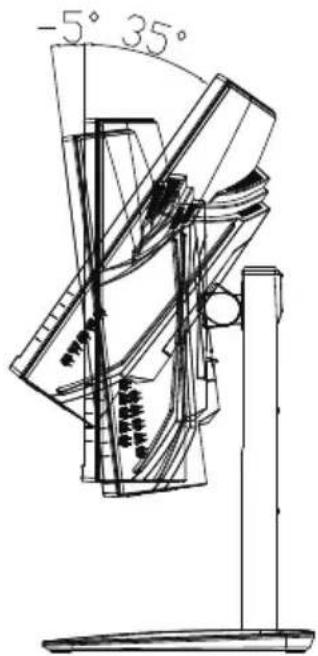
• Height Adjustment
After pressing the top of the monitor then you can adjust the height of the monitor.
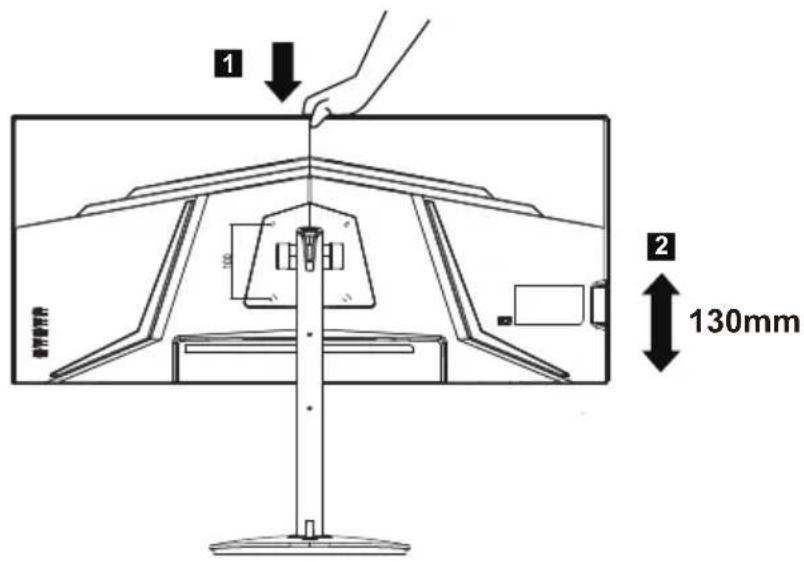
- Check first to make sure that the power cord you use is the correct type required for your area.
- This monitor has a universal power supply that allows operation in either 100/120V AC or 220/240 V AC voltage area. No user-adjustment is required.
- Plug one end of the AC power cord to an AC inlet, and plug the other end into an AC outlet.
- For unit using at 120 V AC: Use a UL Listed Cord Set, Type SVT wire and plug rated 10 A/125 V.
- For unit using at 220/240 V AC (outside of U.S.): Use a Cord Set consisting of H05VV-F cord and plug rated 10 A, 250 V. The cord set should have the appropriate safety approvals for the country in which the equipment will be installed.
SAFETY PRECAUTION
- Avoid placing the monitor, or any other heavy object, on the power cord to avoid damage to the cable.
- Do not expose the monitor to rain, excessive moisture, or dust.
- Do not cover the ventilation slots or openings of the monitor. Always put the monitor in a place where there is adequate ventilation.
- Avoid placing the monitor against a bright background or where sun-light or other light sources may reflect on the face of the monitor. Place the monitor just below eye level.
- Handle with care when transporting the monitor.
- Refrain from giving shock or scratch to the screen, as screen is fragile.
- In order to prevent damage to the monitor, do not lift the monitor by its base.
CLEANING YOUR MONITOR
Please carefully follow the below guidelines when cleaning the monitor.
• Always unplug the monitor before cleaning.
- Use a soft cloth to gently wipe the screen and cabinet front and sides.
- NEVER SPRAY OR POUR ANY LIQUID DIRECTLY ONTO THE SCREEN OR CASE.
- PLEASE DO NOT USE ANY AMMONIA OR ALCOHOL-BASED CLEANERS ON THE LCD DISPLAY SCREEN OR CASE.
- Acer will not be liable for damage resulting from use of any ammonia or alcohol-based cleaners.
POWER SAVING
The monitor will be driven into "Power Saving" mode by the control signal from the display controller, as indicated by the LED flashes power LED.
| State | LED Light |
| ON | Blue |
| Power Saving Mode | Type 1:AmberType 2:LED flashes |
The power saving states will be kept until a control signal has been detected or the keyboard or mouse is activated. The recovery time from Active OFF state back to ON state is around 3 seconds.
DDC
To make your installation easier, the monitor is able to Plug and Play with your system if your system also supports DDC protocol. The DDC (Display Data Channel) is a communication protocol through which the monitor automatically informs the host system about its capabilities, for example, supported resolutions and corresponding timing. The monitor supports DDC2B standard.
CONNECTOR PIN ASSIGNMENT
19-Pin Color Display Signal Cable*

| PIN | Meaning | PIN | Meaning |
| 1. | TMDS Data2+ | 10. | TMDS Clock+ |
| 2. | TMDS Data2 Shield | 11. | TMDS Clock Shield |
| 3. | TMDS Data2- | 12. | TMDS Clock- |
| 4. | TMDS Data1+ | 13. | CEC |
| 5. | TMDS Data1 Shield | 14. | Reserved (N.C. on device) |
| 6. | TMDS Data1- | 15. | SCL |
| 7. | TMDS Data0+ | 16. | SDA |
| 8. | TMDS Data0 Shield | 17. | DDC/CEC Ground |
| 9. | TMDS Data0- | 18. | +5V Power |
| 19. | Hot Plug Detect |
* only for certain models
20-Pin Color Display Signal Cable*

| PIN | Description | PIN | Description |
| 1. | Lane0(p) | 11. | GND |
| 2. | GND | 12. | Lane3(n) |
| 3. | Lane0(n) | 13. | Config1 |
| 4. | Lane1(p) | 14. | Config2 |
| 5. | GND | 15. | AUX_CH (n) |
| 6. | Lane1(n) | 16. | GND |
| 7. | Lane2(p) | 17. | AUX_CH (p) |
| 8. | GND | 18. | Hot Plug Detect |
| 9. | Lane3(n) | 19. | DP Power_Return |
| 10. | Lane3(p) | 20. | DP Power |
* only for certain models
15-pin color display signal cable

| Threading | Explanations | Threading | Explanation |
| 1. Red | 9. +5 V | ||
| 2. Green | 10. Logic ground | ||
| 3. Blue | 11. Monitor ground | ||
| 4. Monitor ground | 12. DDC | continuous data | |
| 5. | DDC return | 13. | Line sync signal |
| 6. | Red-ground | 14. | Field sync signal |
| 7. | Green-ground | 15. | DDC-continuous clock |
| 8. | Blue-ground | ||
* only for certain models
24-pin USB Type C cable
![6.69 [.263] 5.30 [.209] 8.34 [.328] 1.00 [.039] 2.56 [.101] 4.50 [.177]](/content/2026/05/958514/images/a926526f7f7986d0722c9bb9675ce1593503c1c3763a365696e201274d677ef2.jpg)
| PIN No. | Signal Assignment | PIN No. | Signal Assignment |
| A1 | GND | B12 | GND |
| A2 | SSTXp1 | B11 | SSTXp1 |
| A3 | SSTXn1 | B10 | SSTXn1 |
| A4 | VBUS | B9 | VBUS |
| A5 | CC1 | B8 | CC1 |
| A6 | Dp1 | B7 | Dp1 |
| A7 | Dn1 | B6 | Dn1 |
| A8 | SBU1 | B5 | SBU1 |
| A9 | VBUS | B4 | VBUS |
| A10 | SSTXn2 | B3 | SSTXn2 |
| A11 | SSTXp2 | B2 | SSTXp2 |
| A12 | GND | B1 | GND |
* only for certain models
STANDARD TIMING TABLE
| ModeResolutionRemark | |||
| 1 | VGA | 640x480 60Hz | |
| 2 | 640x480 72Hz | ||
| 3 | 640x480 75Hz | ||
| 4 MAC | 640x480 66.66Hz | ||
| 5 VESA | 720x400 70Hz | ||
| 6 | SVGA | 800x600 56Hz | |
| 7 | 800x600 60Hz | ||
| 8 | 800x600 72Hz | ||
| 9 | 800x600 75Hz | ||
| 10 MAC | 832x624 74.55Hz | ||
| 11 1024 | x768 60Hz | ||
| 12 1024 | x768 70KG | ||
| 13 1024 | x768 75Hz | ||
| 14 | MAC 1152x8 | 70 75Hz | |
| 15 1152 | x864 75Hz | ||
| 16 1280 | x960 60Hz | ||
| 17 1280 | x1024 | 60Hz | |
| 18 1280 | x1024 | 75Hz | |
| 19 | VESA | 1280x720 60Hz | |
| 20 | WXGA 1280x8 | 800 60Hz | |
| 21 | WXGA+ 1440x9 | 900 60Hz | |
| 22 | WSXGA+ | 1680x1050 | 60Hz |
| 23 | FHD | 1920x1080 | 60Hz |
| 24 | 1920x1080 | 144Hz (Only for DP) | |
| 25 | Wide HD | 2560x1080 | 60Hz |
| 26 | QHD | 3440x1440 | 60Hz |
| 27 | 3440x1440 | 100Hz | |
| 28 | 3440x1440 | 120Hz (Only for DP) | |
| 29 | 3440x1440 | 144Hz (Only for DP) | |

Note: If the monitor support DisplayPort, it is purposely supporting the G-Sync Freesync Premium/Freesync Premium Pro/Adaptive-Sync (DP) support technology. This technology allows Freesync/Freesync Premium/Freesync Premium Pro/Adaptive-Sync (DP) supported graphics source to dynamically adjust display refresh rate based on typical content frame rates in order to eliminate stuttering and enhance low-latency display.
INSTALLATION
To install the monitor to your host system, please follow the steps as given below:
Steps
-
Turn off your computer and unplug the power cord.
-
2-1 Connect Video Cable
a. Make sure both the monitor and computer are powered-OFF.
b. Connect the VGA cable to the computer.(Optional)
2-2 Connect HDMI Cable (Only HDMI-input model Optional)
a. Make sure both the monitor and computer are powered-OFF.
b. Connect the HDMI cable to the computer.
2-3 Connect DP Cable (Only DP -input model) (Optional)
a. Make sure both the monitor and computer are powered-OFF.
b. Connect the DP cable to the computer.
-
Connec t the Audio cable (only Audio input model) (optional)
-
Connect the USB Type C Cable (only USB Type C input model) (Optional)
-
Insert the monitor power cable into the power port at the back of the monitor.
-
Plug the power cords of your computer and your monitor into a near by electrical outlet.
-
Select Power-off USB charge ON/OFF to enable/disable Power-off USB charge function. (Optional)

| ~ | Note: The location and names of the sockets on the monitor may vary according to monitor model, and some sockets may not available for some models. | |
| HDMI (optional) | (optional) | |
| VGA IN (optional) | USB (optional) | |
| AUDIO IN (optional) | DP (optional) | |
| AUDIO OUT(optional) | USB Type C (Optional) | |
USER CONTROLS
Base Controls
Note: The location and names of the function buttons and power button on the monitor may vary according to monitor model, and some button may not available for some models.
Type 1
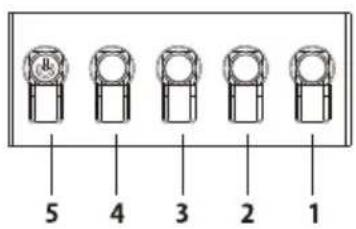
| No. | Description |
| 1 | Go to the main menu. |
| 2 | Enter the source mode. |
| 3/4 | HotKey 1,2 buttons. Press to activate user defined hotkey function. |
| 5 | In the powered-off state, pressing the button powers on the device; in the powered-on state, pressing the button normally enters the mode switching menu, and long-pressing for 3seconds powers off the device. |
Type2

| No. | Description |
| 1 | Enter the mode switching menu. |
| 2 | Enter brightness adjustment. |
| 3 | Enter the source mode. |
| 4 | Go to the main menu. |
| 5 | Power on/off. |
Type3-1

| No. | Item | Description |
| 1 | Power button /indicator | Turns the monitor on/off.Blue indicates power on. Amber indicates standby /power saving mode. |
| 2 | Hotkey 1, 2 buttons | Press to activate user defined hotkey function. |
| 3 | Input button | Press to toggle input sources. |
| 4 | Navi/OK button | Press to activate the OSD menu, then use it as directional key to highlight the desired function.Press it again to enter a selection. |
Type3-2
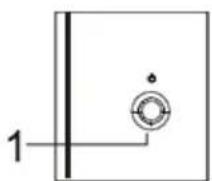
| No. | Item | Description |
| 1 | Menu/Navi/OK button | Power on/Long press to Power off.Enter the main menu,Select/Adjust menu options. |
Using the Shortcut Menu

Note: The following content is for general reference only. Actual product specifications may vary.
The OSD (on-screen display) can be used for adjusting the settings of your LCD Monitor. Press the MENU key to open the OSD. You can use the OSD to adjust the picture quality, OSD position and general settings. For advanced settings, please refer to following page:
The button and the actual functions depend on detail model. Some functions might be grayed if the model can not support.
Main Page

natural_image
Pure black background with five white icons: grid, sun, play button, phone, and menu (no text or symbols)
natural_image
Vertical black-and-white icon set with four white symbols: menu, sun, plug, and menu bar (no text or labels)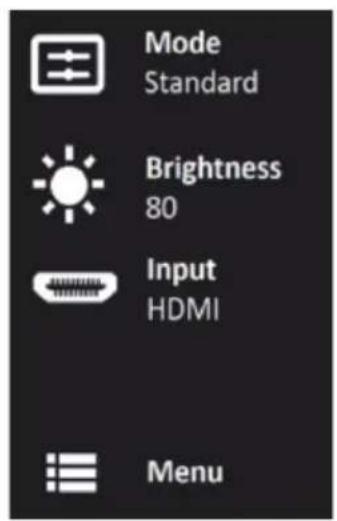
Turn Modes on or off

Note: Please select the button function operation according to the actual button type.
The button of Type 1
From any function page, press buttons 5 to open the Modes control and select which user-defined profile to use (please see the OSD section for more information).
The button of Type 2
From any function page, press buttons 1 to open the Modes control and select which user-defined profile to use (please see the OSD section for more information).
The button of Type 3-1
From any function page, press ⊕ to open the Modes control and select which user-defined profile to use (please see The Function page section for more information).

The Function page
The button of Type 1
Double-press Button 1 to select the menu function, and then use Buttons 1/2/3/4 to adjust the settings you need. When finished, use Button 4 to return to the previous level or exit the menu.
The button of Type 2
Double-press Button 4 to select the menu function, and then use Buttons 1/2/3/4 to adjust the settings you need. When finished, use Button 4 to return to the previous level or exit the menu.
The button of Type 3-1
Open the Function page to select a menu function, and adjust the settings which you want using the Navi/OK button. When you are done, press ✗ to exit. You can also press ⊕ from any function page to select your preferred Mode.
The button of Type 3-2
Open the Function page to select the menu function, and then use the Button Menu/Navi/Ok to adjust the settings you need. When finished, Pull left the Button Menu/Navi/Ok to return to the previous level or exit the menu.
Adjusting the Settings
Use buttons to open the OSD and navigate to the Settings you need.
The button of Type 1
- Double-press Button 1 to bring up the OSD.
- Use Buttons 1/2 to select the Settings you need from the OSD.
- Then press Button 3 to navigate to the setting you want to adjust.
The button of Type 2
- Double-press Button 4 to bring up the OSD.
- Use Buttons 1/2 to select the Settings you need from the OSD.
- Then press Button 3 to navigate to the setting you want to adjust.
The button of Type 3-1
- Press the MENU button to open the OSD.
- Using the Navi/Ok button, to select the Settings you need from the OSD.
- Then Using the Navi/Ok button to navigate to the setting you want to adjust.
The button of Type 3-2
- Press the Menu/Navi/OK button to open the OSD.
- Using the Menu/Navi/Ok button, to select the Settings you need from the OSD.
- Then Using the Menu/Navi/Ok button to navigate to the setting you want to adjust.
Adjusting the Picture
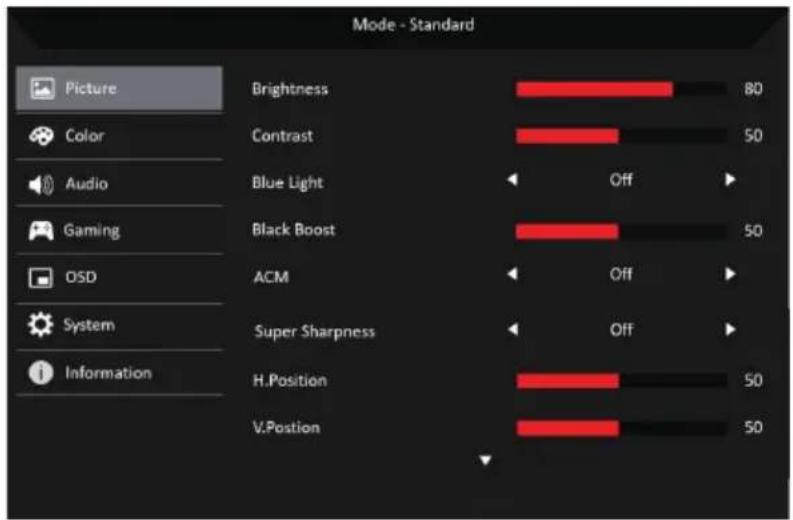

- Brightness: Adjust the brightness from 0 to 100.

Note: Adjusts the balance between light and dark shades.
- Contrast: adjust the contrast from 0 to 100.

Note: Sets the degree of difference between light and dark areas.
- Blue Light: filter out blue light by adjusting different Blue Light showing ratio - 80%, 70%, 60%, 50%.

Note: Higher values allow more blue light through. For the best protection, select a lower value.
-
Black Boost: This boosts the amplitude of the dark color levels of the display—blacks will be less black. The higher the level, the higher the boost.
-
ACM: Turn ACM on or off. The default is off.
-
Super Sharpness technology can simulate high-resolution images by boosting the pixel density of the original source. It can make images sharper and clear.
- H. Position: Adjust the horizontal position from 0 to 100.
- V. Position: Adjust the vertical position from 0 to 100.
- Focus: Adjust the focus from 0 to 100.
- Clock: Adjust the clock from 0 to 100.
Adjusting the Color


- Gamma mode allows you to adjust the luminance tone. The default value is 2.2 (standard value for Windows).
- Color temperature: Default is warm. You can choose Cool, Warm, Normal, Bluelight or User.
- Modes: Select your preferred mode.
- sRGB mode is for getting better color matching representation with the peripheral device, such as DSCs or printers.
- Grayscale Mode: Turn grayscale mode On or Off.
- 6-axis Hue: Adjust the red, green, blue, yellow, magenta and cyan hue.
- 6-axis Saturate: Adjust the red, green, blue, yellow, magenta and cyan saturation.
Adjusting the Audio

- Volume: Adjusts the volume.
- Mute: Select On or Off.
Adjusting the Gaming
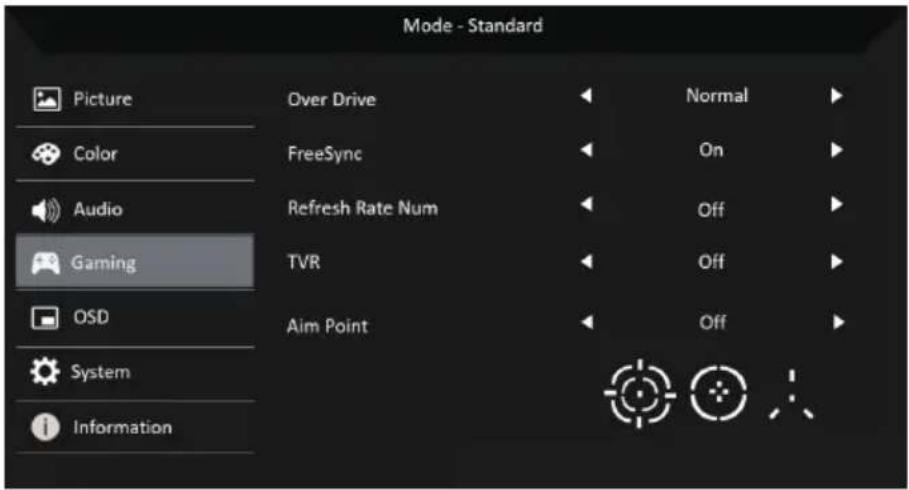
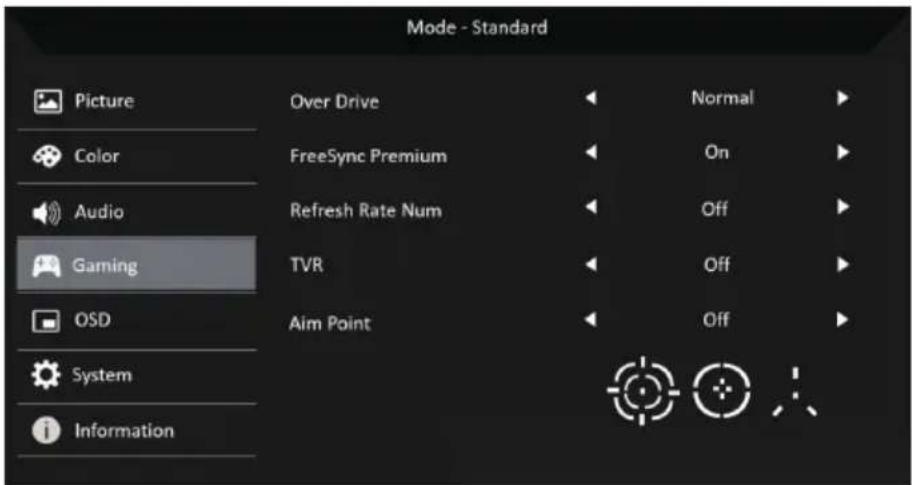
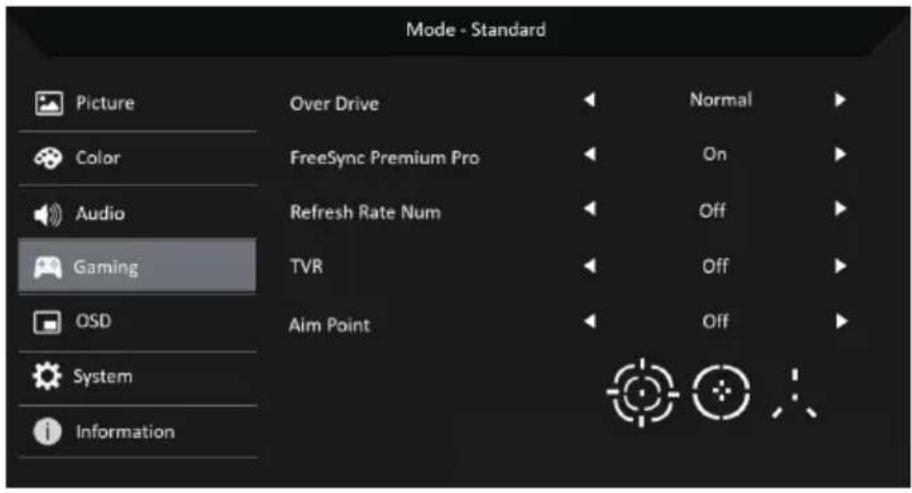
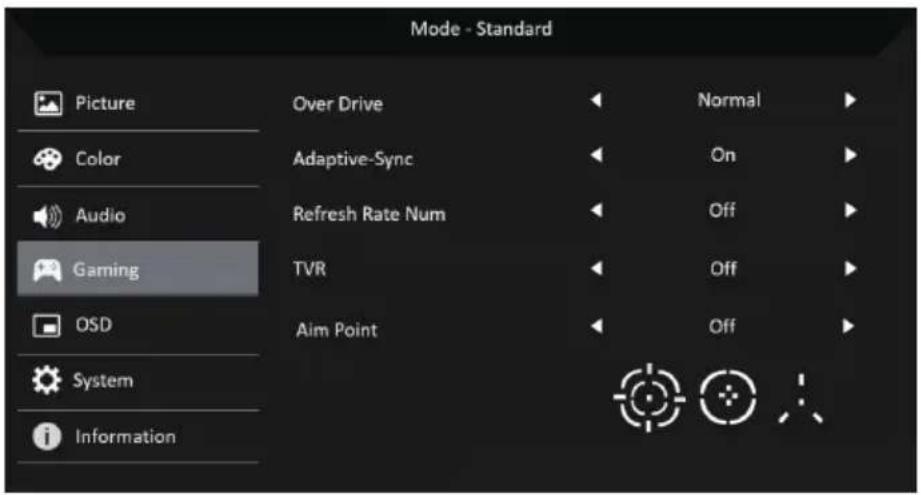
- Over Drive: Select Off, Normal, or Extreme.

Note:
- If FreeSync/Freesync Premium/Freesync Premium Pro/Adaptive-Sync is "ON", then the OverDrive selection is set to "Normal" automatically
-
If FreeSync /Freesync Premium//Freesync Premium Pro/Adaptive-Sync is "OFF", then the user can set Over Drive to either one of the three settings including: (a) Extreme (b) Normal (c) Off
-
FreeSync:Select On or Off. FreeSync is available for AMD supported graphic cards only.
Freesync Premium: Select On or Off.Freesync Premium is available for AMD supported graphic cards only.
Freesync Premium Pro: Select On or Off.Freesync Premium pro is available for AMD supported graphic cards only.
Adaptive-Sync: Select On or Off. Adaptive-Sync is available for AMD supported graphic cards only.

Note: Freesync/Freesync Premium//Freesync Premium Pro/Adaptive-Sync depend on detail model.
-
Refresh Rate Num: Display the panel's current refresh rate on the screen.
-
TVR: When TVR is Extreme or Normal, TVR provides a sharper and clearer dynamic picture; the default is Off.

• TVR does not support PIP/PBP Mode and HDR Mode. (Selective models)
- When TVR is Extreme or Normal, Freesync/Freesync Premium/Freesync Premium Pro/Adaptive-Sync is automatically turned off.
• TVR will affect the brightness of the following: Logo, Aim Point, Message and Input Icon.
• TVR feature is dependent on the monitor's maximum refresh rate. And it is available when the refresh rate is greater or equal to 75Hz.
- Aim Point: Show an Aim point on the screen for shooting games.

Note: Aim Point is not supported in PBP mode.
Adjusting the OSD

- Language: Set the OSD menu language.
- OSD Timeout: Adjust the delay before turning the off the OSD menu.
- Transparency: Select the transparency when using gaming mode. The transparency can be 0% (OFF), 20%, 40%, 60%, or 80%.
- OSD Lock: OSD Lock function is used to prevent OSD button from being pressed accidentally.

Note:
- For Side 9 key/Navi key, Must press Navi Key in the middle to unlock OSD.
- For side/Bottom 5 key, except power key can be unlocked.
Adjusting the System

- Input: Select the source from an available input source.
- Auto Source: Automatically searches for available input sources.
- DP Format: You can select which DP format you are using. The default is set at DP1.4 or DP1.2.
(*only for DP function) - Hot Key Assignment: Select the function of Hot Key 1 or Hot Key 2.
- Wide Mode: You can select which screen aspect you are using.
- PIP/PBP: The options for PIP/PBP Mode are Off, PIP Large, PIP Small, and PBP. You can also adjust the PIP Position, PBP Size, Sub Source, Source Swap, and Audio Source.
- DDC/CI: Allows the monitor settings to be set through the software on the PC.

Note: DDC/CI, short for Display Data Channel/Command Interface, which allows monitor controls to be sent via software.
-
HDMI Black Level: You can select the level of blackness under HDMI source. The options are Normal and Low.
-
Quick Start Mode: Enable monitor rapidly.
-
Power-off USB charge (Optional): Turn On or Off.:
(*only for USB function)
Product information

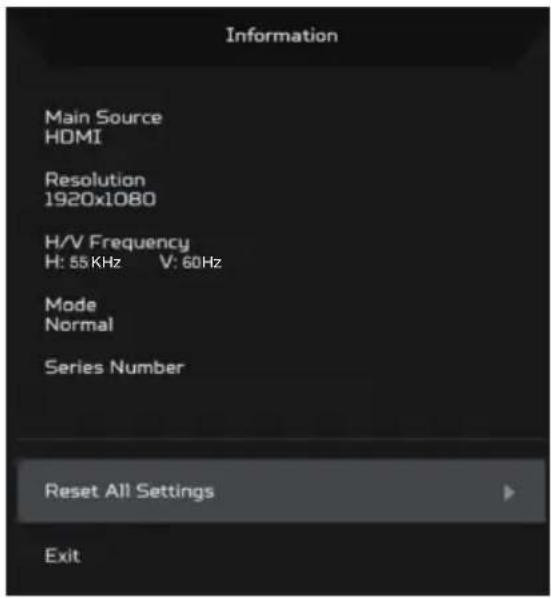
- View the basic information of the machine.
- Reset All Settings: Reset all settings to factory defaults.
TROUBLESHOOTING
Before sending your LCD monitor for servicing, please check the trouble-shooting list below to see if you can self-diagnose the problem.
(HDMI/DP Mode)
| Problems | Current Status | Remedy |
| No Picture | LED ON | Using OSD, adjust brightness and contrast to maximum or reset to their default settings. |
| LED OFF | Check the power switch. | |
| Check if AC power cord is properly connected to the monitor. | ||
| LED flashes | Check that the video signal cable is properly connected to the back of the monitor. | |
| Check whether the computer system's power is on. | ||
| Abnormal Sound (Only Audio-Input model) (Optional) | No sound, or sound level is too low | Check the audio cable with the host PC is connected. |
| Check if the volume setup of the host PC is in minimum position and try to raise the volume level. |
(VGA Mode)
| Problems | Current Status | Remedy |
| No Picture | LED ON | Using OSD, adjust brightness and contrast to maximum or reset to their default settings. |
| LED OFF | Check the power switch. | |
| Check if AC power cord is properly connected to the monitor. | ||
| LED flashes | Check if video signal cable is properly connected at the back of monitor. | |
| Check if the power of computer system is ON. | ||
| Abnormal Picture | Unstable Picture | Check if the specification of graphics adapter and monitor is in compliance which may be causing the input signal frequency mismatch. |
| Display is missing, center shift, or too small or too large in display size | Using OSD, adjust RESOLUTION, CLOCK, CLOCK-PHASE, H-POSITION and V-POSITION with non-standard signals. | |
| Using OSD, in case of missing full-screen image, please select other resolution or other vertical refresh timing. | ||
| Wait for a few seconds after adjusting the size of the image before changing or disconnecting the signal cable or powering OFF the monitor. | ||
| Abnormal Sound(Only Audio-Input model)(Optional) | No sound, or sound level is too low | Check the audio cable with the host PC is connected. |
| Check if the volume setup of the host PC is in minimum position and try to raise the volume level. |
Declaration of Conformity
We,
AOPEN Smartview Incorporated
7F.-5, NO. 369, FUXING N. RD., SONGSHAN DIST., TAIPEI CITY 10541, Taiwan
And,
Acer Italy s.r.l.
Product: LCD Monitor
Trade Name: AOPEN
Model Number: 34HC5CUR
SKU Number: 34HC5CUR
XXXXXXXXXX
("x" = 0\~9, a \~ z, A \~ Z, or blank)
We, AOPEN Smartview Incorporated., hereby declare under our sole responsibility that the product described above is in conformity with the relevant Union harmonization legislations as below Directive and following harmonized standards and/or other relevant standards have been applied:
EMC Directive: 2014/30/EU
EN55032:2015+AC:2 2016 Class B
EN 55035:2017
EN61000-3-2:2019 Class D
EN 61000-3-3:2013+A1:2019
LVD Directive: 2014/35/EU
EN 62368-1: 2014+ A11: 2017
RoHS Directive: 2011/65/EU
EN 50581:2012
ErP Directive: 2009/125/EC
(EU) 2019/2021; EN 50564:2011
Year to begin affixing CE marking: 2020.
FC
Federal Communications Commission
Declaration of Conformity
This device complies with Part 15 of the FCC Rules. Operation is subject to the following two conditions: (1) this device may not cause harmful interference, and (2) this device must accept any interference received, including interference that may cause undesired operation.
The following local Manufacturer /Importer is responsible for this declaration:
Product: LCD Monitor
Brand: AOPEN
Model Number: 34HC5CUR
SKU Number: 34HC5CUR xxxxxx ("x" = 0\~9, a \~ z, A \~ Z or Blank)
Name of Responsible Party: Acer America Corporation
Address of Responsible Party: 333 West San Carlos St.
Suite 1500
San Jose, CA 95110
U.S.A.
Contact Person: Acer Representative
Phone No.: 254-298-4000
Fax No.: 254-298-4147
| English | Product Information for EU Energy Label |
| Bahasa Indonesian | Informasi produk untuk Label Energi UE |
| Deutsch | Produktinformationen für das EU Energielabel |
| Español | Información de producto para EU Energy Label |
| Français | Informations produit pour le label énergétique de l'UE |
| Italiano | Informazioni prodotto per la classe di efficienza energetica UE |
| Nederlands | Productinformatie voor EU-energielabel |
| Polski | Informacje o produkcie dla etykiety energetycznej UE |
| Português | Informação de Produto para Etiqueta Energética da UE |
| Svenska | Produktinformation för EU:s energimärkning |
| 繁體中文 | 用於歐盟能源標示的產品資訊 |
| 简体中文 | 用于歐盟能源标识的产品信息 |
| 日本語 | EU エネルギーラベルのための製品情報 |
| Magyar | Termékinformációk az EU energiacímkéhez |
| Ελληνικά | Πληροφορίες προϊόντος για την ενεργειακή ετικέτα της EE |
| Slovensky | Informácie o výrobku pre energetický štítok EÚ |
| Dansk | Produktoplysninger for EU-energimærke |
| Suomi | Tuotetiedot EU-energiatarraa varten |
| Norsk | Produktinformasjon for EU-energietikett |
| Türkçe | AB Enerji Etiketi için Úrün Bilgileri |
| Română | Informații despre produs pentru eticheta UE privind eficiența energetica |
| български | Продуктова информация за енергийния етикет на Европейския съюз |
| Eesti | Tooteteave EL-i energiamärgisele |
| Lietuvių | Gaminio informacija ES energijos vartojimo efektyvumo etiketei |
| Latviski | Produkta informácija ES Energijas marķejumam |
| Hrvatski | Podaci o proizvodu za energetsku oznaku EU |
| ไทย | ข้อมูลผลิตภัณฑ์สำหรับฉลากพลังงานสหรัฐาสุทธิ์ยุโรป |
| Srpski | Informacije o proizvodu za EU energetsku oznaku |
| العربية | معلومات المنتج ل tolerامة الطاقة في الاح Chad الأوروبي |
| Português (Brasil) | Informações do produto para a Etiqueta de Energia da UE |
| Українська | Информация про продукт для маркування енергоэффективности ЄС |
| Čeština | Informace o produktu pro energetický štítek v EU |
| Русский | Информация о продукте для маркировки этикеткой энергетической эффективности ЕС |
| Slovenščina | Informacije o izdelku za energijsko nalepko EU |


- AOPEN LCD Monitor User Guide
- Special notes on LCD monitors
- Information for your safety and comfort
- Safety instructions
- Cleaning your monitor
- Connecting/disconnecting the device
- Accessibility
- Safe listening
- Warnings
- Using electrical power
- Product servicing
- Potentially explosive environments
- Additional safety information
- Disposal of Waste Equipment by Users in Private Househ old in the European Union
- LCD pixel statement
- Tips and information for comfortable use
- Finding your comfort zone
- Taking care of your vision
- Eyes
- Display
- Developing good work habits
- UNPACKING
- ATTACHING / REMOVING THE BASE
- SCREEN POSITION ADJUSTMENT
- SAFETY PRECAUTION
- POWER SAVING
- DDC
- CONNECTOR PIN ASSIGNMENT
- INSTALLATION
- Steps
- USER CONTROLS
- Base Controls
- Using the Shortcut Menu
- Turn Modes on or off
- The Function page
- Adjusting the Settings
- The button of Type 1
- The button of Type 2
- The button of Type 3-1
- The button of Type 3-2
- Adjusting the Picture
- Adjusting the Audio
- Adjusting the Gaming
- Note:
- Adjusting the OSD
- Adjusting the System
- Product information
- TROUBLESHOOTING
- Declaration of Conformity
- FC
- Federal Communications Commission
Brand : AOPEN
Model : 34HC5CUR P
Category : Screen