M2-4CH - Dash cam Rexing - Free user manual and instructions
Find the device manual for free M2-4CH Rexing in PDF.


| Product Type | Dash Cam |
| Brand | Rexing |
| Model | M2-4CH |
| Channels | 4 (Front, Rear, Interior, Side) |
| Front Video Resolution | 4K (3840x2160) at 30fps |
| Rear/Interior/Side Video Resolution | 1080p (1920x1080) at 30fps |
| Display | 3.19-inch IPS touchscreen |
| GPS | Built-in GPS for speed and location tracking |
| Wi-Fi | Built-in Wi-Fi for app connectivity |
| Parking Mode | Yes (motion detection and time-lapse) |
| G-Sensor | Yes (collision detection and auto-lock) |
| Night Vision | Infrared LEDs for interior camera |
| Storage | Supports microSD up to 256GB (Class 10 or U3) |
| Power Supply | 12V/24V DC (cigarette lighter or hardwire kit) |
| Dimensions (Front Camera) | Approx. 4.5 x 3.5 x 1.5 inches |
| Weight | Approx. 1.5 lbs (entire system) |
| Audio | Built-in microphone and speaker |
| Camera Angle | Front: 170°, Rear: 150°, Interior: 170°, Side: 150° |
| Operating Temperature | -20°C to 65°C (-4°F to 149°F) |
| Warranty | 1 year limited warranty |
| Material | ABS plastic |
| Mount | Suction cup or adhesive mount included |
Frequently Asked Questions - M2-4CH Rexing
User questions about M2-4CH Rexing
0 question about this device. Answer the ones you know or ask your own.
Ask a new question about this device
Download the instructions for your Dash cam in PDF format for free! Find your manual M2-4CH - Rexing and take your electronic device back in hand. On this page are published all the documents necessary for the use of your device. M2-4CH by Rexing.
USER MANUAL M2-4CH Rexing
The information in this manual is subject to change without notice.
www.rexingusa.com
REV012024
Activate Your
18-Month Warranty
& Choose Your
Free Gift!
Activate within 30 days of purchase to claim your free gift and extended limited 12-month warranty to 18 months.
Scan the QR to Activate & Select Your Free Gift

https://www.rexingusa.com/productreg/
Table of Contents
Overview 3
What's in the Box 4
Camera Overview 5
Screen Icons 6
Memory Card Installation. - - . 7
Insert a Memory Card . . . . . . 7
Formatting a Memory Card 8
Installation 10
Dash Cam Installation 10
GPS Logger 14
GPS Date-Time Troubleshooting. 14
Video Playback 15
Basic Operations 16
Resolution 16
Loop Recording. 16
G-sensor 17
Parking Monitor (Parking
Surveillance Mode) 18
Gravity Sensing Record - - - - . 18
Screen Saver 20
Volume 20
Language 20
Date and Time 21
Light Frequency 21
Recording Audio 21
Beep Sound 21
Channel Setting 22
Reset 22
FW Version 22
Warranty and Support 23
Overview
Thank you for choosing REXING!
We hope you love your new products as much as we do. If you need assistance, or have any suggestions to improve it, please contact us.

care@rexingusa.com

(877) 740-8004
Our support team will respond to you as soon as possible.
Always a surprise with Rexing
Check us out here.
- https://www.facebook.com/rexingusa/
- https://www.instagram.com/rexingdashcam/
- https://www.rexingusa.com/support/registration/

Facebook Instagram Site Product Support

Product Support


-


-
What's in the Box
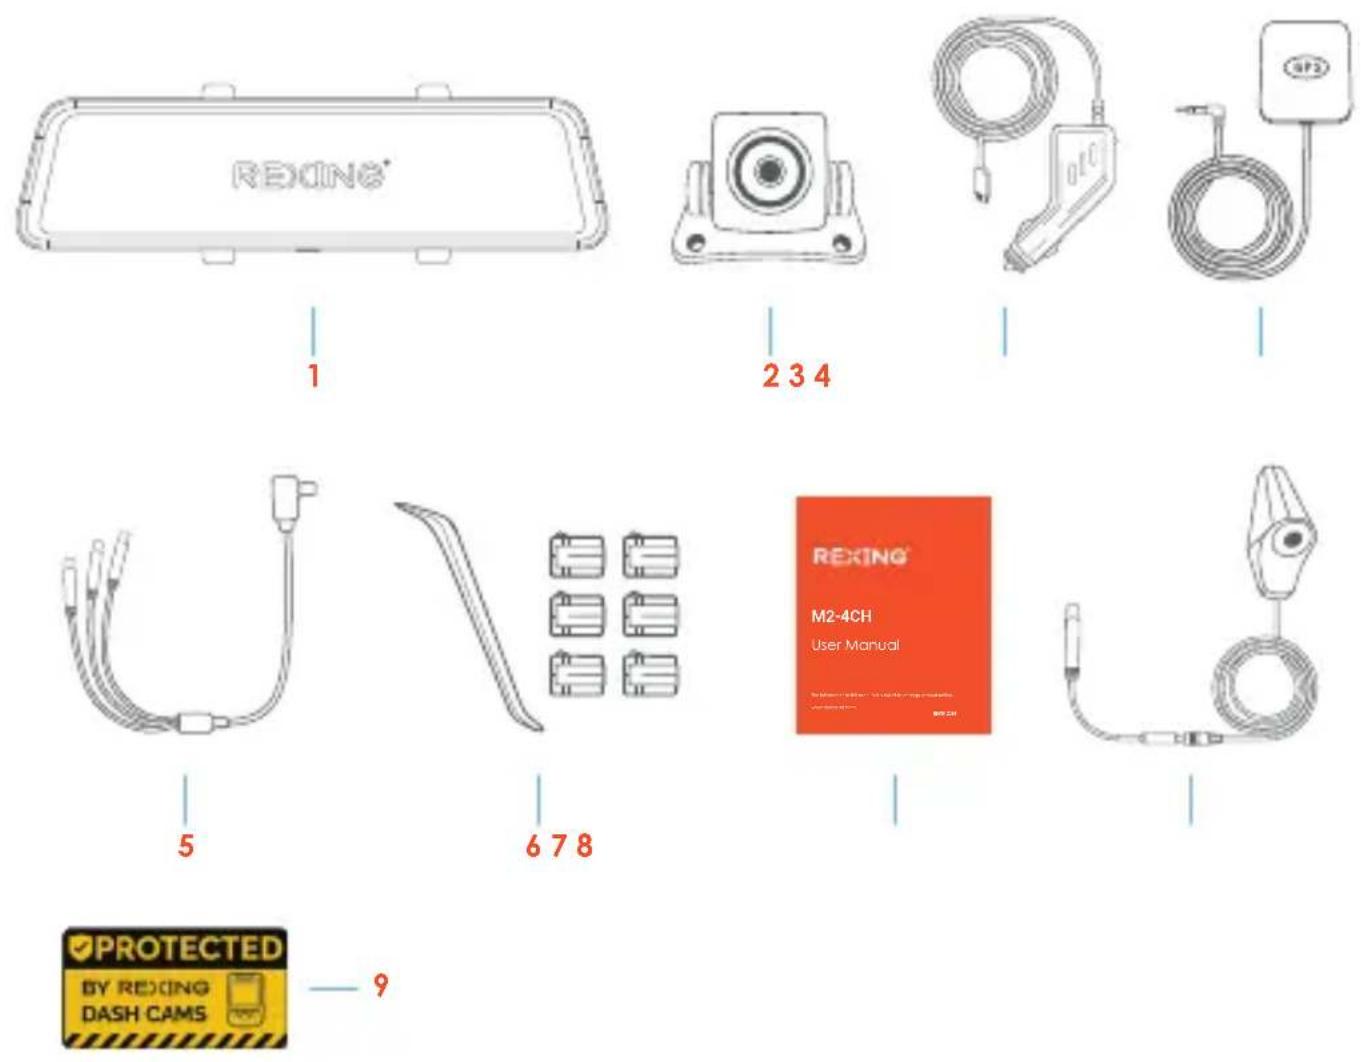
- Rexing M2-4CH smart mirror dash cam
- Rear camera
- In-car power cable (12ft)
- GPS Logger
-
Side/Rear Camera HUB
-
Cable management tool
- User manual
- Side Camera (2 PCs)
- Warning Sticker
Camera Overview
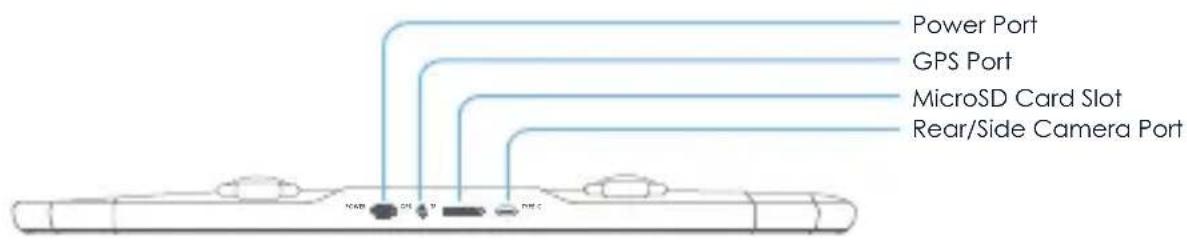
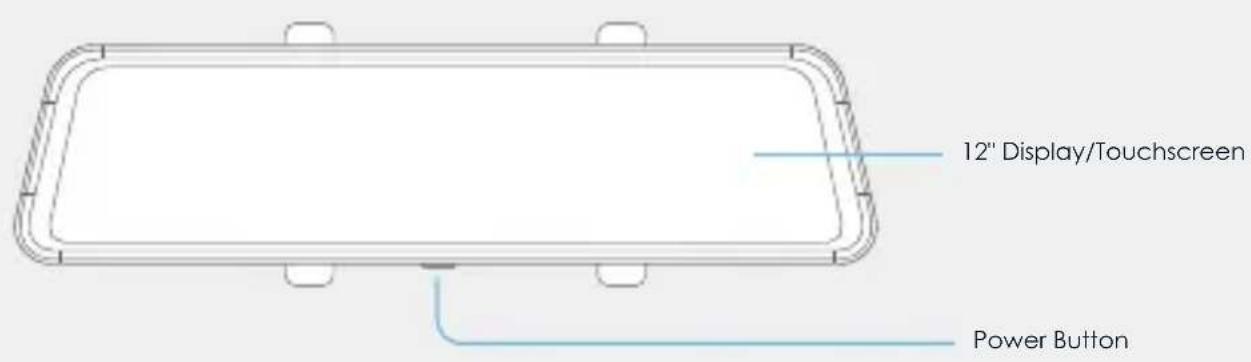
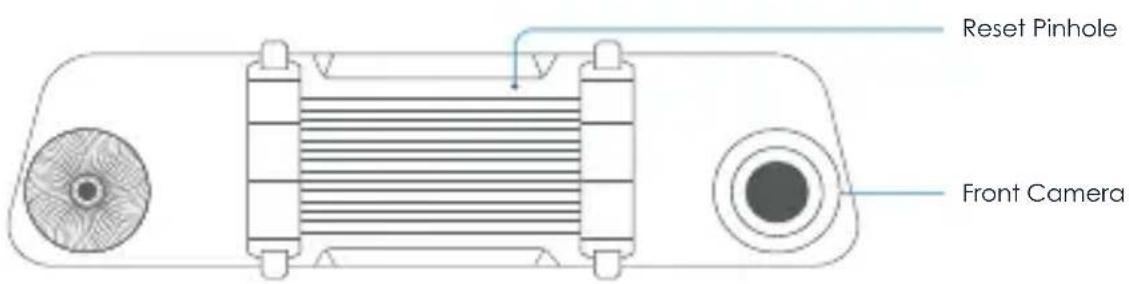
Note
- Please always connect to the power cord to turn on the dash cam
- Press the Power Button to turn On or Off the screen
- Press and hold the Power Button for 3 seconds to turn the device on or off
Screen Icons
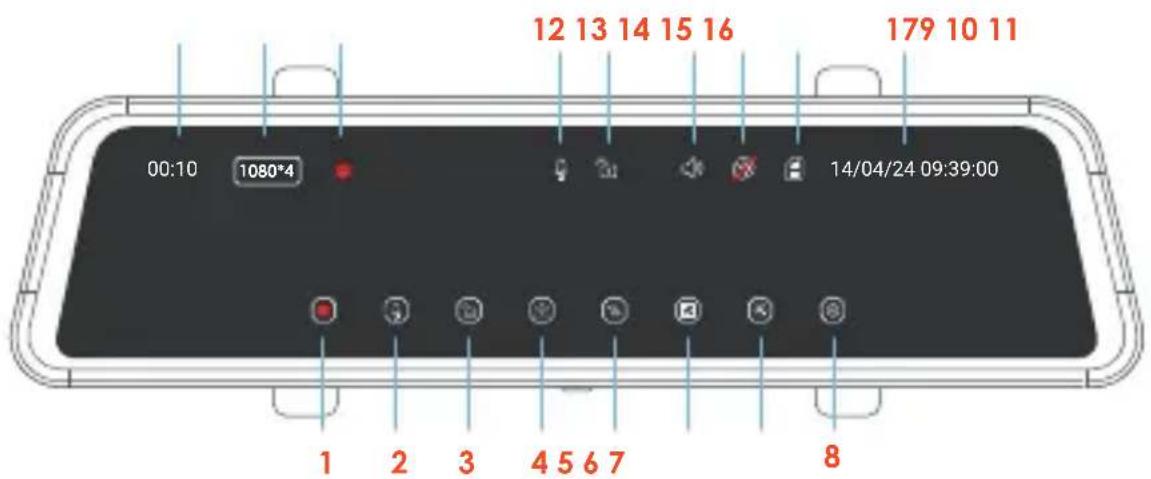
- Start/Stop Recording
- Mic on/off
- Lock/Unlock Current Video
- Take Photo
- Screen View Switch
- Playback
- Screen Brightness
- Settings
-
Video Clip Length
-
Resolution
- Recording Indicator
- Mic Status
- Lock Status
- Speaker Status
- GPS Status
- MicroSD Status
- Date Time
Note
• If the screen is off, tap the screen to turn it back on.
- If the icons on the screen are hidden, tap the screen to display the icons.
- Scroll left or right on the screen to switch the view among Front, Rear, Cabin, and All.
- Scroll up or down to adjust the visual range of each camera.
Memory Card Installation
Step 1. Insert a Memory Card
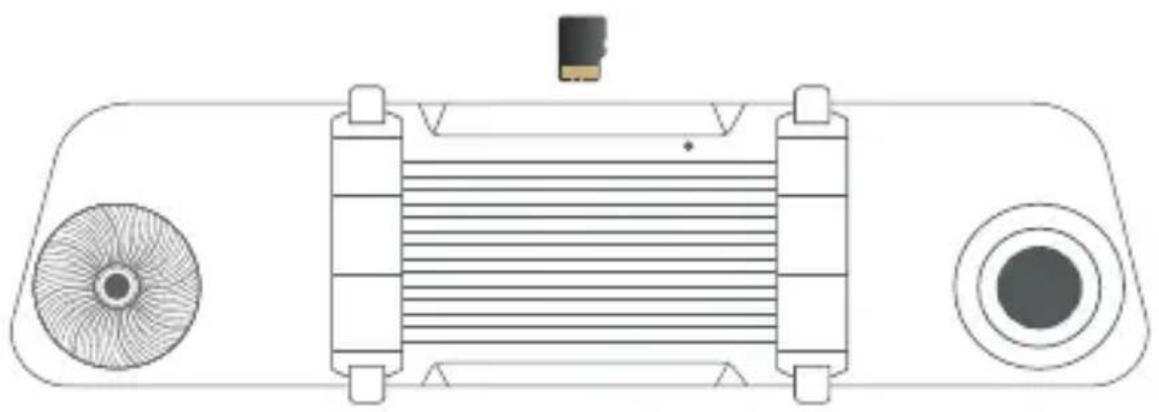
You will need to insert a memory card before beginning recording. Push the memory card into the slot until it locks in place.
The M2-4CH dash cam accepts memory cards with a maximum capacity of 256GB. Depending on the memory card's manufacturer and type, some cards may not be compatible with the dash cam. Using an incompatible card may damage the device, the memory card, or corrupt the data stored on it. For reliable operation, use a Class 10 memory card with a capacity of at least 32GB.
natural_image
Technical line drawing of a mechanical component with no visible text or symbolsNote
• DO NOT insert or remove a memory card while the device is in operation.
- It is recommended that you reformat the memory card every time images are transferred to the computer, or at least once a month.
- Reformatting a memory card keeps important elements of data and also a cleaned file structure which helps to prevent error messages and missing images. Reformatting also restores the memory card, which can help prevent it from becoming corrupted.
Step 2. Formatting the Memory Card
- Tap the icon to stop recording
- Tap the icon to access settings
- Tap General Settings
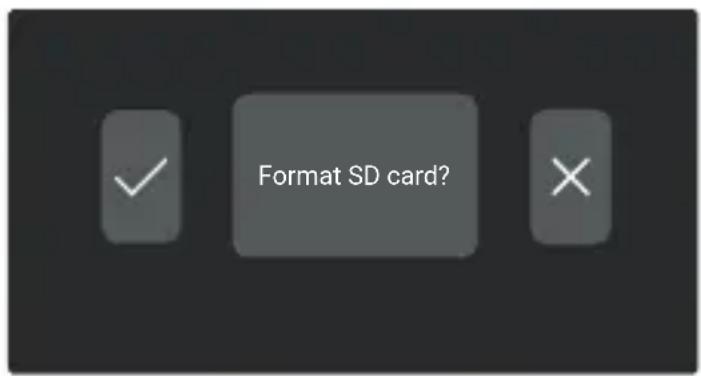
- Toggle down to Format
- Tap OK to format the card
Please format the card on the dash cam before using it. Before formatting a memory card, always remember to make backup copies of all important data stored on the device. The manufacturer's warranty does not cover loss of data resulting from user actions.
Note
Removing the memory card
Before removing a memory card from your dash cam, you must first unmount it for safe removal.
- Tap the ■ icon to stop recording
- Press and hold the power button to turn off the device
- Gently push the memory card in and let go until it releases
Do not remove the memory card while the device is transferring or accessing information. Doing so can result in data loss, corruption, or damage to the memory card or device. Rexing is not responsible for losses that result from the use of damaged memory cards, including the loss of data.
Installation
Dash Cam Installation
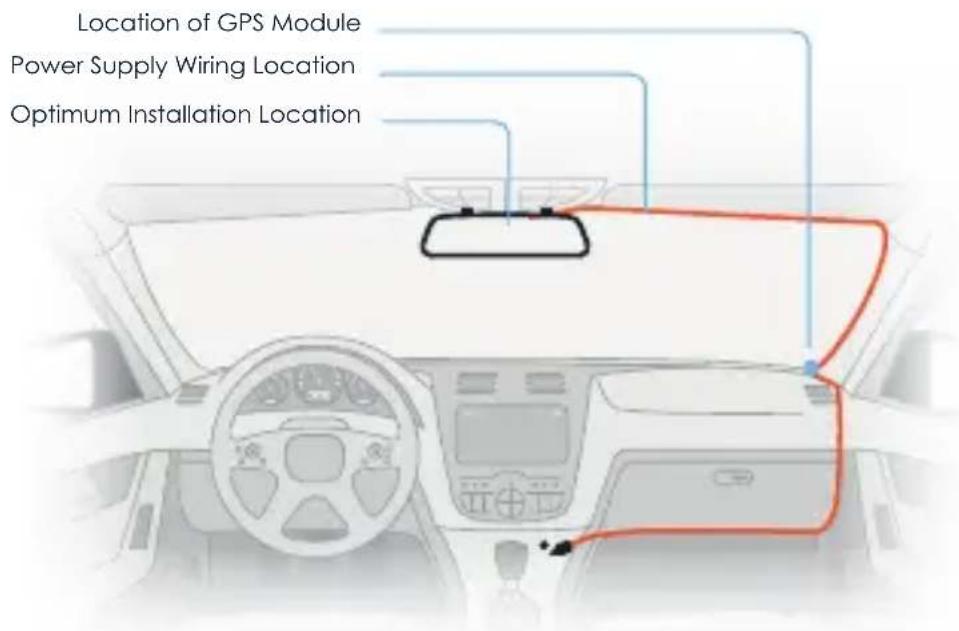
- Strap the dash cam to the rearview mirror of your vehicle with the rubber mounting strap. Adjust the angle of the cameras to ensure that it captures your desired view.
- Mount the side and rear camera as shown below and then connect the rear camera and side camera to the HUB and connect to the main unit. Carefully route the power cable around the door and tuck in under the trim.
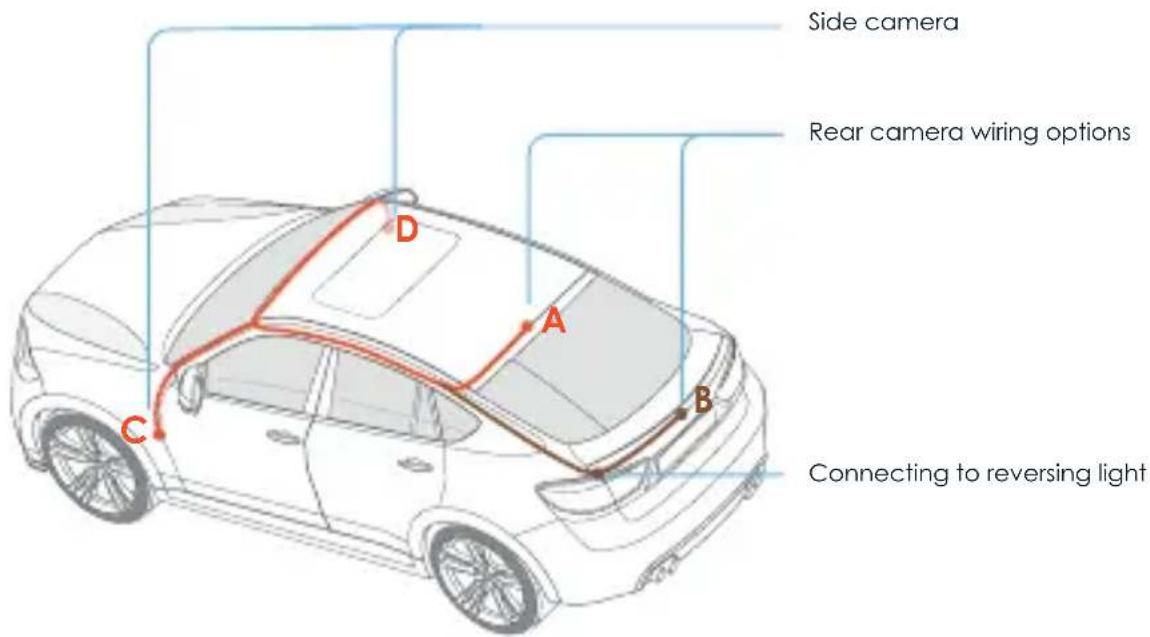
The rearview camera has two wire routing options as shown in the above figure. The first part of both options is characterized with concealing the wire routing against the edges of the door(s).
The device is configured with a streaming media rearview camera that provides clear traffic view behind the car. To obtain clearer and more intuitive images, it is recommended to mount the camera above the license plate (as shown by option B).
-
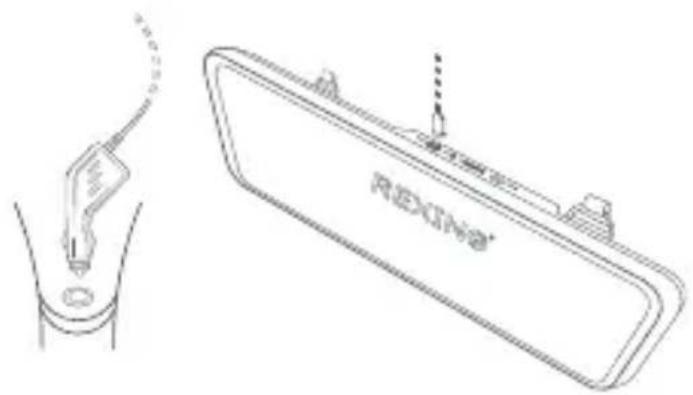
The device will be automatically be powered on when plugged into a 12V accessory socket or cigarette lighter and received a charge (i.e.: the vehicle is started). To turn the device on manually, press and hold the Power button for 3 seconds until the welcome screen appears. The dash cam will automatically start recording when powered on.
-
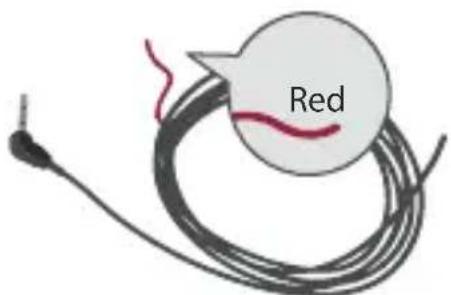
The red wire of the rear camera cable provides a 12 Volt power to your rear camera. It is not necessary to connect the red wire to the power supply. But if you want to use the parking assist function, it's recommended to connect to the power source of your reverse lights, so the screen will display the image of the rear camera automatically when the vehicle is in reverse. If you need more installation information, please reach out to care@rexingusa.com for assistance.
Note
The optional rearview camera is mounted on the rear of the car. Pay attention to its orientation during installation. Plug the rearview camera connector into the corresponding port of the dashcam once the installation is completed. Adjust the position of the lens to ensure that it aligns horizontal with the ground. Start the engine to check the video functionality of the device.
- Plug the GPS module into the GPS port and secure the module to a position close to A-pillar of the car. The antenna receiver side (the side without 3M adhesive) faces the outside and the side with 3M adhesive faces down. It should be properly secured.
- When connecting the charger to the vehicle's 12V DC outlet, be sure to use only a Rexing-approved charger. The charger should be at least a 2.5A charger which is designed and supplied specifically for use with your device. Using an incompatible charger can cause serious personal injury or damage to your device.
natural_image
Technical line drawing of a rearview mirror with cable and connector (no text or symbols)Note
Due to unstable voltages caused by starting the car engine, a voltage fluctuation in some vehicles may be especially obvious. If a flashing screen or some other unforeseeable operating problem occurs when you start the engine, it is recommended to unplug the device from the charger before starting the engine, and then reconnect it after the engine is running.
Note
- Press the Power Button to turn On or Off the screen
- Press and hold the Power Button for 3 seconds to turn the device on or off
We kindly suggest taking a moment to watch our tutorial video. It's designed to help you have a smooth and successful installation experience. We believe you'll find it very helpful!
Please scan QR code
or go to
shop.rexingusa.com >
Buyer's Guide >
How to Install a Dash Cam

GPS Logger
You can then access this information while playing back your recordings using the GPS Video player (For Windows and Mac, available at rexingusa.com)
The dash cam will automatically search for the GPS signal once it's connected to the power source. Press the HOME button and go to System Settings. Toggle the GPS Speed Unit setting, and select your favorite speed unit.
After a GPS signal is found, the screen icon will turn from Gray to green as per the below icons. It will record the speed and location of your vehicle as you drive.

GPS Signal Searching

GPS Signal Active
GPS Date-Time Troubleshooting
If your dash cam GPS data and time are incorrect please to
https://www.rexingusa.com/gps-data-time/
OR scan the QR code below.

Download GPS Video player
Please download GPS logger player through the link OR Scan the QR Code below.

Video Playback
To playback a video on the device, press the 📄 icon on the home screen and select a desired file to play.
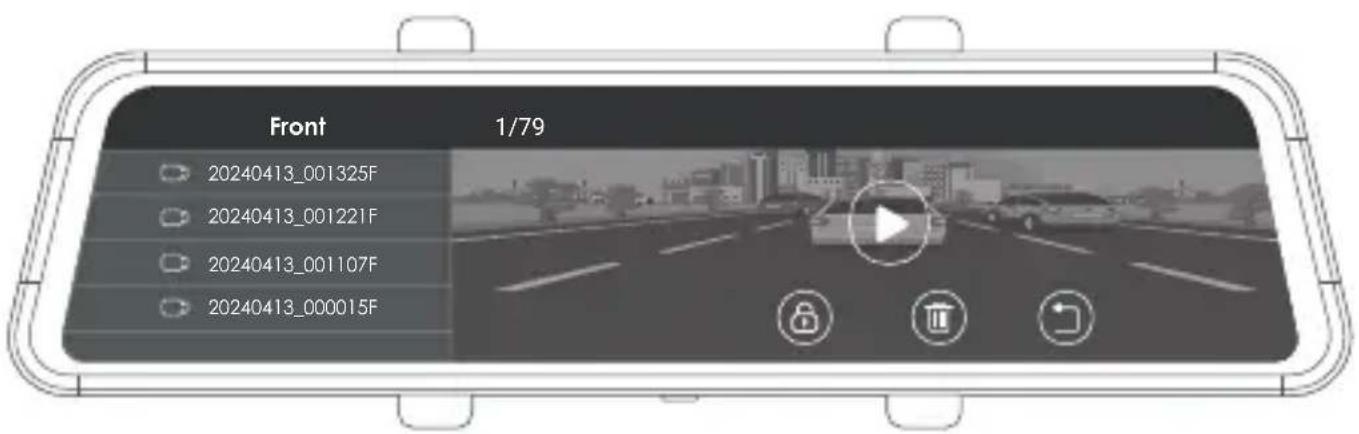
To playback a video on the computer, either use an SD card adapter or connect the device to the computer directly using the included USB cable. To playback a video using an SD card adapter, remove the memory card and insert it into an SD card adapter. Place the adapter in the computer.
The videos are stored at: \Video. Select the video to playback.
Basic Operations
Resolution
The dash cam can record videos in two, three, or four channels. The video resolution taken by each camera is FHD 1920x1080P.
Loop Recording
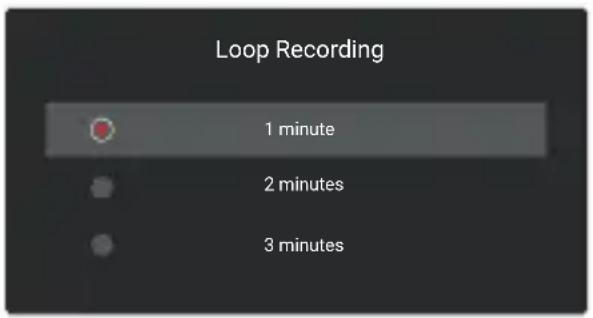
With Loop Recording Mode enabled, the device will continuously erase the older video as it records a new video, keeping only the footage captured over a user-selected time range. All video older than this range will be replaced with new video.
Note
Any locked video files on the memory card will remain protected, and will not be automatically deleted during Loop Recording.
- Tap the icon to stop recording
- Tap the 📄 icon to access settings
- Tap the Video Settings Button
- Toggle to Loop Recording and select your preferred time interval (we recommend 1 minute).
- Tap the √ icon to exit
G-sensor
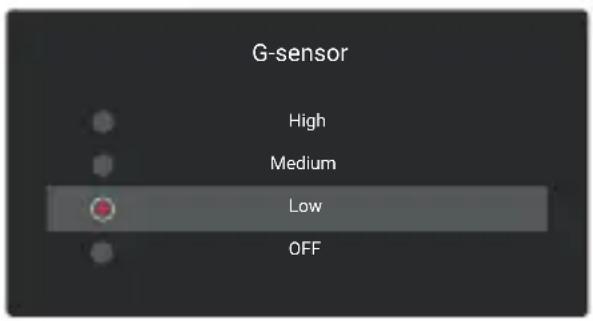
If a change in gravitational forces is detected, such as in the event of a vehicular accident, the g-sensor will signal to the camera, and an automatic locked file will be placed on the current video, preserving your most crucial footage. Locked videos can be found on the memory card under “\event”.
Note
Locked video files won't be erased by Loop Recording, they will remain on the memory card until they are manually deleted, or when the card is formatted.
- Tap the icon to stop recording
- Tap the icon to access settings
- Tap the Video Settings Button
- Toggle to G-sensor and choose your desired sensitivity
- Tap the √ icon to exit
Parking Monitor (Parking Surveillance Mode)
Parking monitor provides surveillance on your parked vehicle.
Option 1: Vibration Detection
Please select your preferred mode from the camera settings, it will allow the dash cam to switch to parking mode automatically if the vehicle's engine turns off and switch back to the normal recording after vehicle's engine turns on.
Note
Rexing Dash Cam Smart Hardwire Kit, Type-C Hard Wire Kit Needed.
Gravity Sensing Record
The Gravity Sensing detects significant or sudden movement (such as an impact or collision), it will trigger an event recording. We suggest setting the “Gravity Sensing” to High sensitivity for Parking Mode Recording.
Note
If you do not use the parking mode function, please change G-sensor setting to low sensitivity. Otherwise, the dash cam will easily lock the video and it cannot be deleted by the loop recording function. This will cause the memory card to be full of locked videos and cause the recorder to fail to work normally.
Note
Installing the provided hardwire kit is optional, but it can enhance your dash cam experience. The kit has a single cable for fuse connection, and the dash cam's behavior depends on your connection choice:
- Constant Fuse: Keeps the dash cam on even when the car is off, but disables the parking monitor.
- On/Off Fuse: Activates parking monitor when parked and frees up your cigarette lighter. Parking recordings are saved in the locked video folders.
Choose the setup that best suits your needs.
We kindly suggest taking a moment to watch our tutorial video. It's designed to help you have a smooth and successful installation experience. We believe you'll find it very helpful!
Please go to
https://www.rexingusa.com/ihwkinstall
or scan QR code


Option 2: Motion Detection
To use this feature, you need to connect it with a Rexing Intelligent Hardwire Kit Type-C Port (available on rexingusa.com, sold separately). Make sure that the Parking Mode is turned off on your dash cam, otherwise it may cause a malfunction.
Once the sensor had detected MOTIONS. The intelligent hardwire kit will power up the dash cam automatically and start recording until the MOTION is cleared.
Screen Saver
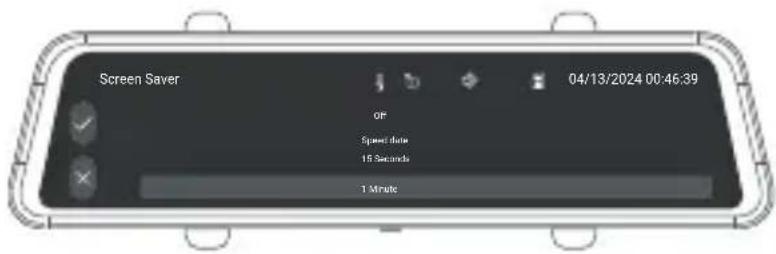
Select a time duration for the screen to stay on after recording starts.
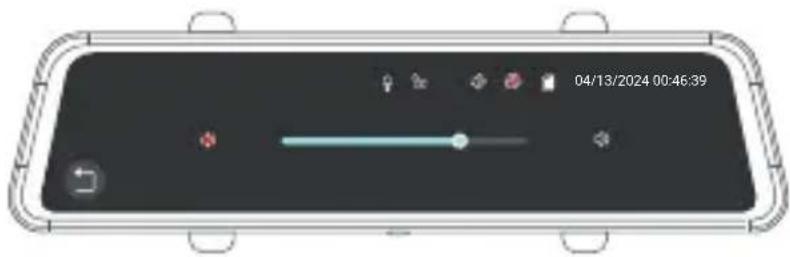
Volume
Use this option to adjust the volume of the device's sound.
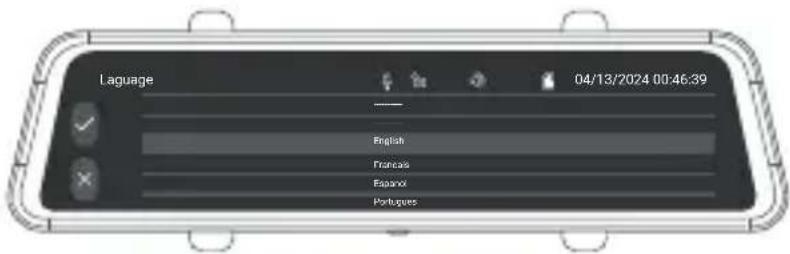
Language
Use this option to select a display language.
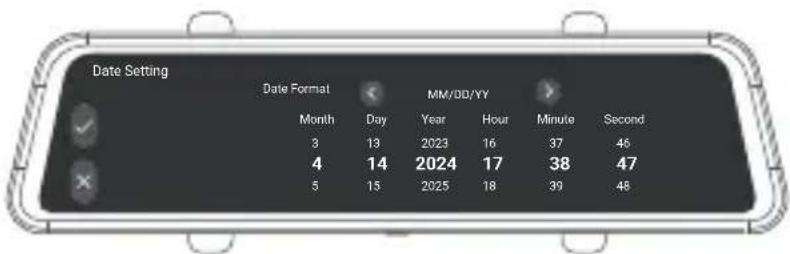
Date and Time
Use the following procedure to change the device's time and date.
- Tap the icon to stop recording
- Tap the icon to access settings
- Choice Year, Month, Day, Hour, Minute, Second
- Tap the to save √ and ✗ to exit
Light Frequency
This option should be set according to the power supply specification used in your country or geographical region (U.S. users should select the "60Hz" option).
Recording Audio
You may choose to record audio with video, or turn off the microphone so that all recorded videos will be muted. The microphone may also be turned on/off by tapping the 🎨 icon on the home screen.
Key Sound
Allows you to turn the device's button sound effect on or off.
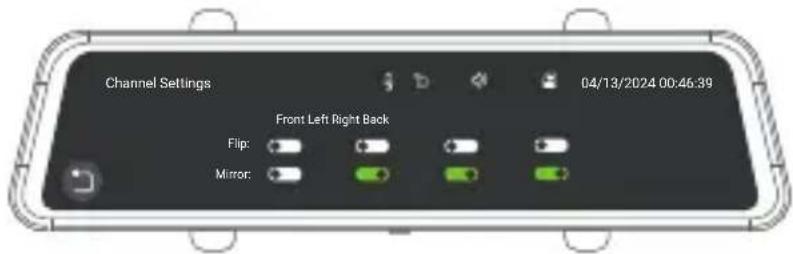
Channel Setting
To Flip/Mirror each channel.
Reset
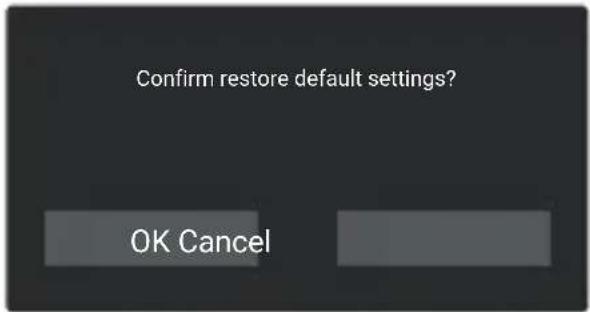
Performing this operation will reset all of your device's settings to their original values.
Note
Any user-customized settings will be lost.
FW Version
View the current device firmware information.
Warranty & Support
Warranty
The Rexing M2-4CH dash cam comes with a full 12-month warranty. If you register your product on our official site
(https://www.rexingusa.com/support/registration), you can extend the warranty to 18 months.
Support
If you have any questions regarding your product, please do not hesitate to contact us at care@rexingusa.com, or call us at (877) 740-8004. Queries are typically answered within 12-24 hours.
Your opinion matters
Rexing is firmly committed to always improving our products, services, and user experience. If you have any thoughts on how we can do even better, we welcome your constructive feedback and suggestions.
Connect with us today at care@rexingusa.com
Thank you for choosing Rexing!
This device complies with part 15 of the FCC Rules. Operation is subject to the following two conditions: (1) This device may not cause harmful interference, and (2) this device must accept any interference received, including interference that may cause undesired operation.
Changes or modifications not expressly approved by the party responsible for compliance could void the user's authority to operate this equipment.
REXING




- 18-Month Warranty
- Free Gift!
- Table of Contents
- Overview
- Thank you for choosing REXING!
- Check us out here.
- What's in the Box
- Note
- Screen Icons
- Memory Card Installation
- Step 1. Insert a Memory Card
- Step 2. Formatting the Memory Card
- Removing the memory card
- Installation
- Dash Cam Installation
- GPS Logger
- GPS Date-Time Troubleshooting
- Download GPS Video player
- Video Playback
- Basic Operations
- Resolution
- Loop Recording
- G-sensor
- Parking Monitor (Parking Surveillance Mode)
- Option 1: Vibration Detection
- Gravity Sensing Record
- Option 2: Motion Detection
- Screen Saver
- Volume
- Language
- Date and Time
- Light Frequency
- Recording Audio
- Key Sound
- Channel Setting
- Reset
- FW Version
- Warranty & Support
- Warranty
- Support
- Your opinion matters
Brand : Rexing
Model : M2-4CH
Category : Dash cam