
XH30 - Flashlight SureFire - Free user manual and instructions
Find the device manual for free XH30 SureFire in PDF.


| Brand | SureFire |
| Model | XH30 |
| Product Type | WeaponLight / Flashlight |
| High Output | 1000 lumens |
| Low Output | 300 lumens |
| Runtime (High) | 1.25 hours |
| Runtime (Low) | 2.5 hours |
| Peak Beam Intensity | 11,300 candela |
| Beam Distance | 213 meters |
| Construction Material | Aluminum |
| Finish | Mil-Spec Hard Anodized |
| Weight (with batteries) | 4.8 oz (136 g) |
| Length | 3.7 in (9.4 cm) |
| Bezel Diameter | 1.25 in (3.17 cm) |
| Battery Type | Two 123A lithium (included) |
| Switching | Ambidextrous push/toggle |
| Water Resistance | IPX7 (submersion up to 1 meter for 30 minutes) |
| Strobe Mode | Yes, with dedicated switch |
| Output Level Selection | Slide switch for High/Low |
| Mounting Compatibility | Universal and Picatinny rails |
| Included Accessories | Two 123A batteries, Universal cross member (preinstalled), Picatinny cross member |
| Warranty | Lifetime No-Hassle Guarantee (defects in material/workmanship) |
| Maintenance | Wipe with clean, dry cloth |
Frequently Asked Questions - XH30 SureFire
User questions about XH30 SureFire
0 question about this device. Answer the ones you know or ask your own.
Ask a new question about this device
Download the instructions for your Flashlight in PDF format for free! Find your manual XH30 - SureFire and take your electronic device back in hand. On this page are published all the documents necessary for the use of your device. XH30 by SureFire.
USER MANUAL XH30 SureFire
Before replacing batteries, read the enclosed BATTERY INFORMATION/WARNING insert in your original packaging. For additional battery safety, handling, and product information, visit www.surefire.com/batteries.
MAINTENANCE
Use a clean, dry cloth to wipe off body and window. For additional tips on maintaining your SureFire illumination tool, visit www.surefire.com/faqs-maintenance.
ACCESSORIES
SureFire makes a full line of accessories for most of its illumination tools. For a complete listing, visit www.surefire.com/partsaccessories.

natural_image
Pure mechanical diagram showing a lever and pivot mechanism without any text or symbolsDG Switches
Grip Switch Assembly for X-series WeaponLights
STROBE WARNING
Exposure to strobing lights may cause dizziness, disorientation, and nausea. A very small percentage of people suffer from photosensitive epilepsy—approximately .00025% of the population—and may experience seizures or blackouts triggered by strobing lights. Visit www.epilepsyfoundation.org for more information about this rare form of epilesesy. Anyone who has had symptoms linked to this condition should consult a doctor before using this product.

18300 MT. BALDY CIRCLE
FOUNTAIN VALLEY, CA 92708-6122
WWW.SUREFIRE.COM
Patents: 7117624, 7591098, 7325352, 7360333, 7310903
THE SUREFIRE NO-HASSLE GUARANTEE
We'll do what it takes to keep your SureFire gear running smoothly. SureFire warrants that if you — our customer — purchase one of our products, and we determine that it is defective in material and/or workmanship during your lifetime, we will repair or replace it — no hassle!
Our warranty does not cover consumables or normal wear-and-tear — things like batteries draining, headbands and headpads wearing out, ink cartridges running out, and switches wearing out — or damage resulting from abuse, alterations, unauthorized repairs, or use contrary to SureFire's user manuals.
Should you need a replacement product, SureFire reserves the right to replace an obsolete product with a current production, like model. In the event that any issue with a SureFire product is not covered under this warranty SureFire can arrange to have the product repaired for a reasonable fee.
STANDARD DISCLAIMER
Except as specified above or prohibited by applicable law: all express or implied conditions and warranties, including, without limitation, any implied warranty or condition of merchantability or fitness for a particular purpose, or accuracy of any informational content, are hereby excluded and disclaimed by SureFire; and in no event will SureFire be liable for any special, direct, indirect, consequential, incidental or punitive damages howsoever arising and regardless of the theory of liability, even if advised of the possibility of such damages. Products, prices, availability, specifications, and offers are subject to change or cancellation at any time without notice.
WARRANTY CLAIMS
For claims, contact Customer Service at 714-545-9444 to obtain a Return Merchandise Authorization number (RMA#). Then package the unit carefully and send to (no CODs):
SureFire, LLC.
Repairs Department, RMA#
17680 Newhope Street, Suite B
Fountain Valley, CA 92708
SureFire will pay any reasonable shipping costs to return the unit to you.
REVISION D 03-2019
71-01-1037
XH30, XH35

SUREFIRE
XH30 / XH35
natural_image
Technical line drawing of two SUNECIDE flashlights (XH30 and XH35) without any text or symbols on the devices themselves.SPECIFICATIONS
| XH30XH35 | ||
| OUTPUT | High: 1,000 Low: 300 lumens High: 1,000 Low: 300 lumens | |
| RUNTIME | High: 1.25 Low: 2.5 hours High: 1.25 Low: 2.5 hours | |
| PEAK BEAM INTENSITY | 11,300 candela 3,000 candela | |
| DISTANCE | 213 meters 110 meters | |
| CONSTRUCTION | Aluminum Aluminum | |
| FINISH | Mil-Spec Hard Anodized Mil-Spec Hard Anodized | |
| WEIGHT [w/batteries] | 4.8 oz (136 g) 4.8 oz (136 g) | |
| LENGTH | 3.7 in (9.4 cm) 3.7 in (9.4 cm) | |
| BEZEL DIAMETER | 1.25 in (3.17 cm) 1.25 in (3.17 cm) | |
| BATTERIES | Two 123A lithium (incl.) Two 123A lithium (incl.) | |
| SWITCHING | Ambidextrous push/toggle Ambidextrous push/toggle | |
| LIQUID INGRESS PROTECTION | IPX7, Submersion up to one meter for 30 minutes | |
All performance claims tested to ANSI/NEMA FL1-2009 Standard.
USER MANUAL
BEFORE INITIAL USE, REMOVE BATTERY INSULATOR

KIT CONTENTS:
• Universal Cross-member (marked "U," installed)
• Picatinny Cross-member (marked "P")
- Two 123A Batteries
BATTERY INSTALLATION / REPLACEMENT
WARNING
Use of substandard batteries can cause injury or property damage. Visit www.surefire.com/batterysafety.
- Attach Battery Cover by aligning cover hinges with weaponlight Hinge Pin (Fig. 1) and carefully snap hinges onto pin.
- Insert SF Batteries with terminals oriented as shown
- Close Battery Cover until compartment latch clicks and locks cover in place.
- To replace batteries, depress latch (Fig. 2) to open Battery Cover, and remove and properly dispose of depleted batteries.
- Install fresh batteries and re-secure Battery Compartment per Installation directions above.
Note: Replace all batteries; never mix old and new batteries.
MOUNTING WEAPONLIGHT TO WEAPON
WARNING
ALWAYS confirm weapon is unloaded and on SAFE before attempting installation.
Weaponlight attaches to both Universal and Picatinny rails but ships with its Universal (marked "U") Cross Member preinstalled. To attach to a Universal accessory rail, skip ahead to Attaching to Host Weapon Rail instructions. To attach weaponlight to a Picatinny rail, the Universal Cross Member must first be removed and the included Picatinny Cross Member (marked "P") must be correctly installed as follows.
INSTALLING PICATINNY CROSS MEMBER
- Loosen Rail-Adjustment Bolt by turning counterclockwise until Universal Cross Member's "wedge" is fully exposed (Fig. 3).
- Remove Universal Cross Member by lifting it out; store in a safe place for future use.
- Place Picatinny Cross Member into slot vacated by the Universal Cross Member, ensuring that the top of "P" on Cross Member's front edge is facing forward (toward bezel) and "wedge" is facing rearward.
- Push Picatinny Cross Member all the way forward and, while holding Cross Member in place, tighten Rail-Adjustment Bolt (Fig. 4) by turning clockwise until movable Rail Guide overlaps Cross Member "wedge," locking it securely in place.
Proceed to Attaching weaponlight to Accessory Rail instructions.
ATTACHING TO HOST WEAPON RAIL
Note: The appropriate Cross Member MUST be installed ("U" for Universal rails; "P" for Picatinny rails) to attach to a weapon's accessory rail. Some pistols with a MIL-STD-1913 rail may require the Universal cross member to properly interface with the location of the front trigger guard surface.
- Adjust gap between stationary and movable Rail Guides by turning Rail-Adjustment Bolt clockwise or counterclockwise until gap is sufficiently wide to fit over weapon accessory rail (Fig. 5).
- Align Fixed Rail with weapon's accessory rail and hinge over the cross slot of host weapon
- Mate Cross Member with corresponding slot in weapon's accessory rail.
- Secure by turning Rail-Adjustment Bolt clockwise. Turn bolt until the weaponlight fits snugly onto host weapon rail. Use a coin or flat head screw driver to further tighten bolt no more than a 1/4 turn or until the bolt stops moving. Do NOT overtighten! The bolt will break if excessive force is applied with a tool.
LIGHT OPERATION
For momentary-on light operation, press and hold either the right or left side of tailcap toggle switch; release to turn light off. (Fig. 6)
For constant-on operation, rotate tailcap toggle switch up or down; rotate in the opposite direction to turn light off. (Fig. 6)
MODE SELECTION
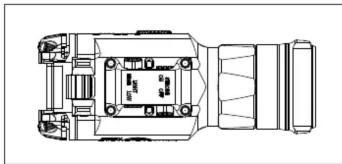
Strobe Mode: To activate the strobe mode slide the strobe switch to the on position as indicated on the engraved switch housing in Fig. 8.
Output Level: To change the output level slide the switch toward either desired output as shown in Fig. 8.
Note: An assortment of remote switches are available for SureFire X-Series WeaponLights.
Visit www.surefire.com/tailcapswitches
FIGURE 1

FIGURE 2

FIGURE 3

FIGURE 4

FIGURE 5

FIGURE 6

natural_image
Technical line drawing of a mechanical device with rotational arrows indicating motion (no text or symbols)FIGURE 7

FIGURE 8
natural_image
Technical line drawing of a mechanical component with no visible text or symbols
- MAINTENANCE
- ACCESSORIES
- DG Switches
- STROBE WARNING
- THE SUREFIRE NO-HASSLE GUARANTEE
- STANDARD DISCLAIMER
- WARRANTY CLAIMS
- SUREFIRE
- XH30 / XH35
- USER MANUAL
- BEFORE INITIAL USE, REMOVE BATTERY INSULATOR
- KIT CONTENTS:
- BATTERY INSTALLATION / REPLACEMENT
- WARNING
- MOUNTING WEAPONLIGHT TO WEAPON
- INSTALLING PICATINNY CROSS MEMBER
- ATTACHING TO HOST WEAPON RAIL
- LIGHT OPERATION
- MODE SELECTION
Brand : SureFire
Model : XH30
Category : Flashlight