SMP100 - Receiver OSD Audio - Free user manual and instructions
Find the device manual for free SMP100 OSD Audio in PDF.


| Product Type | Class D Digital Subwoofer Amplifier |
| Power Output (RMS) | 80W @ 8Ω, 100W @ 4Ω |
| Power Output (Peak) | 160W @ 8Ω, 200W @ 4Ω |
| Frequency Response | 20Hz - 160Hz ±1dB |
| Crossover Range | 40Hz - 160Hz, adjustable |
| Phase Adjustment | 0° - 180°, adjustable |
| Input Sensitivity | 200mV |
| Signal-to-Noise Ratio | 95dB |
| Impedance | 8Ω to 4Ω stable |
| Power Supply | AC 100-240V, 50/60Hz |
| Power Consumption | 150W max |
| Line Level Inputs | Stereo RCA (L/R), audio-sensing |
| Speaker Level Input | 4-pin screw connector, stereo |
| Speaker Level Output (Passthrough) | 4-pin screw connector, full-band |
| Subwoofer Output | 2-pin screw connector, amplified |
| Trigger Input | 3.5mm mini jack, +12 to +24V DC |
| Auto Power On/Off | Signal sensing; off after 15 min no signal |
| Dimensions (W x H x D) | 5.6" x 1.8" x 4.75" (142 x 46 x 121 mm) |
| Weight | 1.75 lbs (0.8 kg) |
| Warranty | 2 years limited |
| Included Accessories | AC power cord, user guide |
| Mounting | Shelf mount only; not rack mountable |
Frequently Asked Questions - SMP100 OSD Audio
User questions about SMP100 OSD Audio
0 question about this device. Answer the ones you know or ask your own.
Ask a new question about this device
Download the instructions for your Receiver in PDF format for free! Find your manual SMP100 - OSD Audio and take your electronic device back in hand. On this page are published all the documents necessary for the use of your device. SMP100 by OSD Audio.
USER MANUAL SMP100 OSD Audio
Our SMP100 Class D Digital Subwoofer Amplifier is a compact 100W amp designed to power passive subwoofers used in home theaters or whole house audio systems. We call this our 'tiny but mighty' powered sub because it measures less than six inches wide but supplies an in-wall or stand-alone subwoofer the power it needs so you can experience room-shaking low frequency impact (bass) on movie and music soundtracks. The advanced crossover circuit can be set at different frequency ranges (35Hz to 160Hz) and can be adjusted with the front-panel control knob. Other features include front-panel adjustable phase and volume controls to dial in just the right amount of low frequency effects (LFE).
Features:
• A compact 100-Watt Class D subwoofer amplifier for multiple source applications
- Ideal for powering subwoofers used in whole-house audio or dedicated home theaters
• Highly efficient Class D technology runs cool under demanding loads
- Adjustable low-pass filter for distortion-free bass
• Front panel phase and volume controls
• Choice of speaker level or audio line level inputs (RCA)
• Auto sensing feature automatically turns on or off when signal is detected
• Distributed power capability for speakers and subs
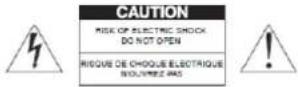
CAUTION: To reduce the risk of electric shock, do not remove cover (or back). No user-serviceable parts inside. Refer servicing to qualified service personnel.
• Explanation of Graphical Symbols

The lightning flash with arrowhead symbol, within an equilateral triangle, is intended to alert you to the presence of uninsulated "dangerous voltage" within the product's enclosure that may be of sufficient magnitude to constitute a risk of electric shock to persons.

The exclamation point within an equilateral triangle is intended to alert you to the presence of important operating and maintenance (servicing) instructions in the literature accompanying the product.
APPLICABLE FOR USA, CANADA OR WHERE APPROVED FOR USAGE
CAUTION: TO PREVENT ELECTRIC SHOCK, MATCH WIDE BLADE PLUG TO WIDE SLOT, INSERT FULLY.
ATTENTION: POUR EVITER LES CHOCS ELECTRIQUES, INTRODUIRE LA LAME LA PLUS LARGE DE LA FICHE DANS LA BORNE CORRESPONDANTE DE LA PRISE ET POUSSER JUSQU AU FOND.
- Read these instructions.
- Keep these instructions.
- Heed all warnings.
- Follow all instructions.
- Do not use this apparatus near water.
- Clean only with a dry cloth.
- Do not block any ventilation openings. Install in accordance with the manufacturer's instructions.
- Do not install near any heat sources such as radiators, heat registers, stoves, or other apparatus (including amplifiers) that produce heat.
- Do not defeat the safety purpose of the polarized or grounding-type plug. A polarized plug has two blades with one wider than the other. A grounding-type plug has two blades and a third grounding prong. The wide blade or the third prong are provided for your safety. If the provided plug does not fit into your outlet, consult an electrician for replacement of the obsolete outlet.
- Protect the power cord from being walked on or pinched particularly at plugs, convenience receptacles, and the point where they exit from the apparatus.
- Only use attachments/accessories specified by the manufacturer.
- Unplug this apparatus during lightning storms or when unused for long periods of time.
- Refer all servicing to qualified service personnel. Servicing is required when the apparatus has been damaged in any way, such as power-supply cord or plug is damaged, liquid has been spilled or objects have fallen into the apparatus, the apparatus has been exposed to rain or moisture, does not operate normally, or has been dropped.
- The apparatus shall not be exposed to dripping or splashing and that no objects filled with liquids, such as vases, shall be placed on the apparatus.
- CAUTION: Servicing instructions are for use by qualified service personnel only. To reduce the risk of electric shock, do not perform any servicing other than that contained in the operating instructions unless you are qualified to do so.
- WARNING: To reduce the risk of fire or electric shock, do not expose this apparatus to rain or moisture.
- Where an appliance coupler is used as the disconnect device, the disconnect device shall remain readily operable.
Congratulations and thank you for purchasing the OSD AUDIO SMP100 Subwoofer Amplifier.
The SMP100 may be small in physical appearance but its got all the muscle you need to drive even the most demanding subwoofers to house thumping levels.
The SMP100 is a Class D 100 Watt amplifier that when properly installed, runs cool under almost any load.
The SMP100 features a stereo/mono line level audio input that can receive full band audio from any audio amplifier, receiver or preamp or an LFE input from an appropriately featured device.
The SMP100 also features a stereo speaker level input. Amplified stereo audio will pass through the SMP100 full-band and unprocessed to a pair of connected stereo speakers. The speaker level input will also be processed by the crossover, phase and volume controls to enhance and optimize low frequency content. This feature is an easy way to add amplified in wall or in-ceiling subwoofers to multi-room audio amplifiers that do not have zone-specific line level outputs.
The adjustable crossover allows fine-tuning the SMP100 Sub OUT setting to properly complement any full-range speakers or room conditions.
The SMP100 is audio-sensing so anytime an audio signal hits the SMP100 line or speaker level inputs, the amp will instantly turn ON. The amp will also turn itself OFF after 15 minutes if no audio signal has been detected. There is also a 12VDC Trigger that will turn the SMP100 on when 12-24VDC is applied and turn the amp OFF when the voltage is removed.
Please read and follow the instructions in this User Guide to assure you are getting the most from your new Subwoofer Amplifier.
Features
• Compact Size...Fits Almost Anywhere
• Cool, Efficient Digital Design
• Stereo Or Mono Audio Line Level Input (RCA)
• Stereo Speaker Level Input and Passthrough
• Adjustable Subwoofer Crossover Frequency
• Adjustable Phase Settings
• Audio Sensing
• 12/24VDC On/Off Trigger Input
100/240V
What's Included
1 - SMP100 Amplifier
1 - AC Power Cord
1 - User Guide
Front Panel Features
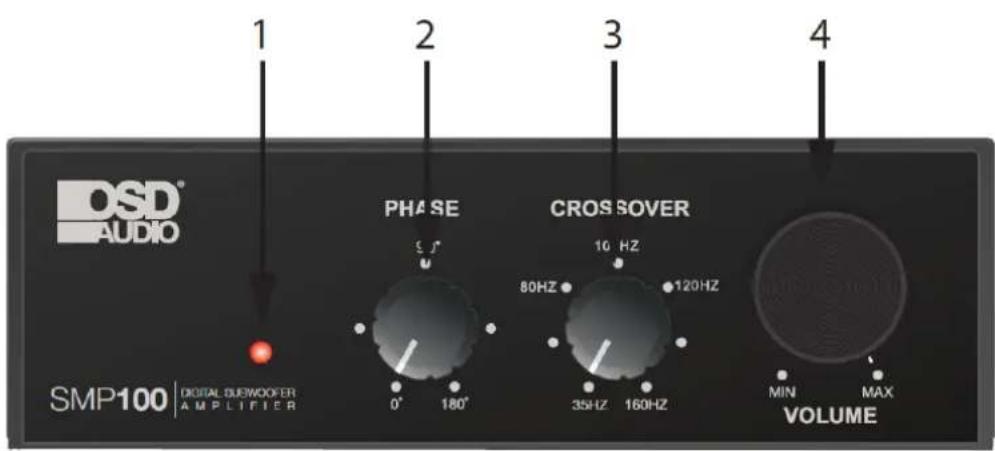
- POWER LED - One, green LED. Green LED illuminates when the SMP100 is connected to AC power and turned ON.
- PHASE - The Phase setting allows compensation for subwoofer location relative to the main speakers. Adjust the Phase setting to the point of highest sub audio output. RANGE: 0° to 180°.
- CROSSOVER - The Crossover sets the frequency at which audio content will pass to the SMP100 Sub OUT. RANGE: 35Hz to 160Hz.
- VOLUME - Adjusts the SMP100 audio output level to the connected subwoofer. Set to an appropriate level for a smooth, natural sounding transition to extend and enhance the low frequency output of the full-range speakers connected to Speaker Level OUT.
Rear Panel Features
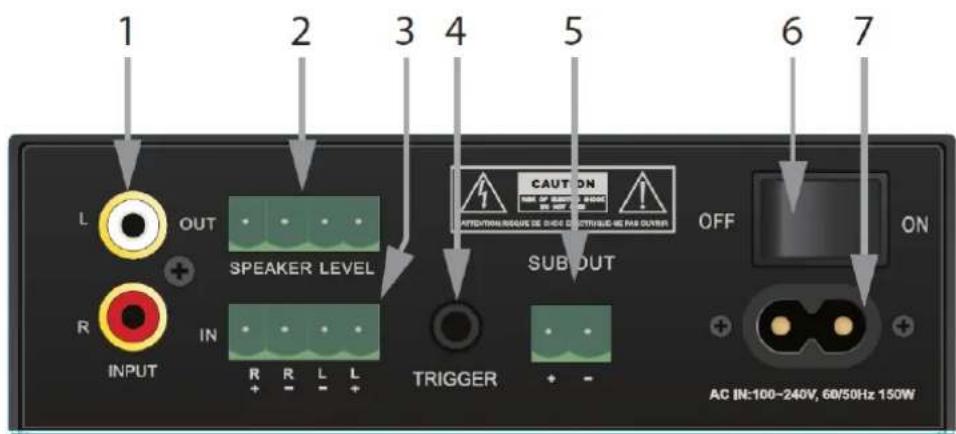
- INPUT - Two, RCA jacks. Stereo or mono audio sensing line level audio input. The SMP100 will turn ON when a line level audio signal is present on either jack. Amp will turn OFF after 15 minutes of no audio signal.
- SPEAKER LEVEL OUT- One, four position plug-in screw connector. The SMP100 will pass-through full-band speaker-level audio from an amplifier connected to the Speaker Level IN. Connect to full band speakers appropriately rated for the amplifier connected to Speaker Level IN. The front panel Volume Control does not affect the Speaker Level OUT. POWER RATING: 100 Watts RMS, 200 Watts MAX.
- SPEAKER LEVEL IN - One, four position plug-in screw connector. Connect to the speaker level OUT on an audio amplifier. The SMP100 will pass-through full-band audio to the speaker Level OUT. The Speaker Level IN signal will also get processed by the Crossover, Phase and Volume controls and then output via the Sub OUT. POWER RATING: 100 Watts RMS, 200 Watts MAX.
- TRIGGER - One, 3.5mm mini jack. Connect to the DC voltage Control OUT on an amplifier, AV Receiver or other audio processor to automatically turn the SMP100 ON/OFF. DC When voltage is applied, the SMP100 will turn ON. When DC voltage is removed, the SMP100 will turn OFF. RANGE: +12 to +24V DC. POLARITY: Tip: +VDC, Sleeve: GND.
- SUB OUT - One, two position plug-in screw connector. Connect to the +/- terminals on a passive (non-amplified) subwoofer. The Volume, Phase and Crossover controls all affect the Sub OUT audio signal. MAX OUTPUT POWER: 80W/8Ω; 100W/4Ω.
- POWER - One, switch. Set to the ON position to turn power to the amp ON. Set to the OFF position to turn power to the amp OFF.
- AC MAINS - One, two-prong socket. Use the supplied 2-pin power cable to connect the unit to an external AC power supply.
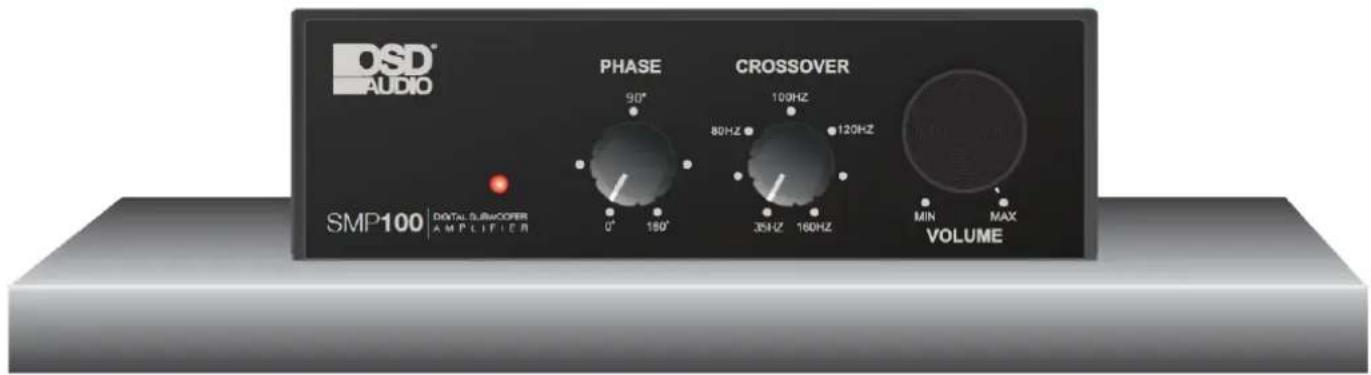
SHELF MOUNT
The SMP100 can be conveniently mounted on a shelf top as shown. Leave room for wires allow adequate space for airflow. Do not set objects on top of the amp.
VENTILATION
Even though the SMP100 will typically run cool, the top and bottom vents allow air to circulate through the chassis allowing optimum performance.
Please be sure to not block the vents with wires or other objects that will block the free flow of air through the amp.
Do Not Remove the feet and always mount horizontally. Mounting vertically will not allow proper airflow which may cause damage to the Amplifier. Improper placement is not covered under warranty.
All connections are conveniently placed on the rear panel for sane wire management, convenient connections and simple service.
The Line Level Input Illustrations shows the SMP100 connected to the Sub OUT on a stereo amplifier. You can also use the Sub OUT, LFE OUT or L&R Line Level OUT on just about any appropriately featured audio device.
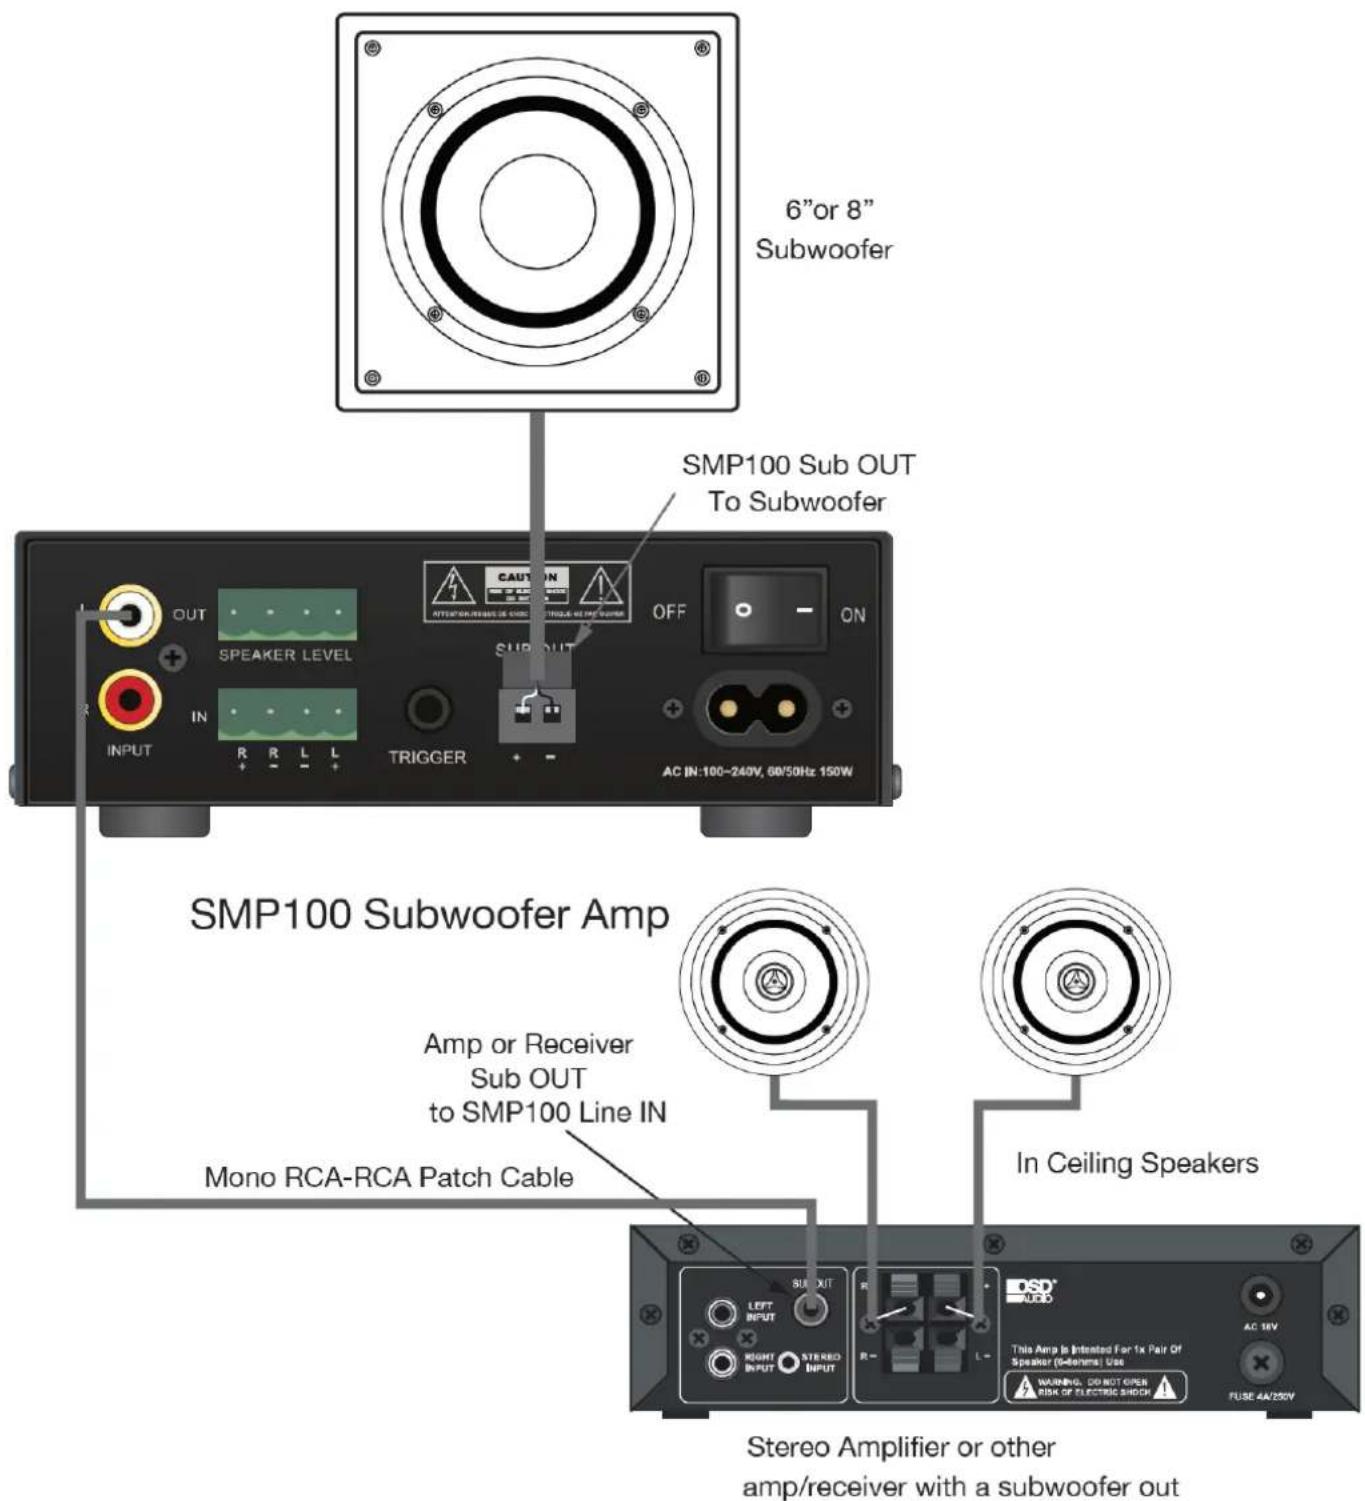
Line Level Input Illustration
In this configuration, the line level audio input will be processed by the Crossover, Phase and Volume Controls and output as an amplified subwoofer channel via the SMP100 Sub OUT.
NOTE: Do not connect the AC power cord or turn the amp on until all connections have been made and confirmed. Making connections with the power on can result in...well... undesirable circumstances...that may not be covered under the factory warranty.
INPUT (SMP100)
- Using a stereo or mono RCA-RCA cable with gold ends, connect the LFE OUT, Sub OUT, or other line level audio OUT on an amplifier, surround receiver or other audio preamp to the Input on the SMP100.
SPEAKER LEVEL IN
- No connection needed
SPEAKER LEVEL OUT
- No connection needed
SUB OUT (SMP100)
- Use16AWG (min) 2-conductor stranded speaker wire for subwoofer connection
- Strip approximately 1/2 to 3/4 of an inch off the ends and twist the strands together so there are no loose strands that can cause shorts.
- While observing proper wire polarity, insert the stripped and twisted ends of the speaker wire into the appropriate + and - terminals on the SMP100. Be sure there are no loose strands that can cause shorts.
- Confirm connection and polarity.
- Connect the speaker wires to the appropriate + and - terminals on the subwoofer.
- Confirm connection and polarity.
TRIGGER
- Using a 2 circuit 3.5mm mini plug, connect +12 to 24VDC from the trigger device to the striped wire (tip). Connect GND from the trigger device to the unmarked wire (sleeve).
AC MAINS
- After all connections have been made connect the supplied AC Power Cord to an unswitched AC power outlet.
The Speaker Level Input Illustration shows the SMP100 connected to the Speaker Level out on a multi-channel audio distribution amplifier. This configuration provides a simple, cost-effective and powerful solution to adding subwoofers to multi-room audio applications.
The amplified signal from the distribution amp connects to the SMP100 and gets passed through to the connected stereo speakers at full bandwidth. The signal also gets processed by the SMP100 and Phase settings before getting amplified to the level set by the SMP100 Volume Control. Once set, the volume control for the distribution amp zone will act as a master volume control for both the stereo speakers and sub.
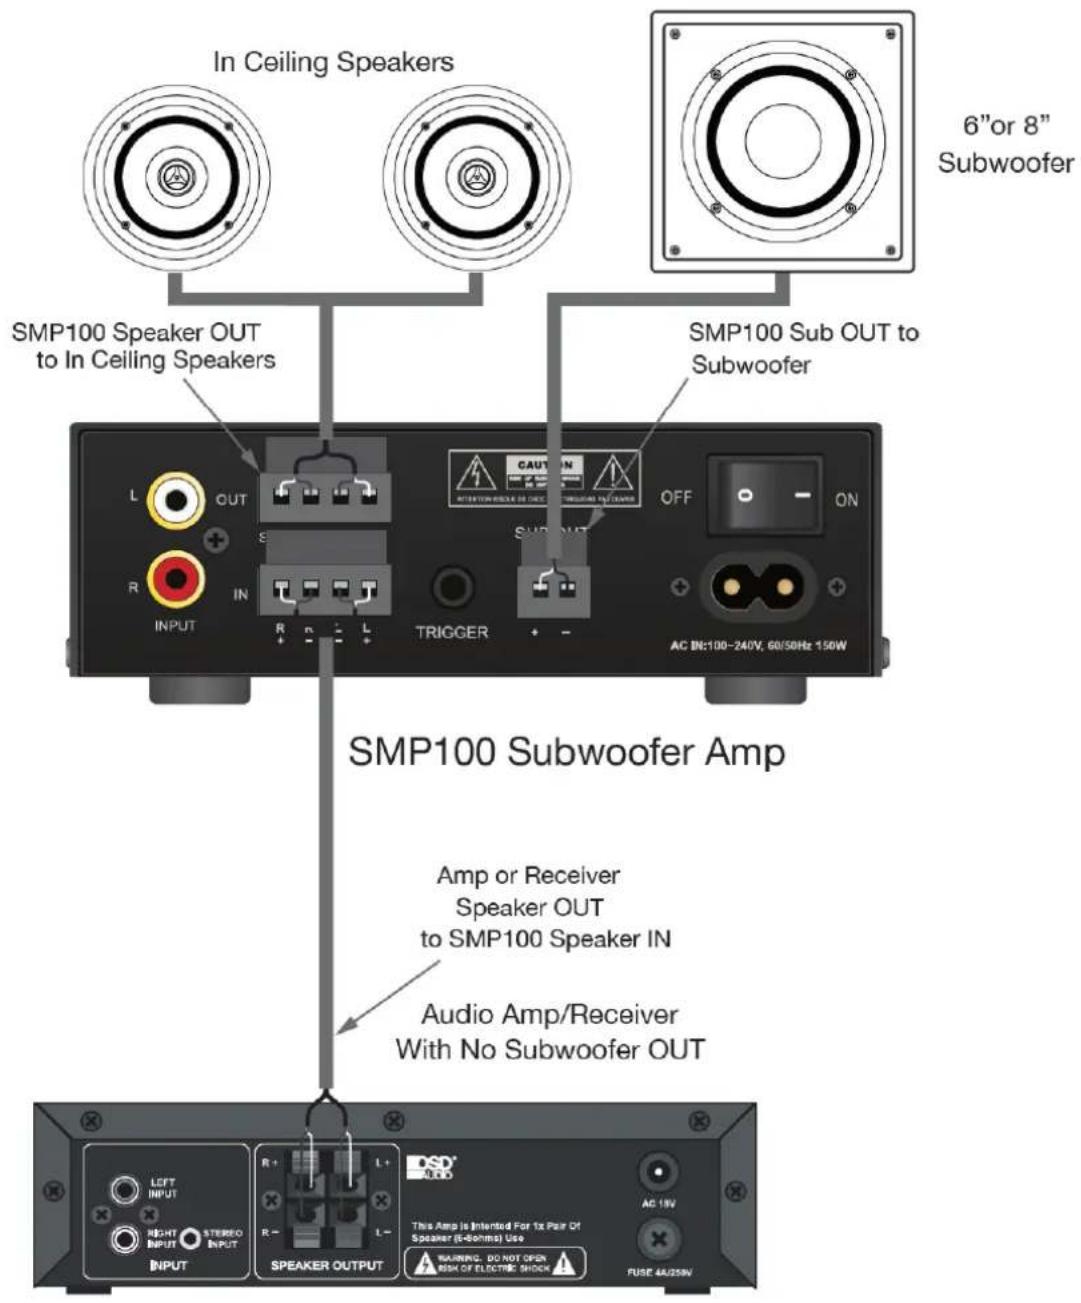
Speaker Level Input Illustration
In this configuration, speaker level audio input will passthrough at full bandwidth to the Speaker Level OUT. It will also be processed by the Crossover, Phase and Volume Controls and output as an amplified subwoofer channel via the SMP100 Sub OUT.
NOTE: Do not connect the AC power cord or turn the amp on until all connections have been made and confirmed. Making connections with the power on can result in...well...undesir - able circumstances...that may not be covered under the factory warranty.
INPUT (SMP100)
- No connection.
SPEAKER LEVEL IN (SMP100)
- Use16AWG (min) 2-conductor stranded speaker wire for speaker connections.
- Strip approximately 1/2 to 3/4 of an inch off the ends and twist the strands together so there are no loose strands that can cause shorts.
- While observing proper wire polarity, connect the Speaker Level OUT of the Audio Amp/Receiver to the appropriate Speaker Level IN + and - terminals on the A120. Be sure there are no loose strands that can cause shorts.
- Confirm connection and polarity.
- Use16AWG (min) 2-conductor stranded speaker wire for speaker connections.
- Strip approximately 1/2 to 3/4 of an inch off the ends and twist the strands together so there are no loose strands that can cause shorts.
- While observing proper wire polarity, connect the SMP100 Speaker Level OUT of the SMP100 to the appropriate Left and Right Speaker + and - terminals. Be sure there are no loose strands that can cause shorts.
- Confirm connection and polarity.
SUB OUT (SMP100)
- Use16AWG (min) 2-conductor stranded speaker wire for subwoofer connections.
- Strip approximately 1/2 to 3/4 of an inch off the ends and twist the strands together so there are no loose strands that can cause shorts.
- While observing proper wire polarity, connect the Sub OUT of the SMP100 to the appropriate Subwoofer + and - terminals. Be sure there are no loose strands that can cause shorts.
- Confirm connection and polarity.
TRIGGER
- Using a 2 circuit 3.5mm mini plug, connect +12 to 24VDC from the trigger device to the striped wire (tip). Connect GND from the trigger device to the unmarked wire (sleeve).
AC MAINS
- After all connections have been made connect the supplied AC Power Cord to an unswitched AC power outlet.
ON/OFF
The SMP100 is auto-sensing, so typically on ce the system is installed and setup, the power will automatically turn ON with the presence of an audio signal on either the L&R Line Inputs or the Speaker Level Inputs. The amp will automatically turn OFF when no audio signal has been detected for 15 minutes.
TRIGGER - If you are using the Trigger IN, the amp will automatically turn ON when DC voltage is applied to the Trigger jack and turn OFF when DC voltage is removed.
POWER - ON/OFF, toggle the Power ON/OFF button once to turn the amp ON/OFF.
Note: Power Toggle Switch must be in the ON position for Auto Sensing and 12v Trigger to work.
VOLUME - Adjust the volume to the subwoofer until low frequency level has a smooth, natural sounding transition from the left and right speakers.
PHASE - The Phase setting allows compensation for subwoofer location relative to the main speakers. Adjust the Phase setting to the point of highest sub audio output. RANGE: 0° to 180°.
CROSSOVER -The Crossover sets the frequency at which audio content will pass to the SMP100 Sub OUT. Adjust the crossover so there is a slight overlap with the main speakers low midrange cut-off to produce a natural sounding transition to low frequencies. RANGE: 40Hz to 160Hz.
MASTER VOLUME - When properly setup, the Volume Control on the Amplifier, Receiver or other audio device that is feeding the SMP100 will control the volume for both the Amplifier/Receiver (main speakers) and SMP100 (subwoofer).
- Design Type: Class D
• Power Output: 80W RMS @ 8-ohm w/ 160W Peak
• Power Output: 100W RMS @ 4-ohm w/ 200W Peak
• Frequency Response: 20Hz \~ 160Hz, +/-1dB
• Impedance: 8 ohm to 4 ohm stable
• Input Sensitivity: 200mV
• Crossover: 40-160Hz - Phase: 0-180'
• Signal to Noise Ratio: 95dB
• Signal Sensing: Power On and Trigger Mode
• Automatic source switching
• Input and Output Terminals: RCA input, speaker level in/out, trigger, sub out - Rack Mountable: No
- Dimensions(W x H x D): 5.6" x 1.8" x 4.75"
• Weight: 1.75 Lbs. - Warranty: 2 years
WARRANTY
All OSD AUDIO electronics have (2) year Limited Warranty against defects in materials and workmanship. Proof of purchase must accompany all claims. During the warranty period OSD AUDIO will replace any defective part and correct any defect in workmanship without charge for either parts or labor
OSD AUDIO may replace returned electronics with a product of equal value and performance. In such cases, some modifications to the mounting may be necessary and are not OSD AUDIO's responsibility.
For this warranty to apply, the unit must be installed and used according to its written instructions. If necessary, repairs must be performed by OSD AUDIO. The unit must be returned to OSD AUDIO at the owner's expense and with prior written permission. Accidental damage and shipping damage are not considered defects, nor is damaged resulting from abuse or from servicing performed by an agency or person not specifically authorized in writing by OSD Audio
OSD AUDIO sells products only through authorized dealers and distributors to ensure that customers obtain proper support and service. Any OSD AUDIO product purchased from an unauthorized dealer or other source, including retailers, mail order dealers and online sellers will not be honored or serviced under existing OSD AUDIO warranty policy. Any sale of product by an unauthorized source or other manner not authorized by OSD AUDIO shall void the warranty on the applicable product.
Damage to or destruction of components due to application of excessive power voids the warranty on those parts. In these cases, repairs will be made on the basis of the retail value of the parts and labor. To return for repairs, you must email customer service at RMA@audiogeargroup.com for a Returned Merchandise Authorization (RMA) number and must be shipped to OSD AUDIO at the owner's expense, along with a note explaining the nature of service required. Be sure to pack the product(s) in a corrugated container with at least 3 inches of resilient material to protect the unit from damage in transit.
This Warranty Does Not Cover: Damage caused by abuse, accident, misuse, negligence, or improper operation (installation) • Any products that have been altered or modified • Any product whose identifying number of decal, serial #, etc. has been altered, defaced or removed • Normal wear and maintenance.
Brand : OSD Audio
Model : SMP100
Category : Receiver