
ECR 244 - Cooker Equator - Free user manual and instructions
Find the device manual for free ECR 244 Equator in PDF.


| Product Type | Electric Cooking Range (Cooker) |
| Model | ECR 244 |
| Dimensions (H x W x D) | 36 x 24 x 24 inches |
| Net Weight | 91.5 lbs |
| Electrical Requirements | 240V / 60 Hz, 40A circuit |
| Number of Burners | 4 (Ceramic) |
| Oven Capacity | 2.4 cu. ft. |
| Controls | 6 knobs (4 hob, 1 oven function, 1 oven temperature) |
| Oven Functions | Defrost, Bake, Air Fry, Grill, Broil |
| Convection Fan | Yes, for even heating |
| Timer Features | Programmable cooking time, delay start, alarm with 3 sound levels |
| Key Lock | Yes, automatic after 7 seconds of inactivity |
| Storage Drawer | Yes, below oven |
| Anti-Tilting Bracket | Included, must be installed |
| Number of Wire Racks | 2, adjustable to 5 levels |
| Oven Light | Yes |
| Power Cord Type | 3-wire or 4-wire UL-listed range cord (40A, 125/250V min) |
| Installation Requirements | Must be installed by qualified technician; 4" clearance from cabinets; 16.5" minimum above cooktop |
| Cleaning Instructions | Use mild detergent and soft cloth; do not use abrasive cleaners |
| Warranty | 1 year parts and labor (residential); 90 days commercial |
Frequently Asked Questions - ECR 244 Equator
User questions about ECR 244 Equator
0 question about this device. Answer the ones you know or ask your own.
Ask a new question about this device
Download the instructions for your Cooker in PDF format for free! Find your manual ECR 244 - Equator and take your electronic device back in hand. On this page are published all the documents necessary for the use of your device. ECR 244 by Equator.
USER MANUAL ECR 244 Equator
Electric Cooking Range
Model - ECR 244
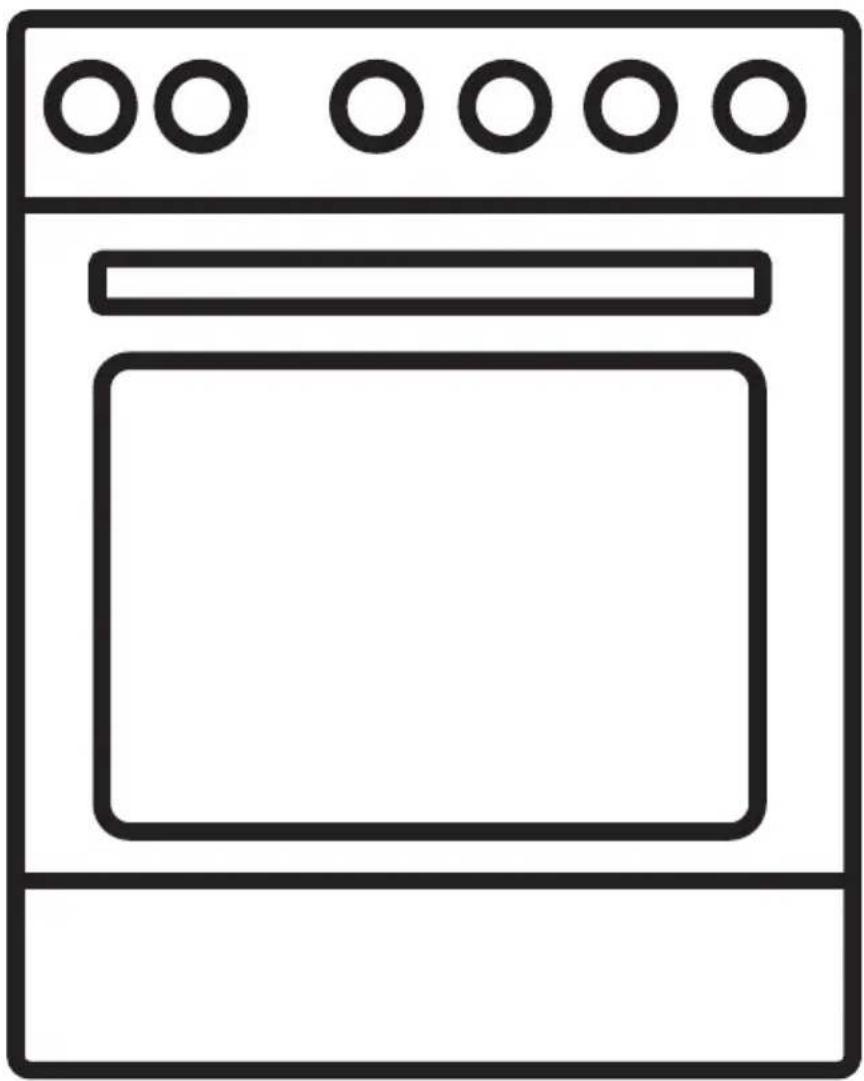
natural_image
Line drawing of a simple oven with four circular tops and one open door (no text or symbols)OWNER'S MANUAL
Warranty
Equator Appliances undertakes to the consumer-owner to repair or, at our option, to replace any part of this product which proves to be defective in workmanship or material under normal personal, family or household use, in USA and Canada, for a period of one year from the date of original purchase. For commercial use, the product is warranted for a period of 90 Days. During this period, we will provide all labor and parts necessary to correct such defect, free of charge, if the appliance has been installed and operated in accordance with the written instructions with the appliance. Ready access to the appliance, for service, is the responsibility of the consumer-owner. Services would be provided from Monday to Friday between normal business hours.
Exclusions
In no event shall Equator Appliances be liable for incidental or consequential damages or for damages resulting from external causes such as abuse, misuse, incorrect voltage or acts of God. This warranty does not cover service calls which do not involve defective workmanship or materials covered by this warranty. Accordingly, diagnosis and repair costs for a service call which does not involve defective workmanship or materials will be the responsibility of the consumer-owner.
Specifically, the following work is not covered under warranty and does not constitute warranty work:
Installation - e.g. Insufficient spacing around appliance Maintenance - e.g. Cleaning the appliance using solvents Mishandling - e.g. Breakage of glass
Most work is covered. The defining factor is, has the machine malfunctioned (Equator Appliances is responsible) or has the customer omitted or done something to cause the machine to malfunction (customer is responsible). Some states do not allow the exclusion or limitation of incidental or consequential damages, so the above limitation of exclusion may not apply to you.
This warranty is given by:
Equator Appliances
10222 Georgibelle Drive, Suite 200
Houston, Texas 77043-5249
For Service:
Call: 1-800-776-3538
Email: service@ApplianceDesk.com
Web: www.ApplianceDesk.com
Business hours: 9:00 am to 5:00 pm weekdays
You can register your Warranty by either of the following methods:
- Scan QR Code
QR Code

-
Open Smart Phone
-
Open Camera
-
Scan QR Code
-
Click the Link
-
Register online at ApplianceDesk.com/Warranty
GENERAL
Since it is a responsibility of the consumer-owner to establish the warranty period by verifying the original purchase date, Equator Appliances recommends that a receipt, delivery slip or some other appropriate payment record be kept for that purpose.
This warranty gives you specific legal rights, and you may also have other rights which vary from State to State.
All rights reserved. Manual subject to change without notice.
Congratulations on your new Electric Cooking Range!
In addition to its contemporary design, this is a highly sophisticated engineered product that will give you many years of satisfaction.
Here are some of the best reasons for buying your appliance for the ultimate cooking experience:
• Energy efficient cooking range.
- Convection fan for even heating.
- Drawer below oven for additional storage space.
- Anti-Tilting Bracket to prevent tip over safety hazard.
- Programmable cooking times and delay start features.
- 5 oven functions, including bake, broil, grill, air fry and defrost.
Safety
Read and follow all safety instructions before installing and using this appliance.
WARNING or CAUTION statements and important instructions appearing in this manual are not meant to cover all possible conditions and situations that may occur. Common sense, caution, and care must be exercised when installing, maintaining, or operating your appliance.
Child Safety
- Do not leave children unattended where the cooking range is being used. They should never be allowed to sit, stand, climb, or play on any part of the appliance, including the storage drawer.
- Do not store items of interest to children in the cabinets above or near the back of the appliance. Children climbing on or near the appliance to reach items could be seriously injured. The weight of a child on an open over door may cause the appliance to tip, resulting in serious burns or other injury. An open drawer when hot may cause burns.
- Never allow children to play with packaging material and dispose of these items promptly.
General Safety
- Do not step, lean, or sit on the door or drawer of this appliance, which can result in serious injuries and also cause damage to the appliance.
- Never cover the base of the oven or the wire racks with materials such as aluminum foil. Doing so blocks air flow through the oven and may cause carbon monoxide poisoning and may also trap heat, causing a fire hazard.
- Do not use the oven as a space heater to heat a room. Doing so could result in carbon monoxide poisoning and overheating of the appliance.
- Keep a fire extinguisher that is easily accessible near the cooktop.
Safe Disposal
Before discarding the appliance, remove the oven door but leave the wire racks in place, in order to prevent risk of child entrapment.
Please dispose of this appliance in accordance with local regulations.
Grounding Instructions
⚠ WARNING: Follow grounding instructions to avoid fire hazard or electrical shock.
Failure to follow this warning may cause serious injury, fire or death.
The Cooking Range must be grounded and installed by a qualified technician.
- For personal safety, this appliance must be properly grounded. For maximum safety, the power cord must be securely connected to an electrical outlet or junction box that is the correct voltage, is correctly polarized and properly grounded, and protected by a circuit breaker in accordance with local codes.
- It is the personal responsibility of the consumer to have the appropriate outlet or junction box with the correct, properly grounded wall receptacle installed. It is the responsibility and obligation of the consumer to assure that the electrical installation is adequate and is in conformance with all local codes and ordinances.
- In the United States, install in accordance with the National Fuel Gas Code ANSI Z223.1/NPFA No. 54, latest edition and National Electrical Code NFPA No. 70 latest edition, and local electrical code requirements. In Canada, install in accordance with CAN/CGA B149.1 and CAN/CGA B149.2 and CSA Standard C22.1, Canadian Electrical code, Part 1-latest editions and local electrical code requirements.
- Do not use an adapter plug, use an extension cord, or remove grounding prong from the power cord. Failure to follow this warning may cause serious injury, fire, or death.
Technical Specifications
| Model | ECR 244 |
| Electrical | 240V / 60 Hz |
| No. / Type of Burners | 4 / Ceramic |
| Oven Capacity | 2.4 cu. ft. |
| No. / Type of Control | 6 / Knob |
| Net Weight (lbs) | 91.5 |
| Product Dimensions H x W x D (inch) | 36 x 24 x 24 |
State of California Proposition 65 Warnings:
WARNING: This product contains one or more chemicals known to the State of California to cause cancer.
WARNING: This product contains one or more chemicals known to the State of California to cause birth defects or other reproductive harm.
Electrical Connection
Effective January 1, 1996 the National Electric Code requires that new construction (not existing) utilize a 4-conductor connection to an electric range.
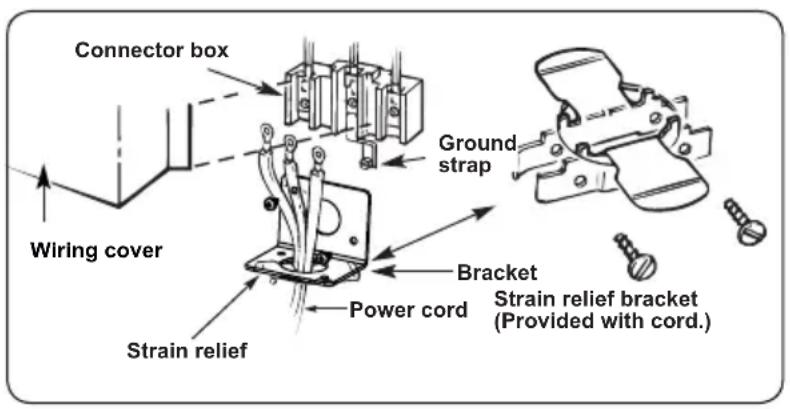
Use only a 3-conductor or a 4-conductor UL-listed range cord. These cords may be provided with ring terminals on wire and a strain relief device.
A range cord rated at 40 amps with 125 / 250 minimum volt range is required. A 50 amp range cord is not recommended but if used, it should be marked for use with nominal 4.13 inch diameter connection openings. Care should be taken to center the cable and strain relief within the knockout hole to keep the edge from damaging the cable.
NOTE: A 4-conductor cord is to be used when the appliance is installed in a mobile home or when local codes do not permit grounding through the neutral.
Power Cord Strain Relief Installation
Only a 4-conductor power-supply cord kit rated 240 volts, 40 amperes and marked for use with ranges must be used. Assemble the strain relief in the hole. Insert the power cord through the strain relief and tighten. Allow enough slack to easily attach the cord terminals to the connector block. If tabs are present at the end of the winged strain relief, they can be removed for better fit.
NOTE: Do not install the power cord without a strain relief. The strain relief bracket should be installed before reinstalling the rear range wiring cover.
3-Wire Power Cord Installation
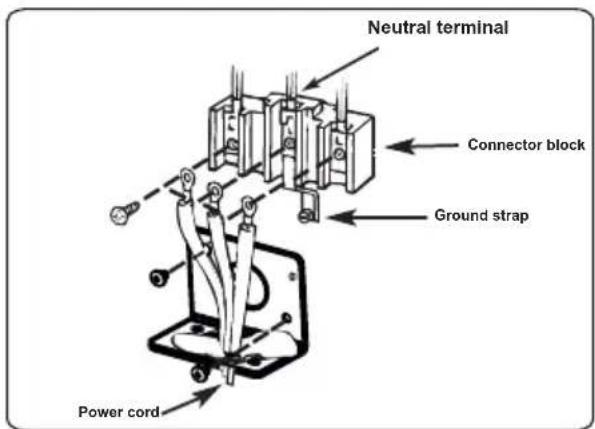
⚠ WARNING: The neutral or ground wire of the power cord must be connected to the neutral terminal located in the center of the connector block. The power leads must be connected to the outside (brass colored) terminals.
Remove the 3 wire terminal screws from the connector block. Insert screws through each power cord terminal ring and into the connector block until the screws engage the nuts. Be certain that the center wire is connected to the center screw of the connector block. Tighten screws securely. Do NOT remove ground strap connection.
4-Wire Power Cord Installation
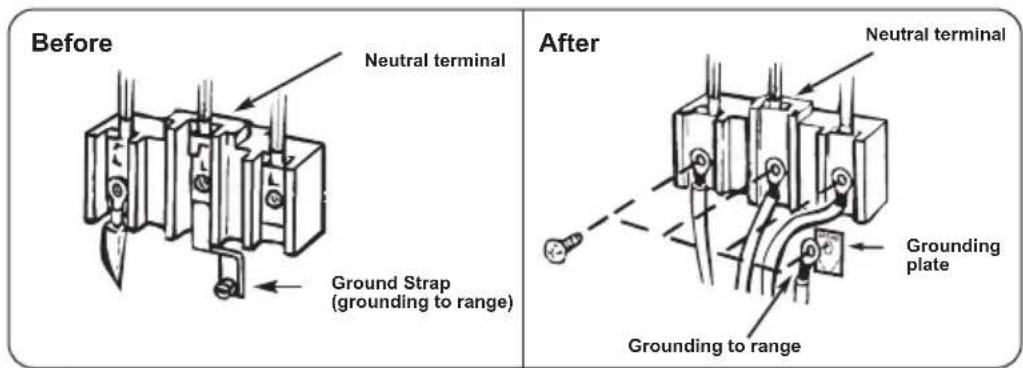
⚠ WARNING: The neutral wire of the supply circuit is connected to the neutral terminal located in the center of the connector block. The power leads must be connected to the outside (brass colored) terminals. The 4th grounding lead must be connected to the frame of the range with the grounding plate and grounding screw.
- Remove the 3 screws from the connector block.
- Remove the grounding screw and strap from the connector block middle location and the screw connection to the frame of the range.
- Insert screws through each power cord terminal ring and into connector block until screw engages nut. Be certain that the center wire is connected to the center screw of the connector block. Tighten screws securely.
- Attach ground wire to the frame of the range.
Installation
⚠ WARNING: This appliance must be installed by an authorised technician, according to the instructions in this manual and in compliance with the current local regulations.
- Incorrect installation may cause harm and damage, for which the manufacturer accepts no responsibility and the warranty will not be valid.
- Prior to installation, ensure that the local distribution conditions (electricity voltage and frequency and/or nature of the gas and gas pressure) and the adjustments of the appliance are compatible. The adjustment conditions for this appliance are stated on the label.
- The laws, ordinances, directives and standards in force in the country of use are to be followed (safety regulations, proper recycling, etc.).
General Instructions
- After removing the packaging material from the appliance and its accessories, ensure that the appliance is not damaged. If there is damage, do not use it and contact customer service.
- Ensure that there are no flammable or combustible materials in the close vicinity, such as curtains, oil, cloth etc. which may catch fire.
- The counter top and cabinets surrounding the appliance must be made of materials resistant to temperatures above 215° F.
- The appliance should not be installed directly above a dishwasher, fridge, freezer, washing machine or clothes dryer.
- To eliminate the risk of burns or fire when reaching over hot surface elements, cabinet storage space above the cooktop should be avoided. If there are cabinets above the cooktop, the risk can be reduced by ensuring there is adequate ventilation space.
Space Requirements for Installation
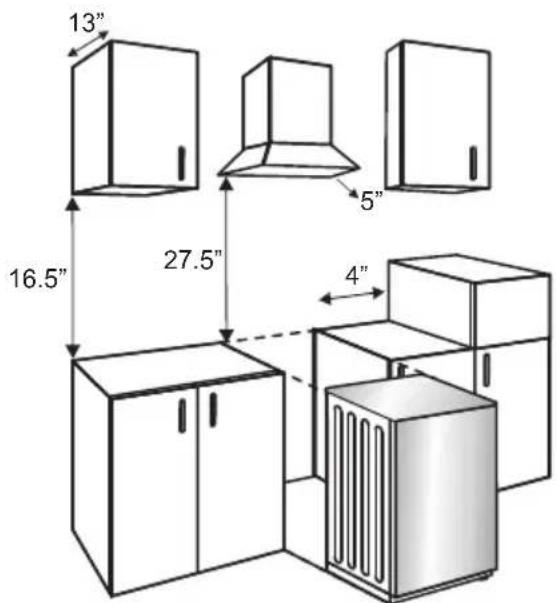
For safety and proper ventilation, ensure that adequate space is provided around and above the Cooking Range. Please note the space requirements in the diagram below.
- The range hood should extend 5" (12.7 cm) beyond the front of the cabinets.
- Cabinets installed above a cooktop may be no deeper than 13" (33 cm).
- If the kitchen cabinets are higher than the cooktop, the cabinets must be at least 4 inches (10 cm) away from the sides of appliance for air circulation.
- The cabinets above the appliance must be at least 16.5" above the surface height of the cooktop.
- The vent hood must be at least 27.5" above the appliance.
Storage Drawer
Below the oven is a storage drawer that can be easily pulled out and provides extra storage space for pots, pans and any cooking accessory that can withstand heat. DO NOT store food, plastic, paper or other items that could be flammable.
Tip Over Hazard
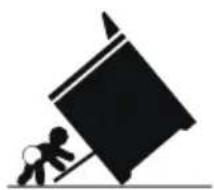
A child or adult can tip the cooking range and be injured or killed.
An Anti-Tilting Kit (bracket and screw) is provided with the cooking range which must be installed in order to prevent the appliance from tipping over.
- Verify the anti-tilting bracket has been installed to floor or wall. Do not operate the range without this bracket in place and fixed.
- If the range is moved, ensure this bracket is fixed again to floor or wall.
To check if the anti-tilting bracket is installed properly, use both hands to grasp the rear edge of the cooking range. Carefully attempt to tilt the range forward. When properly installed, the range should not tilt forward.
WARNING:
natural_image
Silhouette of a person pushing a large block on a horizontal line (no text or symbols)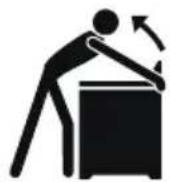
Anti-Tilting Kit
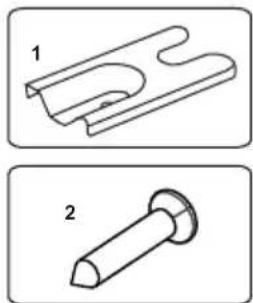
An Anti-Tilting Kit is provided with the Cooking Range. Loosely attach the Anti-Tilting Bracket (1) to the ground using the screw (2) as shown in the figure below.
Push the appliance towards the bracket making sure that the anti-tilting bracket is inserted into the foot on the appliance.
natural_image
Two technical line drawings of mechanical parts: a curved bracket and a pin (no text or symbols)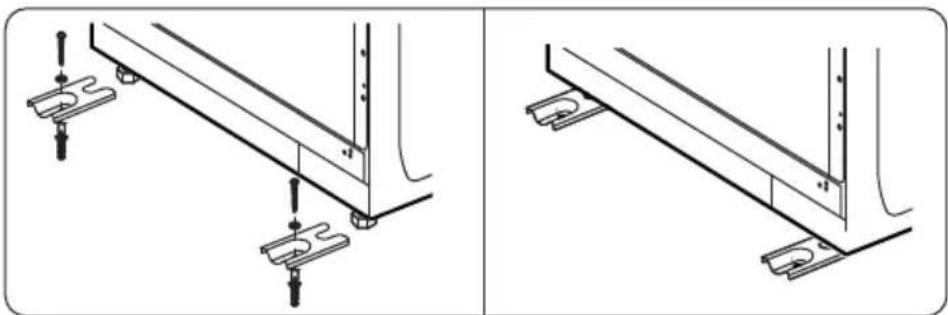
natural_image
Technical line drawing of two mechanical assembly components with mounting brackets and fasteners (no text or symbols)Adjusting the Feet
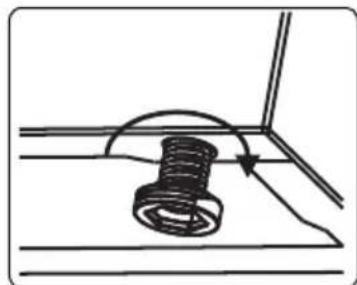
The Cooking Range must be level. Turn the adjustable feet counterclockwise to increase the height or clockwise to decrease the height. Since the appliance is heavy, it is recommended that two people lift and adjust the feet. Never drag the appliance.
natural_image
Simple line drawing of a bolt securing a corner, with no text or symbols present.Instructions For Use
- Do not clean or operate a broken cooktop. If cooktop should break, cleaning solutions and spillovers may penetrate the broken cooktop and create a risk of electric shock. Contact customer service.
- Clean cooktop glass with caution. If a wet sponge or cloth is used to wipe spills on a hot cooking area, be careful to avoid a steam burn. Some cleaners can produce harmful fumes if applied to a hot surface. Avoid scratching the cooktop glass with sharp objects.
- Do not use aluminum foil, oven liners, or any other materials to line the base of the oven, oven racks, or any other part of the appliance. Only use aluminum as recommended for baking, such as lining cookware or as a cover placed on food. Any other use of protective liners or aluminum foil may result in a risk of electric shock or fire or a short circuit.
- Use care when opening oven door or drawer. Stand to the side of the appliance when opening the door of a hot oven. Let hot air or steam escape before you remove or replace food in the oven.
- Keep oven vent ducts unobstructed. Touching surfaces in this area when the oven is on may cause severe burns. Do not place plastic or heat-sensitive items on or near the oven vent. These items can melt or ignite.
- Always place oven racks in desired location while oven is cool. If rack must be moved while oven is hot, do not let potholder contact hot burner or element in oven. Use potholders and grasp the rack with both hands to reposition. Remove all cookware and utensils before moving the rack. Do not use a broiler pan without its insert. Broiler pans and inserts allow dripping fat to drain away from the high heat of the broiler. Do not cover the broiler insert with aluminum foil; exposed fat and grease could ignite.
- Do not cook food on the base of the oven. Always cook in proper cookware and always use the oven racks.
⚠ WARNING: Flammable materials should not be stored in the cooking range, near surface burners, or in the storage drawer. This includes paper, plastic, cloth items, cookbooks, and flammable liquids. Do not store explosive materials, such as aerosol cans, on or near the appliance.
Operation
Keep children and pets away from the cooking range while using the cooktop or oven and until the appliance has fully cooled.
Control Panel
Hob Operation
Cookware should be used correctly:
- Ensure cookware is flat, covers the hob area and is centered.
- Ensure cookware does not have a rough base (to prevent the glass top from getting scratched).
- Ensure base of cookware is dry before placing it on the hob.
Do not use the cooktop if the surface is cracked or damaged. Call Customer Service.
Hob Controls
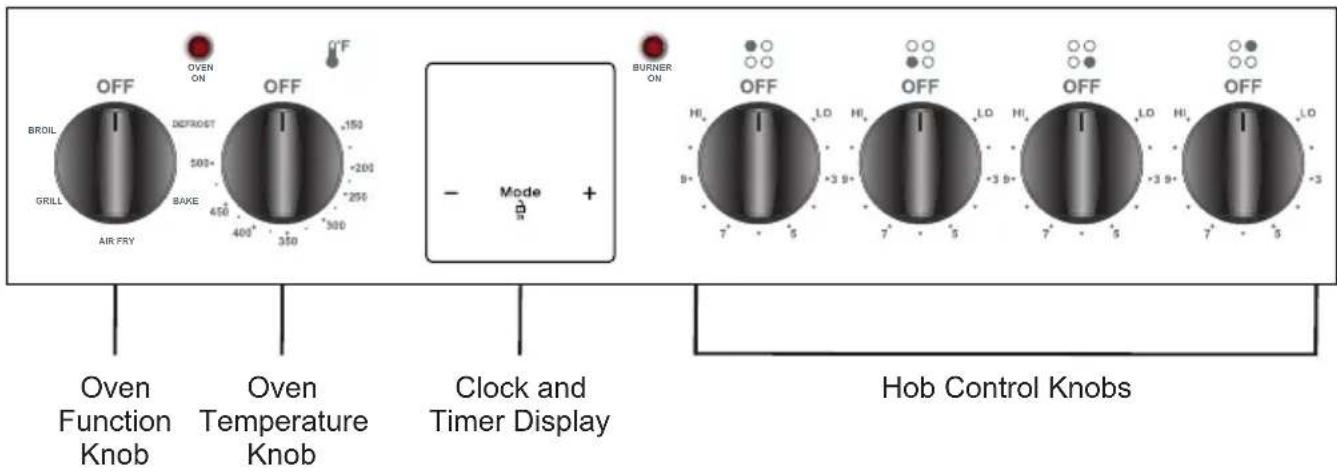
The operation of each of the four hobs is controlled by the respective Hob Control Knobs. The heat level increases as the number increases. From the OFF position, select the desired heat level by turning the Hob Control Knob clockwise from low (LO) to high (HI). The Burner On light will illuminate.
After cooking, turn the Hob Control Knob off by turning it to the OFF position. The hob will remain hot for a period of time, as shown by the residual heat indicator. Please do not touch the hob until it has completely cooled.
Note: When a hob is operated at a high temperature, the heated area may turn on and off. This is a safety feature which prevents the cooktop from overheating. This is normal. It causes no damage to the cooktop and little delay in cooking times.
Oven Operation
The oven is equipped with 2 wire racks, which can be placed at 5 different levels. Before using the oven, adjust or remove one of the racks as needed. Clean the racks with warm water and a soft cloth before use.
Use the oven as follows:
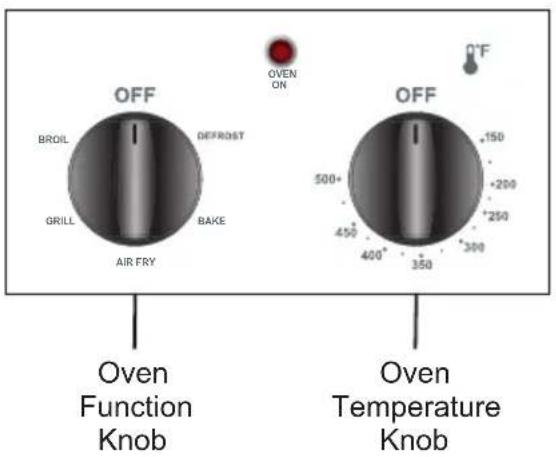
- Turn the Oven Function Knob to the desired setting: Defrost, Bake, Air Fry, Grill or Broil.
- Turn the Oven Temperature Knob to the desired temperature.
• The Oven On light will illuminate.
Oven Functions
- Defrost Place frozen food on middle rack and place a pan below it to catch any melting water and ice.
- Bake Upper and lower heating elements will turn on to ensure even cooking. Preheat oven for 10 minutes before starting to cook.
• Air Fry Upper and lower heating elements will turn on to ensure even cooking and fan will provide air circulation. - Grill Upper heating element will cook food from the top. Ensure there is a pan below the food to catch any oil or marinade drippings.
- Broil Upper heating element and fan will cook food from the top. Use the top position for the rack and high heat. Use a broil pan or ensure there is a pan below the food to catch any oil or marinade drippings.
Clock and Timer
Before using the oven, the clock must be set.
- Press “Mode” on the timer panel for 2 seconds until the dot in the middle of the time display starts to flash.
- Using the + and – keys adjust the clock to the current time.
- After a few seconds, the dot will stop flashing and remain illuminated, and the time will display.
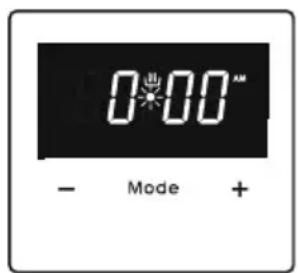
Key Lock
The Key Lock is a default Timer function and automatically activates when the timer has not been used for 7 seconds. The 🔔 symbol will appear and remain illuminated. To unlock the timer function, press and hold the "MODE" button for 2 seconds. The desired timer function can then be selected. These are explained below.
Optional Time and Alarm Features
Time Alarm ^4 (can be used without operating the oven)
The alarm can be set to any time between "00:00" and "23:59" hours. For example, if you want to set an alarm for 10 minutes, follow these steps:
- Press "Mode" until the 🔔 symbol and "00 00" displays and flashes.
- Using the + and – keys, select the time: 10 00.
- The 4 symbol will stop flashing and remain illuminated.
- After 10 minutes the alarm will sound and the 🔔 symbol will start flashing again.
- Press any key on the timer display panel and the alarm will stop.
- Press "Mode" for 2 seconds and the 🔔 symbol will disappear and the clock time will be displayed.
Set duration of cooking time
Place food in the oven and select the duration of time for cooking, which can range up to 10 hours.
- Use the Oven Function and Oven Temperature Knobs to turn on the oven.
- Press "Mode" until "dur" and "A" appear and flash on the Timer Panel.
- Using the + and – keys, select the time for cooking. Then the clock time will reappear on the display and also the “A” and 🔊 symbols will illuminate.
After the cooking time has elapsed, the oven will turn off, the alarm will sound and the symbol "A" will flash.
- Turn the Oven Function and Oven Temperature Knobs to the Off positions.
- Press any key on the timer display panel and the alarm will stop.
- Press "Mode" for 2 seconds and the "A" symbol will disappear and the clock time will be displayed.
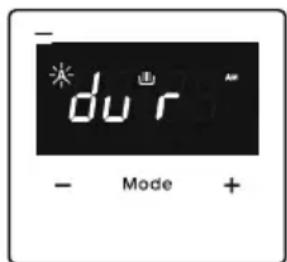
Set end of cooking time
Place food in the oven and select the time for cooking to end, which can be up to 10 hours from the current time.
- Use the Oven Function and Oven Temperature Knobs to turn on the oven.
- Press "Mode" until "end" and "A" appear and flash on the Timer Panel.
- Using the + and – keys, select the time for cooking. Then the clock time will reappear on the display and also the “A” and 📋 symbols will illuminate.
After the cooking time has elapsed, the oven will turn off, the alarm will sound and the symbol “A” will flash.
- Turn the Oven Function and Oven Temperature Knobs to the Off positions.
- Press any key on the timer display panel and the alarm will stop.
- Press "Mode" for 2 seconds and the "A" symbol will disappear and the clock time will be displayed.
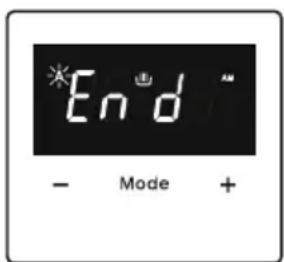
Set duration of cooking time with delay start
Place food in the oven and select the duration of time for cooking and also the delay time for when you want the cooking to start.
Program the duration and end of cooking:
- Use the Oven Function and Oven Temperature Knobs to turn on the oven.
- Press "Mode" until "dur" and "A" appear and flash on the Timer Panel.
- Using the + and - keys, select the time for cooking.
- Press "Mode" until "end" and "A" appear and flash on the Timer Panel.
- Using the + and - keys, select the time for cooking to end. The 📄 symbol will disappear.
- Enter the cooking period, adding it to the current time. Then the clock time will reappear on the display and also the "A" symbol will illuminate.
The operating time will automatically be calculated, and the oven will start and end as programmed.
After the cooking time has elapsed, the oven will turn off, the alarm will sound and the symbol "A" will flash.
- Turn the Oven Function and Oven Temperature Knobs to the Off positions.
- Press any key on the timer display panel and the alarm will stop.
- Press "Mode" for 2 seconds and the "A" symbol will disappear and the clock time will be displayed.
Select the sound level of the alarm
When the time on the clock is displayed:
- Press the + and – keys and the dot in the middle of the screen will start to flash.
- Press "Mode" to display the current alarm sound.
- Press the – key repeatedly to hear the three different sounds.
- Once the desired sound is selected, it will be saved.
Maintenance
Clean the cooking range regularly following these guidelines:
- Turn the power off and let the cooktop and oven cool down before cleaning.
- Do not use abrasive tools, materials and strong cleaners.
- Use mild detergent and soft material to clean the surfaces.
- Clean the oven with special oven cleaners following the manufacturer's instructions.
Troubleshooting
In most cases, when your Cooking Range fails to work, the problems arising can be easily solved without having to call for a technician. Before calling for assistance, always check these points.
| Problem Possible | Cause Solution | |
| The hob does not turn on. | There is no power supply. | Check the household fuse for the appliance.Check whether there is a power cut by trying other electronic appliances. |
| Oven does not turn on. | There is no power supply. | Check the household fuse for the appliance.Check whether there is a power cut by trying other electronic appliances. |
| No heat or oven does not warm up. | Oven temperature control is incorrectly set.Oven door has been left open. | Check the oven temperature control knob is set correctly. |
| Cooking is uneven in the oven. | Oven wire racks are incorrectly positioned. | Check that the recommended temperatures and wire rack positions are being used.Do not frequently open the door unless you are cooking things that need to be turned.If you open the door often, the interior temperature will be lower and this may affect the results of your cooking. |
| Oven light does not operate. | Light has burned out.Electrical supply is disconnected or off. | Electrician should replace light.Make sure the electrical supply is on at the wall socket outlet. |
| The timer keys cannot be pressed properly. | There is moisture on the control panel.The key lock function is set. | Remove the moisture and try again.Check whether the key lock function is set. |
| The oven fan is noisy. | Oven wire racks are vibrating. | Check that the oven is level.Check that the wire racks and any cookware are not vibrating or in contact with the oven back panel. |
Transportation
If you need to transport the product, use the original product packaging and carton.
Tape all independent parts, such as wire racks, to the oven to prevent damage.
If you do not have the original packaging, you can use packing boxes and materials that will ensure no damage to the appliance. You can call Customer Service for guidance.
natural_image
Simple geometric diagram of a circle with a horizontal line crossing through it (no text or symbols)EQUATOR®
ADVANCED Appliances ≡
Equator Advanced Appliances USA, founded in 1991, offers Efficient, High-Quality, and Innovative household appliances.
Our Mission is to simplify domestic chores and save Time, Space, and Energy.
Our Vision is to enhance our Customer's Quality of Life!
- Electric Cooking Range
- Warranty
- Exclusions
- Equator Appliances
- For Service:
- GENERAL
- Congratulations on your new Electric Cooking Range!
- In addition to its contemporary design, this is a highly sophisticated engineered product that will give you many years of satisfaction.
- Safety
- Child Safety
- General Safety
- Safe Disposal
- Grounding Instructions
- The Cooking Range must be grounded and installed by a qualified technician.
- Electrical Connection
- Power Cord Strain Relief Installation
- 3-Wire Power Cord Installation
- 4-Wire Power Cord Installation
- Installation
- General Instructions
- Space Requirements for Installation
- Storage Drawer
- Tip Over Hazard
- WARNING:
- Anti-Tilting Kit
- Adjusting the Feet
- Instructions For Use
- Operation
- Control Panel
- Hob Operation
- Hob Controls
- Oven Operation
- Oven Functions
- Clock and Timer
- Key Lock
- Optional Time and Alarm Features
- Time Alarm 4 (can be used without operating the oven)
- Set duration of cooking time
- Set end of cooking time
- Set duration of cooking time with delay start
- Select the sound level of the alarm
- Maintenance
- Troubleshooting
- Transportation
- EQUATOR®
- ADVANCED Appliances ≡
Brand : Equator
Model : ECR 244
Category : Cooker