
BIC 244 CC ED - Cooker Equator - Free user manual and instructions
Find the device manual for free BIC 244 CC ED Equator in PDF.


| Product Type | Freestanding Electric Cooker |
| Model | BIC 244 CC ED |
| Brand | Equator |
| Dimensions (H x W x D) | 850 x 600 x 600 mm |
| Weight | 55 kg |
| Power Supply | 230 V / 50 Hz |
| Total Connected Load | 10.5 kW |
| Energy Efficiency Class | A |
| Oven Type | Electric conventional |
| Oven Capacity | 65 L |
| Oven Functions | Conventional top/bottom heat, grill |
| Hob Type | Ceramic |
| Number of Cooking Zones | 4 |
| Control Type | Rotary knobs |
| Safety Features | Child lock, automatic shut-off, residual heat indicators |
| Cleaning and Maintenance | Easy-clean enamel oven interior; use hob scraper for ceramic |
| Installation | Freestanding, proper ventilation required |
| Included Accessories | Oven grid, baking tray |
| Spare Parts and Repairability | Available via authorized service centers |
| Warranty | 2 years |
Frequently Asked Questions - BIC 244 CC ED Equator
User questions about BIC 244 CC ED Equator
0 question about this device. Answer the ones you know or ask your own.
Ask a new question about this device
Download the instructions for your Cooker in PDF format for free! Find your manual BIC 244 CC ED - Equator and take your electronic device back in hand. On this page are published all the documents necessary for the use of your device. BIC 244 CC ED by Equator.
USER MANUAL BIC 244 CC ED Equator
Read the instructions carefully and keep for future reference. Information maybe updated from time to time so please refer to the website for the latest version of the manual.

DO NOT RETURN TO STORE!
HAVE QUESTIONS OR NEED SERVICE?

1-800-776-3538

Service@ApplianceDesk.com
Warranty
Equator Appliances undertakes to the consumer-owner to repair or, at our option, to replace any part of this product which proves to be defective in workmanship or materials under normal personal, family or household use, in the USA and Canada, for a period of one year from the date of original purchase. For commercial use, the product is warranted for a period of 90 days. During this period, we will provide all labor and parts necessary to correct such defect, free of charge, if the appliance has been installed and operated in accordance with the written instructions with the appliance. Ready access to the appliance, for service, is the responsibility of the consumer-owner. Service would be provided from Monday to Friday between normal business hours.
Exclusions
In no event shall Equator Appliances be liable for incidental or consequential damages or for damages resulting from external causes such as abuse, misuse, incorrect voltage or acts of God. This warranty does not cover service calls which do not involve defective workmanship or materials covered by this warranty. Accordingly, diagnosis and repair costs for a service call which does not involve defective workmanship or materials will be the responsibility of the consumer-owner.
Specifically, the following work is not covered under warranty and does not constitute warranty work
Installation – e.g. Insufficient spacing around appliance Maintenance - e.g. Cleaning the appliance using solvents Mishandling – e.g. Breakage of glass
Most work is covered. The defining factor is, has the machine malfunctioned (Equator Appliances is responsible) or has the customer omitted or done something to cause the machine to malfunction (customer is responsible). Some states do not allow the exclusion or limitation of incidental or consequential damages, so the above limitation of exclusion may not apply to you.
WARRANTY SERVICE
This warranty is given by:
For Service:
Equator Appliances
Call 1-800-776-3538
10222 Georgibelle Drive, Suite 200
Email: Service@ApplianceDesk.com
Houston, TX 77043-5249
Web: www.ApplianceDesk.com
Website: EquatorAppliances.com
Business hours: 9:00 am - 5:00 pm weekdays
You can register your Warranty by either of the following methods:
- Scan QR Code
- Open Smart Phone
- Open Camera
- Click the Link
- Register online at ApplianceDesk.com/Warranty

- QR Code is also used to obtain Product Information, Manuals and Updates
GENERAL
Since it is the responsibility of the consumer-owner to establish the warranty period by verifying the original purchase date, Conserv Appliances recommends that a receipt, delivery slip or some other appropriate payment record be kept for that purpose.
This warranty gives you specific legal rights, and you may also have other rights which vary from State to State.
All rights reserved. Manual subject to change without notice.
Congratulations on your new Induction Cooktop!
In addition to its contemporary design, this is a highly sophisticated engineered product that will give you many years of satisfaction.
Here are some of the best reasons for buying your appliance for the ultimate cooking experience:
• 9 Power Levels for precision cooking
• Power Boost function for quick high heat
- Keep Warm function
- Pause function for interrupted cooking
- Lock function for safety
- Easy to clean glass surface
Specifications Table
| Model | BIC 244 CC ED |
| Electrical | 240V / 60Hz |
| Number of Burners | 4 |
| Type of Burners | 4 Induction |
| Total Power / Levels | 7400W / 9 |
| Left Rear Burner | 1200W Booster 2000W |
| Left Front Burner | 2100W Booster 2700W |
| Right Rear Burner | 2100W Booster 2700W |
| Right Front Burner | 1600W Booster 2000W |
| Net Weight | 22.2 lbs |
| Product Dimensions HxWxD | 3.1 x 24 x 21 inch |
This appliance is manufactured in compliance with the relevant safety standards.
Read all instructions carefully before installation and operation of the appliance. Failure to follow these warnings could result in a fire or explosion that causes property damage, personal injury or death.
WARNING
- Do not operate the cooktop with a damaged cord or if it malfunctions or has been damaged in any manner.
- To protect against electric shock, do not immerse cord, or main body in water or any other liquid.
- Do not let cord hang over edge of table or counter.
- Do not allow cord to touch a hot surface.
- Always attach plug to appliance first, then plug cord into the wall outlet. To disconnect, turn any control to off, then remove plug from wall outlet.
- For induction burners use only induction compatible cookware.
- Do not allow pans to boil dry or heat empty pans.
- Never leave the cooktop unattended when in use.
- Close supervision is necessary when the cooktop is used by or near children or impaired persons.
- Even after turning off the cooktop, do not touch it as the surface retains residual heat.
- Do not use the cooktop as a work surface.
- Do not store detergents or flammable materials in the area under the cooktop.
- This appliance is not intended for use by persons (including children) with reduced physical, sensory or mental capabilities, or lack of experience and knowledge, unless they have been given supervision or instruction.
Please dispose off or recycle this appliance in accordance with local environmental regulations.
SAVE THESE INSTRUCTIONS
Intended Use
- This appliance is designed for built-in household use only.
- Do no use outdoors
- Do not use the appliance to heat a room.
Installing the cooktop
- Visually inspect the cooktop for damage. Also make sure all cooktop screws are on tight.
- Follow cutout dimensions of the countertop as indicated on the diagram.
- Ensure the wall coverings, countertop and cabinets around the cooktop can withstand heat (up to 200°F) generated by the cooktop.
- Before cutting out the countertop, check that the dimensions in the diagram correspond to the dimensions of the product.
- Ensure the work surface is heat-resistant and is at least 1.2 inch (3 cm) thick.
- Ensure the safety distance between the sides of the cooktop and the inner surfaces of the countertop is at least 0.12 inch (0.3 cm).
- Keep a space of at least 0.2 inch (0.5 cm) around the cut-out.
• Gently lower the cooktop into the countertop cutout.
NOTE: If Sealing the cooktop to the countertop, the cooktop must be removable if service is necessary.
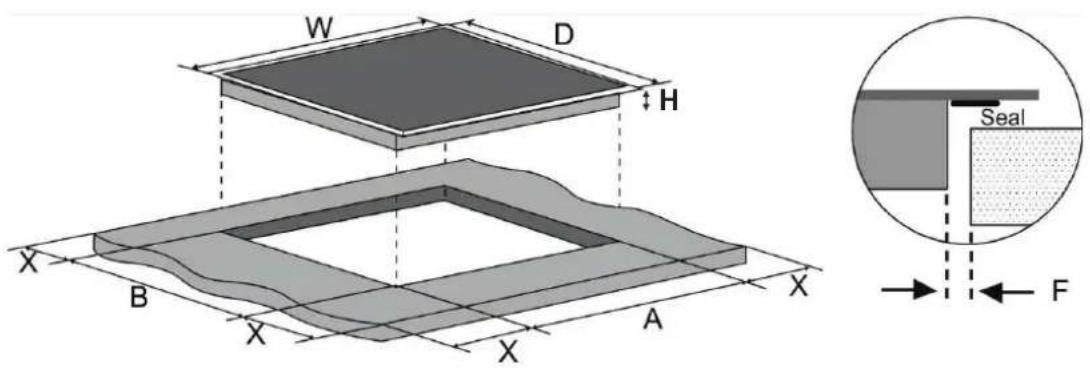
| Cooktop Dimensions | Cutout and Spacing | ||||||
| H (Height) | W (Width) | D (Depth) | A | B | X | F | |
| inch | 2 | 23 | 17.5 | 22 | 19.5 | Min 0.2 | Min 0.12 |
| cm | 5 | 58.4 | 44.5 | 56 | 49.5 | Min 0.5 | Min 0.3 |
Ventilation and safety distances
Ensure that the following conditions are met for adequate ventilation of the cooktop and that the supply and exhaust air is not blocked:
- The safety distance between the cooktop and the cabinet or the vent hood should be at least 30 inch.
• If the cooktop is installed above an oven, the oven must have its own fan. - The safety distance between the bottom of cooktop and the oven must be at least 2 inch.
- The installation must comply with all space requirements and regulations.
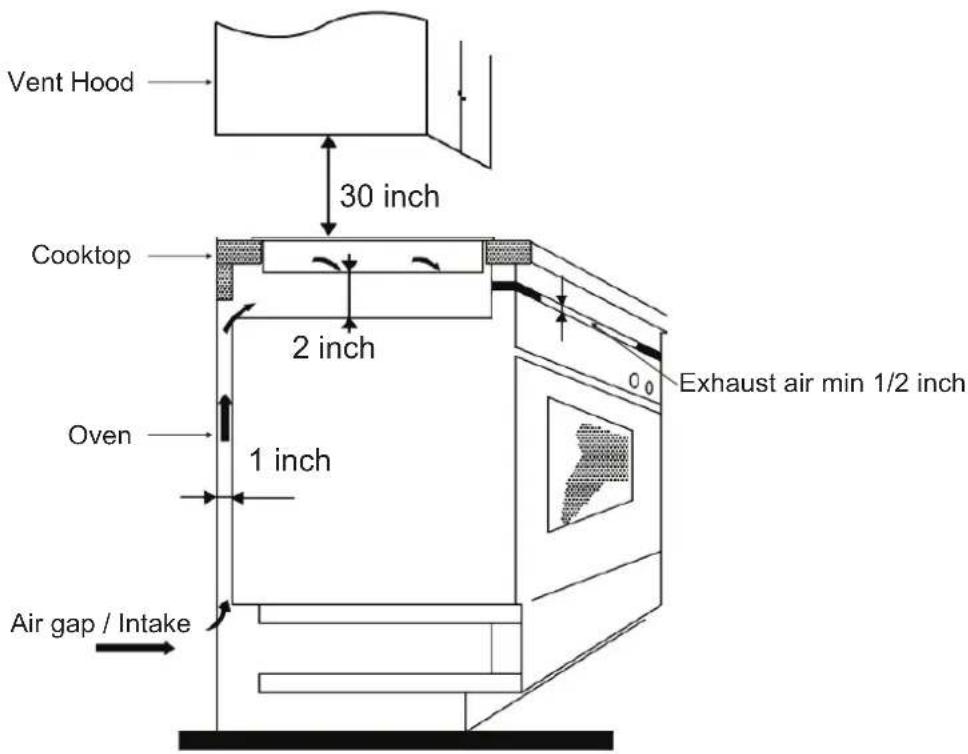
IMPORTANT: To avoid overheating, it is recommended that there is a space of at least half an inch on all four sides between the cooktop and the cabinet where it is installed.
Electrical Connections
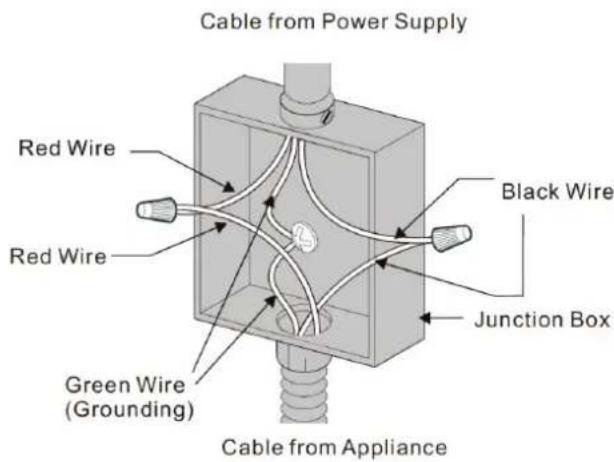
The cooktop must connect to a separate, grounded wire, single phase, AC only electrical supply with its own circuit breaker. These appliances must be installed in accordance with National Electrical Codes, as well as all state, municipal and local codes. This appliance must be supplied with the proper voltage and frequency and amperage, which is protected by a properly sized circuit breaker or time delay fuse.
IMPORTANT: Use the 3-wire cable from home power supply where local codes permit a 3-wire connection.
Compatible Cookware
Use only induction cookware or induction compatible cookware.
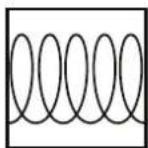
Check your cookware's retail box for the induction symbol. To determine if your cookware is compatible with the induction technology, use a magnet and see if it holds to the bottom of the cookware. If the magnet stays on, then your cookware can be used on the induction cooktop!
Optimally the cookware will have this induction image on the retail box:
Induction
The following are not compatible: glass, ceramic, copper, aluminum, round-bottomed cookware, or cookware with a base less than 5 inches.
NOTE: Some cookware can produce noises when using induction cooking. This is not a fault in the cooktop, and its function will not be impaired in any way as a result. The use of some types of light weight cookware may produce various sounds and vibrations, particularly when cooking at high power levels. High quality cookware is recommended.
Cooktop Features
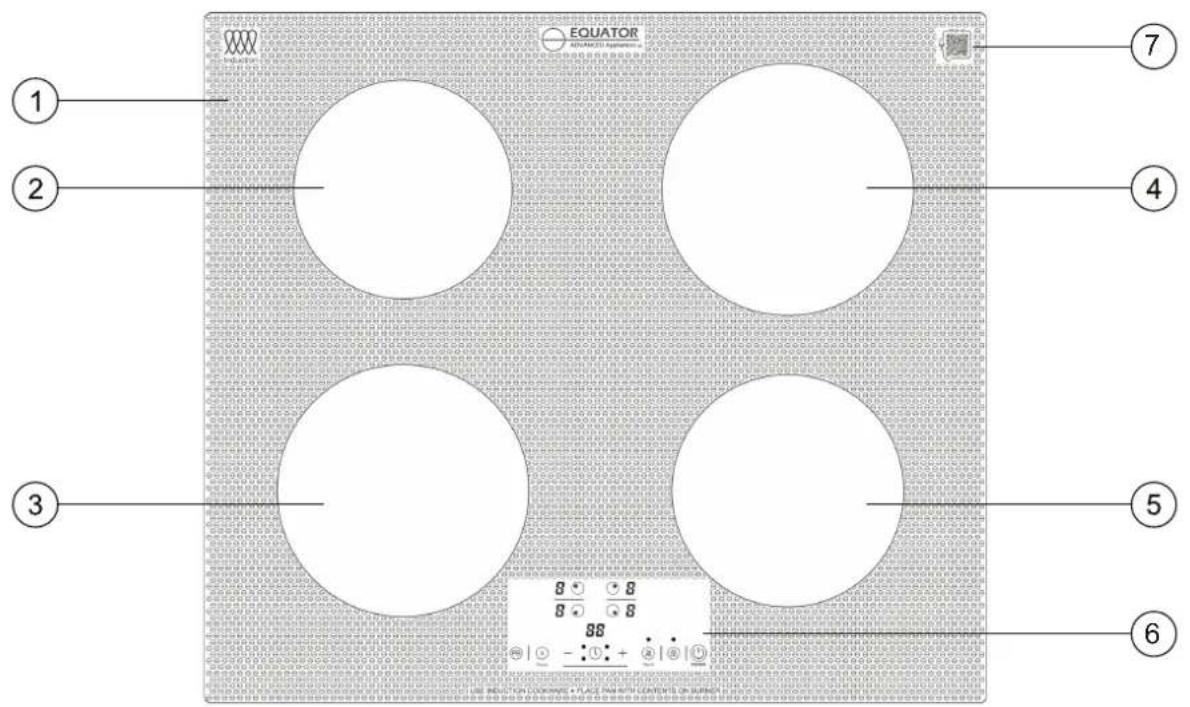
- Glass Surface
- Left Rear Burner
- Left Front Burner
-
Right Rear Burner
-
Right Front Burner
- Control Panel
- Chat AI Code
Main Control Panel
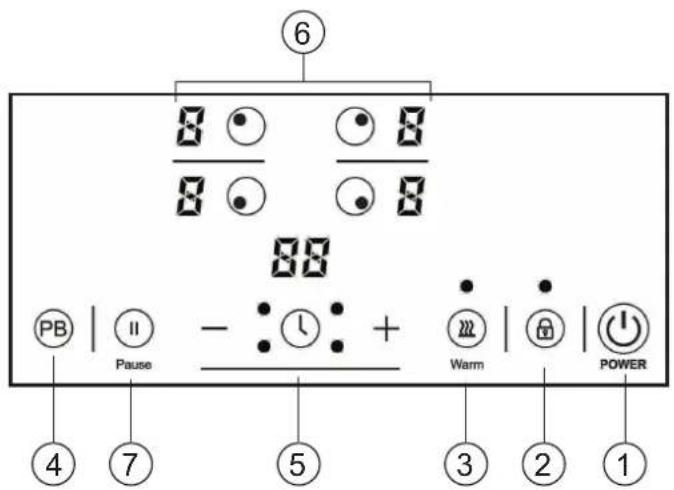
- Power
- Child Lock
- Keep Warm
-
Power Boost
-
Timer
-
Burner On and Display
-
Pause
Ensure the cooktop is plugged into an electrical outlet. Place suitable cookware onto the cooktop.
Main Power ⏻
Press the Power icon ⏻. This powers on the whole cooktop.
You will hear a beep and see flashing lines - on the display next to both the burners.
Burners
To select the burner to use and the power level, press the burner icon for the desired burner. You can select the power or heat level by pressing the + or - icons.
Residual Heat Indicator
When the cooktop has been operating for some time, there will be some residual heat which is indicated on the display as "H". It will turn off once cooktop is cooled down. It can take approximately 30 minutes to cool down completely.
Timer
Press the Timer icon to activate the timer for either of the two burners. Each time the timer icon is pressed the indicator light for either the front or rear burner will illuminate. Once the burner is selected, press the + or - icons on the control panel to set the number of minutes to set the cooking time. The time will show on the digital display and the numbers will count down on it as the time progresses. If both burners are selected, the time on the display will be that of the least number of minutes.
To cancel the timer, press the timer icon to select the burner to cancel. Then press the number "0" two times on the control panel. Or press the timer icon for 3 seconds and all times for all the burners will be cancelled.
Note: Each burner on the cooktop is equipped with a safety temperature sensor which switches off the cooktop if there is excessive heat. This is to protect the electronics from overheating. Wait for the cooktop to cool down before using it again. If any cracks appear on the surface of the cooktop, immediately disconnect it from the power.
If a cooktop is left on accidentally, it will automatically be switched off after a period of time has elapsed.
Power Boost PB
To heat a burner to a high temperature quickly, use the Power Boost feature.
Press the PB icon and the display panel will show "P" while the Power Boost is on. The Power Boost is 1800 W and it will remain on for 5 minutes. Then the heat level will reduce to 9 (1400 W). Power Boost can be cancelled by pressing the burner icon and then the + or – icons to adjust the heat level.
Note: Only one burner can use the Power Boost feature at a time. Both burners cannot use Power Boost at the same time.
Child Lock
To ensure the safety of children, the cooktop controls can be locked so children cannot change the settings.
To lock: hold the Child Lock icon ⏻ for 3 seconds until “L0” displays and the rest of the icons are disabled except the On/Off Power icon. To unlock: hold down the Child Lock icon for 3 seconds and the cooktop will return to normal.
Keep Warm
Press the Keep Warm icon to allow the burner to be on at a low temperature and to keep the food warm. The display will show ☐.
Press the icon again to cancel the Keep Warm feature.
Pause ^II
Press the Pause icon (⑪) to stop heat to the burner. Then press the icon again to resume cooking. The Pause feature remains active for 2 hours and then the burner automatically turns off.
Maintenance
- Wait for the cooktop to cool down completely before cleaning it.
- Do not use chemicals and abrasive materials to clean the cooktop.
- Never wash the cooktop with water.
- Use mild detergent and a damp cloth to wipe down the cooktop.
• Periodically, use a vacuum cleaner to remove dust from intake and exhaust vents. - If plastics or sugars melt onto the cooktop, gently and carefully scrape the debris off while the burner is still hot.
In most cases, when your Cooktop fails to work, the problems arising can be easily solved without having to call for a technician. Before calling for assistance, always check these points. Repairs should only be done by an authorized service agent.
| Problem | Possible Cause | Solution |
| Burner does not maintain a rolling boil or cooking is slow | Improper cookware being used. | Use pans that are flat and match the diameter of the burner. |
| Burners do not work properly | Cooktop controls improperly set. Check to be sure the correct control is set for the burner you are using. | |
| Scratches on cooktop glass surface | Incorrect cleaning materials being used. | Use mild cleaning solution and soft damp cloth. |
| Cookware with rough bottoms being used or coarse particles (salt or spices) are on the surface of the cooktop. Cookware has been dragged across the cooktop surface. | To avoid scratches, use the recommended cleaning procedures. Make sure bottoms of cookware are clean before use, and use cookware with smooth bottoms. Don't drag cookware over the cooktop. | |
| Areas of discoloration on the cooktop | Food spillovers not cleaned before next use. | Cleaning the cooktop after each use. |
| Plastic melted to the surface | Plastic placed on the hot cooktop. | Gently scrape off plastic. |
| Control panel not operating | Control panel is dirty. Clean the control panel. | |
| A fuse may be blown or the circuit breaker tripped. | Replace the fuse or reset the circuit breaker. | |
Error Codes
Information codes may be displayed to help you understand better what is wrong with the appliance.
| Error Codes Possible Cause Solution | ||
| E0 No pan or incorrect pan on burner. | Place correct pan on burner and ensure that if it is an induction burner there is liquid or some substance in the pan. | |
| E2 NTC short or not connected. Call for Customer Service. | ||
| E3 | High voltage: Higher than 145-165V. | Ensure voltage is below this range. |
| E4 Low voltage: Lower than 85-95V. | Ensure voltage is above this range. | |
natural_image
Simple geometric diagram of a circle with a horizontal line crossing through it (no text or symbols)EQUATOR®
ADVANCED Appliances ≡
Equator Advanced Appliances USA, founded in 1991, offers Efficient, High-Quality, and Innovative household appliances.
Our Mission is to simplify domestic chores and save Time, Space, and Energy.
Our Vision is to enhance our Customer's Quality of Life!
- Warranty
- Exclusions
- WARRANTY SERVICE
- GENERAL
- Congratulations on your new Induction Cooktop!
- WARNING
- Intended Use
- Installing the cooktop
- Ventilation and safety distances
- Electrical Connections
- Compatible Cookware
- Cooktop Features
- Main Control Panel
- Main Power ⏻
- Burners
- Residual Heat Indicator
- Timer
- Power Boost PB
- Child Lock
- Keep Warm
- Pause II
- Maintenance
- Error Codes
- EQUATOR®
- ADVANCED Appliances ≡
Brand : Equator
Model : BIC 244 CC ED
Category : Cooker