
SC 120 - Dash cam COBRA - Free user manual and instructions
Find the device manual for free SC 120 COBRA in PDF.


| Product Type | Dash cam |
| Brand | Cobra |
| Model | SC 120 |
| Video Resolution | Quad HD (2560 x 1440) at 30 fps |
| Field of View | 140° |
| Display | None (no built-in screen) |
| Dimensions | Approx. 100 x 50 x 30 mm (estimated) |
| Weight | Approx. 80 g (estimated) |
| Power Supply | 12V vehicle power adapter via USB-C |
| Memory Card | Micro SD card (included 16 GB, supports up to 256 GB) |
| Main Functions | Loop recording, emergency recording, G-sensor, parking mode, motion detection, cloud video management, trip clips, 360 alerts, heads-up navigation |
| Safety Features | G-sensor impact detection, parking mode with motion detection |
| Connectivity | Wi-Fi, GPS, Bluetooth (via Drive Smarter app) |
| Included Accessories | USB-C data cable, vehicle charger, removable mount, cable management kit (6 wire clips & routing tool), 3 electrostatic films, 16 GB SD card |
| Optional Accessories | Easy Install Hardware Kit (ODB II), Fuse Box Hardware Kit |
| Care and Cleaning | Clean lens with soft cloth; avoid water and harsh chemicals |
| Warranty | Limited 1-year warranty |
| Repairability | Contact Cobra support; no user-serviceable parts |
| General Information | FCC ID: BBOSC120, IC: 906A-SC120; class B digital device |
Frequently Asked Questions - SC 120 COBRA
User questions about SC 120 COBRA
0 question about this device. Answer the ones you know or ask your own.
Ask a new question about this device
Download the instructions for your Dash cam in PDF format for free! Find your manual SC 120 - COBRA and take your electronic device back in hand. On this page are published all the documents necessary for the use of your device. SC 120 by COBRA.
USER MANUAL SC 120 COBRA
natural_image
Black and white photo of a smart camera with a circular lens and antenna, set against a hexagonal grid background (no text or symbols visible)Compact Witness, Clear Evidence
Quad HD | Low-Profile Design
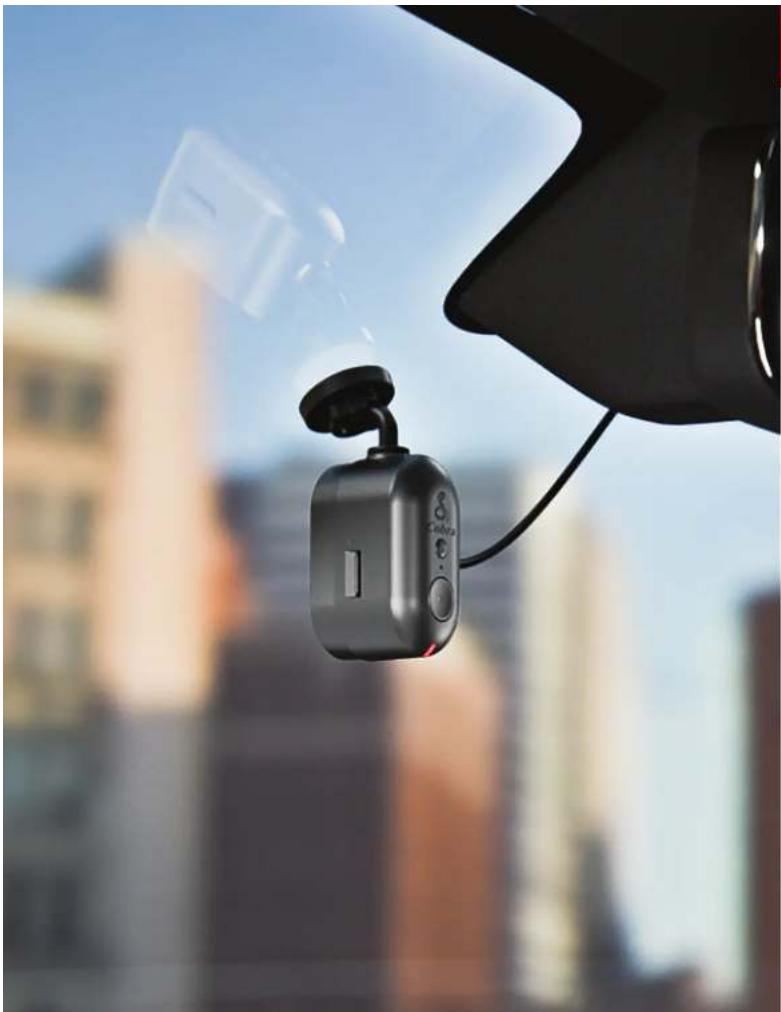
natural_image
Close-up of a car rearview mirror showing the Cebita sensor, with city buildings in the background (no text or symbols visible)
Contents
INTRODUCTION....3
SC 110 / SC 120 DASH CAM FEATURES....3
PRODUCT SERVICE AND SUPPORT 4
WHAT'S IN THE BOX 4
OPTIONAL ACCESSORIES – available at www.cobra.com....4
HARDWARE INTERFACE 5
INSTALLATION 6
DRIVE SMARTER ^4 9
HEADS-UP NAVIGATION 9
PARKING LIVE VIEW 9
TRIP CLIPS....9
VIDEO SETTINGS....10
VIDEO AND PHOTO PLAYBACK MODE....10
MEMORY CARD STORAGE....11
LOOP RECORDINGS....11
EMERGENCY RECORDINGS....11
PHOTOS....11
SAFETY FEATURES 12
GENERAL SETTINGS....12
CLOUD FEATURES....13
FIRMWARE UPDATES....15
SPECIFICATIONS....16
TROUBLESHOOTING....17
FAQ....17
LIMITED 1-YEAR WARRANTY AND TRADEMARK INFORMATION....18
FCC REGULATORY INFORMATION AND WARNINGS....19

Introduction
Congratulations! You made the smart choice by purchasing an SC Series smart dash cam from Cobra. SC Series dash cams provide peace of mind by continuously recording the road with crystal-clear video. With advanced safety features, industry-leading video quality, and exclusive shared alerts from our network of drivers. SC dash cams are the best solution to record your ride.
SC 110 / SC 120 DASH CAM FEATURES
• Quad HD Video Resolution
Quad HD resolution allows you to capture crucial details such as license plate numbers
• 360 Alerts
Gel radar, laser, red light and speed camera location from our database and radar users
- Parking Live View
Enables security recording and live viewing of your dash cam footage (Hardwire kit and WiFi hotspot required)
- Trip Clips
Create time-lapse videos of your drives to easily share with friends and family
• Cloud Video Management
Manage and share footage from your phone
• Over-The-Air Updates
Update your dash cam with the latest firmware and features
• SD Card included with SC 120 only
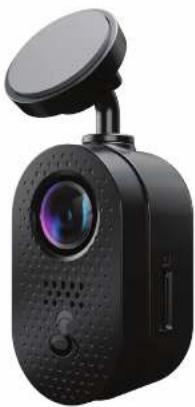
natural_image
Black remote camera with a circular head-mounted sensor and visible lens (no text or symbols)
Introduction
PRODUCT SERVICE AND SUPPORT
For any questions about operating or installing this new Cobra product, PLEASE CONTACT COBRA FIRST...do not return this product to the retail store. The contact information for Cobra will vary depending on the country in which you purchased and utilize the product. For the latest contact information, please go to www.cobra.com/support.
WHAT'S IN THE BOX
• SC 110 / SC 120 Dash Cam
- USB-C Data Cable
• 16GB SD Card (SC 120 model only)
- Vehicle Charger
- Removable Mount
- Cable Management Kit: 6 Wire Clips & Cable Routing Tool
• Temporary Install Film:
3 Electrostatic Films
SC 120 Dash Cam


Micro SD Card (SC 120 only)

Removable Mount
(Pre-mounted on dash cam)
OPTIONAL ACCESSORIES - available at www.cobra.com
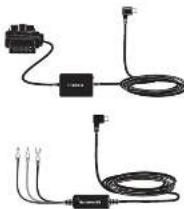
Easy Install Hardware Kit: 0010070-1 - Wires your dash cam directly into the ODB II diagnostic port for a quick and clean installation. This provides the camera constant power and unlocks Parking Mode features.
Fuse Box Hardware Kit: 0010073-1 - Wires your dash cam directly into the vehicle's fuse box for a clean installation. This provides the camera constant power and unlocks Parking Mode features.
natural_image
Two black cable and plug devices with connectors, no visible text or symbols
Introduction

Installation
HARDWARE INTERFACE
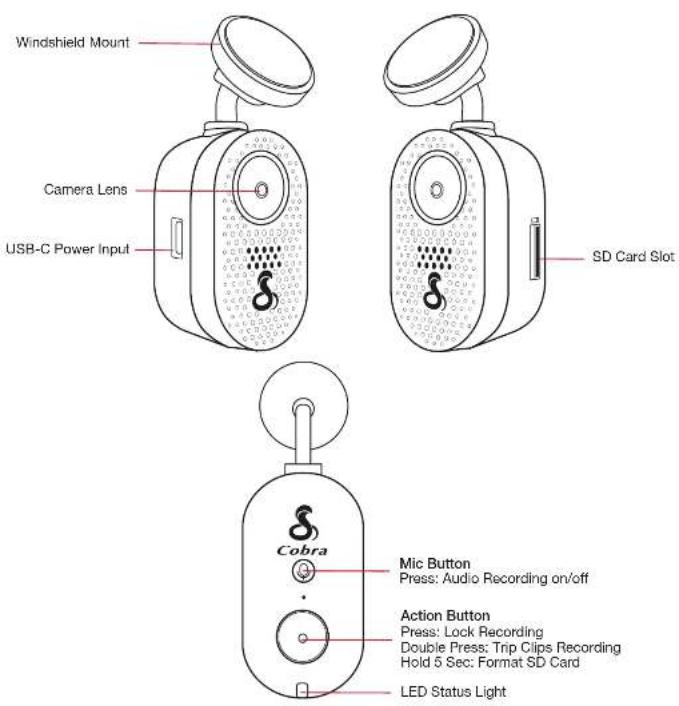
MOUNT
Find an area on your vehicle's windshield that is centrally located and close to the top of the windshield. Make sure the mounting area on the windshield is clean. The dash cam should be mounted so the display is easily visible to the driver.
(Optional: Place the included electrostatic film on the desired location for a semi-permanent install).
Plug the power cable into the dash cam and then route the power cable along the headliner using the included tool and cable routing clips as needed.
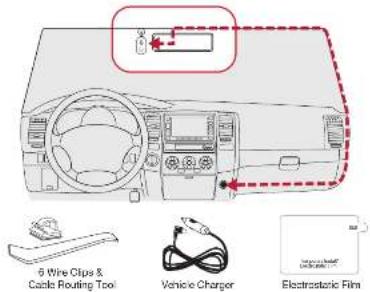

POWER
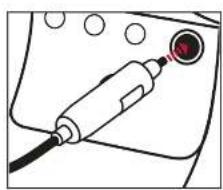
Plug one end of the supplied 12V vehicle power adapter into your vehicle's 12V power port and the other end into the USB-C port. The unit will automatically turn on and start recording. To manually power on the device PRESS AND HOLD the Action Button.
Note: Hardwire Kits are available at www.cobra.com for a more permanent installation that allows for discrete routing of the power cable and recording while your vehicle is off. See page 4 for more details.
natural_image
Simple line drawing of a medical or electronic device with a probe inserted, no text or symbols present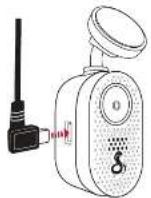
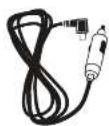
Vehicle Charger
Dash cam automatically turns on and begins recording
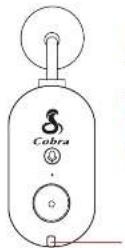

Blue LED lights up when the dash cam is powered up.

Red LED light flashes when the dash cam is recording.

Purple LED light flashes when the dash cam is recording a locked video or trip clips.
LED Status Light
DRIVE!
Your dash cam is designed for easy operation. Once powered on, it will immediately start loop recording. As the SD card fills up, the oldest footage is erased to make space for new recordings. To keep any important footage from being deleted, simply press the Action Button, and it will be locked.

Installation continued Installation
POWERING ON THE DEVICE
The device will power on automatically when plugged in and can also be powered by pressing the Action Button until the display activates (when connected to power).
CONTINUOUS LOOP RECORDING
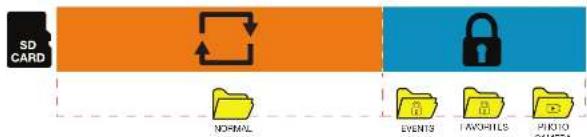
flowchart
graph LR
    A["SD CARD"] --> B["NORMAL"]
    B --> C["EVENTS"]
    C --> D["FAVO-FILS"]
    D --> E["PHOTO CAMERA"]
Once the SD card is full, the dash cam will continuously overwrite the oldest footage recorded with recent recordings. To protect a clip so that it will not be overwritten, press the Action Button so that the clip is moved into the locked content partition.
An Emergency Recording is triggered when the Action Button is pressed or when the G-Sensor registers a significant impact (hard braking or collision). Emergency Recordings create locked files that are not overwritten by Continuous Loop Recording. To ensure that important footage is not lost surrounding an incident, the adjacent video clip is locked if the incident happens within 30 seconds of the beginning or end of a clip.
THE SD MEMORY CARD
The SC 120 comes with a SD memory card. To remove the SD card, press firmly on the card to push it further into the slot until you hear a click. The card will pop out upon release. Extract the card and replace it if necessary by inserting a new card into the slot and pressing until it locks in place.
This dash cam supports SD cards up to 256GB. Before using, be sure to format the card in-dash cam. We recommend using Class 10 high-endurance cards from reputable brands for continuous video recording in a dash cam.
For the latest compatible SD cards, check www.cobra.com.
VOLUME ADJUST
The dash can allows you to select "Volume" in the setting menu to adjust the volume of notifications and voice announcements. You can also make volume adjustments using the Drive Smarter® app.
INITIAL SETUP
Upon initial power-up, the device will display the video stream and initiate loop recording automatically. To optimize functionality, it is recommended to pair the dash cam with the Drive Smarter app for downloading the latest firmware and ensuring the dash cam is up-to-date. Please refer to the CONNECTION INSTRUCTIONS for app-to-cash cam pairing.

Operation

Operation
DRIVE SMARTER®

Download DRIVE SMARTER®
CONNECTION INSTRUCTIONS
- Start the Drive Smarter® app and log in/create an account.
- Follow the instructions in the Drive Smarter® app to create a vehicle and connect the dash cam.
- When complete, a chime will sound on the dash cam and it will appear as Connected in the Drive Smarter® app.
360 ALERTS
Connecting to the Drive Smarter® app enables your dash cam to receive real-time driver alerts about what is on the road ahead, including:

Red Light Dash cam

Speed Dash cam

Speed Traps

Live Police

Caution Areas
HEADS-UP NAVIGATION
Connecting your dash cam to the Drive Smarter® will also enable you to receive navigation instructions using the Drive Smarter app.
Simply connect your SC 110 / SC 120 to Drive Smarter® app, find a route in the app, and drive using your smart phone or in-car display for guidance!
PARKING LIVE VIEW
Enables security recording and live viewing of your dash cams. (Hardwire kit and WIFI hotspot required)
TRIP CLIPS
Create time-lapse videos of your drives to easily share with friends and family.
VIDEO SETTINGS
Video Resolution
This setting allows you to set the following resolutions on your camera. Lower resolution settings result in smaller file sizes, which makes the files easier to transfer and share
The available resolutions are:
• 1440P QHD ..... 2560 x 1440 30 Frames per Second
• 1080P Full HD..... 1920x1080 30 Frames per Second
Video and Photo Playback Mode
This device stores videos and photos on its removable SD card. In Playback mode, you can review saved files and play back videos with sound. Use the arrows to navigate and the OK key to select a video or photo. Press the Back key to return to the previous screen.
You can view and delete photos. There's no need to lock photo files, as they won't be overwritten by continuous loop recording.

Operation

Operation
SAFETY FEATURES
The SC Series dash cams come with several safety features designed to protect you and your vehicle. You can adjust the level of protection that fits you via dash cam and Drive Smarter®app settings.
G-Sensor Impact Detection
Your dash cam is equipped with a built-in G-Sensor that can detect collisions. If a collision is detected, it automatically secures the recording during the incident. Additionally, if the event happens within 30 seconds of the start or end of a clip, the adjacent recording is also locked. This ensures you always have at least 30 seconds saved before and after the event.
You can adjust the G-Sensor sensitivity from 1 to 3 or turn it off. Level 1 makes it easiest to activate the G-sensor, while Level 3 only locks videos in the case of the most severe impacts. Videos locked due to G-sensor impact detection are stored in the Events folder on the SD card.
Parking Mode & Motion Detection
Parking Mode utilizes the built-in Motion Sensor and G-Sensor to monitor your vehicle when it's parked*. While parked, the dash cam is in a "sleeping" state, keeping an eye out for motion or G-Sensor impacts. If either is detected, the unit will wake and begin recording.
After 5 minutes of inactivity, the dash cam automatically enters parking mode. If no motion is detected during this period, recording stops, with the dash cam staying alert for potential G-sensor impacts or motion. When motion or a G-sensor impact above Level 1 occurs, the unit awakens and starts saving 1-minute clips as long as activity is detected.
* Optional hardwire kit required
Notes
- Parking Mode only works properly if the dash cam is powered. Either the 12V power port must remain on with the ignition off, or the dash cam must be hardwired to a constant power source (please check www.cobra.com for available accessories).
- In scenarios where frequent motion triggers the sensor and prevents the dash cam from entering sleep mode, the "Auto Surveillance Shutoff" setting can be employed. This feature helps avoid unnecessary recordings.
If your vehicle remains inactive for more than 48 hours (or a shorter duration for older batteries), it is advisable to utilize the "Auto Surveillance Shutoff" setting. This allows you to set a time limit on Parking Mode, preventing potential battery drainage.
- You can choose to have your dash cam monitor for impacts and/or motion by controlling the 'Parking Mode' and 'Motion Detection' settings separately.
GENERAL SETTINGS
Video Resolution
Allows you to select the desired video resolution for loop recordings and emergency videos. Smaller (1 min) files are easier to transfer to your phone and share.
Loop Clip Time
Loop recordings and emergency videos can be saved in 1 min, 2 min, or 3 min clips depending on your preference. Smaller (1 min) files are easier to transfer to your phone and share.
WIFI
Allows enabling/disabling WiFi connection on the device and viewing the dash cam's WiFi name and password.
GPS
GPS can be disabled if needed. Enabling this setting allows your recordings to have an exact GPS location stamped on the footage. This also always allows you to know the location of your vehicle if the dash cam is wired via a hardwire kit and connected to a WiFi hotspot is installed in the car.
Date / Time
- Enable "Automatic" mode to have date / time settings based on the dash cam's GPS signal. Having the correct date and time ensures that timestamps associated with your videos are accurate. In this mode, you will still have to ensure that you have picked the correct "Time Zone" and enabled or disabled "Daylight Savings" based on your location.
- To manually set the date and time, cursor down to "Manual", and select it. You will now be able to enter Date and Time information.
Microphone
The microphone can be enabled or disabled via settings or on the main screen. When disabled your recorded videos will be silent,
Motion Detection
Enabling Motion Detection allows your dash cam to monitor movement around the dash cam (changes in light) which can be used to record any suspicious activity around the vehicle when parked. This setting screen allows you to choose which of the available dash cams should be used to monitor for activity. If leaving your vehicle off for more than 45 hours (or less if your battery is old) please use the "Auto Surveillance Shutoff" setting to set a time-limit on Motion Detection and prevent your battery from being drained.
Note: For Motion Detection to work the dash cam needs to be connected via hardwire kit (part: 0010070-1) or be plugged into an 'always on' Cigarette Lighter Socket using a 12V power cable (12V Power Adapter (CLA) if PN: 0010072-1 or Fuse Tap Power Adapter #0010073-1). You can check if your vehicle has an 'always on' CLA adapter online or in the vehicles owners manual.


OperationOperation
Parking Mode
Enabling Parking Mode allows your dash carn to monitor for changes in its internal G-Sensor/accelerometer. Bumps, collisions, and break-ins can trigger the G-Sensor to save valuable footage from the moment of impact. If leaving your vehicle off for more than 48 hours (or less if your battery is old) please use the "Auto Surveillance Shutoff" setting to set a time-limit on Motion Detection and prevent your battery from being drained.
Note: For Parking Mode to work the dash cam needs to be connected via hardwire kit (see page 4 for more details) or be plugged into an 'always on' cigarette lighter socket. You can check if your vehicle has an 'always on' CLA adapter online or in the vehicles owners manual.
Surveillance Auto Shutoff
If leaving your vehicle off for more than 48 hours (or less if your battery is old) please use the "Auto Surveillance Shutoff" setting to set a time-limit on Motion Detection and Parking Mode to prevent your battery from being drained. Auto Shutoff time starts after Parking Mode starts.
G-Sensor
You can use this setting to set the sensitivity of the G Sensor from 1-3 or turn it off. Level 1 is the easiest to activate the G-sensor. Level 3 is the setting which will only lock videos when the most severe impacts are detected. Level 1 is recommended for most users.
Watermark (Date/Time, Speed, GPS, Driver ID Video Stamp
The watermark settings allow you to toggle having the date/time, speed, GPS coordinates, the Cobra logo and a custom Driver ID be stamped into the bottom of all recorded video.
Driver ID Watermark
This setting allows you to associate a Driver ID with the dash cam (for example: John, Employee 12, etc). This allows you to set the name of the driver which will be stamped on the footage as part of the watermark.
360 Alerts
This feature enables users to view real-time and shared alerts gathered from the Drive Smarter® network. You have the option to receive voice announcements through your phone or in-car display when approaching a red light camera or speed camera location. Alternatively, you can opt to disable notifications from the unit altogether and rely solely on the Drive Smarter® app for guidance.
Drive Smarter® Services
These settings allow you to select which videos you would like auto-uploaded to the Drive Smarter® app for sharing/review. You can also choose to have Incident Reports sent to your insurance provider, as well as Mayday alerts sent to your Emergency Contact if a severe G-Sensor event is detected.
Speed Units
Choose between miles/hour or kilometers/hour as the speed unit stamped in the watermark.
Volume
Turns volume on or off.
Restore Defaults
Resets the device to factory settings. Note: restoring defaults will NOT erase data on your memory card.
Format SD Card
Allows you to format the inserted SD card. Note: This action will permanently delete all data on the card. It is recommended to format any new card and periodically format existing cards.
About
You can use this setting to view your dash cams electronic serial number including FCC ID number and Industry Canada number. You can also view the manufacture part number and firmware version.

Cloud Features

Cloud Features
CLOUD VIDEO MANAGEMENT
Important Videos can be uploaded to the cloud by connecting to the camera's gallery using the Drive Smarter app. Simply view the desired video and press "Upload to Cloud". These videos are uploaded to your Drive Smarter Portal for safekeeping, allowing you to free up space on your SD Card for new locked recordings.
Parking Live View
To use Parking Mode and Remote Live View, ensure these settings are enabled on your camera.
- Remote Live View: This feature allows remote viewing of your camera's video stream to monitor your vehicle or loved ones. Connect your camera to an always-on hotspot such as your built-in vehicle WiFi (with active subscription), an in-car WiFi adapter, or home WiFi. Use the Drive Smarter app to set up Hotspot Settings (Devices > Device Settings > Hotspot Settings).
- Parking Mode: This feature allows the camera to go into a low-power state
Ensure your camera's firmware is up-to-date to use Cloud Features. Accept over-the-air updates when prompted by Drive Smarter or check the Firmware Update page in your device settings.
When the vehicle is powered on:
• The camera can initiate a Remote Live View session without requiring a hardwire kit.
- If connected to an active internet hotspot, it will appear as "Available" on the administrator's Drive Smarter account.
- View the live feed on the Drive Smarter app's "Remote Security" tab or by logging into Drivesmarter.com via the web portal.
When the vehicle is powered off and Parking Mode is enabled:
• The camera enters Low Power Parking Mode after a period of inactivity.
• The camera monitors for impacts using the built-in G-Sensor.
- Upon detecting an impact, the camera turns on fully, begins recording immediately, and connects to any programmed hotspot.
- If Parking Mode Notifications are enabled, the account administrator will receive a notification from the Drive Smarler app that an impact has been detected.
- If Automatic Video Upload is enabled, clips of the incidents will automatically upload to the account holder's Drive Smarter account for review (accessible on Drivesmarter.com).
• View the live feed using the Remote Security tab on the Drive Smarter app or by logging into Drivesmarter.com.
- If the camera displays as "Unavailable," it has returned to low-power Parking Mode (disconnected from internet) and is monitoring for additional impacts.
CLOUD VIDEO MANAGEMENT continued
Automatic Video Upload
If Automatic Video Upload is enabled, locked recordings will automatically upload to the account holder's Drive Smarter account for review (accessible on Drivesmarter.com). This applies to locked recordings while driving or while parked. Log into Drivesmarter.com to view your cloud videos.
Parking Mode Notifications
If Parking Mode Notifications are enabled, the account administrator will receive notifications when a Parking Mode incident is detected through the Drive Smarter app.
Please ensure that:
- The camera is hardwired to the vehicle for constant power or is connected to an "always on" CLA port.
- The camera has been programmed to a hotspot with an active internet connection.
- Your phone allows notifications from Drive Smarter.

Firmware Updates

Dash Cam Specifications

Ensure the dash cam is connected to a constant power source during the update process. Failure to do so could result in your unit becoming non-functional. Your vehicles cigarette lighter socket or a household outlet work best.
Using the Drive Smarter® App
If there is a newer firmware available, you will be automatically prompted to download the latest firmware when connected to the Drive Smarter app. You can check your firmware version by going into your Device Settings > Firmware Updates.
Using a Mac or PC
For optimal performance, check www.drivesmarter.com periodically for software updates.
- View the current firmware version by selecting App Support in the Drive Smarter ^® main menu.
- Connect the dash cam to your computer using the included USB to USB-C cable.
- Power on the dash cam and select Connect to Computer using the Action button.
• The dash cam will be listed in Windows Explorer/Finder. - Download the update file from www.drivesmarter.com and save it to your computer. It will end with ".bin" as the file extension. Note: You do not need to double click or open this file on the computer.
- Copy/paste or drag the update file you downloaded .bin file into the root directory of the dash carn's SD card.
- Wait for the file to transfer and then safely disconnect the dash cam from the computer. The dash cam will turn off.
- Plug the USB-C cord into a reliable power source such as your home's outlet or your vehicle's CLA adapter. The dash cam will turn on and automatically boot into the Firmware Update Menu.
- Follow the directions on in the Drive Smarter ^ app to update firmware if the unit has one. Units without displays will update automatically.
- You can check the current firmware version by selecting App Support in the Drive Smarter® main menu, choosing Device Firmware version and submitting your device information.


| Features / Models | SC 110 / SC 120 | SC 220C | SC 256R* |
| Video Resolution | QHD | QHD= (160IP) Front OnlyFull HD (108IP) Interior | QHD (40) Front Only, Full HD (108IP) Rear |
| Camera Views | Front Only | Front & InteriorCam Included | Front & RearCam Included |
| Field of View | 140° | 140° Front120° Interior | 140° Front/120° Rear |
| Display | — | 3" Touchscreen | 3" Touchscreen |
| SD Card Included | 16 GB (SC 120 only) | 16 GB | 32 GB |
| Embeds Time and Location on Video | √ | √ | √ |
| 360 Alerts with the Drive Smarter® App | √ | √ | √ |
| Emergency Mayday Alert | √ | √ | √ |
| Incident Reports | √ | √ | √ |
| Parking Mode & Motion Detection | √ | √ | √ |
| Parking Live View | √ | √ | √ |
| Trip Clips | √ | √ | √ |
| Privacy Mode | √ | √ | √ |
| Extreme Temperature Protection | √ | √ | √ |
| Cloud Video Management | √ | √ | √ |
| Bluetooth® Connectivity | √ | √ | √ |
| Dual Band Wi-Fi | √ | √ | √ |
| Built-In GPS | — | √ | √ |
| Heads-Up Navigation | — | √ | √ |
| Accessory Camera Compatible | — | √ | √ |
| 3-Camera Capable | — | — | √ |
| * Configurable Accessory Camera include External-View & Interior Cameras | |||

Troubleshooting

Limited 1-Year Warranty and Trademark Information
If your unit does not appear to be operating properly, please follow these troubleshooting steps:
• Make sure the power cord is properly connected.
- Make sure the socket of your vehicle's cigarette lighter is clean and free of corrosion.
- Make sure the power cord's cigarette lighter adapter is firmly seated in your cigarette lighter.
• Make sure you have downloaded the latest firmware to your unit.
FAQ
- Where do I mount/position my dash cam on the windshield?
a. Power on your dash cam so you can see the dash cam's view while mounting. We recommend centering your dash cam and mounting under the rear-view mirror.
• What is the largest SD card size I can use in my dash cam?
a. We recommend using a minimum Class 10 or U1 card from a reputable vendor up to the following sizes.
| Model SC 110/SC | 120^A SC 220C SC 250R | |
| Max SD Card Size | 256GB 512GB 512GB |
Important: When using a SD card for the first time please format the card in the dash cam by using the dash cam menu or the Drive Smarter® app.
• Why is my unit not powering up?
a. Please ensure your unit is properly connected. If you have turned the unit off, press and hold the power button to turn on again. If you are using Parking Mode and Motion Detection Mode with a hardwire kit, the unit might not "wake up" when you enter your vehicle. Simply begin driving and when your unit detects this it will wake up and begin recording.
• How do I use Parking Mode and Motion Detection?
a. Parking Mode and Motion Detection can be turned on in the dash cam's settings. These two features will monitor your vehicle automatically when the unit is connected directly to the car's battery via hardwire kit (check for availability at www.cobra.com).
Note: When the car is parked your unit will go into a low-power "standby"/sleeping state where it monitors for activity. The unit will automatically wake up when it detects significant motion or driving.
- Why is my unit not getting a GPS Lock (GPS icon is red)?
a. The GPS inside the device locks in with the satellite best when you are on the road. You may not be able to get a GPS lock while in your garage, parking structures, or if testing the dash cam in your home.
^ An SD card in included with SC 120. SD cards are available at www.cobra.com.
Warranty Terms:
Cobra warrants your product against all defects in materials and workmanship for a period of one (1) year from the date of original purchase.
Cobra, at our sole discretion, will repair or replace your product (with the same or comparable product) free of charge.
Cobra will not pay shipping charges that you incur for sending your product to us. Products received COD will be refused.
To make a warranty claim, we will require proof or purchase in the form of an invoice or receipt. No proof of purchase is required for factory direct purchases.
Warranty Exclusions: Warranty does not apply to your product under any of the following conditions: 1. The serial number has been removed or modified. 2. Your product has been subjected to misuse or damage (including water damage, physical abuse, and/or improper Installation). 3. Your product has been modified in any way. 4. Your receipt or proof-of-purchase is from a non-authorized dealer or internet auction site including E-bay, U-bid, or other non-authorized resellers.
LIMITATION OF WARRANTY: EXCEPT AS EXPRESSLY PROVIDED HEREIN, YOU ARE ACQUIRING THE PRODUCT "AS IS" AND "WHERE IS", WITHOUT REPRESENTATION OR WARRANTY. COBRA SPECIFICALLY DISCLAIMS ANY REPRESENTATION OR WARRANTY INCLUDING, BUT NOT LIMITED TO THOSE CONCERNING THE MERCHANTABILITY AND SUITABILITY OF THE PRODUCT FOR A PARTICULAR PURPOSE. COBRA SHALL NOT BE LIABLE FOR CONSEQUENTIAL, SPECIAL OR INCIDENTAL DAMAGES INCLUDING, WITHOUT LIMITATION, DAMAGES ARISING OUT OF THE USE, MISUSE OR MOUNTING OF THE PRODUCT.
The above limitations or exclusions shall be limited to the extent they violate the laws of any particular state. Cobra is not responsible for products lost in shipment between the owner and our service center.
General Warranty Information
Each product we manufacture is covered by our factory warranty. While each product may have unique components and policy, the general guideline below will apply to most Cobra products.
All Cobra products purchased factory-direct or from our Authorized Resellers will come with a full one to three (1-3) year warranty from the date of the original retail purchase (see policy statement above for full warranty details and exclusions).
Standard accessories packaged with each model will have a one-year factory warranty. Accessory items have a one-year factory warranty.
Shipping to our facility is not covered in our warranty. Return shipping is included within the US. This warranty is non-transferrable.
For the sake of clarity, 'repair or replace the Product or its defective part' does not include removal or installation work, costs or expenses which include but are not limited to labor costs or expenses. Cobra will not be responsible for lost packages.
©2024 Cobra Electronics Corporation. Cobra and the snake design are proprietary trademarks of Cobra Electronics Corporation, USA. Other trademarks and trade names are those of their respective owners.
Coxal Electronics Corporation ^™ is a trademark of Ozara Electronics Corporation, USA.
Apple and the Apple logo are trademarks of Apple Inc. Registered in the U.S. and other countries. App Store is a service mark of Apple's worldwide. Android and Android Auto are trademarks of Google LLC. Compatible Android phone and compatible active data plans acquired. The Bluetooth® word mark and logos are registered trademarks of Bluetooth SIG. Inc. and any use of such marks by Cotra Electronics Corporation is under license features. Specifications and prices subject to change without notice. The Driver Awareness Alert display feature is subject to US Patent Numbers 8,842,004 and 8,870,422 and additional pending US Patent Applications.

FCC Regulatory Information and Warnings
NOTES
FCC ID:BBOSC120 IC:906A-SC120
NOTE: This device complies with part 15 of FCC rules: Operation is subject to the following two conditions: (1) This device may not cause harmful interference, and (2) This device must accept any interference received including interference that may cause undesired operation.

CAUTION: Modifications or parts not approved by Cobra Electronics Corporation may violate FCC Rules and void authority to operate this equipment. This device complies with RSS-310 of Industry Canada. Operation is subject to the condition that this device does not cause harmful interference.
CAN ICES-3B/NMB-3B

DISPOSAL OF ELECTRONICS EQUIPMENT: This product may contain hazardous substances that could impact health and the environment if not disposed of properly.
The crossed out wheeled bin symbol indicates that the product should not be disposed of along with household waste. It should be handed over to an applicable collection point for the recycling of electrical equipment. By ensuring that this product is disposed of correctly you will help/prevent potential negative impact on the environment.
If you need more information on the collection, reuse and recycling systems, please contact your local civic office or the shop where it was originally purchased.
FCC Caution
Information to the user.
NOTE: This equipment has been tested and found to comply with the limits for a Class B digital device, pursuant to part 15 of the FCC Rules. These limits are designed to provide reasonable protection against harmful interference in a residential installation. This equipment generates uses and can radiate radio frequency energy and, if not installed and used in accordance with the instructions, may cause harmful interference to radio communications. However, there is no guarantee that interference will not occur in a particular installation. If this equipment does cause harmful interference to radio or television reception, which can be determined by turning the equipment off and on, the user is encouraged to try to correct the interference by one or more of the following measures:
-Reorient or relocate the receiving antenna.
-Increase the separation between the equipment and receiver.
-Connect the equipment into an outlet on a circuit different from that to which the receiver is connected. -Consult the dealer or an experienced radio/TV technician for help.
This equipment complies with FCC radiation exposure limits set forth for an uncontrolled environment. This equipment should be installed and operated with minimum distance 20cm between the radiator & your body.
ISED Warning:
This device complies with Industry Canada licence exempt RSS standard(s).
Operation is subject to the following two conditions: (1) This device may not cause interference, and (2) This device must accept any interference, including interference that may cause undesired operation of the device.
- French:
- Compact Witness, Clear Evidence
- Contents
- Introduction
- SC 110 / SC 120 DASH CAM FEATURES
- PRODUCT SERVICE AND SUPPORT
- WHAT'S IN THE BOX
- OPTIONAL ACCESSORIES - available at www.cobra.com
- Installation
- MOUNT
- POWER
- DRIVE!
- Installation continued Installation
- POWERING ON THE DEVICE
- THE SD MEMORY CARD
- VOLUME ADJUST
- INITIAL SETUP
- DRIVE SMARTER®
- Download DRIVE SMARTER®
- CONNECTION INSTRUCTIONS
- ALERTS
- HEADS-UP NAVIGATION
- PARKING LIVE VIEW
- TRIP CLIPS
- VIDEO SETTINGS
- Video Resolution
- Video and Photo Playback Mode
- Operation
- SAFETY FEATURES
- G-Sensor Impact Detection
- Parking Mode & Motion Detection
- Notes
- GENERAL SETTINGS
- Loop Clip Time
- WIFI
- GPS
- Date / Time
- Microphone
- Motion Detection
- OperationOperation
- Parking Mode
- Surveillance Auto Shutoff
- G-Sensor
- Watermark (Date/Time, Speed, GPS, Driver ID Video Stamp
- Driver ID Watermark
- Drive Smarter® Services
- Speed Units
- Volume
- Restore Defaults
- Format SD Card
- About
- Cloud Features
- CLOUD VIDEO MANAGEMENT
- When the vehicle is powered on:
- When the vehicle is powered off and Parking Mode is enabled:
- CLOUD VIDEO MANAGEMENT continued
- Automatic Video Upload
- Parking Mode Notifications
- Please ensure that:
- Firmware Updates
- Dash Cam Specifications
- Using the Drive Smarter® App
- Using a Mac or PC
- Troubleshooting
- Limited 1-Year Warranty and Trademark Information
- FAQ
- Warranty Terms:
- General Warranty Information
- FCC Regulatory Information and Warnings
- FCC ID:BBOSC120 IC:906A-SC120
- FCC Caution
- Information to the user.
- ISED Warning:
- - French:
Brand : COBRA
Model : SC 120
Category : Dash cam