
C1BIR24 - Fridge COYOTE - Free user manual and instructions
Find the device manual for free C1BIR24 COYOTE in PDF.


| Product Type | Refrigerator |
| Brand | Coyote |
| Model | C1BIR24 |
| Energy Class | A+ |
| Total Capacity | 120 L |
| Fridge Capacity | 100 L |
| Freezer Capacity | 20 L |
| Climate Class | N/ST |
| Noise Level | 40 dB |
| Annual Energy Consumption | 100 kWh |
| Voltage | 220-240 V |
| Frequency | 50 Hz |
| Dimensions (H x W x D) | 850 x 500 x 550 mm |
| Weight | 25 kg |
| Refrigerant | R600a |
| Adjustable Thermostat | Yes |
| Reversible Door | Yes |
| Interior Light | Yes |
| Number of Shelves | 3 glass shelves |
| Door Compartments | 2 |
| Defrost Type | Automatic |
| Cleaning Instructions | Use mild detergent and dry cloth |
| Spare Parts Availability | Available from Coyote service centers |
| Repair Index (France) | 7.5/10 |
Frequently Asked Questions - C1BIR24 COYOTE
User questions about C1BIR24 COYOTE
0 question about this device. Answer the ones you know or ask your own.
Ask a new question about this device
Download the instructions for your Fridge in PDF format for free! Find your manual C1BIR24 - COYOTE and take your electronic device back in hand. On this page are published all the documents necessary for the use of your device. C1BIR24 by COYOTE.
USER MANUAL C1BIR24 COYOTE
24" Built-in Refrigerator
Model: C1BIR24-L/R
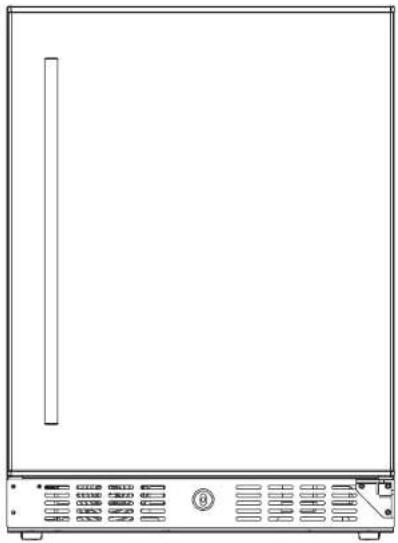
natural_image
Front view of a white electronic device with indicator lights and ports (no visible text or symbols)Owner's Manual
BEFORE USE, PLEASE READ AND FOLLOW ALL SAFETY RULES AND OPERATING INSTRUCTIONS.
TABLE OF CONTENTS
Appliance Safety 3
Important Safeguards 3-4
Parts Listing 5
Installation Instructions 5-8
Before Using Your Appliance 5
Installation of Your Appliance 5-6
Electrical Connection 6
Extension Cord 6
Installing the Stainless Steel Handle 7
Operating Your Appliance 7-8
Control Panel 7-8
ON/OFF Power 7
Key Lock 7
Setting the Temperature Control 7-8
Interior Light 8
Door Lock 8
Shelves 8
Care and Maintenance 9
Cleaning Your Appliance 9
Power Failure 9
Vacation Time 9
Moving Your Appliance 9
Energy Saving Tips 9
Troubleshooting 10
Limited Warranty 11
COYOTE
Outdoor Living
LIMITED WARRANTY
Coyote will warrant to the original purchaser of this product that it will be free of defects in material and craftsmanship for the set time frame listed below, when the product is assembled and used under normal operating conditions set forth in this manual;
All Parts – 1 Year Limited Warranty
Coyote will require a proof of purchase to validate the date of purchase. Therefore, you should save your receipt in a safe and accessible place, in case it is required as a proof of purchase.
This Limited Warranty is limited to the replacement of parts at Coyote's discretion, that prove to be defective under normal use and service. Furthermore, Coyote may require the return of the damaged part(s) for examination before issuing replacement parts. If Coyote would like to have the damaged product returned first, the shipping charges must be paid by the customer. No returns or shipments back will be accepted without prior Coyote authorization
Upon receipt of the damaged parts and to Coyote's satisfaction, if the original part is proven defective, Coyote may elect to approve the claim and issue a replacement part, without charge.
This warranty does not cover any failures or operating difficulties due to abuse, accident, misuse, alteration, misapplication, vandalism, maintenance, improper installation, operation or service, as stated in this manual. Furthermore, this warranty does not cover cosmetic wear from normal use, such as, scratches, dents, corrosion or discoloration caused by weather, heat, chemicals, paint loss, surface rust, or abuse during installation. Damage due to severe weather conditions such as hail, hurricanes, earthquakes, tsunami's tornadoes, an Act of God or terrorism, is not covered by this warranty.
Warranty Restrictions:
• This warranty is non-transferable and only applies to the original owner.
• This warranty is void if used for a commercial or rental purpose.
- This warranty gives you specific legal rights and you may have other rights, which vary from state to state.
• For assistance or more information on this products warranty, please contact:
Coyote Customer Service
855-520-1559
Monday – Friday
8:00am - 4:30pm CST
TROUBLESHOOTING
You can solve many common problems easily, saving you the cost of a possible service call. Try the suggestions below to see if you can solve the problem before calling a service technician.
Troubleshooting Guide
| PROBLEM | POSSIBLE CAUSE |
| The unit does not operate. | Not plugged in.The appliance is turned off.Tripped circuit breaker or blown fuse |
| The unit is not cold enough. | Check the temperature control setting.External environment may require a higher setting.The door is opened too often.The door is not closed completely.The door gasket does not seal properly. |
| Turns on and off frequently. | The ambient temperature is warmer than normal.A large amount of contents has been added to the unit.The door is opened too often.The door is not closed completely.The temperature control is not set correctly.The door gasket does not seal properly. |
| The light does not work. | Not plugged in.Tripped circuit breaker or blown fuse.The light switch is "OFF" |
| Vibrations | Check to assure that the appliance is level. |
| The unit seems to make too much noise. | A rattling noise may come from the flow of the refrigerant, which is normal.As each cycle ends, you may hear gurgling sounds caused by the flow of refrigerant in your unit.Contraction and expansion of the inside walls may cause popping and crackling noises.The appliance is not level. |
| The door will not close properly. | The appliance is not level.The door was reversed and not properly re-installed.The gasket is dirty.The shelves are out of position. |
| Display shows "EL" or "EH". | The air temperature sensor has failed. |
If you've checked the table above and find that you still need help with your appliance, call our Customer Service facility at 855-520-1559 between 8:00AM and 4:30 GMT. We will do our best to answer your questions.
WARNING
CALIFORNIA PROPOSITION 65 - WARNING: This product can expose you to BPA and Styrene, which is on the list of substances known by the state of California to cause cancer, birth defects or reproductive harm. For more information go to: www.p65Warnings.ca.gov
APPLIANCE SAFETY
Your safety and the safety of others are very important.
We have provided many important safety messages in this manual and on your appliance. Always read and obey all safety messages.

This is the Safety Alert Symbol. The symbol alerts you to potential hazards that can kill or injure you and others. All safety messages will follow the Safety Alert Symbol and either the words "DANGER" or "WARNING".

DANGER
Danger means that failure to heed this safety statement may result in severe personal injury or death.

WARNING
Warning means that failure to heed this safety statement may result in extensive product damage, serious personal injury, or death
All safety messages will alert you about the potential hazard, tell you how to reduce the chance of injury, and let you know what can happen if the instructions are not followed.

IMPORTANT SAFEGUARDS
Before the appliance is used, it must be properly positioned and installed as described in this manual, so read the manual carefully. To reduce the risk of fire, electrical shock or injury when using the appliance, follow basic precautions, including the following:

DANGER

- Plug into a grounded 3-prong outlet, do not remove grounding prong, do not use an adapter, and do not use an extension cord.
- Replace all panels before operating.
- It is recommended that a separate circuit serving only your appliance be provided. Use receptacles that cannot be turned off by a switch or pull chain.
- Never clean appliance parts with flammable fluids. These fumes can create a fire hazard or explosion. And do not store or use gasoline or other flammable vapors and liquids in the vicinity of this or any other appliance. The fumes can create a fire hazard or explosion.
- Before proceeding with cleaning and maintenance operations, make sure the power line of the unit is disconnected
- Do not connect or disconnect the electric plug when your hands are wet.
- Unplug the appliance or disconnect power before cleaning or servicing. Failure to do so can result in electrical shock or death.
- Do not attempt to repair or replace any part of your appliance unless it is specifically recommended in this manual. All other servicing should be referred to a qualified technician
WARNING
FOLLOW WARNING CALLOUTS BELOW ONLY WHEN APPLICABLE TO YOUR MODEL
- Use two or more people to move and install appliance. Failure to do so can result in back or other injury.
• To ensure proper ventilation for your appliance, the front of the unit must be completely unobstructed. Choose a well-ventilated area with temperatures above 41°F (7°C) and below 106°F (41°C).
• The appliance should not be located next to ovens, grills or other sources of high heat. - The appliance must be installed with all electrical, water and drain connections in accordance with state and local codes. A standard electrical supply (115 V AC only, 60 Hz), properly grounded in accordance with the National Electrical Code and local code and ordinances, is required.
• Do not kink or pinch the power supply cord of the appliance. - The size of the fuse (or circuit breaker) should be 15 amperes.
- It is important that the appliance be leveled in order to work pro
- It is important that the appliance be leveled in order to work properly. You may need to make several adjustments to level it.
- All installations must be in accordance with local plumbing code requirements.
• Make certain that the pipes are not pinched, kinked or damaged during installation. - Check for leaks after connection
- Never allow children to operate, play with or crawl inside the appliance.
- Do not use solvent-based cleaning agents or abrasives on the interior. These cleaners may damage or discolor the interior.
- Use this appliance only for its intended purpose as described in this Owner's Manual.
- Keep fingers out of the "pinch point" areas. Clearances between the doors and between the doors and cabinet are necessarily small. Be careful closing doors when children are in the area.
DANGER
Risk of child entrapment!
Child entrapment and suffocation are not problems of the past. Junked or abandoned appliances are still dangerous, even if they will "just sit in the garage a few days".
Before discarding your old refrigerator:
• Take off the doors
- Leave the shelves in place so that children may not easily climb inside.
- SAVE THESE INSTRUCTIONS -
CARE AND MAINTENANCE
CLEANING YOUR APPLIANCE
• Turn off the power, unplug the appliance, and remove all items, including shelves.
- Wash the inside surfaces with a solution of warm water and baking soda (about 2 tablespoons of baking soda to a quart of water).
- Wash the shelves with a mild detergent solution
- Wring excess water out of the sponge or cloth when cleaning the area where the controls are located, or any electrical parts.
- Wash the outside cabinet with warm water and mild liquid detergent. Rinse well and wipe dry with a clean soft cloth
- Use an approved stainless steel cleaner to clean the door and handle. Do not use steel wool or a steel brush on the stainless steel.
CAUTION:
Failure to unplug the appliance during cleaning could result in electrical shock or other personal injury.
POWER FAILURE
Most power failures are corrected within a few hours and should not affect the temperature of your appliance if you minimize the number of times the door is opened. If the power is going to be off for a longer period of time, you need to take the proper steps to protect the contents.
VACATION TIME
- Short vacations: Leave the appliance operating during vacations of less than three weeks.
- Long vacations: If the appliance will not be used for several months, remove all items and turn off the appliance. Clean and dry the interior thoroughly. To prevent odor and mold growth, leave the door open slightly, blocking it open if necessary.
MOVING YOUR APPLIANCE
- Remove all items.
2 Securely tape down all loose items (shelves) inside your appliance. - Turn the adjustable legs up to the base to avoid damage.
4 Tape the door shut. - Be sure the appliance stays secure in the upright position during transportation. Also, protect the outside of the appliance with a blanket or similar item.
ENERGY SAVING TIPS
- The appliance should be located in the coolest area of the room or outdoor location, away from heat producing appliances and out of direct sunlight.
- Ensure that the unit is adequately ventilated. Never cover air vents.
• Do not keep the door open any longer than necessary - Let hot foods cool to room temperature before placing in the unit. Overloading the unit forces the compressor to run longer.
- Be sure to wrap foods properly, and wipe containers dry before placing them in the unit. This cuts down on frost build-up inside the unit.
- Unit shelves and storage bins should not be lined with aluminum foil, wax paper, or paper toweling. Liners interfere with cold air circulation, making the unit less efficient.
- Organize and label food to reduce door openings and extended searches. Remove as many items as needed at one time, and close the door as soon as possible.
• The range of the temperature control is from 34°F to 43°F.
- To view the set temperature at any time, touch the UP or DOWN symbol. The set temperature will flash in the display window for 5 seconds. After 5 seconds, the temperature inside the unit will rea ear popblue in the dis la window.
NOTE:
- If the unit is unplugged, or power is lost or turned off, you must wait 3 to 5 minutes before restarting the unit. If you attempt to restart before this time delay, the unit will not start.
- When you use the unit for the first time or restart the unit after it has been shut off for a long time, there could be a few degrees variance between the temperature you select and the one indicated on the LED readout. This is normal and is due to the length of the activation time. There should not be a problem once the unit has been running for a few hours.
Interior Light
The unit is equipped with an interior LED light which can be turned ON or OFF by touching the symbol.
DOOR LOCK
Your unit is provided with a lock and key combination.
The keys are located inside the plastic bag that contains the Owner's Manual. Insert the key into the lock and turn it counterclockwise to unlock the door. To lock the door, do the reverse operation, making sure the metal pin is engaged completely. Remove the key and put it in a secure place for safekeeping.
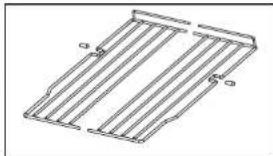
SHELVES
To prevent damaging the door gasket, make sure to have the door all the way open when pulling the shelves out of the rail compartment.
- For easy access to the stored content, you can pull the shelf approximately halfway out of the rail compartment. However this unit was designed with a plastic post on each side of the shelf track to prevent shelf contents from falling.
- When removing the shelf from the inner rails, make sure to remove all shelf contents first. Then move the shelf to the position where the notches in the shelf are exactly aligned with the plastic posts and lift the shelf. In order to replace the shelf, repeat this procedure in reverse
natural_image
Technical line drawing of a metal grate or rack structure with mounting holes (no text or symbols)PARTS LISTING
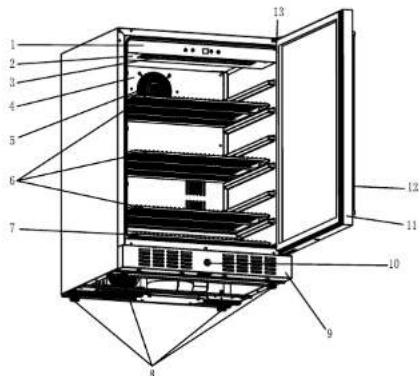
| Reference No. | Part Description | Qty on Unit | Reference No. | Part Description | Qty on Unit |
| 1 | Control panel sticker | 1 | 8 | Leveling Leg | 4 |
| 2 | Temperature control box | 1 | 9 | Venting Grid | 1 |
| 3 | Light | 1 | 10 | Lock | 1 |
| 4 | Air deflector | 1 | 11 | Door | 1 |
| 5 | Cooling fan | 1 | 12 | Door handle | 1 |
| 6 | Upper Shelf | 3 | 13 | Top Hinge | 1 |
| 7 | Lower shelf | 1 | |||
INSTALLATION INSTRUCTIONS
BEFORE USING YOUR APPLIANCE
- Remove the exterior and interior packing.
- Before connecting the appliance to the power source, let it stand upright for approximately 2 hours. This will reduce the possibility of a malfunction in the cooling system from handling during transportation.
- Clean the interior surface with lukewarm water using a soft cloth
• Install the handle on the door. (See page 8.)
INSTALLATION OF YOUR APPLIANCE
- The appliance is designed for built-in or recessed or free standing installation for indoor or outdoor use.
- CAUTION: This appliance is not designed for the storage of medicine or other medical products.
-
Place your appliance on a floor that is strong enough to support it when it is fully loaded. To level the unit, adjust the front leveling legs.
-
For free standing installation, 5 inches (127mm) of space between the back and sides of the unit are suggested, which allows the proper air circulation to cool the compressor and condenser. Even for built-in installation, it is a must to keep 14 " (6.35mm) space on each side and at the top. Take care that the air vent at the front of the appliance is never covered or blocked in any way.
NOTE: It is recommended that you do not install the appliance near an oven, radiator or other heating source. Direct sunlight may affect the acrylic coating and heat sources may increase electrical consumption. Don't install in a location where the temperature will fall below 44°F (7°C). For best performance, do not install the appliance behind a cabinet door or block the base grille - Avoid locating the unit in moist areas.
- Plug the appliance into an exclusive, properly grounded wall outlet. Do not under any circumstances cut or remove the third (ground) prong from the power cord. Any questions concerning power and/or grounding should be directed toward a certified electrician or an authorized service center.
ELECTRICAL CONNECTION

WARNING
Improper use of the grounded plug can result in the risk of electrical shock. If the power cord is damaged, have it replaced by a qualified electrician or an authorized service center.
This appliance should be properly grounded for your safety. The power cord of this appliance is equipped with a three-prong plug which mates with standard three-prong wall outlets to minimize the possibility of electrical shock
Do not under any circumstances cut or remove the third (ground) prong from the power cord supplied. For personal safety, this appliance must be properly grounded
This appliance requires a standard 115/120 Volt AC \~ 60Hz three-prong grounded electrical outlet. Have the wall outlet and circuit checked by a qualified electrician to make sure the outlet is properly grounded. When a standard 2-prong wall outlet is encountered, it is your responsibility and obligation to have it replaced with a properly grounded 3-prong wall outlet.
To prevent accidental injury, the cord should be secured behind the appliance and not left exposed or dangling.
The appliance should always be plugged into its own individual electrical outlet which has a voltage rating that matches the rating label on the appliance. This provides the best performance and also prevents overloading house wiring circuits that could cause a fire hazard from overheating. Never unplug the appliance by pulling on the power cord. Always grip the plug firmly and pull straight out from the receptacle. Repair or replace immediately all power cords that have become frayed or otherwise damaged. Do not use a cord that shows cracks or abrasion damage along its length or at either end. When moving the appliance, be careful not to damage the power cord.
EXTENSION CORD
Because of potential safety hazards under certain conditions, it is strongly recommended that you do not use an extension cord with this appliance. However, if you must use an extension cord it is absolutely necessary that it be a UL/CUL-Listed, 3-wire grounding type appliance extension cord having a grounding type plug and outlet and that the electrical rating of the cord be 115 volts and at least 10 amperes.
INSTALLING THE STAINLESS STEEL HANDLE
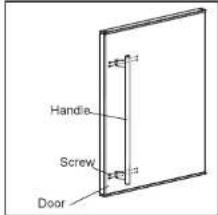
This appliance includes a stainless steel handle that is not required to operate the unit. To install the handle, follow the instructions below:
- Using a screwdriver to remove the screws on door where the handle is to be installed.
2 Align the handle with the screws removed in step # 1. Tighten the screws using a Phillips head screwdriver until the handle is both flush and secured tightly against the door side. (DO NOT over-tighten as this will cause damage to the stainless steel door surface.)
OPERATING YOUR APPLIANCE
It is recommended you install the appliance in a place where the ambient temperature is between 44° and 106°F (7° - 41°C). If the ambient temperature is above or below the recommended temperatures, the performance of the unit may be affected. For example, placing your unit in extreme cold or hot conditions may cause interior temperatures to fluctuate. The range of 34° - 43°F (1° - 6°C) may not be reached.
CONTROL PANEL
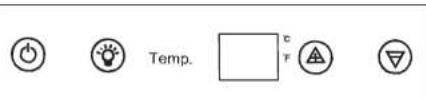
ON/OFF Power
To turn the appliance ON or OFF, touch the ⏻ symbol and hold for 5 seconds.
Key Lock
If no key is touched for 2 minutes, the controls will be locked automatically. To release the lock touch the △ and ▽ symbols at the same time for at least 5 seconds.
Setting the Temperature Control
You can choose between Fahrenheit and Celsius for the temperature display by touching the symbol. A Fahrenheit or Celsius degree indicator will appear next to the temperature display window.
- You can set the temperature by touching the UP and DOWN symbols. When you push the two buttons for the first time, the LED readout will show the original temperature set previously. (The temperature preset at the factory is 38°F (3°C).
- The temperature you are setting will increase by one degree each time you touch the UP symbol, and will decrease by one degree each time you touch the DOWN symbol.
- 24" Built-in Refrigerator
- TABLE OF CONTENTS
- COYOTE
- LIMITED WARRANTY
- All Parts – 1 Year Limited Warranty
- Warranty Restrictions:
- TROUBLESHOOTING
- WARNING
- APPLIANCE SAFETY
- DANGER
- IMPORTANT SAFEGUARDS
- Risk of child entrapment!
- - SAVE THESE INSTRUCTIONS -
- CARE AND MAINTENANCE
- CLEANING YOUR APPLIANCE
- CAUTION:
- POWER FAILURE
- VACATION TIME
- MOVING YOUR APPLIANCE
- ENERGY SAVING TIPS
- NOTE:
- Interior Light
- DOOR LOCK
- SHELVES
- INSTALLATION INSTRUCTIONS
- BEFORE USING YOUR APPLIANCE
- INSTALLATION OF YOUR APPLIANCE
- ELECTRICAL CONNECTION
- EXTENSION CORD
- INSTALLING THE STAINLESS STEEL HANDLE
- OPERATING YOUR APPLIANCE
- CONTROL PANEL
- ON/OFF Power
- Key Lock
- Setting the Temperature Control
Brand : COYOTE
Model : C1BIR24
Category : Fridge