C106SIX-PT - Oven Cosmo - Free user manual and instructions
Find the device manual for free C106SIX-PT Cosmo in PDF.


| Product Type | 24 in. Digital Control Wall Oven |
| Model | C106SIX-PT |
| Brand | Cosmo |
| Installation Type | Built-in (under work top or upright cupboard) |
| Power Supply | 240 V / 60 Hz (hardwired, proper grounding required) |
| Temperature Range | 150°F - 500°F (default 350°F) |
| Functions | Oven Lamp, Defrost, Bottom Heater, Conventional Cooking, Convection with Fan, Double Grilling, Double Grilling with Fan, True European Convection, Radiant Grilling |
| Control Type | Digital touch / button control with LCD display |
| Clock | 12-hour clock with setting by hour and minute |
| Child Lock | Yes (press Start and Pause/Cancel simultaneously for 3 seconds) |
| Reminder / Timer | Up to 9 hours (reminder and reservation function) |
| Oven Light | Yes (halogen lamp 130V/25W) |
| Energy-Saving Mode | Yes (LCD turns off after 10 min standby or manual activation) |
| Accessories Included | Wire shelf, slider bracket |
| Shelf Positions | 5 layers (between 1st and 5th) |
| Cleaning | Mild detergent, non-abrasive; do not use steam cleaner or sharp scrapers |
| Safety Features | Cooling fan continues until temp below 160°F, auto shut-off when not started within 5 min |
| Warranty | Register at www.cosmoappliances.com/warranty; Customer Support: 1-888-784-3108 |
| Estimated Dimensions (WxHxD) | Approx. 24 x 27 x 24 inches |
| Estimated Weight | Approx. 100 lbs |
Frequently Asked Questions - C106SIX-PT Cosmo
User questions about C106SIX-PT Cosmo
0 question about this device. Answer the ones you know or ask your own.
Ask a new question about this device
Download the instructions for your Oven in PDF format for free! Find your manual C106SIX-PT - Cosmo and take your electronic device back in hand. On this page are published all the documents necessary for the use of your device. C106SIX-PT by Cosmo.
USER MANUAL C106SIX-PT Cosmo
natural_image
Line drawing of a COSMO air purifier unit with no text or symbols on the main body (pure technical diagram)24 IN. DIGITAL CONTROL WALL OVEN
C106SIX-PT
IMPORTANT SAFETY INSTRUCTIONS
Read these instructions completely and carefully. Save these instructions for local inspector's use. Observe all governing codes and ordinances.
NOTE TO INSTALLER: Be sure to leave these instructions with the
Consumer. Keep these instructions for future reference. Product failure due to improper installation is not covered under warranty agreement.
INSTALLATION & USER MANUAL
THANK YOU FOR YOUR PURCHASE.
Thank you for your purchase. We know that you have many brands and products to choose from and we are honored to know that you have decided to take one of our products into your home and hope that you enjoy it.
COSMO appliances are designed according to the strictest safety and performance standard for the North American market. We follow the most advanced manufacturing philosophy. Each appliance leaves the factory after thorough quality inspection and testing. Our distributors and our service partners are ready to answer any questions you may have regarding how to install, use and care for your products. We hope that this manual will help you learn to use the product in the safest and most effective manner.
If you have any questions or concerns, please contact the dealer from whom you purchased it, or contact our Customer Support at: 1-888-784-3108.
Please read the important safety instructions before using our product for your own safety and to reduce the risk of fire or electrical shock, etc.
Please keep this manual for future use. Thank you!
Table of Contents
SAFETY AND WARNINGS 4-7
FITTING OVEN INTO KITCHEN 8
CONTROL PANEL DESCRIPTION ......9
OPERATION INSTRUCTIONS ....10
CLOCK SETTING 10
FUNCTION SETTING 10-11
LAMP SETTING 12
INQUIRING FUNCTION 12
CHILD LOCK FUNCTION ....13
REMINDER FUNCTION 13
RESERVATION FUNCTION 14
START/PAUSE/CANCEL FUNCTION 14
ENERGY-SAVING FUNCTION 15
OPERATION NOTES 15
ACCESSORIES 16
SHELF PLACEMENT WARNING ....17
BULB REPLACEMENT ....18
SECURE THE OVEN TO THE CABINET ....19
VENTILATION OPENINGS ....20
OVEN CONNECTION 21-23
OVEN INSTALLATION ....24
REMOVE THE DOOR FROM OVEN 25
CLEANING AND MAINTENANCE 26
WARRANTY & SERVICE 28-29
WARNINGS
These are the most critical warnings summarized below.
WARNING
- Make sure the appliance is properly installed and grounded by a qualified technician.
- When the oven is first switched on, it may give off an unpleasant smell. This is due to the bonding agent used for the insulating panels within the oven. Please operate the appliance, completely empty, with the conventional cooking function at 500 degrees Fahrenheit for 90 minutes to burn away any residue inside the cavity.
- During the first use, it is normal that there will be some smoke and a slight odor. If this does occur, wait for the smell to clear before using the oven.
- Please use the product in an open environment.
- Do not leave children unattended in area when the appliance is in use. Do not allow children to sit or stand on the appliance.
- If there is damage to or cracks in the glass of the oven door, switch off the appliance and do not operate until repairs have been completed.
- DO NOT attempt to repair or replace any part of the appliance, unless specifically recommended in the manual. All other servicing should be made by a qualified technician.
- During use, the appliance becomes very hot. Use caution and avoid touching heating elements inside the oven.
Safety & Warnings
- Do not allow children to go near the oven when it is operating.
• Children should be supervised to ensure that they do not use or play with the appliance. - All wiring and electrical connections should be installed to local code. Some jurisdictions may require a licensed electrician to perform the installation of this appliance.
- Ensure that the appliance is switched off before replacing the oven lamp to avoid electric shock.
- Keep oven vent ducts unobstructed.
- Never use your appliance for warming or heating a room.
- Wear proper apparel while operating the appliance; loose fitting or hanging garments should never be worn while using the appliance.
- Accessible parts may become hot during use.
- Use only dry potholders; moist or damp potholders on hot surfaces may result in burns from steam. DO NOT let potholder touch hot heating elements. DO NOT use a towel or other bulky cloth.
- If the supply cord is damaged, it must be replaced by the manufacturer, service agent or similarly qualified technician in order to avoid a hazard.
- DO NOT use harsh abrasive cleaners or sharp metal scrapers to clean the oven door glass; such cleaners and tools can scratch the surface, which may result in shattering of the glass.
- DO NOT use a steam cleaner to clean the appliance.
- The appliance is not intended to be operated by an external timer or separate remote control system.
- The instructions for ovens that have shelves include details of the correct installations of the shelves.
- Use caution when opening oven door; let hot air or steam escape before removing or replacing food.
- Always place oven racks in desired location while oven is cool. If rack must be moved while oven is hot, do not let potholder contact hot heating element in oven.
- DO NOT heat unopened food containers, as build up of pressure may cause container to burst and result in injury.
- DO NOT TOUCH HEATING ELEMENTS OR INTERIOR SURFACES OF OVEN. Heating elements may be hot even though they are dark in color. Interior surfaces of an oven can become hot enough to cause burns.
- During and after use, DO NOT touch, or let clothing or other flammable materials contact heating elements or interior surfaces of oven, until they have had sufficient time to cool. Other surfaces of the appliance may become hot enough to cause burns, among these surfaces are oven vent openings and surfaces near these openings, oven doors, and over door windows.
Safety & Warnings
- Flammable materials should NOT be stored in an oven or near surface units.
- DO NOT USE WATER ON GREASE FIRES. Smother fire or flame, or use dry chemical or foam-type fire extinguisher.
- Kitchens are an active work environment, and as such, we recommend wearing appropriate attire, including closed toe shoes, when operating this appliance.
• DO NOT touch the oven with wet or damp hands or feet.
- Do not open the oven door often during the while in use.
- The appliance MUST be installed by an authorized technician. The manufacturer is NOT responsible for any damage that might be caused by defective placement or installation by unauthorized personnel.
- When the oven door or oven drawer is open, DO NOT leave any item on it; the appliance may become imbalanced, or the weight of the item with break the door.
- Some parts of appliance may stay hot for a long time; allow the appliance to cool down completely and use extreme caution before touching any part of appliance that is exposed to direct heat.
- If you will not use the appliance for a long time, it is advised to unplug the appliance.
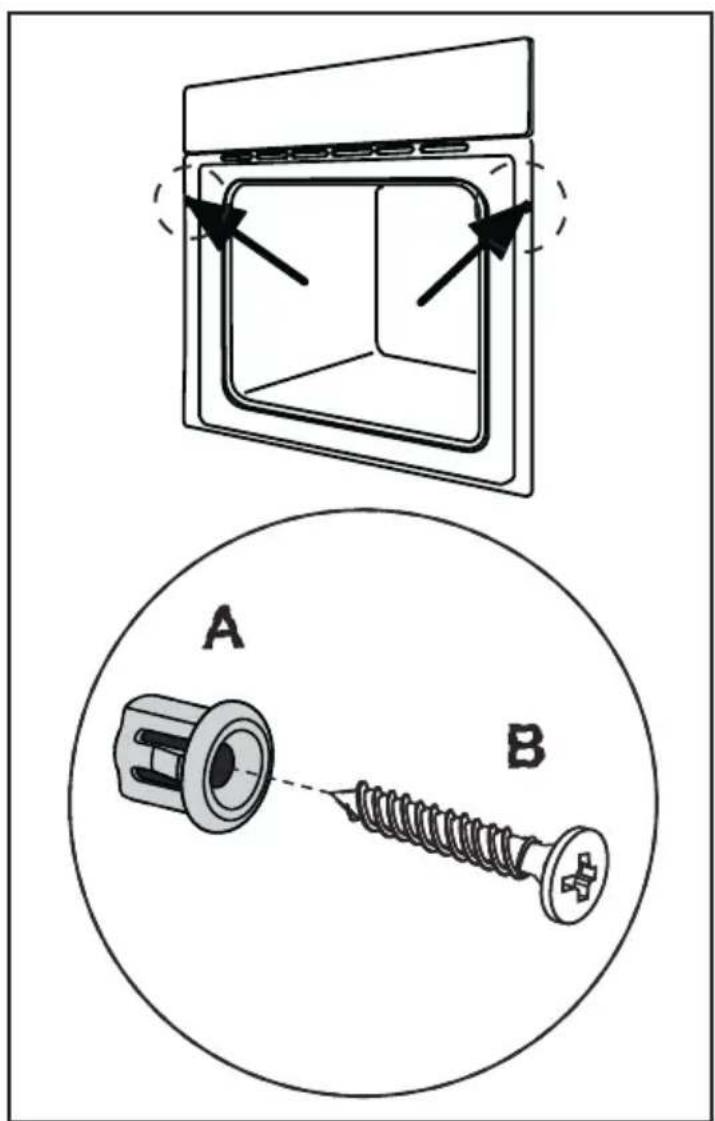
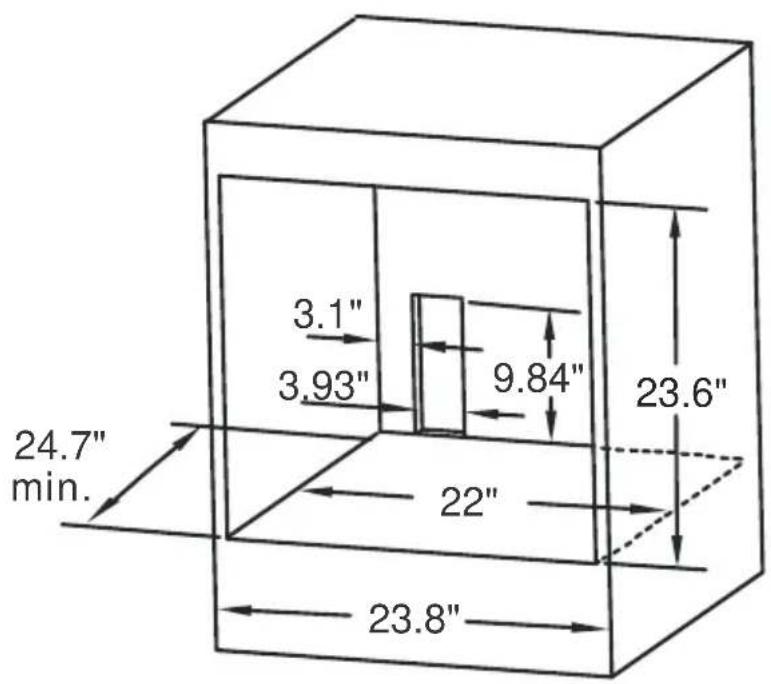
The oven may be installed underneath a work top or into an upright cupboard. Fix the oven in position by screwing into place, using the two fixing holes in the frame. To locate the fixing holes, open the oven door and look inside. To allow adequate ventilation, the measurements and distances adhered to when fixing the oven.
IMPORTANT
To ensure the oven will function properly, the kitchen housing / panels of the kitchen cabinet next to the oven must be made of a heat-resistant material.
Ensure that the glue of cabinets made of veneered wood can withstand temperatures of at least 250 °F. Plastics or glues that cannot withstand such temperatures will melt and deform the cabinet, once the oven has been lodged inside the cabinets, electrical parts must be completely insulated. This is a legal safety requirement. All guards must be firmly fixed into place so that it is impossible to remove them without using special tools.
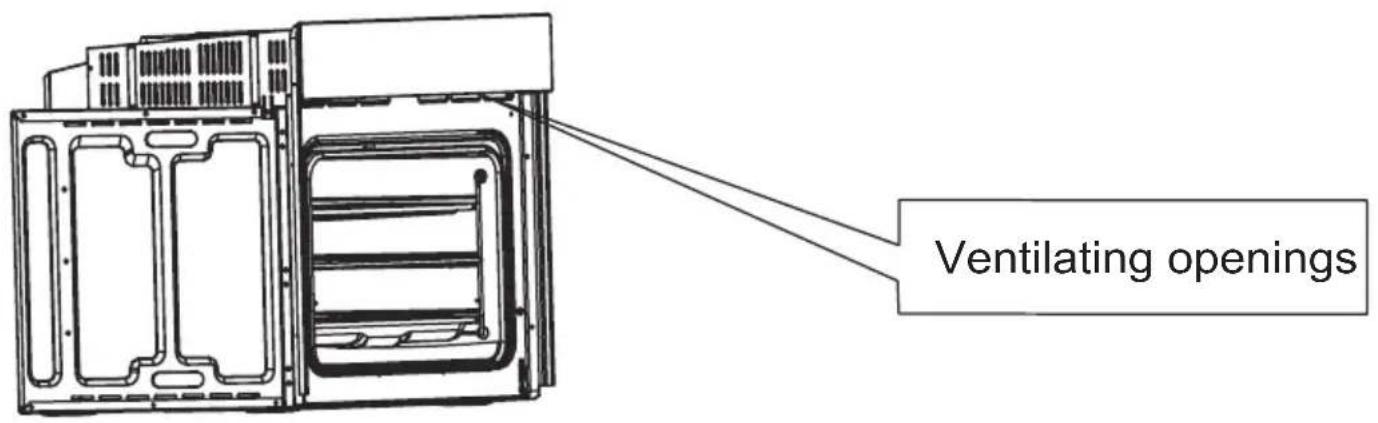
Remove the back of the kitchen cabinet to ensure an adequate current of air circulates around the oven. The hob must have a rear gap of at least 45 mm.
When the oven is unpacked, check if the cabinet is damaged in any way. If you have any doubts at all, DO NOT use it: contact a qualified professional. Keep packing materials such as plastic bags, polystyrene, or nails out of the reach of children.
Control Panel Description
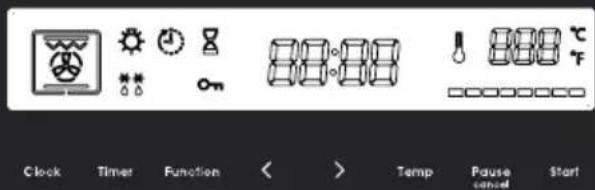
| Symbol | Function Description |
 | Oven Lamp: Allows the user to observe the food inside of the oven, through the window. Oven lamp will light for all cooking functions. |
| [HST4] | Defrost: The circulation of air at room temperature allows for quicker thawing of frozen food, without the use of any heat. A gentle but quick way to speed up the defrost-ing and thawing times of frozen foods, ready-made dishes, etc. |
 | Bottom Heater: A concealed element located on the bottom of the oven that provides heat. It is mainly used for keeping food warm. The temperature can be set within the range of 150-500 °F. The default temperature is 350 °F. |
 | Conventional Cooking: For use of the top and bottom heating elements to provide convectional cooking. The temperature can be set within the range of 150-500°F. The default temperature is 350° F. |
 | Convention with Fan: Combination of the fan and both heating element provides more even heat distribution, saving up to 30-40% of energy. Dishes are lightly browned on the outside and still moist on the inside. NOTE: This function is suitable for grilling or roasting big pieces of meat at a higher temperature. The temperature can be set within the range of 150-500°F. The default temperature is 350° F. |
 | Double Grilling: For use with inner radiant grill element and top element. The temperature can be set within the range of 350-500°F. The default temperature is 350° F. |
 | Double Grilling with Fan: For use of the inner radiant grill element, top heating element and fan. The temperature can be set within the range of 350-500°F. The default temperature is 350° F. |
 | True European Convection: An element around the fan provides an additional source of heat for convection style cooking. In convection mode, the fan automatically comes on to improve air circulation within the oven and creates an even heat for cooking. The temperature can be set within the range of 150-500°F. The default temperature is 350° F. |
 | Radiant Grilling: The inner grill element switches on and off to maintain temperature. The temperature can be set within the range of 350-500°F. The default temperature is 350° F. |
Clock Setting
After connecting the unit to the power, the numbers "12:00" will show on the display.
1.) Press "Clock" the hour number will flash.
2.) Press "<>" to adjust the hour number; time should be within numbers 0 through 12.
3.) Press "Clock", the minute number will flash.
4.) Press "<>" to adjust the minute number; time should be within numbers 0 through 59.
5.) Press "Clock" to finish the clock settings; symbol ":" flashes, and the time will be illuminated.
NOTE: This is a 12-hour clock. After oven is powered on, if the clock is not set, it will show "12:00" on display.
Function Setting
1.) Press "F" to choose a cooking function. The related function indicator will light up. Continue pressing until desired function is selected.
2.) Press "<>" to adjust the cooking time and adjust the temperature before pressing "Temp" to switch.
3.) Press "Start" to begin cooking.
4.) If Step 2 is skipped, press "Start" to confirm the start of cooking; default time is 9 hours, default temperature will display on the LCD.
Function Setting Notes
• After connecting the unit to the power, the numbers "12:00" will show on the display.
- The step quantities for the adjustment time of the coding switch are as follows:
0--0:30 min: step 1 minute
0:30--9:00 hour: step 5 minutes
- The step quantities for the adjustment of temperature is 5^ C / 25^ F and " 🔍". " **" cannot adjust the temperature.
- Press " <>" to adjust the cooking time when cooking begins. Then press " Start" to confirm. If " Start not pressed within 6 seconds, the oven will revert back to the previous time to continue cooking.
- Press "Temp", " 🔊" shows, then press "<>" to adjust the temperature when cooking begins. Then press " Start" to start cooking. If " Start not pressed within 6 seconds, the oven will revert back to the previous time to continue cooking.
Lamp Setting
1.) Press "Fun select a function, and the corresponding icon will illuminate.
2.) Press " Start " button to start, " 0:00 " and icon " 🔍 " will light up, " : " will flash.
Inquiring Function
In the following states, you can use the inquiring function; after 3 seconds, the inquiring function will turn off.
1.) During cooking, if the clock was set, press " " Clock button to see the current time; if the reminder function was set, press " Timer " button to see the time of reminder.
2.) In reminder state, if the clock was set, press "Clock" button to see the current time.
3.) In clock display state, if the reservation function was set, press "Timer" button to see the time of reservation.
Child Lock Function
To Lock: Press " Start " and " Pause cancel " simultaneously for 3 seconds, there will be a long beeping sound and the " On " symbol will illuminate.
To Unlock: Press " Start " and " Pause cancel " simultaneously for 3 seconds, there will be a long beeping sound indicating the Child Lock is unlocked.
NOTE: If you want to stop cooking, press the Stop button quickly (Do not hold down).
Reminder Function
The oven has 9 hour reminder that will alert you to start cooking at a certain time, from 1 minute to 9 hours. The reminder can only be set when the oven is in Standby Mode. To set the reminder:
1.) Press reminder setting button "T" and the display shows "8" and "AL";
2.) Press " <" to set the time of reminder.
3.) Press " Start " to confirm setting. " : " will flash and the indicator for reminder " ☒ " will light. The time will count down.
NOTE: The oven buzzer will sound for 10 times after the time back to the zero hour. " 8 " symbol disappears on the screen to remind you to start cooking. You can cancel the reminder during setting by pressing the stop button; After the reminder has been set, you can cancel it by pressing stop button twice.
Reservation Function
The delay function can only be used once the Clock has been set on the appliance. In standby mode:
1.) Press "Timer" 2 times, the display shows " ", and "End".
2.) Press " <> " to set the hour of the cooking ending time of reservation.
3.) Press "Timer" button again;
4.) Press " <> " to set the minute of the cooking ending time of reservation.
5.) Press "Function" to choose the cooking function you wish to use.
6.) After setting the cooking time and temperature, press "Start".
NOTE: Subtract the cooking time from the cooking ending time, you will get the time that oven starts to cook.
Start/Pause/Cancel Function
1.) If the cooking time has been set, press " Start " to start cooking. If the cooking is paused, press " Start " to resume cooking.
2.) During cooking process, press "Pause" once to pause the cooking.
Press " Pause " twice to cancel the cooking.
cancel
Energy-Saving Function
The oven features a 9-hour notification to remind you to start cooking at a certain time, from 1 minute to 9 hours. The reminder can only be set when the oven is in Standby Mode. To set the reminder:
1.) In standby mode and reminding state, press "Start" for three seconds, the LCD display will go off and set to energy-saving mode.
2.) If there is no oven operation within 10 minutes in Standby Mode, the LCD display will go off and go into Energy-Saving Mode.
3.) Under the Energy-Saving Mode, pressing any key on the oven's control panel will cancel Energy-Saving Mode.
Operation Notes
- The oven lamp will be ON for all functions.
- If the cooking program/setting has been set and the "Start button is not pressed within 5 minutes, the current time will be displayed or turn back to waiting state, and the cooking program/setting will need to be set again. A buzzer will sound once when effectively pressed, if not effectively pressed there will be no response.
• A buzzer will sound 5 times to alert you when cooking has finished.
Accessories
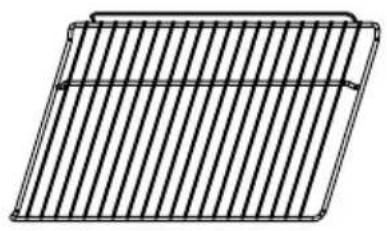
natural_image
Pure 3D wireframe diagram of a rectangular grid structure (no text or symbols)Wire Shelf
For grill, dishes, cake pan with items for roasting and grilling.
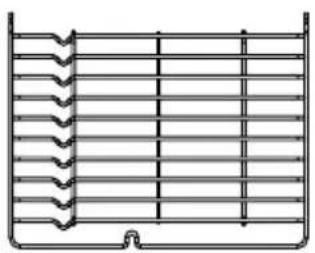
natural_image
Pure technical diagram of a heat exchanger or cooling unit with no text, numbers, or symbolsSlider Bracket
For cooking larger sized food, these shelf support rails on the right and left sides of the oven can be removed, so dishes and trays can be placed on the oven floor to use functions such as Radiant Grilling, Double Grilling and Double Grill with Fan.
NOTE: When placing cookware on the oven floor, please DO NOT use any functions with the Bottom Heater, in order to prevent heat gathering at bottom (Only for specific models).
Shelf Placement Warning
Shelf Placement Warning
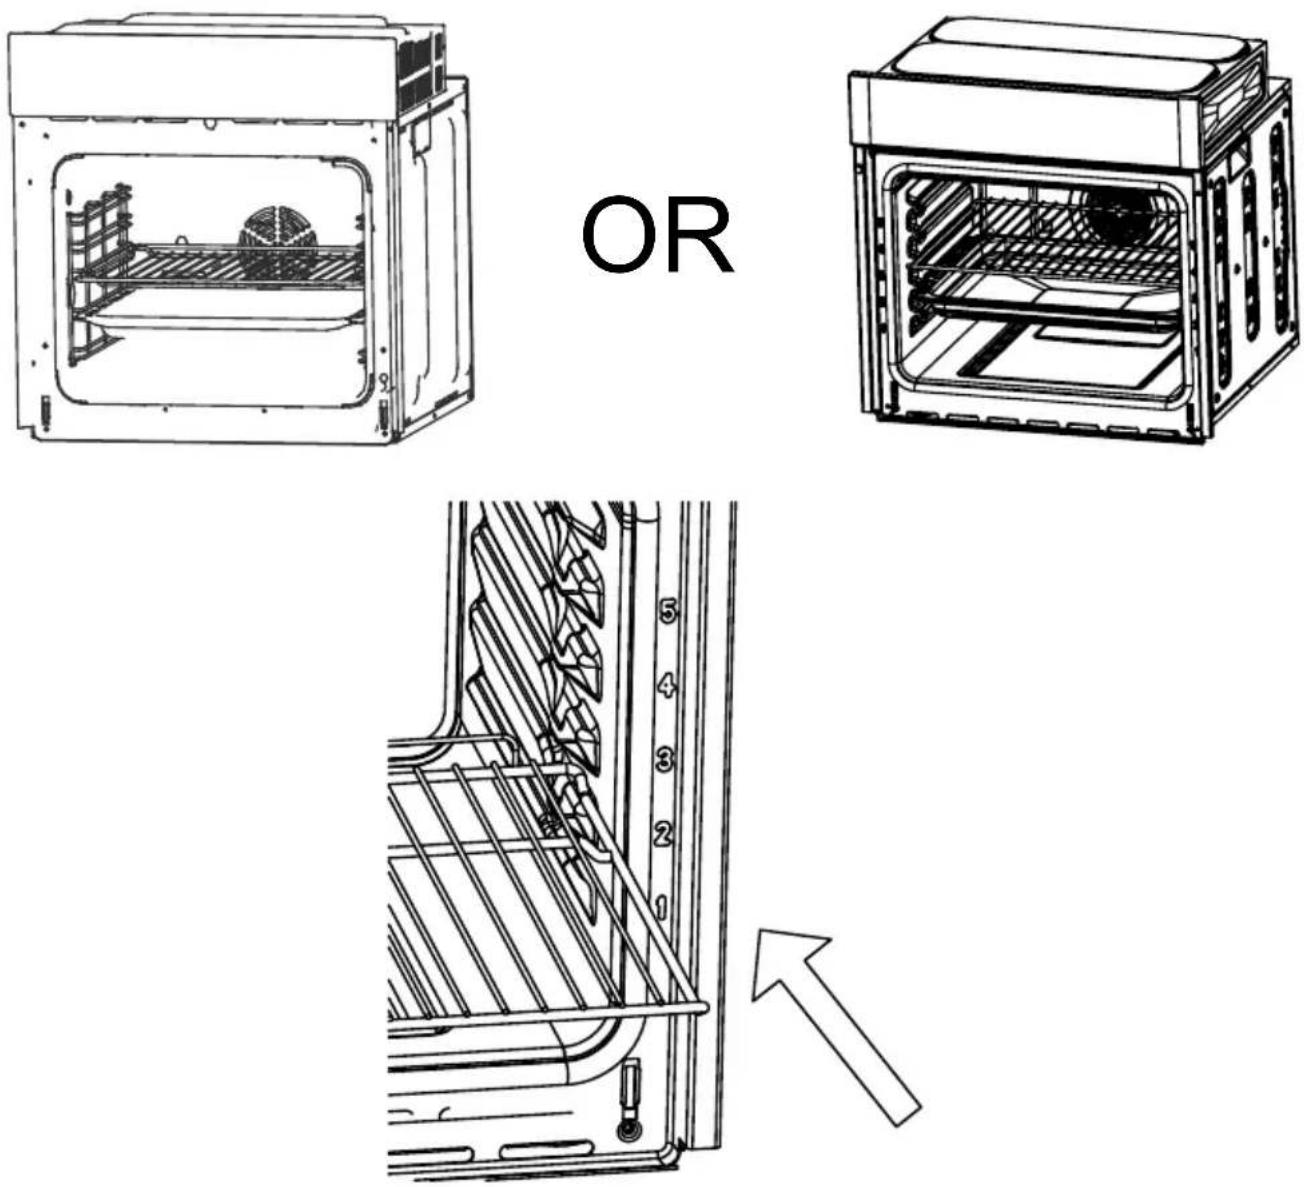
To ensure the oven shelves are used safely, correct shelf placement between the side rails is important. Shelves and the pan only can be used between the first and fifth layers.
The shelves should be used correctly with the side rails, as it will ensure that during careful removal of the shelf or tray and so any hot food will not not slide out.
Bulb Replacement
1.) Disconnect power from the main outlet, or switch off the circuit breaker of the unit's main outlet.
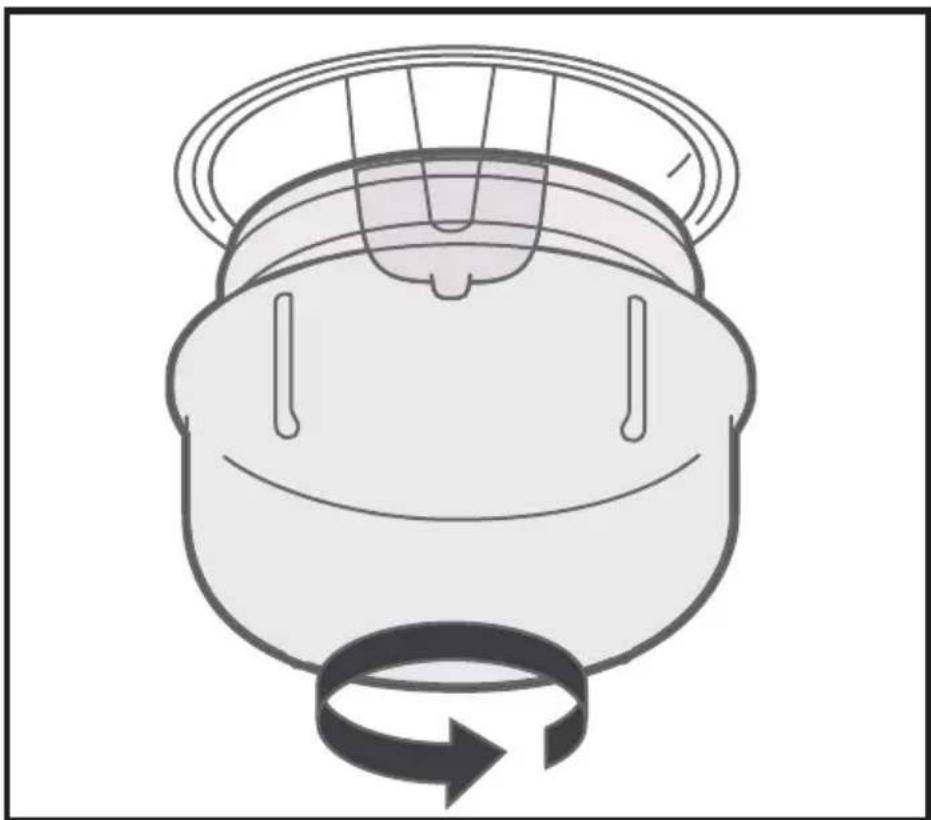
2.) Unscrew the glass lamp cover by turning it counter-clockwise (NOTE: It may be stiff) and replace the bulb with a new one of the same type.
3.) Screw the glass lamp cover back in place.
NOTE: Only use 130V/25W halogen lamps.
natural_image
Diagram of a mechanical component with a rotating arrow indicating rotation (no text or symbols)Securing the Oven to the Cabinet
Securing the Oven to the Cabinet
1.) Fit oven into the cabinet recess.
2.) Open the oven door.
3.) Secure the oven to the kitchen cabinet with two distance holders " A " which fit the holes in the oven frame and fit the two screws " B ".
Ventilating Openings
When cooking is finished, or in a Pause state or in Standby Mode -AND- if the oven's center temperature is over 160 degrees, the cooling fan will continue working for 15 minutes, -OR- when the oven's center temperature becomes lower than 160 degrees, the cooling fan will stop in advance.
Oven Connection
This appliance must properly installed and grounded by a qualified technician. Ask your dealer to recommend a qualified technician or an authorized repair service.
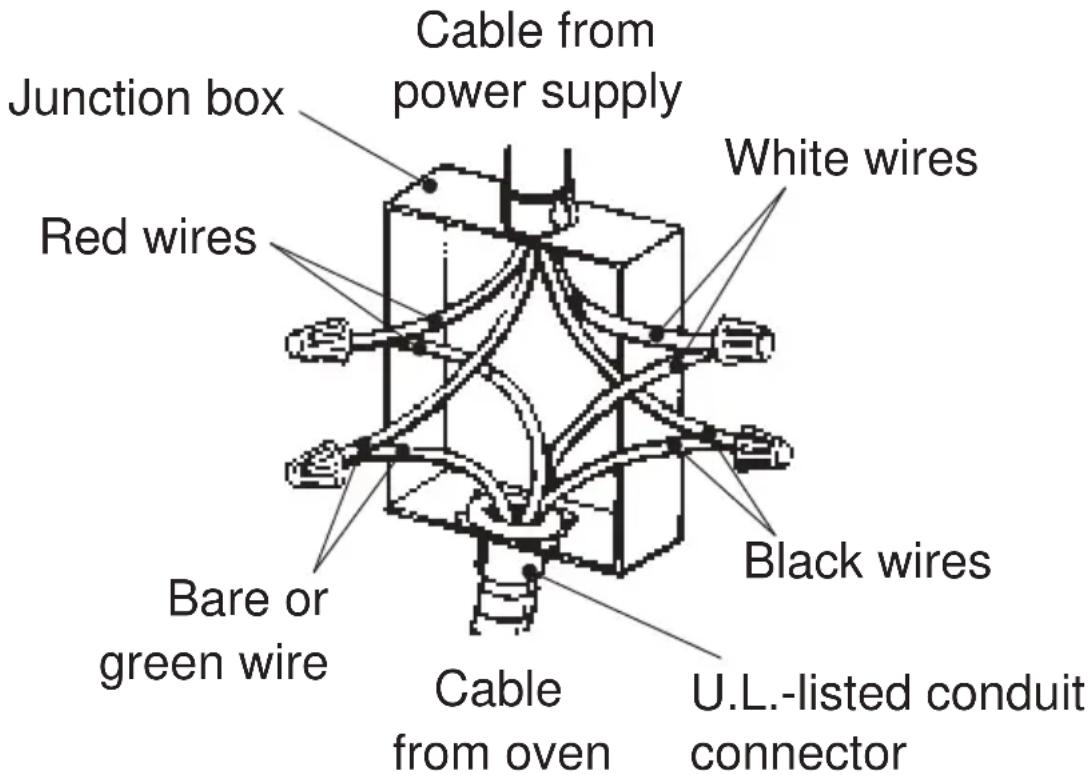
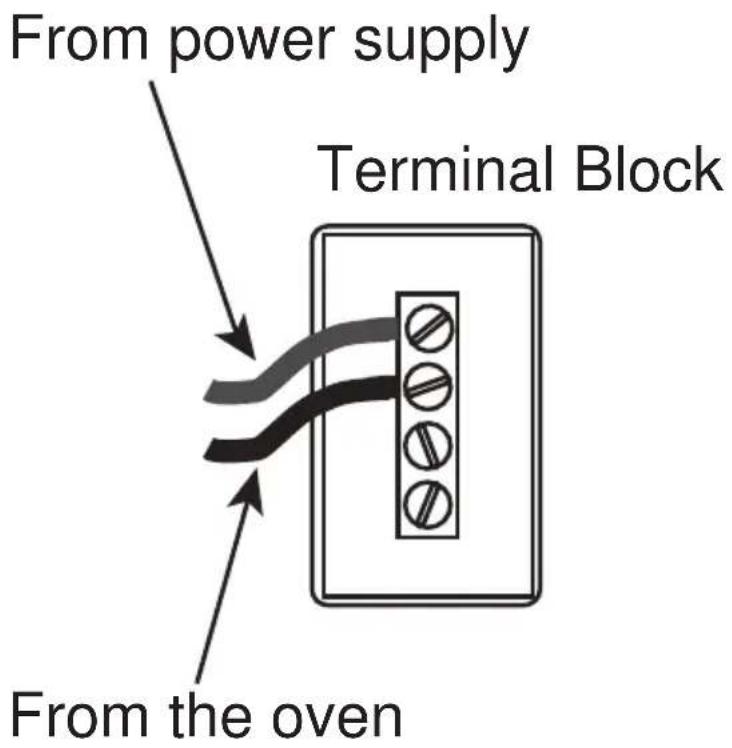
This appliance is manufactured with a green GROUND wire connected to the oven chassis. After making sure that the power has been turned off, connect the flexible conduit from the oven to the junction box using a U.L. listed conduit connector. Figures 1 and 2 and the instructions provided below present the most common way of connecting the ovens.
Your local codes and ordinances take precedence over these instructions.
Complete electrical connections according to local codes and ordinances “WARNING” Risk of Electric Shock, frame grounded to neutral of appliance through a link.
Grounding through the neutral conductor is prohibited for new branch-circuit installations (1996 NEC); mobile homes; and recreational vehicles, or in an area where local codes prohibit grounding through the neutral conductor.
For installations where grounding through the neutral conductor is prohibited:
- Disconnect the ground from the neutral at free end of conduit
- Use grounding terminal or lead to ground unit
- Connect neutral terminal or lead to branch circuit neutral in usual manner
Wire Branch Circuit
Refer to Figure:
- Disconnect ground from neutral at free end of conduit.
- Connect the green GROUND wire from the oven to the GROUND wire in the junction box (bare or green colored wire).
- Connect the red and black leads from the oven to the corresponding HOT Wires in the junction box.
- Connect the white wire from the oven to the NEUTRAL (gray or white) wire in the junction box.
- Connect the local codes and power supply codes using a terminal.
- The terminal uses a thing adapting to the wire of the cord.
Ungrounded Neutral
Figure
Oven Connection
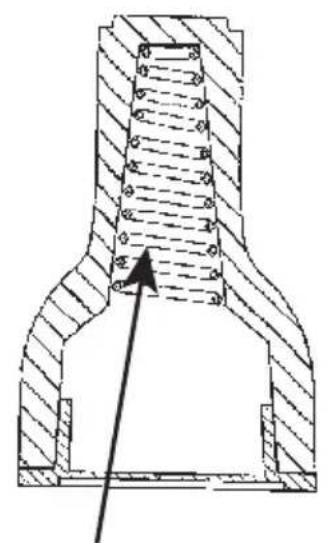
IMPORTANT: Use twist-on connector with square-wire spring
natural_image
Technical drawing of a mechanical component with hatched areas and internal channels, showing a directional arrow (no text or symbols)Square-wire spring
OR
Oven Installation
NOTES
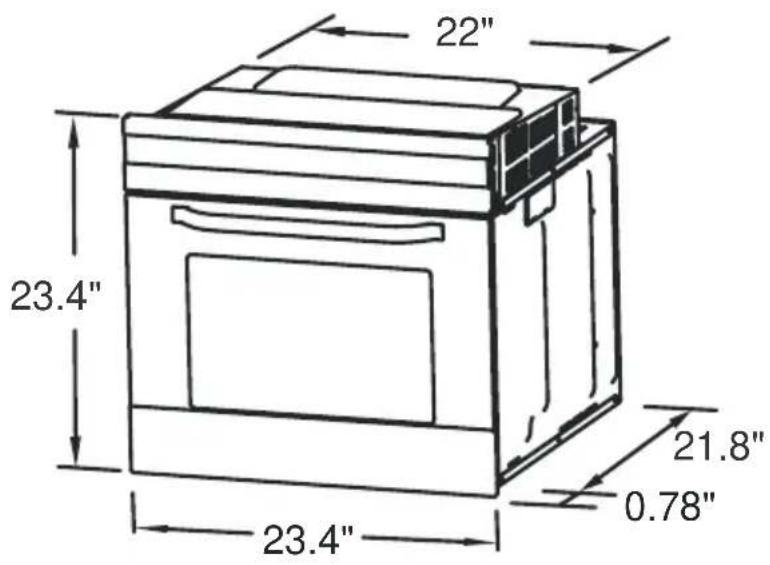
- Only plus deviations are admissible for all dimensions.
- The cabinet does not include the power switch or socket.
- The number of accessories included depends on the particular appliance purchased.
Removing the Oven Door
Removable oven door allows full access to entire interior of the oven for easier and quicker maintenance.
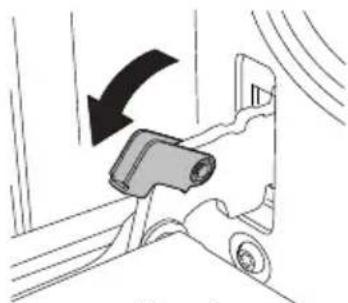
1.) To remove the door, open the door to the maximum angle. Then pull the buckle at the door hinge backward.
(Figure 1)
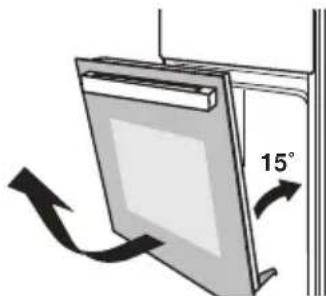
2.) Close the door to an angle approximately 15^ . Lift up and slowly pull the door out from the oven.
(Figure 2)
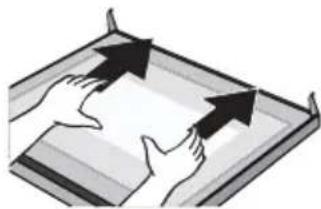
3.) Place the door flat with door top cover towards yourself, put your hands on the glass and pull it towards the oven.
(Figure 3)
4.) Separate the glass carefully by lifting it approximately 25°.
(Figure 4)
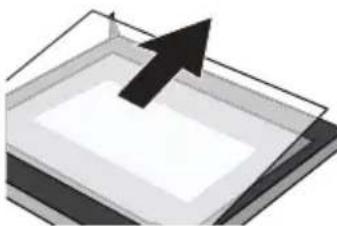
5.) Push the glass into the position indicated by the arrow in Figure 5. Gently pull the glass out of the socket.
6.) After pulling out the inner glass, please take out the middle layer glass as shown in Figure 6.
7.) When cleaning is completed, reverse the above procedures to return the door to its original position.
natural_image
Diagram of a car seatbelt mechanism with a black arrow indicating clockwise motion (no text or symbols)Figure 1
natural_image
Diagram of a door frame with an 15-degree angle indicator and directional arrows (no text or symbols)Figure 2
natural_image
Illustration of two hands exchanging a document with arrows indicating direction (no text or symbols)Figure 3
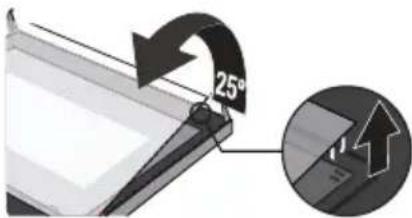
Figure 4
natural_image
Abstract 3D diagram of a rectangular box with a black arrow pointing upward (no text or symbols)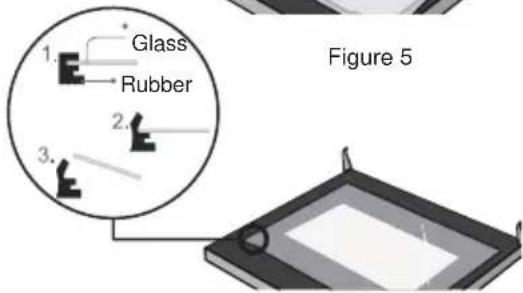
Figure 6
To keep the appliance looking good and performing well, we strongly recommend keeping the unit clean. While the modern design of the appliance keeps maintenance to a minimum, the parts of the unit which come into contact with food must be cleaned regularly.
- Before any maintenance and cleaning, disconnect the power.
- Set all appliance controls to the OFF position.
- Wait until the inside of the unit has cooled completely before cleaning; use caution and ensure the oven is NOT hot or warm.
- Clean the surface of the unit with a damp cloth, soft brush or fine sponge and then wipe dry. In case of heavy soiling, use hot water with a non-abrasive cleaning product.
- When cleaning the glass oven door, do NOT use abrasive cleaners or sharp metal scrapers, these can scratch the surface or lead to the glass being damaged.
- Never leave acidic substances (Such as lemon juice or vinegar) on stainless steel parts.
- Do NOT use a high pressure cleaner for cleaning the unit.
- The baking pans may be washed in mild detergent.

APPLIANCES
WARRANTY AND SERVICE
For full warranty details on this product please visit: http://www.cosmoappliances.com/warranty
TO RECEIVE WARRANTY SERVICE, YOUR PRODUCT MUST BE REGISTERED. TO REGISTER, VISIT:
WWW.COSMOAPPLIANCES.COM/WARRANTY
SCAN TO REGISTER
IMPORTANT
Do Not Return This Product To The Store If you have a problem with this product, please contact
Cosmo Customer Support at
+1(888)784-3108
DATED PROOF OF PURCHASE, MODEL #, AND SERIAL #
REQUIRED FOR WARRANTY SERVICE
IMPORTANT
Correct Disposal of this product:
This marking indicates that this appliance should not be disposed with other household wastes. To prevent possible harm to the environment or human health from uncontrolled waste disposal, recycle it responsibly to promote the sustainable reuse of material resources.

Cosmo is constantly making efforts to improve the quality and performance of our products, so we may make changes to our appliances without updating this manual.
- IN. DIGITAL CONTROL WALL OVEN
- C106SIX-PT
- THANK YOU FOR YOUR PURCHASE.
- Table of Contents
- SAFETY AND WARNINGS 4-7
- FITTING OVEN INTO KITCHEN 8
- CONTROL PANEL DESCRIPTION ......9
- OPERATION INSTRUCTIONS ....10
- CLOCK SETTING 10
- FUNCTION SETTING 10-11
- LAMP SETTING 12
- INQUIRING FUNCTION 12
- CHILD LOCK FUNCTION ....13
- REMINDER FUNCTION 13
- RESERVATION FUNCTION 14
- START/PAUSE/CANCEL FUNCTION 14
- ENERGY-SAVING FUNCTION 15
- OPERATION NOTES 15
- ACCESSORIES 16
- SHELF PLACEMENT WARNING ....17
- BULB REPLACEMENT ....18
- SECURE THE OVEN TO THE CABINET ....19
- VENTILATION OPENINGS ....20
- OVEN CONNECTION 21-23
- OVEN INSTALLATION ....24
- REMOVE THE DOOR FROM OVEN 25
- CLEANING AND MAINTENANCE 26
- WARRANTY & SERVICE 28-29
- WARNINGS
- WARNING
- Safety & Warnings
- IMPORTANT
- Control Panel Description
- Clock Setting
- Function Setting
- Function Setting Notes
- Lamp Setting
- Inquiring Function
- Child Lock Function
- Reminder Function
- Reservation Function
- Start/Pause/Cancel Function
- Energy-Saving Function
- Operation Notes
- Accessories
- Wire Shelf
- Slider Bracket
- Shelf Placement Warning
- Bulb Replacement
- Securing the Oven to the Cabinet
- Ventilating Openings
- Oven Connection
- This appliance must properly installed and grounded by a qualified technician. Ask your dealer to recommend a qualified technician or an authorized repair service.
- Wire Branch Circuit
- OR
- Oven Installation
- NOTES
- Removing the Oven Door
- Removable oven door allows full access to entire interior of the oven for easier and quicker maintenance.
- APPLIANCES
- WARRANTY AND SERVICE
- Correct Disposal of this product:
Brand : Cosmo
Model : C106SIX-PT
Category : Oven